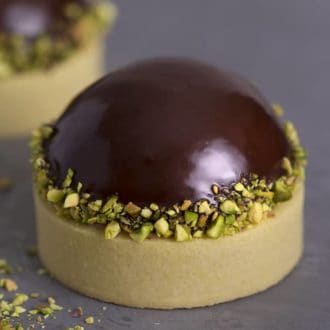
Pistachio Tart
Crunchy pistachios are found throughout this decadent tart crowned with a chocolate-covered custard dome.
Servings 6 tarts
Calories 931kcal
Ingredients
For the Tart Shell:
- 160 g confectioners sugar
- 6 Egg Yolks
- 1 tsp vanilla bean paste 5mL or extract
- 1 lb all-purpose flour 450g
- 1 cup unsalted butter 226g cold
- ¼ tsp salt 1g heaping
- pistachios finely chopped for assembly
For the Pastry Cream Mold:
- 2 cups whole milk 473mL
- 1/2 vanilla bean split lengthwise
- 6 egg yolks
- 2/3 cup sugar 135g
- 1/4 cup cornstarch 32g
- 1 tbsp cold unsalted butter 14g
- 1 1/2 tsp gelatin powder 4g, heaping
- 1 tbsp water 15mL
For the Swiss Meringue Buttercream:
- 3 egg whites room temperature
- 1 cups unsalted butter 452g room temperature
- 3/4 cup granulated sugar 150g
- 1 pinch kosher salt
- 1 tsp vanilla extract 5mL
- 2 tbsp dark chocolate 22g, melted & cooled
For the Chocolate Ganache:
- 1 cup semisweet chocolate chips 200g
- 1/2 cup Heavy cream 118mL heated
For the Chocolate Glaze:
- 4 oz semisweet chocolate 115g, finely chopped
- 1/2 cup heavy whipping cream 118mL
- 1/4 cup light corn syrup 60mL
- 1 tsp vanilla extract 5mL
Instructions
For the Tart Shell:
- Add the icing sugar, butter, vanilla & salt in the bowl of a stand mixer fitted with a paddle attachment.
- Add the yolks one at a time while beating on low and mix until well combined. Scrape down the bowl halfway through.
- Slowly add in the flour, and mix on low speed until it is just combined. The mixture will look crumbly. Don't worry as it will come together when rolled and rested.
- Pour the mixture on a lightly floured surface. You will want to divide the dough into 2 batches to make rolling out easier.
- Place a large piece of parchment paper down, lightly flour it, and place one batch of dough on top. Sprinkle the dough lightly with flour and place another large piece of parchment paper over the top.
- Roll the dough out with a rolling pin to 3mm (1/8 inch). I have a rolling pin with training wheels on the side that tells me exactly what 3mm is but you can eyeball it. 3mm is two pennies thick.
- Place the whole sheet of pastry in the fridge for 30 minutes. Repeat the above steps with the second batch of dough if divided.
- Once the dough has chilled, remove one sheet from the fridge. Peel off the top sheet of parchment paper, very lightly flour the pastry, then flip it over.
- Peel off the remaining sheet of parchment paper, lightly flour the dough again to prevent it from sticking.
- Cut out the dough using a 5.75" oval perforated tart ring. Peel off the excess dough and you can re-roll this for another use. You can use different dimensions if you have different tart forms.
- Remove the second sheet of dough from fridge. Using a sharp knife, cut long strips of dough about 7-8” long and ¾” wide.
- Carefully lift the strips and place them on the inside of the tart rings. Press them against the side so they line up with the dough at the bottom.
- Press the bottom of the dough gently with your fingers to mold it to the base of the dough.
- Cut off any excess pastry hanging over the top of the tart rings with a sharp knife.
- Place the tart shells into the freezer for 30 minutes to 1 hour.
- Pre-heat your oven to 320F. Place the tray with your tart shells in the oven. Bake for 15 minutes or until the shell is lightly golden.
- Remove tart shells from the oven and allow time to cool before piping so the filling does not melt.
For the Pastry Cream Mold:
- In a medium saucepan, heat the milk and vanilla bean to a boil over medium heat. Immediately turn off the heat and set aside to infuse for 15 minutes.
- In a bowl, whisk the egg yolks and sugar until light and fluffy.
- Add the cornstarch and whisk vigorously until no lumps remain. Whisk in 1/4 cup of the hot milk mixture until incorporated.
- Whisk in the remaining hot milk mixture, reserving the saucepan.
- Mix the gelatin powder and water together, add it to the mixture and give it a whisk.
- Pour the mixture through a strainer back into the saucepan.
- Cook over medium-high heat, whisking constantly, until thickened and slowly boiling.
- Remove from the heat and stir in the butter. Let them cool slightly.
- Cover each batch with plastic wrap, lightly pressing the plastic against the surface to prevent a skin from forming.
- Chill at least 2 hours or until ready to serve. (The custard can be made up to 24 hours in advance).
- Transfer the pastry cream to a piping bag and snip off the tip.
- Pipe the cream into 4 x 4.5" Silicon Disc molds and freeze for 3 hours minimum.
For the Swiss Meringue Buttercream:
- Add egg whites, sugar and salt in a bowl. Give the mixture a brief whisk.
- Place the bowl over a pan of simmering water. Making sure the water does not touch the bowl.
- Whisk the egg whites occasionally while it warms up. When the mixture has warmed, whisk it constantly.
- Heat the mixture until it reaches an internal temperature of 160ºF or until it's not grainy between your fingers.
- Transfer to the bowl of a stand mixer with a whisk attachment. Whisk until you get room temperature glossy peaks.
- Switch to a paddle attachment and while the mixture is running on low, add tablespoon sized dollops of room temperature butter making sure to let the butter incorporate before you add the next piece.
- Once all the butter is incorporated, go ahead and add the vanilla extract.
- Melt the semi-sweet chocolate and allow it to come to room temp.
- Add the melted and cooled chocolate to one batch. Mix until fully incorporated.
- Just before assembling the tarts, give the buttercream a final whip, transfer it to a piping bag and snip off the tip.
For the Chocolate Ganache:
- Melt chocolate and cream together on low heat. Whisk together and set aside.
- You might need to add more or less cream to achieve the desired consistency.
- Once you’re ready to assemble your tart, transfer the ganache to a piping bag and snip off the tip.
For the Chocolate Glaze:
- Finely chop the chocolate and put it in a medium sized bowl.
- Place the heavy cream in a small pot over medium low heat. Bring it to a simmer.
- Immediately pour the cream over the chopped chocolate.
- Add corn syrup and the vanilla extract. Whisk until smooth.
For the Assembly:
- Once your tarts are cooled and your pastry cream molds are ready, you can assemble your tart.
- Pour or pipe in the chocolate ganache as the bottom layer of the tart.
- Make sure your pistachios are finely chopped and sprinkle the desired amount on top of the ganache.
- Pipe a layer of the chocolate Swiss meringue buttercream on top of the pistachios.
- Drizzle the chocolate glaze on top of the pastry cream mold.
- Carefully dip the bottom edge of the mold in the chopped pistachios.
- Using an offset spatula, carefully place the pastry cream mold on top of the buttercream.
Video
Notes
- Make sure to freeze the tart shells completely before baking.
- The best bake will be achieved with a perforated silicone mat and a perforated tart ring.
- The strawberry centers are really optional. Use any flavor you'd like or just fill completely with the vanilla pastry cream.
- You can add finely chopped pistachios to the dough for some extra flavor and crunch. It will not roll out as smoothly but will taste delicious.
- Chill that dough if it becomes unmanageable!
- Don’t be afraid to make these in stages. You can make the dough one day, do the cutting and baking the next and then assemble with filling when you’re ready to serve.
Nutrition
Serving: 1tart | Calories: 931kcal | Carbohydrates: 184g | Protein: 4g | Fat: 19g | Saturated Fat: 11g | Cholesterol: 15mg | Sodium: 42mg | Potassium: 110mg | Fiber: 1.5g | Sugar: 18g | Vitamin A: 550IU | Calcium: 38mg | Iron: 1.4mg