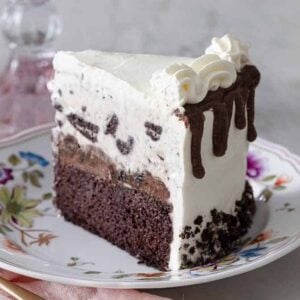
Ice Cream Cake Recipe
A homemade ice cream cake with a real chocolate cake base, a hot fudge and Oreo crunch layer, and your favorite ice cream under billowy whipped cream. This is the Dairy Queen-style favorite, made at home, and endlessly customizable.
Equipment
- 846 tip
- 1 8 inch cake pan
Ingredients
- 1½ quarts ice cream slightly softened
- 1 8-inch chocolate cake layer
- 14 oreo cookies roughly chopped (160g)
- 1 cup hot fudge sauce room temperature (290g)
- 2 cups heavy whipping cream (480ml)
- 3 tablespoons powdered sugar
- 2 teaspoons vanilla extract
- Optional decorations: ½ cup hot fudge to drip, 1 cup crushed cookies, sprinkles, cherries, etc.
Instructions
Make the Ice Cream Layer:
- Fully line an 8-inch cake pan with plastic wrap. Place the pan in the freezer for 15 minutes. While the pan chills, place your cartons of ice cream on the counter for 15 minutes to slightly soften.
- Use an ice cream scoop to transfer all the ice cream to your lined cake pan. Cover with another layer of plastic then press down into a flat layer. Return the pan to the freeze until the ice cream is very firm again, at least 2 hours. (You can do this stage several days in advance if you’d like! This is also a great time to bake and cool your cake layer.)
Assemble the Layers:
- Once the ice cream layer is very hard, place the cake layer on a serving plate or cardboard round. Cover the top with the fudge sauce then sprinkle the chopped cookies on top.
- Remove the ice cream layer from the freezer. Remove and discard the top layer of plastic wrap. Use the excess from lining the pan to lift the ice cream layer out of the pan. Place it top-side down on top of the cookies and fudge on the chocolate cake. Press the plastic wrap down around the side of the cake, and place in the freezer for at least 1 hour. (You can keep this in the freeze for several days. Tightly wrap it with more plastic wrap or foil, if you do.)
Make the Whipped Cream:
- To a large bowl with an electric mixer or to the bowl of your stand mixer fitted with a whisk attachment, combine cold whipping cream, sugar and vanilla. Start mixing with the mixer on low, gradually increasing the speed to high and mix until very soft peaks form, about 3 minutes. Whisk the rest by hand until the peaks firm up, being sure not to over-whip the cream as it will curdle.
- Reserve 1 cup of the whipped cream and place it in a piping bag fitted with a large closed star tip (Ateco 846). Place it in the fridge.
Decorate the Cake:
- Remove cake from freezer and cover with the remaining whipped cream, smoothing the top and sides. Press crumbled cookies onto the bottom edge. If you want to add a fudge drip, freeze the cake for 1 hour before adding it.
- To pipe a drip of chocolate onto the edge of the cake, warm additional fudge and place it in a piping bag. Pip it around the top edge of the cake, letting some drip down the sides. Using the reserved whipped cream, pipe a scalloped pattern onto the top edge. Add sprinkles or cherries on top if desired.
- You can serve the cake immediately or store the cake in the freezer until ready to slice. If storing for more than a few hours, let it freeze for about an hour to firm up the decorations, then cover it with plastic wrap. Before serving, remove the cake from the freezer and leave it on the counter for about 15 minutes for easier slicing.
Notes
- For the drip, use hot fudge from your jar or homemade, or make a simple ganache by melting 1 cup semisweet chocolate chips with ½ cup heavy cream.
- Temper the cake slightly before cutting. If you let the assembled cake sit out at room temperature for 15 minutes before slicing it, it will make it easier to cut.
- For clean slices, warm the knife. Run hot water over the knife and wipe between slices for clean cuts. The heat helps slice through the hard, frozen ice cream. I use a large chef’s knife or a serrated bread knife for the easiest cut.
- Keep the assembled cake frozen. Whipped cream doesn’t hold up well once thawed after it has been frozen, so return the cake to the freezer after slicing it, if you have leftovers. This will keep all of the components at their ideal texture and prevent the ice cream from melting and pooling out of the cake.
Nutrition
Calories: 839kcal Carbohydrates: 100g Protein: 11g Fat: 46g Saturated Fat: 24g Polyunsaturated Fat: 4g Monounsaturated Fat: 15g Trans Fat: 1g Cholesterol: 128mg Sodium: 671mg Potassium: 584mg Fiber: 3g Sugar: 67g Vitamin A: 1295IU Vitamin C: 1mg Calcium: 296mg Iron: 4mg