

This post may contain affiliate links. Please read our disclosure policy.














Homemade apple turnovers are so easy to make! You just need store-bought puff pastry and a few ingredients for the cinnamon and brown sugar apple filling. My tested recipe shows you how to make a filling that doesn’t leak out and why a hot oven makes puffy layers that shatter.
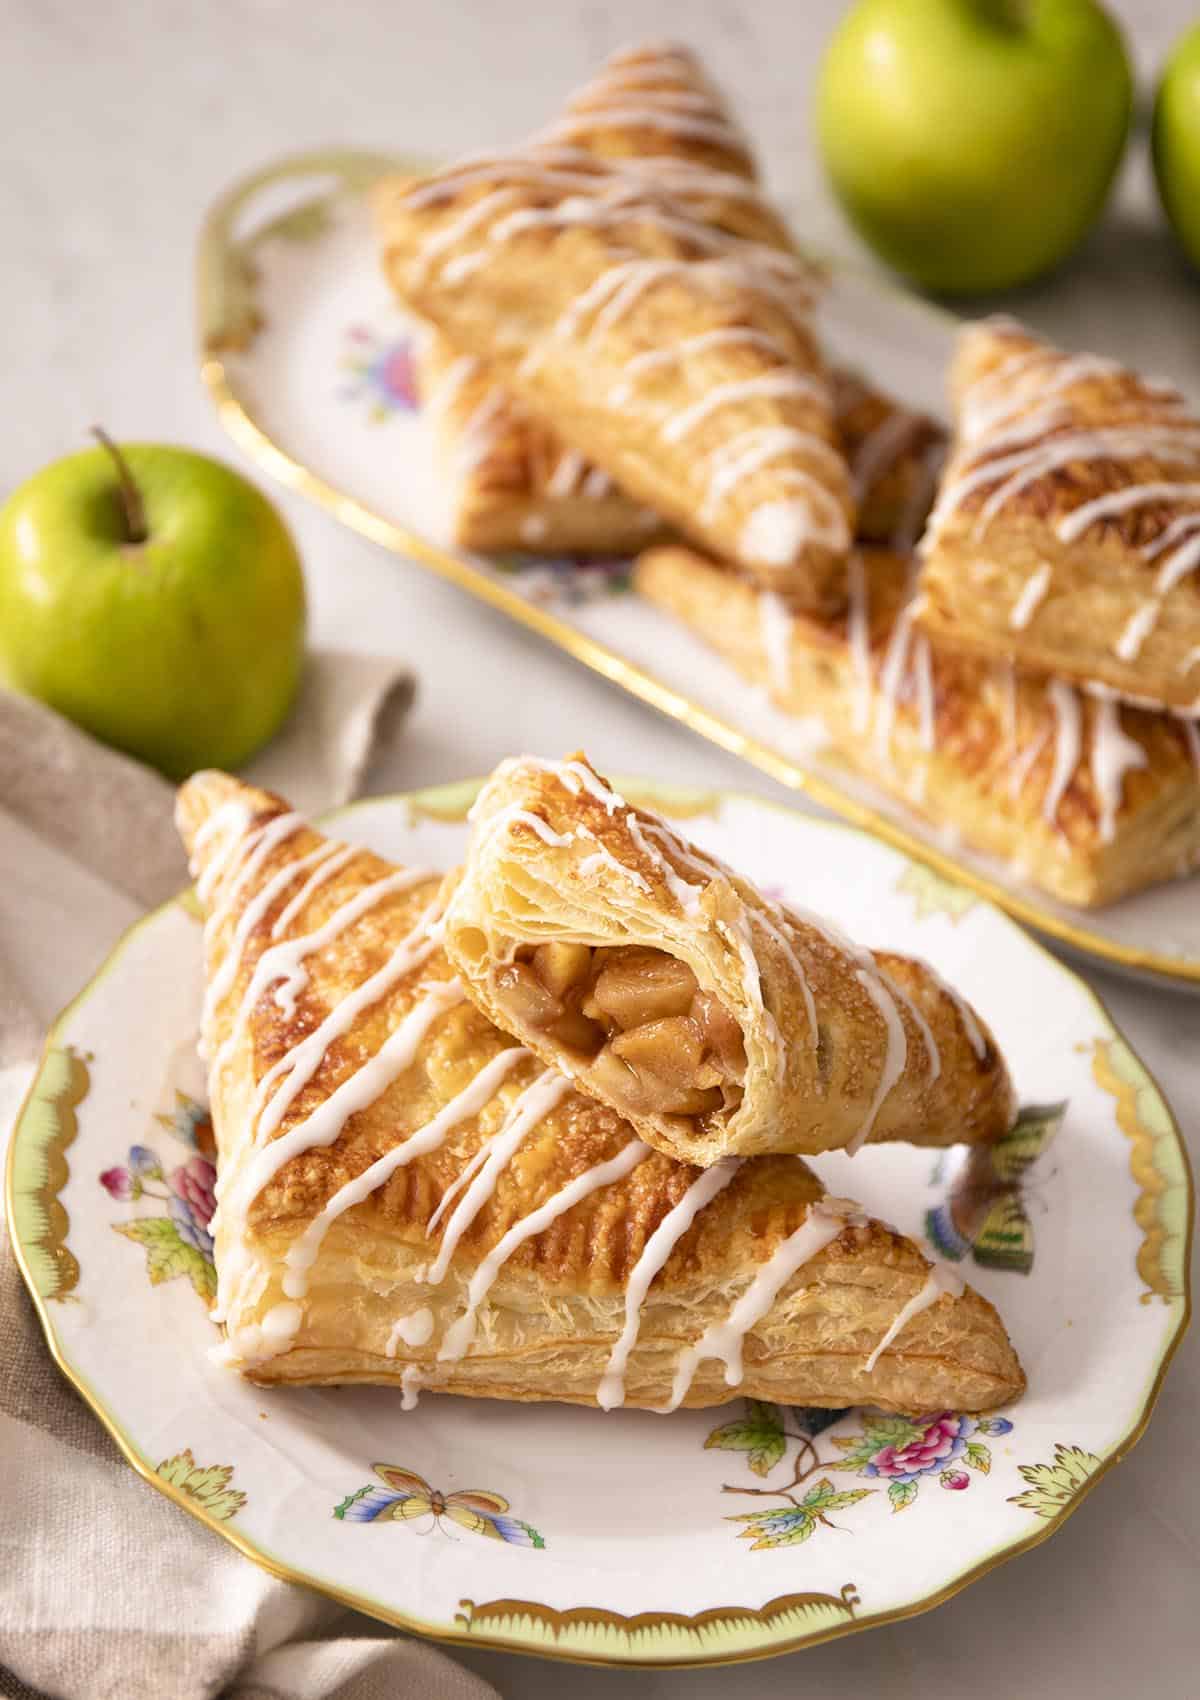
I have been making these turnovers since 2020, and they have been a favorite of readers since then! Over the years, though, readers told me the filling ran short if their apples were small, so I retested it with more apples and rebalanced the recipe. You now get eight, packed-full turnovers regardless of the size of your apples. I also ran an oven temperature test to show you why baking puff pastry at a high temperature is essential to making a turnover that is puffy and deeply golden brown.
The whole recipe takes just one package of store-bought puff pastry, a handful of ingredients for the filling, and about 30 minutes of hands-on time. But don’t skip the chilling! Here are all of my tips from testing this recipe over the years and why I know you’ll love it!
“These are the best turnovers I’ve ever had! The apple filling is gooey but not mushy and perfectly spiced. I made the whole batch and baked four, then froze the others for later. They baked perfectly frozen, too!”
Michael
What Makes a Turnover a Turnover
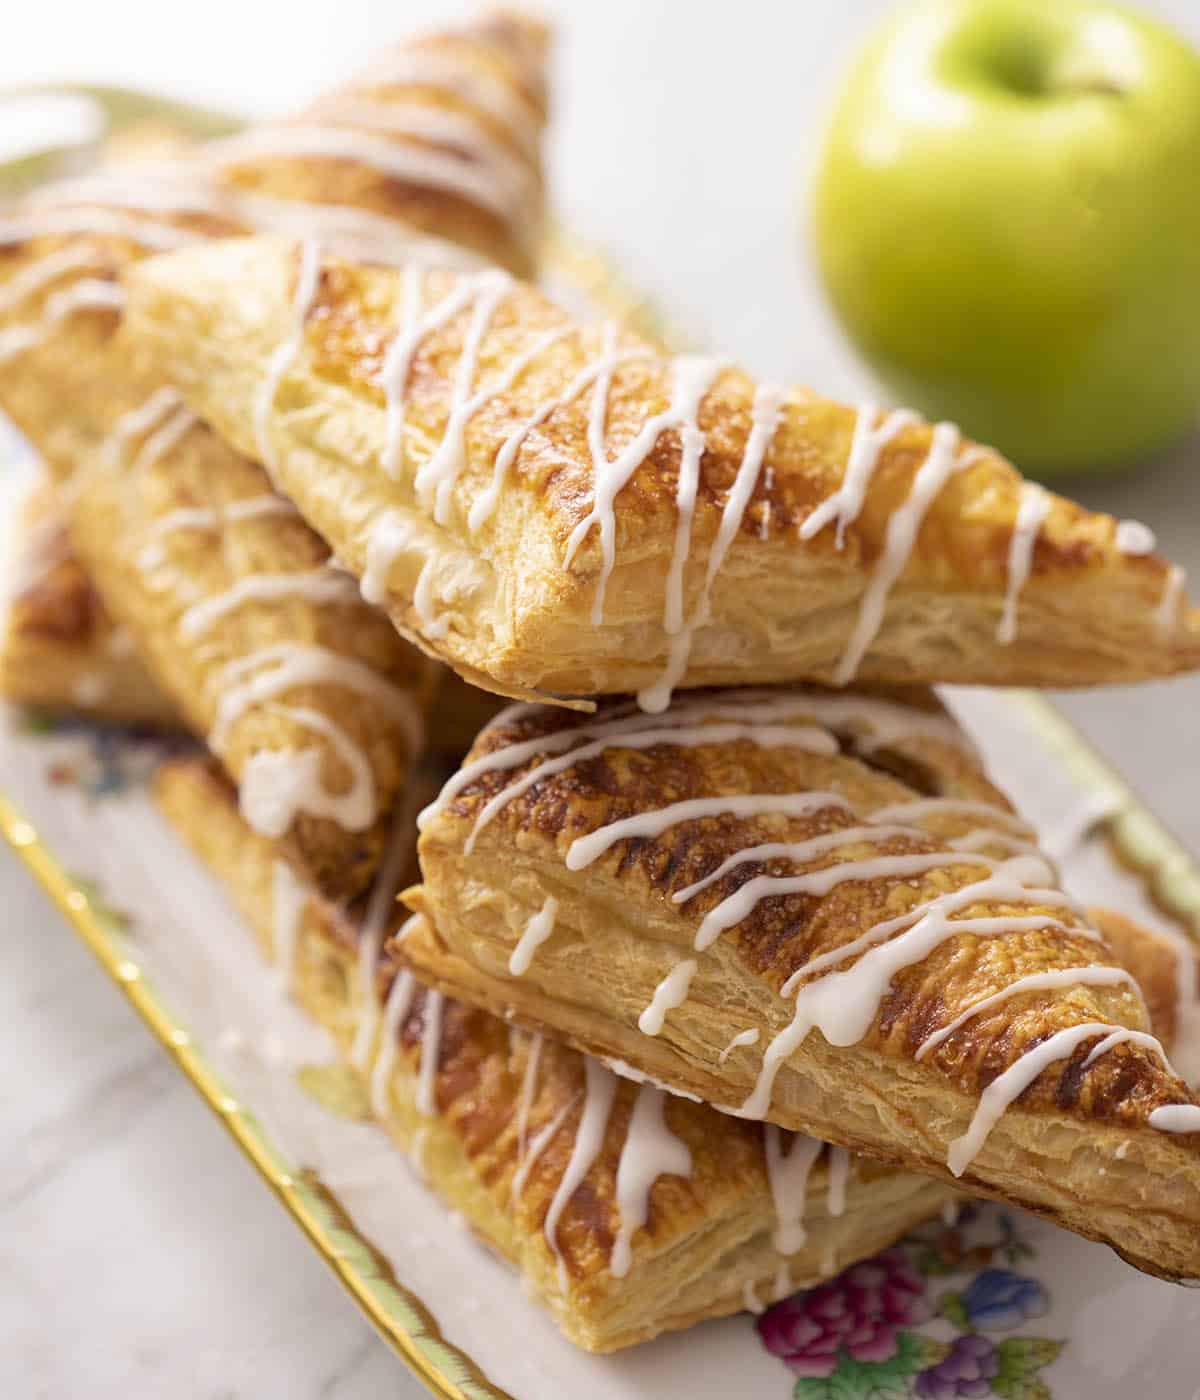
A turnover is simply a square of pastry, folded diagonally over a filling, and sealed shut before baking until golden brown. The fold is where the turnover gets its name! The elements in the turnover can be varied: the pastry can be puff pastry or rough puff, and the filling can be sweet or savory.
The apple pastry family gets easily muddled with many of them looking similar or having similar ingredients, but the differences are worth knowing so you can make the actual pastry you want!
- Apple strudel is rolled, not folded, with layers of paper-thin phyllo wrapped around the fruit in a long log, so you get a crackly texture rather than puffed layers.
- Apple fritters aren’t truly a pastry at all. They’re a batter studded with apple and fried like a donut, which is why they come out craggy and cakey instead of layered.
- Apple hand pies are the closest relative to a turnover, with the same handheld idea, but cut from pie dough, which bakes short and flaky rather than puffed and heavily layered.
- And a full apple pie is sliced and made in a pan! My recipe uses fresh apples that cook down inside the crust while the whole pie bakes—something you cannot do in a turnover. Raw apples in a turnover release too much liquid into a sealed pocket and steam the pastry from the inside.
I learned that last one the hard way when I was first testing this recipe. I tested turnovers with a raw apple filling to see if I could shorten the time overall. The pastry came out golden on top, but pale, damp, and gummy inside with very minimal layers. It was not delicious! The extra time it takes to cook the filling for turnovers is so worth it.
Key Ingredients
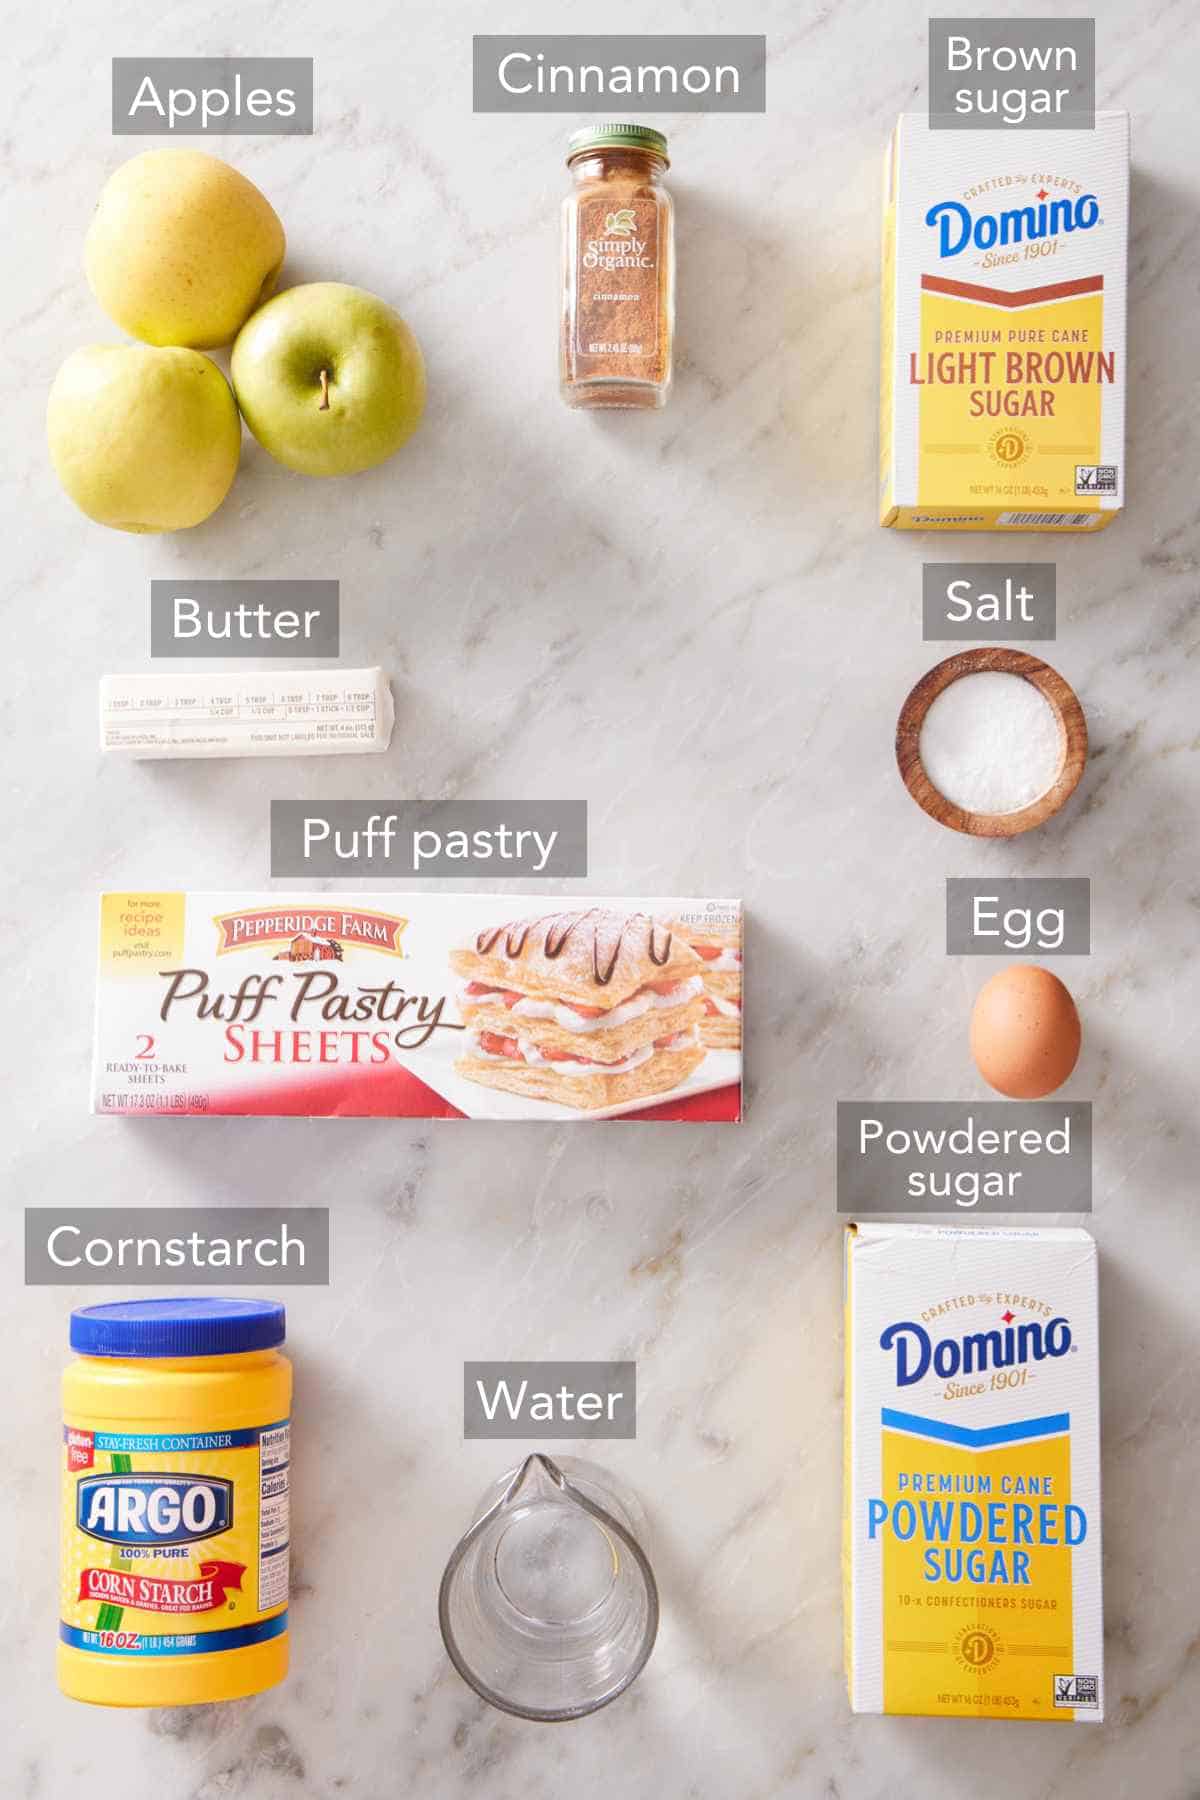
These are the main ingredients you need to make apple turnovers. You can find the full list of ingredients and measurements in the recipe card below.
Apples — use a firm variety so the apples still have texture after baking. The apples get cooked once on the stove and again in the oven, so any variety that is already soft in the skillet turns to mush after baking. I use Granny Smith apples for the tartness against all that brown sugar. Fuji, Pink Lady, and Honeycrisp all hold their shape well too. Gala and McIntosh will work if you want a softer, more jam-like filling—just know that’s the trade. I tested my cooked apple pie filling using Honeycrisp and McIntosh. The McIntosh turned very soft by the end of cooking in the skillet. If you like some softness and soft crispy chunks, you can mix the varieties.
Brown sugar — light or dark both work. Dark brown sugar brings deeper molasses notes, and light brown sugar lets the fresh apple flavor shine through a bit more. I go back and forth depending on how tart or flavorful the apples are that week.
Cornstarch — two teaspoons, added at the end, thickens the filling. This is the ingredient doing the structural work to keep the filling from being too runny. Cooked apples release a lot of liquid, and cornstarch gelatinizes as those juices come to a boil, binding the loose syrup into a jammy consistency that stays put inside the pastry pocket instead of running out the seam.
Puff pastry — frozen store-bought puff pastry sheets are what I reach for most often. I just thaw them per the package instructions. If you want to go all the way, my homemade puff pastry gives you noticeably taller, more distinct layers.
Powdered sugar — whisked with water for the glaze. Out of it? You can make your own with my homemade powdered sugar method. This is also optional, if you’d rather keep the turnovers plain.
Why Puff Pastry Needs a 400°F Oven
This is where my inner science teacher gets happy. Puff pastry is laminated—dozens of butter layers pressed between thin dough layers. When that butter hits a hot oven, the water in it flashes to steam, and the steam physically shoves the dough layers apart. That’s the “puff” part of puff pastry! It’s not chemical leavening like adding baking soda; it’s a natural process of the molecules changing in the oven heat.
This means oven temperature is essential to create the right reaction. My team made a batch of turnovers and each half of the batch two ways: one tray at 400°F as written, and one at 350°F. The 400°F tray came out deeply golden with visibly separated layers. The 350°F tray was pale, noticeably shorter, and the layers had fused together instead of puffing apart. At the lower temperature, the butter just melted and soaked into the dough instead of steaming. They also tasted flatter because they lacked rich golden color, which is caramelization, and caramelization is flavor.
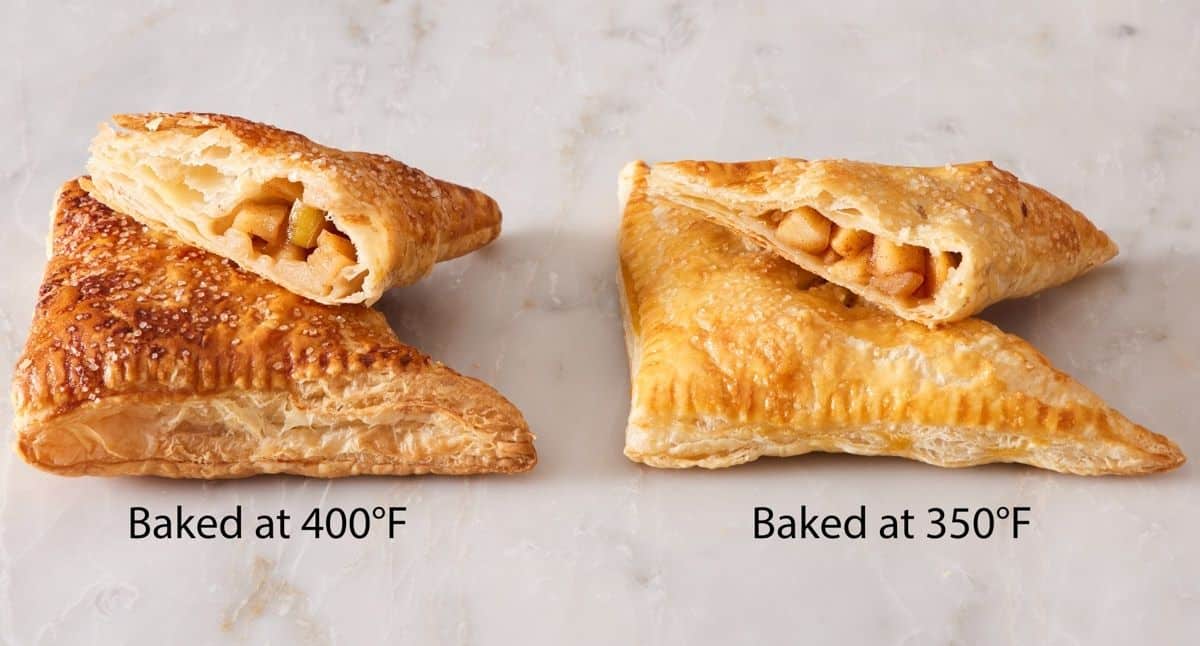
Don’t drop the temperature to slow the browning. If the tops are darkening faster than you’d like, tent them loosely with foil for the last few minutes and leave the oven dial alone.
How To Make Apple Turnovers
Below are portions of the recipe in step-by-step process images for making apple turnover. Full instructions are in the recipe card below.
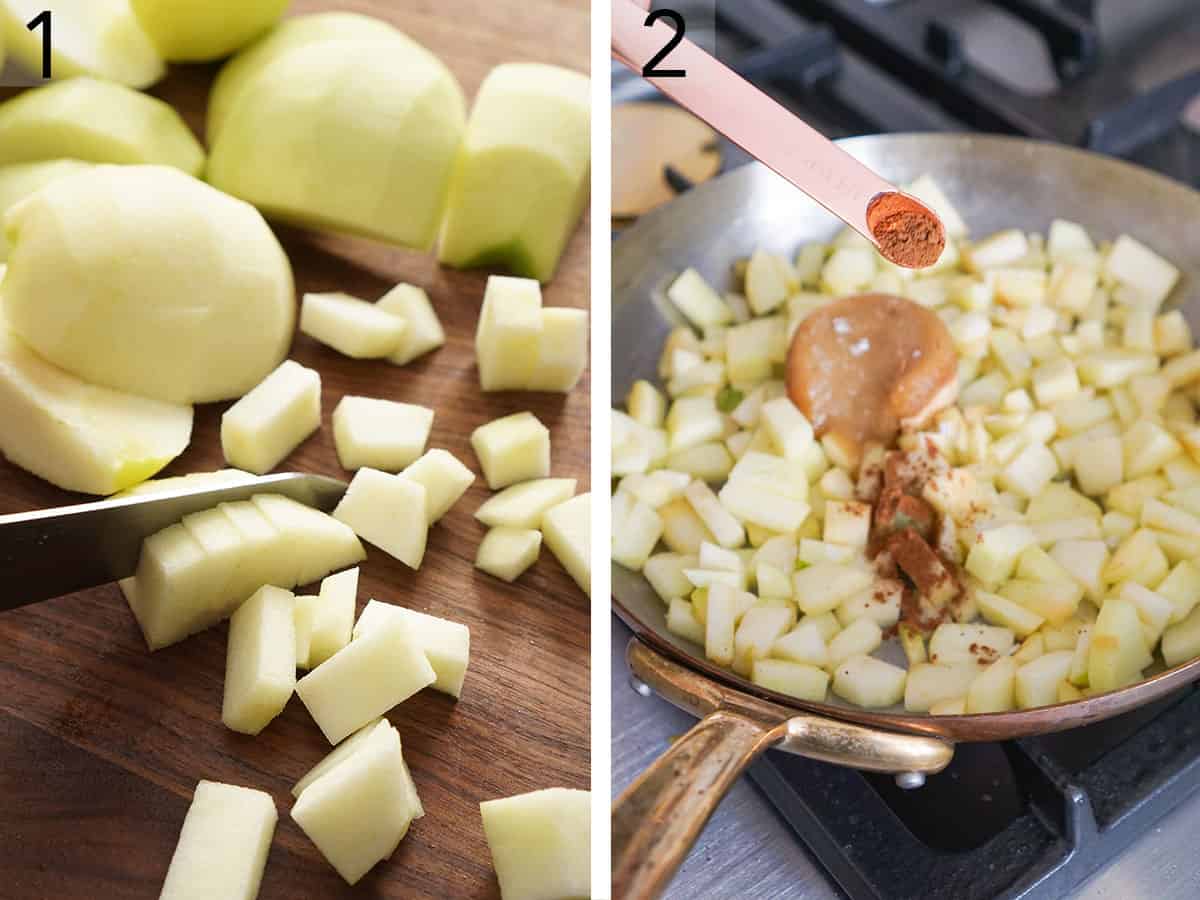
1. Make the filling: When you prep the apples, dice them into even ¼-inch cubes. Even pieces cook at the same rate, and uneven ones give you a filling that’s simultaneously mushy and crunchy. You also don’t want them too big, or they can poke through the pastry when shaping the turnovers.
2. Melt the butter in a large skillet over medium heat. Add the diced apples and cook for a few minutes, stirring often, until they start to feel slightly tender. Add the brown sugar, cinnamon, and salt.
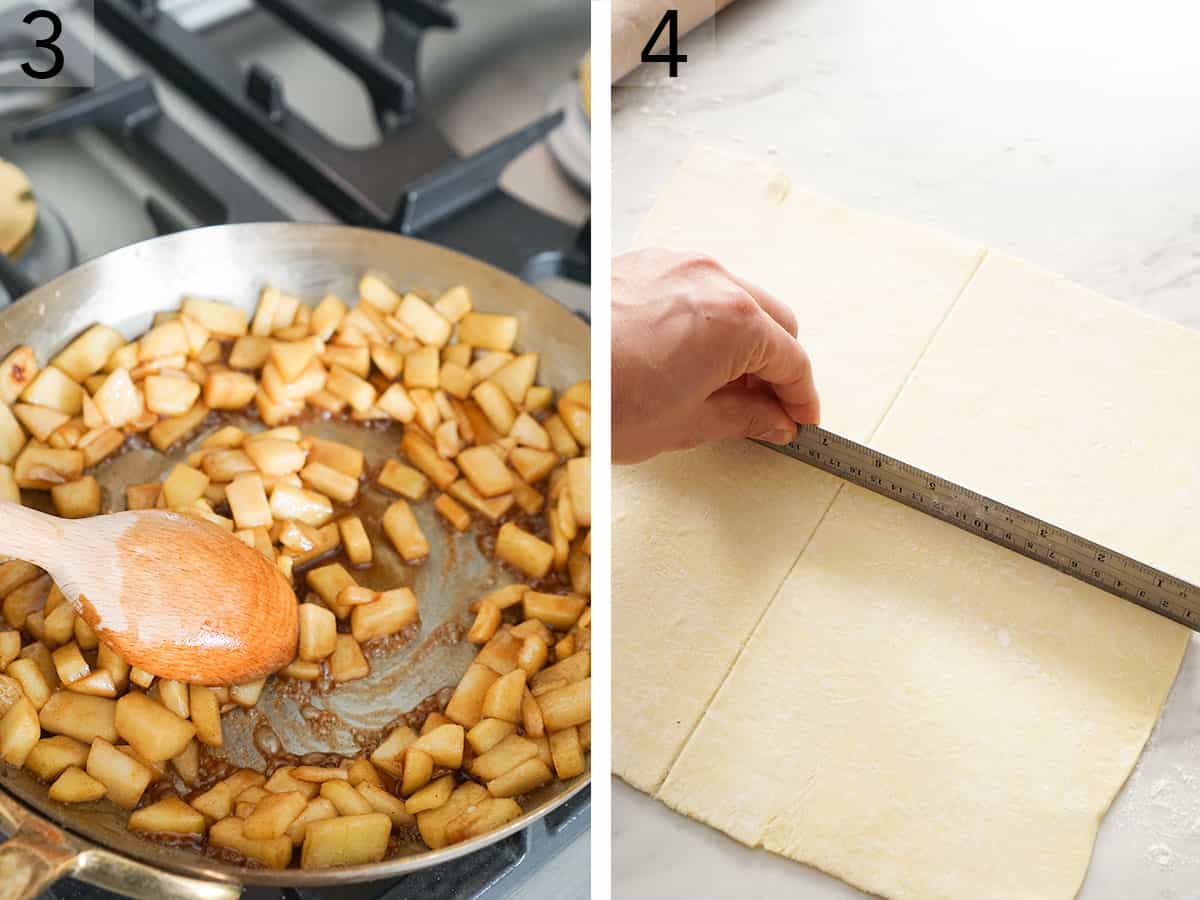
3. Stir to coat and keep cooking until the apples are softened but still have some structure in the center and the pan liquid turns syrupy. Reduce the heat to low, sprinkle in the cornstarch, and stir immediately. The juices need to actually bubble for the cornstarch to thicken. Transfer to a bowl, cool for 15 minutes at room temperature, then chill for 30 minutes.
4. Assemble the turnovers: Roll each thawed sheet of puff pastry into a 12-inch square on a lightly floured surface. Then cut into 4 equal squares.
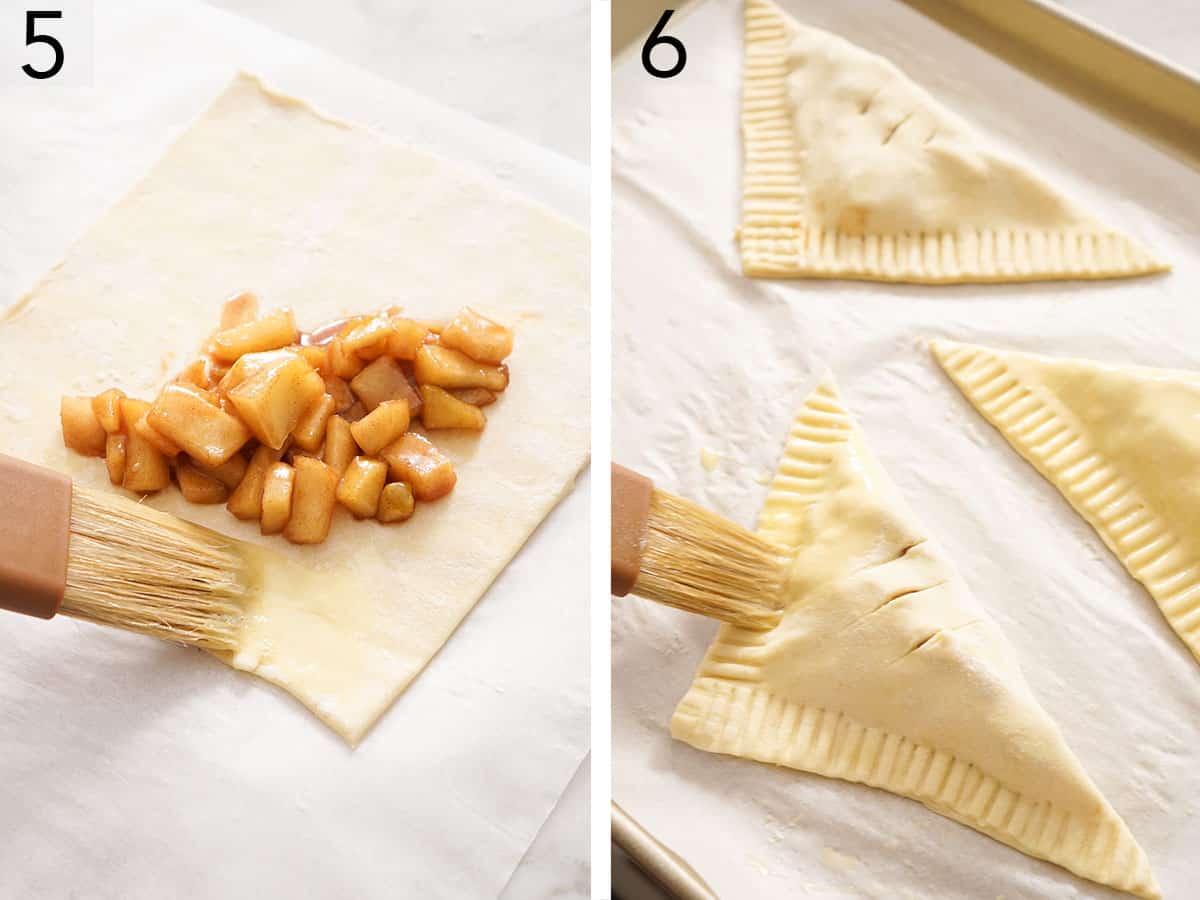
5. Spoon the chilled filling onto one side of each square, brush the edges with egg wash, and fold one corner of the pastry over to meet the opposite one. Crimp both straight edges with a floured fork to seal the turnover. Place the turnovers on a parchment-lined baking sheet.
6. Bake: Brush the tops with egg wash and cut a few slits to release steam. Sprinkle the tops with sugar if you’d like a crunchy top. Bake at 400°F until deeply golden and puffed, about 20 minutes.
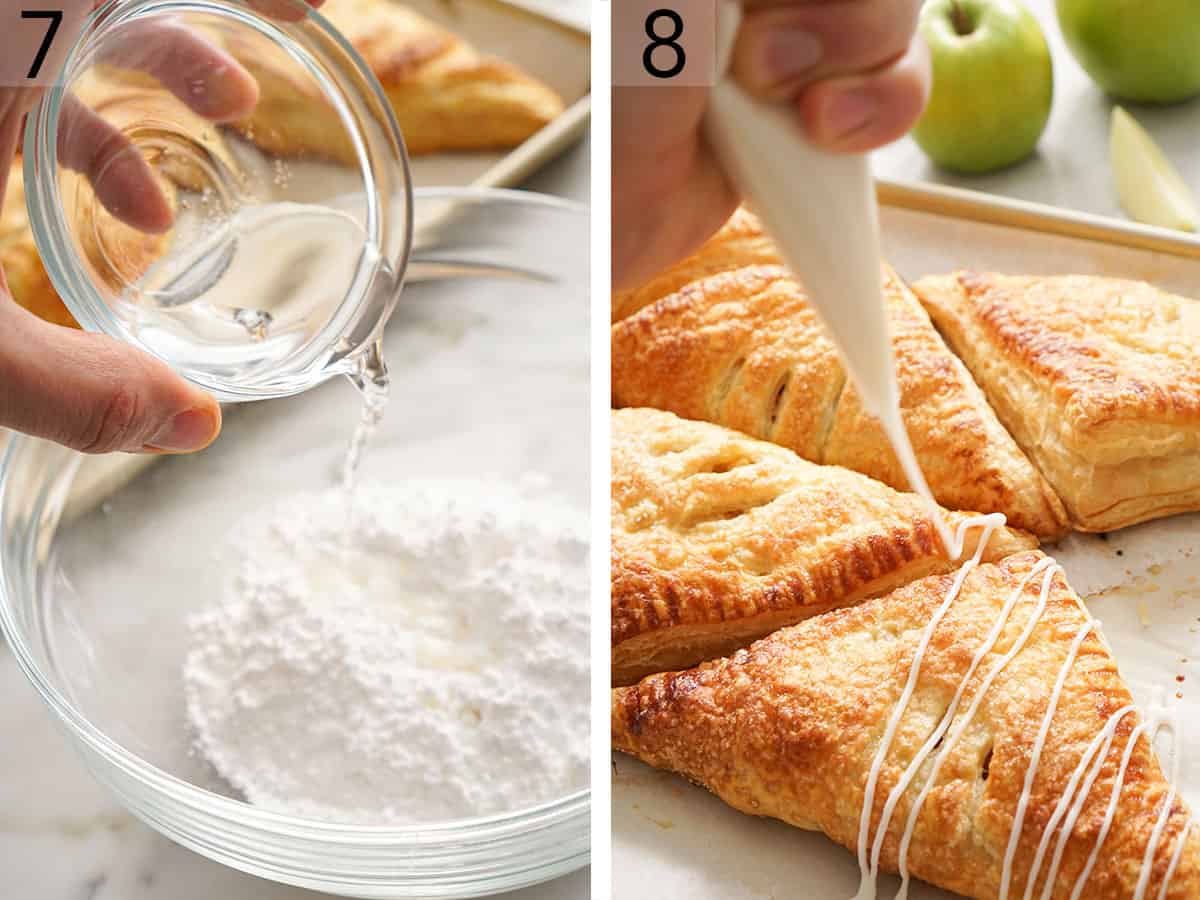
7. Make the glaze: Once they’ve cooled for about 15 minutes, whisk the powdered sugar and water until smooth.
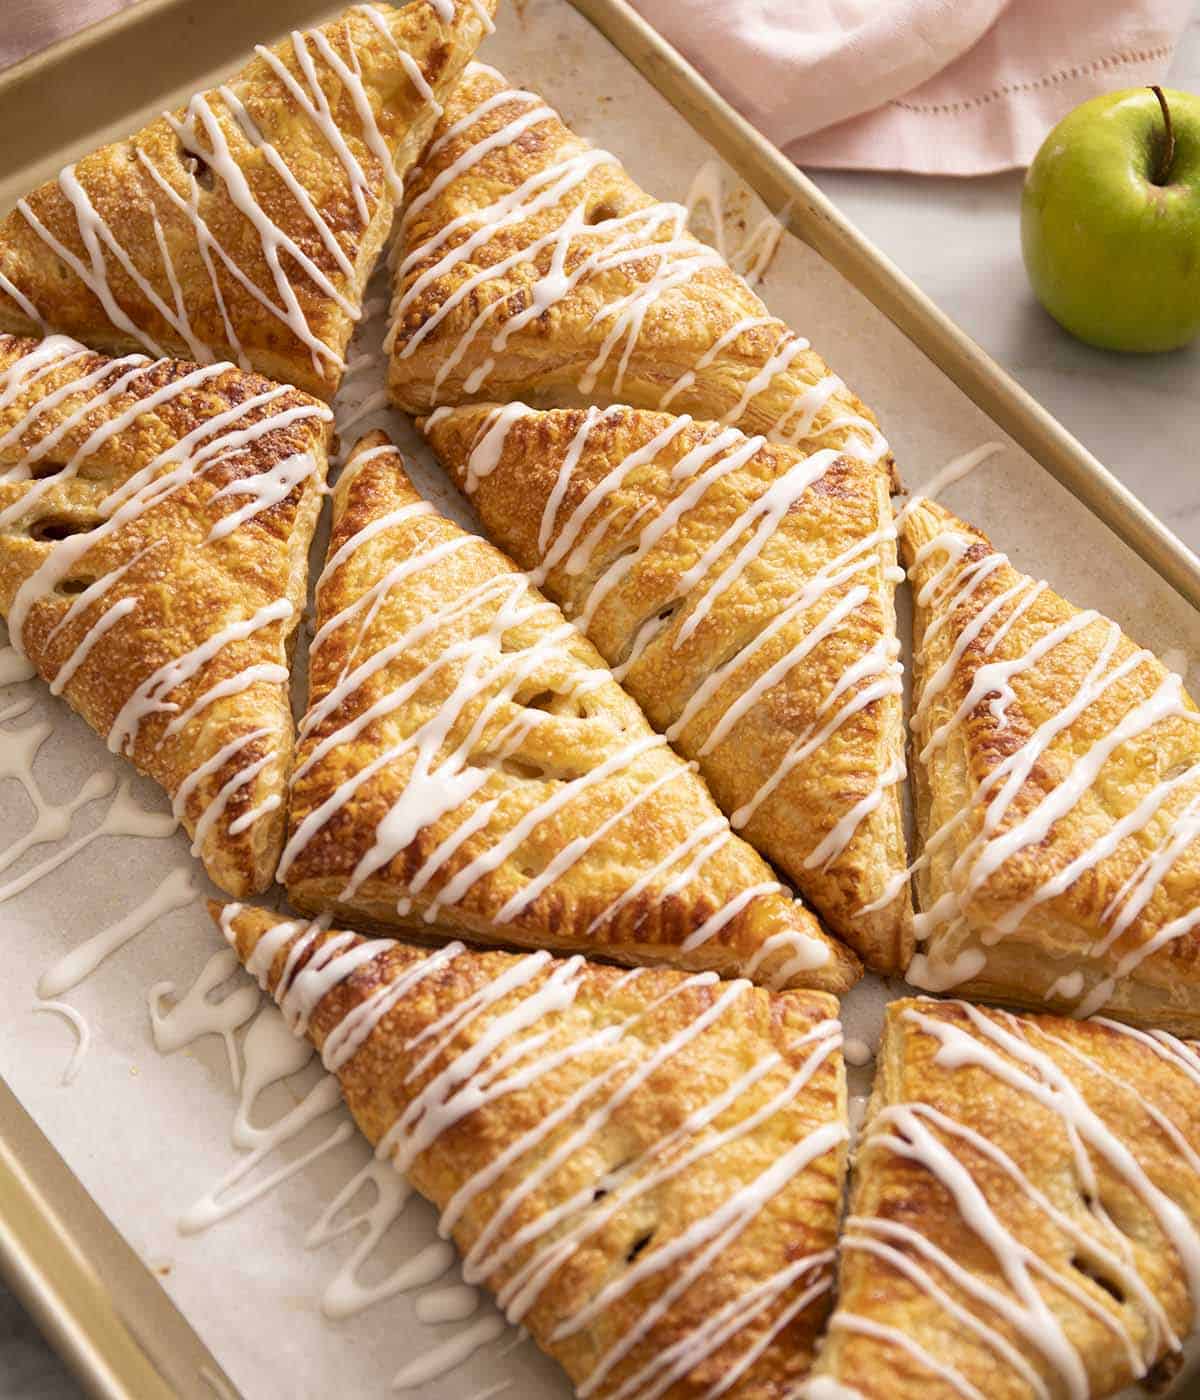
8. Drizzle the glaze over the warm turnovers. If you glaze them piping hot, the glaze will melt and run off the sides, making the coating very thin.
How to Keep Apple Turnovers From Leaking
Every batch of turnovers I have made has one that weeps a little at a seam, so that’s normal. But a batch where all of them burst open means something specific went wrong. These are the most common causes, and how to avoid them:
Chill the filling until it’s cold, not just cool. This is where most people try to save time by skipping the chill time. A warm filling softens the butter in the pastry on contact, so the seal never really forms and the whole thing loosens before it hits the oven. You need about 45 minutes in total, and it should feel cold to the touch when you are ready to use it. I have tested this, and the turnovers made with a warm filling leaked significantly compared to the turnovers with the cold filling, resulting in turnovers that were mostly hollow. Trust me—the chilling time is worth it!
Dice small — Big apple chunks push against the pastry from the inside and poke through when you crimp. The small dice also lets you pack noticeably more filling into each turnover, which is the whole point of my new version with the increased filling! Dicing the apples into ¼ inch chunks is ideal. They’ll naturally vary some, but don’t go any larger than ½ inch.
Crimp firmly, all the way along both cut edges. Press the fork tines down firmly enough to see them bite into the dough (but don’t break through the bottom). Dip the fork in flour if it’s sticking. A decorative crimp that is barely noticeable on the surface isn’t truly sealed.
Cut the vents. Even with cooked apples, the filling still generates steam as it bakes. If that steam has nowhere to go, it will build up pressure, find the weakest point in your seam, and burst through it. Two or three small slits cut into the top layer of pastry with the tip of a sharp knife are all it takes. This is the easiest step at preventing a broken seal!
Pro Tip For Apple Turnovers
Make sure the pastry stays cold. If the pastry has gone soft and tacky while you’re working—either from a warm kitchen or slow hands—cover it and put it back in the fridge for 5 to 10 minutes. Cold puff pastry is going to be much easier to work with. Plus, the butter needs to stay cold to steam and puff well in the oven.
Make Ahead and Freeze
Assemble the turnovers completely but skip the egg wash on top. Freeze them flat on a parchment-lined sheet until solid, about 4 hours, then transfer them to an airtight container with parchment between any stacked turnovers. They keep well when frozen for about 3 months.
To bake from frozen: arrange the frozen turnovers on a lined rimmed baking sheet, brush the tops with egg wash, and sprinkle with sugar if desired. Bake as directed with 5 to 10 minutes added to the baking time. Don’t thaw them first! Going into the oven frozen actually helps, because the butter is plenty cold enough to steam rather than seep.
Apple Turnovers Recipe

Equipment
- Large baking sheets
- Parchment paper
- Large skillet
- mixing bowl
Ingredients
For the Turnovers:
- 2 tablespoons unsalted butter
- 4 cups peeled, cored, and diced apples (3 to 4 medium Granny Smith apples) (500g)
- ½ cup packed light or dark brown sugar (110g)
- 1 teaspoon cinnamon
- ¼ teaspoon salt
- 2 teaspoons cornstarch
- 2 sheets frozen puff pastry thawed (1, 17.3oz/490g package)
- Egg wash (1 large egg + 1 teaspoon water, beaten)
For the Glaze: (optional)
- ¾ cup powdered sugar (180g)
- 1 tablespoon water
Instructions
For the Turnovers:
- In a large skillet over medium heat, melt the butter. Add the apples and cook for a few minutes while stirring frequently. Add the brown sugar, cinnamon, and salt, and stir to coat the apple pieces. Cook for 5 to 10 minutes or until the apples are softened and become syrupy. Reduce the heat to low.
- Sprinkle in the cornstarch and stir until the juices boil and thicken, about 1 minute. Transfer to a bowl. Let cool for 15 minutes then refrigerate until chilled, about 30 minutes.
- When the apples are chilled, Preheat the oven to 400°F. Line two baking sheets with parchment paper.
- Roll each thawed puff pastry sheet out on a lightly floured surface into a 12-inch square. Cut each sheet into 4 equal squares.
- Place a square of puff pastry on the baking sheet and brush the edges of each square with the egg wash. Place a few tablespoons of filling in each square. (You may have a little bit of filling left over depending on how small you diced the apples and how much they cooked down.) Fold one point of the puff pastry over the filling to the opposite point, creating a triangle. Crimp and seal in the filling by pressing the lines of a fork along both straight edges. Brush the top with more egg wash and cut a few small slits in the top. Sprinkle with sugar, if desired.
- Bake for 18 to 20 minutes or until the pastry is golden and puffed. Let cool for at least 15 minutes.
For the Glaze:
- In a small mixing bowl, combine the powdered sugar and water and whisk until smooth. You can add a bit more water if the consistency needs to be thinned out. Drizzle over the warm turnovers and enjoy!
Notes
- Want more tartness in your apple filling? Add 2 tablespoons of lemon juice. Stir it in while the filling is bubbling so it doesn’t get too runny.
- If your puff pastry feels warm after shaping, pop the tray in the freezer for 15 minutes before baking. You want to make sure the butter hasn’t started to melt before entering the oven, or the pastry won’t puff properly. If it feels very greasy, looks shiny, or you can see butter coming out of the pastry dough, then you know you need to chill it.
- If you have any filling leftover, you can freeze it for later use. Use it in a yogurt parfait, spoon over ice cream, or stir it into overnight oats.
Nutrition
Have you tried this recipe? Tag me today!
Mention @preppykitchen and tag #preppykitchen!
How to Serve
I want one of these slightly warm with coffee for breakfast! For dessert, swap the glaze for a drizzle of caramel sauce or butterscotch sauce, or serve them alongside a scoop of vanilla ice cream or a spoonful of whipped cream.
Storing and Reheating
Baked turnovers keep at room temperature in an airtight container for up to 2 days. The USDA’s guidance for sugar-sweetened fruit pastries is up to two days at room temperature, after which they should be moved to the refrigerator for up to two more days. Baked turnovers also freeze well for up to 1 month. Thaw them in the fridge overnight or on the counter for a few hours.
Refrigeration does soften the pastry, so reheat before serving: 350°F oven or toaster oven for 5 to 10 minutes, or an air fryer at 325°F for 5 minutes. If you know you’re saving some, leave those unglazed and glaze after reheating. The glaze bubbles and gets very crispy in the oven.
Frequently Asked Questions
You can, and it’s a decent shortcut. Canned filling usually comes in large slices, so chop the apple slices smaller before you use it, or it won’t fit in the pastry squares very well.
Yes! I do this often when I know I want turnovers on Sunday morning, but don’t want to get up too early. Cook the filling, cool it, and refrigerate in an airtight container for up to 4 days. Use it straight from the fridge! This will cut your day-of prep time down by almost an hour, so all you have to do is assemble and bake the turnovers.
Pears swap in almost one for one. Juicier fruit like blueberries, cherries, or peaches needs more thickener. Use the same 4 cups of fruit and add an extra 1-2 teaspoons of cornstarch. Thick fruit preserves or a firm fruit paste or butter also work with no cooking at all.
You can, but you’ll be making something closer to my air fryer hand pies than a turnover. Pie dough bakes short and sturdy instead of puffing into sky-high layers. You can use the same filling, though.
More Apple Recipes To Try
Make the most of apple season with one of these dessert recipes packed with apples:
- Apple Pie — my classic double-crust pie with a no-cook fresh apple filling. It’s the full-size version of what’s inside these turnovers.
- Apple Cobbler — a no-cook apple filling makes this dessert fast to assemble.
- Apple Strudel — rolled in phyllo rather than folded in puff pastry, for a crisper, more delicate shell.
- Apple Fritters — the fried, craggy, glazed cousin in the apple pastry family.
- Apple Pie Filling — a make-ahead batch of cooked spiced apples that doubles as turnover filling.
If you’ve tried this apple turnover recipe, then don’t forget to rate it and let me know how you got on in the comments below. I love hearing from you!





