
This post may contain affiliate links. Please read our disclosure policy.


Homemade Biscuits are so easy to make from scratch, and all you need are 6 simple ingredients. Sky-high, flaky, and buttery, the fold-and-stack trick makes them tall and layered every time.

A great biscuit is often judged by height and layers—tall, craggy sides that pull apart into flaky sheets, a tender center, and enough butter that you barely need to add more. These are the perfect biscuits I’ve landed on after baking and recipe testing more batches than I can count, and the secret isn’t a fancy ingredient. It’s two key techniques: keeping the butter cold, and a quick fold-and-stack method that builds the layers. I’ll walk you through both!
One thing I did intentionally with this recipe is use regular whole milk, not buttermilk. Plenty of great biscuits use buttermilk, but I wanted a recipe you can make on a Sunday morning without a special trip to the store—and after testing it both ways, the whole-milk version bakes up just as tall and tender. If you want the tangy, buttermilk style, I have a great buttermilk biscuit recipe for that!
“Layered and pillowy- so delicious. Made these for Thanksgiving and got a ton of compliments. Thanks for the excellent recipe and directions!”
Hillary

The Three Keys to Tall, Flaky Biscuits
After dozens of batches, three things separate a sky-high biscuit from a flat, dense one:
Cold butter, always. When cold butter hits the hot oven, the water in it flashes to steam and pushes the dough apart, creating flaky pockets and lifting the biscuit up. If you let the butter melt into the dough before baking—from warm hands or a warm kitchen—those pockets never form, and you get a squat, crumbly biscuit instead of a tall, layered one.
Barely mix the dough. After the milk goes in, the dough should still look shaggy and a little crumbly. The more you work it, the more gluten develops, and gluten is what turns biscuits tough and dense. The fold-and-stack in the next step is what brings it together, not your hands kneading it smooth.
Laminate with a fold-and-stack. Folding, cutting, and stacking the dough builds distinct butter and dough layers, similar to the way puff pastry does. It’s what gives you that pull-apart, sheet-by-sheet flakiness, and it’s the biggest difference between a homemade biscuit and a canned one.
Key Ingredients
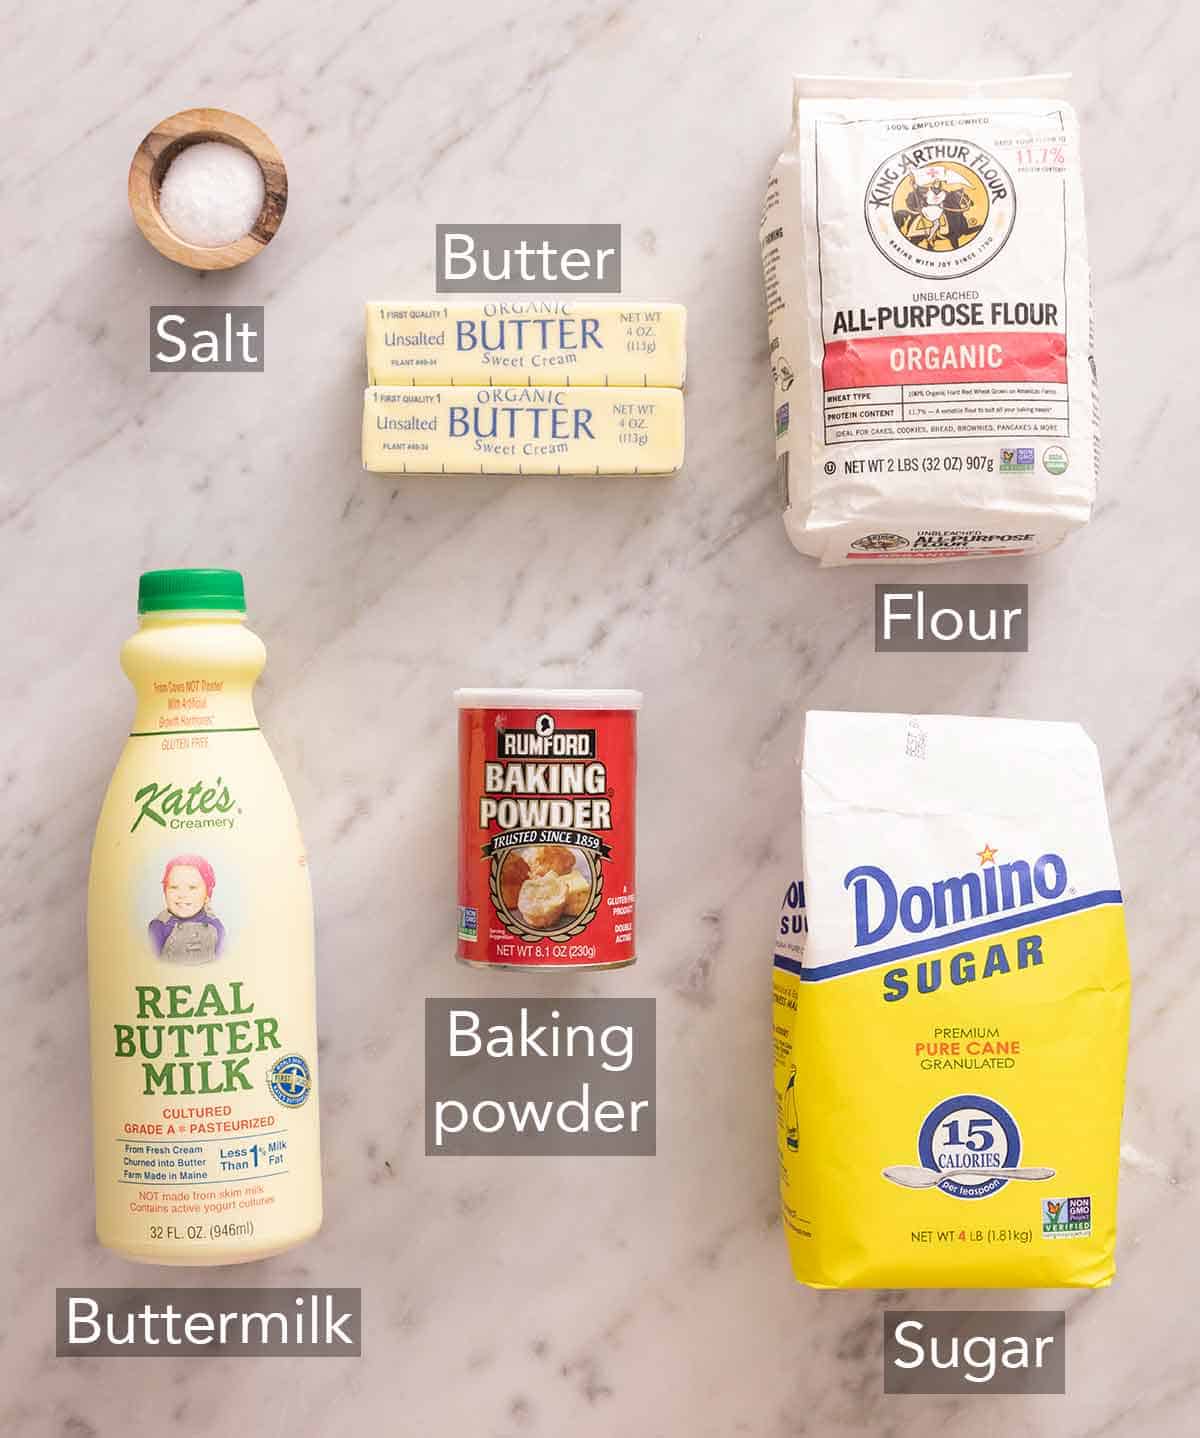
These are the main ingredients you need to make this easy biscuit recipe. You can find the full list of ingredients and measurements in the recipe card below.
All-purpose flour — this basic flour has just the right protein level for a tender biscuit. Bread flour’s extra protein builds too much gluten and toughens them. For an even lighter crumb, you can swap up to ½ cup (120g) of the all-purpose flour for cake flour.
Cold unsalted butter — the source of both flavor and lift. A high-fat European butter (like Kerrygold) makes them especially rich, but standard American sticks work beautifully. I developed this recipe with Land O’Lakes. Whatever brand you use, it has to be cold. You can also use salted butter for this recipe, but read about making the swap in my Academy lesson: Salted vs Unsalted Butter.
Whole milk — I chose regular milk, so you don’t need to have buttermilk on hand. There’s also no baking soda in this recipe, so you don’t need an acidic ingredient to cause it to react. Keep the milk cold so it doesn’t warm the butter as you mix. If you want to use buttermilk, you can.
Baking powder — the only leavening here, so check that it’s fresh. Expired baking powder is the most common reason biscuits don’t rise.
Sugar and salt — a little sugar isn’t enough to make them sweet, but it rounds out the flavor and helps the tops and bottoms brown. Salt sharpens everything. I use fine sea salt in these biscuits. Learn more about the different types of salt in my Academy lesson: Salt 101.
Why the Fold-and-Stack Makes Them Tall
The technique I use is a simple lamination: pat the dough into a rectangle, fold it in half, cut it crosswise, and stack the halves—this makes four layers. Repeat the set three more times (for a total of four rounds), and you’ve built sixteen layers of butter and dough (it’s a gentler cousin of the lamination in my puff pastry).
Readers have asked whether they can skip it if they don’t care about making several layers. I had my team bake one batch with a single fold-and-cut against the four sets the recipe calls for, baking the two biscuits in the same oven, at the same temperature, for the same amount of time.
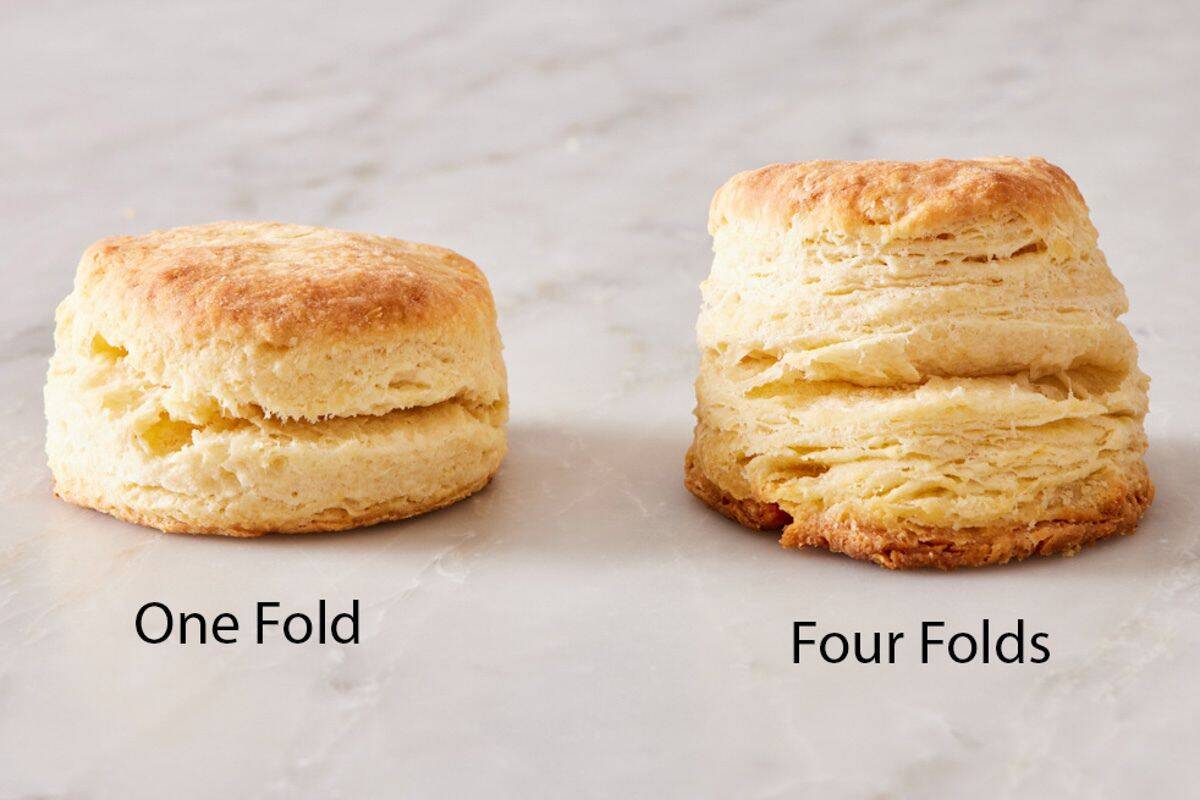
The four-set biscuits came out visibly taller with far more distinct flaky layers. The reason ties back to the cold butter: every layer is another sheet of butter waiting to steam and push the dough up. More layers mean more lift. It also solves the risk of overmixing—the folding brings a shaggy dough together into one smooth mass without kneading and overdeveloping the gluten structure.
How To Make Biscuits
Below, I’ve highlighted portions of the recipe in step-by-step process images along with instructions for making the best biscuits. You can find the full set of instructions in the recipe card below.
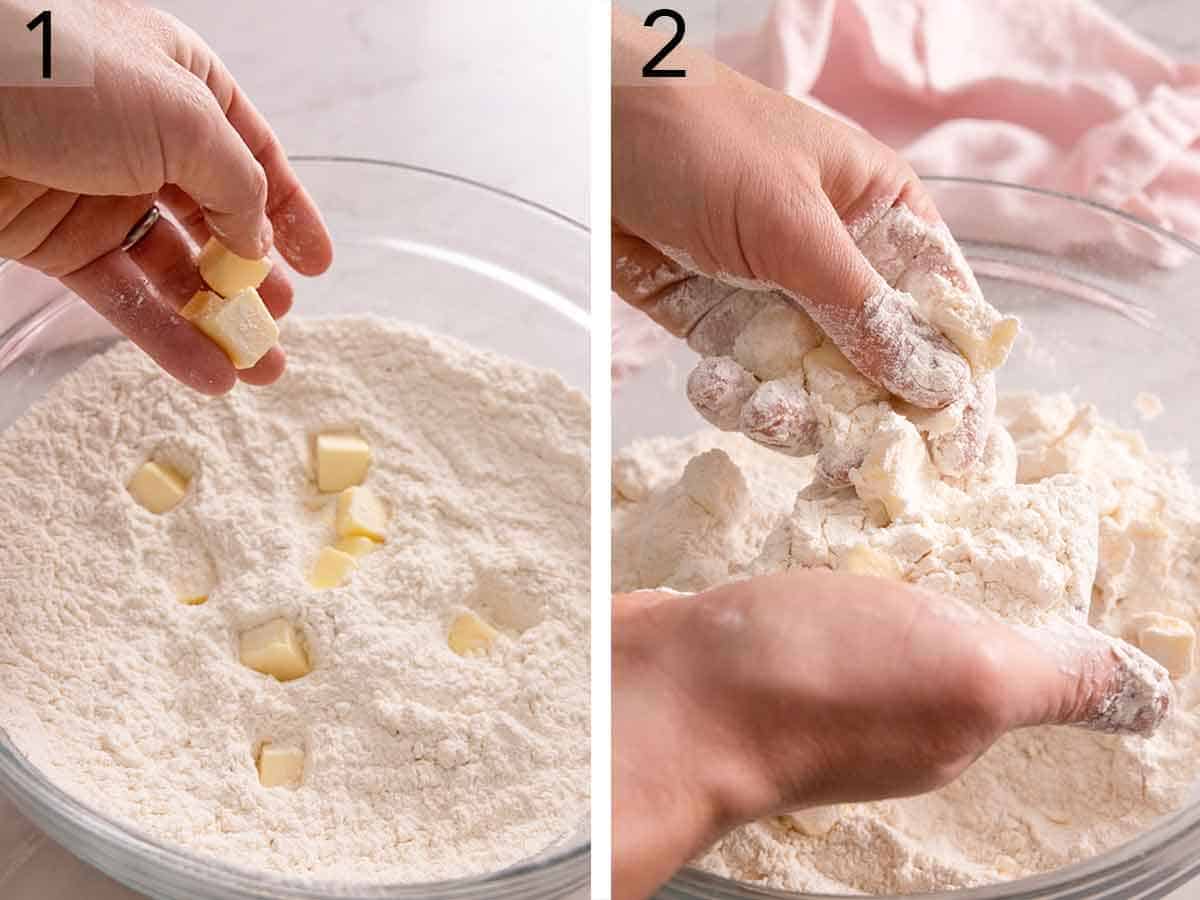
1. Combine the dry ingredients and add the butter. Whisk the flour, sugar, baking powder, and salt. Toss in the cold cubed butter and coat the pieces with the flour.
2. Cut in the butter. Work it in with a pastry blender (cutter) or your fingers until the pieces range from pea- to almond-sized. Those visible butter pieces are what steam into flakiness, so don’t blend them into a fine sand. If you have naturally warm hands, I recommend using a pastry blender.
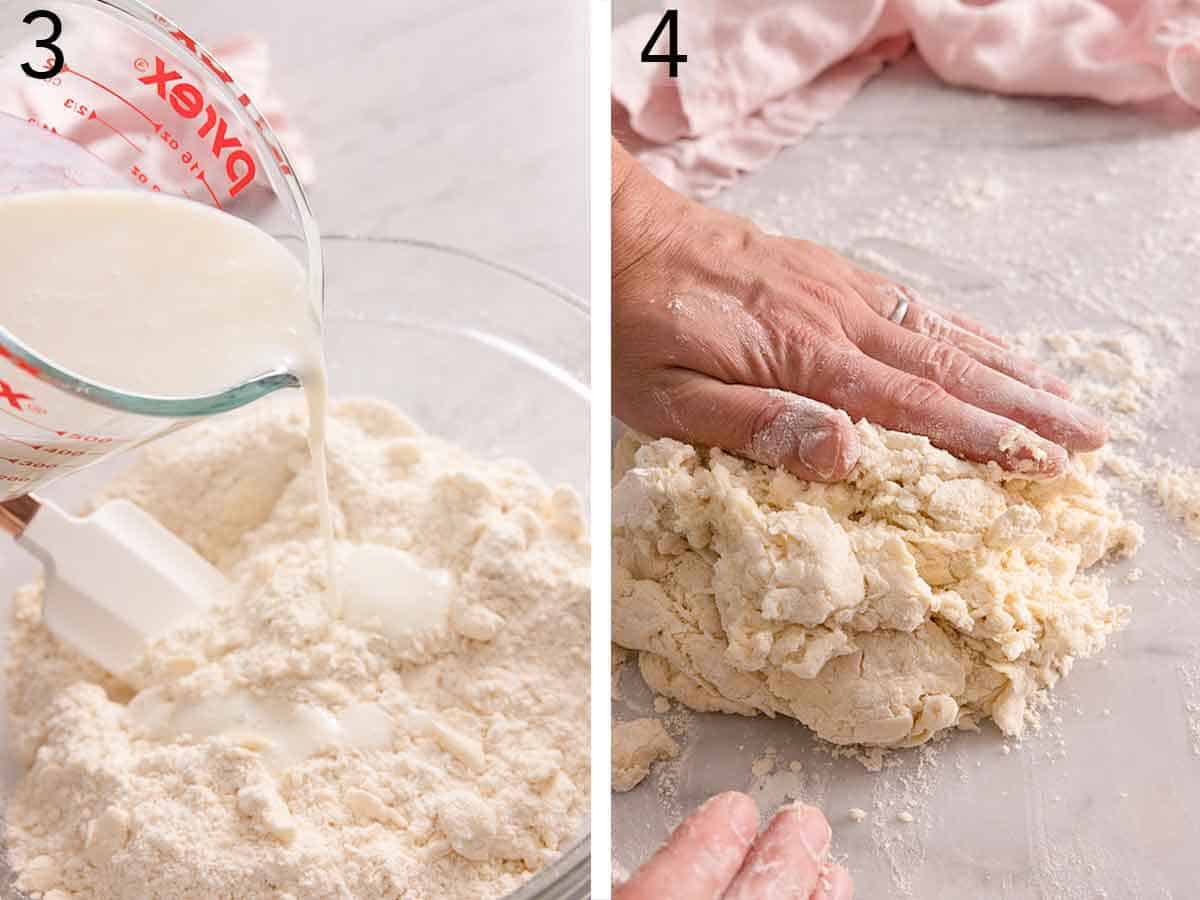
3. Add the milk and mix just until shaggy. Fold in the cold milk with a spatula until most of the flour is moistened, but the dough still looks somewhat crumbly. It won’t come together fully yet, and that’s correct.
4. Press the dough. Turn the dough onto a well-floured surface. Pat to a 1-inch-thick rectangle. Press any bits that have crumbled away to the sides or on top of the dough.
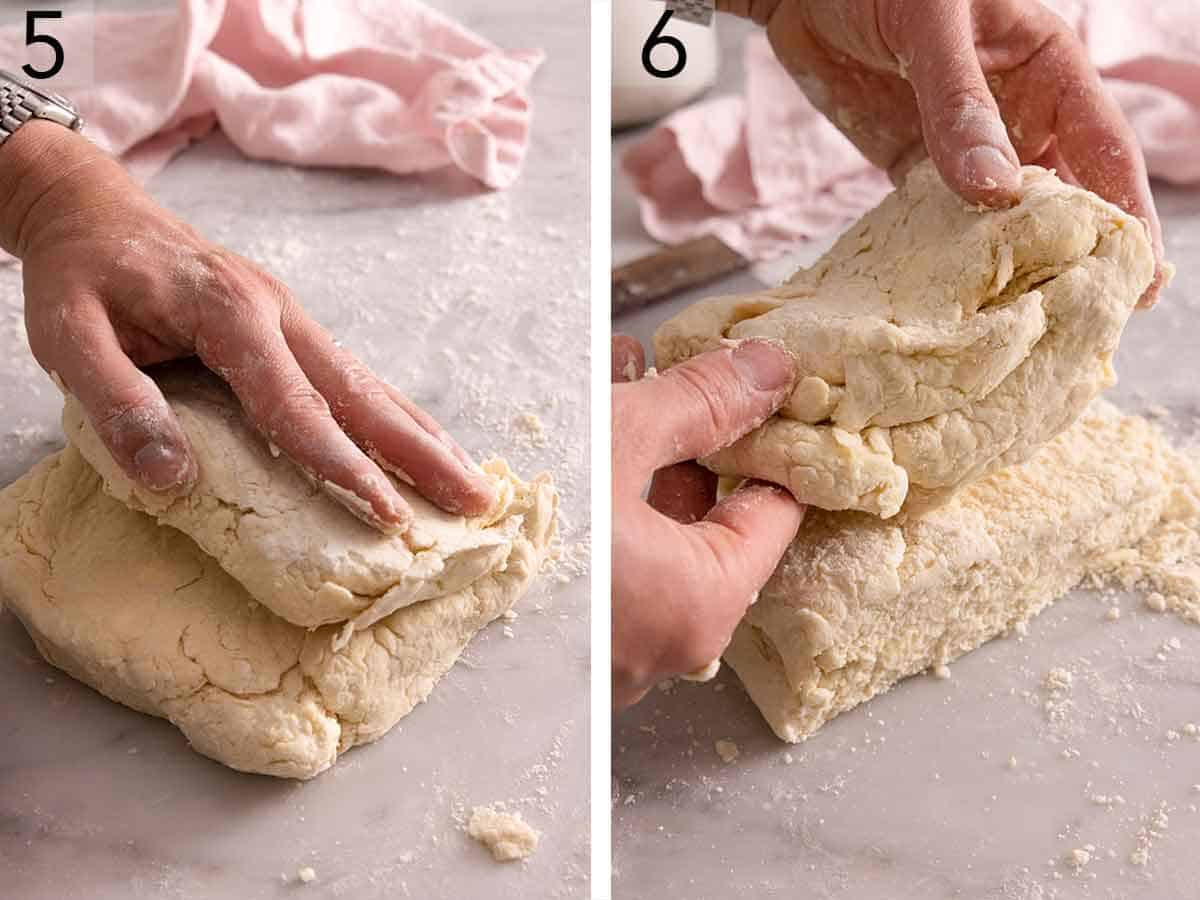
5. Fold the dough. Fold the dough in half, using a bench scraper to lift up the dough if you have one. The dough will still be crumbly, so don’t worry if some pieces fall away as you fold the dough. Just press them back into the dough.
6. Cut and stack. Cut the dough crosswise, stack the halves, and pat the dough back into a rectangle.
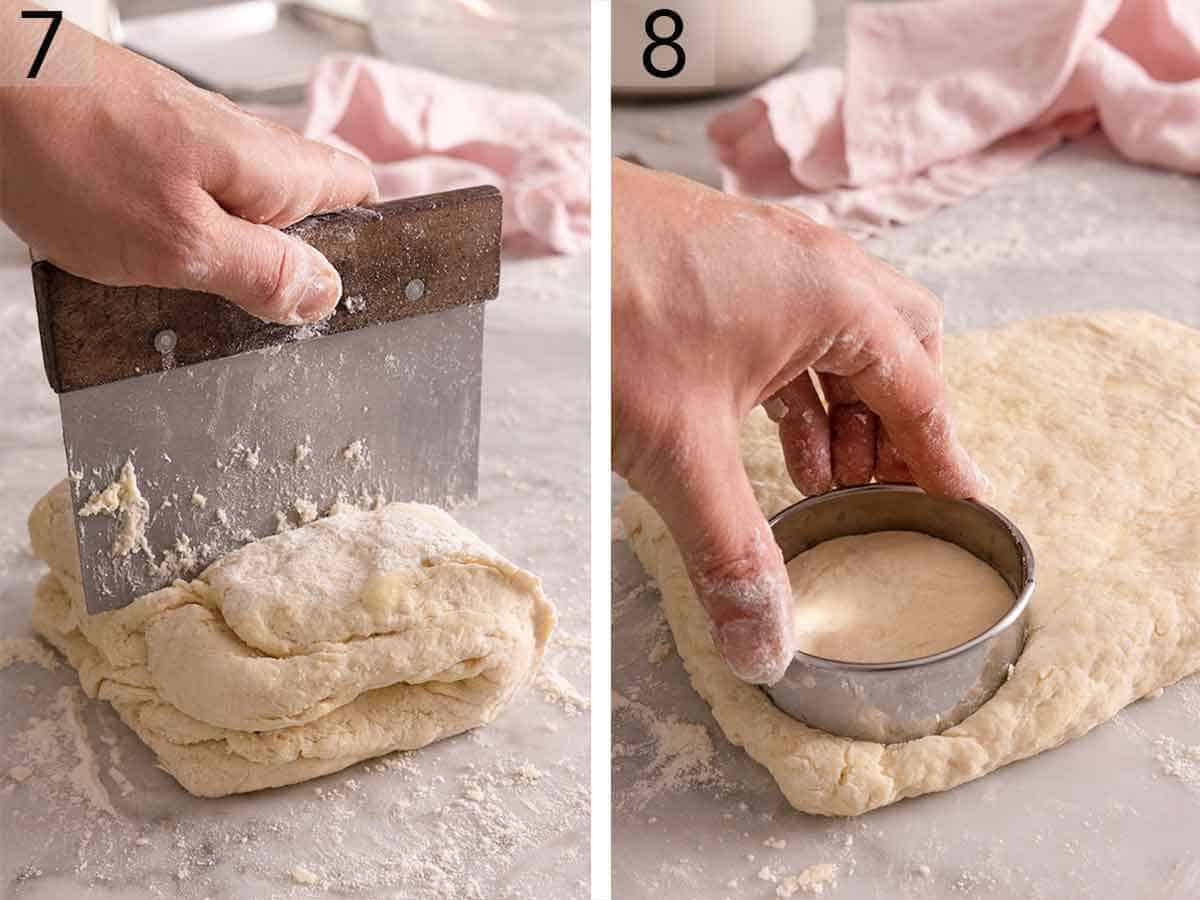
7. Cut and stack 3 more times. Repeat pressing, folding, and cutting three more times so you have a total of 4 cut-and-folds. The dough will go from crumbly to cohesive as you work.
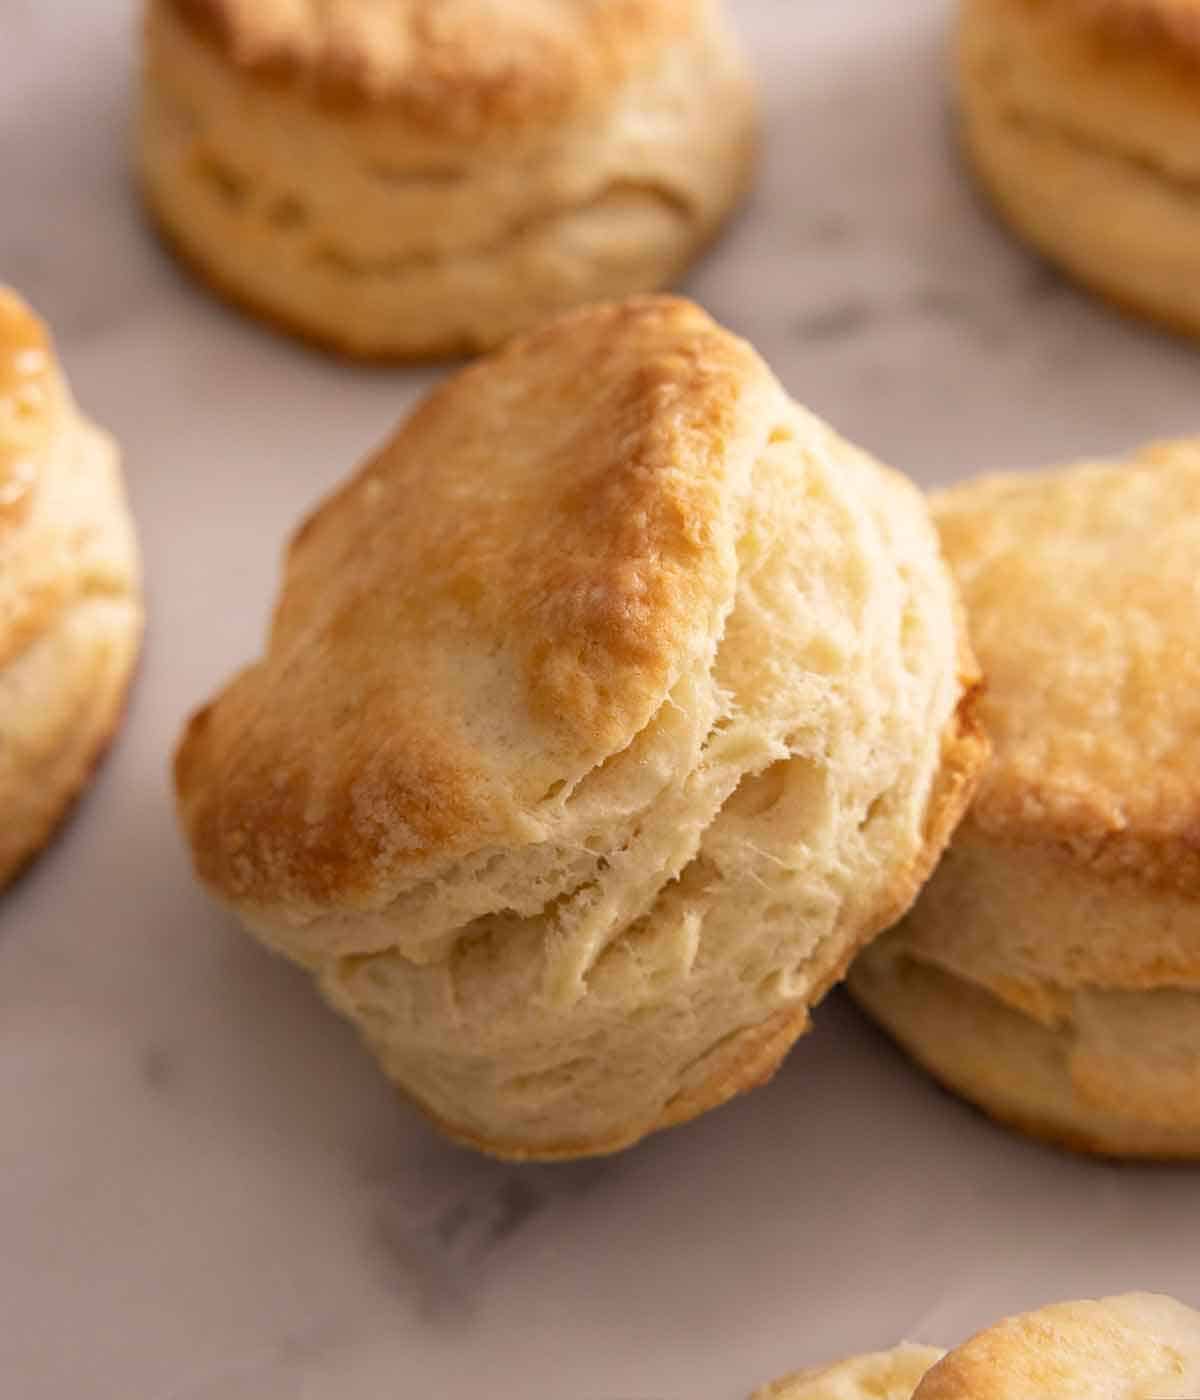
8. Cut out and bake. Roll the dough to 1-inch thick and cut out the biscuits with a 2½ to 3-inch floured cutter, pressing straight down and lifting straight up. Do not twist it (twisting seals the layers shut, and the biscuits rise crooked or short). Place the biscuits on a parchment paper lined rimmed baking sheet. For the best rise, freeze the cut biscuits for 20 minutes before baking to get the butter very cold. Bake at 425°F for about 20 minutes, until golden brown on top and bottom. Brush the tops with melted butter straight from the oven if you like.
Troubleshooting: Flat, Tough, or Lopsided Biscuits
Flat biscuits? Almost always the result of warm butter or expired baking powder. If the butter softened while you worked, chill the cut biscuits before baking. Getting it very cold again will ensure it steams and lifts the biscuits. If they still won’t rise, check the baking powder’s date; an expired container can mean the powder doesn’t react in the oven, so the biscuits don’t get the added lift. A cool kitchen and cold ingredients fix most height problems, though.
Tough or dense biscuits? Overworked dough. Stop mixing while it’s still shaggy and let the fold-and-stack do its job to bring the dough together. The more you knead, the more gluten you build, and the tougher they get.
Lopsided or short-risen biscuits? Usually a twisted cutter. Press straight down and lift straight up. Dragging a knife or twisting a cutter pinches the layers closed on one side so they can’t spring up evenly.
Pro Tips For Making The Best Biscuits
Measure the flour correctly. Mismeasuring your flour can result in biscuits that are gummy in the center or too dry. Using a scale is the most accurate way to get the exact right amount of flour and have consistent results every time. If you don’t have a scale, fluff the flour in the container with a spoon, sprinkle it into a dry measuring scoop, and level it off with the flat edge of a knife. Learn how to properly measure with and without a scale in my Academy lesson: How To Measure Ingredients Correctly.
If your kitchen is warm, freeze your cubed butter before you start. Popping it in the freezer for 15 to 20 minutes beforehand helps it hold up better as you work it into the biscuit dough. This is also a great trick if you have warm hands and aren’t using a pastry cutter!
For even taller biscuits, place them right next to each other on the baking sheet. Doing so will actually help them rise higher by giving each biscuit some structural support as it rises. This will produce less crispy sides, so if you prefer a crisp biscuit all around, space them an inch or two apart.
Biscuit Recipe

Equipment
- Baking Sheet
- 2 ½-3 inch Biscuit cutter
Ingredients
- 4 cups all-purpose flour (480g)
- 2 tablespoons granulated sugar
- 1 tablespoon baking powder
- 2½ teaspoons salt
- 1 cup very cold unsalted butter cubed (227g)
- 1⅓ cups cold milk (320mL)
- melted butter for brushing (optional)
Instructions
- Preheat the oven to 425°F. Line a baking sheet with parchment paper.
- In a large bowl, whisk together the flour, sugar, baking powder, and salt.
- Toss in the cubed butter to coat with flour. Using a pastry blender or by rubbing the butter pieces between your fingers, work the butter into the flour until the butter pieces range in size from peas to almonds.
- Using a silicone spatula, fold the milk into the flour mixture, until most of the flour is moistened but the dough is still crumbly. (Don’t over mix it. It will come together in the next step.) Turn out onto a well-floured surface.
- With floured hands, pat the dough to a 1-inch thick rectangle. Fold the dough in half. (A bench scraper or large spatula can be helpful here!) Cut the dough in half crosswise and stack the two halves on top of each other. Pat the dough into a rectangle again. Repeat folding, cutting, stacking, and patting 3 more times.
- Roll the finished dough to a thickness of about ¾ to 1 inch and cut into biscuits using a 2½ to 3-inch round, floured cookie cutter. Place on prepared baking sheet. For best results, freeze the biscuits for 20 minutes.
- Bake for 20 minutes or until tops and bottoms are golden brown. Immediately brush with melted butter, if desired. Enjoy hot or cool completely on a wire rack. While biscuits are best fresh from the oven, you can store at room temperature for up to 3 days.
Notes
- Make sure the oven has reached 425°F before adding the biscuits. The immediate hot temperature will make sure the biscuits get nice and tall by steaming the butter.
Nutrition
Have you tried this recipe? Tag me today!
Mention @preppykitchen and tag #preppykitchen!
How to Store
Biscuits are best the day they’re baked, but they’ll keep in an airtight container at room temperature for up to 3 days. Reheat in a 350°F oven or air fryer for a few minutes to bring back the crisp edges.
How to Serve
A hot biscuit barely needs more than salted or honey butter and a spoonful of jam (raspberry and strawberry are the favorites in my house). Split and stack one with air fryer bacon, cheese, and a scrambled egg for the best breakfast sandwich, or go all in and smother them in sausage gravy.
Frequently Asked Questions
No. This recipe uses whole milk, so you don’t need a special ingredient, and it bakes up just as tall and very tender. If you prefer the buttermilk tang, swap it one-for-one, or stir a tablespoon of lemon juice into a cup of milk and let it sit for 5 minutes for a quick substitute. Buttermilk will make them slightly more tender, but the biscuits are very good without it.
Yes. Freeze the unbaked cut biscuits on a lined baking sheet until solid, then bag them and freeze for up to 3 months. You can bake them straight from frozen, adding about 5 minutes, or thaw them in the fridge overnight. Freezing before baking actually helps, since the butter goes into the oven extra cold.
Nope! Pat the dough into a 9-inch square and cut it into thirds in both directions, making 3-inch squares. Use a large, sharp knife or bench scraper, again, pressing straight down. Square biscuits waste no scraps and rise just as tall.
More Biscuit Recipes to Try
- Drop Biscuits — the no-roll, no-cut version: scoop straight onto the pan and bake in under 30 minutes.
- Cheddar Biscuits — stir-together biscuits packed with gooey cheese. Great for dinner or a bread basket.
- Buttermilk Biscuits — the tangy, classic buttermilk version that is perfect finished with honey butter.
- Strawberry Shortcake — a flaky biscuit base piled with whipped cream and juicy fresh strawberries.
- Sourdough Biscuits — these flaky biscuits use sourdough discard in place of buttermilk for a tangy take on the classic.
If you’ve tried this biscuit recipe, then don’t forget to rate it and let me know how you got on in the comments below. I love hearing from you!


