
This post may contain affiliate links. Please read our disclosure policy.


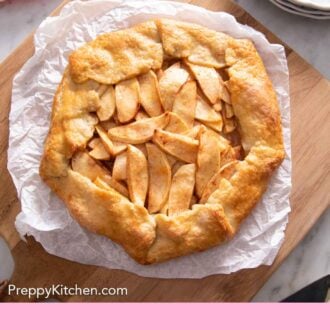
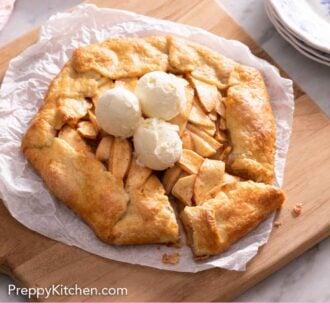
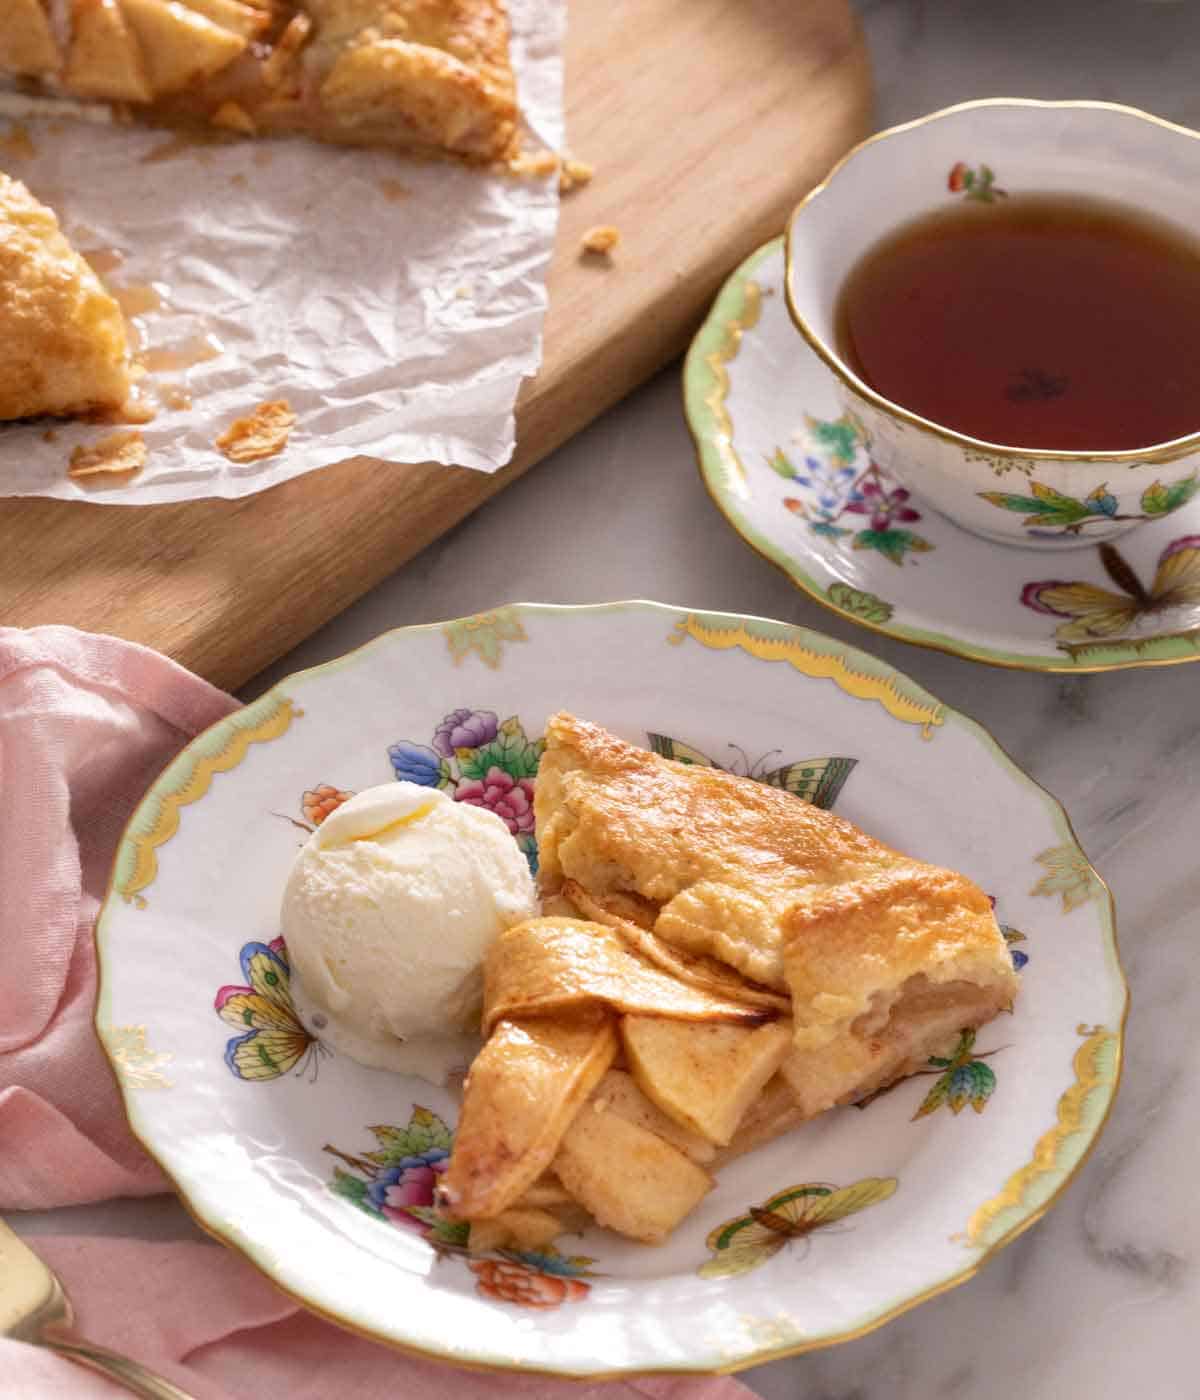
This comforting apple galette recipe is perfect for fall apple season! The sweet, cinnamon-kissed fresh apple filling is wrapped in a buttery, flaky crust. It’s super easy to make and is begging to be topped with a big scoop of vanilla ice cream.

“I made your galette this weekend and loved how easy it was! The simple folding of the crust was very easy to do and it turned out very flakey. I used Granny Smith apples and they were tender but didn’t lose their texture. Great recipe!”
Jackie
If you feel intimidated by making a classic pie, try my apple galette recipe instead! I developed this recipe to be easy to make and achieve delicious results regardless of your skill level as a baker. This rustic, free-form pie has all the warmth and glorious apple flavors you’re looking for in an apple pie, but with a fraction of the effort.
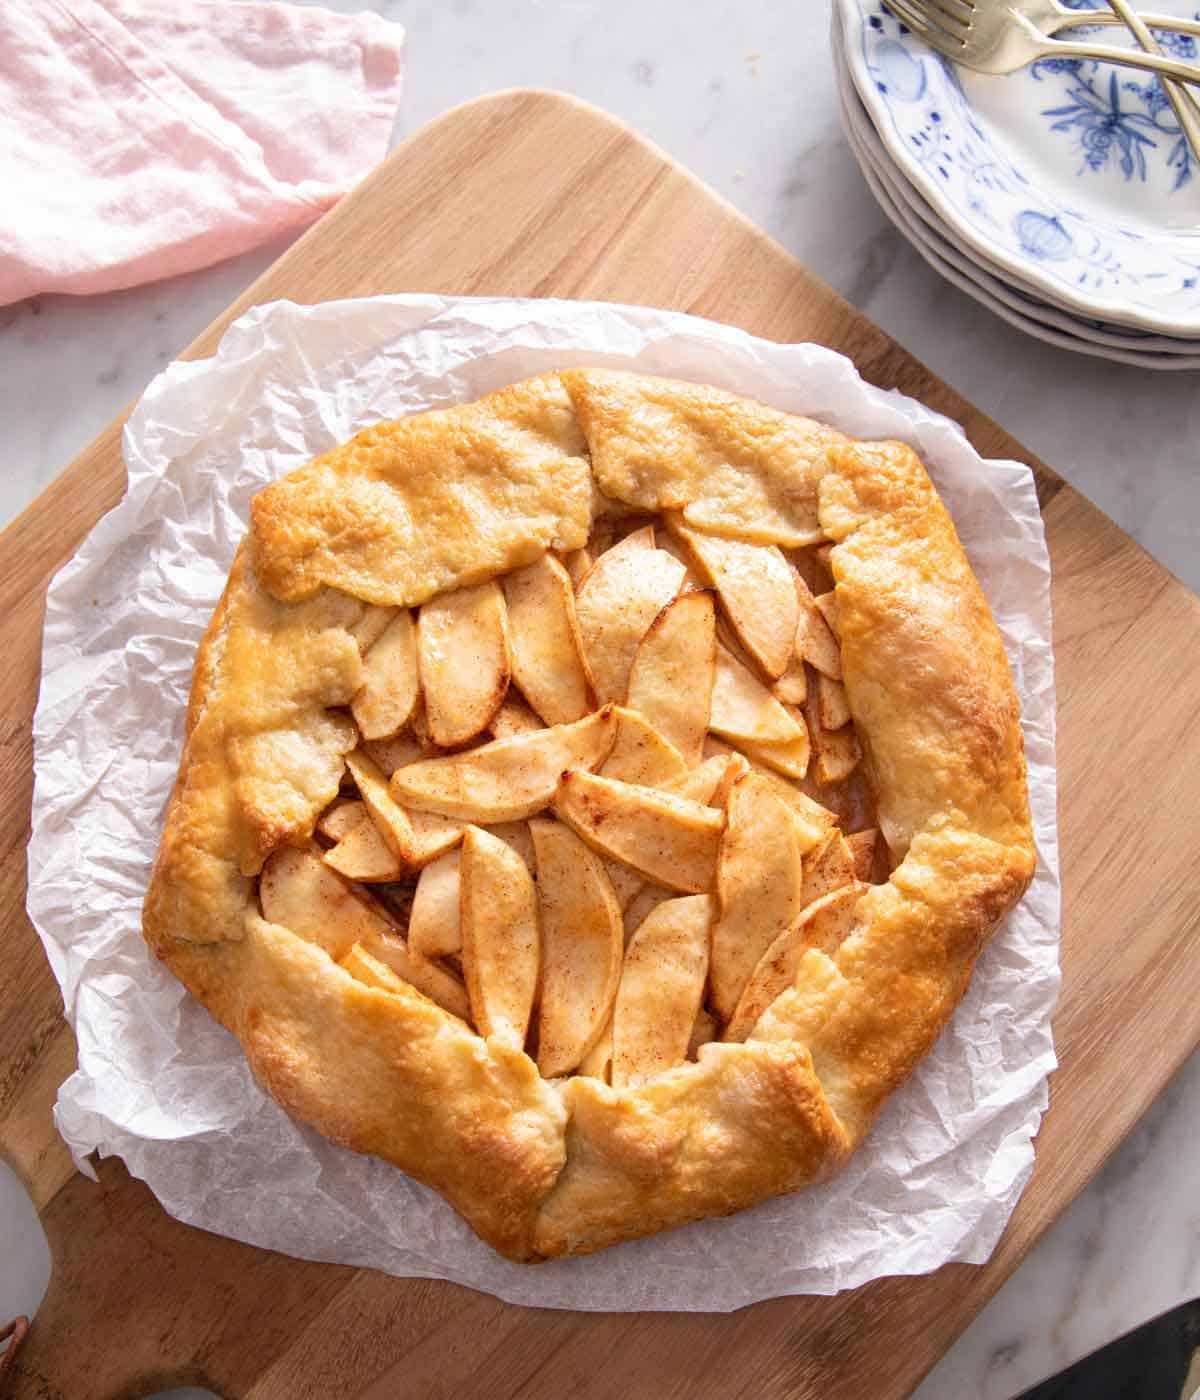
A galette’s beauty lies in its simplicity. The unfussy folds of crust over the lightly spiced apple filling are very forgiving. Any less-than-perfect crimps are basically unnoticeable and simply add to its appeal. I made the filling super easy, too. Simply tossing fresh apples with sugar and spices means you don’t have to cook anything beforehand. Plus, you bake it right on a sheet pan, so you don’t even need a pie pan!
What’s The Difference Between A Pie And A Galette?
Think of a galette as a rustic, free-form pie. It only has a bottom crust consisting of dough rolled into a circle and then folded over the filling (but the dough does not cover the filling completely). Galettes are baked on baking sheets, not in pie pans.
Pies like apple pie require a bit more precision. They are baked in a pie dish and commonly have a top and a bottom crust. Pies also usually have some sort of decoration involved, be it a carefully woven lattice top or decorative crimped edges.
Key Ingredients
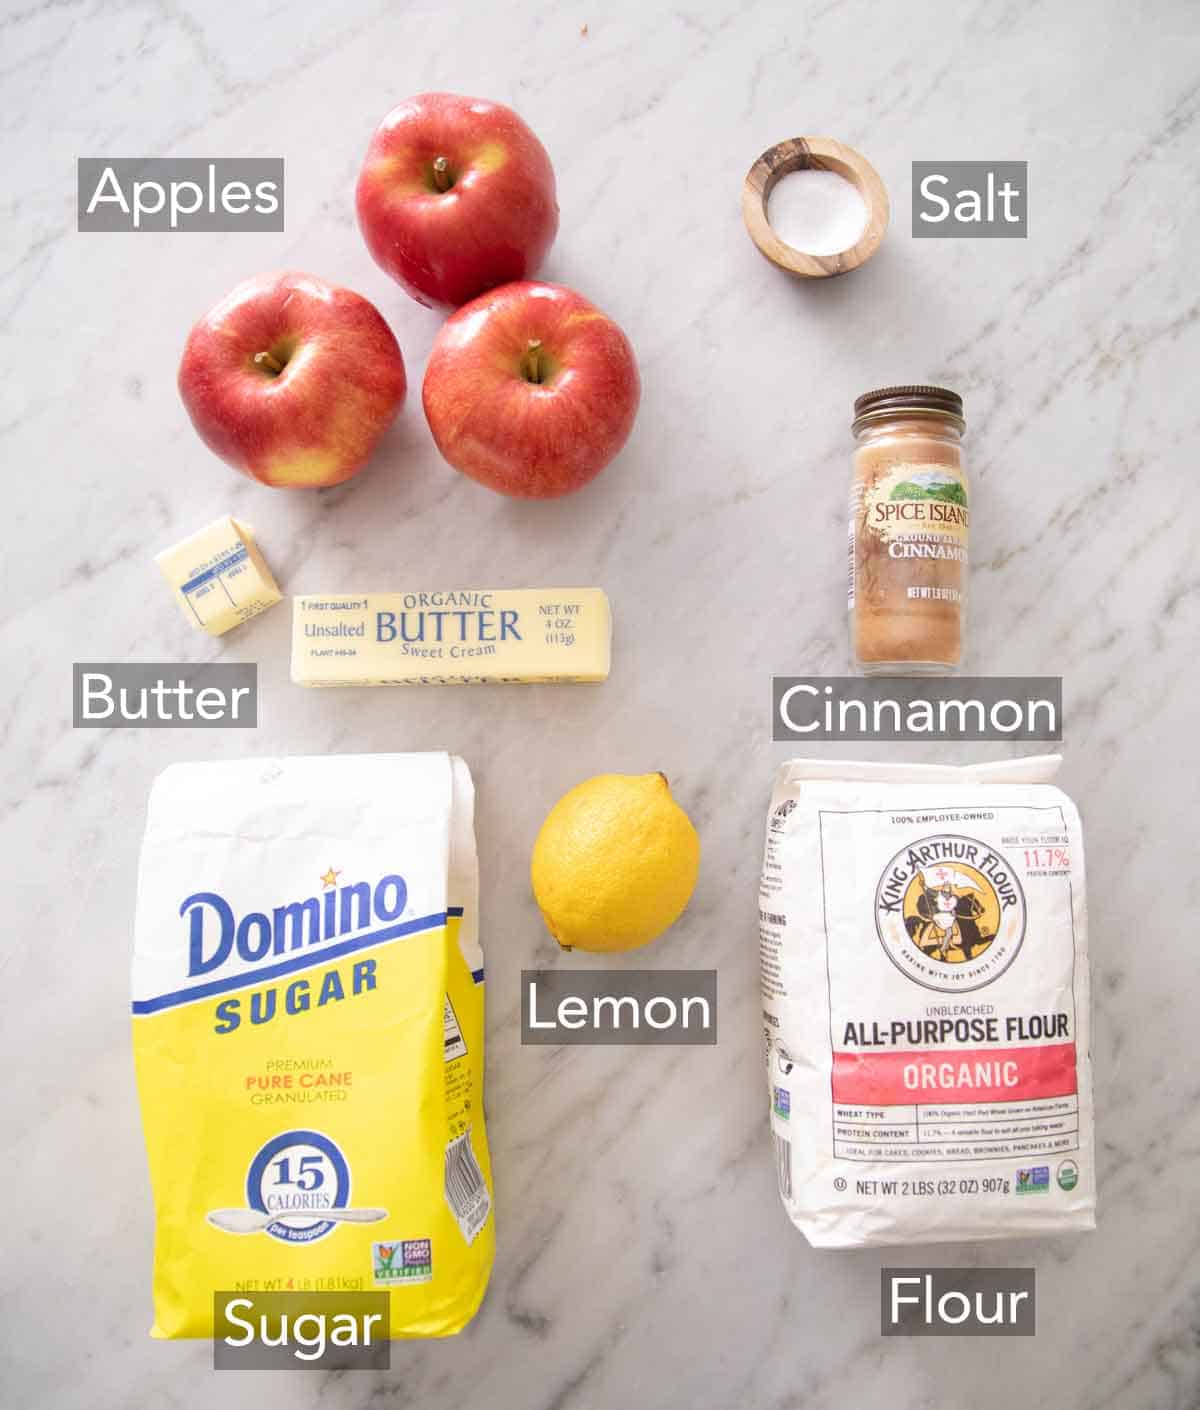
Here are the main ingredients you’ll need to make the best apple galette. You can find the full list of ingredients in the recipe card below.
Apples — peel a few large baking apples (the best apples to use are listed below) and slice them evenly for the filling. Apple slices that are all relatively the same thickness will help the filling cook up more evenly.
Lemon juice — fresh lemon juice brightens up the apple filling, enhancing the fresh flavor of the fruit.
Sugar — you need granulated sugar for the apple filling, and coarse sugar to sprinkle on the crust before baking for a little crunch. If you want a more caramel-like flavor in the filling, feel free to swap the granulated sugar for light or dark brown sugar!
Cinnamon — ground cinnamon adds warmth and cozy flavor to the fresh, sliced apples. Feel free to add a few sprinkles of other baking spices you love to play with the flavor!
Galette dough — for the crust, you will need to cube unsalted butter and keep it cold for maximum flakiness. (Cold butter steams in the hot oven, producing those delicate, desirable flakes!) Work it into the all-purpose flour with a little bit of sugar, salt, and cold water, and you’ll have a crust in just a few easy steps. This technique is very similar to my pie crust recipe– check out the post for more details and tips for making the flakiest crust!
Choosing The Best Apple For Your Galette
The best apples to use are ones that will hold up when baked and not turn mushy or grainy. You should also enjoy the flavor of the apples you bake with! When I tested this recipe, I discovered my favorite apples to use in this apple galette are Granny Smith, Pink Lady, and Honeycrisp.
Granny Smith and Pink Lady apples are quite tart, so you get the ideal sweet-tart balance when you make the filling. Honeycrisp apples are sweeter and a good option if you prefer a sweeter dessert. You can use one variety or a combination! These three varieties hold their shape well when baked, so you end up with a filling that is tender but still has some texture. Also, if you prefer a different variety of apples, use it. This recipe is very adaptable and works with any type!

Can I Use Puff Pastry Instead Of The Galette Dough?
A reader comment prompted this question, and I had my executive editor Sarah cross-test it to see if it works. Her findings were that, yes, you can use 1 (16-ounce) sheet of thawed store-bought frozen puff pastry or homemade puff pastry to make an apple galette! Roll it into a 12-inch square and trim off the edges to form a rough circle. If you buy a box of frozen puff pastry with two sheets (about 8.5 ounces each), brush one very lightly with water, stack them together, and roll them out.
She found that the puff pastry didn’t hold the folds as well, and the sides of the galette opened up more during baking than pie dough, given the natural extra-flakiness of puff pastry. But the results were delicious! Puff pastry offers a more delicate crust than the homemade galette dough. Both are flaky and delicious in their own way, so feel free to use whichever you wish!
Pro Tips For Making The Best Apple Galette
Weigh the flour. This is the easiest way to avoid using too much flour, which will yield a dry, crumbly crust. If you don’t have a kitchen scale, fluff your flour with a spoon in its container, spoon it into your measuring cup, and use a knife to level it off.
If you don’t have a food processor: Make the dough by hand using a pastry cutter or your hands. Combine the flour, sugar, and salt. Add the cubed butter and work it into the flour until the mixture is very crumbly. Stir in the water with a fork and gently knead the dough into one large mass. Wrap and chill as directed.
If the chilled pie crust dough starts to tear and crack when you’re rolling it out, let it rest for a few minutes at room temperature before trying to roll it again. Also, turn the pie crust a few times when you roll it out to keep it from sticking to the surface.
Peel the apples. While not completely necessary, peeling the apples before slicing them makes a world of difference to the texture of the filling once the apples bake. The peels tend to become wrinkly and rubbery in the oven, which I prefer to avoid.
Don’t overfill the crust. Lay the apple slices out in an even layer. If there is too much apple filling, the crust may not bake properly and become soggy, and the filling may bubble over.
Refrigerate the galette once you assemble it: This optional step helps the butter in the pastry dough firm up so that the galette holds its shape nicely and the crust is flaky when baked. It can be refrigerated for up to 2 hours before baking.
How To Make An Apple Galette
Here are helpful process images along with steps for making the apple galette. You can find the detailed instructions in the recipe card below.
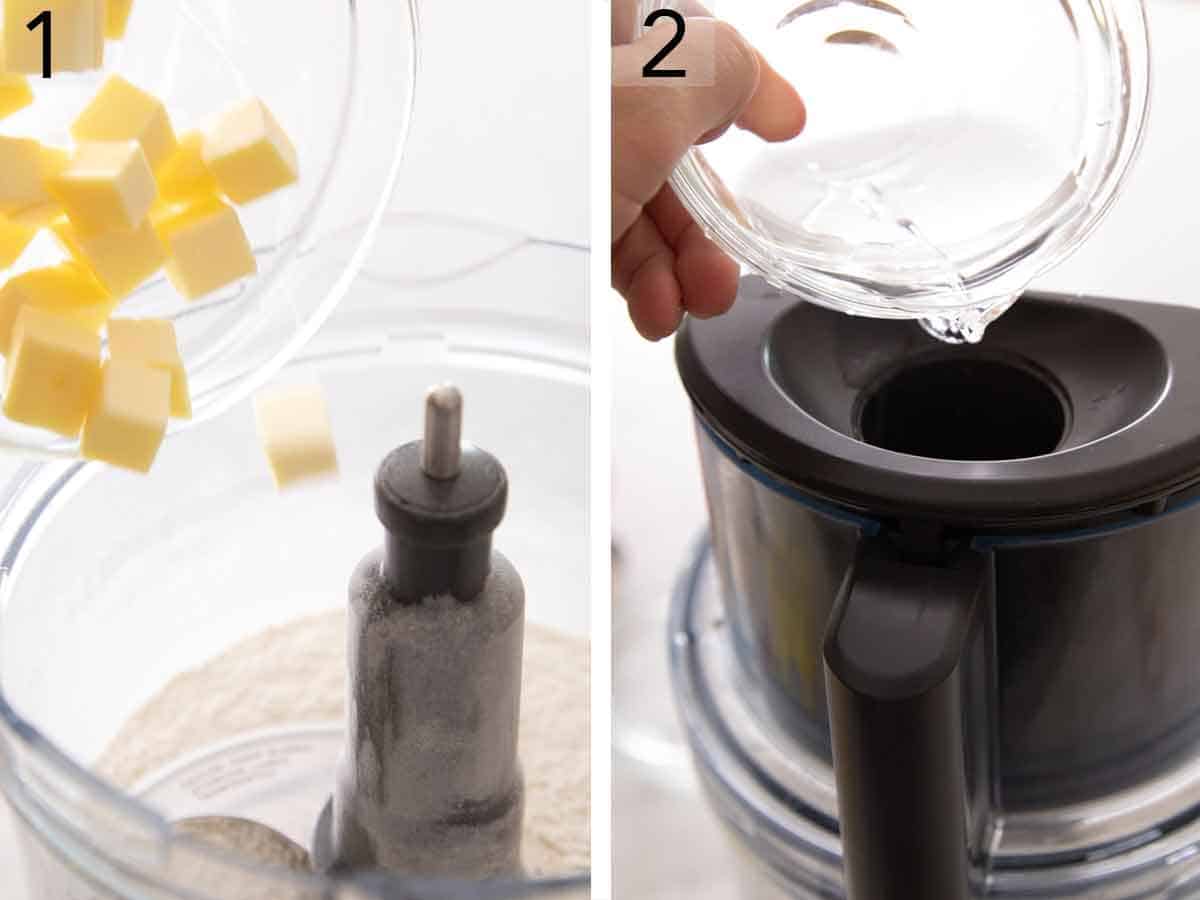
1. Combine the dry crust ingredients– flour, white sugar, and salt– in a food processor, then pulse to combine. Add the cubed butter and pulse a few times to break the pieces down. (They should be about the size of a nickel.)
2. While pulsing, drizzle in 4 tablespoons of ice water.
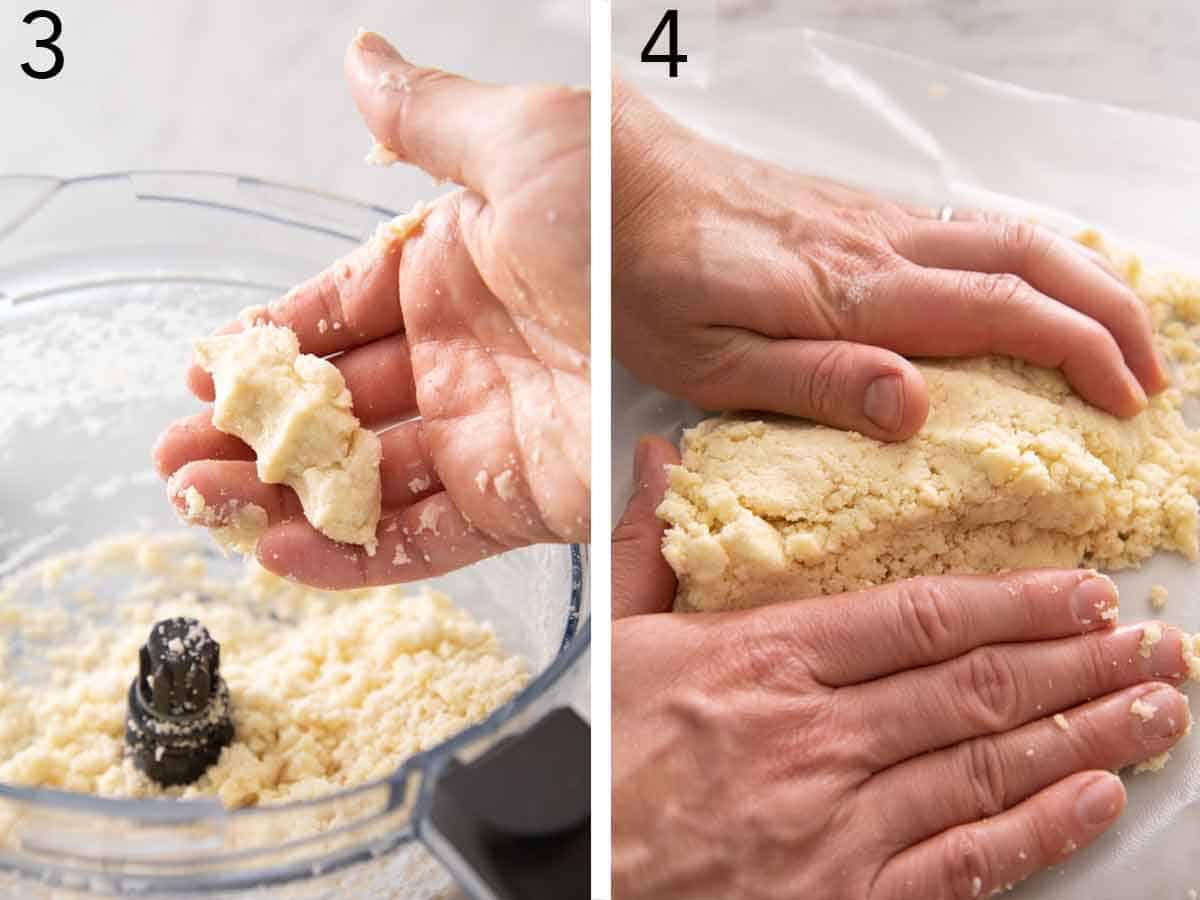
3. Continue to pulse until the flour mixture starts to clump together.
4. Turn out the dough onto a lightly floured surface and lightly knead it together just to form a single ball. Shape it into a disk and wrap it tightly in plastic wrap. Chill for at least 2 hours or for up to 3 days.
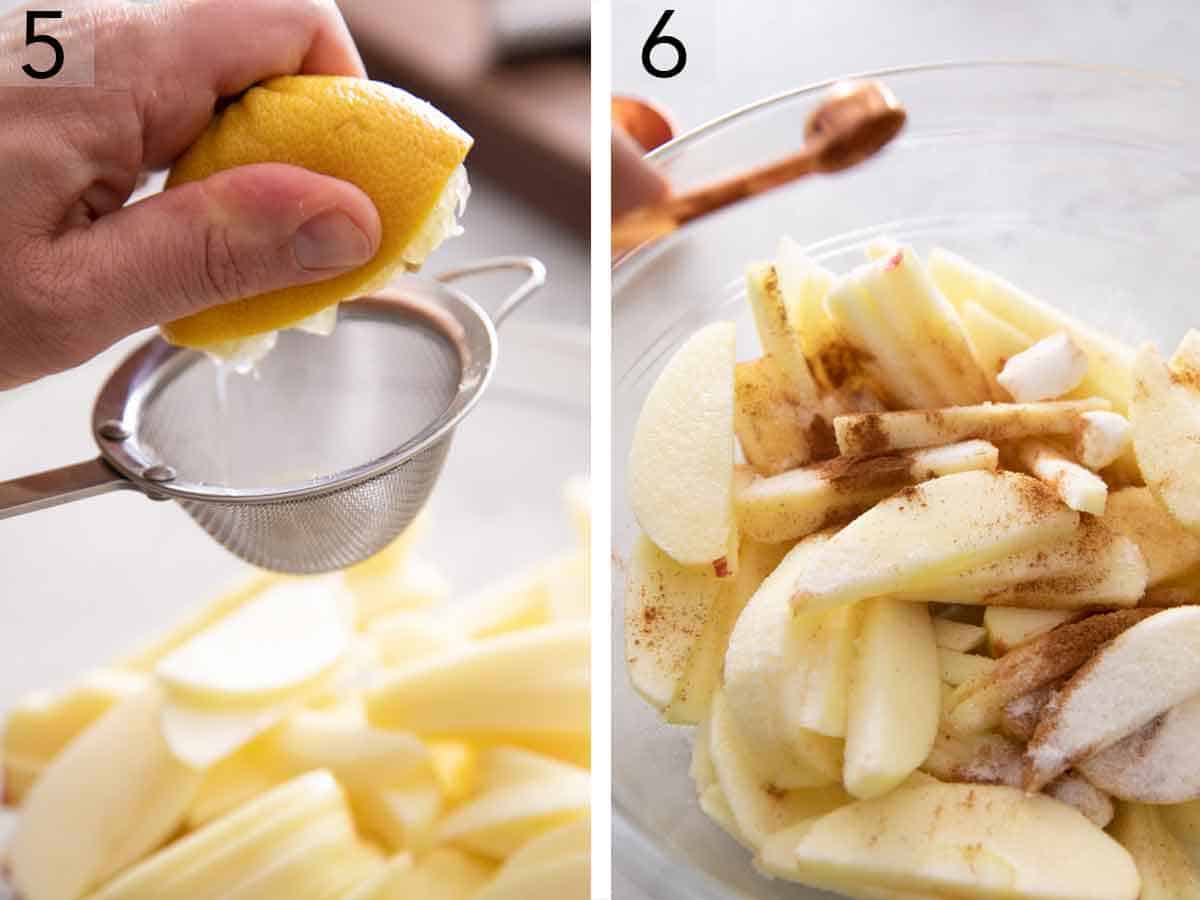
5. Wash, peel, core, and cut the apples into ⅛-inch thick slices. Place the sliced apples in a large bowl, and toss with lemon juice.
6. Sprinkle the apples with sugar and cinnamon and toss until they are well coated. Set aside.
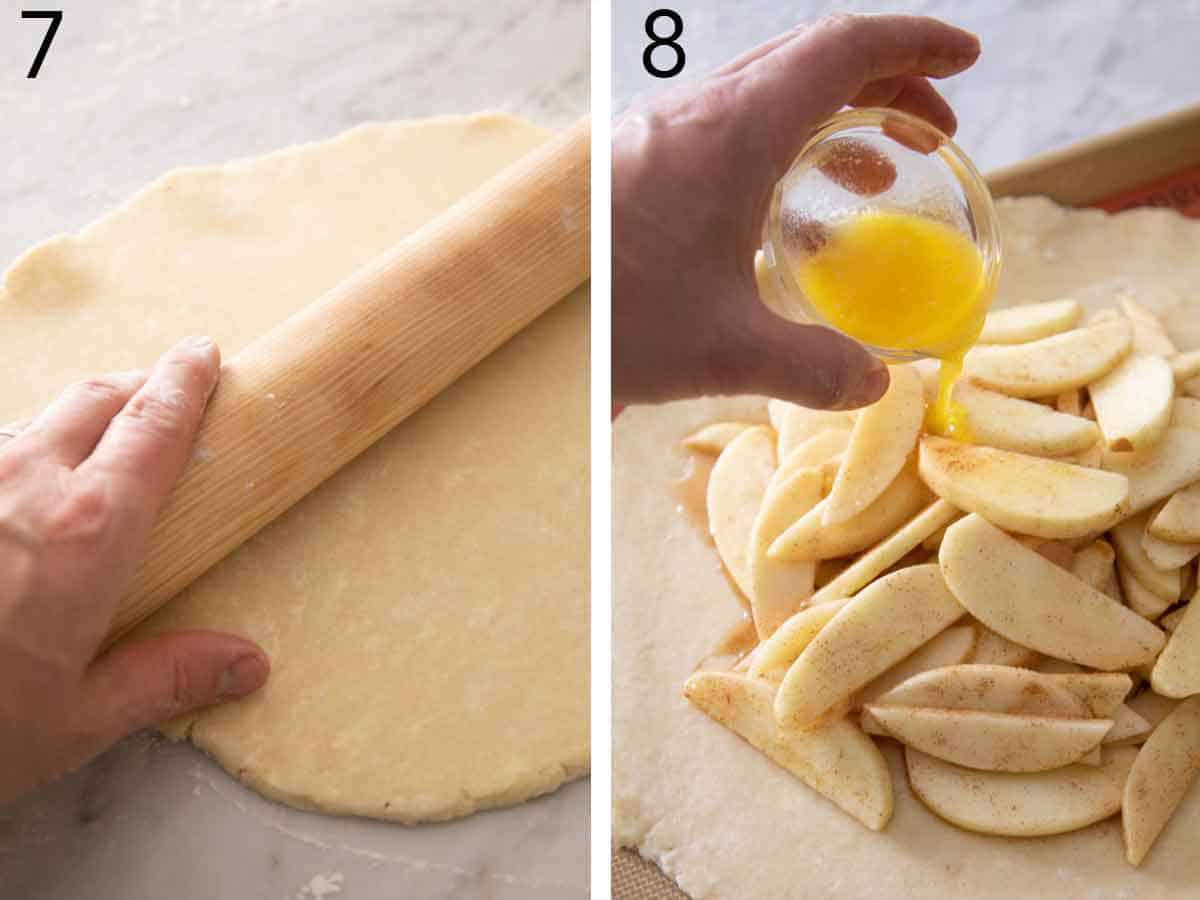
7. On a lightly floured surface, roll the chilled pie dough into roughly a 12-inch circle with a rolling pin. (I like to let my pie dough sit out for 10 to 15 minutes before rolling if it’s been chilling for a long time.) Line a baking sheet with parchment paper or a silicone baking mat. Transfer the dough to the lined baking sheet. (The dough will likely hang over the edges. Don’t worry about this, as it will fit once you fold the dough over the filling later on!)
8. Place the apple galette filling in the center of the dough, leaving a 3-inch border all around. Drizzle the apples with the melted butter.
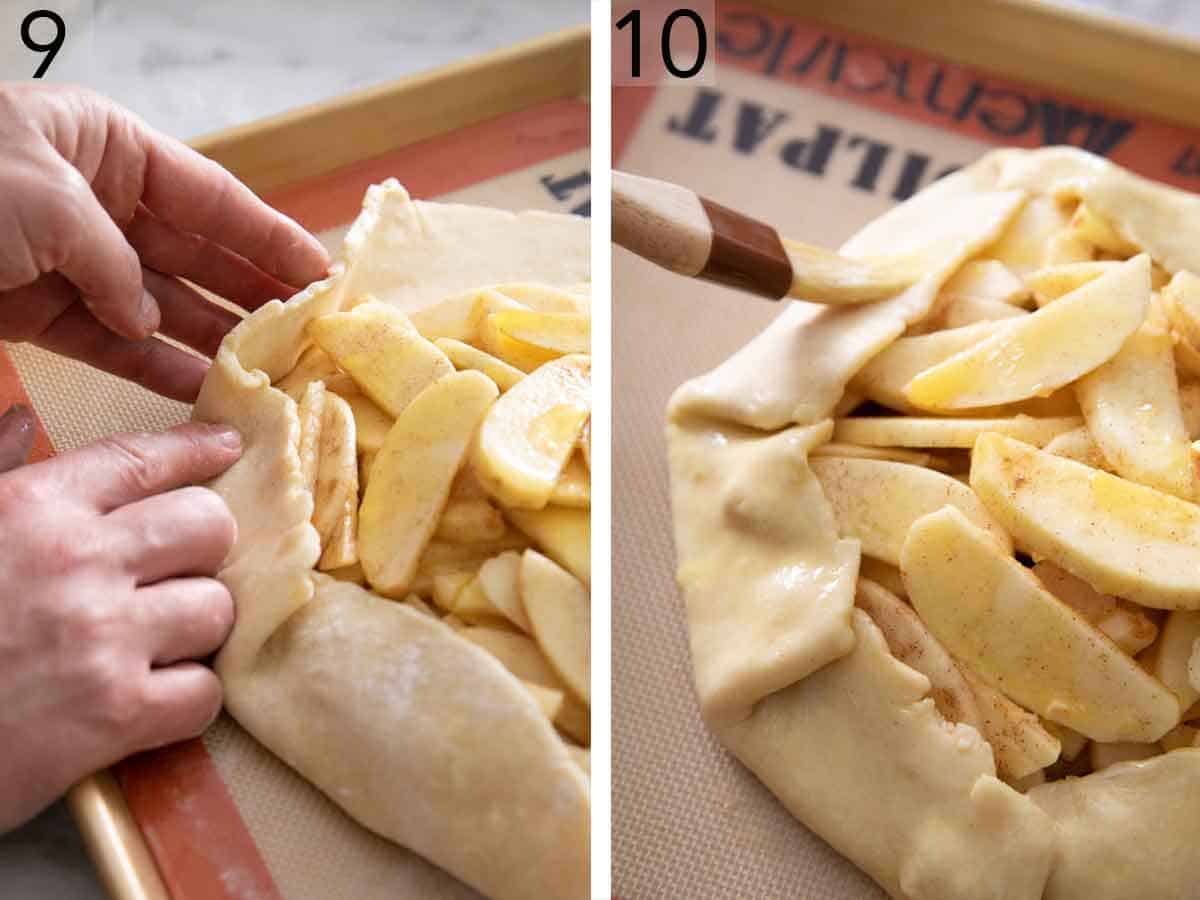
9. Fold the edges of the dough over the filling towards the center. The dough will not fully cover the filling, so don’t try to force it. The folds should be rustic and not decorative, so don’t fuss over them too much!
10. Brush the dough with the beaten egg and sprinkle it with coarse sugar for a little sparkle and added sweetness. Bake at 400°F for 45 minutes or until the crust is golden brown and the galette filling is bubbly. Let the dessert cool on a wire rack for at least 30 minutes before slicing.
Apple Galette Recipe

Equipment
- Baking Sheet
- Rolling Pin
Ingredients
For the Pie Dough:
- 1 ½ cups all-purpose flour (180g)
- 2 tablespoons granulated sugar
- ½ teaspoon salt
- ½ cup cold unsalted butter cubed (113g)
- 4 tablespoons ice water
For the Apple Filling:
- 2 to 3 large baking apples
- 1 tablespoon lemon juice
- ¼ cup granulated sugar (50g)
- ½ teaspoon cinnamon
Assembly:
- 2 tablespoons butter melted
- 1 egg beaten
- Coarse sugar for sprinkling
Instructions
For the Pie Dough:
- In a food processor, combine flour, sugar, and salt. Pulse to combine. Add the butter and pulse a few times just to break the pieces down a bit.
- While pulsing, drizzle in 4 tablespoons of ice water. Pulse until dough starts to clump together. Turn out dough onto a lightly floured surface and knead together to form a ball. Shape into a disk and tightly wrap in plastic wrap. Chill for at least 2 hours or up to 3 days.
For the Apple Filling:
- Preheat the oven to 400°F. Line a baking sheet with parchment paper or a silicone baking mat.
- Peel, core, and slice the apples into ⅛-inch thick slices. Place in a large bowl. Toss with lemon juice until well coated.
- Sprinkle apples with sugar and cinnamon and toss until combined.
For the Assembly:
- On a lightly floured surface, roll pie dough into roughly a 12-inch circle. Transfer to the lined baking sheet (the dough will likely hang over the edges.) Arrange the apple filling in the center of the dough, leaving a 3-inch border. Drizzle the apples with melted butter.
- Fold the edges of the dough over the filling towards the center. (The dough will not fully cover the filling). Brush the dough with egg and sprinkle with sugar.
- Bake for 45 minutes or until crust is golden brown and filling is bubbly. Let cool on a wire rack for at least 30 minutes before slicing.
Notes
- Don’t skip the final cooling before slicing the galette. While it is delicious eaten warm, it does need a bit of time to let the juices set before you cut into it. It will still be warm after 30 minutes!
Nutrition
Have you tried this recipe? Tag me today!
Mention @preppykitchen and tag #preppykitchen!
Serving Suggestions
You can serve this apple galette as-is, and it will be delicious. But if you want to add a little something extra, here are some ideas:
- Brush the apple filling of the baked galette with warm apple jelly or apricot preserves for a glossy finish.
- Drizzle with salted caramel sauce.
- Add a big scoop of vanilla ice cream or a dollop of whipped cream.
Make-Ahead And Storage Tips
Make ahead: To save time on the day you plan on serving this dessert, make the dough up to 3 days in advance and store it, tightly wrapped in plastic wrap, in the refrigerator. All that’s left to do is roll out the chilled dough and make the filling!
Storing leftovers: While this apple galette tastes the best the day you make it, leftovers will keep, covered, on the counter for a day, or refrigerated for up to 4 days. Reheat the galette in the oven at 350°F for 10 to 15 minutes before enjoying leftovers.
Freezing leftovers: You can also freeze the baked galette. Once it cools completely, freeze it on a baking sheet until solid, and then wrap it tightly in plastic wrap and aluminum foil. Store in a freezer bag or a freezer-safe container for up to 3 months. Thaw on the counter for a few hours before reheating it in the oven at 350°F until warmed through.
Frequently Asked Questions
If you overstuff the crust with apple filling, the dough will not bake properly, and you will end up with a soggy bottom. It’s also best not to wait too long after assembling the galette to bake it. To help it hold its shape in the oven, you can refrigerate it for a maximum of 2 hours after assembling, but not longer than that.
If you’re nervous about the bottom not being crisp, position an oven rack in the bottom third before preheating it. Bake the galette on that rack so the bottom of the crust is closer to the hottest part of the oven. In recipe testing, I found that this galette baked up great on the center rack. But baking in the bottom third is a little trick I do when I’m certain of how an oven cooks, or if I just want a bit of extra baking insurance!
To freeze the galette before baking, assemble it, but do not brush it with egg wash or sprinkle it with coarse sugar. Freeze on a baking sheet until solid, then wrap it in plastic wrap and foil and transfer to a freezer bag or freezer-safe container. You can freeze the apple galette for up to 3 months.
When you’re ready to bake it, no need to thaw it out. Brush the frozen unbaked galette with egg wash, sprinkle the dough with coarse sugar, and bake as directed in the recipe. Add about 10 to 15 minutes to the bake time to account for the galette being frozen.
More Apple Desserts To Try
If you enjoyed this apple galette recipe, try one of my other favorite apple dessert recipes!
My homemade apple tart is a simple take on the French classic, with a buttery crust, fresh sliced apples and cinnamon sugar sprinkled on top.
Skillet fried apples are one of the easiest apple recipes to make. Serve them over ice cream or a slice of pound cake!
My apple fritters whip up in just 30 minutes, are packed with fresh apples, and coated in a sweet glaze.
If you’ve tried this apple galette recipe, then don’t forget to rate it and let me know how you got on in the comments below. I love hearing from you!


