
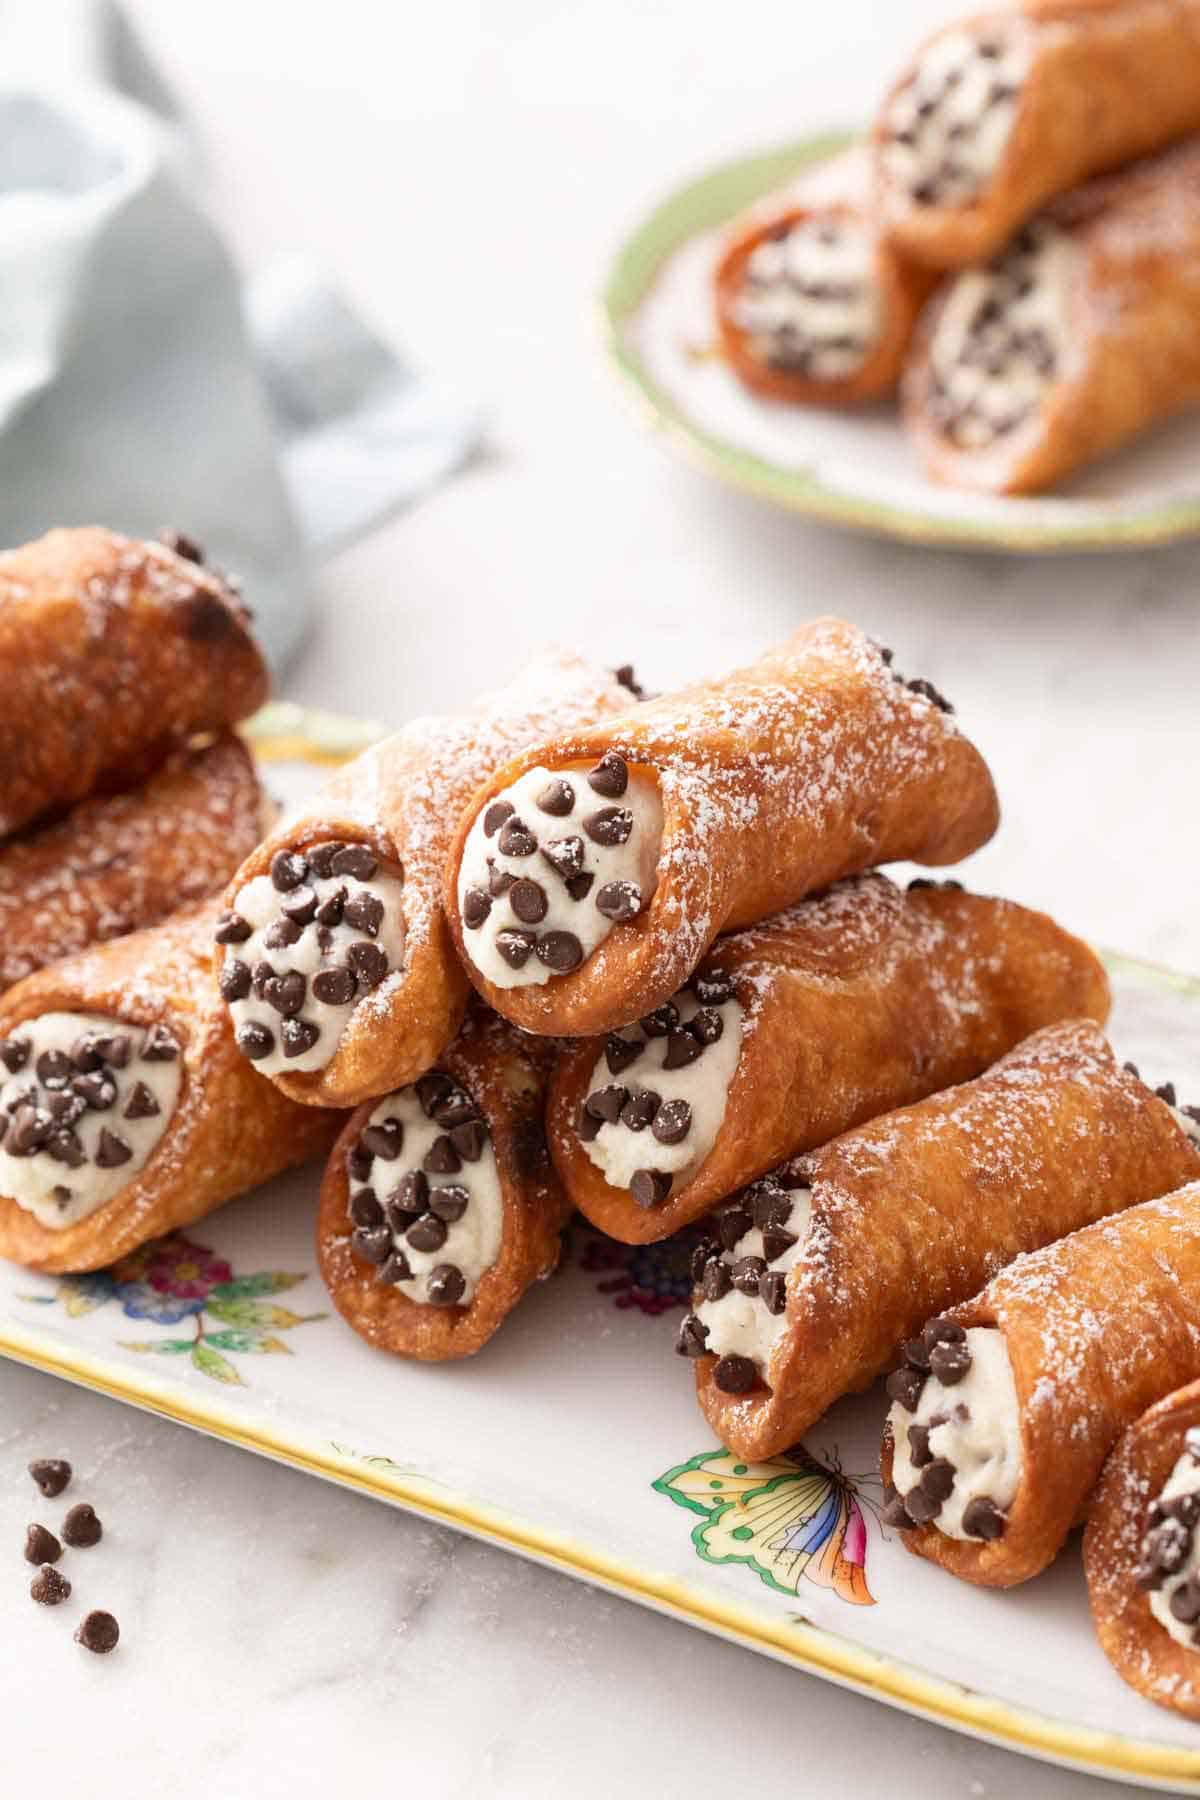
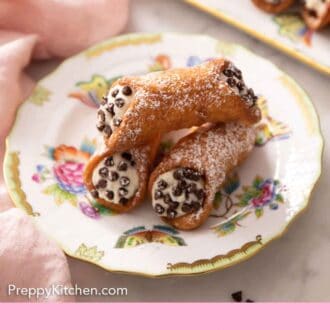


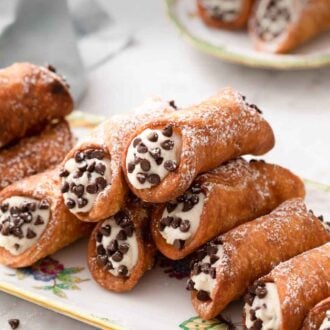
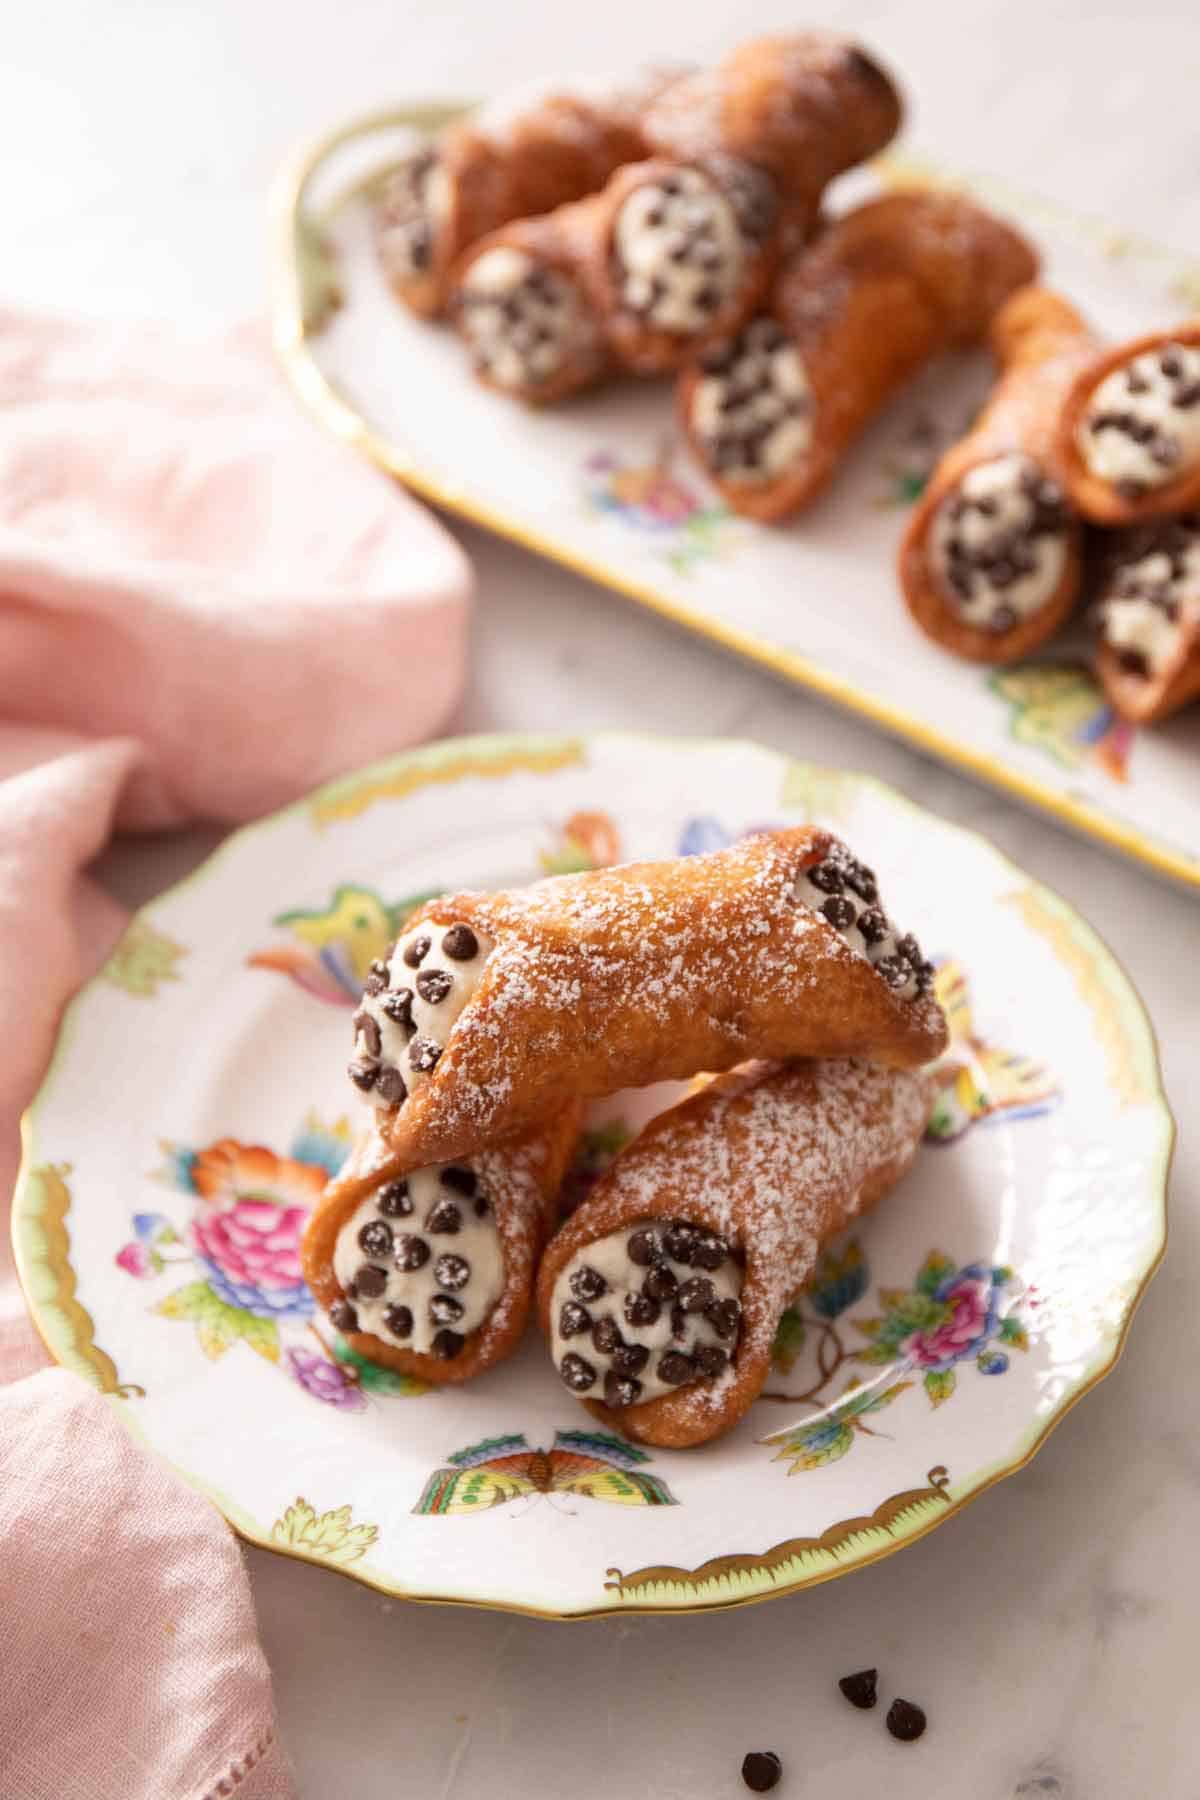
Cannoli is an Italian pastry composed of a light, crisp tube-shaped shell filled with a dreamy ricotta filling. My version is studded with chocolate chips and scented with cinnamon and vanilla. While there are a few steps to making cannoli, I rigorously tested this recipe to create a step-by-step guide that answers all your questions and makes the process easier than you’d think!
One of my main tips is to use a deep-fry thermometer. The temperature of the frying oil is absolutely vital for perfectly golden brown cannoli shells that are crisp and never burned or soggy.
A reader, Donna, says: “These were easy to make and delicious! The dough rolled out beautifully after 2 hrs of resting time. I also added a few drops of anise oil as I am used to the taste of anise in the filling. Best cannoli dough recipe I have used.” ★★★★★
Table of Contents
Key Ingredients & Substitutions For Cannolis
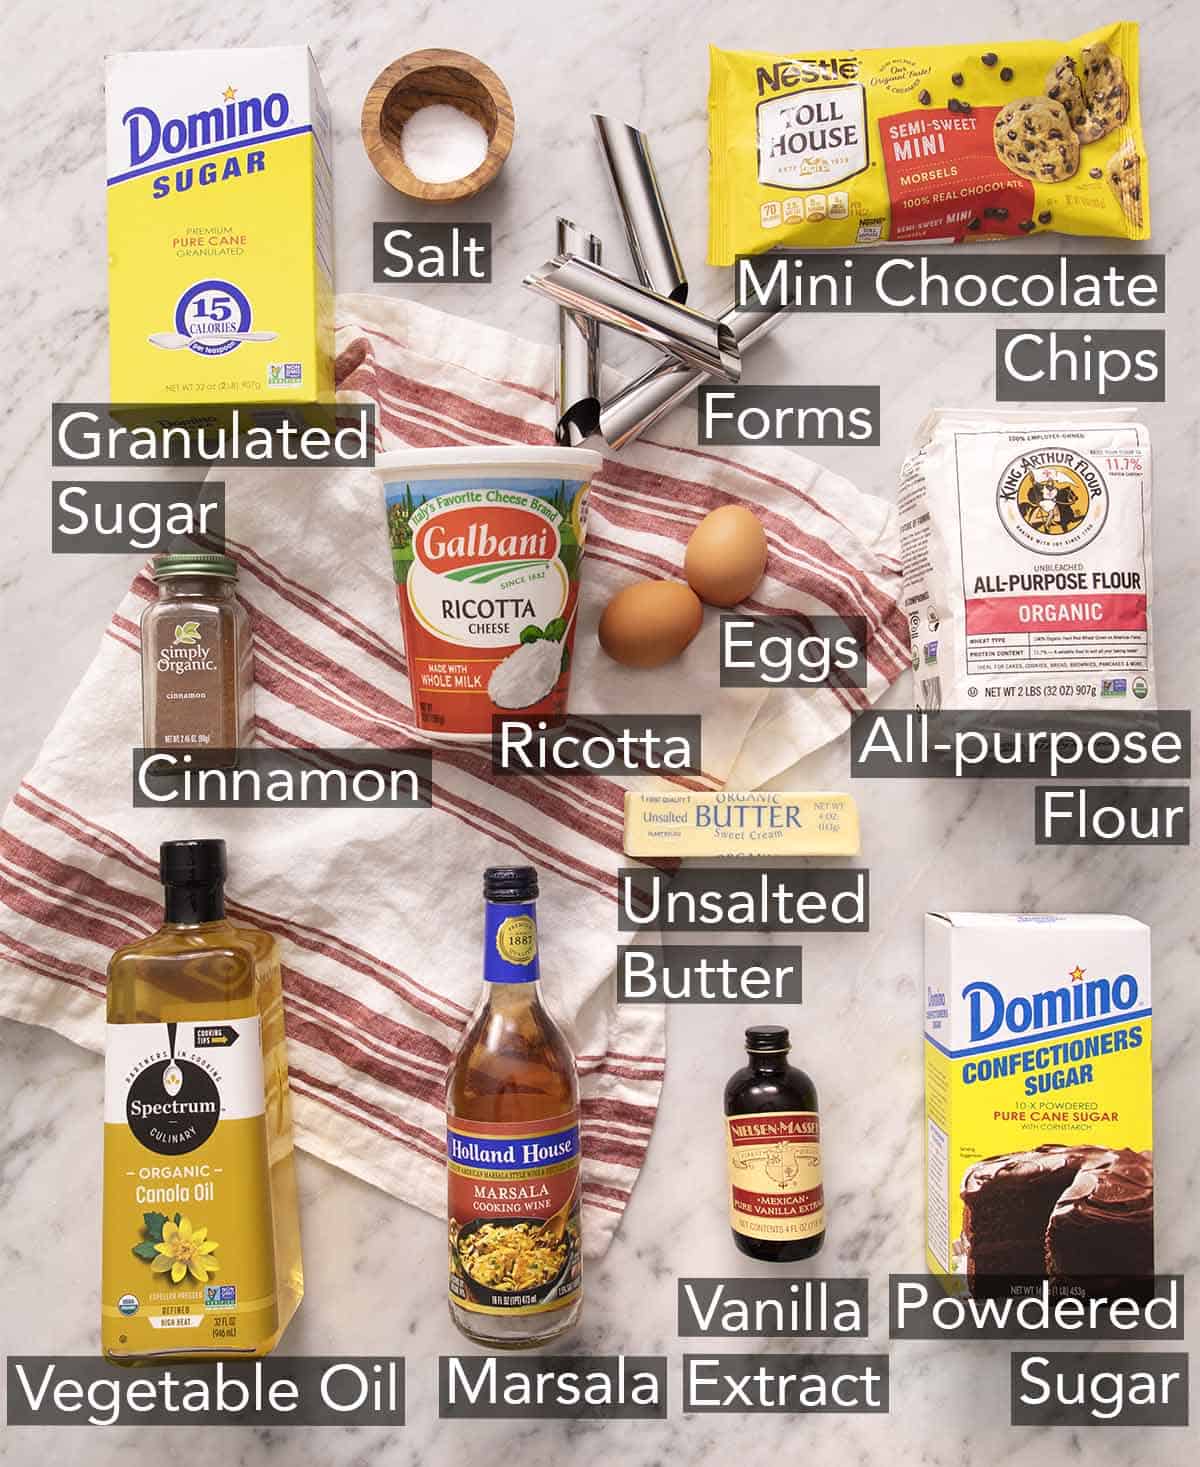
These are the main ingredients you need to make the best cannoli. You can find the full list of ingredients and measurements in the recipe card below.
Sugar — a small amount of granulated sugar sweetens the cannoli shells and helps them brown in the oil. You don’t want too much sugar in the shells since the cannoli filling is plenty sweet!
Butter — cold butter is cut into the flour, so you end up with a cannoli dough that fries up crispy and flaky.
Marsala wine — the special ingredient in the cannoli dough! Marsala wine makes the shells crispy and flaky by controlling the gluten development in the flour. See the FAQ section for both alcoholic and non-alcoholic substitutes for the wine.
Oil — use a neutral oil with a high smoke point for frying, like vegetable oil, canola oil, or grapeseed oil.
Ricotta cheese — I recommend whole milk ricotta, not 2% or skim, for the richest flavor in the filling. You can replace up to half of the ricotta with mascarpone if you like. Just mix it into the drained ricotta cheese in Step 4 of the recipe.
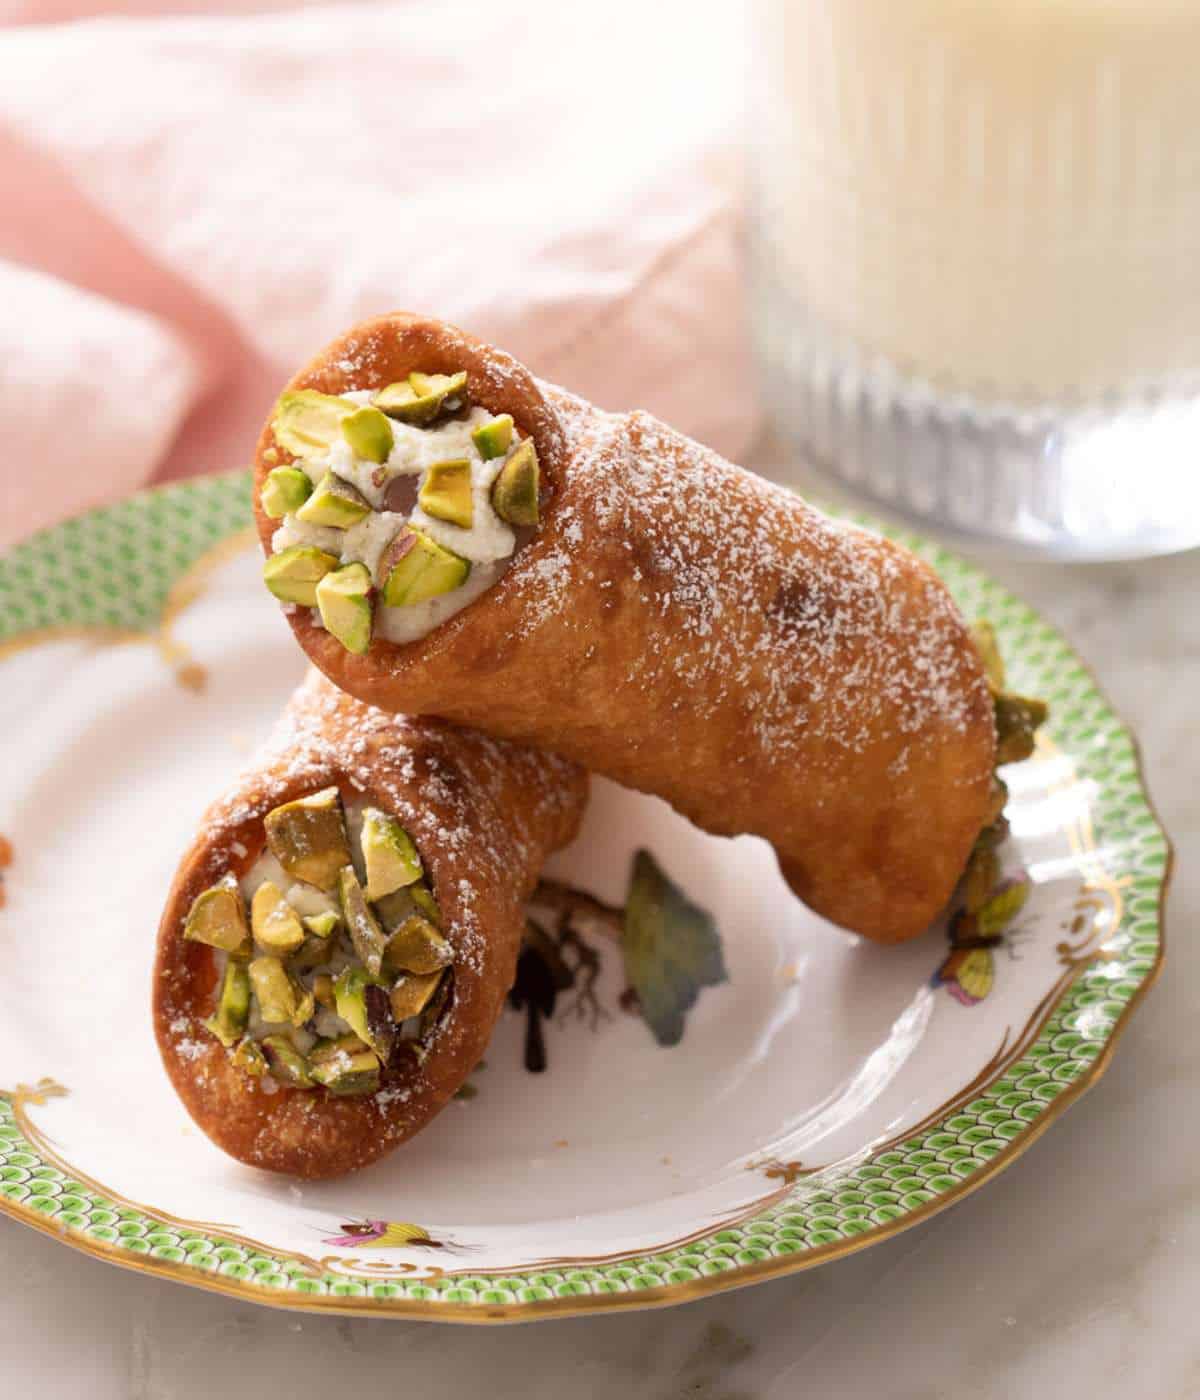
Powdered sugar — confectioner’s sugar adds plenty of sweetness, and also structure and stability, to the rich cannoli filling. I like to garnish my filled cannoli with a light dusting as well, just before serving them.
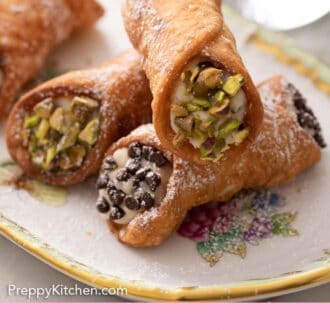
Chocolate — semisweet mini chocolate chips are my favorite for the filling, but you can also use dark chocolate for a deeper flavor. Or finely chop your favorite chocolate bar!
Flavor Variations
You can add a bit of additional flavor to the shells by adding a splash of vanilla extract or anise extract. Add delightful light citrus notes to the ricotta filling by stirring 1 teaspoon of fresh orange zest or lemon zest into it.
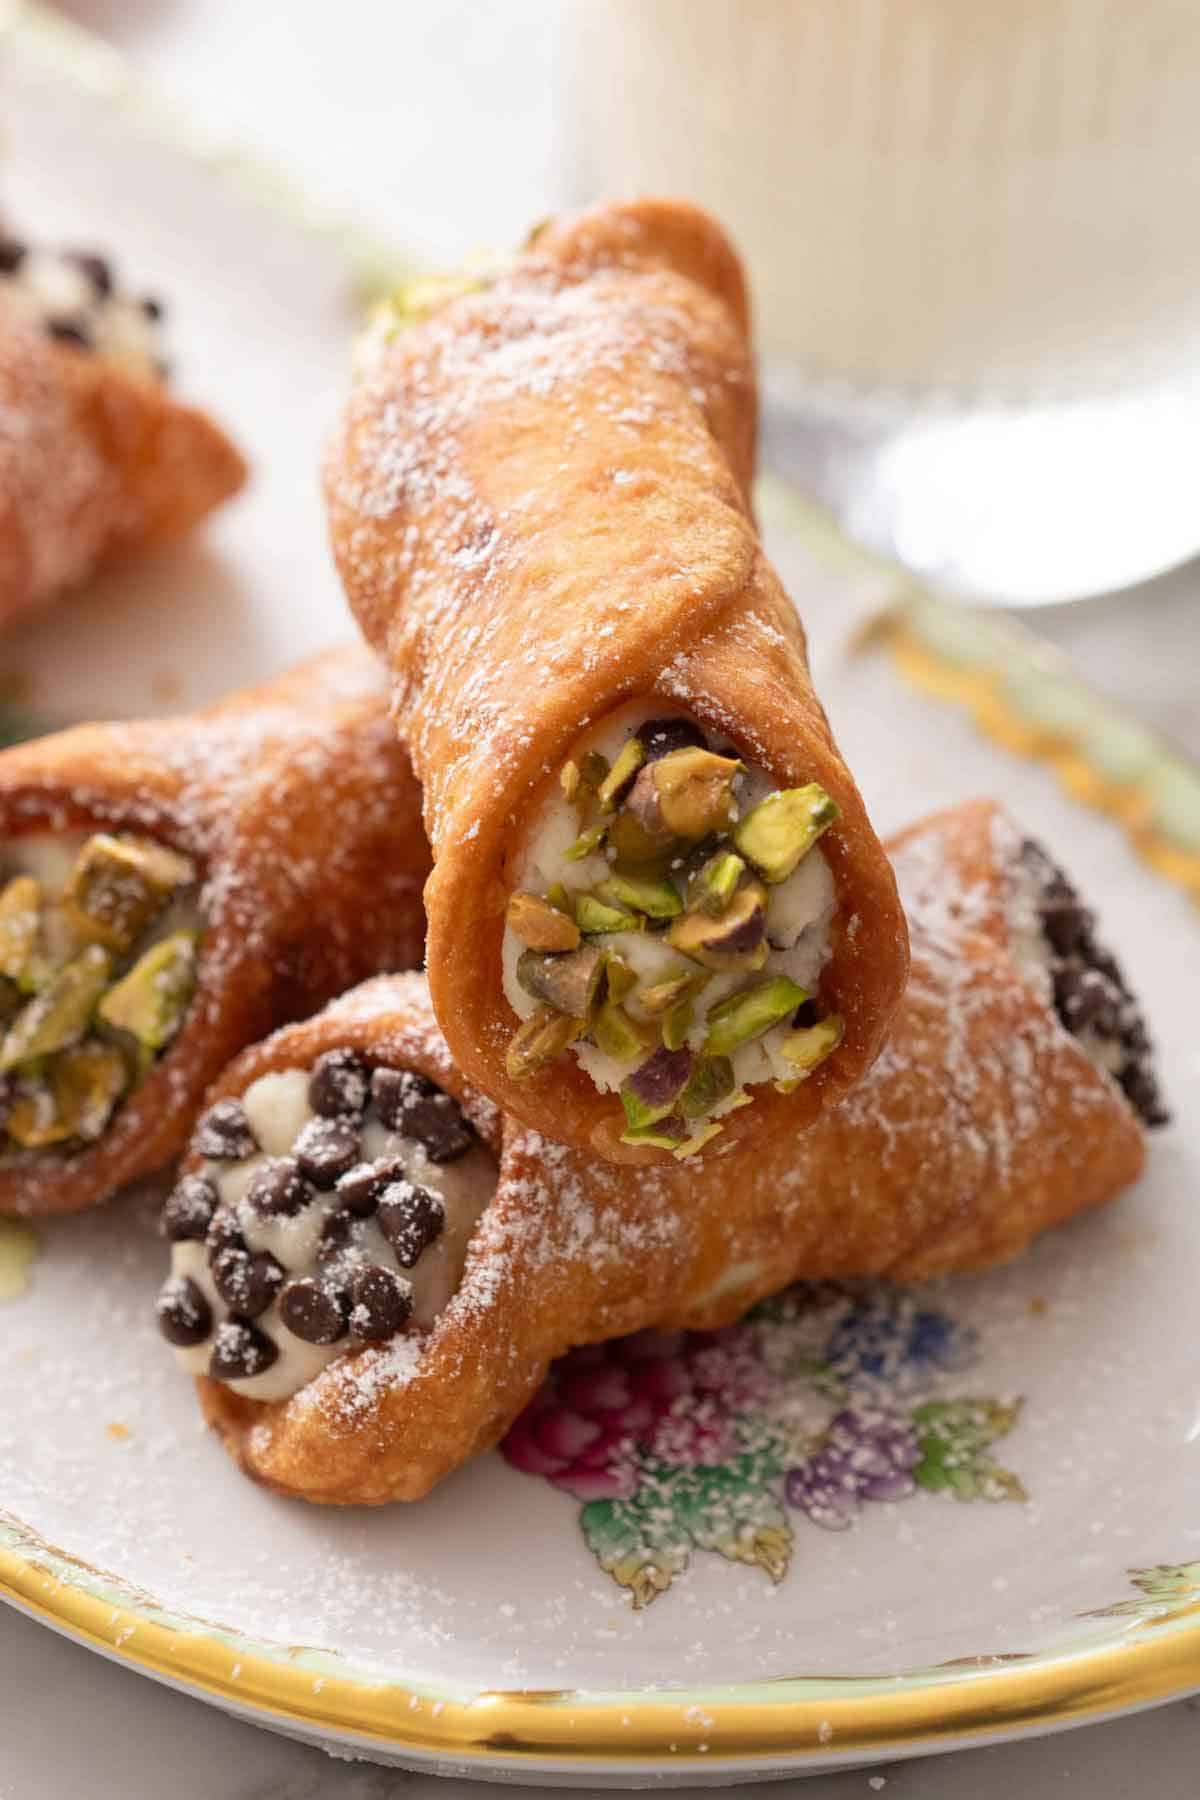
For garnishing, dip the ends of the cannoli shells in melted chocolate before filling them. (Check out my post on how to melt chocolate chips for dipping!). You can dip the chocolate ends in chopped pistachios, chopped candied fruits, or chocolate chips for a crunchy or fruity finish. Let the chocolate harden before adding the ricotta filling.
How Do I Keep Cannoli Shells From Getting Soggy?
Roll the dough thin. This is the foundation of a crispy cannoli shell. Try to roll each shell to ⅛-inch thickness, which you can do with a pasta machine (#7 setting) or rolling pin. This ensures a very quick cook time, so they don’t absorb too much oil and become soggy.
Make sure your oil is at the right temperature. The correct temperature for the frying oil ensures golden, crispy shells that are never burned or soggy. Use a deep-frying thermometer to make sure the oil is at 360°F throughout the frying process. I just keep it in the pot so I can adjust the heat as needed while frying.
Don’t fill the shells too far in advance. While most of the moisture is removed from the ricotta, the filling will still turn the shells soggy over time. Don’t fill the homemade cannoli shells more than 2 hours in advance, if possible.
Pro Tips For Making Homemade Cannoli
Drain the ricotta to prevent a runny filling. Removing the extra moisture from the cheese gives the filling a smooth and light texture and helps keep the shells from getting soggy. To drain the ricotta, place it in 2 layers of cheesecloth and squeeze out the moisture. If you don’t have cheesecloth, spread the cheese on 4 layers of paper towels and top with another 2 layers. Let it sit for several minutes, then scrape the ricotta cheese off the paper towels.
Seal the shells well before frying. Seal the ends together well using egg white as an “adhesive”. Otherwise, they will open up while frying.
How To Make Cannolis
Below, I’ve highlighted portions of the recipe in step-by-step process images along with instructions for making homemade cannoli. You can find the full set of instructions in the recipe card below.
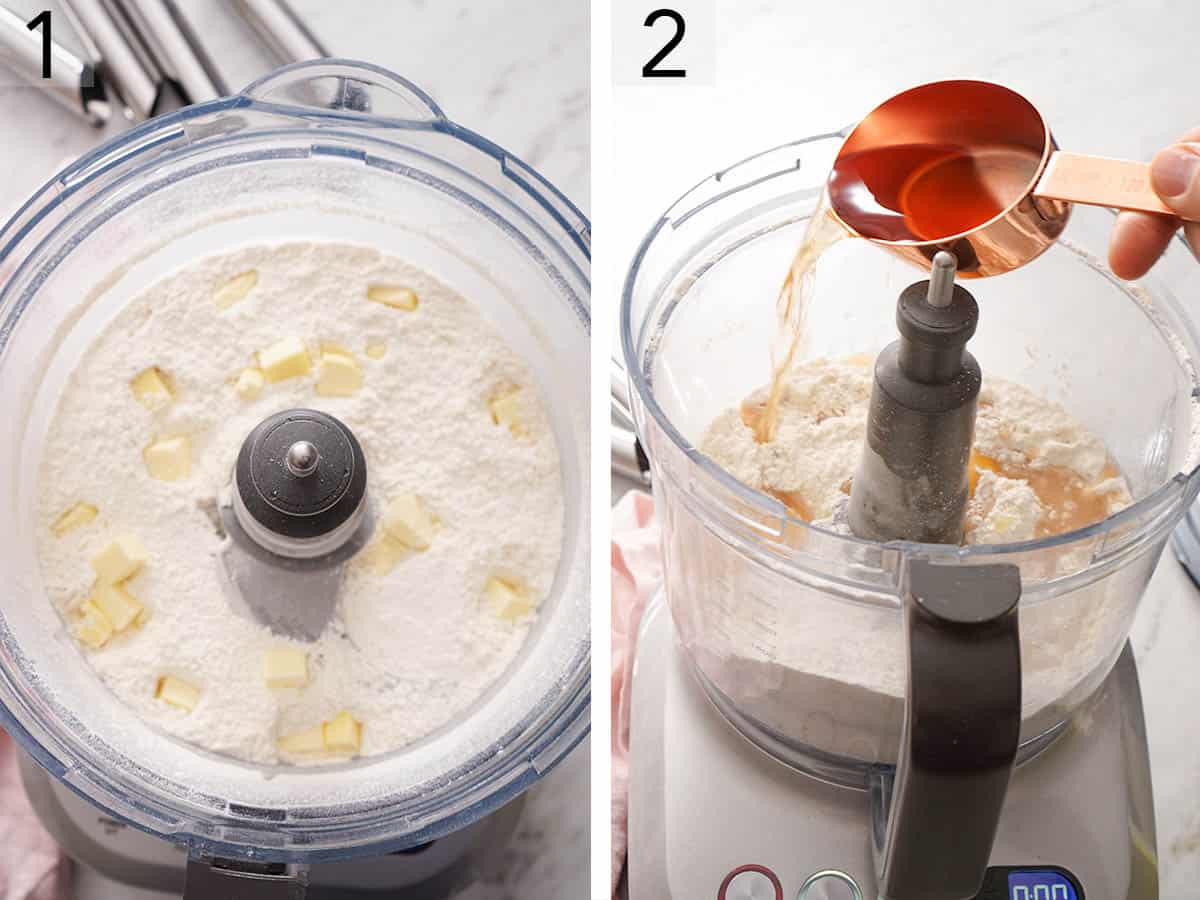
1. Make the Dough: To the bowl of a food processor, add the all-purpose flour, white sugar, and salt, then pulse to combine. Add the cubed butter to the dry ingredients and pulse to cut the butter into the dough.
2. Add the egg yolks and marsala to the flour mixture and pulse so the mixture clumps together into a dough.

3. Transfer the dough onto a lightly floured surface and knead until smooth and elastic, about 3 to 4 minutes. Cover and let the cannoli dough rest at room temperature for 1 hour.
4. Drain the Ricotta: Meanwhile, place the ricotta in cheesecloth and squeeze it to drain off excess liquid.
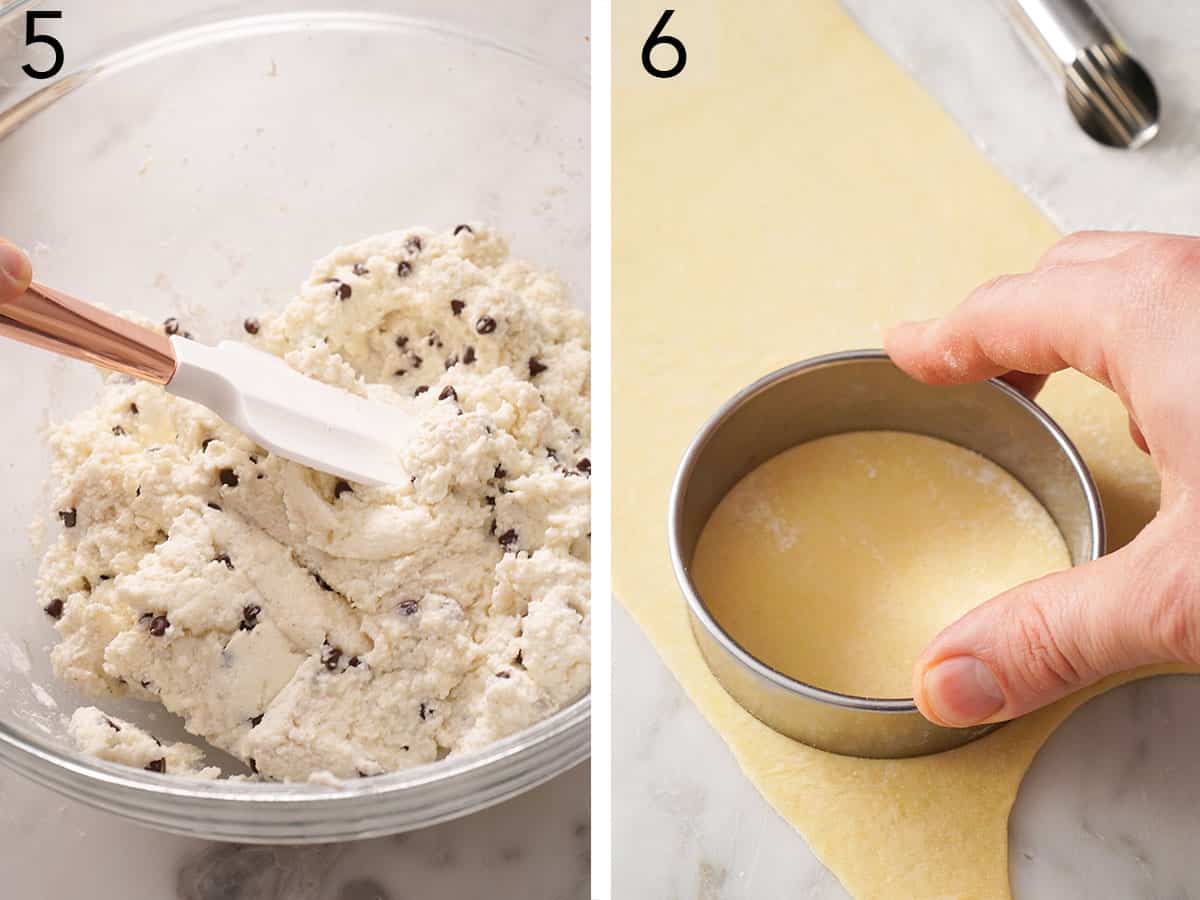
5. Make the Filling: Stir together the drained whole milk ricotta, powdered sugar, mini chocolate chips, vanilla extract, and ground cinnamon in a large bowl. Cover the creamy filling with plastic wrap and refrigerate.
6. Cut the Dough: Use a pasta maker or rolling pin to roll the rested dough to about ⅛-inch thickness, then cut out 18 4-inch circles. Heat your frying oil of choice in a large pot and place a deep-fry thermometer in the oil. It should be 360°F when you fry, so keep an eye on the temperature. Place a wire rack in a rimmed baking sheet and place a single layer of paper towels on the wire rack.
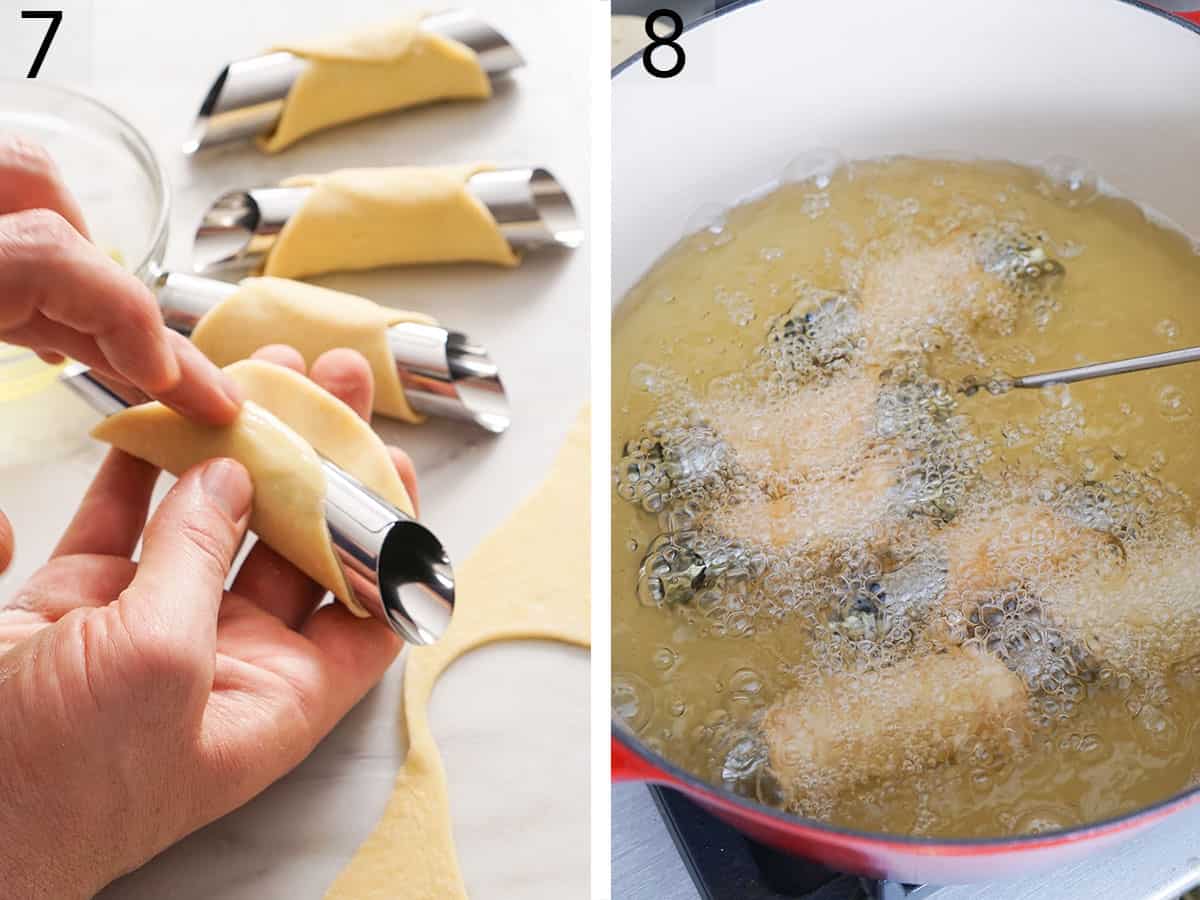
7. Shape the Shells: While the oil heats up, wrap the dough circles around metal cannoli forms. Use the reserved egg white as “glue” where the ends will overlap, pressing the ends together with your fingers. Now you’re ready to fry the cannoli shells!
8. Fry the Shells: Fry the shells in batches in the hot oil for approximately 2 minutes, or until they’re a deep golden brown. Transfer to the lined wire rack for the oil to drain.
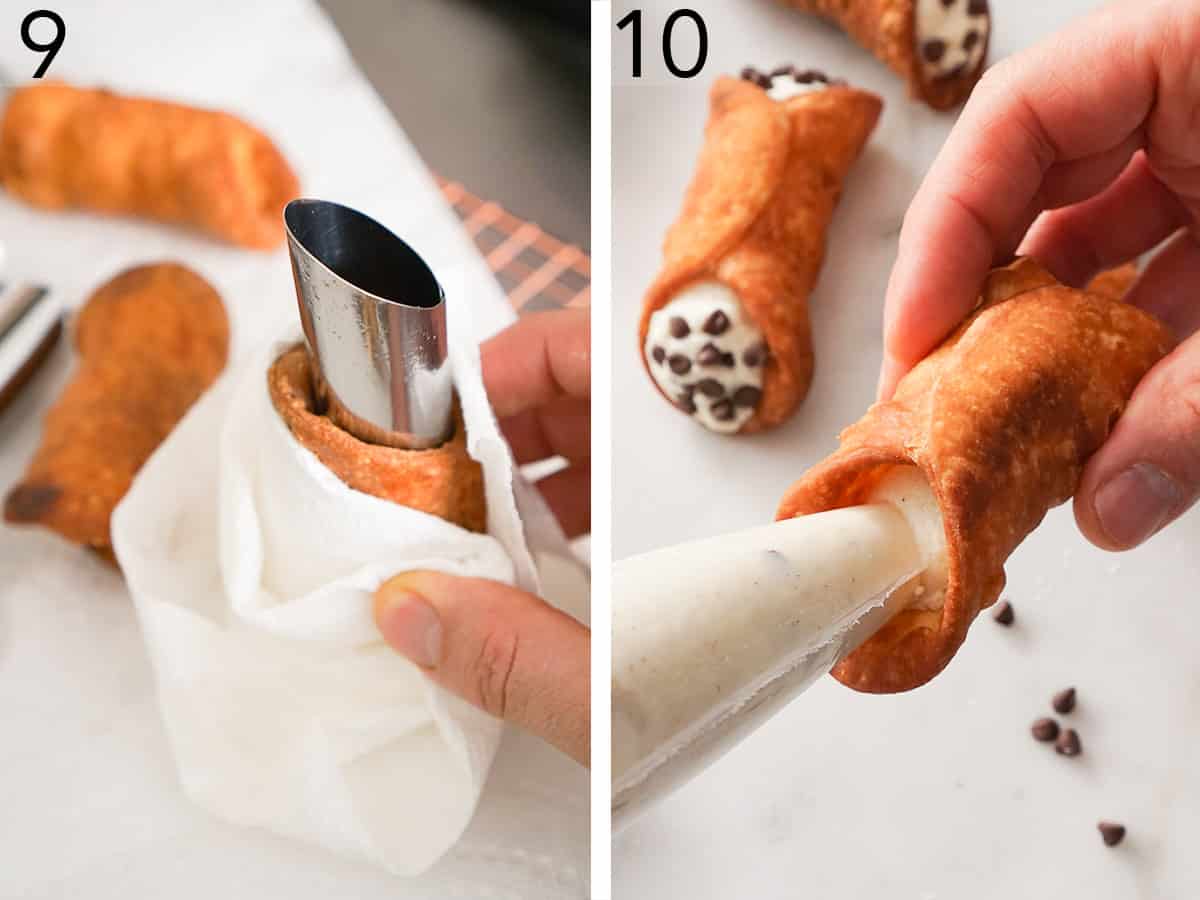
9. Immediately and carefully remove the metal forms from the fried shells so you can wrap the next batch of dough circles. Let the shells cool completely before filling.
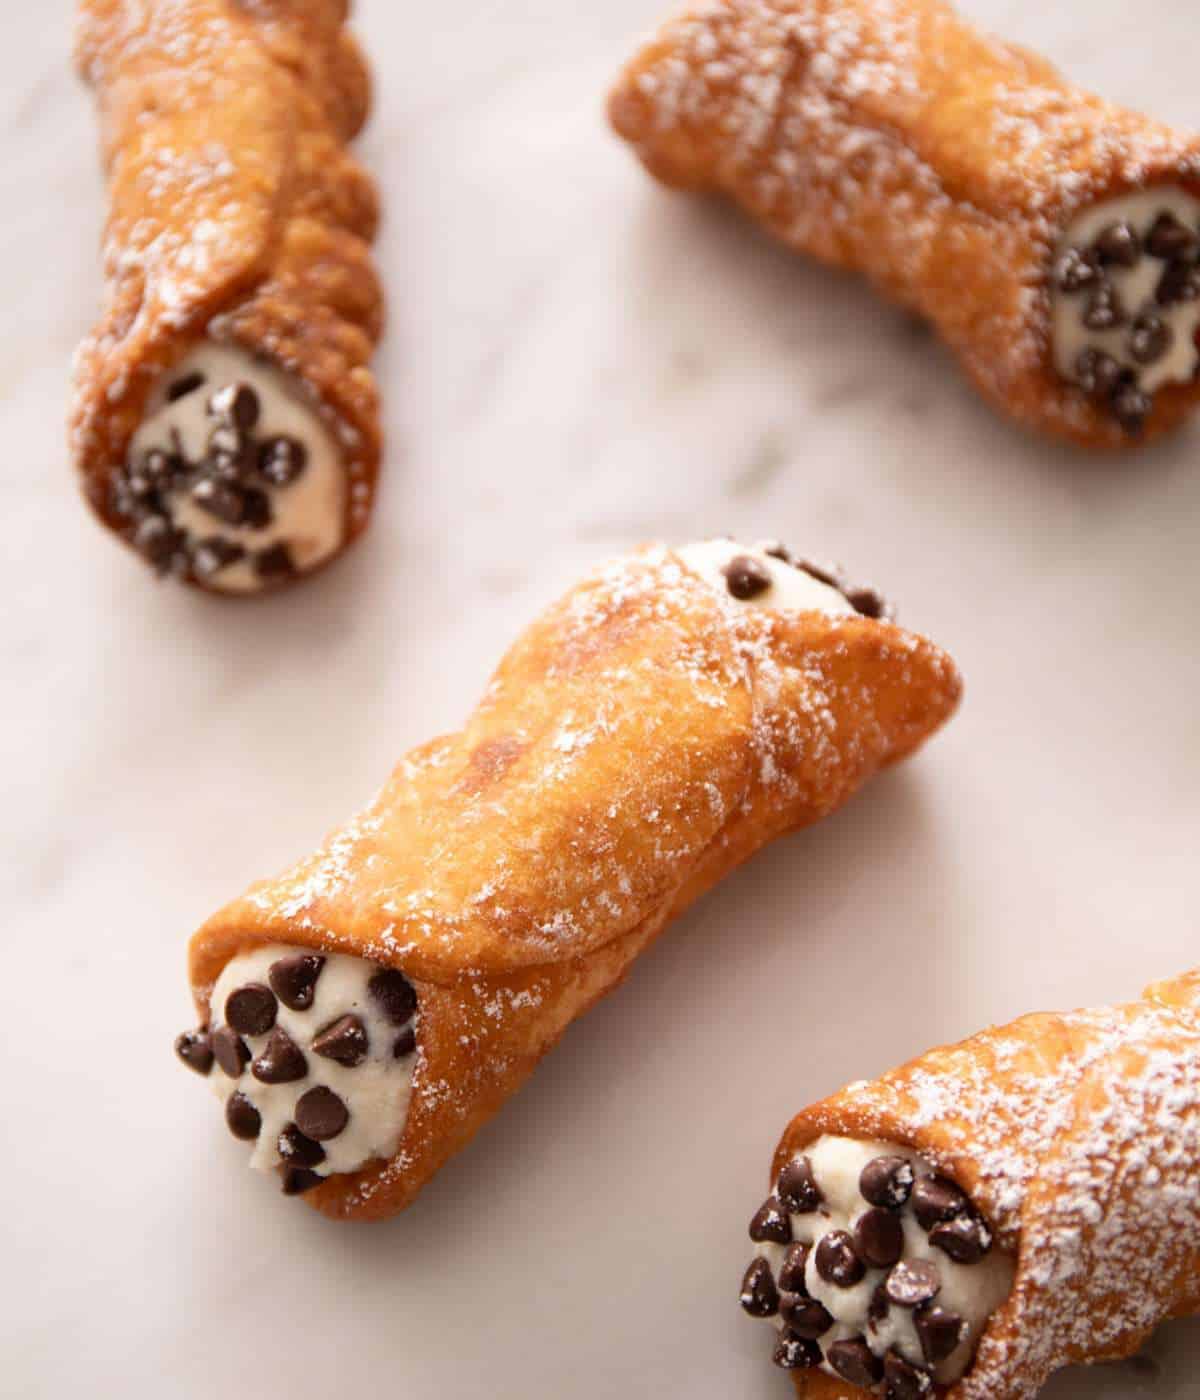
10. Fill the Cannoli: Once the shells have cooled, remove the filling from the refrigerator and transfer it to a piping bag. Snip off the tip, then pipe filling into each cannoli tube. To finish, press more mini chocolate chips or pistachios onto the filling at the ends and dust them lightly with powdered sugar.

Cannoli Recipe
Video
Equipment
- Food Processor
- Mixing Bowls
- Metal cannoli forms or molds
- Wire cooling rack
- Large Pot
Ingredients
For the Shells:
- 2 cups all-purpose flour (240g)
- 2 tablespoons granulated sugar
- ¼ teaspoon salt
- 2 tablespoons unsalted butter cut into small pieces
- ½ cup marsala wine (120mL)
- 2 large egg yolks (reserve the egg whites for brushing)
- 2 quarts vegetable oil for frying
For the Filling:
- 32 ounces whole milk ricotta (900g)
- 1 cup powdered sugar (120g)
- ⅓ cup mini chocolate chips (60g)
- 1 teaspoon vanilla
- ¼ teaspoon cinnamon
- Garnishes: mini chocolate chips, finely chopped pistachios
Instructions
For the Dough:
- Add the flour, sugar and salt to the bowl of a processor and pulse to combine. Add the cold butter cubes and pulse until broken up into small pieces, about 8 pulses. Add the egg yolks and marsala and pulse until the mixture starts to clump together, you can add more wine a tablespoon at a time if needed to bring the dough together.
- Turn the dough out onto a lightly floured counter and knead for 3-4 minutes or until it forms a smooth and elastic dough. Cover and allow to rest at room temperature for an hour.
Make the Filling:
- While the dough is resting, lay two large pieces of finely woven cheesecloth on top of each other. Place the ricotta in the center, gather the cheesecloth around it, and twist and squeeze the ball to release liquid from the ricotta. (If you don’t have cheesecloth, spread the ricotta onto 4 layers of paper towels and top with another 2 layers. Let it sit for 15 minutes, then scrape off the ricotta.)
- Add the drained ricotta, powdered sugar, chocolate chips, vanilla, and cinnamon to a large bowl, then stir together. Cover and chill the filling until you are ready to use it.
Shape and Fry the Shells:
- Only a lightly floured surface, roll the rested dough to about ⅛-inch-thickness, then cut out eighteen 4-inch circles. You can re-roll scraps if desired, by kneading the scraps back into a ball and letting it rest 10 to 15 minutes before rolling out again. (You can roll the dough by hand or even use a pasta roller to create thin sheets. If using a pasta maker, start on #1 setting, then keep rolling it through as you decrease the thickness until you get to the proper thickness, typically #7.)
- Heat the oil in a large pot (5- to 7-quarts) over medium heat and place a deep-fry thermometer in the oil. The oil should be 360°F when you fry so keep an eye on the temperature and adjust heat as needed. Set a wire rack inside a rimmed baking sheet and lay a single layer of paper towels on top of the rack.
- As the oil heats up, wrap the circles around your metal cannoli forms and use your finger to wipe some of the reserved egg white where the ends will overlap, then press the ends together. (If you don’t seal the cannoli well they will open up in the deep fryer.)
- Fry the shells in batches for about two minutes or until deep golden brown. Use a spider or tongs to transfer to the paper towel-lined rack and let the shells drain. Immediately and carefully remove the metal forms. (I like to wear an oven mitt or grab the shell with a paper towel, hold it vertically so the tube is pointing down, and gently press the end of the form onto the wire rack to free it from the shell. Continue wrapping the forms with dough and frying. Let the shells cool completely on the wire rack before filling.
Assemble the Cannoli:
- When ready to fill the shells, transfer the filling to a piping bag, snip the tip off and pipe it into the shells. Then, press more chocolate chips or pistachios onto the filling at the ends and dust lightly with powdered sugar.
Notes
- Fill the shells when you are ready to serve them. Even though you drain the ricotta, the filling still has a lot of moisture and will soften the cannoli shells with time. For the crispiest shells, fill them right before serving. To fill them in advance, stick to an hour or two before serving so that the shells don’t get too soft.
- Store cannoli in the fridge once they have been filled. The ricotta filling needs to be kept refrigerated to stay fresh and safe to serve.
Nutrition
Storage and Make-Ahead
Storage: Leftover filled cannoli can be refrigerated for a couple of days, but the shells will become soft over time. Instead, try to only fill the shells you know will get eaten. You can store the leftover fried shells and filling separately for about 4 days. Store the shells in an airtight container at room temperature, and refrigerate the filling in an airtight container.
Make-ahead: The dough and filling can be refrigerated for 1 day before making and assembling the cannoli. Bring the dough back to room temperature before rolling and cutting out the shells. For the crispiest shells, don’t fill the cannoli more than an hour or two in advance, if possible.
Frequently Asked Questions
You can freeze the unfilled shells in a freezer bag or freezer-safe container for about 3 months. Don’t freeze the filling, which will lose its creamy texture and become grainy as it thaws.
You can use Madeira wine, a dry sherry, or sweet red vermouth in place of the marsala wine. For a non-alcoholic substitute, use white grape juice, substituting 1 tablespoon of the juice with sherry vinegar or white wine vinegar.
Yes, you can use pre-made cannoli shells. They are already fried, so only make the filling and then fill and garnish the shells as directed.
More Dessert Recipes To Try
Try one of these incredible Italian desserts next.
Twice-baked biscotti are crisp and nutty, ideal for dipping into your cup of morning coffee. I share lots of flavor variations in the post.
Ladyfingers are crisp, light, and airy. They’re commonly used in tiramisu, but they’re also wonderful in trifles and Charlotte cakes.
This classic tiramisu has layers of rum- and espresso-soaked ladyfingers with a creamy mascarpone filling.
Need a 5-minute dessert recipe? Try my affogato! Pour espresso over vanilla ice cream and voilà! Dessert is served.
Enjoy tiramisu in cake form with my tiramisu cake! A fluffy sponge cake is soaked with coffee and brandy, and filled with a brandy-scented mascarpone mixture.
If you’ve tried this homemade cannoli recipe, then don’t forget to rate it and let me know how you got on in the comments below. I love hearing from you!
Donna says
These were easy to make and delicious! The dough rolled out beautifully after 2 hrs of resting time. I also added a few drops of anise oil as I am used to the taste of anise in the filling. Best cannoli dough recipe I have used.
pam says
Absolutely delicious! Super easy to make and came out just like an Italian bakery🥰
Terri says
These were so good. I followed the recipe to a T and it didn’t disappoint. When the first couple were done I was worried that they didn’t look right, but I now realize thats because I’ve never seen an empty cannoli before:) They were so light and flaky. Better than my favorite bakery. I replaced 1/4 cup of the ricotta with mascarpone. Fabulous all the way around. Thank you
Heather says
These were delicious! The recipe was very simple and easy to follow. I did not have any wine so after looking up substitutes, I was able to sub it with 2 Tbsp. vinegar that was then topped with water to the 1/2 c. mark. I only ended up needing about 1/4 c. liquid. The filling/taste was different than what I was expecting because the last cannolis I had (which was years ago) might have been filled with mascarpone. But the ricotta was amazing and a great way to end pizza night! 🙂