
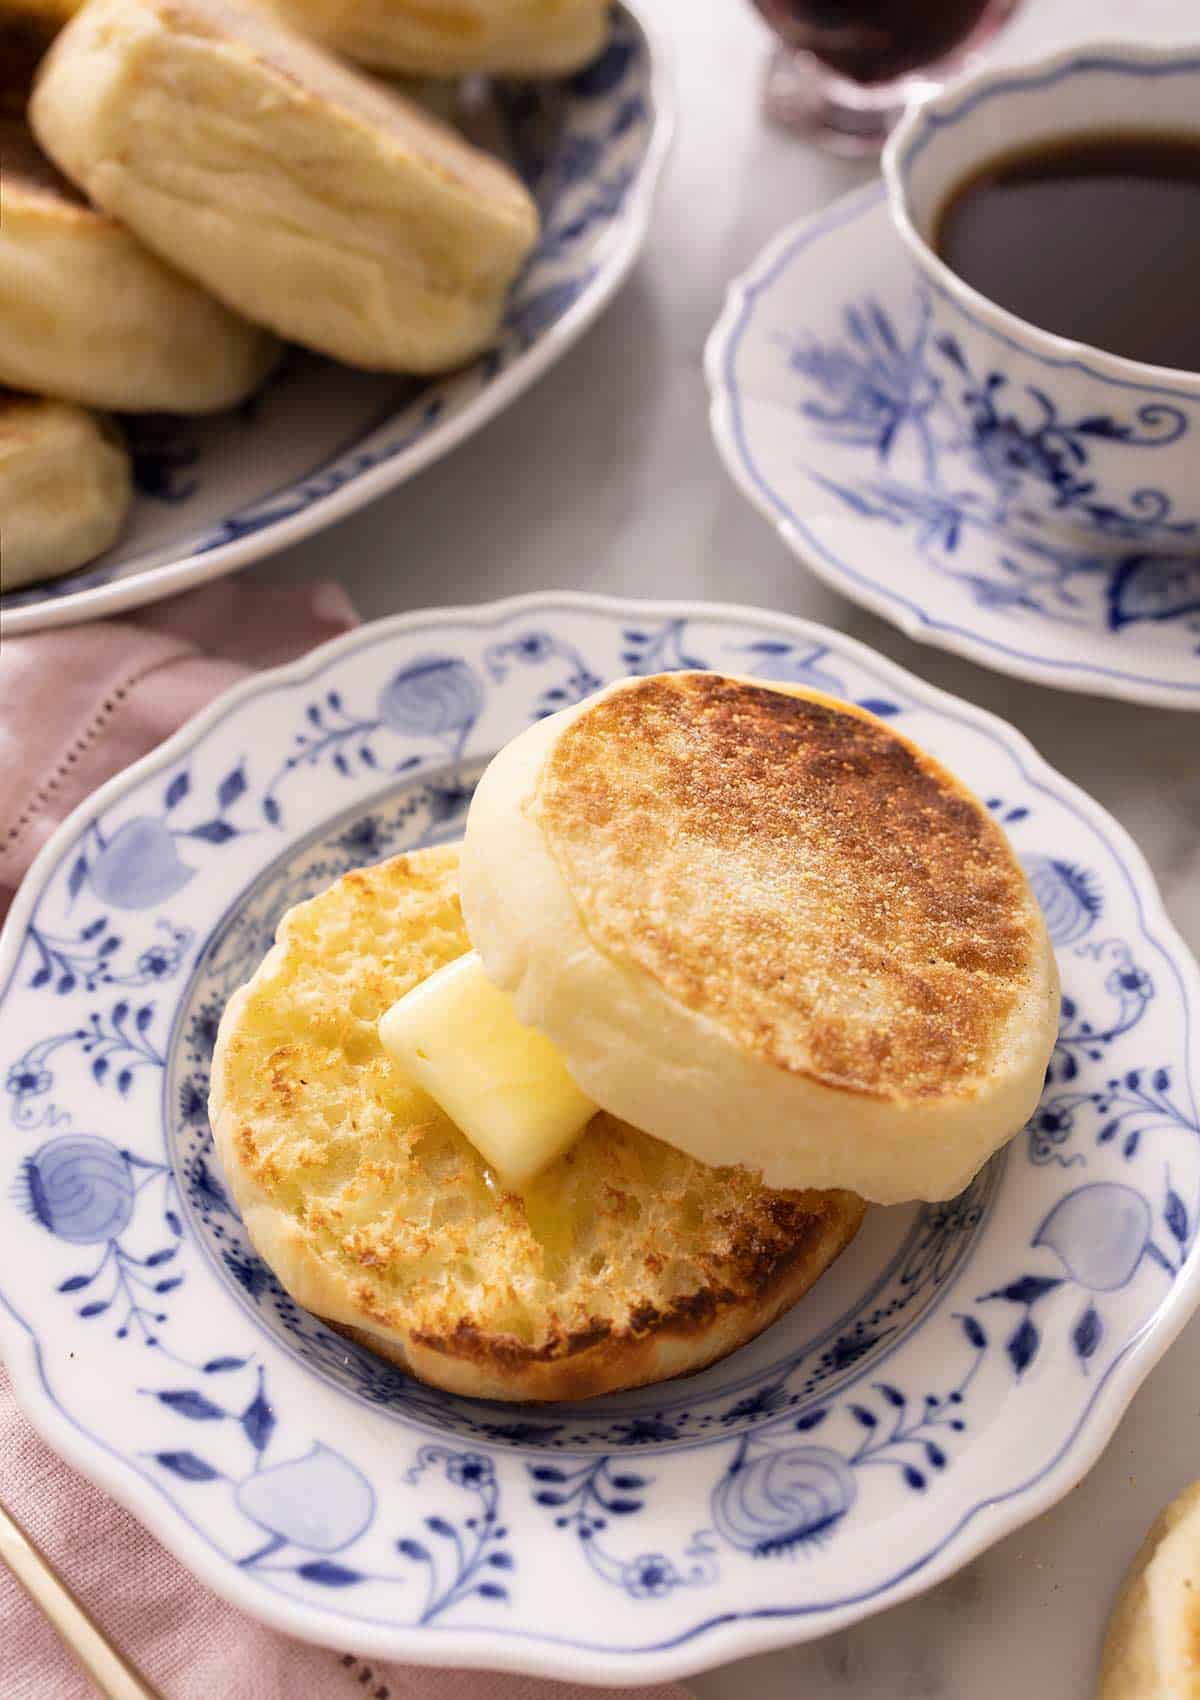

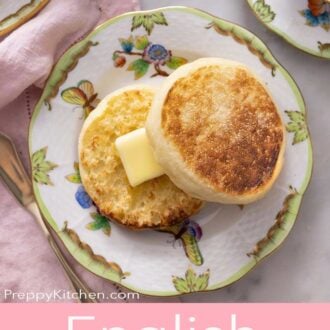


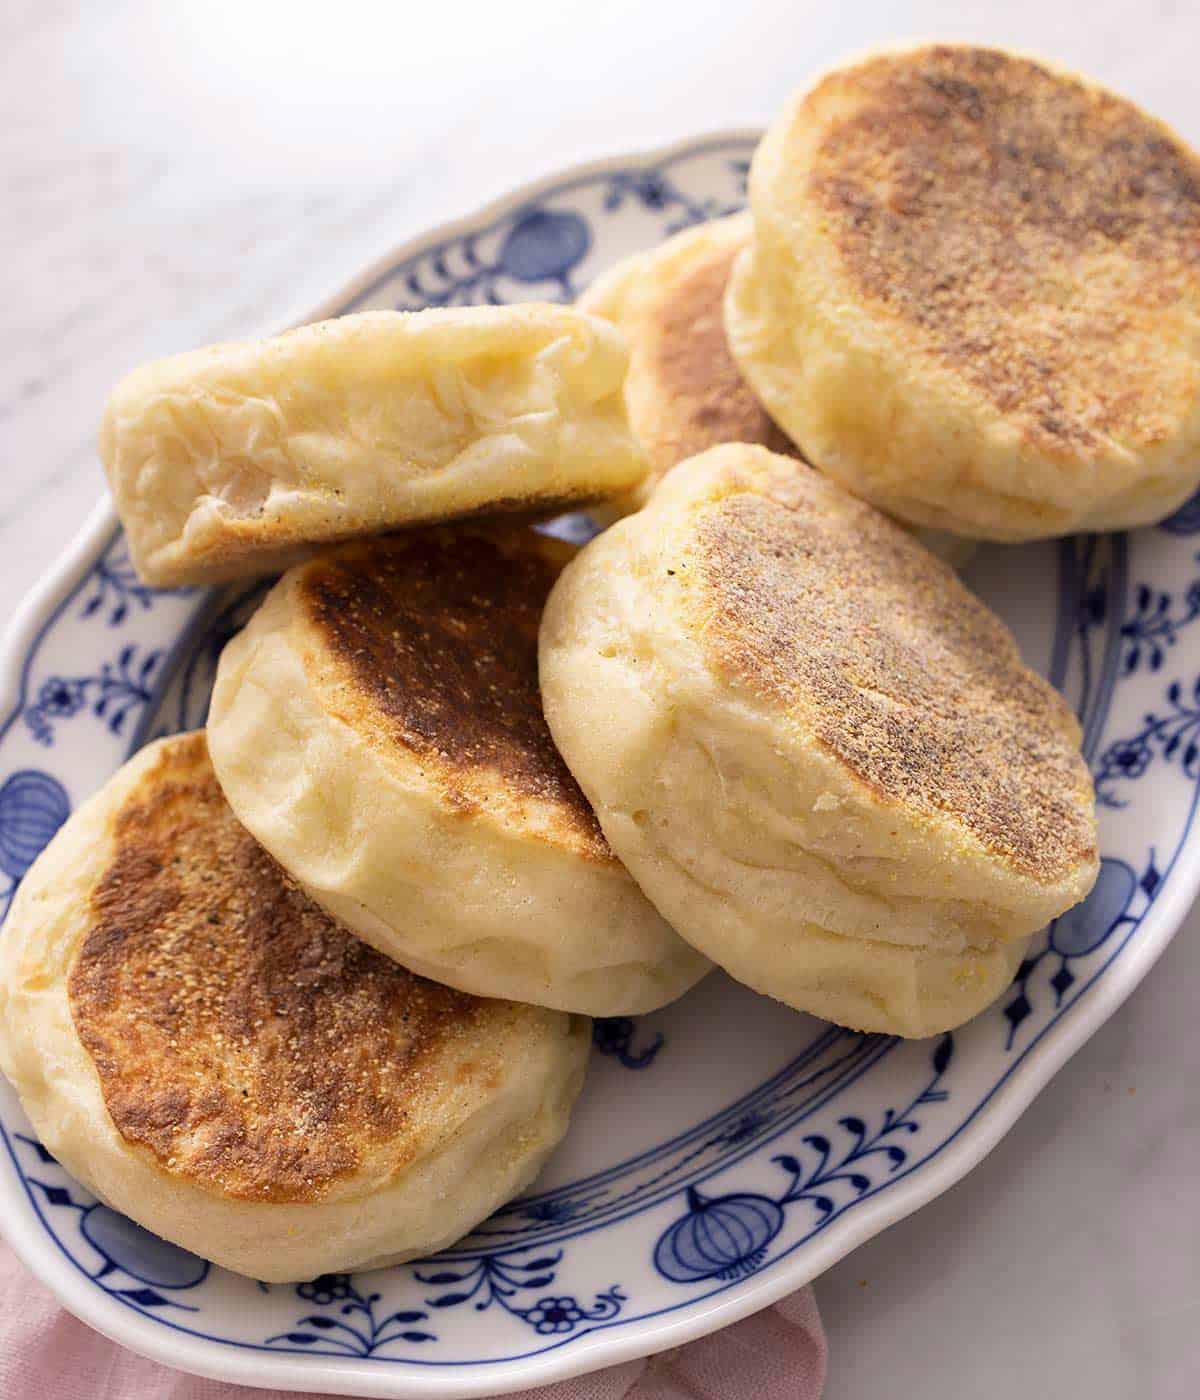
English Muffins are one of my favorite breakfasts whether they’re simply toasted and slathered with butter and jam or made into delicious breakfast sandwiches with sausage, bacon, or egg. My English muffin recipe is so easy to make and you don’t have to be a master baker to make them. They’re soft, chewy, and have so much flavor, trust me when you realize how easy they are and how much more delicious (and healthier) they are compared to store-bought you’ll be making them over and over again. Check out my recipe tutorial below complete with step by step photos, notes on ingredients, and all my top tips!
A reader, Stephanie, says: “Absolute perfection on the first try. Followed the steps as written. I have struggled with so many other yeasted recipes and was expecting to fail here too but I did not! Texture and taste are on point, so light and airy. I’ll be making more to freeze!” ★★★★★
Key Ingredients
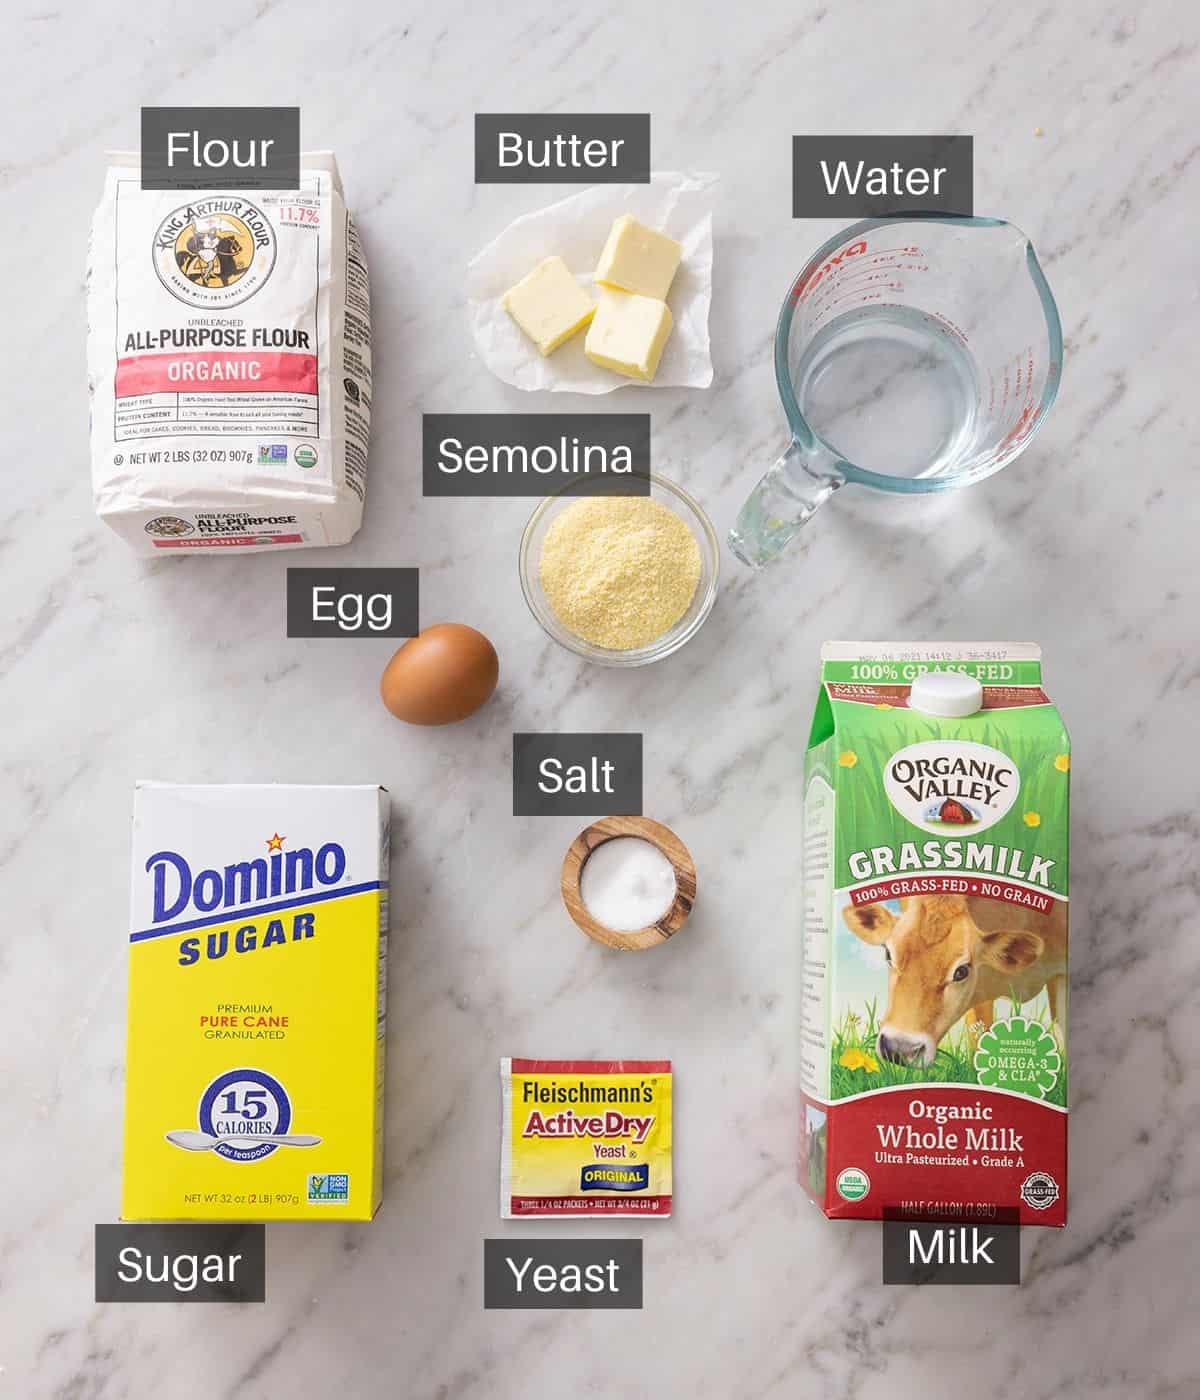
These are the main ingredients you need to make English muffins. You can find the full list of ingredients and measurements in the recipe card below.
Flour — all-purpose flour is perfect for this recipe you don’t need to use bread flour.
Butter — melted butter not only adds flavor but gives the muffins all the nooks and crannies for a traditional look and texture.
Yeast — you can use active dry or instant yeast for this, it’s activated in warm milk and water before using.
Milk — whole milk will give you the best flavor and help keep the muffins moist although you can use low-fat milk or even dairy-free.
Sugar — for flavor and to help activate the yeast. I don’t recommend using brown sugar as it’ll change the flavor.
Salt — it’s really important to season the dough with salt to enhance the flavors.
Semolina — semolina or cornmeal is used to sprinkle over the English muffins before cooking.
How To Tell When They Are Ready To Flip
When you remove the lid, the tops of each muffin should appear dry, and not look wet or shiny anywhere. Also, they will puff up quite a bit in the pan, and they should hold that puffiness. In the photo below on the left, you can see what they look like when they are ready to flip. If they aren’t ready, they will likely deflate slightly and wrinkle when the lid is removed (as shown in the images on the right). Return the lid for another minute or so and check again—they will puff back up and hold that puffiness when they’re ready!
Test them by flipping one muffin. If it collapses, cover the pan for 1 to 2 more minutes, then try flipping another one. If it doesn’t, then flip the rest and keep cooking.

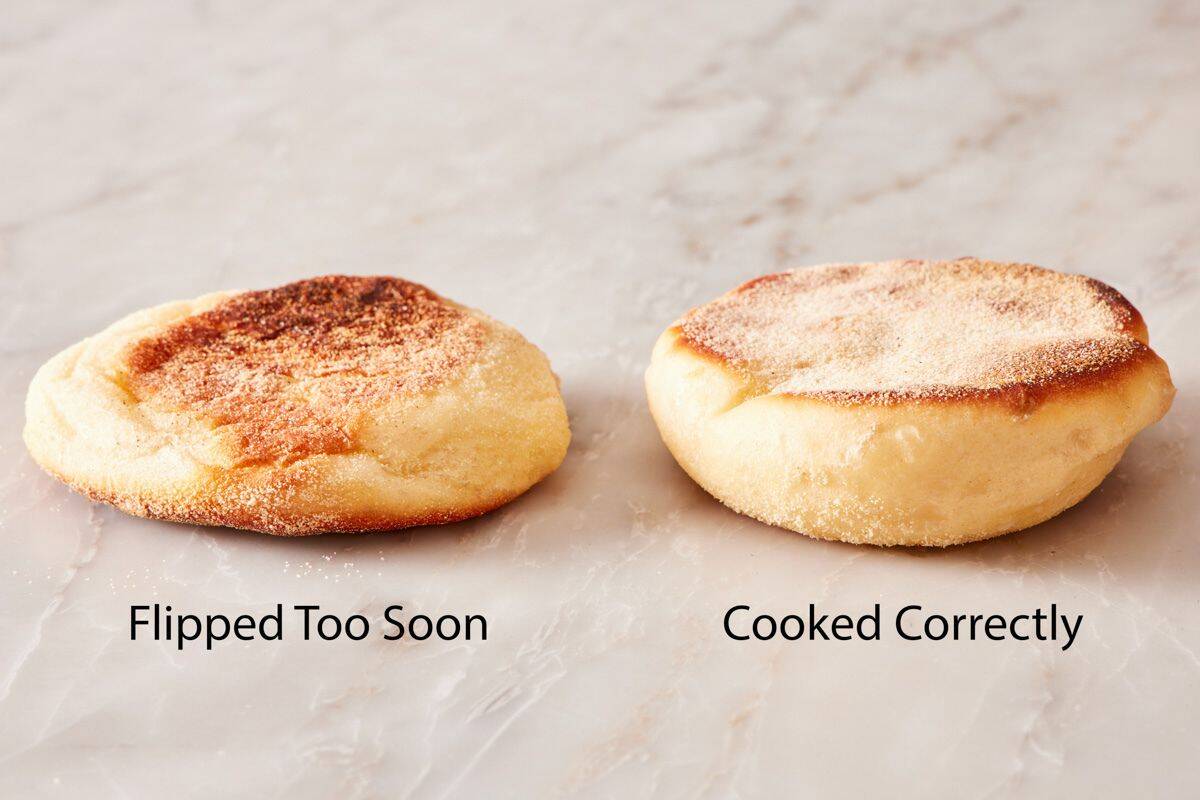
Don’t Flip The English Muffins Too Soon
When cooking the English muffins, it’s important to flip at the right time. If they are flipped too soon, the center of the muffins will not have cooked and set up yet, which means they will collapse on themselves once flipped. You can see in the image below, the English muffin on the left was flipped too soon and it collapsed, baking very flat. The English muffin on the right held its height and fluffy structure.
Pro Tips For Making This Recipe
Here are my top tips to help you make and serve the best English muffins!
- Although you can let the dough proof for just 1 hour they will have more flavor the longer you leave it (4-8 hours).
- I recommend using a stand mixer to make these as the dough is very sticky and difficult to handle.
- If you use bread flour instead of AP flour your muffins will have a chewier texture.
- Place the dough in a warm place to prove quicker but make sure it’s not hot or in direct sunlight or it will have the opposite effect.
- If you don’t have a round cutter you can shape the dough into rounds by hand.
- If your muffins are under-baked and overly soft in the middle then bake them for about 3 minutes at 350F and they’ll be right as rain.
- If your English muffins are sticking when cooking you can add a tiny amount of butter to the pan.
- A cast-iron skillet or griddle is best for cooking the muffins.
- You’ll need to cook them in batches, make sure to brush away the excess semolina so it doesn’t burn.
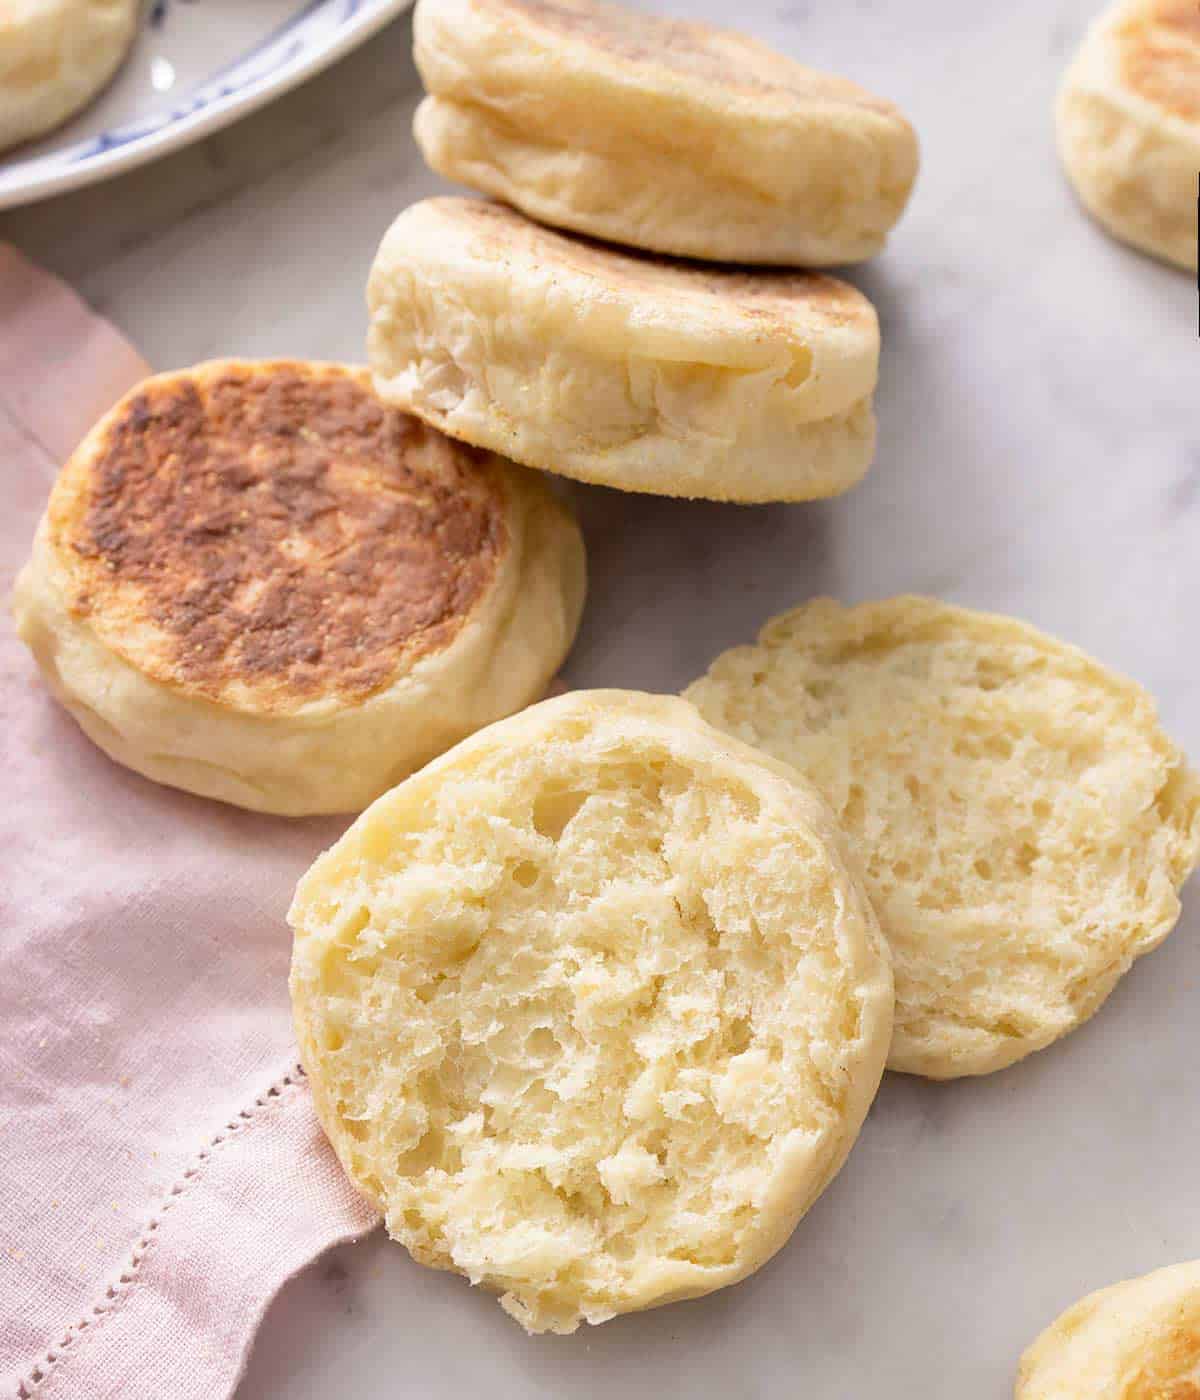
- Use a serrated knife to cut open the muffins when you are ready to serve them.
- The English muffins are best served toasted.
How To Make English Muffins
Below, I’ve highlighted portions of the recipe in step-by-step process images along with instructions for making homemade English muffins. You can find the full set of instructions in the recipe card below.
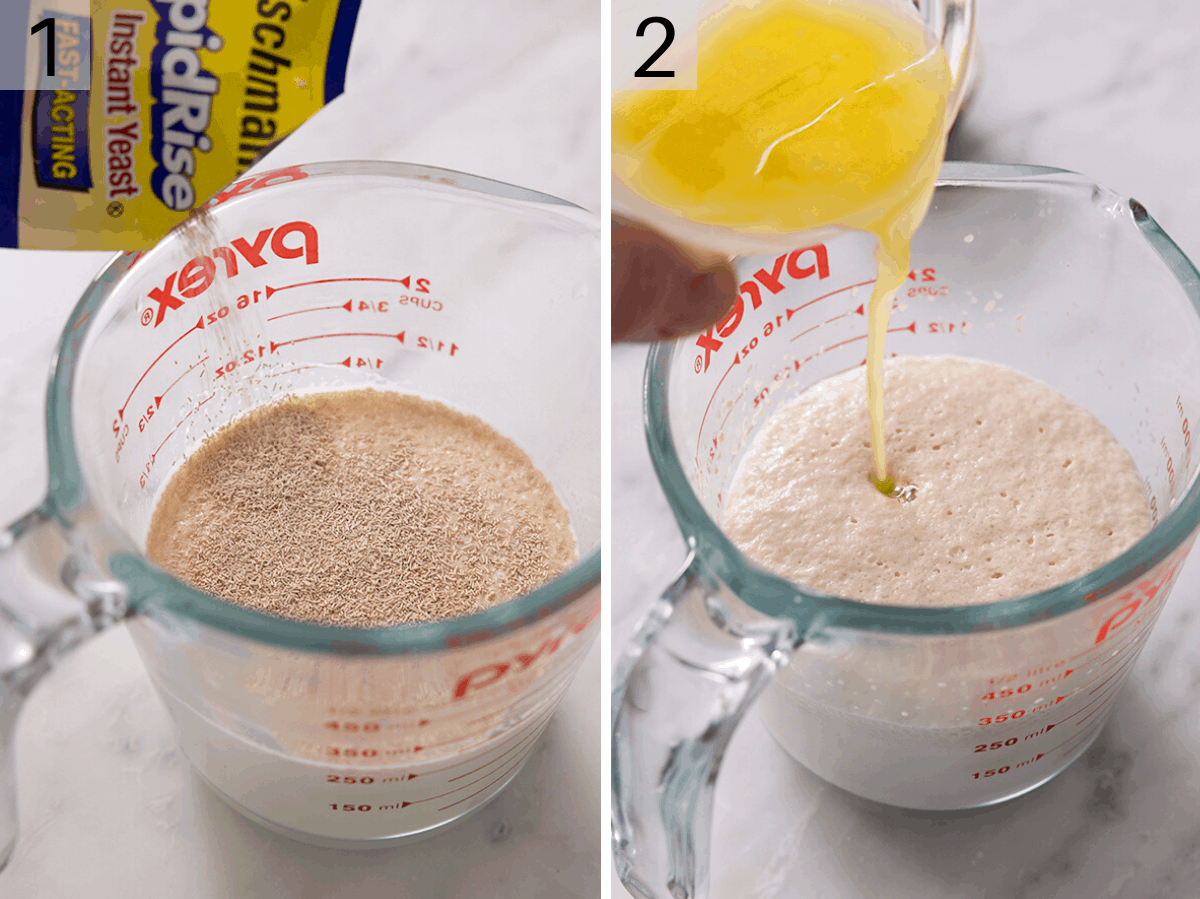
1. Add the yeast to warmed milk, water, and sugar.
2. Once foaming (6-7 minutes) add the egg and melted butter.
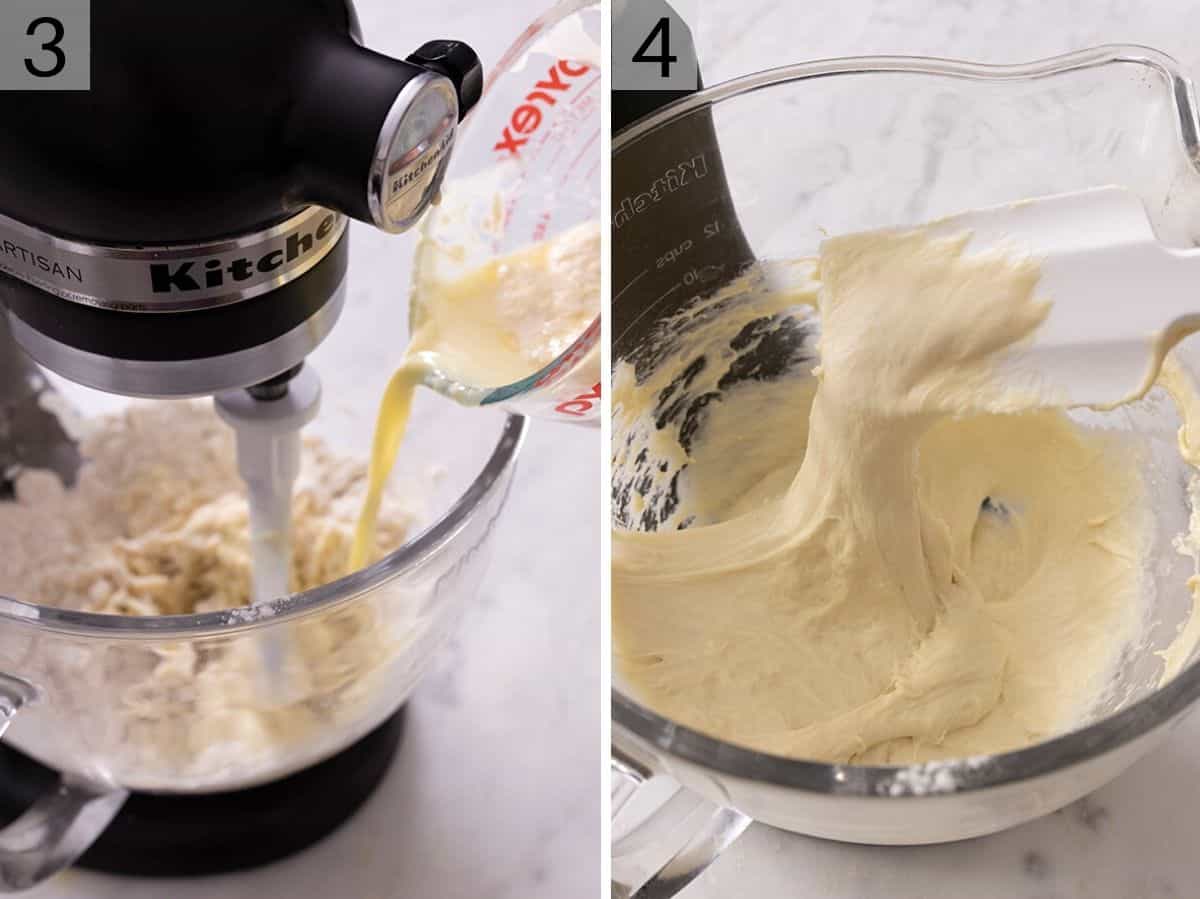
3. Combine flour and salt in the bowl of a stand mixer then add the milk and yeast mixture.
4. Mix until the dough is elastic and smooth. Transfer to a large oiled bowl and cover until doubled in size.
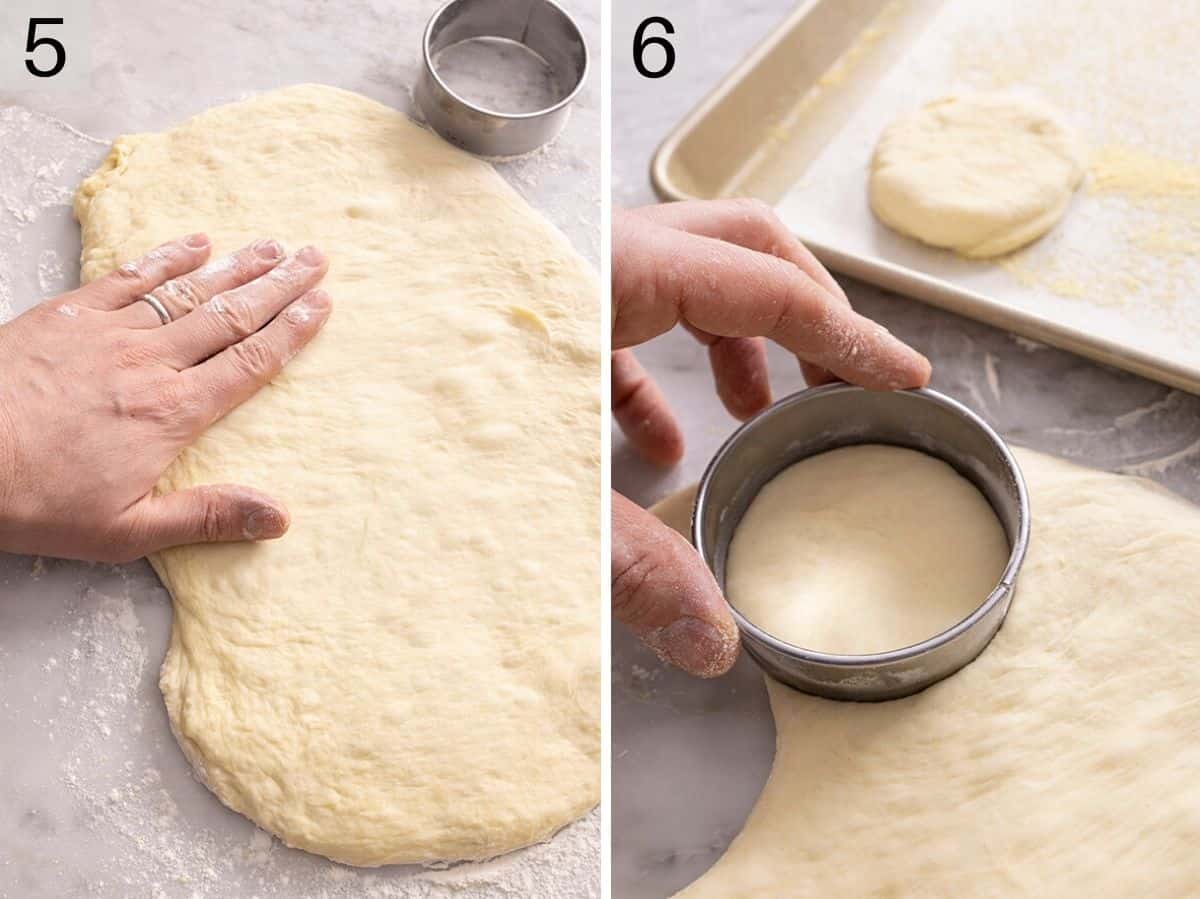
5. Pat out the dough on a floured surface until just under 1 inch thick.
6. Cut out the English Muffins with a 2½ inch round cutter.
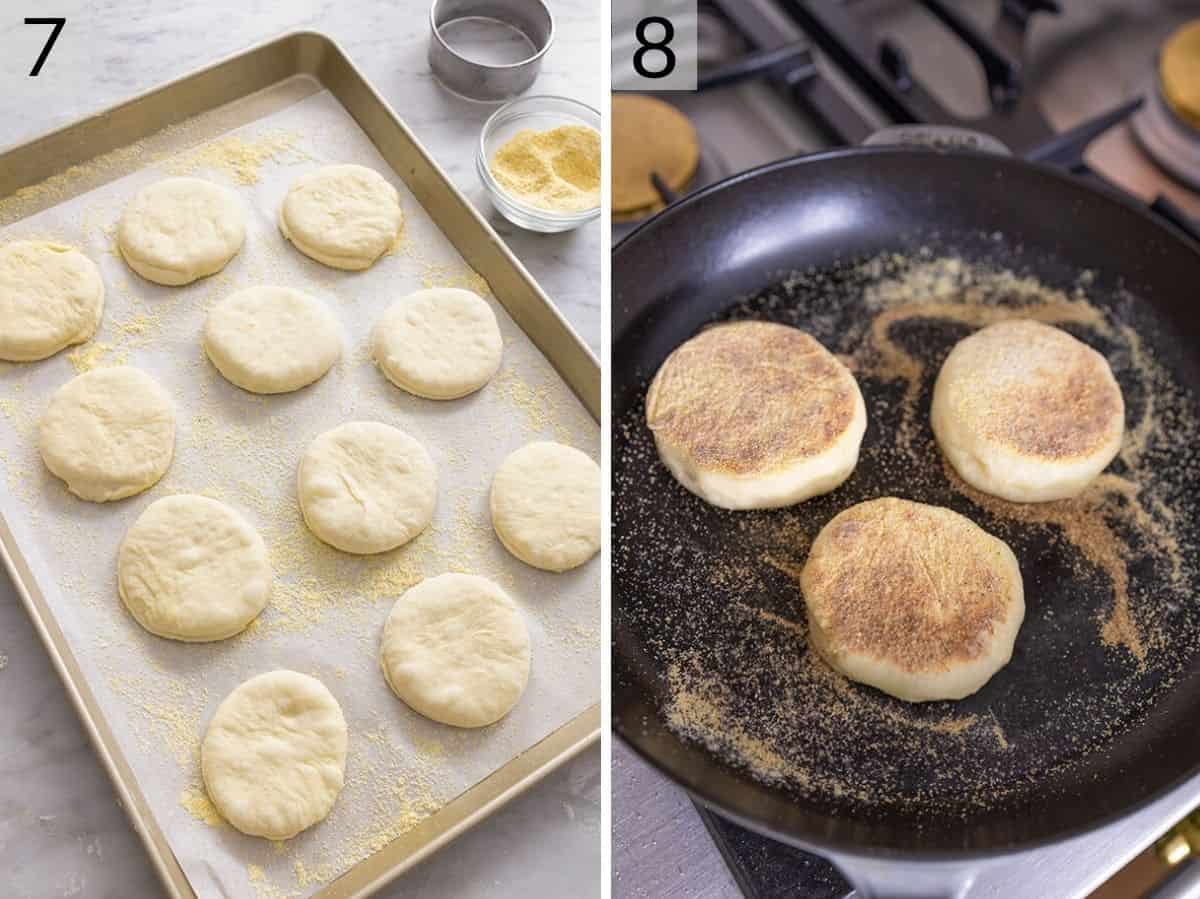
7. Lay them spread apart on a baking sheet sprinkled with semolina. Cover and let proof for another 30 minutes or so.
8. Once ready, cook the muffins on a hot skillet for 6 to 8 minutes on each side.

English Muffins Recipe
Video
Equipment
- Large-sized skillet
- 2½-inch round cutter
- Stand mixer
- mixing bowl
Ingredients
- ¾ cup milk (180ml)
- ½ cup water (120ml)
- 2 tablespoons granulated sugar
- 1 (.25-ounce/7g packet) active dry yeast
- 3 cups all-purpose flour (360g)
- 1 teaspoon salt
- 3 tablespoons butter melted and cooled slightly (42g)
- 1 large egg room temperature
- Cornmeal for dusting or Semolina
Instructions
- Combine the milk, water, and sugar in a bowl or glass measuring cup. Stir together and warm in the microwave to 110°F. Add the yeast and stir once more. Set aside for 5-7 minutes or until a foamy head develops.
- While the yeast wakes up, combine the flour and salt in the bowl of a stand mixer and whisk together, then fit with a paddle attachment.
- Mix the egg and melted butter into the milk mixture then slowly pour the liquid into your flour mixture while mixing on low. Increase the speed to medium-high and mix for about 7 minutes or until the dough is elastic, smooth, and pulls away from the side of the bowl.
- Transfer to a large, oiled bowl and cover with plastic wrap. Allow to double in size in a warm spot (about an hour). You can also refrigerate the dough overnight, in which case you’ll let it warm for an hour when ready to use.
- Transfer the dough to a floured counter, lightly flour the top, then gently spread out and pat down until it’s just under an inch thick. Line two baking sheets with parchment paper and sprinkle with cornmeal or semolina.
- Use a 2½-inch round cutter to cut your muffins, then gently transfer them to the prepared baking sheets using a spatula or your hands. Gently knead together then re-roll the scraps and continue cutting until the dough is used up. Cover the pans loosely with plastic wrap and place in a warm spot to rise until visibly puffed for about 30 minutes.
- Place a large skillet over medium heat. Once you can feel the heat when placing your hand a few inches over the surface, sprinkle the surface with cornmeal or semolina, then carefully place 3-4 muffins on the pan. Cover and reduce the heat to medium-low, then cook for 6 to 8 minutes, until each piece is browned on the bottom and appears dry on top. (Adjust the heat to low, if the muffins are browning too quickly before the tops have dried out.) Then, carefully flip and cook for another 6 to 8 minutes, until browned on the other side.
- Clear the old cornmeal off the pan, then add a fresh sprinkle and cook the remaining muffins. Enjoy warm! If you haven’t made these before it’s best to cook a test muffin to get the feel of it.
Notes
- Adjust the burner heat as needed while cooking the muffins. I often find that after my first batch, the skillet is very warm and needs lower heat to prevent the bottoms from over-browning. Adjust your burner setting as necessary to keep the muffins cooking evenly between each batch.
- Overnight method: You can refrigerate the dough overnight to bake off in the morning! Once the dough has been added to the oiled bowl, cover it, and immediately refrigerate for up to 16 hours. When you are ready to cut and cook, you don’t need to warm up the dough. Just turn it out onto the surface, press, and cut as directed. The second rise time once cut may be longer since the dough is cold, up to 1 hour, until they are puffed and ready for cooking. If your dough has more than doubled in size while chilling, turn it out and knead it 3 or 4 times before pressing and cutting.
Nutrition
Frequently Asked Questions
The dough is supposed to be sticky, it’s needed to give them all the nooks and crannies that are traditionally found in English muffins.
Yes, you can make the dough and let it prove in the fridge overnight. Bring it to room temperature for 1 hour before continuing with the next steps. Alternatively, you can bake the English Muffins in advance and toast them when you are ready to serve.
English muffins are perfect toasted and spread with butter or jam for breakfast or a snack. They’re also one of the key ingredients for Egg benedict and breakfast sandwiches (McMuffin style), or can be served with scrambled eggs and bacon.
They can be stored in an airtight container for up to 3-5 days and can be toasted if they start drying out or you can freeze them for up to 3 months. Thaw completely before serving.
More Breakfast Recipes To Try
Make one of my other popular breakfast recipes next!
You can make hot, pillow-y beignets right at home! This New Orleans classic is best served hot with a big dusting of powdered sugar straight from the fryer.
My quick and easy lemon poppy seed muffins stir together in just a few minutes. Finish the warm muffins with a spread of butter or a sweet lemon glaze for a delicious breakfast treat.
Make a batch of golden, crispy waffles in no time! Plus, they freeze great so you can make a big batch one morning and freeze the rest for a quick breakfast later.
These fluffy banana pancakes are packed with flavor from ripe mashed bananas and a splash of vanilla. Add your favorite toppings and a drizzle of maple syrup for the perfect family brunch.
If you’ve tried this English muffin recipe, then don’t forget to rate it and let me know how you got on in the comments below. I love hearing from you!
Stephanie L says
Absolute perfection on the first try. Followed the steps as written. I have struggled with so many other yeasted recipes and was expecting to fail here too but I did not! The only adjustment I had to make was to the temp of my cast iron skillets. I upped it to more of a medium low because the lowest temp was not getting them to bake up. This caused me to have to flip the first batch an extra time or two. Texture and taste are on point, so light and airy. I’ll be making more to freeze!
Kate says
Store bought English muffins have NOTHING on these. I’ve used this recipe twice this week, and the second round was a double batch for the freezer.
Will never go back to the bread aisle for English muffins!
Denise Brsdley says
I just finished making these. I think they turned out great. Very different from store bought in that they are richer tasting and softer
Kim says
This is the best English muffin recipe I’ve found! So soft and moist but they hold their shape well. Yum!
Diana says
When I made the dough, I questioned if the ingredient measurements were off because my dough was so watery. But I trusted the process and let it sit overnight in the fridge in an airtight container. In the morning I took it out to warm up for about an hour and then I put the dough onto a working surface (with lots of flour cause it will be sticky) patted it down into a square and cut 9 pieces out. I didn’t make mine round cause that’s just too much work. My iron skillet took forever to heat up cause I can it on 2, then I turned the heat to 5 and they came out perfect. I did hold mine for about 8-10 min on each side since they were bigger pieces. I love this recipe. I wonder if I can make these in an oven with same results. It would be perfect for my family community breakfasts that we do if I can just pop them in the oven and have them come out ready once breakfast is ready
Shannon says
Hi John!
So, I tried making these twice last night and the dough never set up, both times… I am not sure what the problem was, the only thing that I could think was the problem was that I used 2% milk, should I have used whole milk?
Thank you so much,
Shannon
Heather says
These were absolutely delicious and so light and soft! But then so perfect toasted! I love english muffins for breakfast sandwiches and these were incredible. Thank you for developing for the recipe!
William H Stoneman says
I LOVE to bake but you REALLY HAVE TO LOVE baking to make English Muffins. Maybe after 50 times, I might get as good as you, Mr. Kanell!
Daisy says
Can I substitute for whole wheat flour ?
Tina Mohankumar says
Dear Jhon i follow most your recipies and have had good results, so now i just keep following them each time you post. Thank you so much. Will make these English muffins.