
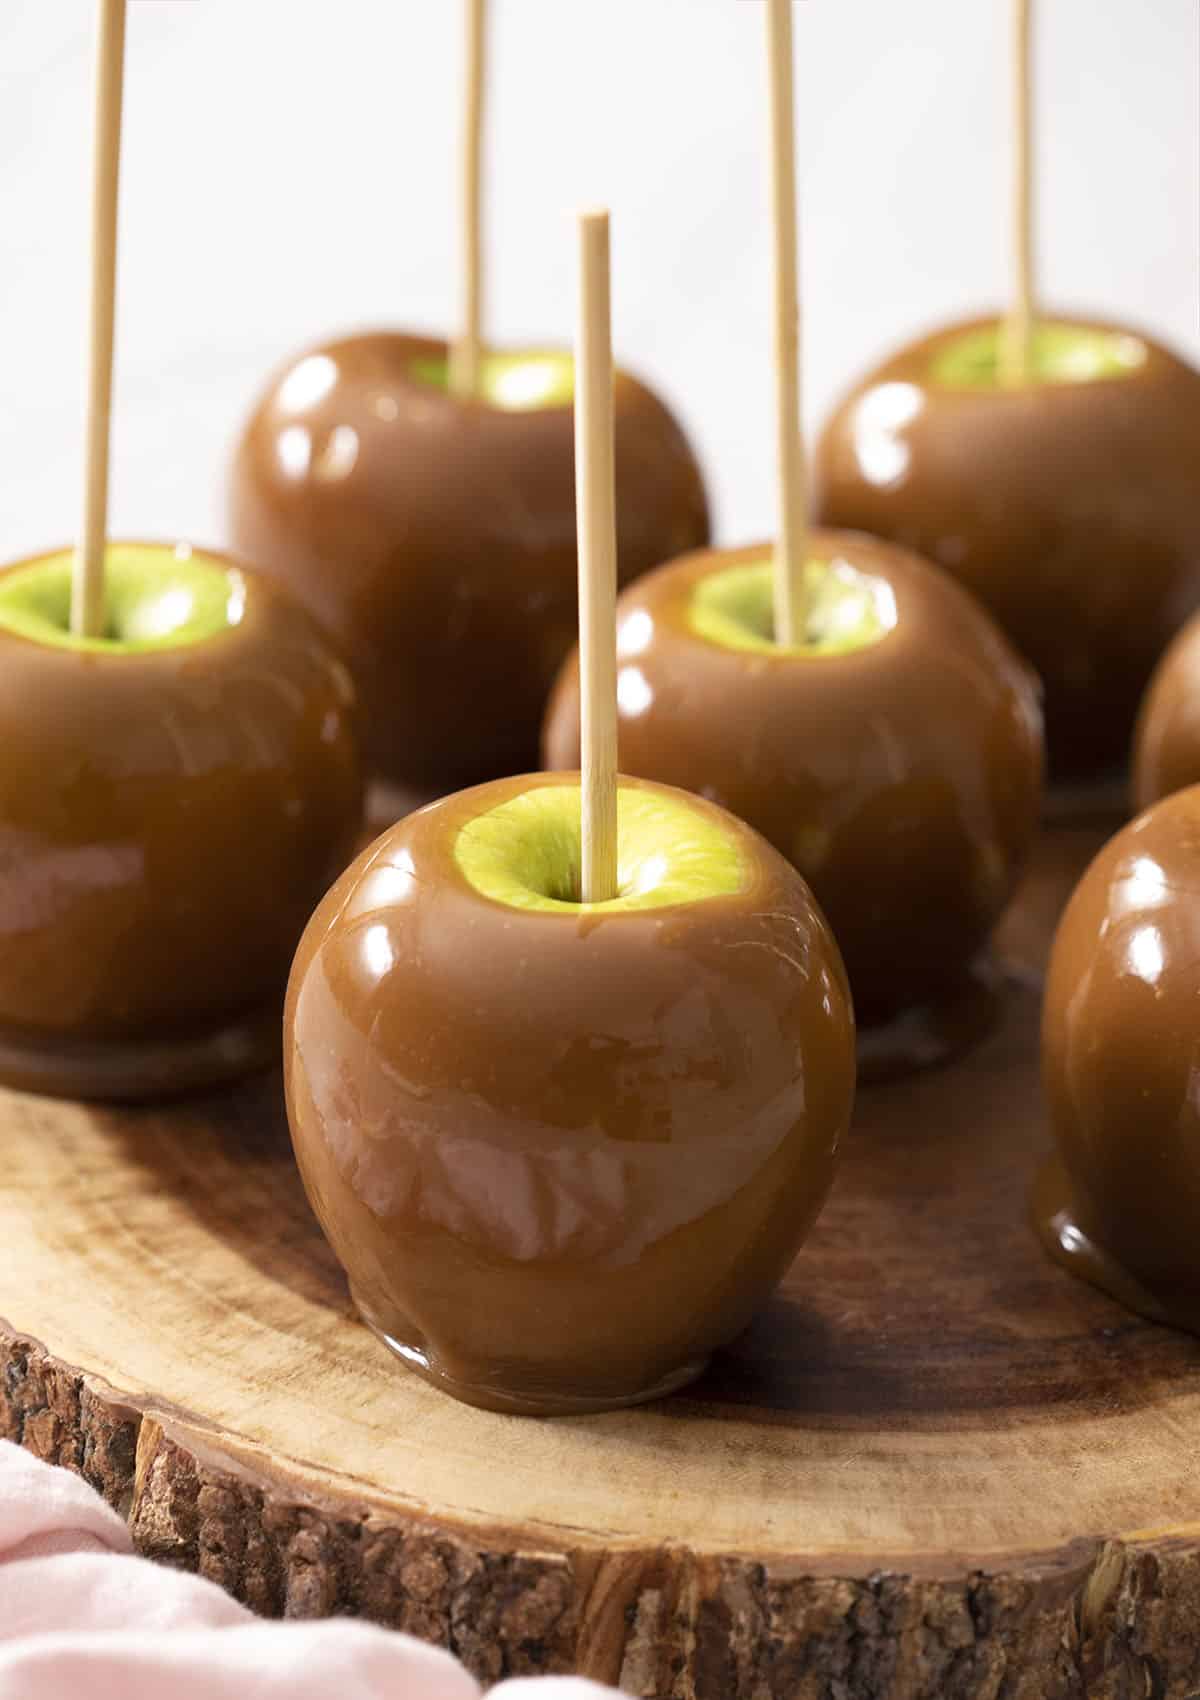
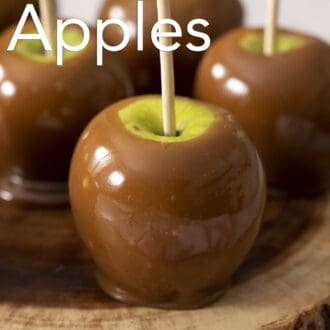
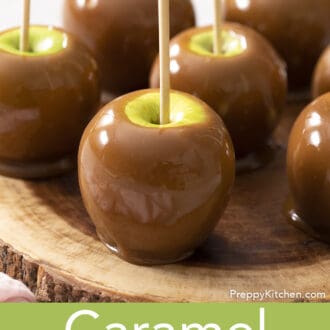

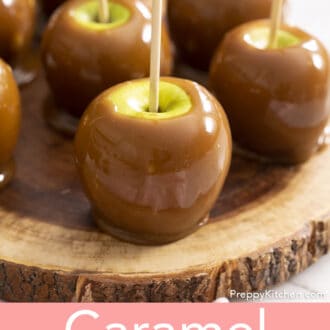
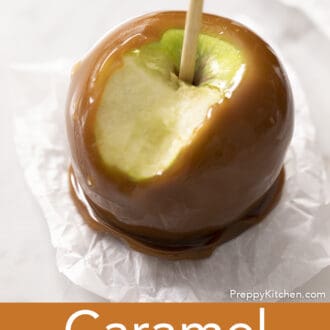
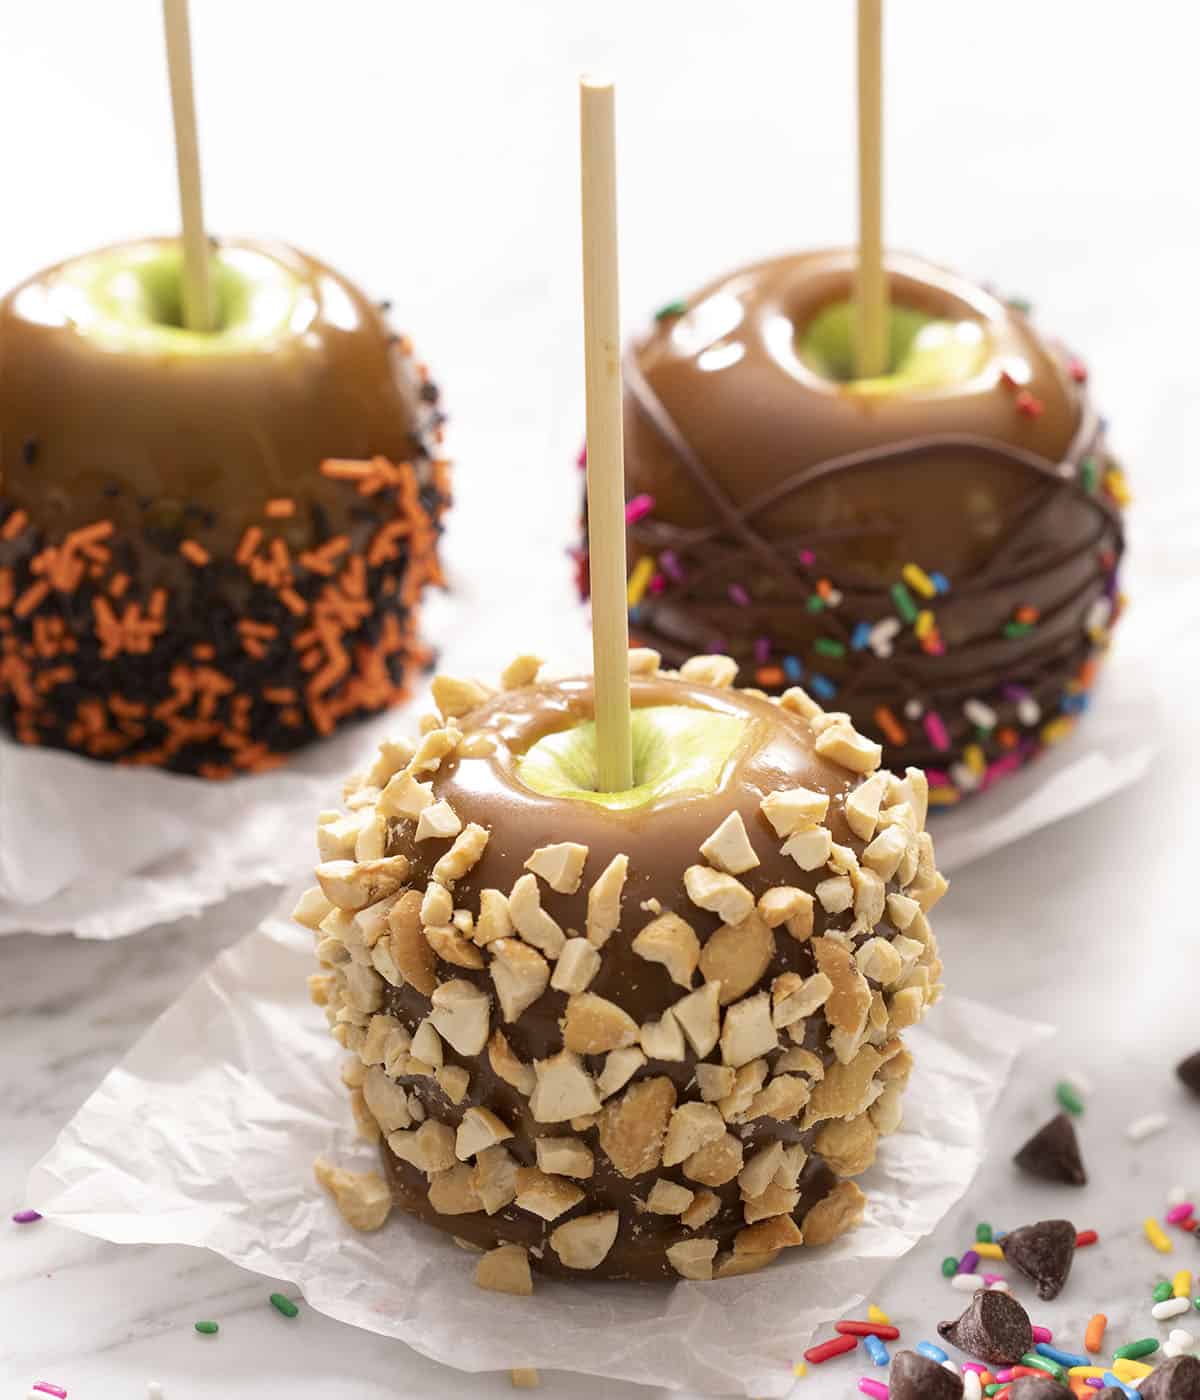
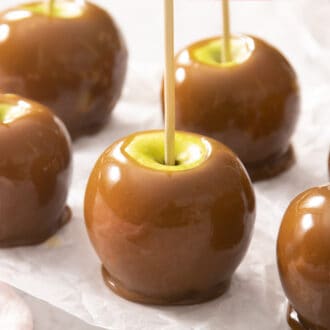
It’s apple season, and that means I’m making lots of apple desserts like caramel apples! Crisp, juicy apples dipped in buttery caramel— what could be better? You can even make gourmet caramel apples by adding your favorite toppings like sprinkles, melted chocolate, or chopped nuts. I’ve retested the recipe and updated it to explain the caramel cooking process in a bit more detail, and slightly tweaked the ingredient amounts to make it foolproof. Plus, I teach you the important role corn syrup plays in the coating for caramel apples that are actually enjoyable to eat. Once you see how easy they are to make, you’ll be making caramel apples all season long!
A reader, J, says: “I use Peter’s caramel typically for caramel apples, but John’s homemade caramel is the best there is! The corn syrup works perfectly!” ★★★★★
How I Improved This Recipe
This recipe was originally published in 2020 and has been a big reader favorite ever since. Over the years, I’ve received several of the same questions about why their caramel was too thin or slid off the apples. So I retested the recipe and updated it to help you troubleshoot the caramel coating, and included some new helpful tips to answer common reader questions. Here’s what I changed:
- Made the caramel slightly thicker. This was a minor change to the amount of corn syrup used in the caramel coating. Some readers had consistency issues with the caramel being too thin to coat the apples well. So, I fixed that by making the caramel slightly more viscous and reducing the added corn syrup. The result is a chewy caramel that isn’t too hard and is foolproof every time.
- Increased the caramel cooking temperature slightly. Cooking the caramel to a higher temperature of 245°F made the coating a bit more stable and easier to dip.
- Added tips for dipping the apples. The apples have to be prepped properly to help the caramel stick. I’ve added details about how to do this, plus plenty of decorating ideas!
Key Ingredients
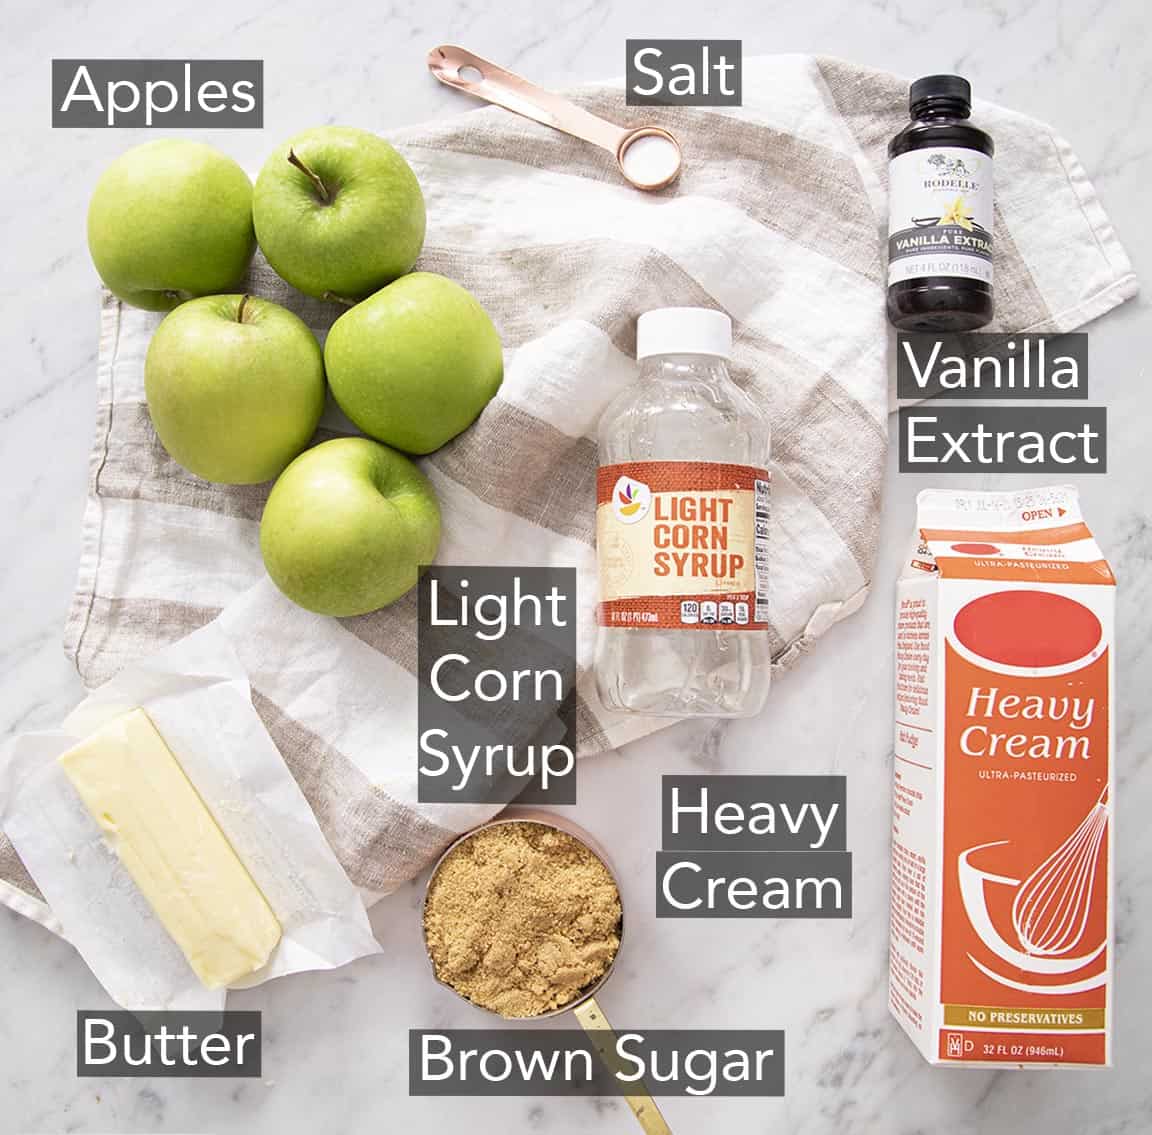
These are the main ingredients you need to make caramel apples. You can find the full list of ingredients and measurements in the recipe card below.
Apples — Granny Smith are the best apples for this recipe. Their tart flavor balances out the sweet caramel. Honeycrisp apples also work very well. Make sure you choose firm apples with no brown or soft spots. Small to medium apples are the ideal choice as they’re easy to handle. Large apples get a bit cumbersome for dipping and decorating.
Sugar — light brown sugar gives the caramel its molasses-like flavor and is a quick hack for homemade caramel— there’s no need to wait for granulated sugar to caramelize or run the risk of it crystallizing! If you only have dark brown sugar on hand, it works, too! Just note that your coating will be darker in color than mine.
Cream — both regular or heavy cream works to give the caramel sauce its velvety finish. Half and half and whole milk will not work as they do not have enough fat and are too thin to make a thick or rich caramel coating.
Corn syrup — light corn syrup is a non-negotiable for caramel that has the correct sticky consistency. It also prevents the sugar from crystallizing while the caramel cooks. (More on that below!)
Butter — unsalted butter adds richness, flavor, and an amazing buttery mouthfeel to the caramel. Salt is added separately to precisely control the flavor, but if you only have salted butter, you can use it! A salty caramel is always delicious.
Useful Tools And Equipment
There are a few handy tools I recommend for the perfect homemade caramel apples every time. Nothing complicated or specialty, don’t worry!
Candy thermometer — a candy thermometer is essential for knowing when the caramel is ready for dipping. It removes any guesswork and makes the whole process much easier! I prefer a digital one for the best precision, but a classic mercury thermometer will work too.
Heavy-bottomed pot — a tall, heavy-bottomed saucepan or pot is best for cooking caramel because it heats up evenly and insulates the ingredients from the direct burner heat, so the ingredients won’t burn or scorch.
Nonstick parchment paper or silicone mat — you’ll place the dipped apples on either of these to set. Since they’re nonstick, your caramel apples will be easy to remove when they’re ready!
Caramel apple sticks or heavy skewers — push caramel apple sticks or sturdy wooden skewers into each apple (but not through the bottom of the apple, or they won’t be able to stand up) to prepare them for dipping.
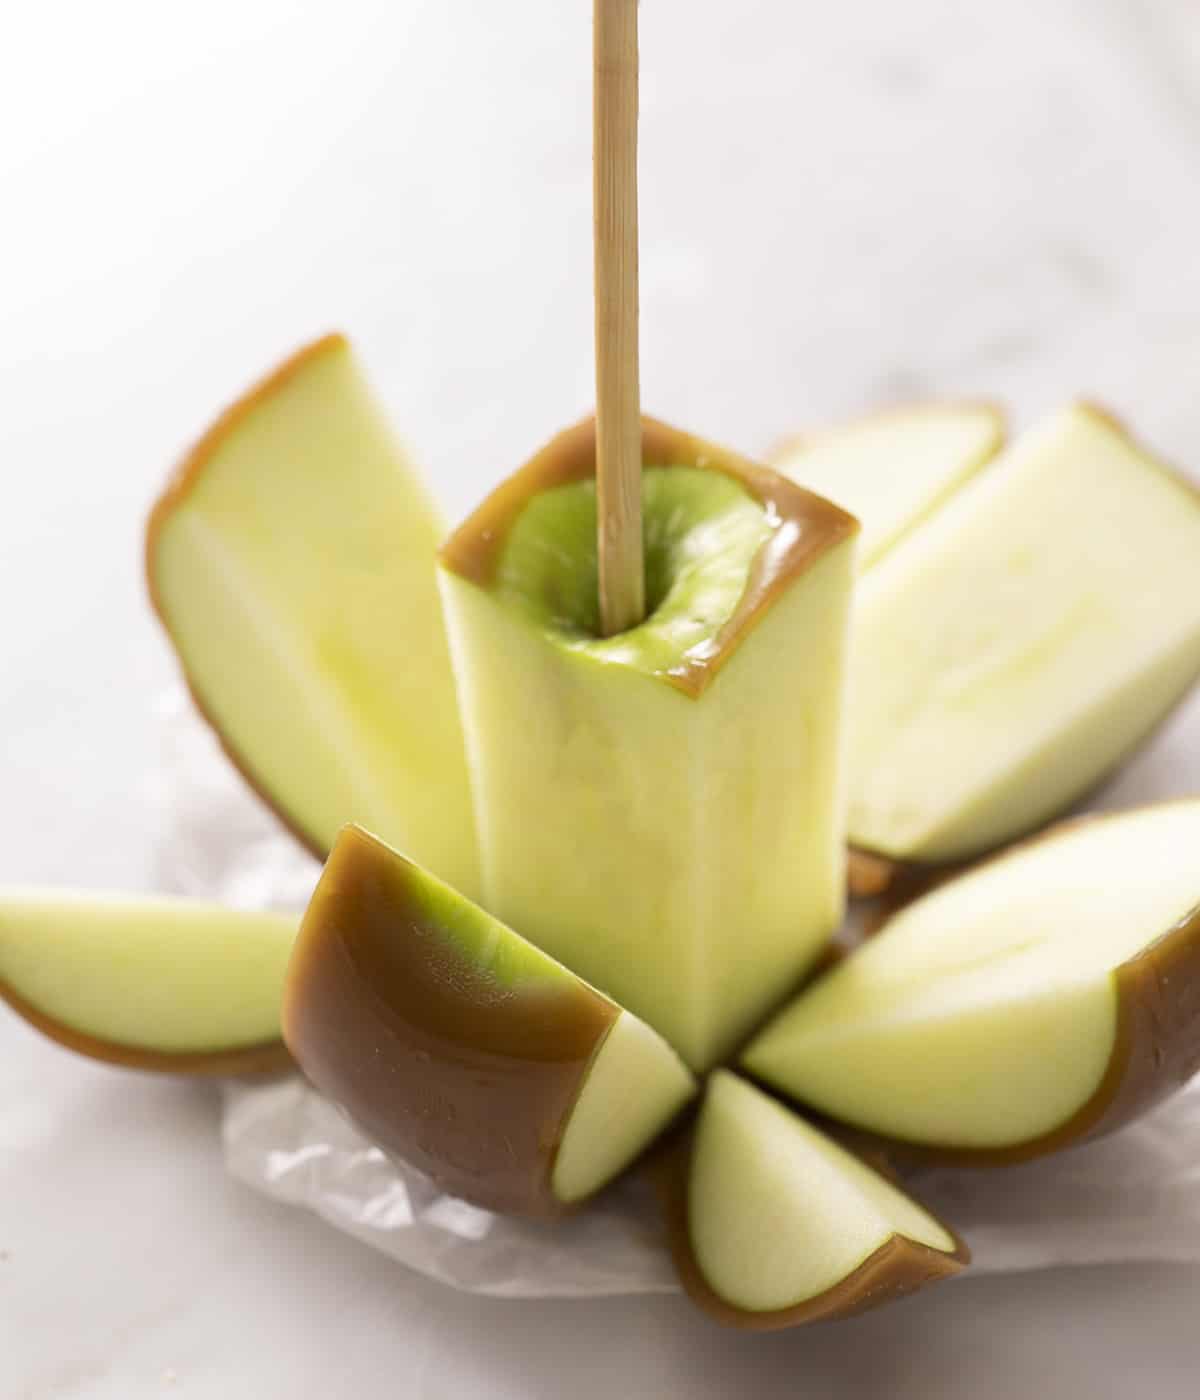
How Do I Keep The Caramel From Sliding Off?
Prepping the apples correctly makes a world of difference to caramel apples. Apples are coated in wax to preserve their freshness, which is what often causes caramel to slide right off. In the image below, you can see the difference when you dip apples that are scrubbed versus unscrubbed.
To remove the waxy coating, you need to scrub the apples thoroughly in hot tap water with a paper towel, a clean, textured kitchen towel, or a new non-scratch scrubbing pad. Alternatively, you can soak them in hot water for about 5 minutes, then scrub them. (Be careful! Very hot water will burn your hands. I find hot tap water works well for this.)
After you’ve cleaned the apples, pop them into the refrigerator to chill, as caramel sets better on cold apples. Be sure to dry them well just before dipping, as the chilled apples can develop condensation on their skin once removed from the refrigerator.

Making The Best Caramel Coating
As previously mentioned, I recently retested this recipe and adjusted the ratios slightly to make the caramel more foolproof. You need the caramel to be thick enough to cling to the apples, but soft enough to be chewy and easy to eat once chilled. Corn syrup and cooking the caramel to the proper temperature are the key!
- Temperature: The caramel should be cooked to 248°F, just above the soft-ball stage. This temperature yields a chewy caramel that isn’t so thin that it runs off the apples. Temperatures higher than 248°F will make the caramel far too firm, chewy, and unpleasant to eat. Be sure to keep an eye on your thermometer when it’s close to temperature.
- Why corn syrup is important: Corn syrup is essential to stabilizing the caramel coating. Since it’s made of glucose (an inverted sugar), it keeps the brown sugar crystals from reforming once melted and keeps the fat from the heavy cream and butter from separating in the sauce. Its thick consistency also adds body to the sauce, so the caramel clings to the apples better. Since corn syrup is also fluid when at room temperature, it keeps the caramel chewy once it cools.
Dipping and Decorating The Apples
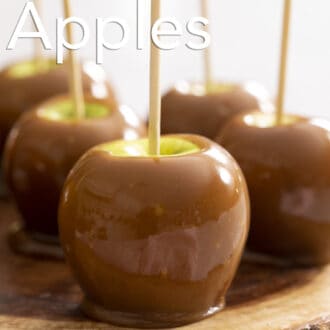
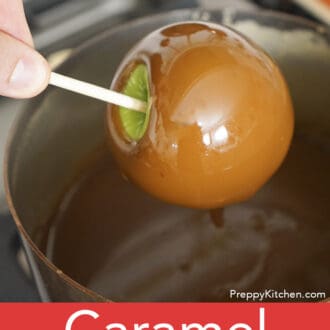
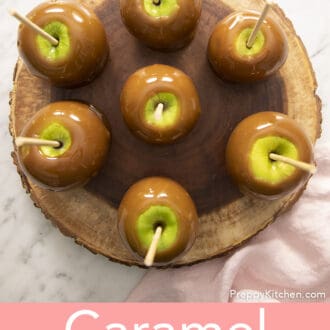
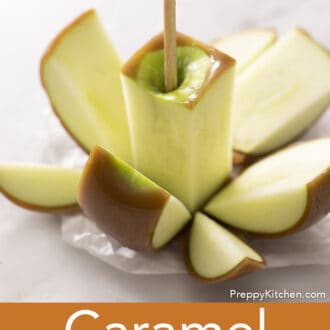
Dip your apple by holding onto the skewer, dunking the apple into the caramel, and turning it to coat the whole apple. It helps to hold the pot at an angle to collect a pool of caramel. Once coated, lift the apple out of the caramel and shake or turn it slightly to let the excess caramel drip off, then place the dipped apple on a silicone baking sheet or piece of parchment paper to set.
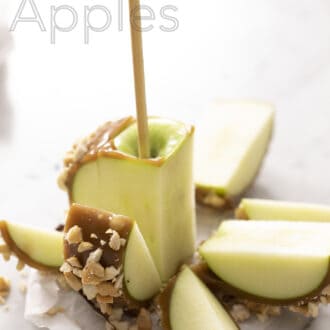
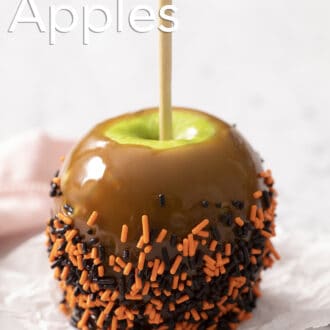
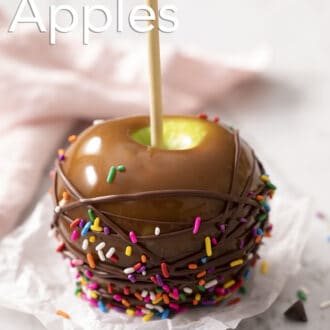
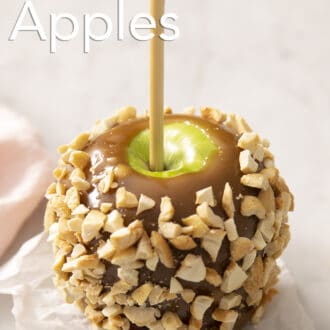
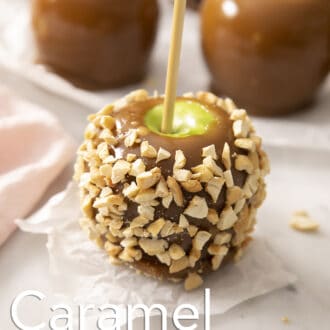
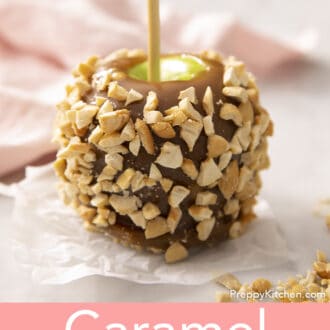
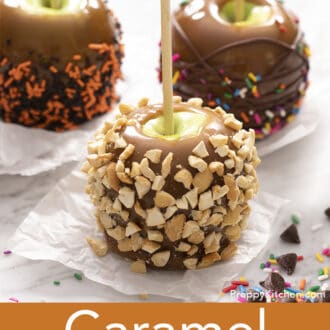
If adding any toppings, remember to set up a work station before you start dipping so they’re ready to go. After dipping, immediately roll or sprinkle the toppings onto the caramel to make gourmet caramel apples. Here are some ideas:
- Chopped nuts (roasted and salted peanuts, toasted walnuts, or toasted pecans)
- Mini M&Ms, mini chocolate chips, or chopped candy bar
- Sprinkles or shredded coconut
- Crushed cookies, Oreos, or pretzels
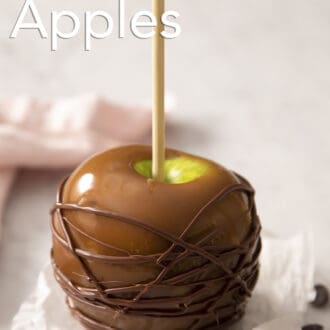
You can also drizzle the apples with melted chocolate (white, milk, or dark chocolate) once the caramel has set.
Pro Tips For The Best Caramel Apples
Gather the tools for making homemade caramel before you start. Once you put the caramel ingredients on the heat, you shouldn’t step away from your stove until it is ready. So, make sure you have a stirring utensil, candy thermometer, pastry brush, and small bowl of water ready and nearby.
If the caramel gets too thick to dip or smoothly coat the apples, gently rewarm it. Reheat the caramel on low heat until it reaches 200°F once again, which is the ideal temperature for dipping.
Pop any bubbles in the caramel coating. While bubbles in the caramel won’t affect the flavor of your caramel apple, they will affect the look of the apples once the coating sets. It’s really easy to pop the bubbles by lightly blowing hot air over the coating with a hairdryer or heat gun right after dipping.
How To Make Caramel Apples
Below, I’ve highlighted portions of the recipe in step-by-step process images along with instructions for making homemade caramel apples. You can find the full set of instructions in the recipe card below.
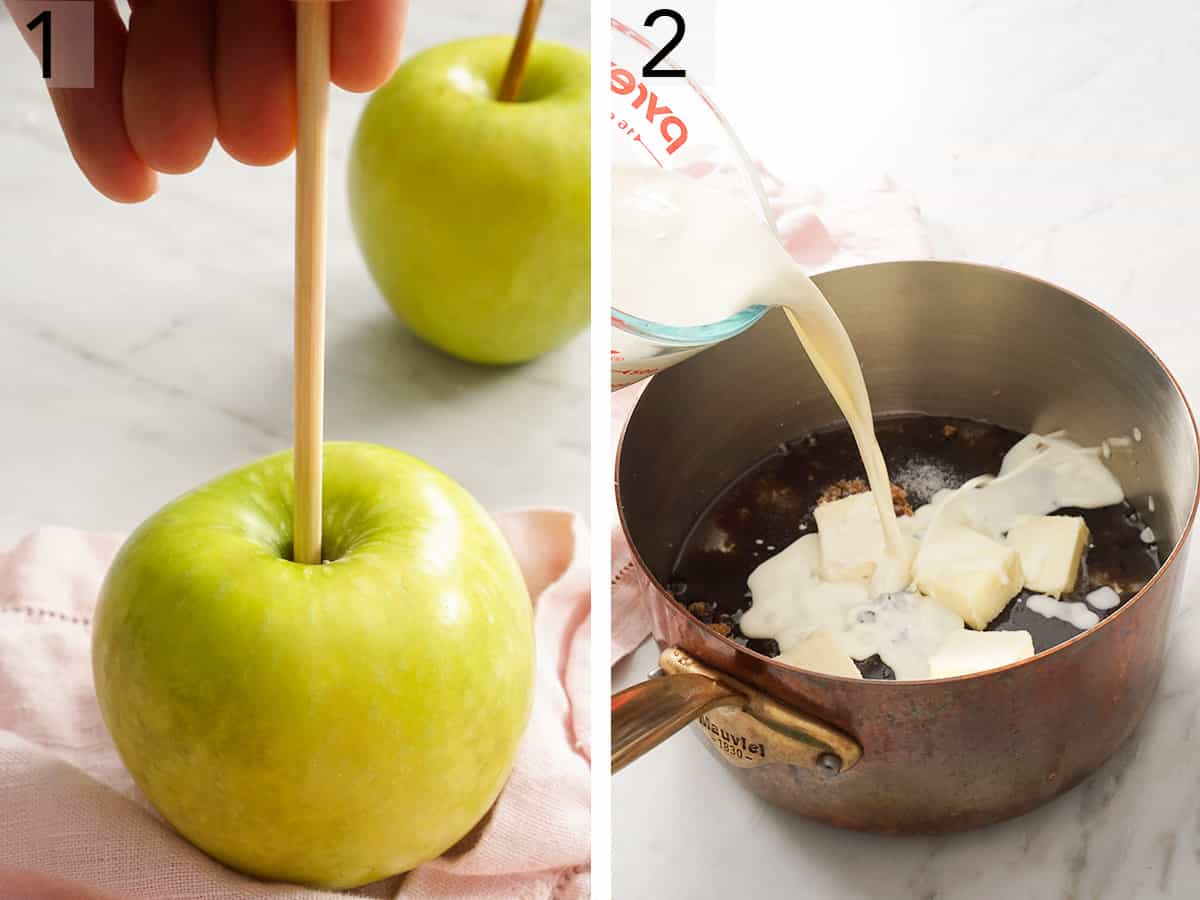
1. After thoroughly cleaning the apples, push a skewer or caramel apple stick into the stem end of the clean, dry apples. This creates a “handle” that you can hold when dipping the apple into the caramel. Refrigerate the prepared apples while you make the caramel.
2. To a large, heavy-bottomed pot (at least 5 quarts with tall sides so the caramel doesn’t bubble over), add the brown sugar, cream, corn syrup, butter, and salt.
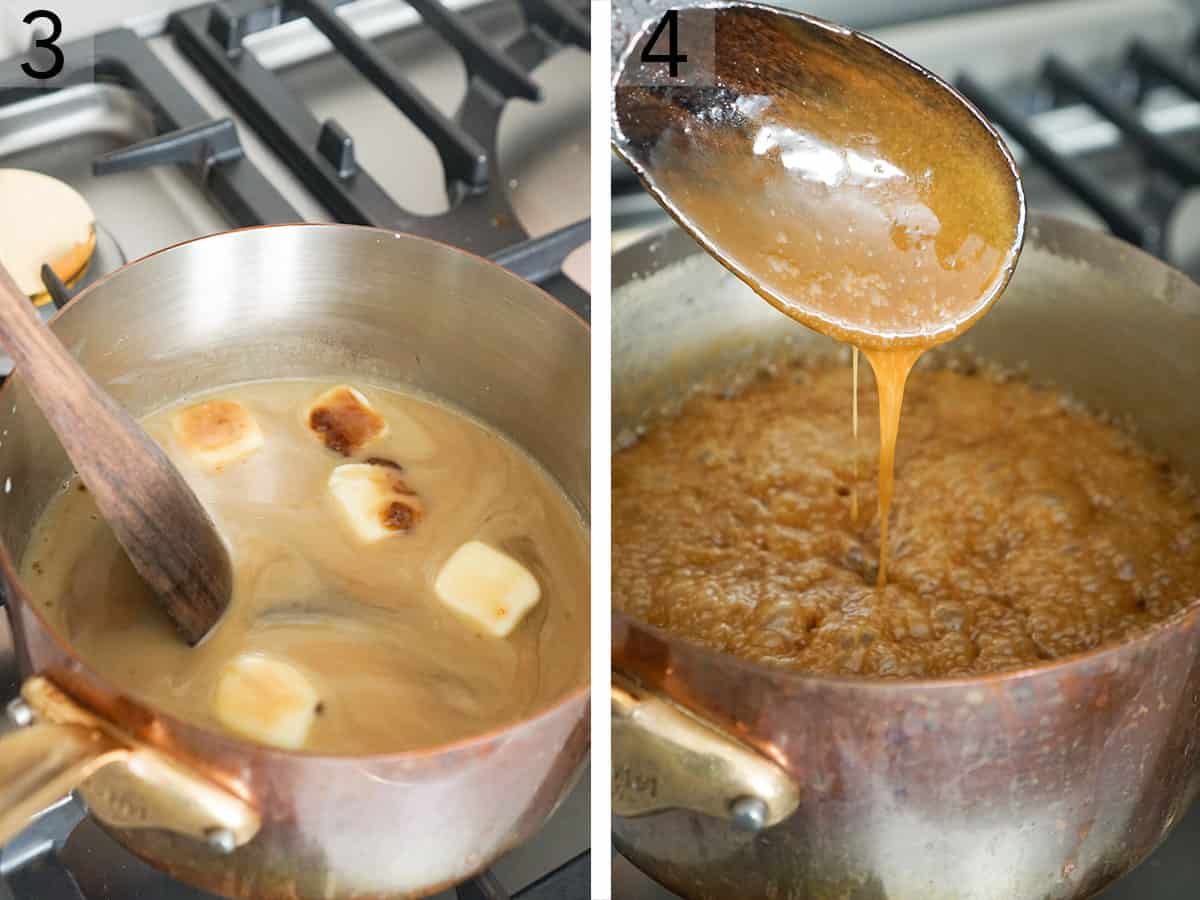
3. Cook over medium-high heat, stirring frequently with a wooden spoon, until the butter has melted.
4. Attach a candy thermometer to the side of the pot, not touching the bottom. Or just have an instant-read thermometer on hand. Continue to cook the caramel without stirring, but brush any sugar that may collect on the side of the pot with a wet pastry brush. Cook until the caramel temperature reaches 248°F. Remove from the heat with the thermometer still attached. Add vanilla extract and stir. Now leave the hot caramel to cool at room temperature down to 200°F.
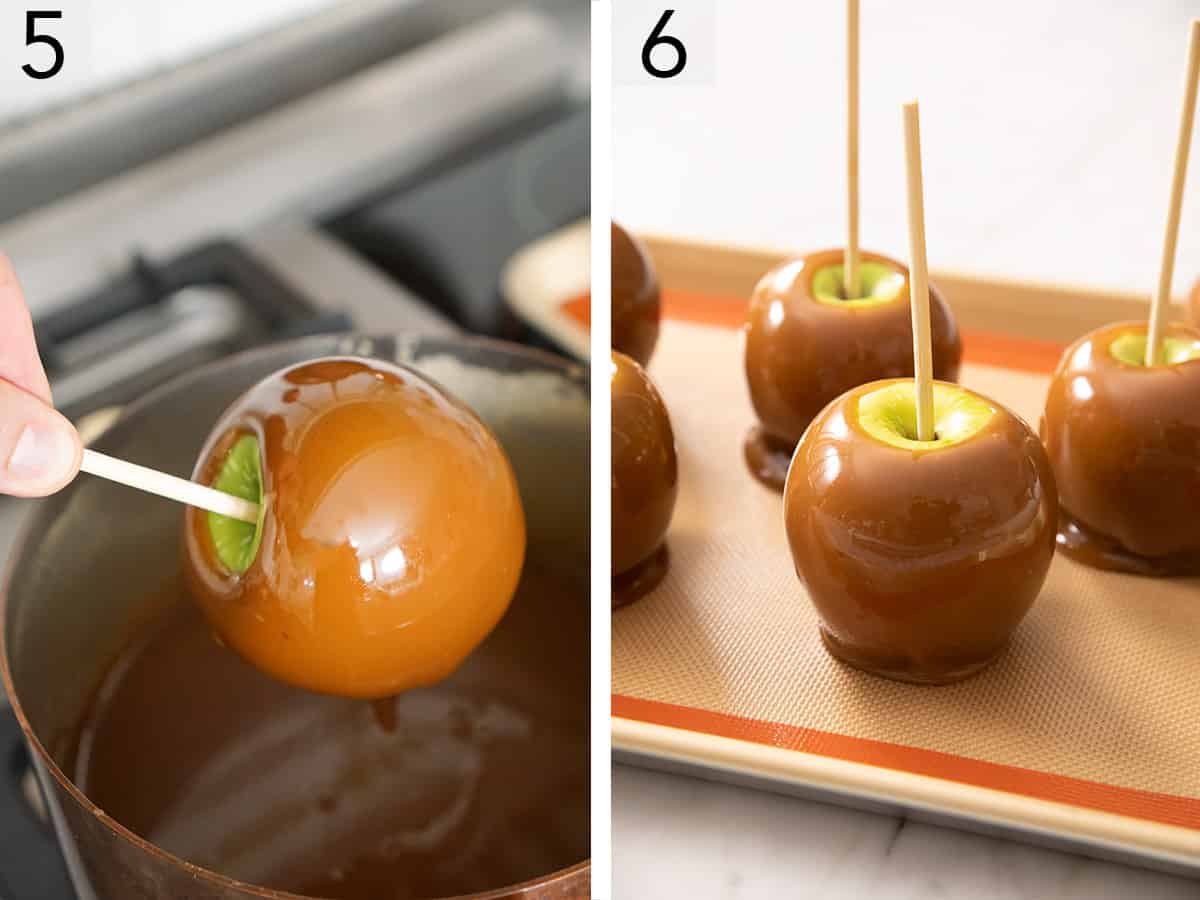
5. Meanwhile, prepare your work station for dipping the apples. Line a large baking sheet with a nonstick material like parchment paper, a silicone mat, or lightly grease the sheet with butter. If you plan on decorating the apples, set the toppings out, and decorating needs to happen immediately after dipping! Once the caramel is cooled, dip the apples into the caramel and let the excess drip off.
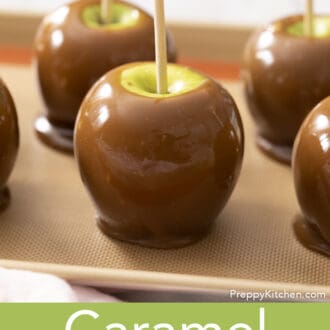
6. Place each dipped apple on the prepared baking sheet to set for about 15 minutes. If you want plain caramel apples, you’re done! If you plan on decorating them, do so right after dipping the apples.
Caramel Apple Recipe
Video
Equipment
- Candy thermometer
- Large Pot
- Apple stick (wooden), or thick skewer
Ingredients
- 8 small to medium Granny Smith Apples (2½ to 3¼ pounds, 1.1 to 1.5kg)
- 2 cups packed light brown sugar (440g)
- 1½ cups heavy cream (360mL)
- ½ cup light corn syrup (120mL)
- 3 tablespoons unsalted butter
- ½ teaspoon salt
- 1 tablespoon vanilla extract
Instructions
Apple Preparation:
- Remove all stems from apples and wash them by rubbing the skin vigorously with a paper or kitchen towel in hot water to remove the wax coating.
- Push an apple stick or wooden skewer into the stem end to create a handle. Make sure the apples are dry, then refrigerate the apples to help the caramel set faster.
For the Caramel:
- In a large pot (at least 4 quarts so the caramel doesn’t bubble over), combine the brown sugar, cream, corn syrup, butter, and salt. Place over medium heat, stirring frequently with a silicone spatula, scraping any sugar from the sides of the pot, until the butter has melted.
- Attach a candy thermometer to the side of the pot (or have an instant read thermometer close by). Cook without stirring, while occasionally brushing any sugar that collects on the side of the pot down with a wet pastry brush, until the temperature reaches 248°F, 18 to 20 minutes.
- Remove the pot from, heat but leave the candy thermometer attached. Add the vanilla (be careful as the mixture will bubble up), then stir to combine. Set aside to cool for 10 to 15 minutes until the mixture reaches 200°F.
Dipping the Apples
- While the caramel is cooling, line a large baking sheet with parchment paper, a silicone mat, or lightly grease the sheet with butter. (If you plan to decorate the apples, have your toppings ready as well.)
- Once the caramel reaches 200°F, wipe any condensation from the apples before dipping. Tip the pan slightly so that the caramel collects on one side. Dip an apple into the caramel so that it covers about three-quarters, rotating it 360° to coat all sides. Pull the apple straight up by the stick and hold it over the pot for about 10 seconds, shaking and turning it gently so that the excess caramel drips off. Place on the prepared baking sheet to cool for about 15 minutes, to allow the caramel to firm up. Repeat with the remaining apples, working quickly to dip all of the apples as the caramel will cool and thicken as more apples are dipped.
- If desired, you can roll the apples in chopped nuts or sprinkles before the caramel sets. Or let the caramel set and drizzle them with melted chocolate.
Notes
- Use a wooden spoon or silicone spatula to stir the caramel. Wood and silicone don’t conduct heat well, so they won’t affect the temperature of the caramel or burn your hands while you stir.
- Don’t waste leftover caramel! Pour it onto parchment paper and shape the caramel into a fairly uniform log. Once the caramel has cooled completely, cut it into smaller pieces and enjoy delicious buttery caramel candies. Or, wrap each one in some parchment paper to eat later.
Nutrition
How To Store
Store caramel apples in an airtight container for up to 5 days. Keep in mind that the longer they sit uncovered once the caramel has firmed up, the stickier they can become from collecting moisture from the air.
Can I make the caramel ahead of time? Yes! Store it at room temperature for up to 24 hours, then gently reheat it on the stove on low heat until it reaches 200°F. Prep and dip the apples as directed in the recipe.
Gifting Caramel Apples
Homemade gifts are a sweet and thoughtful way to show appreciation for the special people in your life, and these are one of my favorites to share. After the caramel has set, wrap the apple in cellophane or place it in a clear plastic treat bag and tie it securely to the stick with a cute ribbon. Voila! You have a handmade gift ready to deliver!
More Dessert Recipes To Try
Make the most of apple season, and try these tasty apple desserts next!
Apple bread has a wonderful, moist crumb and lots of cozy flavor from warm spices. Tart Granny Smith or Honeycrisp apples are my favorites to use in this recipe!
Four-ingredient homemade applesauce knocks its store-bought counterparts out of the park! Use it in baking, as a snack, or as a topping for waffles and French toast.
Apple turnovers are puff pastry triangles loaded with a cinnamon-scented fresh apple filling. You can make them ahead and freeze them for later!
My apple bundt cake has a bit of fall in every bite, from the apples to the warm spices, and crunchy walnuts. No electric mixer needed! Mixing the batter together by hand ensures a tender, moist cake every time.
Whole baked apples are a delight! Stuff the apples with a brown sugar, cinnamon, and pecan mixture, bake, and enjoy!
If you’ve tried this caramel apple recipe, then don’t forget to rate it and let me know how you got on in the comments below. I love hearing from you!
Clare says
Hello John Kanell
Can I use honey instead of corn syrup?
Sarah Ward (Executive Editor, Preppy Kitchen) says
While tempting, I don’t recommend it. Part of the reason corn syrup is used is because it’s an inverted sugar (glucose). This helps prevent the sugar in the caramel coating from recrystallizing when it is boiled and then cooled again. Honey will naturally crystalize, so you lose that advantage with the switch. If you want some honey for flavor, you could try substituting up to 2 tablespoon of the corn syrup for honey. (Just note that we haven’t test it that way!)
Hannah says
What can I use as a substitute for corn syrup?
Victoria says
Perfect! Easy recipe and amazing results. Thank you.
J Wood says
I use Peter’s caramel typically for caramel apples, but John’s homemade caramel is the best there is! The corn syrup works perfectly!
Adrianne says
My kids can’t handle a lot of dairy, so we tried this will full fat coconut milk in lieu of the cream and it worked like a dream. It did cool off much faster than expected, so putting the bowl in a warm place, or maybe leaving it in the pot snd turning the burner back to low while dipping could help. We managed to use a spatula to scrape the caramel over last few apples and once we dipped them in mini MMS, they look great. Thanks for sharing!
Sumaya says
Hi John, we don’t have corn syrup in the UK but we have something called golden syrup. Would that work as a substitute?
Brian says
Hey. Is there a full video for this recipe? Thanks!
jkanell says
No but I need to make one soon!
Katherine says
I love the chocolate and caramel combo!
Ava says
Great for a party! Cute and festive!