
This post may contain affiliate links. Please read our disclosure policy.
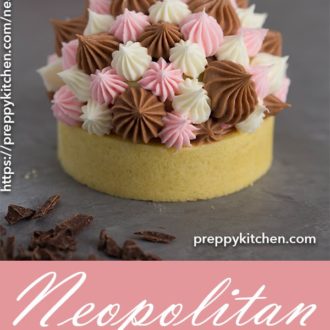
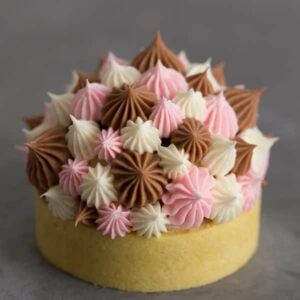
My scrumptious Neapolitan tart has layers of chocolate, vanilla, and strawberry custard along with a crisp pastry shell, chocolate ganache, fresh strawberries, and the cutest buttercream dollops ever!!

I’ve been on a tart making binge lately and it’s been so fun! These desserts might look impressive but they’re actually pretty straightforward as long as you have a couple tools!
These are the magic tart tings I used to bake the shells. They are a bit pricey but they work SO well and last forever.
These dome molds are really handy for creating all sorts of pastry elements including of course the domes I used in this recipe.
A few tips before baking these Neapolitan tarts
- Make sure to freeze the tart shells completely before baking.
- The best bake will be achieved with a perforated silicone mat and a perforated tart ring.
- If you’re not used to making pastry cream check out my How to Make Vanilla Pastry Cream post, it has a full tutorial video.
- You can totally use American buttercream if you want to save some time and like things a little sweeter.
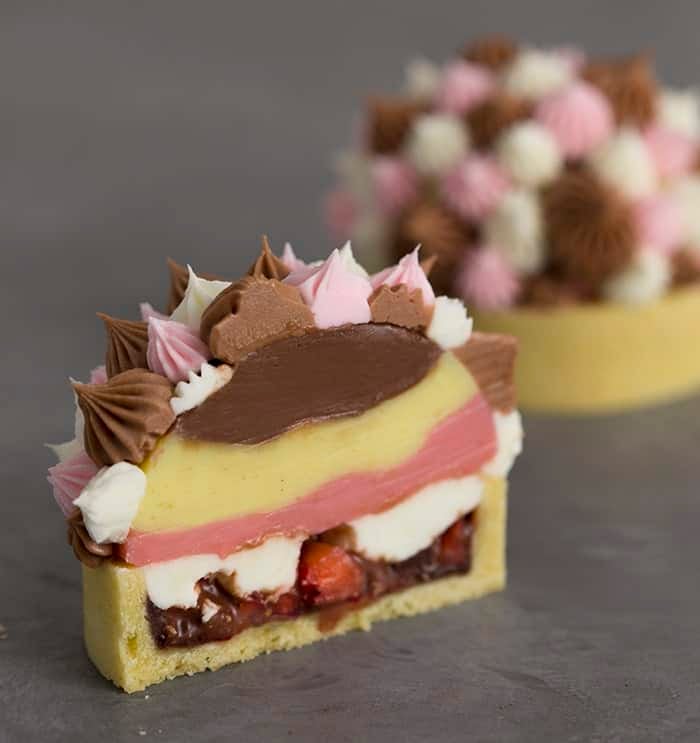
So many layers and I love them ALL!!! The fresh strawberries are a nice surprise and add a nice pope of brightness to the tart.
You can switch things up by subbing in raspberries for the strawberries, making the whole tart chocolate, or skipping all those cute buttercream dollops and replacing them with a drizzle of white chocolate ganache!
Is Neapolitan a flavor?
Neapolitan desserts are made up of layers of chocolate, vanilla, and strawberry flavored components. The term originated in the 19th century with an influx of immigrants from Naples skilled in creating frozen desserts. Originally there were many flavors often stacked in combinations of three, resembling the Italian flag, but eventually chocolate, vanilla and strawberry became the norm.
Steps to assemble this Neapolitan tart
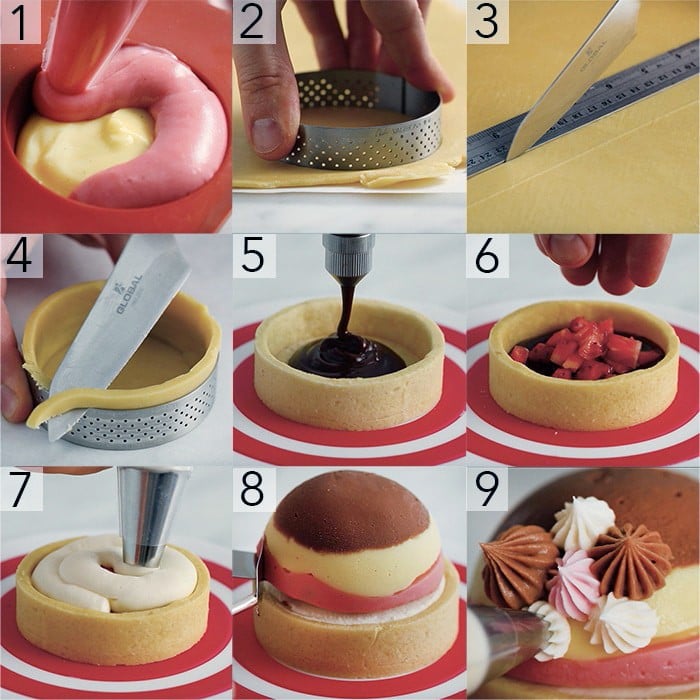
- To make the molds; as soon as you have your pastry cream made with your batches separated and flavored. Transfer them to their own piping bags, and one at a time, pipe each flavor into the silicon disc mold, then freeze them for 3 hours minimum. (You’ll want to make these molds first).
- For the tart shells; once your dough is set and chilled, cut out the dough using a 4.5″ round perforated tart ring.
- Using a sharp knife, cut strips out of the second sheet of dough that are about 7-8” long and 3/4” wide.
- Carefully lift the strips and place them on the inside of the tart rings. Press them gently with your fingers against the side and the bottom to mold it to the base of the dough. Place the tart shells into the freezer for 30 minutes to 1 hour. Just before the hour is up, preheat the oven to 320 degrees. Bake the shells for 15 minutes until they are lightly golden.
- Once your tart shells are fully cooled, melt the chocolate and transfer it to a piping bag, then snip off the tip. Pipe in the chocolate ganache as the bottom layer of the tarts.
- Chop up the fresh strawberries into small pieces and sprinkle the desired amount into the tarts on top of the ganache.
- Transfer the Swiss meringue buttercream to a piping bag, snip off the tip and pipe a layer just on top of the strawberries. Smooth out the top of the buttercream with an offset spatula.
- Remove the pastry cream molds from the silicon discs and carefully place them on top of each tart. You will want to keep the other tarts refrigerated while you pipe your SMBC dollops onto each one.
- Transfer the three flavored batches of Swiss buttercream into piping bags fitted to a variety of small and medium star tips. Alternating between each color/flavor, pipe dollops on top and all around the mold until it is completely covered.
If you’ve tried this Neapolitan tart then don’t forget to rate the recipe and let me know how you got on in the comments below, I love hearing from you!
Neapolitan Tart
Ingredients
For the Tart Shell:
- 160 g confectioners sugar
- 6 Egg Yolks
- 1 tsp vanilla bean paste 5mL or extract
- 1 lb all-purpose flour 450g
- 1 cup unsalted butter 226g cold
- ¼ tsp salt 1g heaping
- chopped fresh strawberries for assembly
For the Pastry Cream Mold:
- 2 cups whole milk 473mL
- 1/2 vanilla bean split lengthwise
- 6 egg yolks
- 2/3 cup sugar 156g
- 1/4 cup cornstarch 32g
- 1 tbsp cold unsalted butter 14g
- 1 1/2 tsp gelatin powder 4g, heaping
- 1 tbsp water 15mL
- 1/4 cup dark chocolate 38g, melted & cooled
- 2 tbsp strawberry jam 50g, strained
- pink food coloring
For the Chocolate Ganache:
- 1 cup semisweet chocolate chips 200g
- 1/2 cup Heavy cream 118mL heated
For the Swiss Meringue Buttercream:
- 5 egg whites room temperature
- 2 cups unsalted butter 452g room temperature
- 1 ½ cups granulated sugar 300g
- 1 pinch kosher salt
- 1 tsp vanilla extract 5mL
- 2 tbsp dark chocolate 22g, melted & cooled
- 1 tsp strawberry jam 7g, strained
- pink food coloring
Instructions
For the Tart Shell:
- Add the icing sugar, butter, vanilla & salt in the bowl of a stand mixer fitted with a paddle attachment.
- Beat the mixture on a medium speed for a few minutes until it forms a paste. Scrape down the bowl halfway through.
- Slowly add in the flour, and mix on low speed until it is just combined. The mixture will look crumbly. Don't worry as it will come together when rolled and rested.
- Pour the mixture on a lightly floured surface. You will want to divide the dough into 2 batches to make rolling out easier.
- Place a large piece of parchment paper down, lightly flour it, and place one batch of dough on top. Sprinkle the dough lightly with flour and place another large piece of parchment paper over the top.
- Roll the dough out with a rolling pin to 3mm (1/8 inch). I have a rolling pin with training wheels on the side that tells me exactly what 3mm is but you can eyeball it. 3mm is two pennies thick.
- Place the whole sheet of pastry in the fridge for 30 minutes. Repeat the above steps with the second batch of dough if divided.
- Once the dough has chilled, remove one sheet from the fridge. Peel off the top sheet of parchment paper, very lightly flour the pastry, then flip it over.
- Peel off the remaining sheet of parchment paper, lightly flour the dough again to prevent it from sticking.
- Cut out the dough using a 4.5" round perforated tart ring. Peel off the excess dough and you can re-roll this for another use. You can use different dimensions if you have different tart forms.
- Remove the second sheet of dough from fridge. Using a sharp knife, cut long strips of dough about 7-8” long and ¾” wide.
- Carefully lift the strips and place them on the inside of the tart rings. Press them against the side so they line up with the dough at the bottom.
- Press the bottom of the dough gently with your fingers to mold it to the base of the dough.
- Cut off any excess pastry hanging over the top of the tart rings with a sharp knife.
- Place the tart shells into the freezer for 30 minutes to 1 hour.
- Pre-heat your oven to 320F. Place the tray with your tart shells in the oven. Bake for 15 minutes or until the shell is lightly golden.
- Remove tart shells from the oven and allow time to cool before piping so the filling does not melt.
For the Pastry Cream Mold:
- In a medium saucepan, heat the milk and vanilla bean to a boil over medium heat. Immediately turn off the heat and set aside to infuse for 15 minutes.
- In a bowl, whisk the egg yolks and sugar until light and fluffy.
- Add the cornstarch and whisk vigorously until no lumps remain. Whisk in 1/4 cup of the hot milk mixture until incorporated.
- Whisk in the remaining hot milk mixture, reserving the saucepan.
- Mix the gelatin powder and water together, add it to the mixture and give it a whisk.
- Pour the mixture through a strainer back into the saucepan.
- Cook over medium-high heat, whisking constantly, until thickened and slowly boiling.
- Remove from the heat and stir in the butter.
- When the butter is fully incorporated, split the cream into 3 batches.
- Add the melted and cooled chocolate to one batch. Mix until fully incorporated.
- Add the strained strawberry jam to a separate batch and a couple drops of pink food coloring until you reach a desired color. (You can heat up the jam to help strain it if you need). Mix to incorporate.
- Let them cool slightly. Cover each batch with plastic wrap, lightly pressing the plastic against the surface to prevent a skin from forming.
- Chill at least 2 hours or until ready to serve. (The custard can be made up to 24 hours in advance).
- Transfer each batch of pastry cream to their own piping bag and snip off the tip.
- Pipe each mixture, one at a time, into 4 x 4.5" Silicon Disc molds and freeze for 3 hours minimum.
For the Chocolate Ganache:
- Melt chocolate and cream together on low heat. Whisk together and set aside.
- You might need to add more or less cream to achieve the desired consistency.
- Once you’re ready to assemble your tart, transfer the ganache to a piping bag and snip off the tip.
For the Swiss Meringue Buttercream:
- Add egg whites, sugar and salt in a bowl. Give the mixture a brief whisk.
- Place the bowl over a pan of simmering water. Making sure the water does not touch the bowl.
- Whisk the egg whites occasionally while it warms up. When the mixture has warmed, whisk it constantly.
- Heat the mixture until it reaches an internal temperature of 160ºF or until it's not grainy between your fingers.
- Transfer to the bowl of a stand mixer with a whisk attachment. Whisk until you get room temperature glossy peaks.
- Switch to a paddle attachment and while the mixture is running on low, add tablespoon sized dollops of room temperature butter making sure to let the butter incorporate before you add the next piece.
- Once all the butter is incorporated, go ahead and add the vanilla extract.
- Reserve 2/3 of the white Swiss meringue buttercream by putting it in a separate bowl.
- Melt the semi-sweet chocolate and allow it to come to room temp.
- Split the remaining amount of buttercream in half and add the melted and cooled chocolate to one batch. Mix until fully incorporated.
- Add the strained strawberry jam to the last batch of buttercream and a dollop or two of pink food coloring until you reach a desired color.
- Just before assembling the tarts, give each buttercream a final whip before transferring to piping bags.
- Transfer half of the vanilla Swiss buttercream to a piping bag and snip off the tip. Set aside until needed.
- Transfer the last three batches of Swiss buttercream to piping bags fitted to a variety of small and medium star tips. Set aside until needed.
For the Assembly:
- Once your tarts are cooled and your pastry cream molds are ready, you can assemble your tart.
- Pour or pipe in the chocolate ganache as the bottom layer of the tart.
- Make sure your strawberries are chopped into small enough pieces and sprinkle a desired amount on top of the ganache.
- Pipe a layer of vanilla Swiss meringue buttercream on top of the strawberries.
- Using an offset spatula, carefully place the pastry cream mold on top of the buttercream.
- Using the tree batches of Swiss buttercream, pipe dollops on top and all around the pastry cream mold.
Notes
- Make sure to freeze the tart shells completely before baking.
- The best bake will be achieved with a perforated silicone mat and a perforated tart ring.
- You can make the tart shells and domes a day ahead then assemble before serving.
Nutrition
Have you tried this recipe? Tag me today!
Mention @preppykitchen and tag #preppykitchen!
IF YOU LOVE THIS RECIPE TRY THESE OUT!


