
This post may contain affiliate links. Please read our disclosure policy.

French pastry might seem intimidating but it’s really fun and SO delicious! My striped chocolate and vanilla tart has a crisp two-tone shell filled with all sorts of decadent goodness!
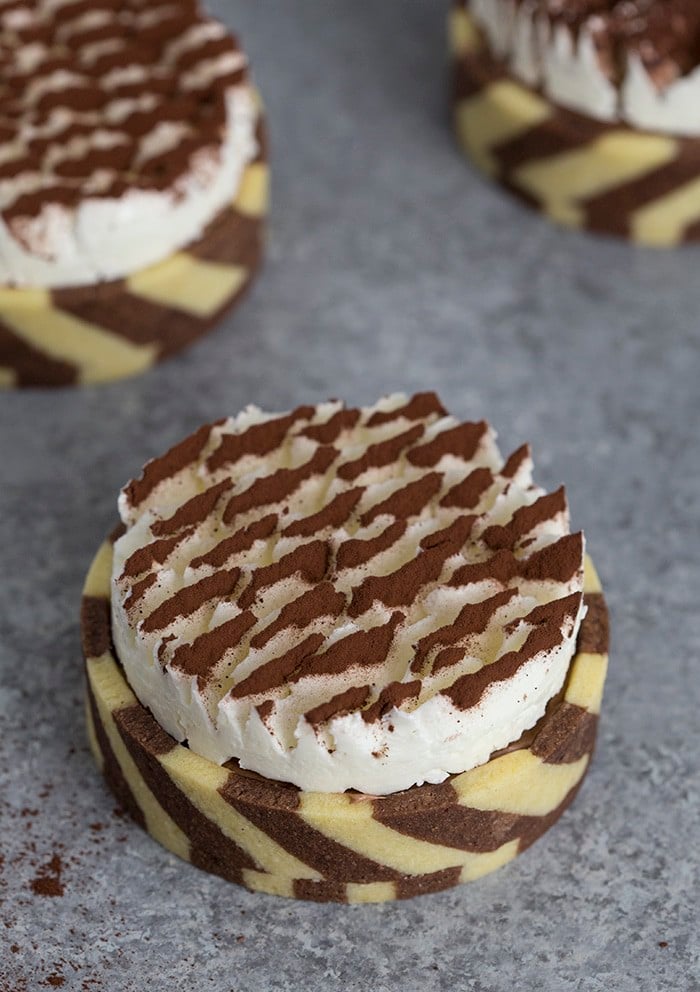
Sometimes you want to make something super simple and delicious, but sometime you want to challenge yourself and make something that really takes you out of your comfort zone. This striped chocolate tart is my take on a classic French Pastry and in case you’re wondering, yes, it was worth the time!
I’ve made laminated doughs for cookies before, most recently on my glittery pink and white heart cookies, so I thought it would be fun to try the technique on a tart shell!
A Few Notes on this French pastry
- Freezing the shells before baking is really important so don’t skip that step! Check on them after a 2-3 minutes in the oven. If the walls have sagged down, remove from oven and press back into ring. Continue baking and they should be fine.
- You can make the shells in advance and keep them in an airtight container for a few days before filling.
- Make sure to chill that top before cutting out the circles and store in freezer until ready to assemble.
For the Swiss Meringue:
- Don’t let any yolks get into your whites when you separate the eggs. The easiest avoid yolks is to separate the eggs one at a time into separate bowls and then pour the white in as you go along.
- Don’t get scared when you add the butter in! if it’s a soup or if it’s looking wonky just chill is a few minutes then get back to mixing.
- If your idea of warm is tepid then go ahead and use a thermometer to see when your egg white mixture has reached 160F.
Steps to assemble this French pastry
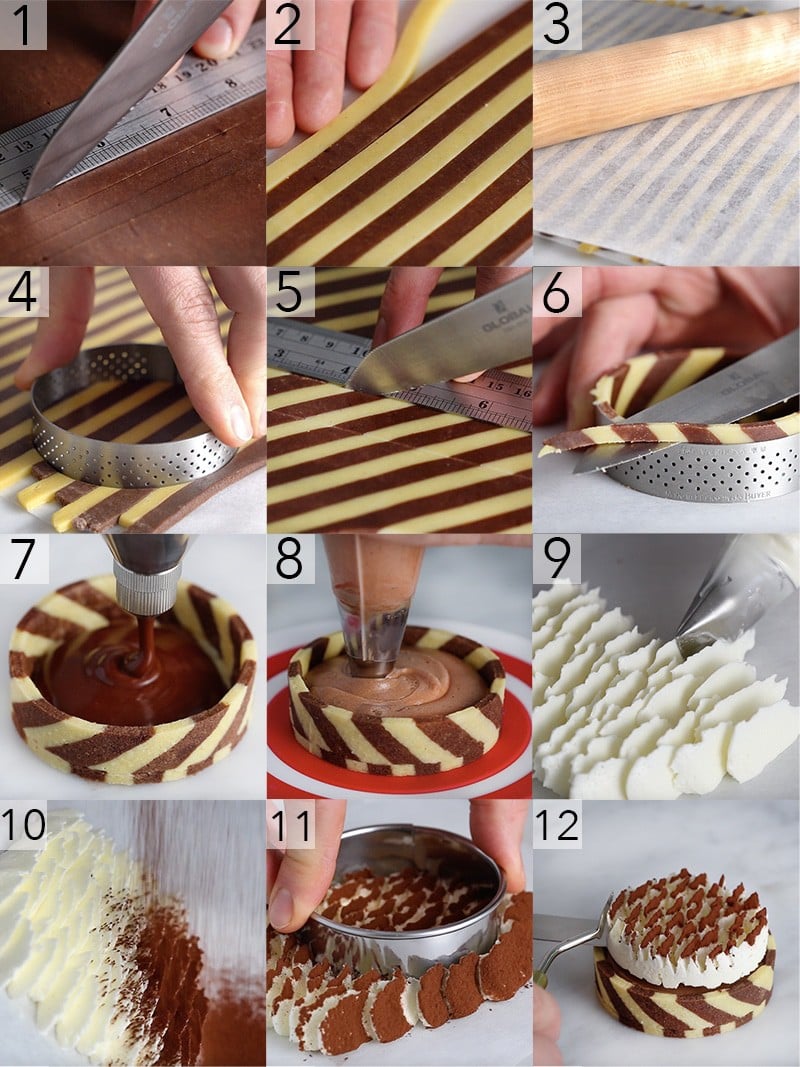
- When both batches of pasty dough are set, using a ruler, cut about 1/4-inch strips out of each batch with a sharp knife. .
- Carefully lift the strips up from each batch and on a sheet of parchment paper; layer them, making sure they’re touching as you alternating between the two colors. This should create two large sheets of striped pastry dough.
- When you are done layering the strips of dough, place a piece of parchment paper on top and roll it out to create a seal between the layers. Place the whole sheet of dough in the fridge for 30 minutes.
- Once the dough has chilled, remove one sheet from the fridge, peel off the top sheet of parchment paper and using a 4.5” round perforated tart ring (or any other tart ring you have) cut out 6 circles of dough.
- Remove the second sheet of dough from the fridge and using a sharp knife, cut long strips of dough; about 7-8” long and 3/4” wide. Carefully lift the strips and place them on the inside of the tart rings. Make sure to press them against the sides so they line up with the dough at the bottom.
- Cut off any excess pastry hanging over the top of the tart rings with a sharp knife then place the tart shells into the freezer for 30 minutes to 1 hour. Just before the hour is up, pre-heat the oven to 320 degrees F. Place a try with the tart shells in the oven for 15 minutes or until the shell is almost lightly golden then remove them from the oven.
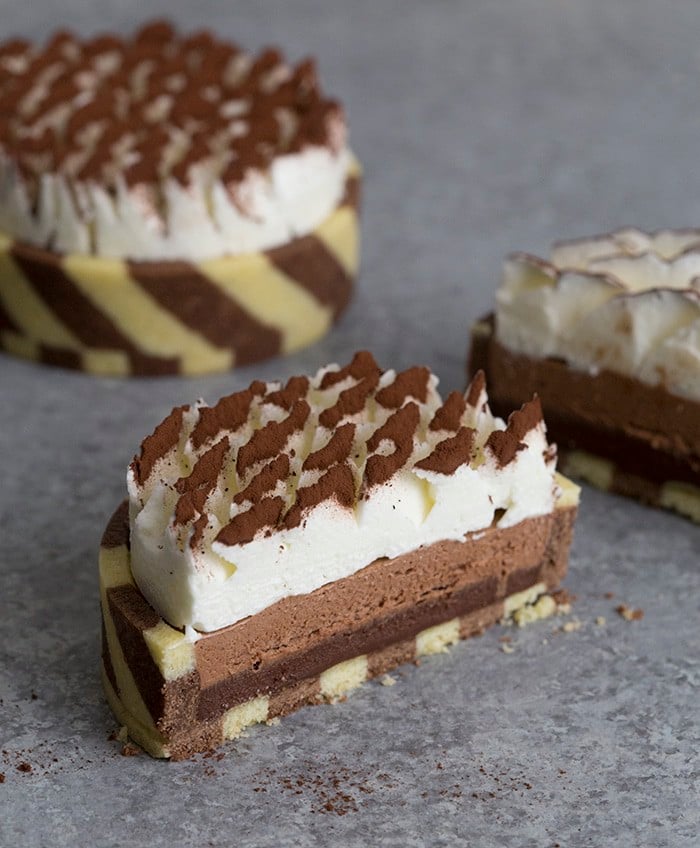
- Once your tart shells have fully cooled, and you have made your chocolate ganache, transfer it to a piping bag and snip off the tip. Now pipe the chocolate ganache in as your first layer of the tart.
- When you have made your chocolate Swiss buttercream, transfer it to a piping bag and snip off the tip. (You may need to give it a quick whip before transferring it to a piping bag if it has been sitting for a bit). Now pipe in the chocolate Swiss buttercream as your second layer of the tart.
- To make the ridged top; transfer the batch of white Swiss buttercream to a piping bag fitted to a 127 or medium petal tip. Pipe strips of buttercream (with the thicker side of the petal tip down) in tight rows with the piping tip perpendicular to the surface of the parchment paper. Keep piping until the design is a bit larger than the cutter you will be using, then carefully place it in the freezer for 30 minutes.
- Remove the buttercream topping from the freezer and while you are carefully tilting it to one side, sift on the cocoa powder. You can sift on as much or as little as you please.
- Using a cutter slightly smaller sized than your tart shell; cut out a circle from the Swiss buttercream ridged top. Keep these tops in the fridge until you assemble your tarts.
- When you are ready, carefully place the ridged top over the chocolate buttercream. If you find yourself falling behind at all, just place the tarts in the fridge until you catch up and are ready for the next step. Enjoy!
If you’ve tried this French pastry then don’t forget to rate the recipe and let me know how you got on in the comments below, I love hearing from you!
French Pastry
Ingredients
Vanilla Tart Shell:
- 80 g confectioners sugar
- 3 Large Egg Yolks
- 1/2 tsp vanilla extract 2.5mL
- 1/2 lb plain flour 225g
- 1/2 cup unsalted butter 113g cold & cubed
- ¼ tsp salt 1g
Chocolate Tart Shell:
- 80 g confectioners sugar
- 3 Large Egg Yolks
- 1/2 tsp vanilla extract 2.5mL
- 1/2 lb plain flour 215g
- 1/2 cup unsalted butter 113g cold & cubed
- 3 tbsp cocoa powder
- ¼ tsp salt 1g
Chocolate Ganache:
- 1 cup semisweet chocolate chips 200g
- 1/2 cup Heavy cream 110g heated
Swiss Meringue Buttercream:
- 5 egg whites at room temperature
- 2 cups unsalted butter 452g room temperature
- 1 ½ cups granulated sugar 300g
- 1 pinch kosher salt
- 1 tsp vanilla extract 5mL
- 1/3 cup semi-sweet chocolate
Ridged Top:
- Swiss meringue buttercream
- 3 tbsp cocoa powder for assembly
Instructions
For the Tart Shell:
- You're making two batches of pastry, one vanilla and one chocolate. Later on they will be laminated together.
For the Vanilla Dough:
- Add the icing sugar, butter, vanilla & salt in the bowl of a stand mixer. You can also use a hand mixer.
- Beat the mixture on a medium speed for 2 minutes until it forms a paste. Scrape down the bowl after 1 minute.
- Add in the egg yolks and mix until fully incorporated.
- Add in the flour, and mix on low speed until it is just combined. You want the mixture to have JUST come together.
- Transfer the dough on a lightly floured piece of parchment paper. Add a second piece of parchment paper dusted with flour on top. Press down and then roll out to 1/8 an inch or 3mm.
- Transfer to fridge to chill for at least 30 minutes.
For the Chocolate Dough
- For the second batch, repeat the above steps. Just sift the cocoa powder in with the confectioners' sugar at the beginning.
- Using a ruler, cut about 1/4-inch strips out of each batch of dough with a sharp knife.
- Carefully lift up the strips from each batch and layer the alternating colored strips so they are touching, this should be done on a a sheet of parchment.
- Place a sheet of parchment on top and roll out to create a seal.
- Place the whole sheet of pastry dough in the fridge for 30 minutes.
- Once the dough has chilled, remove one sheet from the fridge. Peel off the top sheet of parchment paper, very lightly flour the pastry, then flip it over.
- Peel off the remaining sheet of parchment paper, lightly flour the dough again to prevent it from sticking.
- Using a 4.5" round perforated tart ring (or any tart ring you have) cut out 6 large circles of dough.
- Remove the second sheet of dough from fridge. Using a sharp knife, cut long strips of dough about 7-8” long and ¾” wide.
- Carefully lift the strips and place them on the inside of the tart rings. Press them against the side so they line up with the dough at the bottom.
- Press the bottom of the dough gently with your fingers to mold it to the base of the dough.
- Cut off any excess pastry hanging over the top of the tart rings with a sharp knife.
- Place the tart shells into the freezer for 30 minutes to 1 hour.
- Pre-heat your oven to 320F. Place the tray with your tart shells in the oven. Bake for 15 minutes or until the shell is almost lightly golden.
- Remove tart shells from the oven and allow time to cool before piping so the filling does not melt.
For the Chocolate Ganache:
- Melt chocolate and cream together on low heat. Whisk together and set aside.
- You might need to add more or less cream to achieve the desired consistency.
- Once you’re ready to assemble your tart, transfer the ganache to a piping bag and snip off the tip.
For the Swiss Meringue Buttercream:
- Add egg whites, sugar and salt in a bowl.
- Give the mixture a brief whisk.
- Place the bowl over a pan of simmering water. Making sure the water does not touch the bowl. Whisk the egg whites occasionally while it warms up. When the mixture has warmed, whisk it constantly.
- Heat the mixture until it reaches an internal temperature of 160ºF or until it's not grainy between your fingers. Transfer to the bowl of a stand mixer with a whisk attachment. Whisk until you get room temperature glossy peaks.
- Switch to a paddle attachment and while the mixture is running on low, add tablespoon sized dollops of room temperature butter making sure to let the butter incorporate before you add the next piece.
- Once all the butter is incorporated, go ahead and add the vanilla extract.
- Reserve 2/3 of the white Swiss meringue buttercream for the topping.
- Melt the semi-sweet chocolate and allow it to cool to room temp. Add it into the rest of the batch that’s left in the stand mixer.
- Once the chocolate is fully incorporated and you’re ready to assemble the tarts, transfer the chocolate buttercream to a piping bag and snip off the tip.
- For the Ridged Top:
- Transfer the batch of white Swiss meringue buttercream to a piping bag fitted to a 127 (medium petal) tip.
- Pipe strips of buttercream (with the thicker side of the petal tip down) in tight rows with the piping tip perpendicular to the surface of the parchment paper. Keep piping until the design is a bit larger than the cutter you will be using.
- Carefully place the buttercream pattern in the freezer for 30 minutes.
- Remove the buttercream topping from the freezer. While carefully tilting it to one side, sift on cocoa powder.
- Using a cutter slightly smaller sized than your tart shell, cut out a circle from the ridges Swiss buttercream top.
- Keep these tops in the fridge until you assemble your tarts.
For the Assembly
- Once your tart shells have cooled, pipe in the first layer of chocolate ganache.
- Pipe a layer of the chocolate Swiss meringue buttercream over the ganache.
- Carefully place the ridged top over the chocolate buttercream and enjoy!
Notes
- Freezing the shells before baking is really important so don't skip that step! Check on them after a 2-3 minutes in the oven. If the walls have sagged down, remove from oven and press back into ring. Continue baking and they should be fine.
- You can make the shells in advance and keep them in an airtight container for a few days before filling.
- Make sure to chill that top before cutting out the circles and store in freezer until ready to assemble.
Nutrition
Have you tried this recipe? Tag me today!
Mention @preppykitchen and tag #preppykitchen!
IF YOU LOVE THIS RECIPE TRY THESE OUT!


