
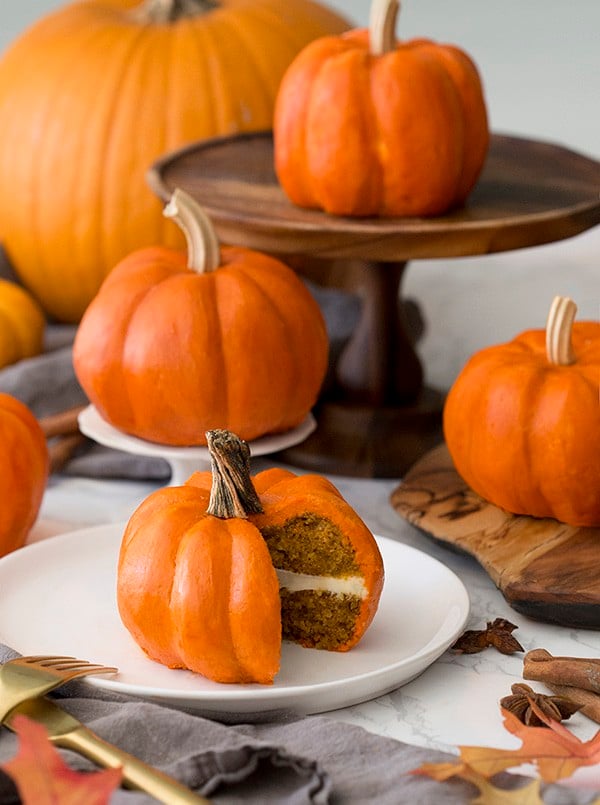
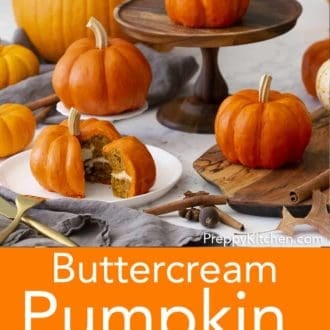
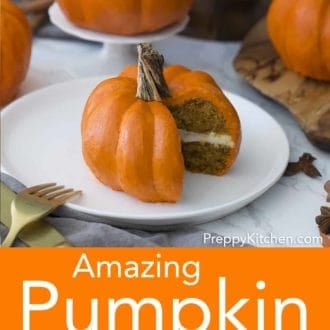
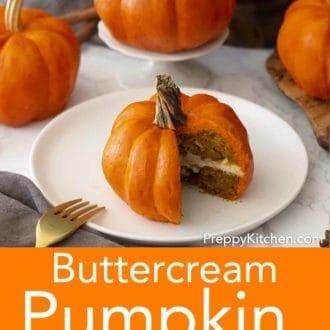
Mini-pumpkin bundt cakes filled with Fall spices and cream cheese frosting! I thought these would be really cute as part of a centerpiece at dinner mixed in with real pumpkins and Autumn leaves. Dessert could be right in front of you without you having any idea!
Pro Tips for Amazing Pumpkin Cake
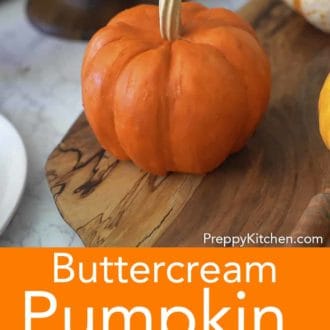
- I used real pumpkin stems for these cakes to give the most realistic appearance. I just bought a “Cinderella” pumpkin because they have a long stem then cut a few segments off with some garden clippers.
- You could also make the stems from some fondant or thick buttercream, but it wouldn’t look quite as real and takes more time.
- The KEY to decorating these cakes is to chill them after you apply and smooth the buttercream. Once chilled you can do some sculpting and then chill again if the cake softens up too much.
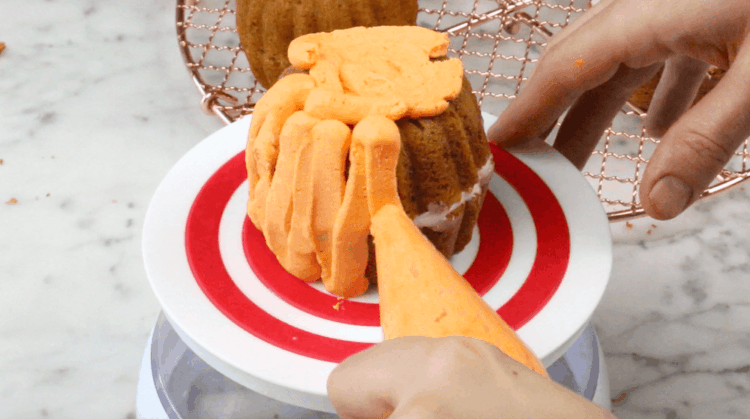
- The best shaping tool I can recommend is a yogurt container you cut into half circles and rounded points. These pieces will flex and give you better control when shaping and smoothing the pumpkins.
- Measure your flour correctly! Adding too much flour to the recipe is the most common mistake. The best, and easiest way to measure flour is by using a scale. If you don’t have one then fluff your flour with a spoon, sprinkle it into your measuring cup, and use a knife to level it off.
- After you cover your cakes in buttercream, I recommend chilling them in the fridge for about 20 minutes so they will be easier to sculpt. If you’re making a bunch of them you can have a little assembly line going with cakes coming into and out of the fridge.
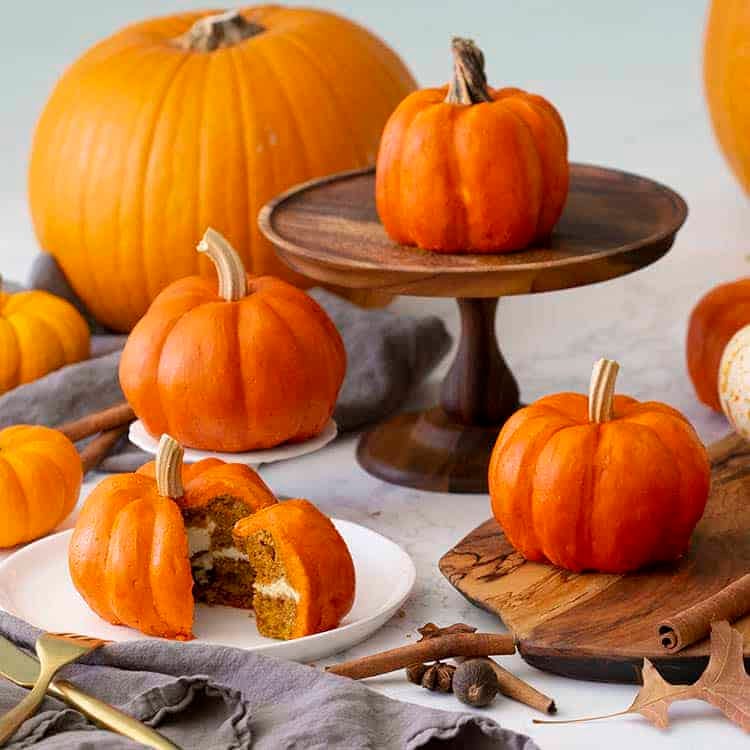
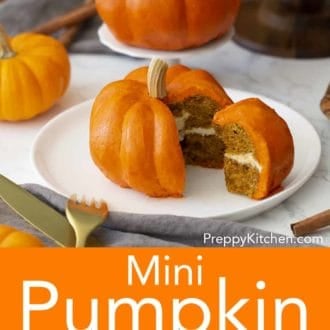
I love the way these cakes look “naked”! If you want a cute and FAST version on these then sandwich the bundts together with the cream cheese frosting, and pour a glaze on top. You can finish them off by adding the pumpkin stems or leave as is.
Alternate Glaze Recipe if you’re not a buttercream fan:
Sift powdered sugar and spiced into a bowl. Drizzle in milk and mix until desired consistency is reached.
- 3 cups powdered sugar
- 1/2 tsp cinnamon
- 1/4 tsp ginger
- 1/4 tsp allspice
- 1 pinch cardamom
- 4-8 tablespoons milk
- 2-4 drops orange food coloring (optional)
Steps to Make Pumpkin Cake

1. Sift the flour, salt, spices, and leavening agents into a large bowl. Whisk together and set aside.
2. Cream the butter and oils together then beat in the yogurt and eggs. Mix in the dry ingredients alternating with the pumpkin purée and beat until combined. Scrape the bowl down and mix and stray pockets of ingredients in by hand.
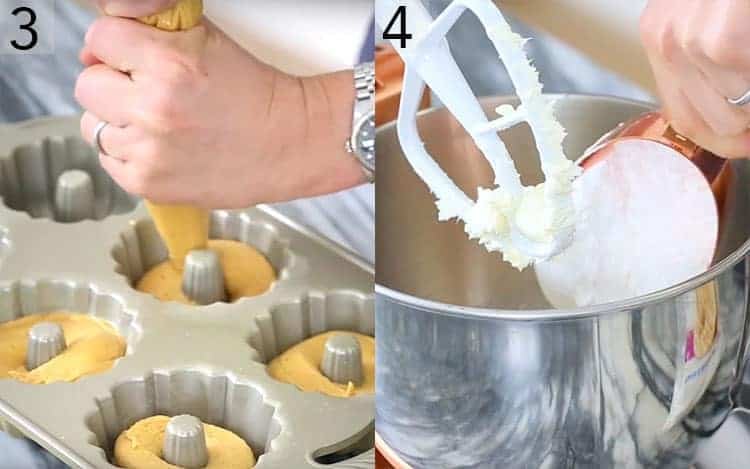
Pipe the batter into the buttered and floured mini bundt pans then bake at 350F until centers are set, about 20 minutes.
4. Make the cream cheese frosting then whip up the buttercream and color orange if desired. I’ve had many people make white pumpkins so they can skip the food coloring.

5. Cut bottoms off cakes (less if you want tall pumpkins, more if you want rounder ones).
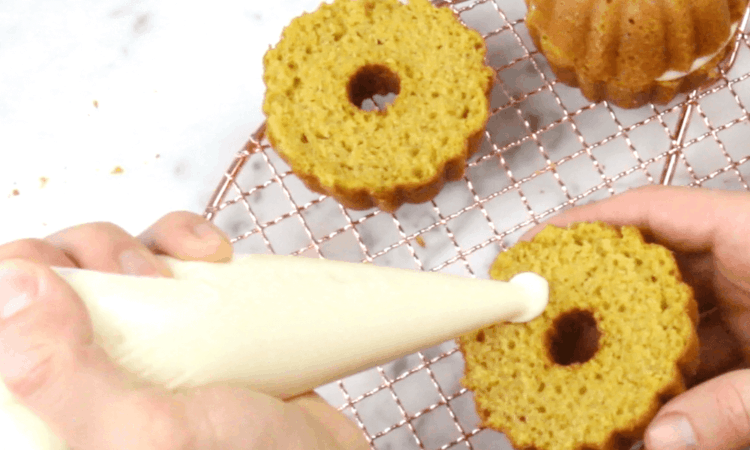
6. Pipe or smear cream cheese frosting onto the bottom of one mini bundt cake and sandwich together. Fill in the hole on top with a bit of the bunt cake you trimmed off in the precious step.
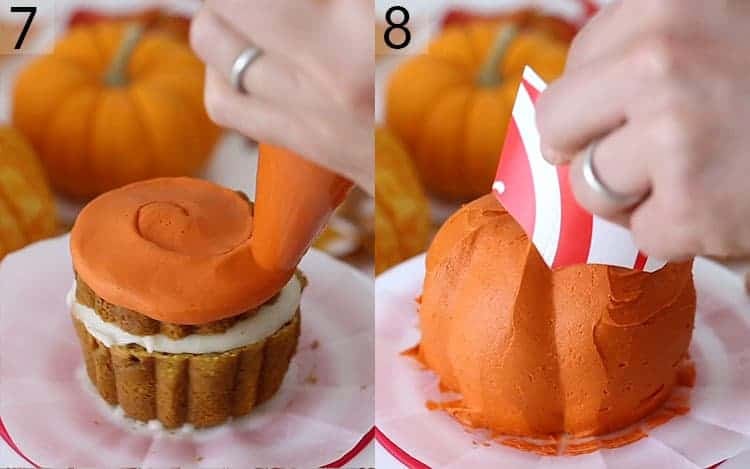
7. Cover in orange buttercream. I like to work on a piece of parchment paper so I can move the cakes around easily.
8. Sculpt into a pumpkin shape. (I cut a yogurt container up to make my shaping tools. The best ones were a rounded off “V” to scrape the indents and a straight edge to sooth the sides)
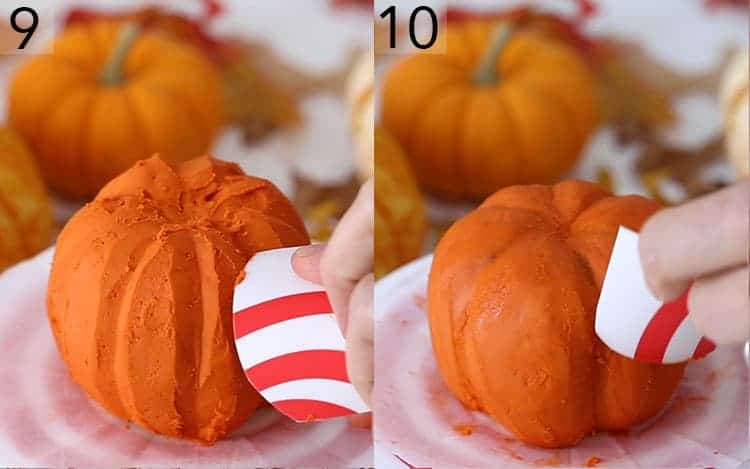
9. Chill the cakes to harden the buttercream then use a rounded piece of plastic to smooth the pumpkin out further.
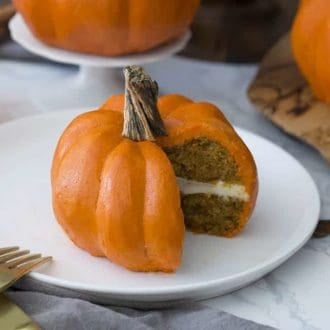
10. The final smoothing will need a bit of water to moisten the outside. You can use a damp paper towel, your clean fingers, or a smoothing tool to give the cakes a final smooth. The quickest way is to smooth with your wet, clean hands. Top each pumpkin with a stem. I used a real pumpkin stem but you can make one from fondant, modeling chocolate or even very thick buttercream.
IF YOU LIKED THIS RECIPE TRY THESE OUT
Brown Butter Pumpkin Sheet Cake
If you’ve tried this pumpkin cake recipe then don’t forget to leave a rating and let me know how you got on in the comments below, I love hearing from you!
Mini Pumpkin Cake
Video
Ingredients
For the Cake
- 3 cups all-purpose flour
- 1 tsp baking powder
- 1 tsp baking soda
- 2 tsp cinnamon
- 1/4 tsp ginger
- 1/4 tsp allspice
- 1 pinch ground cloves
- 1 pinch nutmeg
- 2 cups granulated sugar
- 1/4 cup brown sugar lightly packed
- 1/2 cup melted coconut oil
- 1/4 cup vegetable oil
- 1/3 cup plain yogurt
- 1 can pumpkin puree 15 oz
- 1/2 tsp salt
- 3 large eggs
For the Cream Cheese Frosting
- 8 oz cream cheese softened
- 2 cups powdered sugar
- 1 tsp vanilla extract
For the Buttercream
- 1 lb confectioners' sugar
- 1 cup salted butter room temp
- 1/4 cup milk add in slowly until you achieve desired consistency
- 1 tsp vanilla extract
- 10 drops orange food coloring Amount of food coloring will depend on brand used and desired color.
Instructions
For the Cake
- Preheat oven to 350F. Butter and flour your mini bundt pans.
- Cream the oils and sugar together, then add in the yogurt and mix until combined.
- Mix in eggs one at a time, making sure one egg is incorporated into the mixture before adding the next.
- In a separate bowl sift the remaining dry ingredients together.
- Mix dry ingredients into the sugar/egg mixture in three batches alternating with the pumpkin puree. Mix until just combined.
- Spoon or pipe your batter into the pans, filling 2/3 the way up.
- Bake at 350 for about 20 minutes or until wooden skewer inserted into center comes out clean.
- Allow to cool in pan for about 10 minutes before inverting onto a wire rack.
For the Cream Cheese Frosting
- Beat the cream cheese in a bowl until it is smooth. Add in vanilla and powdered sugar and mix until ingredients are well-incorporated and desired consistency is reached.
- For the Buttercream
- Beat butter until light and fluffy, add vanilla and then slowly add sugar. Add milk a few tablespoons at a time until desired consistency is reached. You will want a stiffer buttercream so you might be using less milk. Finally add in the food coloring.
Assembly
- Cut bottoms off cakes (less if you want tall pumpkins, more if you want rounder ones).
- Pipe or smear cream cheese frosting onto the bottom of one mini bundt cake and sandwich together.
- Cover in orange buttercream and sculpt into a pumpkin shape. (I cut a yogurt container up to make my tools. The best ones were a rounded off "V" to scrape the indents and a straight edge to sooth the sides)
- Top with a stem. I used a real pumpkin stem but you can make one from fondant or even very thick buttercream.

Notes
- If you fill the mini bundt forms about half way up there will be enough batter to make about 10 or so pumpkins. I ended up cutting a lot off the bottom from each cake to get a rounder pumpkin. The excess makes a great snack or can be used to make pumpkin cake pops!
- I used real pumpkin stems for these cakes to give the most realistic appearance. I just bought a "Cinderella" pumpkin because they have a long stem then cut a few segments off with some garden clippers.
- You could also make the stems from some fondant or thick buttercream, but it wouldn't look quite as real and takes more time.
- The KEY to decorating these cakes is to chill them after you apply and smooth the buttercream. Once chilled you can do some sculpting and then chill again if the cake softens up too much.
Jennifer says
Did this for my daughter’s 25th birthday! They were a big hit! Love to share pictures, but apparently that’s not an option.
Angela Gentry says
That was one of the best video tutorials I have ever seen! Such great explanation and awesome tips and tricks! I am so grateful I came across this recipe, which I am getting ready to make for Thanksgiving dessert. I can’t wait to go through all your other recipes. Thank you again for sharing!
John K. says
Hi Angela,
That makes me so happy to hear and it is my pleasure!! How did they turn out?
Best,
John
Shivali says
John, please HELP! How do these store and travel if made ahead of time? Can they be made 5-6 days in advance? Should they be refrigerated? Does the frosting ever harden per say and will the texture remain if traveling through the airport for 6-7 hours? What kind of container would you suggest? I’d really like to bring these along to thanksgiving!
Thank you so much!
John K. says
Hi Shivali,
I would not recommend traveling with these pumpkins.
If you want to give it a shot my best advice would be to put the pumpkins in the refrigerator for about 15 minutes, once the frosting hardens up, wrap each one in plastic wrap and store them in a container where they can not get smushed. If there is a cooler bag you can bring them on the airplane in, I would recommend doing that. There is still a chance the frosting will soften and they will loose their shape.
Overall try to keep them sealed tight and refrigerated for as long as possible.
Good luck!
John
Ihsan says
Hi John!
Thanks for the recipe! I want to try this out but was wondering, would the same recipe be enough to make two regular sized bunt pans (so one large pumpkin) or would I need to double it?
Ihsan.
John K. says
Hi Ihsan,
I would follow the recipe for my Pumpkin Bundt Cake! It’s exactly what you need to make one large pumpkin!
Best,
John
Stephanie says
These came out really good. I couldn’t find little pumpkins so I used pecan halves and they looked pretty real!
John K. says
Hey Stephanie,
I’m happy you made and enjoyed these mini pumpkin cakes! Good idea using pecans!
Best,
John
Katy says
My Mom and I had a blast creating these pumpkins!
For us about 20 minutes in the freezer worked better than the fridge for the final sculpting. We also substituted marscapone cheese for cream cheese and that worked out well. It took use two batches of buttercream. One cool result of that was for the last pumpkins we had two shades of orange by lining a new icing bag with batch 1 and then placing batch 2 in the middle. We used the left over pumpkin and little bit of icing to make cake pops and the leftover chocolate from cake pops to make pumpkin stems. And, yes, all that took all day. Thanks for a fun recipe:)
John K. says
Hi Katy,
Thanks for the positive feedback! Happy to hear you loved these mini pumpkin cakes and enjoyed making them!! Great idea using the leftovers to make cake pops!!
Best,
John
Tiffany says
I had so much fun making these and everyone has commented on how real they look! It was easier for me to put the cake in the fridge for a few minutes after cooling from baking and then put buttercream on it. This was my first cake sculpting so I had to redo it a few times. I can’t wait to make more today!
John K. says
Hi Tiffany,
I’m so happy to hear that! These mini pumpkins are SO much fun to make!
Enjoy!!
Best,
John
Susannah says
I just made these little pumpkin cakes today! They are really adorable and I can’t wait to bring them to a gathering of friends tomorrow. Thanks, John, for this wonderful recipe and tutorial.
John K. says
Hi Susannah,
It is my PLEASURE! I’m very glad you made these little pumpkins! What did your friends think?
Best,
John
Susannah Strong says
They loved them! They didn’t know at first that they weren’t actually real gourds.
jkanell says
So Happy it was a hit!
Lynn says
So frustrated. The cakes look and taste great, but I can’t get the frosting to look right to save my life. Im pretty good at cake decorating too and I don’t know why I’m struggling so badly. Every time I use the “pointed tool” it indents too much and shows the cake underneath. Maybe my buttercream is too thin?
John K. says
Hi Lynn,
I would pipe a thicker layer of buttercream on the pumpkins! Also, place them in the refrigerator so they are easier to sculpt.
Best,
John
Izzy says
Hello,
I really want to make these amazing cakes for my nieces 1st birthday party however I don’t have a bundt tin and nowhere in my town sells them/don’t have enough time to order online 🙁 Do you have any advice on how to get the shape? Could I use a normal cupcake tin?
Thanks!
John K. says
Hi Izzy,
You can try to use a normal cupcake pan. They will be a lot smaller and may not be as round. Just sure to refrigerate them as you go so the frosting will become more stiff and easier to shape! You can also cut around the tops of the cupcakes to make them more round. I hope it works out!
Best,
John