
This post may contain affiliate links. Please read our disclosure policy.


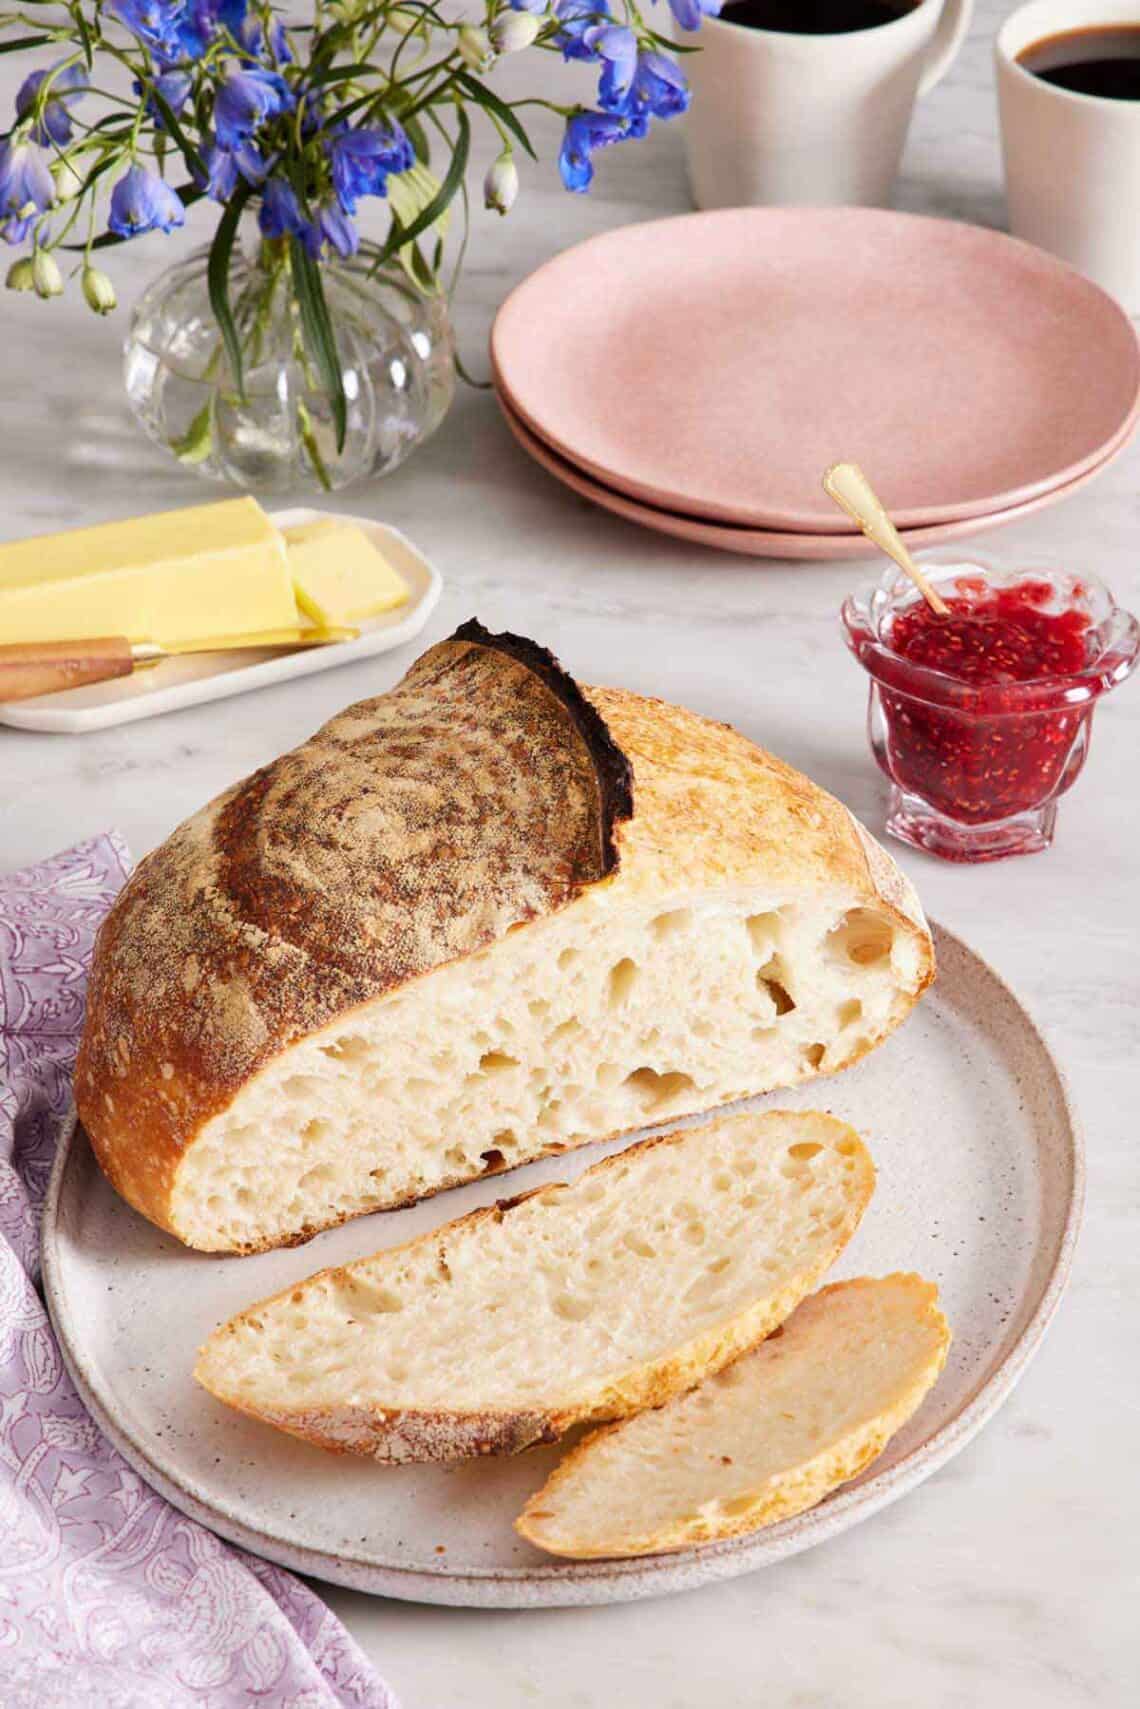
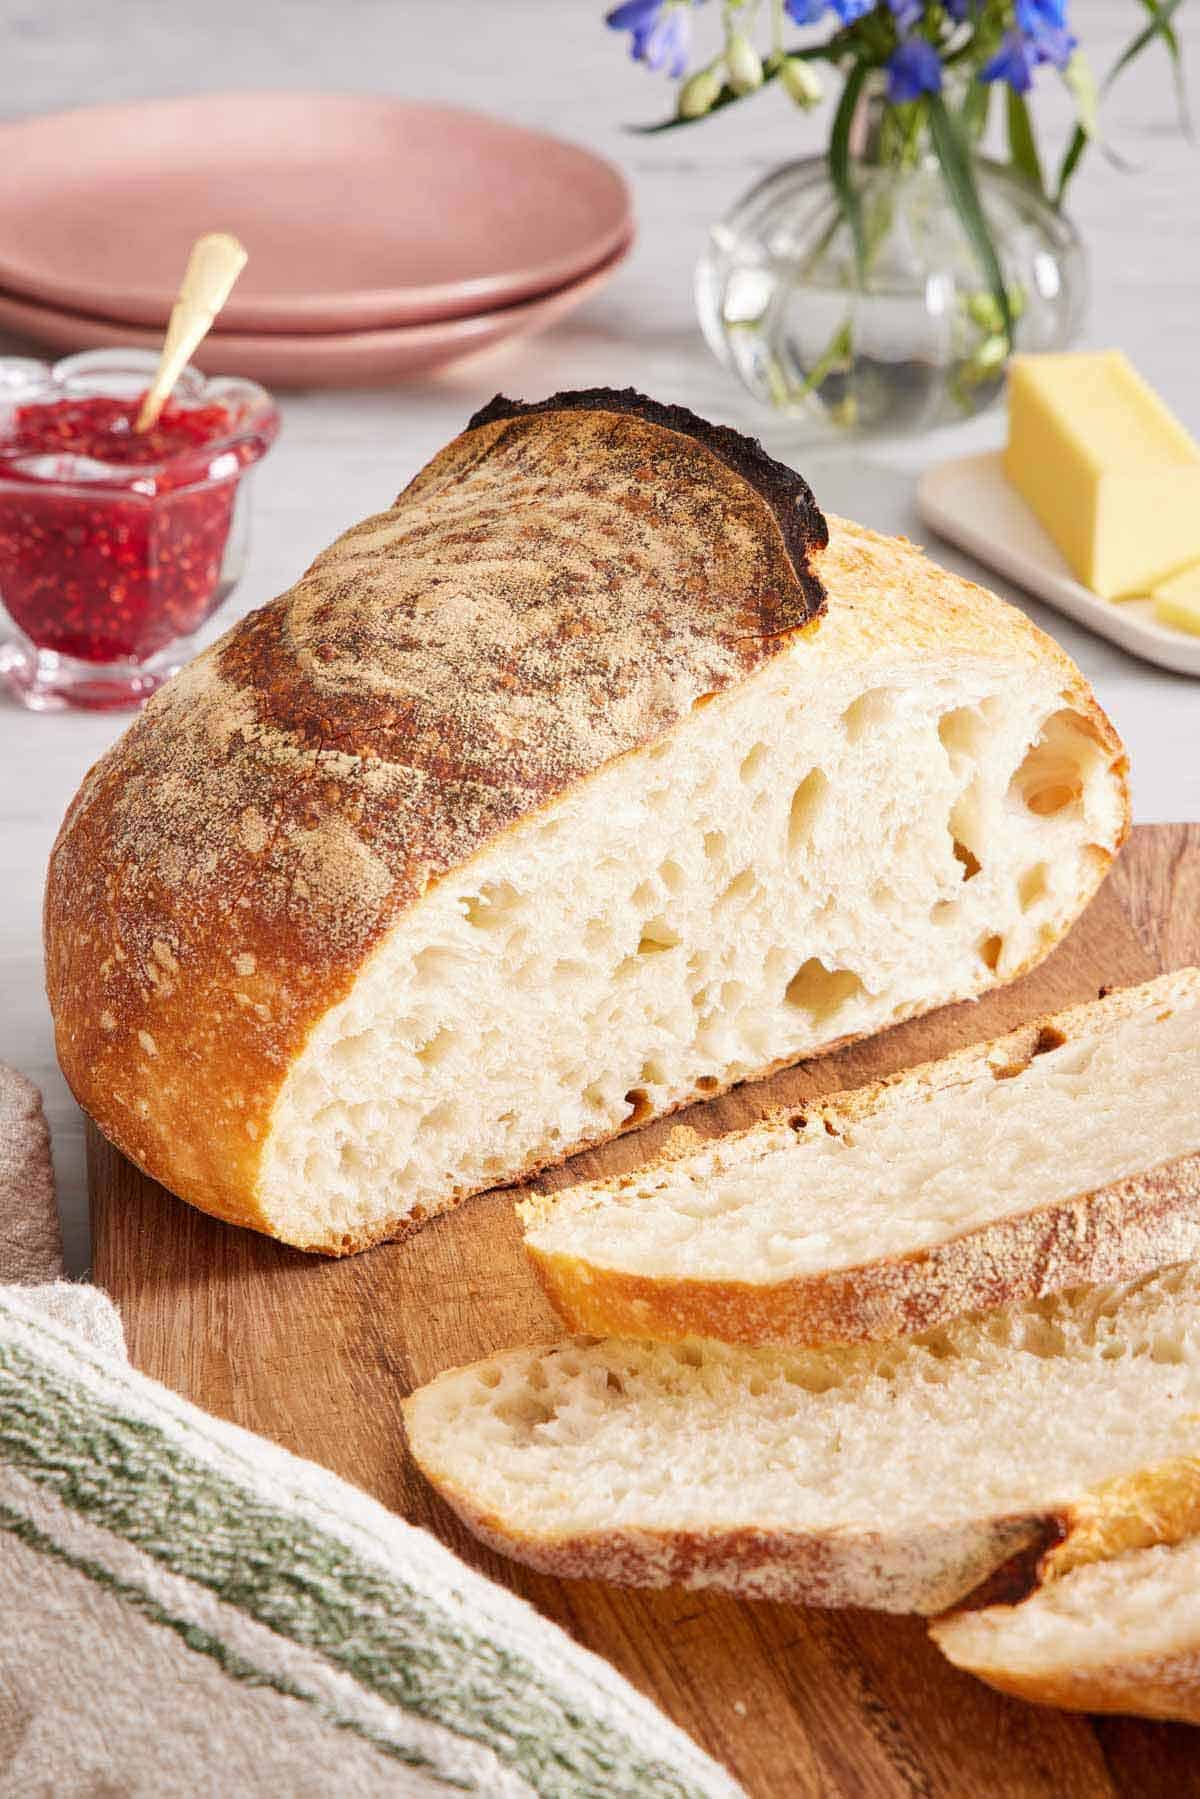
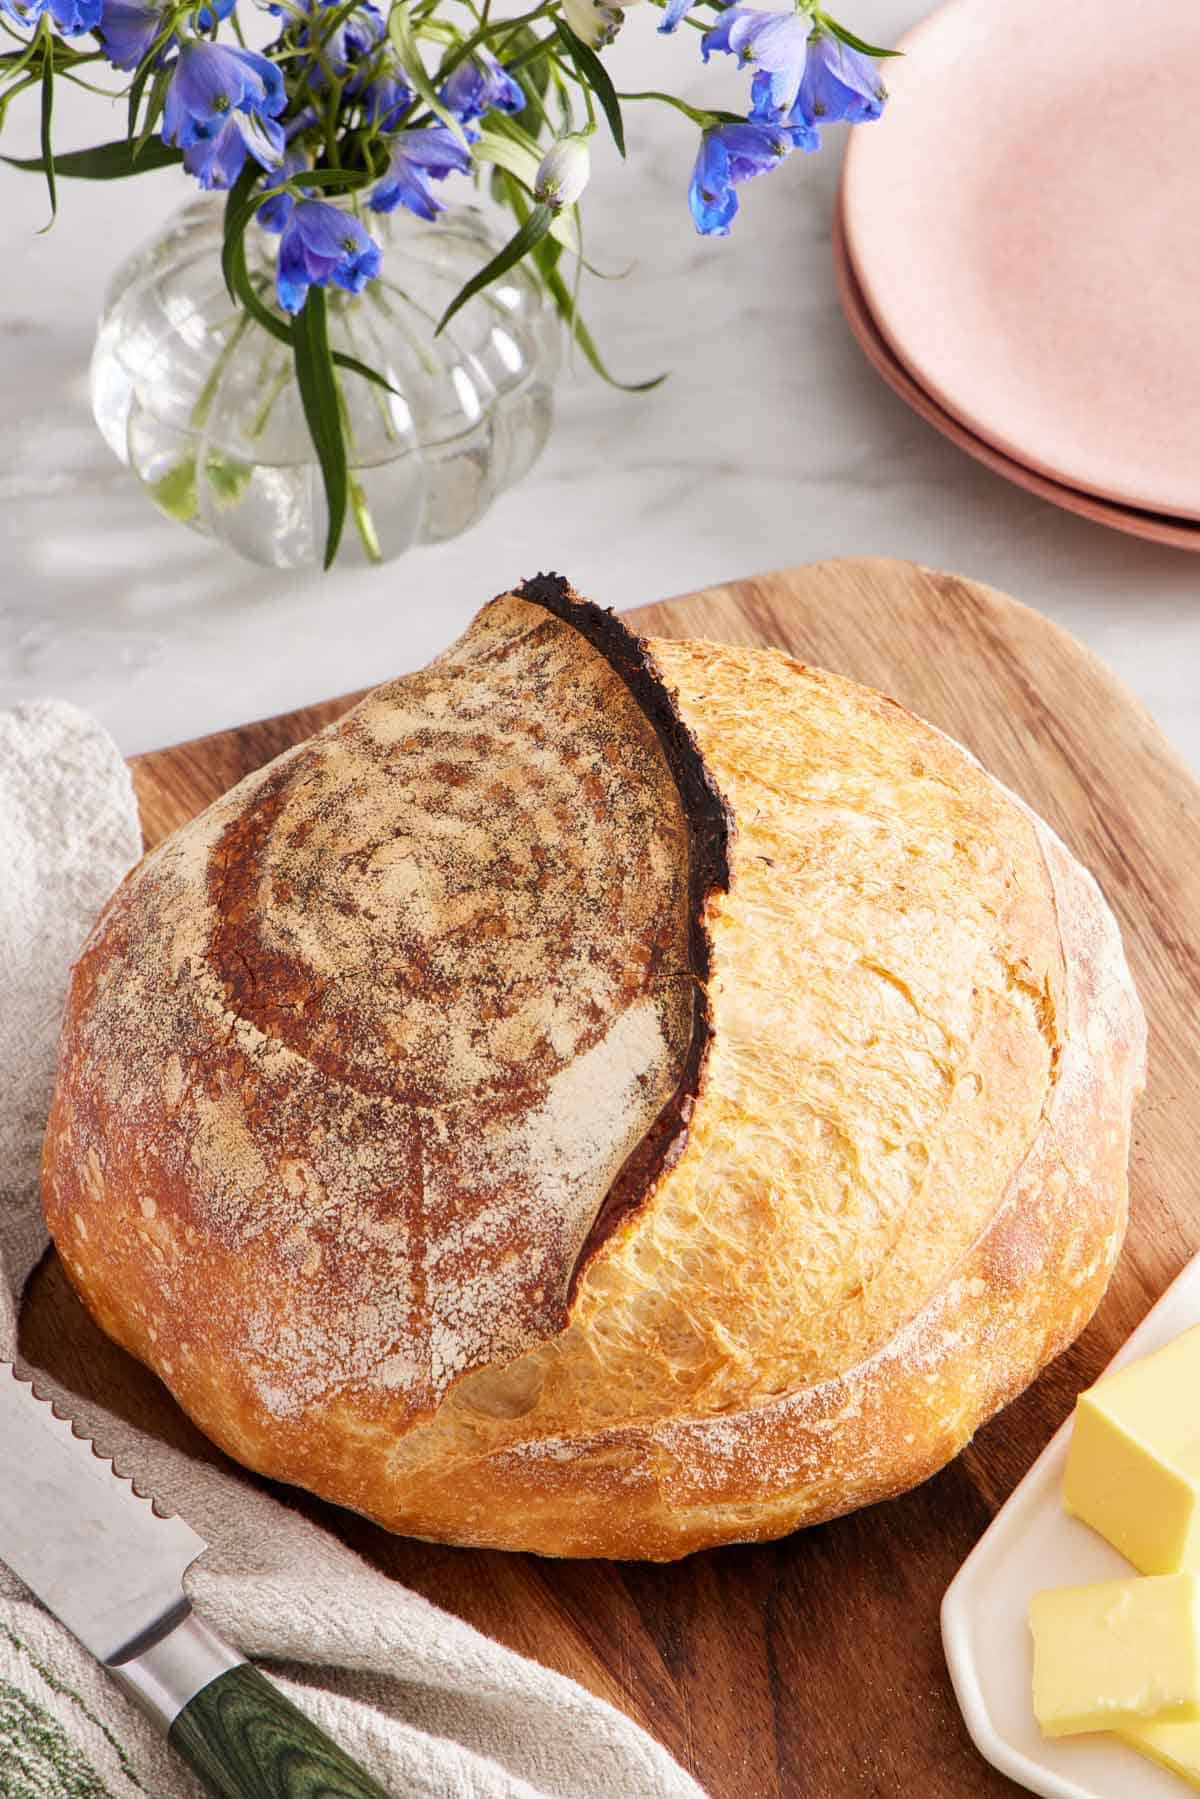
You won’t believe how easy it is to make Sourdough Bread at home. This beginner-friendly sourdough recipe does not require kneading, takes very little hands-on prep time, and has straightforward and clear steps. It’s perfectly crusty on the outside, tender and chewy on the inside, and incredibly flavorful.
If you want to make homemade sourdough bread but feel intimidated, rest assured that there is nothing tricky about this recipe. You don’t need a mixer or a bread machine, nor do you even have to knead the dough. This easy sourdough bread recipe is perfect for beginners, and my step-by-step guide will have you enjoying baking rustic sourdough bread from scratch in no time.
There is nothing better than a freshly baked loaf of sourdough. It has a slightly acidic, tangy flavor from the sourdough starter that is simply addictive. In this post, I cover the basics of sourdough baking, so whether it’s your first time or you’re a sourdough aficionado, it will answer any questions that may pop up while you give it a try. For more homemade bread recipes, try my artisan bread, beer bread, or brioche bread.
Equipment Needed

Large mixing bowl and cover — this is what you’ll mix the dough in. It can be a bowl that has its own lid, or you can use a large plate or baking pan as a lid. Alternatively, you can use a damp kitchen towel or plastic wrap to cover the bowl.
Colander or banneton (proofing basket) — you’ll use this for the dough’s final rise. If you’re just starting out, there’s no need to buy any special equipment. I use a colander (or strainer) myself!
Kitchen towel — the sourdough will sit on a kitchen towel in the colander or banneton for proofing. Choose one that is smooth in texture, like a floursack towel, so the dough doesn’t stick to the towel.
Dutch oven — if you have a seasoned (non-enamel) cast iron Dutch oven, I recommend using that. If you only have an enamel-coated pot with a light interior, use an old one or buy one specifically for bread making. Because the pot goes in the oven at a very high temperature for a long period of time, it will likely discolor the inside and possibly the outside coating. It shouldn’t cause damage to enamel that is in good condition. I like to use an old Dutch oven that’s clean but that I’m not concerned about looking nice.
Sharp knife or bread lame — use this to score the dough, which will let it rise properly during baking.
Ingredients Needed
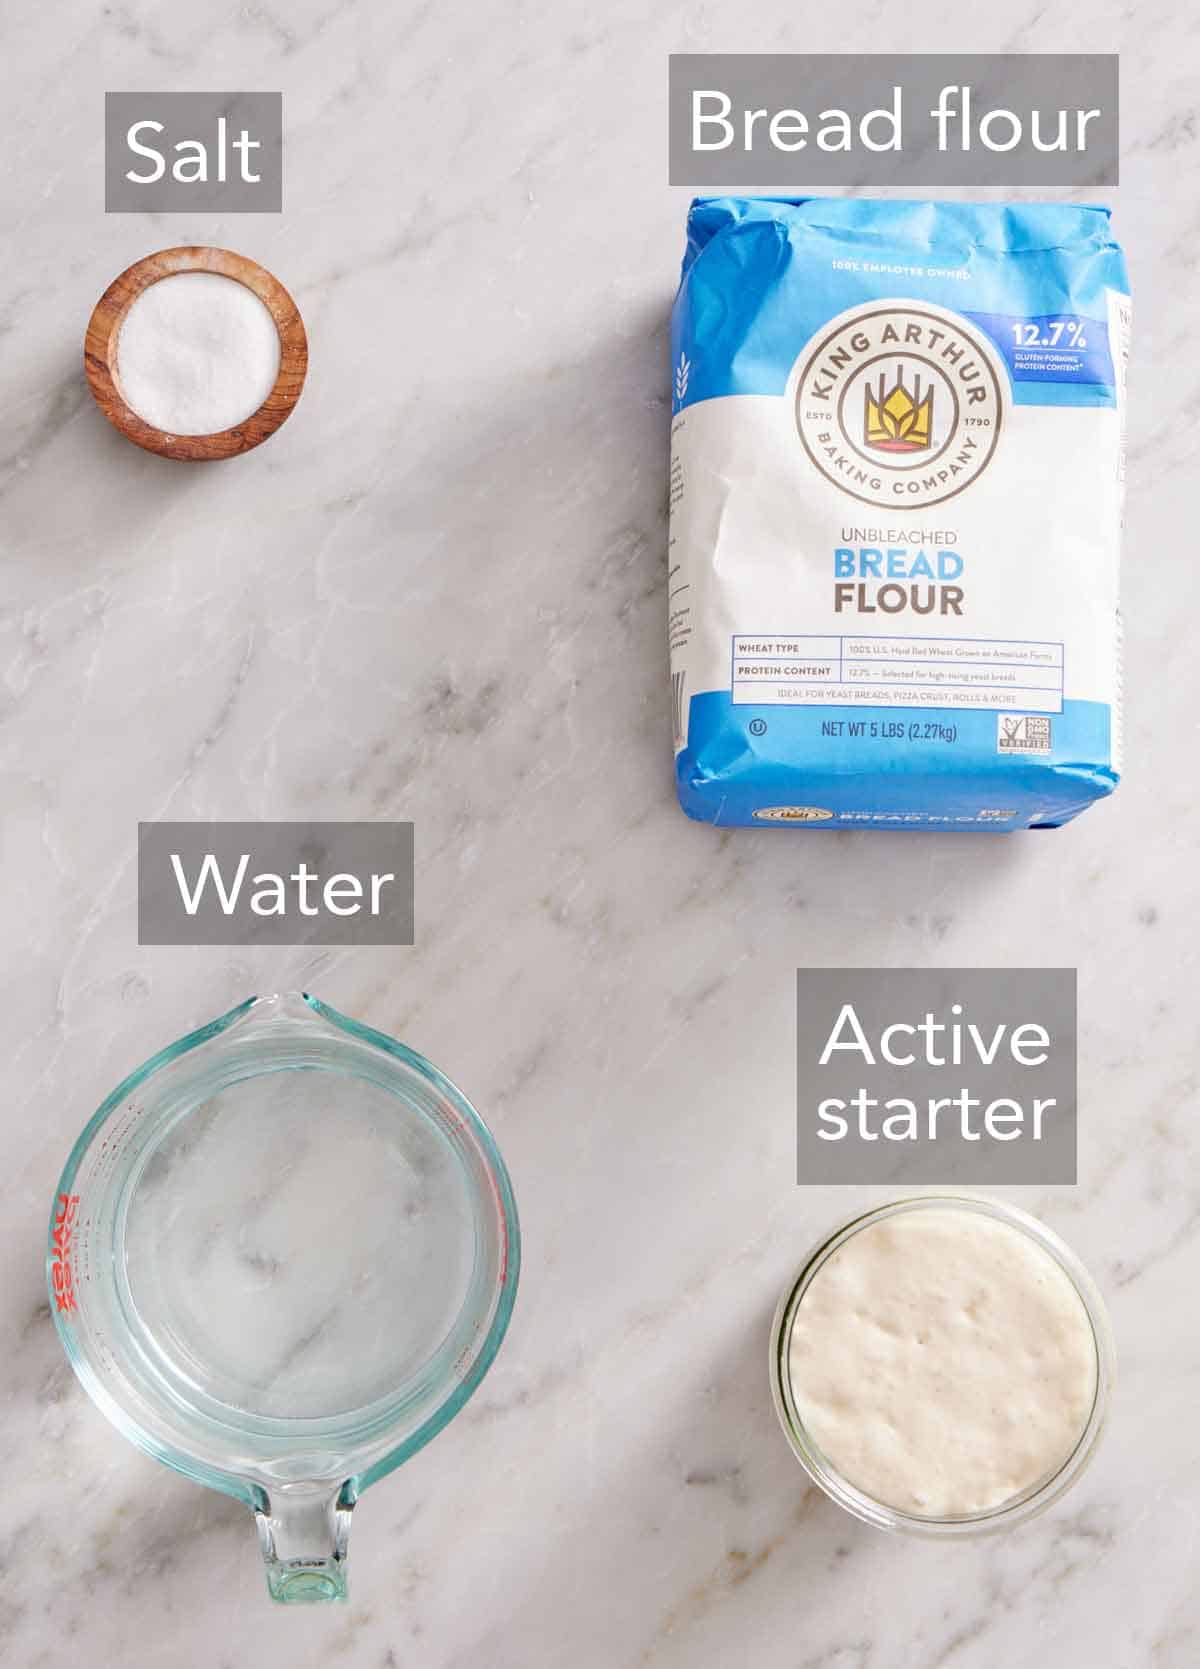
Water — use filtered water, as the chlorine and other additives in tap water can mess with the healthy bacteria in the active starter.
Active sourdough starter — you can use homemade or store-bought sourdough starter as long as it is active.
Flour — bread flour has a higher protein content than all-purpose flour, which is very important for the perfect chewy texture and ideal rise you’re looking for in sourdough bread.
Salt — not only does salt add flavor, but it also helps to strengthen the dough, allowing it to hold the air produced by the yeast during fermentation.
How To Feed Your Starter
Each time you feed your starter, discard half the starter and add equal parts of flour and water. Mix, cover loosely, and let it rest in a warm spot until it has almost doubled in volume. Repeat the process if needed until you have a healthy, active sourdough starter. See my post for detailed instructions on how to make a homemade sourdough starter that starts with whole wheat flour and how to care for it once it’s ready for baking.
For this recipe, mix 50 grams of sourdough starter, 50 grams of water, and 50 grams of all-purpose flour to get enough starter for the bread dough. You will probably have more starter than the 120 grams needed (but it’s better to have too much than too little!). Just feed what’s leftover with more flour and water, or add it back to your main starter.
Once your starter is mature and robust (after about 10 active feedings and uses), feel free to use the sourdough discard to make discard recipes like sourdough pancakes, sourdough waffles, and sourdough biscuits.
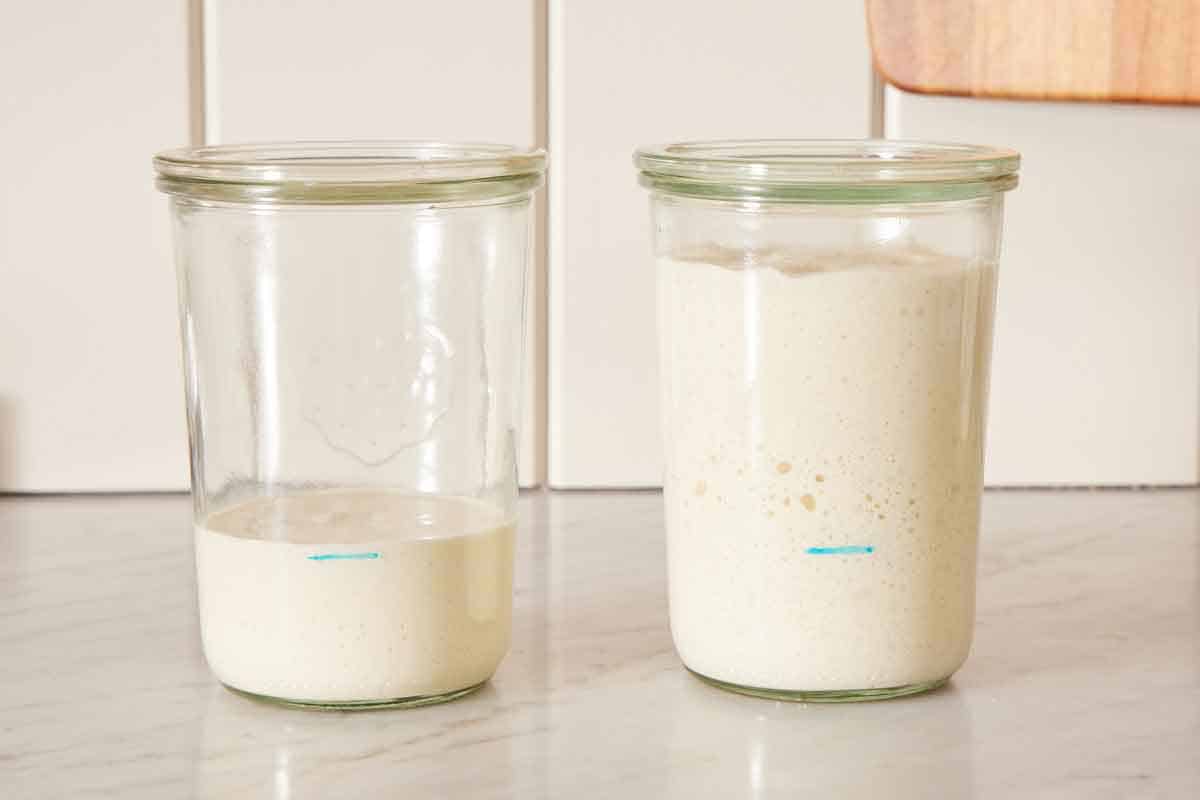
How To Know When Your Starter Is Active And Ready To Use
I recommend feeding your starter 6 hours before you want to start your sourdough bread to give it proper time to activate. Feed your starter, then look for it to rise up and then start to fall. You want to use it when it’s “hungry,” aka when it’s risen up and starting to deflate again.
I recommend taking note of the volume of the starter right after being fed to easily tell when it has risen greatly in volume. Mark the jar containing the starter with where the top of the starter is after feeding. It should have at least doubled in size (if not more) after a few hours. It should also smell very sour and have lots of bubbles throughout. To be doubly sure, try the float test: drop a small amount of starter into water. If it floats, it’s ready. If it sinks, it needs more time.
You can also use a refrigerated starter that has been fed and activated then immediately stored in the fridge for later use– be sure to use it within 3 to 4 days to make sure it’s still active.
The 5 Stages of Making Sourdough Bread
1. Mixing the Dough: Quickly combine the water, starter, flour, and salt to form a shaggy mixture. This mixture then rests for 1 hour to enhance the flavor and hydrate the flour. This is a variation of autolyse, which is typically only flour and water mixed together and left to sit, but the intention is the same: to hydrate the flour, improve the flavor of the bread, start gluten development, and to eliminate kneading the dough.
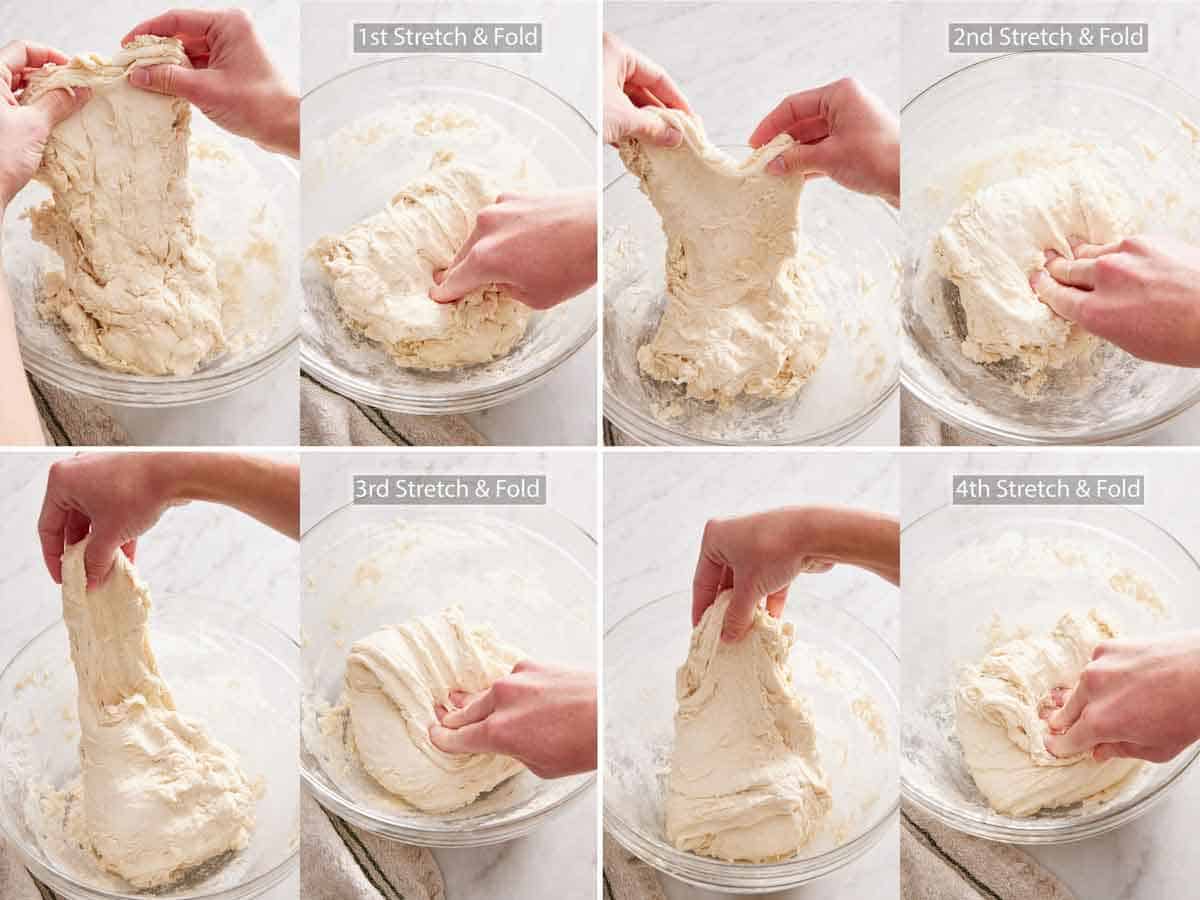
2. Stretching and Folding: This step will gently help with gluten development, improving the dough’s elasticity and strength. This is done instead of kneading (and is much easier!).
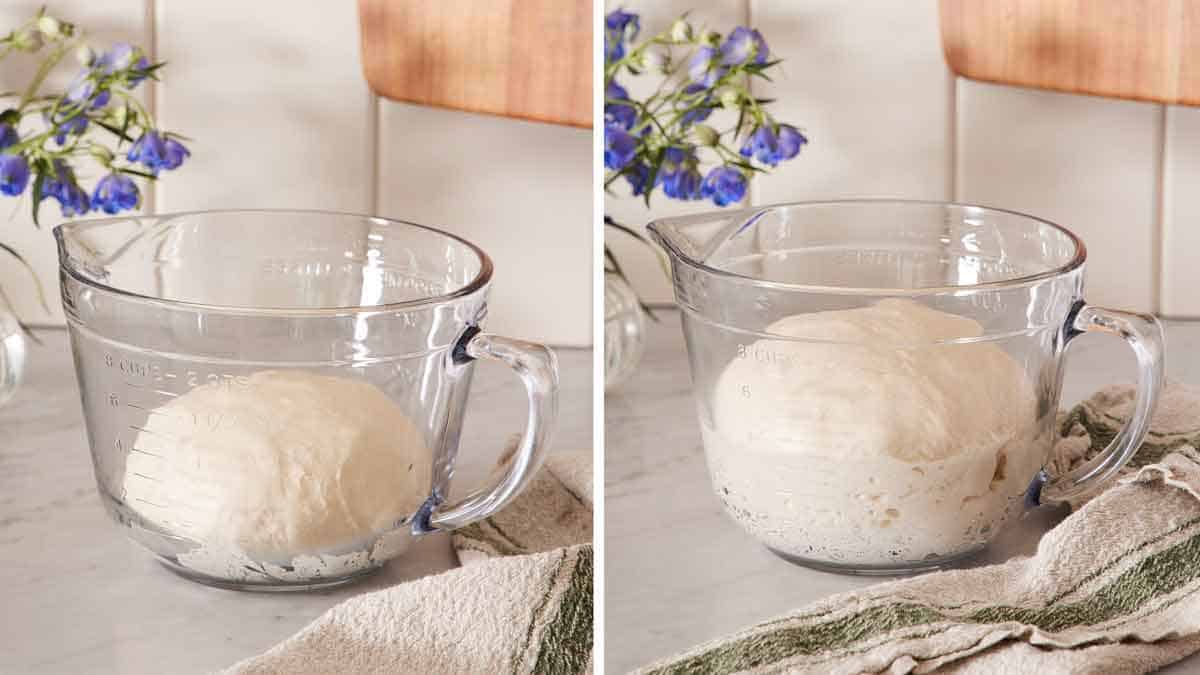
3. Bulk Rise (or Bulk Fermentation): This refers to the first rise, lasting 6 to 12 hours, depending on the temperature of your kitchen. This is all about flavor development and aerating the dough.
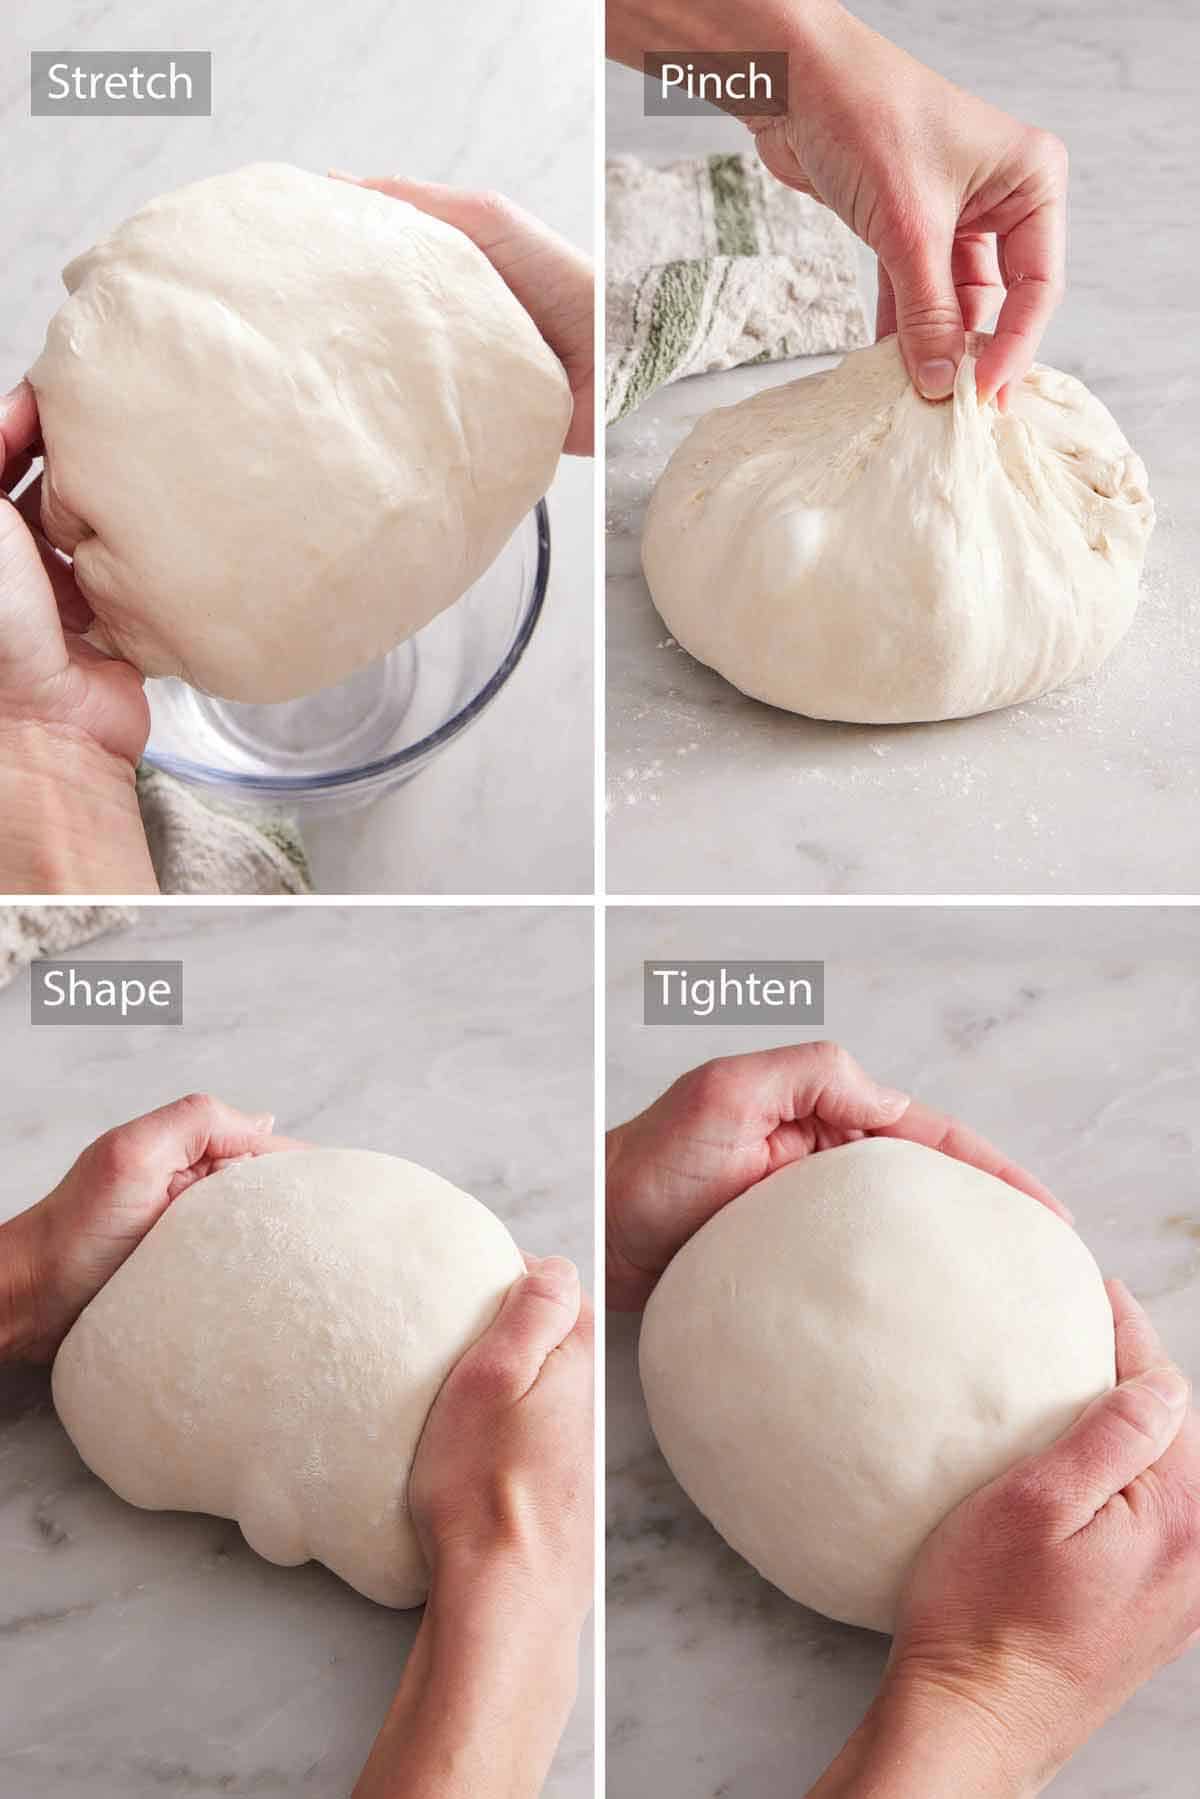
4. Shaping and Final Rise: Shaping the dough into a tight ball is key for sourdough bread to rise properly. The final rise happens right before the dough goes into the oven.
5. Baking: Use a sharp knife or bread lame to slash the dough, which will allow steam to escape and help the bread rise properly. Then, bake it in a preheated Dutch oven at high heat to develop the proper rise and chewy crust.
How To Make Sourdough Bread
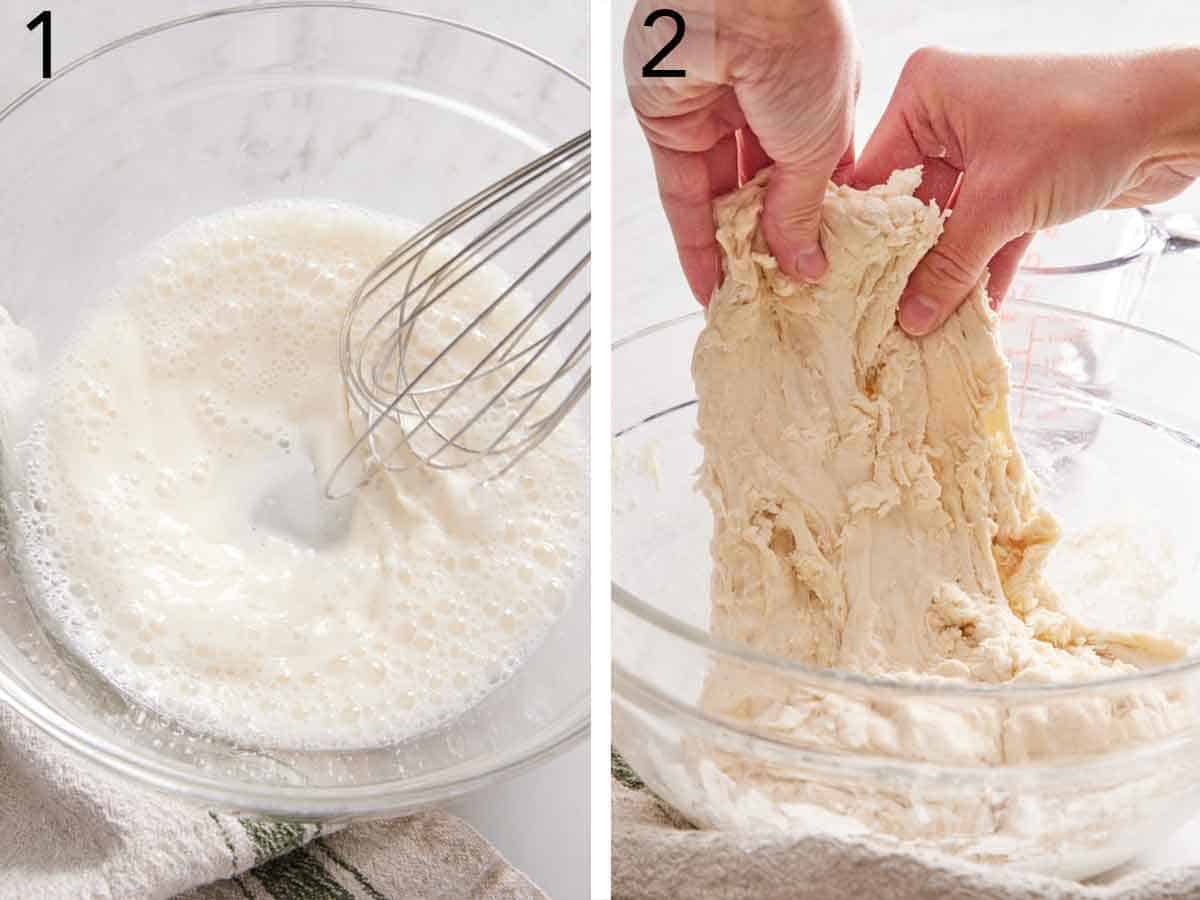
1. In a large bowl, combine the water, sourdough starter, flour, and salt. Stir until the mixture is shaggy. Cover and let it sit at room temperature for 1 hour.
2. Stretch and fold the dough in 4 to 6 sets to develop the gluten. I tend to do 4 rounds of folding, but you can do an extra 2 for chewier sourdough bread.
3. Shape your dough into a ball and return it to the bowl. Cover and let the dough rise until well puffed, 6 to 12 hours, ideally in a place that is 68°F to 75°F. This is called the bulk rise.
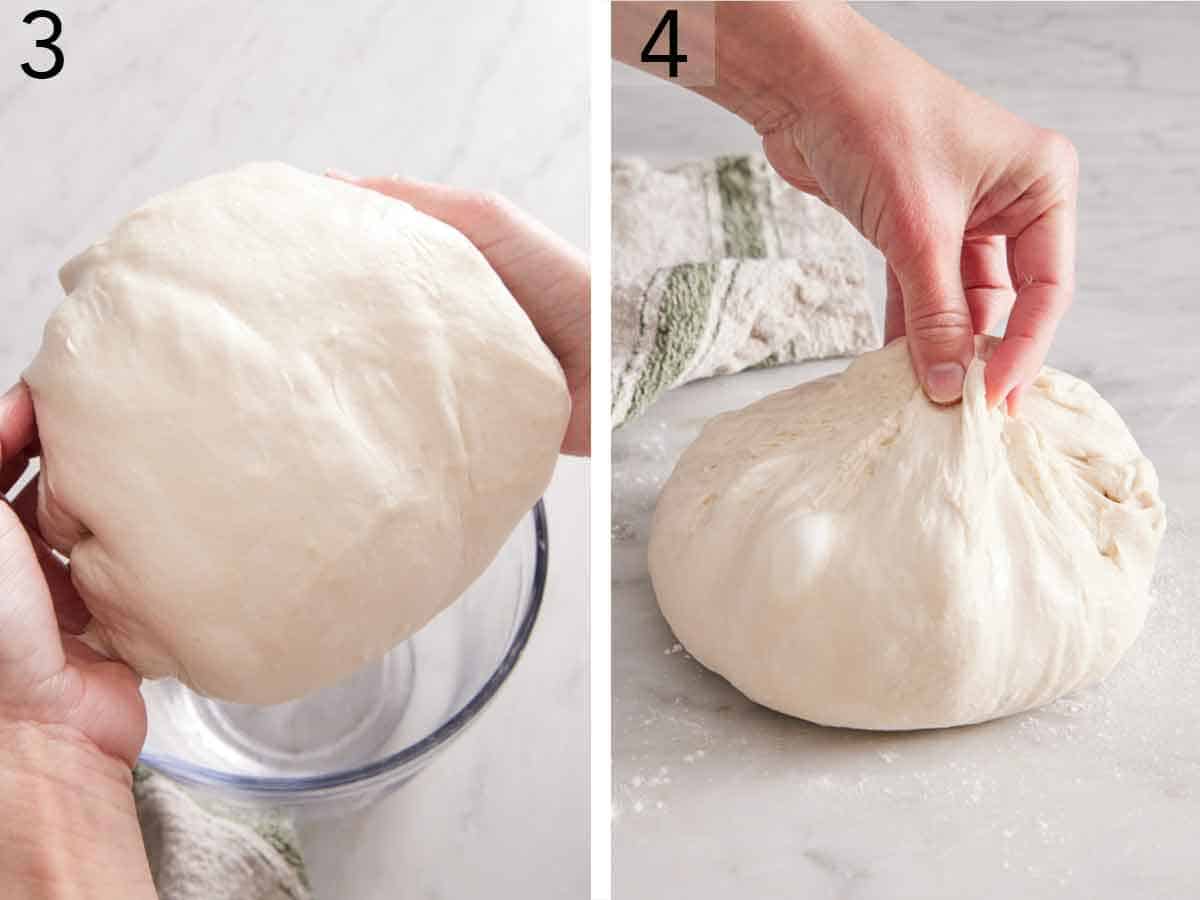
4. Start to shape the dough by stretching it up out of the bowl, placing it on a floured surface, and pinching it together into a rough ball.
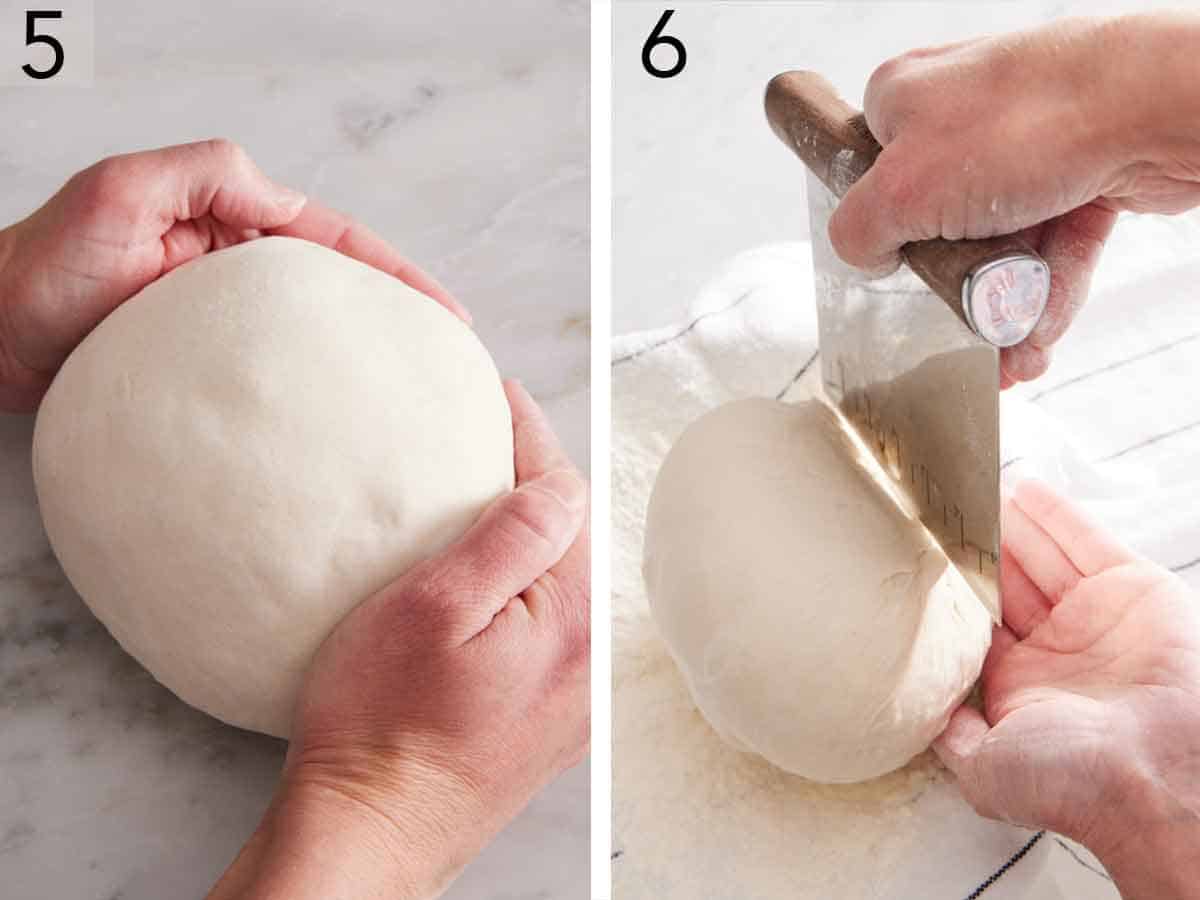
5. Then, flip it over and shape the dough into a tight, smooth ball with lots of surface tension by gently pulling it across your counter. Lightly dust the top of the dough with flour.
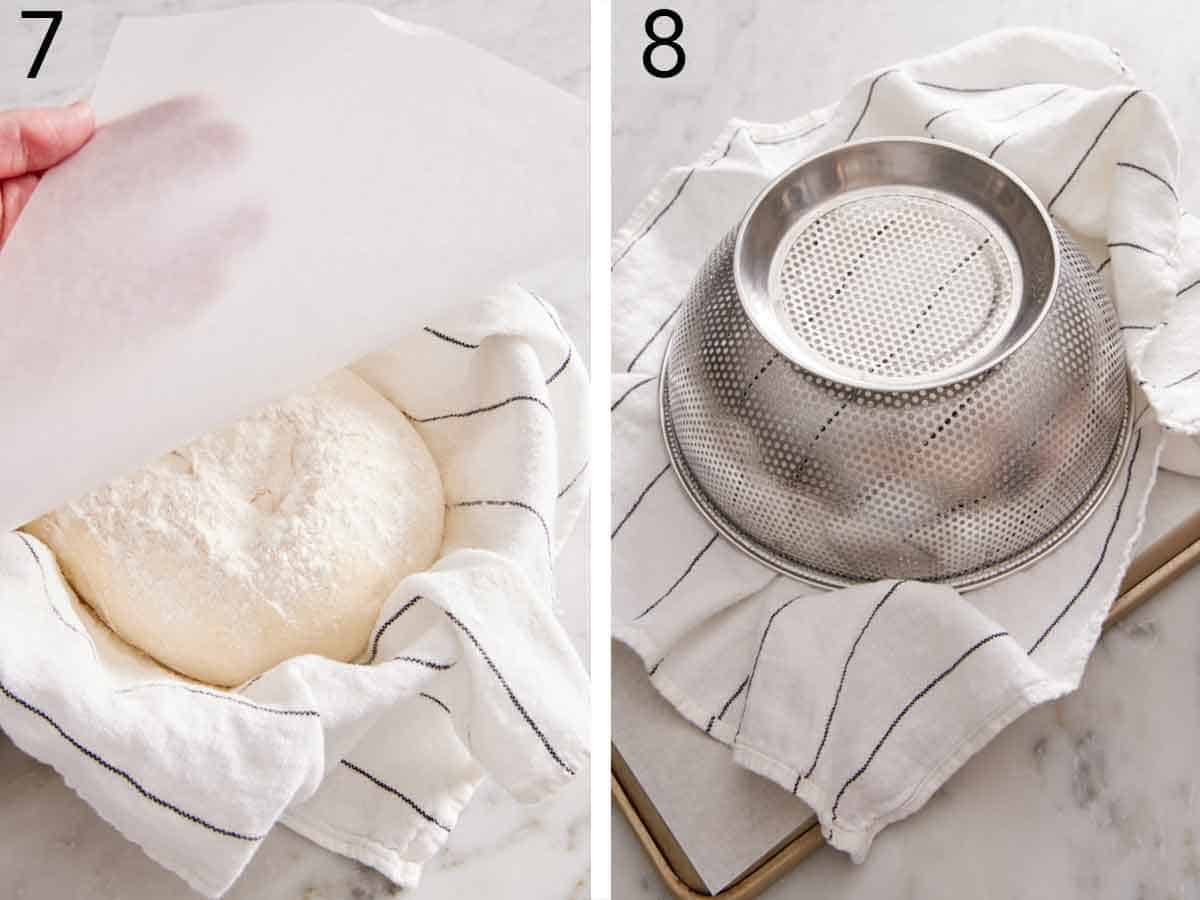
6. Line a bowl or colander with a clean kitchen towel and dust it generously with regular flour or rice flour. Using a bench scraper, carefully pick up the dough ball and flip it over, setting it smooth side down in the towel. Cover and rise at room temperature for 30 minutes. Then, place the loaf in the refrigerator while the oven preheats (at least 1 hour). Place a large cast-iron Dutch oven into the oven. Preheat the oven to 500°F for 1 hour.
7. When ready to bake, remove the loaf from the fridge. Uncover and lightly flour the loaf. Place a piece of parchment paper on top of the bowl and a baking sheet over that.
8. Quickly invert it so that the dough falls onto the parchment paper. Remove the colander and carefully peel back the towel. You will not need them again.
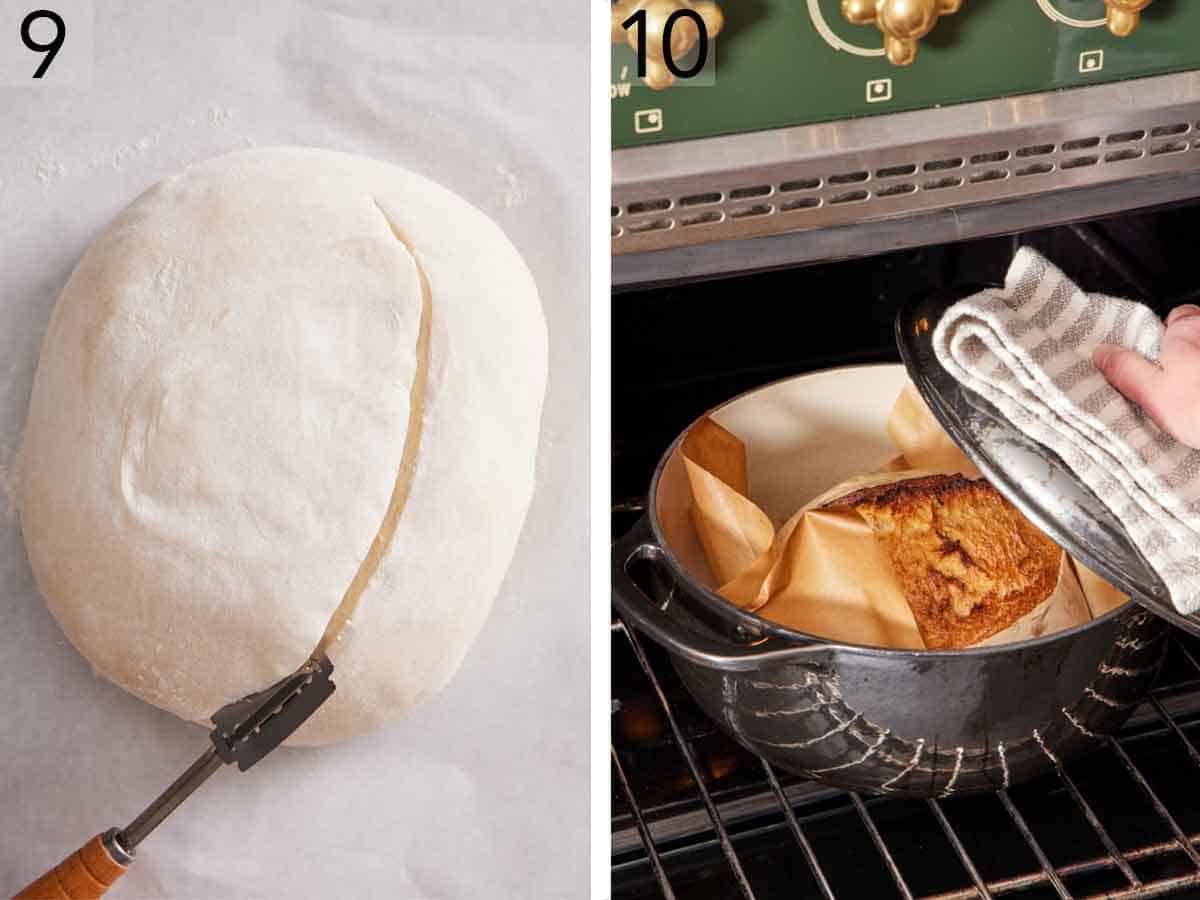
9. Using a sharp knife or bread lame, score down the length of the loaf or cut in a decorative design. Carefully remove the very hot pot from the oven. Using the parchment paper as handles, place the dough inside the pot and cover with the lid. Bake for 20 minutes, then reduce the oven temperature to 450°F.
10. Carefully remove the lid and continue baking the bread until the crust is a deep golden brown or the internal temperature is 195°F to 205°F. Use the parchment paper and a spatula to lift the bread out of the Dutch oven and place the sourdough bread on a wire rack to cool completely before slicing.
Why Do You Stretch and Fold The Dough?
Stretching and folding the dough is an easier alternative to kneading, as it helps develop gluten and produces chewy bread with a light texture. This is because, unlike kneading, it helps preserve the air bubbles forming in the dough as it ferments. Kneading would produce a much denser loaf because the process pushes out the air.
This process is very easy! Starting at 12 o’clock, tuck your fingers under the edge of the dough and pull it up until it doesn’t stretch easily anymore, then fold it down over the dough in the bowl. Turn the bowl 90 degrees (a quarter turn) and repeat. Do this a total of 4 times so the bowl makes a full 360-degree turn by the last fold. Each time you stretch and fold, the dough will be more elastic and easier to stretch.
Be sure to wet your hands with cold water to help keep the dough from sticking to you. I recommend filling a measuring cup with cold water and keeping it near you so you can wet your fingers as needed.
How Do I Know The Bulk Rise Is Done?
When the dough has properly risen, it should jiggle slightly when you shake the bowl, and you should see some large air bubbles under the surface of the dough. I like to place the dough in a container with measurements on the side for an easy visual (like a large measuring bowl or a Cambro). It should be close to doubled in size by the end of the bulk rise, which will be easy to see if you’ve used a measuring bowl.
You can also test its spring. Dip your finger in flour and poke the top of the dough. If it mostly springs back, it’s ready! If it feels very dense and the indentation stays for a while, it hasn’t proofed enough yet. If it looks deflated or very soft, the dough is probably over-proofed.
Temperature’s Effect On Fermentation
Sourdough ferments quickly in warm temperatures and slowly in cold temperatures. The ideal rising/fermenting temperature is around 72°F. So keep your room temperature in mind when determining timing and how long each stage may take. Room temperature can change timing by several hours.
If my room is warm, I leave the dough on the kitchen counter. If it’s cold, I’ll place it in a proofing drawer or in the oven with the light on to mimic a warmer room temperature. If your oven has a bread-proof setting, you can use that too!
You can also choose your environment based on when you want to bake the bread. If you made the dough in the morning and want to bake it that same evening, put it in a warm spot to rise to speed up the process. If you want to slow it down and bake sourdough bread a day or two later, pop it in the fridge.
Cold Fermentation For A More Sour Flavor
Sourdough flavor intensifies with time, so a longer and slower fermentation means the more sour (or flavorful) the bread will be. Because sourdough ferments more slowly in cold temperatures, you can chill the dough to slow the fermentation process down and develop this intenser flavor. There are two options for this; you can do one or both:
- Cold bulk rise: You can bulk rise in the fridge for 24 hours after the final stretching and folding. Bring the dough back to room temperature before shaping it.
- Cold final rise: You can shape the loaf and do the final rise in the refrigerator for up to 36 hours. Once the loaf is in the towel-line colander or banneton, place the whole thing in a big plastic bag or fully wrap it in plastic wrap and refrigerate it. Let it sit out at room temperature for 30 minutes during the oven preheat.
How To Shape The Perfect Loaf
Once your dough has completed the bulk rise, this next step is all about forming a smooth, round ball with good surface tension on the outside. Proper shaping will help the loaf rise well during baking and produce a nice outer crust.
- Stretch: Dip both hands in cold water to prevent the bread dough from sticking. Slip your fingers under the dough on either side and lift the dough up about a foot or two above the counter so that it is basically draped over your hands. Place the dough on the counter.
- Pinch: Sprinkle the top of the dough lightly with flour and flip it over so it is floured side down. Pinch all of the edges into the center, like you are bundling up a sack.
- Shape: Flip the dough over again so the seams are on the work surface and the smooth side is facing up. With your hands cupped around the top side of the loaf, gently pull the dough ball towards you.
- Tighten: Continue this motion by rotating the dough so that the edges are tightened all around, forming a nice, neat ball with good surface tension. I usually find 8 to 10 pulls forms good tension on the loaf.
After this stage, the loaf is almost ready to bake! It needs one more gentle rise to get it ready for the hot Dutch oven.
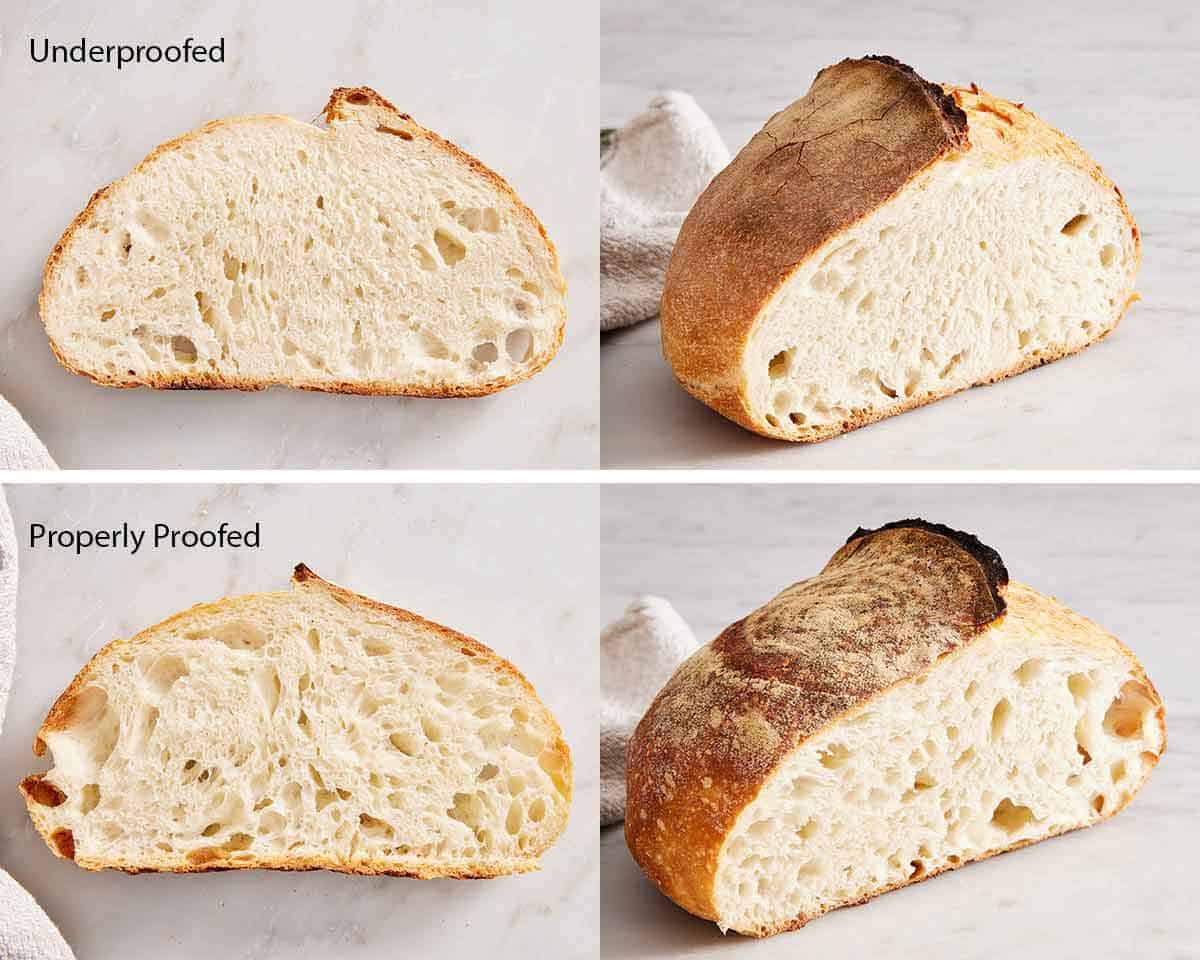
What Happens If I Underproof The Dough?
Dough that is under-proofed will yield sourdough bread with a much tighter, denser crumb structure inside the loaf. The crust will have fewer bubbles and will be tough and firm, and neither the bread nor the crust will have the correct chewy texture. In extreme cases, the sourdough loaf can bake up so dense that the inside is totally gummy and doesn’t rise at all.
Proper fermentation and rising produce more air bubbles in the dough, so the structure inside the bread is lighter, more airy, and has lots of pockets throughout. The crust will also have lots of little bubbles on the surface and be chewy rather than hard and tough.
So be sure to let the dough rest and rise for long enough during both the bulk rise and the second rise in the colander.
How To Store A Sourdough Loaf
Sourdough bread keeps well at room temperature for a maximum of 2 days after baking. Store it in a bread box or bread bag. Do not refrigerate the bread, which will cause it to become unpleasantly hard and dry.
To store homemade sourdough bread longer, consider freezing it. Freezing actually locks in the freshness! While you can freeze the whole loaf, I like to freeze slices so I can grab a serving or two as I need. Separate slices with parchment paper to prevent sticking, and store in a freezer bag for up to 3 months. Pop frozen slices in the toaster or in a hot oven to warm them up.
Pro Tips For Making This Recipe
- Weighing the ingredients is the best way to make a great sourdough loaf. It ensures the ratio of flour to water to starter is correct for the ideal ferment. Of course, you can still make this recipe without a scale, but if you have one, I highly encourage you to use it. Plus, there are no measuring cups to clean!
- Use rice flour to dust the loaf if you have it. It doesn’t burn at high oven temperatures, so it produces a really pretty top crust. This is totally optional, though, and regular flour will work just fine!
- Let the sourdough bread cool completely before slicing. I know it can be hard to wait to dig in with the mouthwatering aroma of fresh bread wafting through the house, but wait until the loaf has cooled completely. Slicing it while it is still hot can lead to it tasting gummy.

Frequently Asked Questions
Yes! Depending on what mix-ins you want to add, you may need to add them at the beginning or further along the preparation process. Small, fine seasonings like dried or minced herbs or ground spices can be added at the beginning when mixing the dough (Step 1).
If you’re using chunkier mix-ins like cubed or shredded cheese, dried cranberries, walnuts, seeds, chocolate chips, etc., I recommend adding them in after the second set of stretching and folding. You may want to add another round or two (for a total of 5 or 6 sets of stretching and folding) to make sure the mix-ins are fully incorporated.
Yes, just divide the dough in half after the bulk rise (end of Step 5), then pinch and shape each piece into a ball. Decrease the first baking time by 5 minutes (15 minutes instead of 20) and the second baking time by 5 to 10 minutes (10 to 15 minutes instead of 20).
No. You can use another large oven-safe pot (like a stainless steel pot), a specific bread oven, or a lidded bread baker.
You do want to bake it in a lidded pot, though. This closed environment traps steam, which causes the loaf to rise more dramatically for a better texture inside. Removing the lid in the middle of baking releases that steam so the crust can crisp up.
If you’ve tried this sourdough bread recipe, then don’t forget to rate it and let me know how you got on in the comments below. I love hearing from you!
Sourdough Bread Recipe

Equipment
- mixing bowl
- Collander or shallow bowl
- Kitchen towel
- Dutch oven
- Sharp knife or bread lame
Ingredients
- 310 grams warm filtered water (90F) (1 1/3 cups)
- 120 grams active starter (See Notes) (1/2 cup)
- 500 grams bread flour (4 cups plus 2 tablespoons)
- 16 grams fine sea salt (2 teaspoons)
Instructions
Make the Dough:
- In a large metal or glass bowl, whisk together the water and starter until mostly combined. Add the flour and salt. Stir together by hand or with a spatula until the mixture is very shaggy but most of the flour is mixed in. Cover with a damp kitchen towel or plastic wrap and let it sit at room temperature for 1 hour. (This helps with flavor and kick-starts gluten development.)
Stretch and Fold:
- Fill a bowl or measuring cup with several inches of cold water. Uncover your dough.
- With the dough bowl directly in front of you, dip your fingers into the water, and then slide them under one edge of the dough down to the bottom of the bowl. (I like to pull at the top or 12 o’clock.) Pull that section of dough up, stretch it over the center, and press it down into the dough to help hold it in place. Turn the bowl 90*, or a quarter turn, and repeat 3 more times until you’ve made 4 folds and turns.
- Recover the bowl and rest for another 20 minutes. Repeat the stretch and fold process again. At this point, you can repeat the stretch and fold sequence two more times or you can move on to the rise. (Continuing to stretch and fold will develop a stronger gluten structure resulting in a chewier loaf. The flavor and texture will be great either way, it’s up to your preference and time!)
Bulk Rise:
- After the final stretch and fold, shape your dough into a ball. If your bowl is crusted with flour, scrape it clean or transfer your dough to another bowl. Cover and let the dough rise until well puffed, 6 to 12 hours, ideally in a place that is 68F to 75F. (See notes.)
- To test if the dough has risen enough, dip your finger in flour and poke the top of the dough. If it mostly springs back, it’s ready! If it holds the indentation without any movement or feels very dense, continue letting it proof and test it every hour. If it looks deflated or very soft, it is likely over-proofed. I’d still continue and bake it! It may bake up flatter but should still taste great.
Shaping the Dough:
- Stretch: Dip both hands in cold water. Slip your fingers under the dough on either side and lift the dough up about a foot or two above the counter. It should essentially be draped over your hands. (If the dough is sticking to the bowl, use a dough scraper or a spatula to loosen it.) Place it on the counter.
- Pinch: Sprinkle the top of the dough lightly with flour, and flip it over so the floured side is down. Pinch all of the edges into the center, like you are bundling up a sack.
- Shape: Flip the dough over so the seams are on the counter. With your hands cupped around the top of the loaf, gently pull the dough ball towards you, tightening the shape. Continue this motion by rotating the dough so that the edges are tightened all around and it forms a nice ball. Lightly dust with flour.
- Line a bowl or colander with a clean smooth kitchen towel and dust generously with flour (regular or rice flour). With the help of your dough or bench scraper, carefully pick up the dough ball and flip it over, setting it smooth side down in the towel. Cover and rise at room temperature for 30 minutes. (You can also place the dough in a large plastic bag and seal it, then refrigerate for up to 36 hours. The cold slows the rise and ages the yeast, resulting in a more sour, deeper flavored loaf.)
- After the 30-minute rise, place the loaf in the refrigerator while the oven preheats (at least 1 hour).
Bake:
- Place a large cast-iron Dutch oven or large heavy-duty oven-safe pot with the lid on in the oven. Preheat the oven to 500F for 1 hour. (If you have chilled your loaf for more than 1 hour, remove it from the refrigerator while the oven preheats.)
- When ready to bake, remove the loaf from the fridge. Uncover and lightly flour the loaf. Place a piece of parchment paper on top of the bowl and a baking sheet over that. Invert so that the dough falls onto the paper. Remove the bowl and towel.
- Using a sharp knife or razor blade, make a shallow cut down the length of the loaf or cut in a decorative design.
- Carefully remove the pot from the oven. Using the parchment paper as handles, place the loaf inside the pot and cover with the lid. (If the parchment is hanging out of the pot, just firmly press the lid down to seal it.)
- Bake for 20 minutes. Reduce the oven temperature to 450F.
- Carefully remove the lid and continue baking until the crust is a deep golden brown or the internal temperature is 195F to 205F, about 20 minutes more. Use the parchment and a spatula to lift the bread out of the pot and place the loaf on a wire rack to cool completely before slicing.
Notes
- Weighing the ingredients is the best way to make a great sourdough loaf. It ensures the ratio of flour to water to starter is correct for the ideal ferment. Of course, you can still make this recipe without a scale, but if you have one, I highly encourage you to use it. Plus, there are no measuring cups to clean!
- Use rice flour to dust the loaf if you have it. It doesn’t burn at high oven temperatures, so it produces a really pretty top crust. This is totally optional, though, and regular flour will work just fine!
- Let the sourdough bread cool completely before slicing. I know it can be hard to wait to dig in with the mouthwatering aroma of fresh bread wafting through the house, but wait until the loaf has cooled completely. Slicing it while it is still hot can lead to it tasting gummy.
Nutrition
Have you tried this recipe? Tag me today!
Mention @preppykitchen and tag #preppykitchen!


