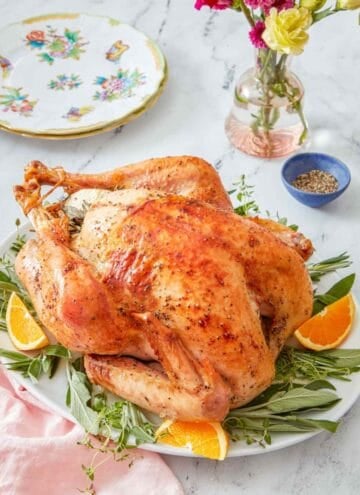
Serve a Thanksgiving turkey that is as impressive as it is delicious with this spatchcock turkey recipe! If its showstopping appearance makes you wonder if it’s complicated, don’t worry—I will guide you through the process. In just a few simple steps, you will have the juiciest, most flavorful turkey with incredibly crispy skin.
Best of all, spatchcocked turkey cooks in almost half the roasting time of traditional whole turkey, making it a great option for kitchens with limited oven space or roasting time. You can brine the turkey if desired, but the easy seasoned butter rubbed all over the turkey before cooking, makes this Thanksgiving main course tasty as-is! For more main dish recipes, check out my roasted chicken, honey glazed ham, and roasted duck.
What Is Spatchcocking?
Spatchcocking is the process of removing the backbone and flattening poultry before cooking. You can spatchcock a turkey, chicken, Cornish hen, or duck.

Why Spatchcock A Turkey?
Spatchcocking turkey increases its surface area, so it cooks faster and more evenly. This means the white meat is less likely to dry out (cooking in about the same time as the dark meat), and you end up with very juicy turkey breasts. Also, all parts of the turkey with skin are exposed to the heat of the oven, allowing the skin to get crispier.
Ingredients

Turkey — use a fresh turkey or frozen turkey (fully thawed), ideally 12-13 pounds in size. Check out my post about how to cook a turkey for tips on thawing a frozen turkey if you need them! Remove the neck and giblet bag from the turkey before starting this recipe.
Butter — unsalted butter adds richness and flavor to the turkey and helps the skin crisp up. Soften the butter to room temperature for 1-2 hours, until an ultra-soft and spreadable consistency, or learn how to soften butter in about 10 minutes if you’re short on time.
Garlic — fresh garlic adds a lovely savory flavor to the turkey. You will need 3 cloves, finely chopped or pressed.
Seasonings — fresh rosemary and thyme are the perfect herbs for seasoning the meat. If desired, you can use half the amount of dried herbs.
How To Spatchcock A Turkey

1. Place a wire rack inside a large, rimmed baking sheet. Place the turkey on a large cutting board and pat it dry with paper towels, inside and out. Trim any neck fat that is overhanging so that it is flush with the flesh. Remove the wishbone if desired. Arrange the turkey so that it is breast-side down.
2. Using sharp kitchen shears or poultry shears, cut through the small bones on one side of the backbone, staying as close to the bone as possible. Repeat on the other side of the backbone to completely remove it from the turkey.

3. With your hands holding the two cut sides, pull them away from each other to open up the turkey.
4. Flip the bird over so it is breast-side up. Place your hands between the two breasts and firmly push down to break the breastbone. You should hear a small crack.

5. Place the turkey breast side up on the prepared rack. Tuck the wings behind the breasts and turn the thighs inward towards the center of the turkey. Let it stand at room temperature for 1 hour.
6. After resting for 30 minutes, preheat the oven to 450°F. In a small bowl, combine ¼ cup of the softened butter with the garlic, rosemary, and thyme. Mash the mixture with a fork until well combined. In a small bowl, stir together the salt and pepper.

7. Using your hands, separate the skin from the flesh on both breasts and the thighs, being careful not to tear the skin. Season the turkey on both sides with the salt and pepper mixture. Massage the seasoned butter underneath the skin of the turkey.
8. Rub the remaining 4 tablespoons of plain softened butter over the skin. Roast for 25 minutes. Turn the sheet pan 180°. Reduce the oven temperature to 375°F and continue to roast for another 60 to 80 minutes until the skin is golden brown and the internal temperature of the thickest part of the breast reads at least 155°F, and a meat thermometer inserted in the thickest part of the thigh reads at least 165°F. Remove from the oven and tent the turkey loosely with foil. Let it rest for 20 to 30 minutes before carving and serving.
Should I Brine The Turkey First?
If you’d like to brine the turkey first, you can, but you don’t need to. If using a wet Turkey Brine, be sure to dry it off well before seasoning and roasting. If using a dry brine, brine it as directed and prep the turkey for roasting before rubbing it with butter. You can spatchcock the turkey before or after brining it.
How Long Does It Take To Cook Per Pound?
It takes 7-8 minutes per pound to cook a spatchcocked turkey. This is almost half the time directed for roasting a whole turkey! For the juiciest white and dark meat, roast the thighs to 165°F and the breasts to 155°F, the cooking process will carry over while the turkey rests and will come up to its final temperature in about 20 minutes.
Start Roasting At A Higher Temperature For Crisper Skin
Ensure crisp skin and juicy meat by roasting the turkey initially at 450°F. Not only does the high heat brown the skin, but it also creates a searing effect, locking in the meat’s moisture and allowing the skin’s fat to render, making it perfectly crisp.

How To Serve A Spatchcocked Turkey
Cut the turkey following my turkey carving guide and serve it hot with your favorite Thanksgiving sides, such as stuffing, mashed potatoes, cranberry sauce, and sweet potato casserole.
Prep Ahead
- Spatchcock the turkey a day in advance. Limit holiday meal prep stress by spatchcocking the turkey ahead of time. You can prepare the turkey up to a day in advance. For extra flavor, rub it with the seasoning mixture ahead of time, too. Store it right on the roasting pan, wrap it in plastic wrap, and refrigerate it. Warm it at room temperature for an hour and remove the wrap before roasting.
- For extra crispy skin, assemble it on the baking sheet and wire rack and refrigerate it uncovered for up to 24 hours to dry out the skin.
Pro Tips For Making This Recipe
- Reserve the backbone for another use. Bones have a lot of flavor and are great for making turkey stock. Reserve the backbone and cooked bones after carving if you plan on making it.
- Pat the turkey dry. Moisture makes the skin soft, and dry skin gets the crispiest when roasted. Don’t skip patting the skin dry with paper towels to remove any excess moisture.
- Make for easy clean-up. Line the rimmed baking sheet with heavy-duty aluminum foil and spray the wire rack with non-stick cooking spray to make clean-up a breeze.
- Make turkey gravy. If you’d like to use any of the pan drippings for homemade gravy, add 1 cup of water to the pan before placing the wire rack and the turkey on top. This prevents the pan drippings from burning while the turkey roasts. For extra flavor, you can add chopped vegetables to the sheet tray as well. Dice 1 onion, 2 carrots, and 3 celery stalks and spread them on the tray, then set the wire rack on top. Strain the drippings before making the gravy.
- Rest the turkey after roasting. The turkey breast will cook another 10 to 12°F during the 20 to 30 minute rest period. It needs this rest time to reach a safe internal temperature, which should be 165°F. For the most accuracy, place an instant-read thermometer in the thickest part of the breast while resting to monitor the temperature.

Frequently Asked Questions
When meal planning, plan on 1 to 1½ pounds of uncooked turkey per person. For example, a 12-pound turkey will feed 8 to 12 people.
Yes, though you can technically spatchcock a turkey of any size, larger birds require larger pans, which may be limited in size or hard to fit in the oven. I recommend using a turkey that is 20 pounds or less.
Yes, you can cut the turkey in half before roasting and place each half on separate baking sheets. Rotate the baking sheets between the oven racks after turning down the temperature and again after 40 minutes of roasting at 375°F.
If you’ve tried this Spatchcock Turkey recipe, then don’t forget to rate it and let me know how you got on in the comments below. I love hearing from you!

Spatchcock Turkey Recipe
Equipment
- Large rimmed baking sheet
- Wire rack
Ingredients
- 1 (12 to 13-pound) turkey
- 2 tablespoons salt
- 2 teaspoons ground black pepper
- ½ cup unsalted butter softened, divided
- 3 cloves garlic finely chopped
- 2 teaspoons finely chopped rosemary
- 1 teaspoon finely chopped thyme
Instructions
- Place a wire rack inside a large, rimmed baking sheet.
- Place the turkey on a large cutting board and pat it dry with paper towels, inside and out. Trim any neck fat that is overhanging, so that it is flush with the flesh. Remove the wishbone, if desired.
- Arrange the turkey so that it is breast-side down. Using sharp kitchen or poultry shears, cut through the small bones on one side of the backbone, staying as close to the bone as possible. Repeat on the other side of the backbone so that it can be completely removed from the turkey. (Reserve the backbone for another use, such as turkey stock.)
- With your hands holding the two cut sides, pull them away from each other to open up the turkey. Flip the bird over so it is breast-side up. Place your hands between the two breasts and firmly push down to break the breastbone. (You should hear a small crack).
- In a small bowl, stir together the salt and pepper.
- Place the turkey breast side up on the prepared rack. Tuck the wings behind the breasts and turn the thighs inward towards the center of the turkey. Season the turkey on both sides with the mixture. Let it stand at room temperature for 1 hour.
- After resting for 30 minutes, preheat the oven to 450°F.
- While the oven preheats, in a small bowl combine ¼ cup of the softened butter with the garlic, rosemary and thyme. Mash the mixture with a fork until well combined.
- Using your hands, carefully separate the skin from the flesh on both breasts and the thighs, being careful not to tear the skin. Massage the seasoned butter into the flesh, underneath the skin, on each of these parts of the turkey.
- If there is excess moisture on the skin of the turkey, gently pat it dry with paper towels. Rub the remaining 4 tablespoons of plain, softened butter all over the skin of the turkey.
- Roast for 25 minutes. Turn the sheet pan 180°. Reduce the oven temperature to 375°F and continue to roast for another 60 to 80 minutes until the skin is golden brown and the internal temperature of the breasts are at least 155°F, and the thighs, at least 165°F.
- Tent the turkey loosely with foil and let it rest for 20 to 30 minutes before carving and serving.
Notes
- Reserve the backbone for another use. Bones have a lot of flavor and are great for making turkey stock. Reserve the backbone and cooked bones after carving if you plan on making it.
- Pat the turkey dry. Moisture makes the skin soft, and dry skin gets the crispiest when roasted. Don’t skip patting the skin dry with paper towels to remove any excess moisture.
- Make for easy clean-up. Line the rimmed baking sheet with heavy-duty aluminum foil and spray the wire rack with non-stick cooking spray to make clean-up a breeze.
- Make turkey gravy. If you’d like to use any of the pan drippings for homemade gravy, add 1 cup of water to the pan before placing the wire rack and the turkey on top. This prevents the pan drippings from burning while the turkey roasts. For extra flavor, you can add chopped vegetables to the sheet tray as well. Dice 1 onion, 2 carrots, and 3 celery stalks and spread them on the tray, then set the wire rack on top. Strain the drippings before making the gravy.
- Rest the turkey after roasting. The turkey breast will cook another 10 to 12°F during the 20 to 30 minute rest period. It needs this rest time to reach a safe internal temperature, which should be 165°F. For the most accuracy, place an instant-read thermometer in the thickest part of the breast while resting to monitor the temperature.


Mary says
I followed this recipe to the letter. (Even the four cups of broth for the stuffing recipe.)The results for both were Simply AMAZING. So simple, so delicious. I will always roast turkey by spatchcocking from now on. (My 2lb hammer, meat clever, and Cutco scissors were very helpful in the process.) Thank you! Thank you!