
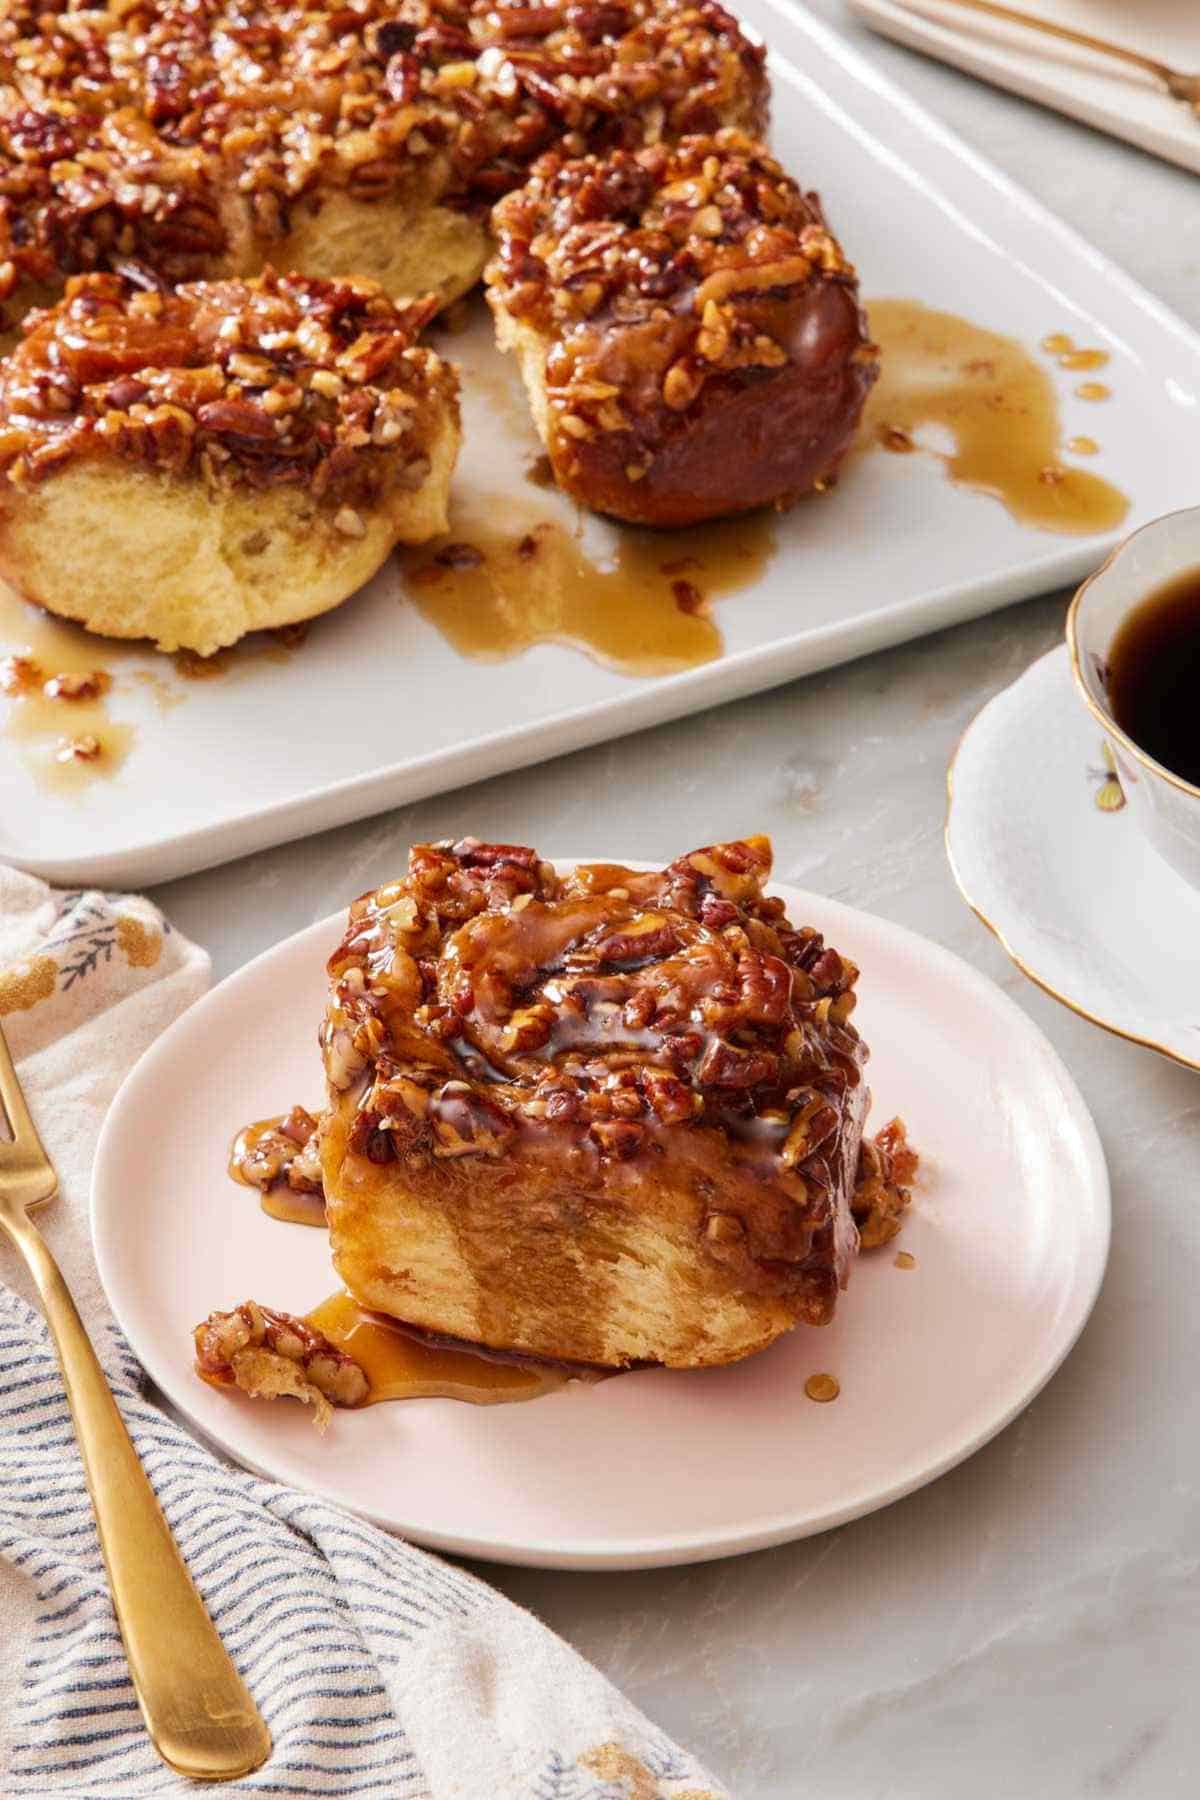
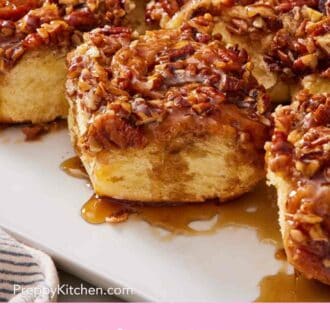
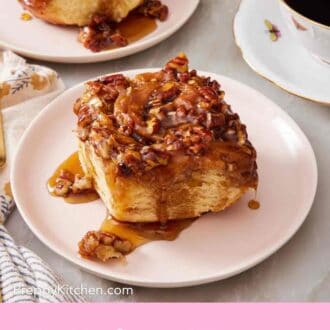
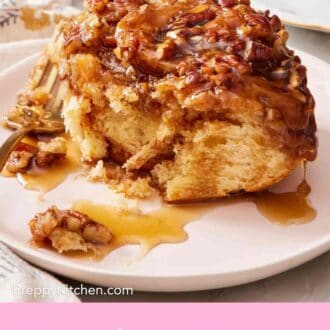
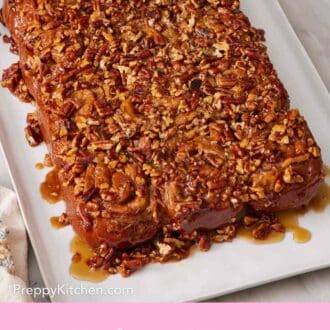
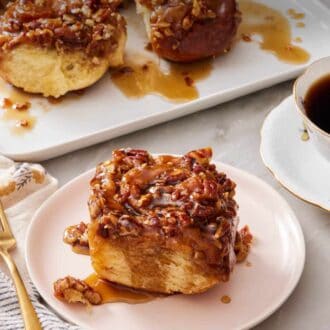
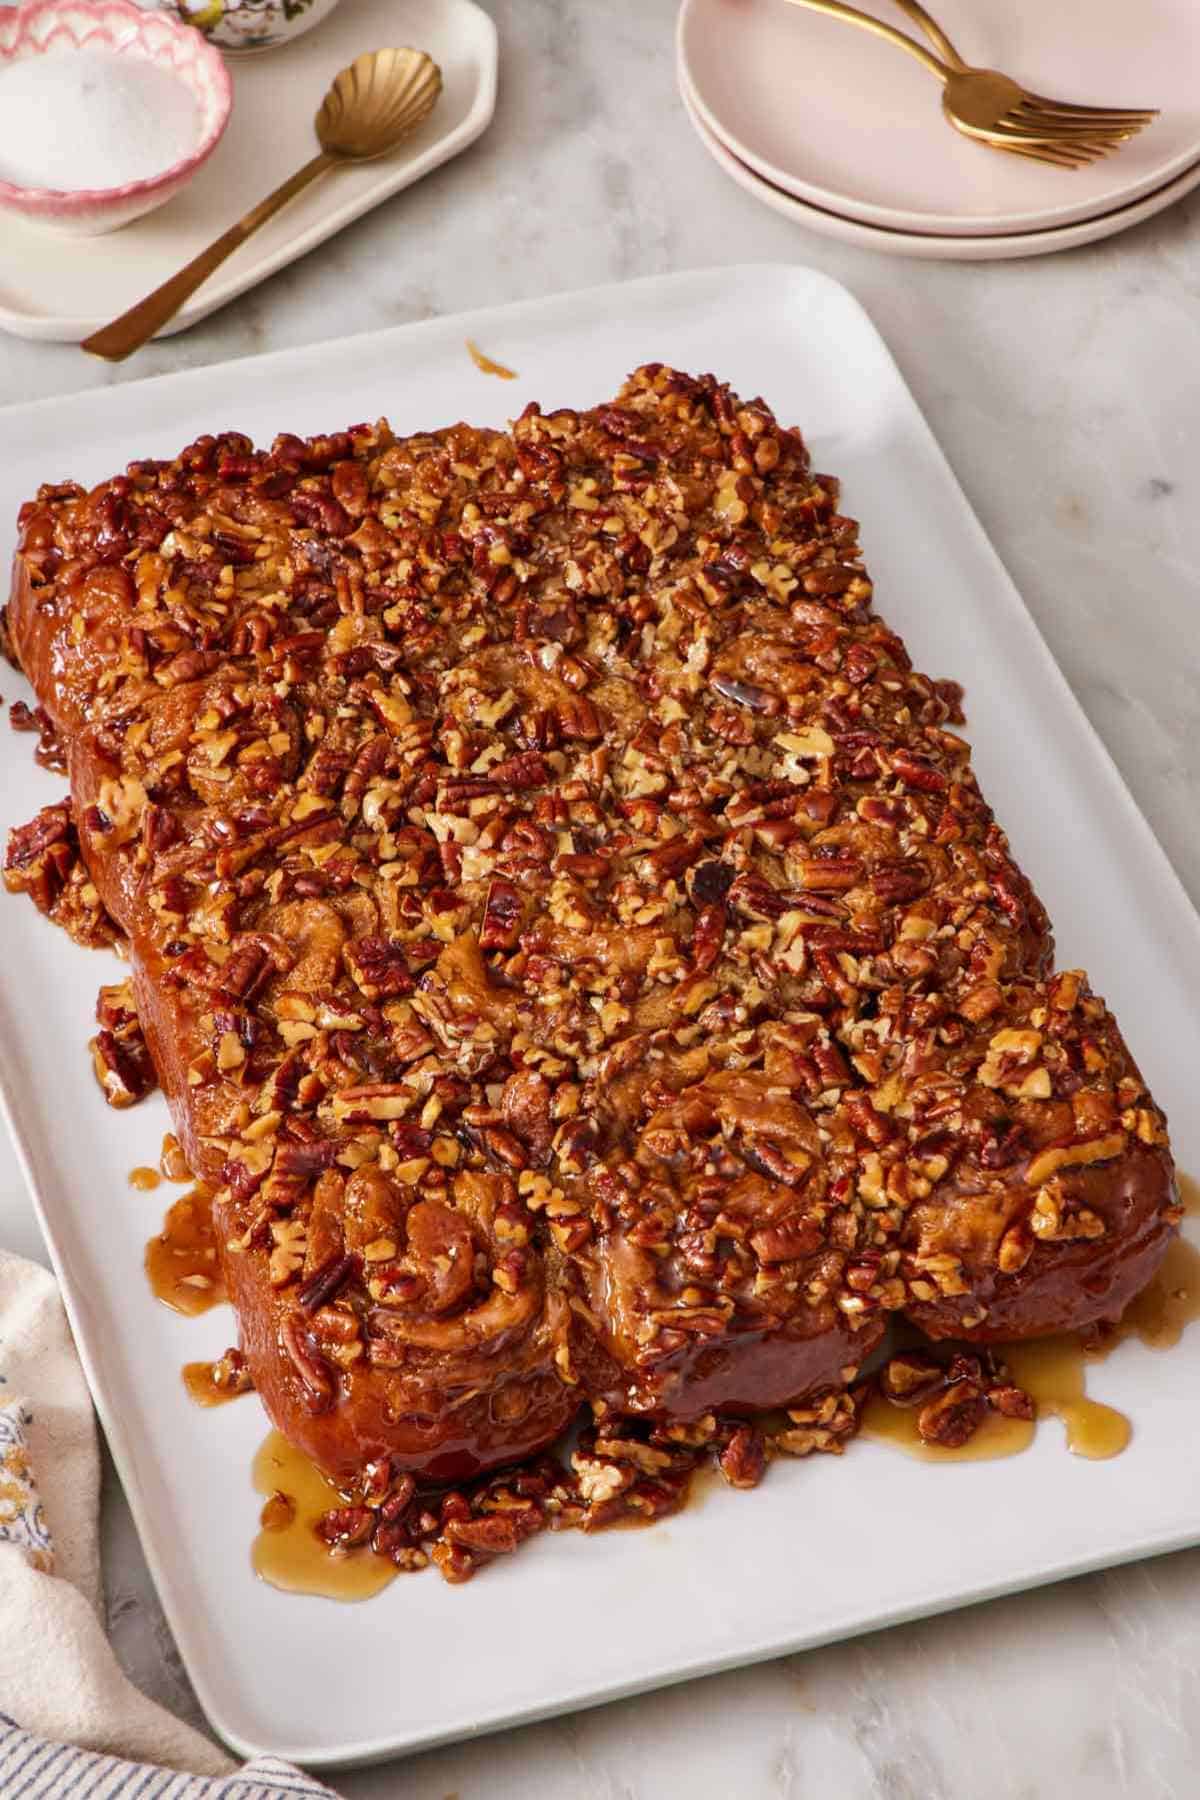
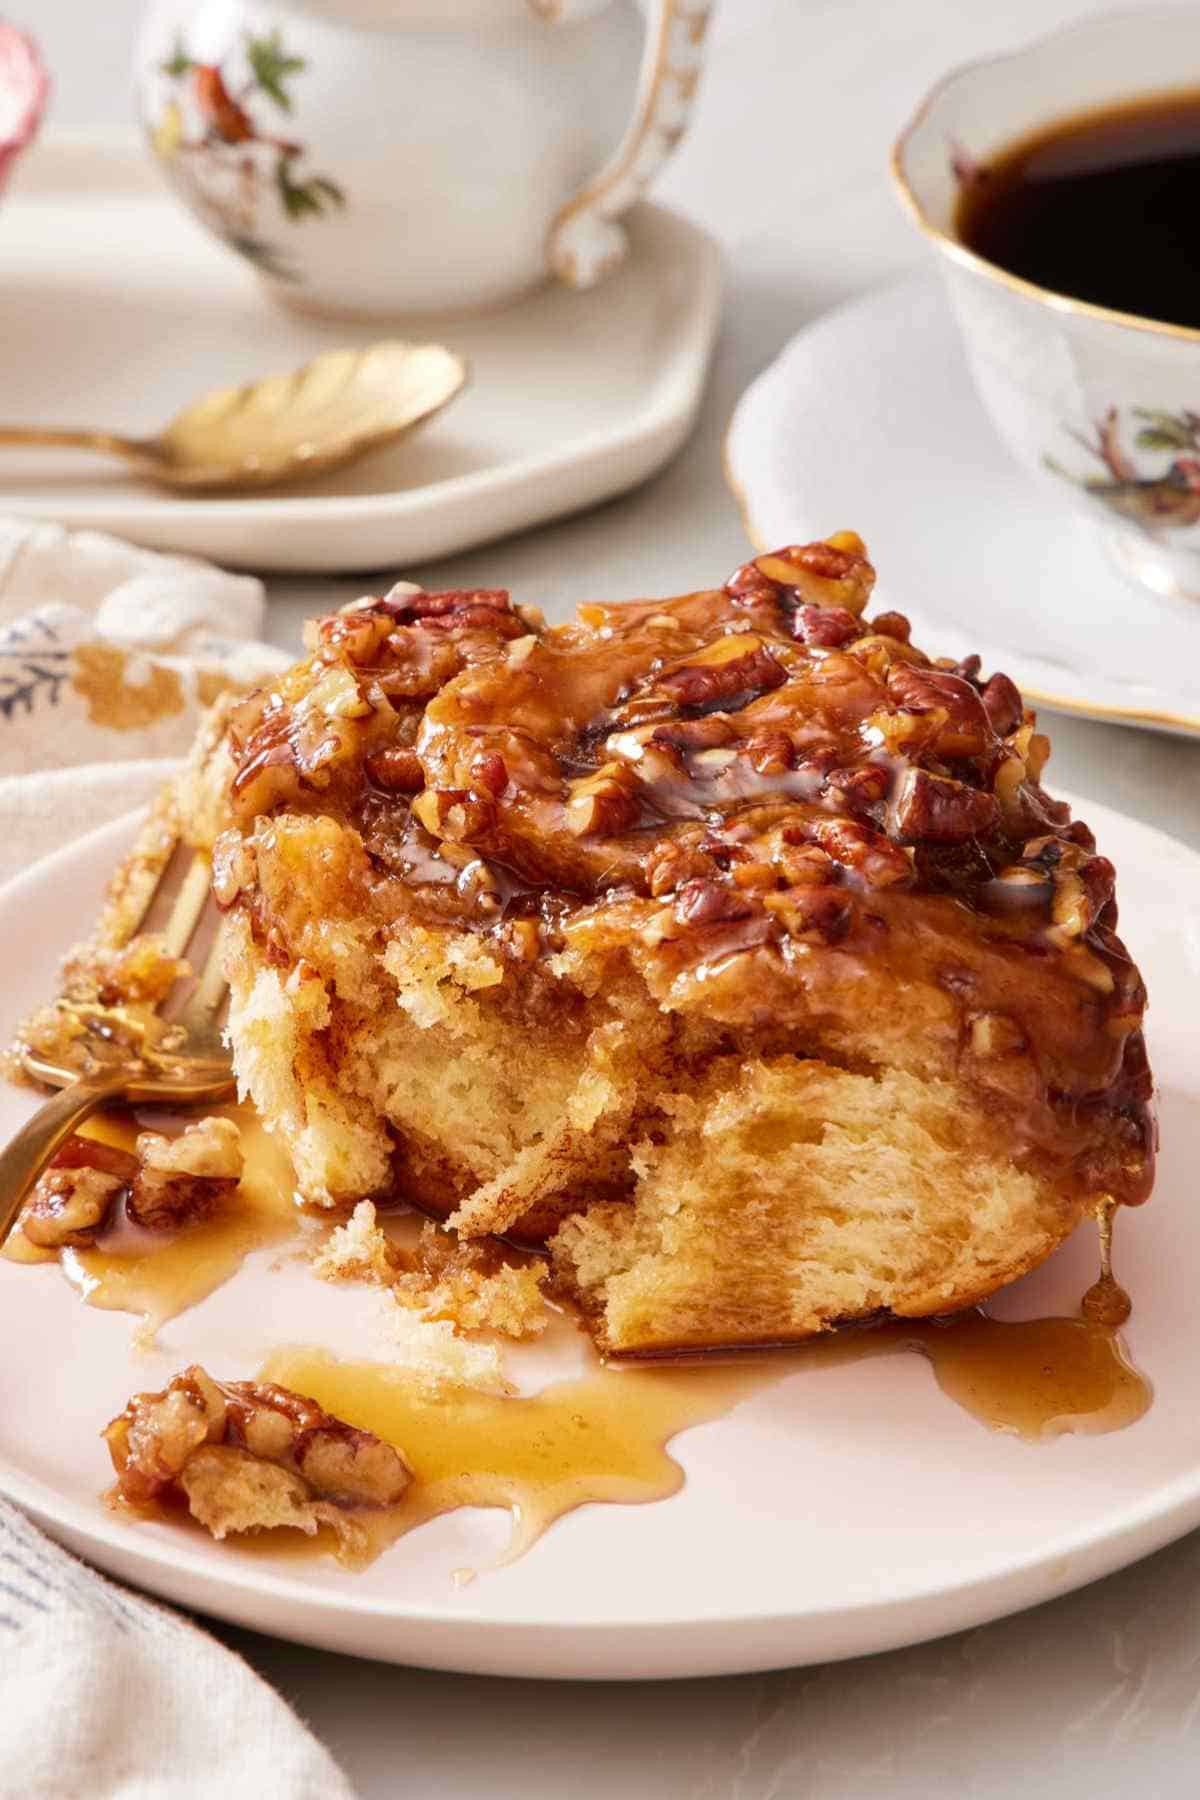
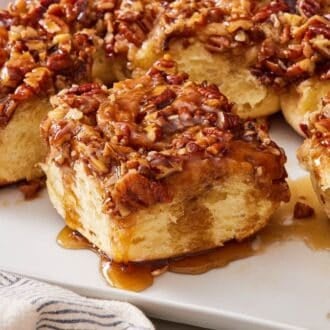
These sticky buns are always a hit! Tender rolls made with enriched dough are filled with cinnamon sugar and topped with gooey brown sugar and pecan caramel. I developed and tested this recipe several times for the softest dough that is rich and fluffy. It’s simple to do, if you proof the dough properly in a warm place!
These sticky buns are a great make-ahead breakfast option because you can assemble and chill them overnight to bake the next morning. You can also freeze them before baking! I share all the info for how to do that in the post.
A reader, Staci, says: “Another fabulous recipe from Preppy Kitchen!! These are decadent, melt in your mouth fantastic! Thank you for this recipe. I am such a fan of yours!” ★★★★★
Table of Contents
Key Ingredients & Substitutions
These are the main ingredients you need to make gooey sticky buns. You can find the full list of ingredients and measurements in the recipe card below.
Yeast — you’ll bloom active dry yeast in warm milk and sugar to help the dough rise. You can use one 0.25-ounce envelope or 2¼ teaspoons from a jar. Be sure your yeast isn’t expired or within a month of the expiration date. I find the closer to the date, the more risk of the yeast not activating properly.
Butter — melted unsalted butter adds richness and flavor to the dough. It also helps prevent the dough from getting too tough, so your rolls are tender as the added fat inhibits some gluten formation.
Eggs — you need 1 egg and 2 egg yolks. You can freeze the egg whites to use in a different recipe! The eggs give richness to the dough but also lend structure, so the baked rolls are fluffy and tender.
Pecans — pecans add crunch and flavor to the sweet, decadent sauce and are the classic sticky bun topping ingredient. Feel free to swap them for walnuts, sliced almonds, cashews, peanuts, or pistachios, or use a mix of nuts!
Honey — adds sweetness and the perfect stickiness to the gooey sauce. You can switch it for maple syrup if you wish.
Filling — you just need light brown sugar, ground cinnamon, and melted butter for the cinnamon filling. This will melt in the oven, making the rolls extra gooey in the center.
Can I use instant or rapid-rise yeast?
Yes! No need to bloom it first— just add it to the other ingredients and start mixing the dough. Keep in mind that the rise times will be much faster. (The dough will only need about half the time to rise in each stage.)
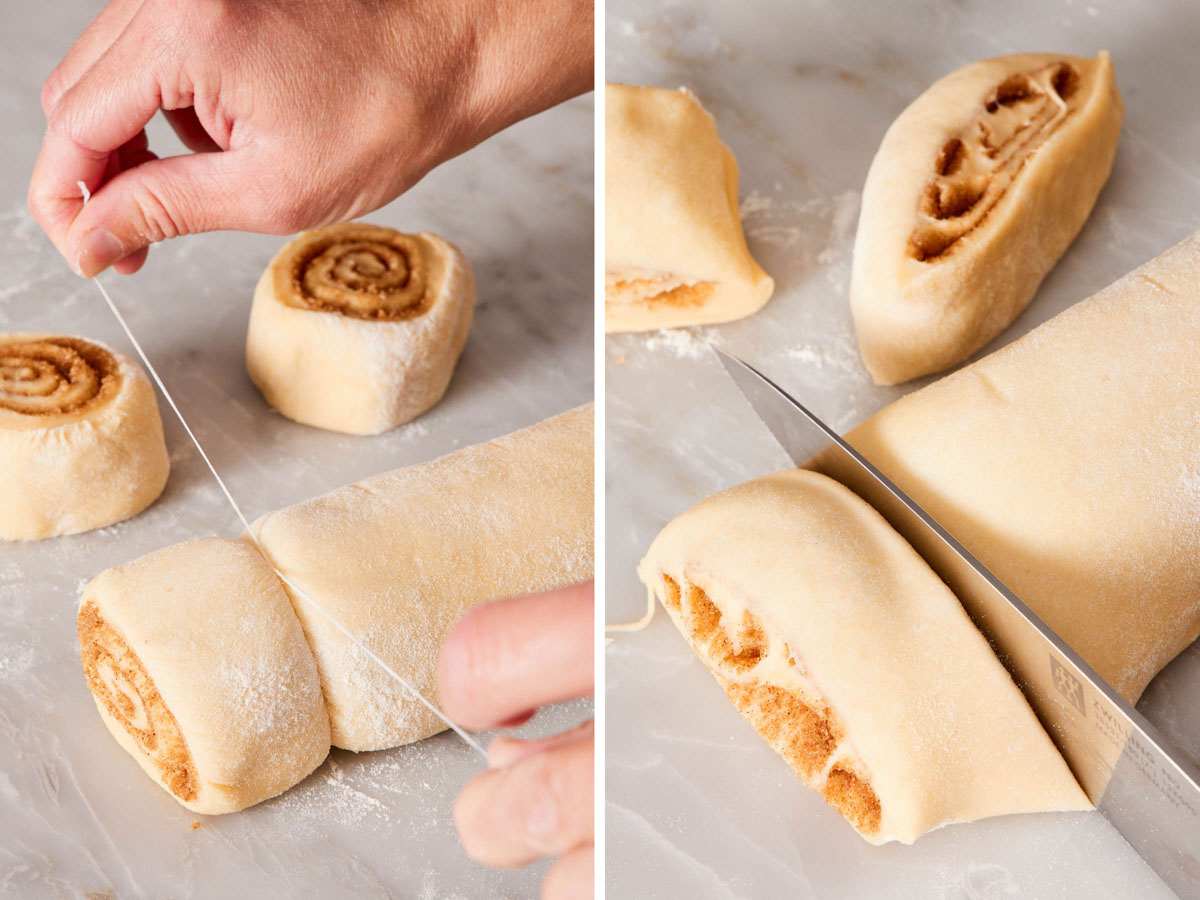
The Perfect Tool For Cutting: Dental Floss
Dental floss is not the most common kitchen tool, but it is the ideal item for cutting perfect rolls! I always use this method to cut my homemade cinnamon rolls. Choose unflavored dental floss to avoid the buns having a minty taste.
To cut the buns, score a mark on top of the dough log for each cut to make even slices. Slip the dental floss under the log at a mark, then pull the ends up and cross them over the dough. Pull the floss firmly and quickly in opposite directions until the floss has cut all the way through the dough. This will give you clean cuts and round slices!
If you don’t have dental floss, a sharp knife will also do the trick! Just be sure to use a back-and-forth cutting motion. If you simply press and cut straight down, you will smash the rolls. You can see both of these cutting methods illustrated in the image below.
Easy Variations
My recipe for classic sticky buns is easy to adapt if you want to make them your own! Here are some ideas to try:
- Extra crunchy topping: You can add up to 1 extra cup of chopped pecans for extra crunchiness.
- Mixed-nut swap: Replace some of the pecans with other nuts for a mixed-nut topping. See the Key Ingredients section for some other types of nuts you can use.
- Add a filling: Sprinkle 1 cup of raisins, dried cranberries, or chocolate chips over the cinnamon sugar before rolling up the dough.
- Add orange zest: Mix the zest of 1 orange into the dough with the other wet ingredients. The zest complements the brown sugar caramel and toasted nuts very nicely.
Pro Tips and Troubleshooting Pecan Sticky Buns
Don’t over-flour when rolling the dough. Lightly flour your work surface to prevent sticking, but don’t go overboard! Too much flour will dry out the dough and result in dense buns.
Proof the dough in a warm environment. Place the dough in a warm, draft-free spot that’s around 75°F to 78°F. This is the ideal temperature range for the dough to rise properly. If it’s colder, the dough will still rise but more slowly. If it’s a lot warmer, the dough will rise faster and can easily be overproofed.
The type of pan impacts the softness of the buns. Ceramic or glass baking dishes will give you the softest sticky buns. Because metal pans conduct heat faster, the buns will likely bake faster and can become a bit crusty instead of pillowy.
How To Make Sticky Buns
Below, I’ve highlighted portions of the recipe in step-by-step process images along with instructions for making homemade sticky buns. You can find the full set of instructions in the recipe card below.
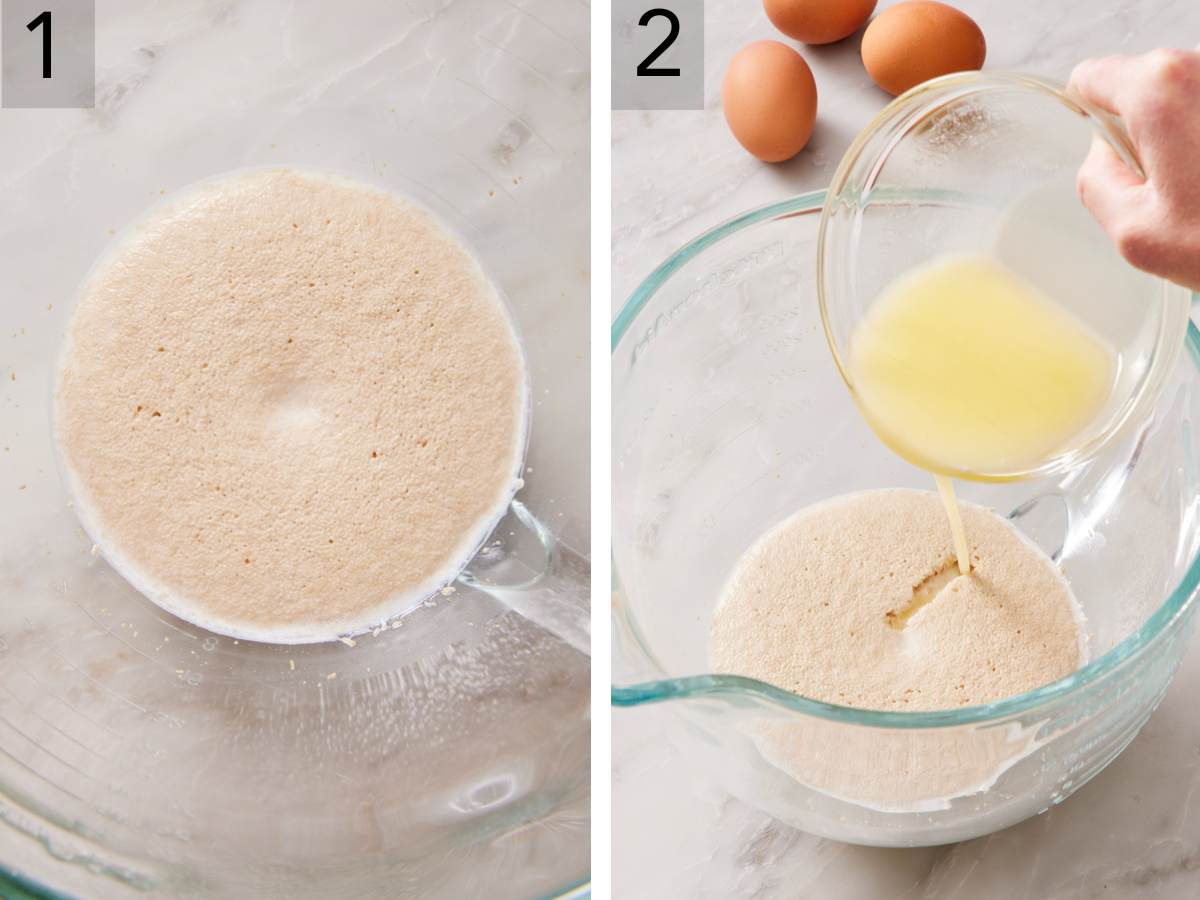
1. Bloom the Yeast: Stir together the milk, ¼ cup sugar, and the active dry yeast in the bowl of a stand mixer. Cover and set aside to activate the yeast. It should be foamy after 5 to 7 minutes.
2. Add the melted butter to the activated yeast mixture, along with the egg, egg yolks, vanilla extract, and remaining ¼ cup white sugar. Whisk to combine.
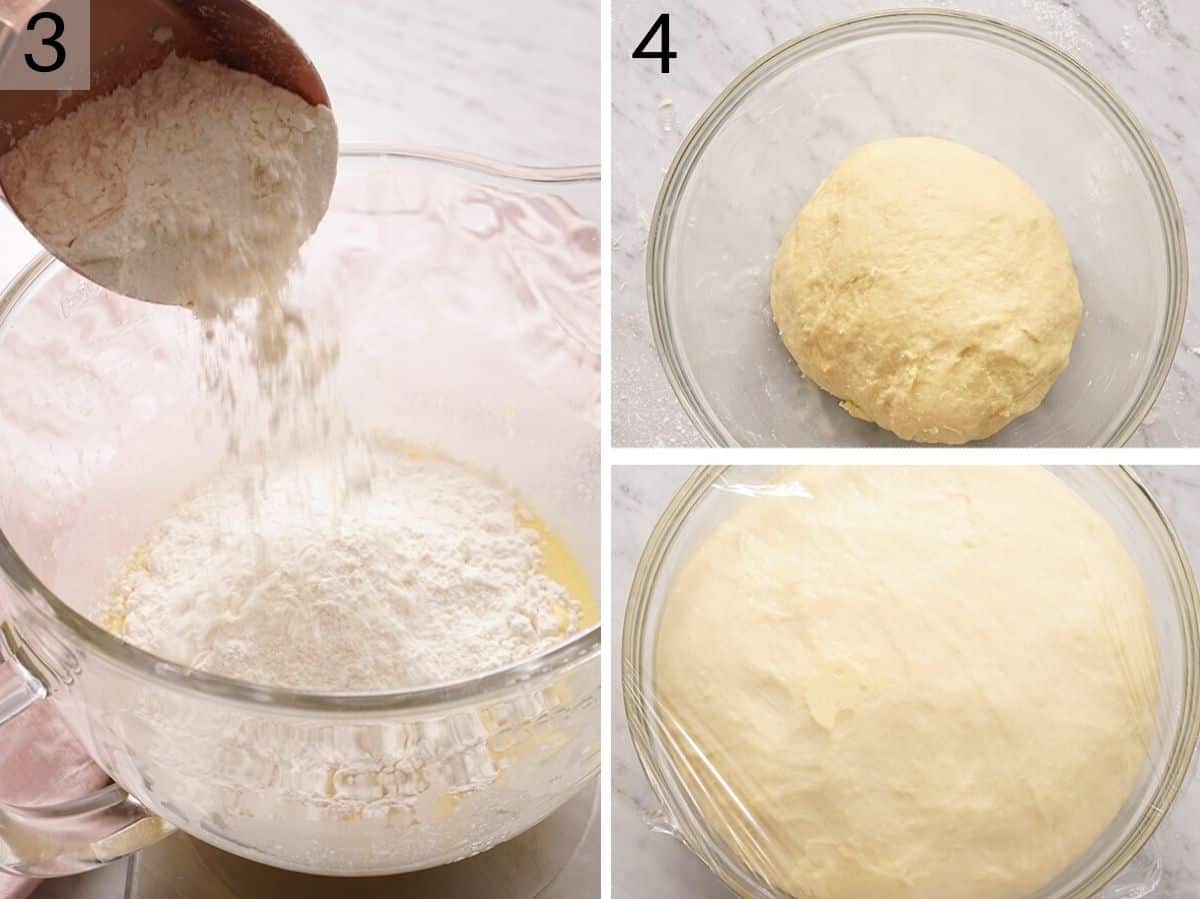
3. Knead the Dough: Add half the all-purpose flour and whisk again to combine. Add the remaining 2 cups of flour, and add the dough hook attachment to the stand mixer. If you want to add orange zest, add it now. Mix the dough on medium speed for about 5 minutes. It will be on the moist, sticky side, but if it seems wet, you can add a bit more flour. Turn the dough onto a floured surface and knead until it’s smooth and elastic.
4. The First Rise: Place the kneaded dough in a buttered bowl. Cover with plastic and place the bowl in a warm, draft-free spot for the dough to rise until it has doubled in size. (The dough will rise a second time, a few steps down, once the rolls are cut. Both phases of rising work together to produce fluffy and tender rolls, so don’t try to rush and skip one!)
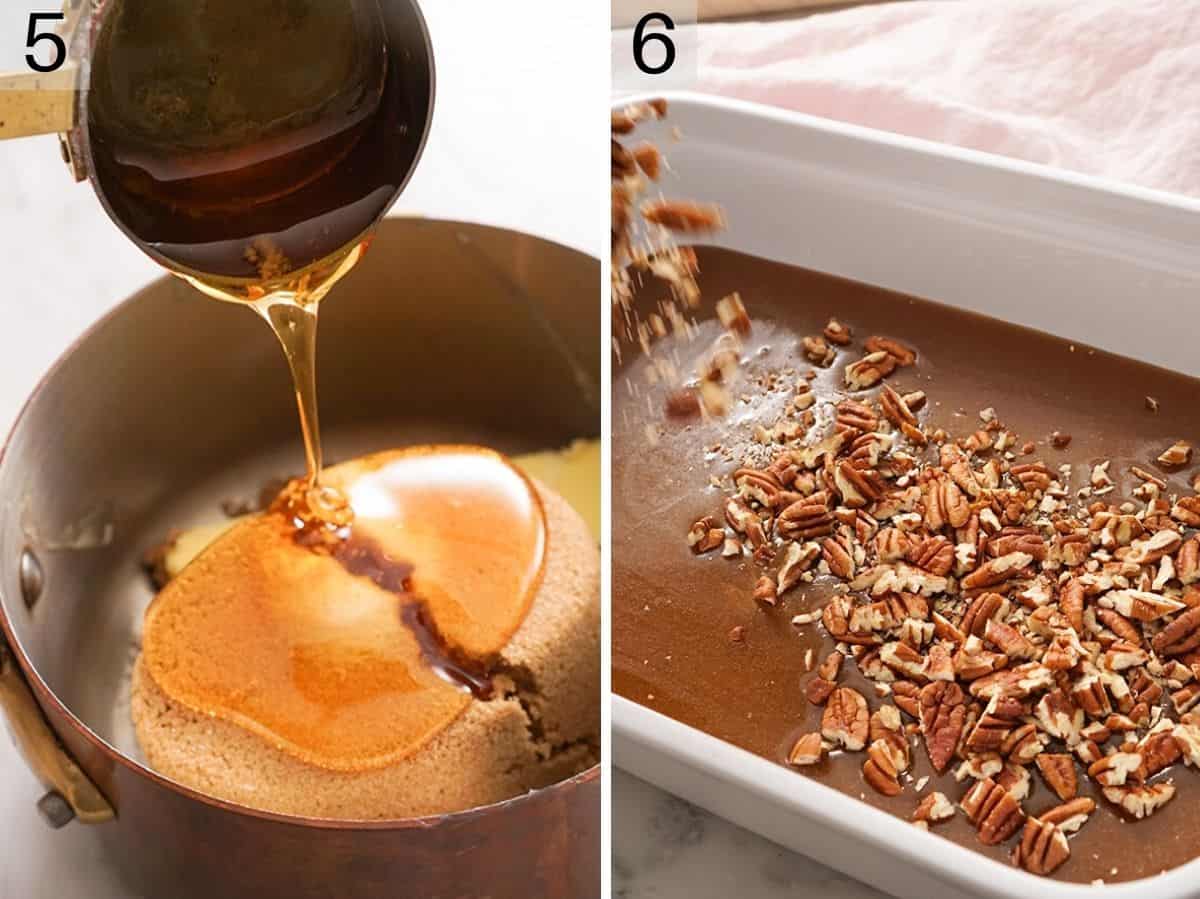
5. Make the Topping: Add the butter, brown sugar, honey, and salt to a small saucepan. Place it over medium-low heat and stir occasionally until the butter melts and the sugar dissolves.
6. Pour the sauce into a lightly greased 9×13-inch baking pan. Sprinkle chopped pecans evenly over the top of the sauce around the bottom of the pan.
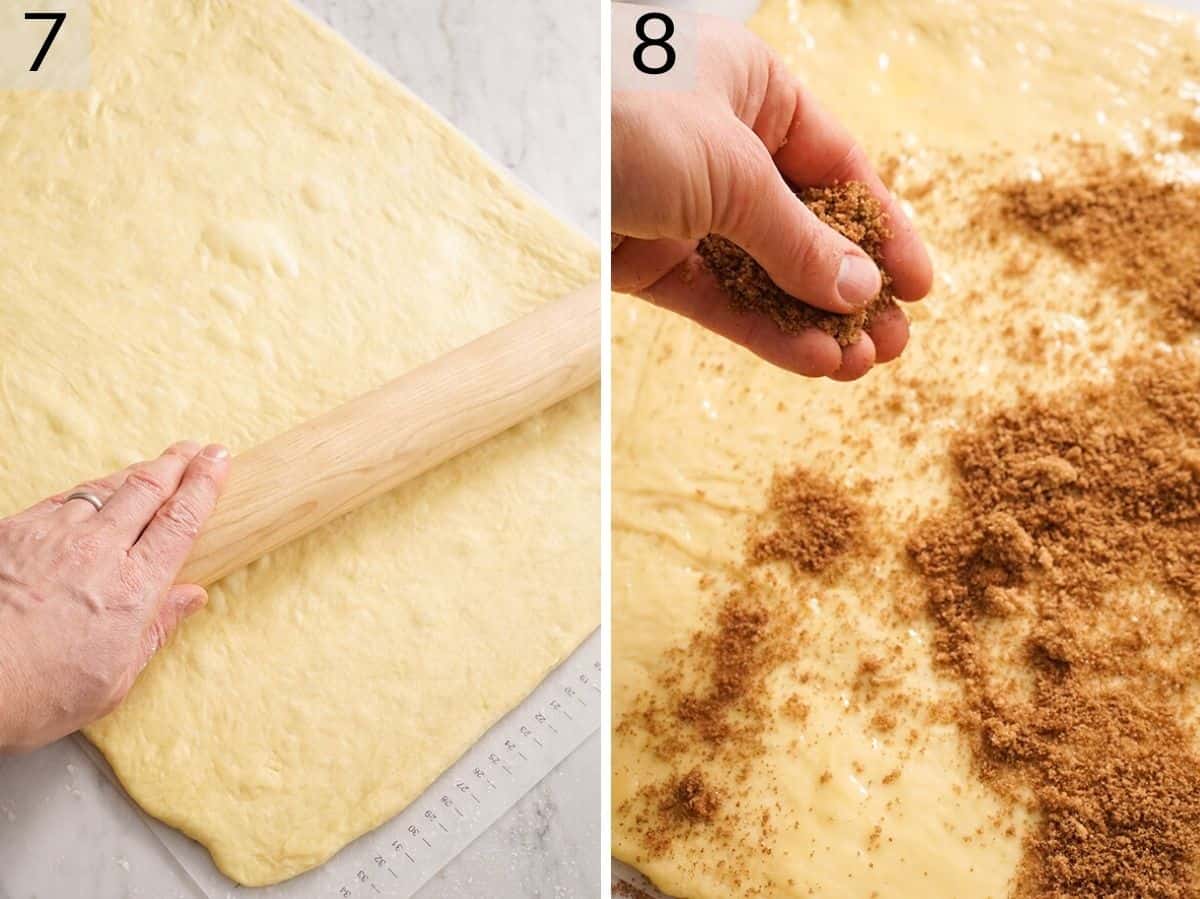
7. Rolling and Filling: After the dough’s first rise, transfer it to a lightly floured surface and spread it into a roughly 12×18-inch rectangle. You can use a rolling pin to even out the dough if needed.
8. Whisk together brown sugar and cinnamon in a medium bowl. Brush the sticky bun dough with melted butter before sprinkling cinnamon sugar evenly over the dough.
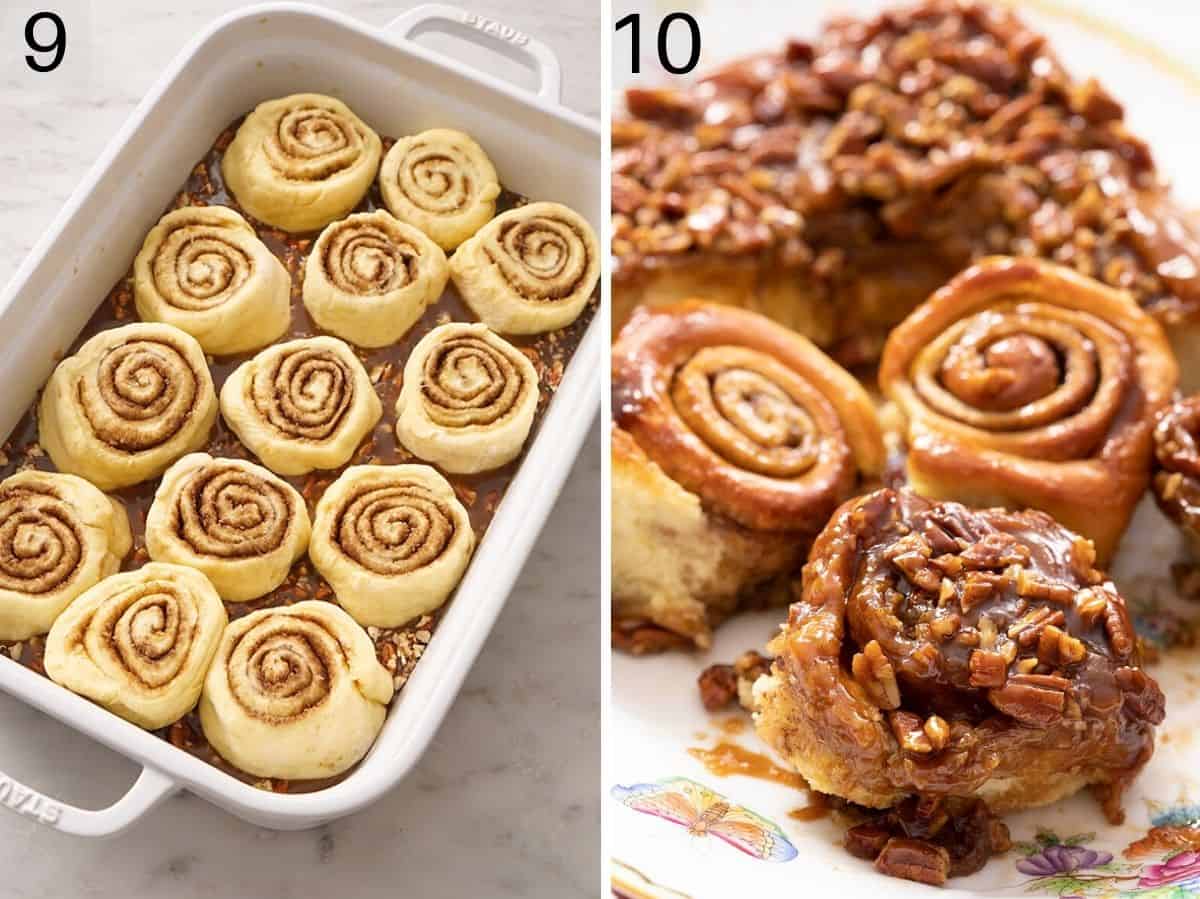
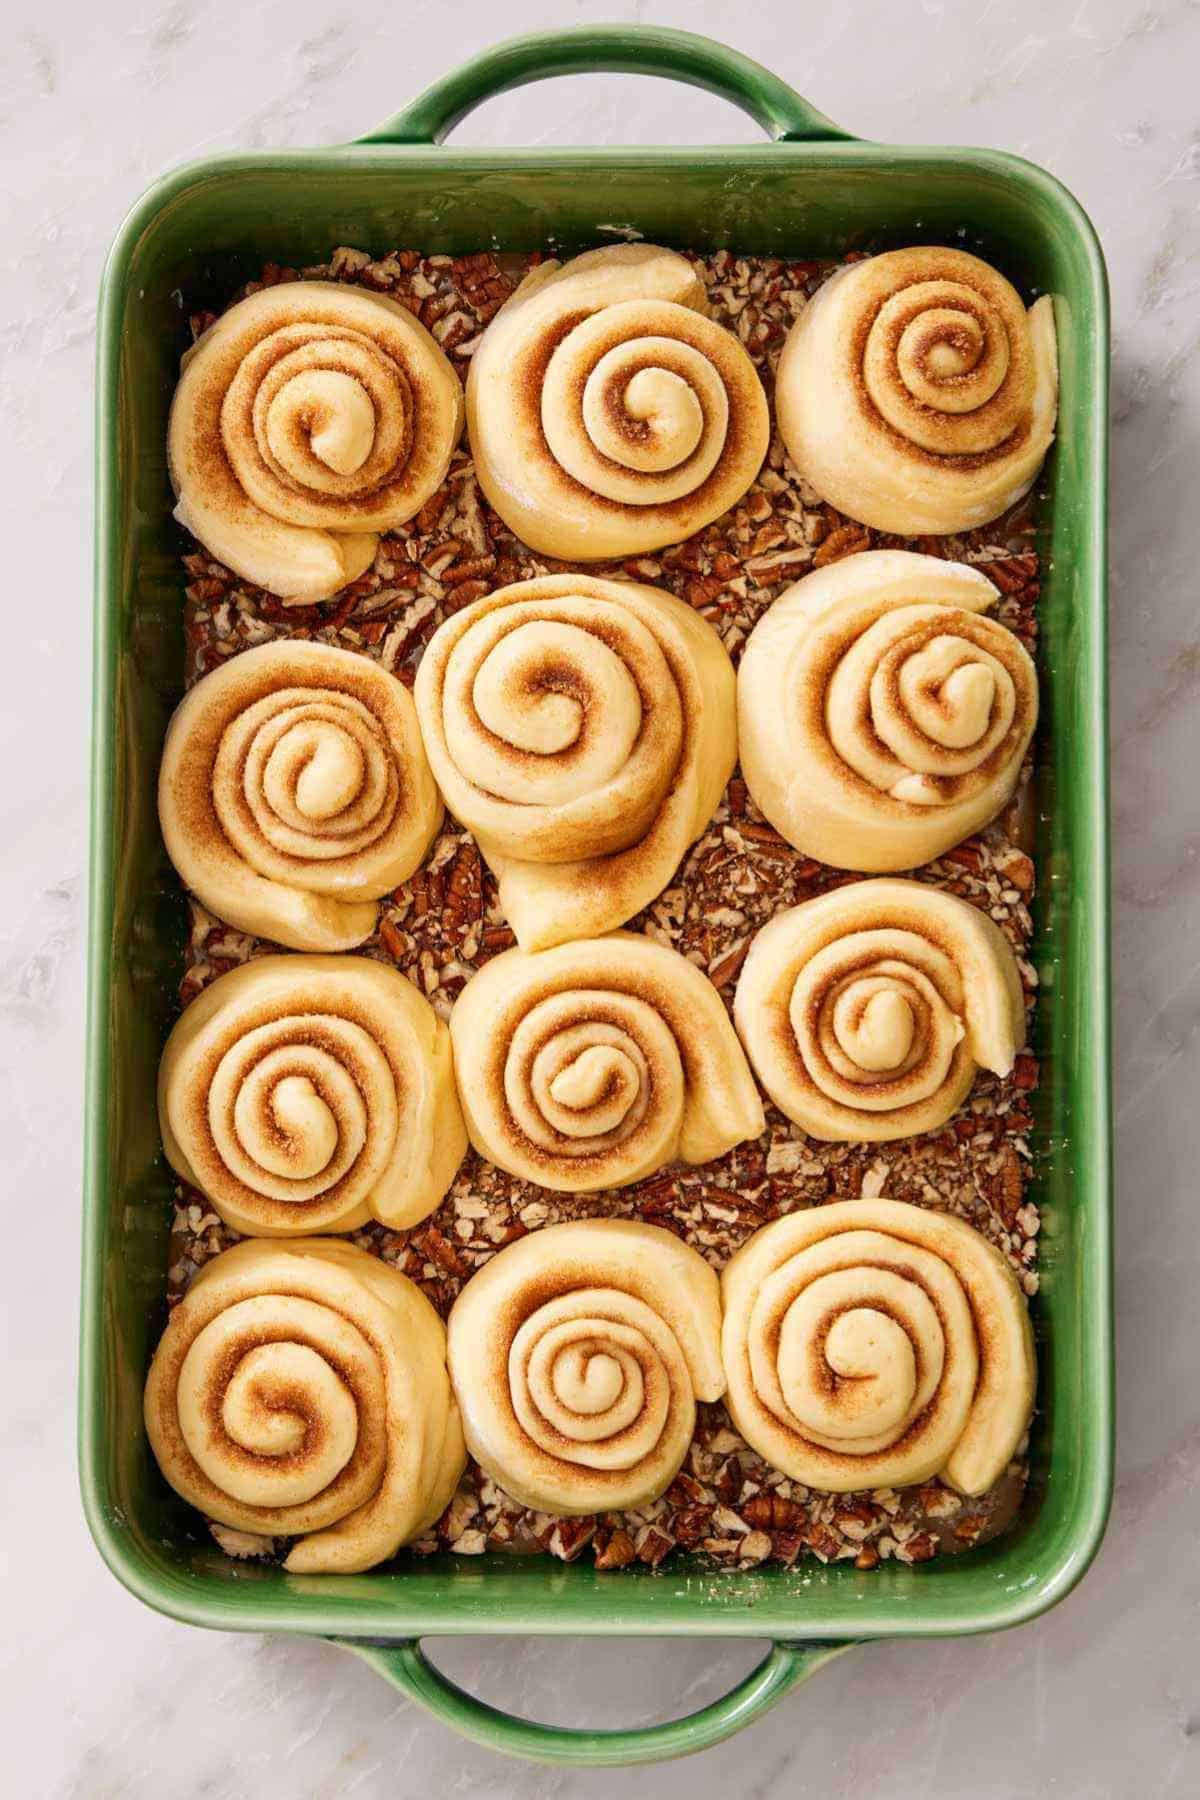
9. Shape and Cut the Rolls: Start at the long end of the dough rectangle that’s closest to you. Roll the dough towards the other long edge to form a tight log. Cut into 12 equal pieces using unflavored dental floss as described above or a sharp knife. Place the rolls, cut side down, on top of the pecan mixture in the prepared baking dish.
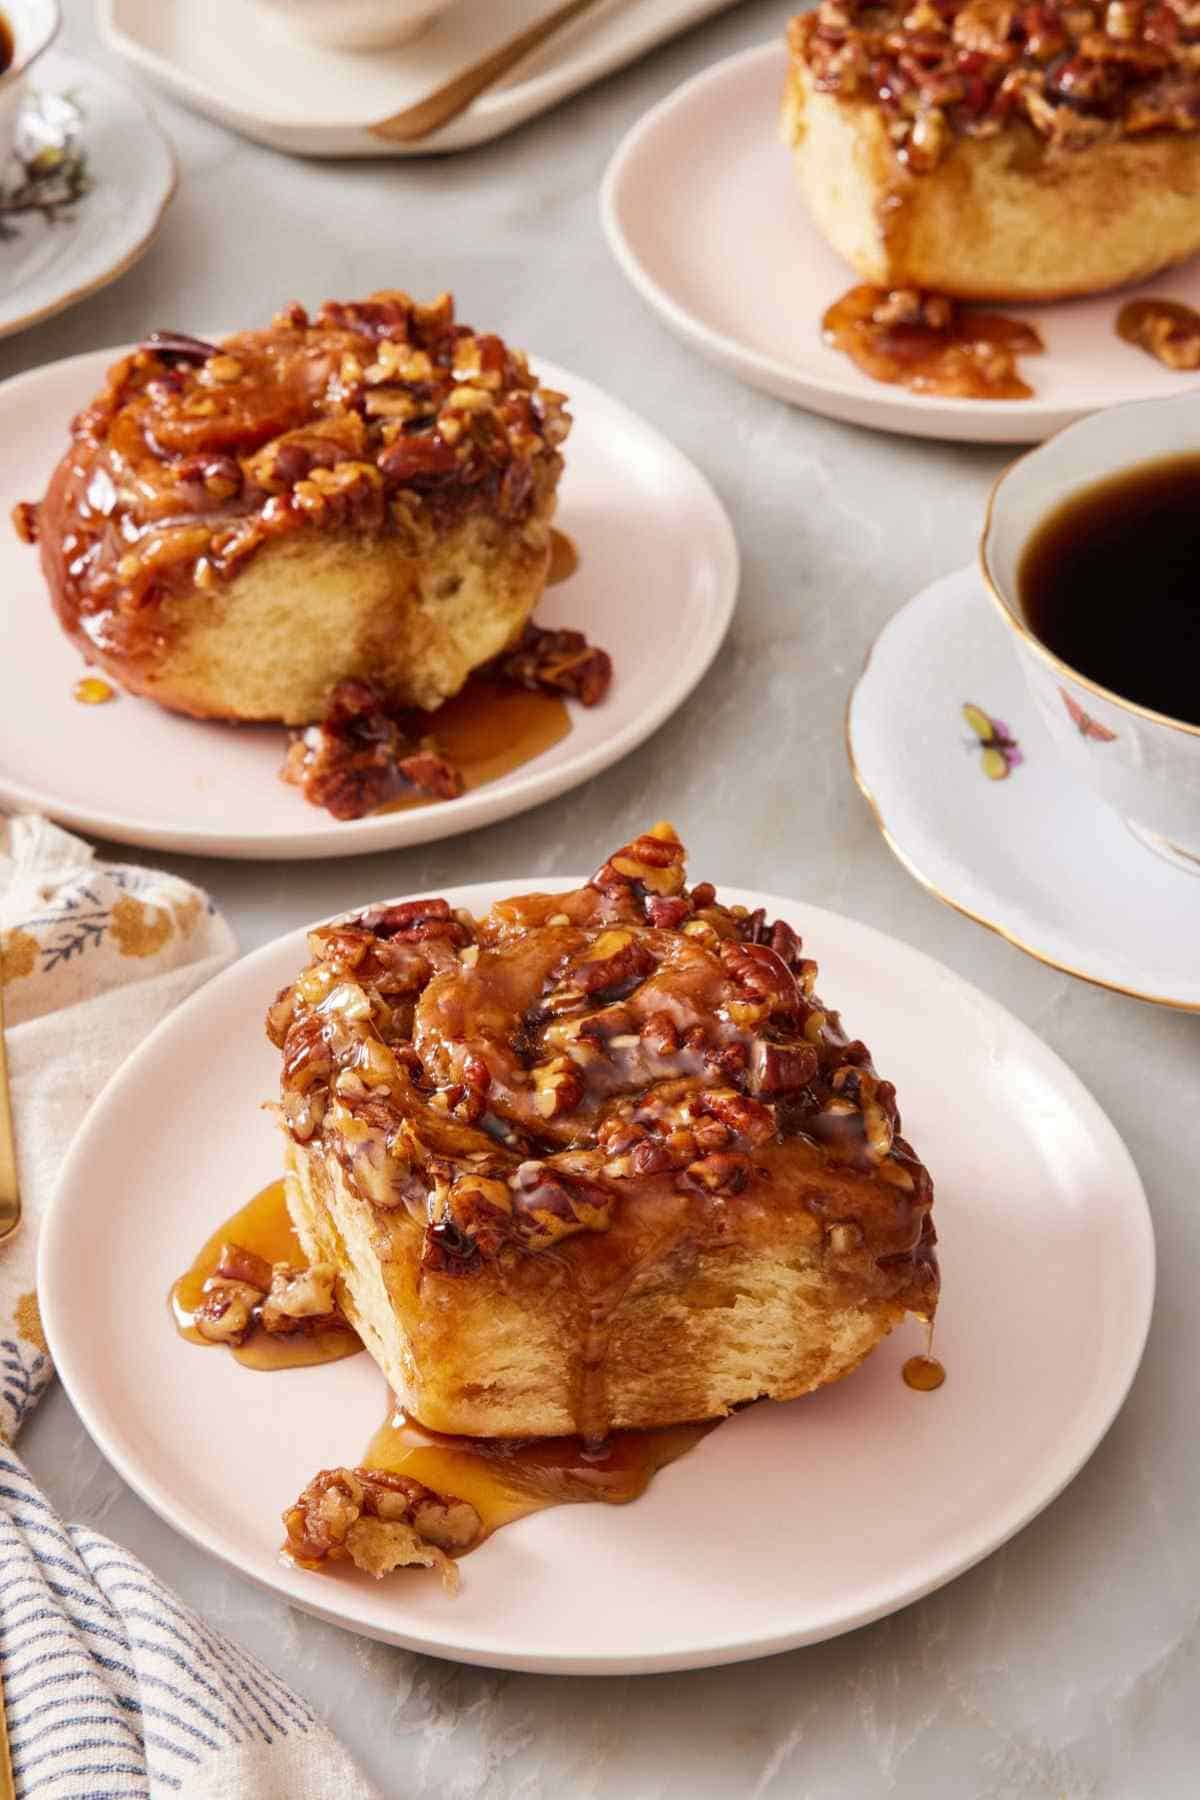
10. Second Rise and Bake: Loosely cover the baking dish with plastic wrap and let the rolls rise a second time until almost doubled in size. Bake at 375°F for about 35 minutes or until the rolls are golden or golden brown. Tent with aluminum foil after 15 minutes to prevent the tops from browning too much. Once baked, allow the sticky buns to cool in the pan for 2 to 3 minutes so the edges stop bubbling. Run a knife along the edge of the pan to loosen them, invert onto a serving platter, and serve them warm.
Sticky Buns Recipe
Video
Equipment
- Stand mixer with dough hook attachment
- 9×13 inch baking dish
Ingredients
Dough:
- 1 cup warm milk (100-110°F) (240mL)
- ½ cup granulated sugar divided (100g)
- 1 (¼ ounce/7g) package active dry yeast (2¼ teaspoons)
- 6 tablespoons unsalted butter melted and cooled slightly, plus more for the pan (85g)
- 1 large egg room temperature
- 2 large egg yolks room temperature
- 1 teaspoon salt
- 1 teaspoon vanilla extract
- 4 cups all-purpose flour divided (480g)
- Optional: Zest of 1 orange
Topping:
- 1½ cups coarsely chopped pecans (180g)
- ¾ cup packed light brown sugar (165g)
- ½ cup unsalted butter (113g)
- ¼ cup honey (60ml)
- ½ teaspoon salt
Filling:
- ½ cup packed light brown sugar (110g)
- 2 teaspoons ground cinnamon
- 4 tablespoons unsalted butter melted (70g)
Instructions
Make the Dough:
- In the bowl of a stand mixer, stir together the warm milk, ¼ cup (50g) sugar and the yeast. Cover and set aside for 5-7 minutes or until foamy.
- Once the yeast is foamy, add the melted butter, egg, egg yolks, vanilla, and remaining ¼ cup (50g) sugar to the yeast and whisk together. Add half the flour (2 cups/240g) and whisk to combine.
- Add the remaining 2 cups of flour and attach the dough hook. If desired, add in the orange zest as well. Mix on medium speed for about 5 minutes or until the dough comes together. (The dough should feel moist and sticky, but you can add a bit of flour if it seems wet.) Transfer dough to a floured surface and knead until it’s smooth and elastic, about 2 minutes. The dough should bounce back when pressed with a finger.
- Place the dough in a lightly buttered bowl, then cover with plastic and place in a warm place to rise for 1½ to 2 hours, until doubled in size.
Make the Topping:
- While the dough rises, prepare the topping. Lightly grease a 9×13-inch baking pan with butter.
- In a small saucepan, combine the butter, brown sugar, honey, and salt. Cook over medium-low heat, stirring occasionally, until the butter is melted and the sugar has dissolved, about 5 minutes. Immediately pour the topping into the prepared pan. Sprinkle the chopped pecans evenly over top.
Fill and Shape the Rolls:
- Once the dough has risen, transfer it to a floured surface (I like to use a pastry mat), then gently spread it out into a rectangular shape that’s roughly 12×18 inches. (If needed, use a rolling pin to spread and level the dough.)
- In a medium bowl, combine brown sugar and cinnamon, then whisk together. Brush the dough with melted butter, then sprinkle the cinnamon sugar evenly over the top, spreading it into an even layer with your hand, if needed.
- Starting at the long end closest to you, roll up the dough towards the other long end, forming a tight log. Cut into 12 equal pieces, (about 1½ inches wide) using unflavored dental floss or a sharp serrated knife.
- Place the rolls cut side down and evenly spaced apart in the prepared baking dish on top of the pecan mixture. Loosely cover the dish and let the rolls rise in a warm place until almost doubled in size, about 1 hour.
- After the dough has risen for 40 minutes, preheat the oven to 375°F. Bake for about 35 minutes or until golden or until golden brown, tenting with foil after 15 minutes to prevent the tops from taking on too much color.
- Allow to cool in the pan for 2 to 3 minutes just until the edges stop bubbling, then run a knife along the edge of the pan and invert onto a serving dish and serve warm.
Notes
- How to test for doneness: If you’re uncertain about the color of the buns, you can use an instant-read thermometer to check the temperature. Insert the thermometer into the center roll—it should be 185 to 195°F.
- If you are using a dark pan or a metal pan, the buns may bake faster. Keep an eye on them and check them a few minutes early.
- Make-ahead option: Assemble the rolls in the pan and skip the second rise. Cover and chill overnight, then let them rise at room temperature for at least 1 hour before baking.
Nutrition
Storage and Make Ahead
Storing: While pecan sticky buns are best enjoyed shortly after baking, you can store leftovers in an airtight container at room temperature for up to 2 days. For longer storage, refrigerate them and enjoy within 1 week.
Reheating: You can pop them into the microwave for a few seconds, or place them (covered with aluminum foil) into a 350°F oven for 5 to 10 minutes.
Make-Ahead (Overnight Option)
Assemble the rolls through Step 10, then cover and refrigerate overnight. The next day, allow the rolls to come to room temperature, then rise for at least an hour. Bake as directed.
Can I freeze the sticky buns before baking?
Yes, but let them complete the second rise before you freeze them. Thaw completely in the fridge (about 18 hours), then bring to room temperature and bake as directed.
Frequently Asked Questions
Two main culprits are yeast and temperature. Check the label of the yeast beforehand to make sure it hasn’t expired yet. And if, after 10 or so minutes, the yeast is not bubbly after being mixed with milk and sugar, there’s a chance it is bad. For proofing the dough, you need a warm environment, anywhere from 75°F to 78°F. A colder space will not allow the dough to rise properly and will take much longer.
If the dough is under-proofed after its second rise, the sticky buns will turn out dense. The rolls should be almost doubled in size before baking. Using too much flour is another common cause of dense buns. Weigh the flour that you put into the dough for the most accurate measurement, and don’t over-flour your work surface.
Use a deep pan to contain the bubbly caramel. As added insurance against a messy oven, you can place a rimmed baking sheet under the baking pan to catch any sauce that might bubble over.
Replace the milk with non-dairy milk like oat milk or almond milk. You can use an egg replacer instead of eggs, but know that the dough might not be as soft and fluffy (since eggs also add fat to the dough).
More Breakfast Recipes To Try
If you love sticky buns, try one of these breakfast recipes next!
Coffee cake, with its ribbon of cinnamon sugar and crisp streusel topping, is a winner every time! Top it with a sweet vanilla glaze for extra decadence.
Crisp, flaky croissants take time, but are so worth it! In my post, I share all the tricks for delicious homemade croissants.
It’s so easy to make waffles from scratch with my easy recipe! The fuss-free batter comes together in a matter of minutes.
The best French toast is fluffy and soft, never soggy. I love making it with brioche bread!
Whip up a batch of easy apple turnovers with store-bought puff pastry and from-scratch apple filling. A drizzle of sweet glaze is a lovely finishing touch.
If you’ve tried this sticky bun recipe, then don’t forget to rate it and let me know how you got on in the comments below. I love hearing from you!
Debbie says
I have tried both cinnamon bun recipes from Preppy kitchen and love them both. His tips are so good. Today I added orange zest and what a game changer.
Eddie says
These sticky buns are easy and absolutely scrumptious. I will make them again. The caramelizing of the topping—to die for. I forgot to include the orange zest which I had planned to add but will make it a point to do so in the future as I’m sure it would add a nice zing. I used fishing line rather than plain dental floss to cut the dough since I had that on hand, and it worked perfectly. The only small tweak that I’ll make next time is to bump up the sugar/cinnamon filling a smidge, add crush pecans to that and reduce the pecans for the topping. Definitely a keeper!
Nickie Gay says
These are AMAZING! I make these every year now for Christmas Morning Breakfast. My family loves these so much, it has become a tradition!
Staci says
Another fabulous recipe from preppy kitchen!! These are decadent, melt in your mouth fantastic! Thank you for this recipe I am such a fan of yours!
M.A. Franklin says
Yepp these are easy to make and amazing. I will be making them as Moms Day gifts for some of my lady neighbors. They are something !!!!
Sherri says
I was a bit dubious about the dough not going through a second rise, so admittedly I waited til they were in the pan before turning on the oven. They came out *perfect*, so delicious and fluffy. I wish I had seen the advice of adding the orange zest to the dough; I did add it to the filling, but I couldn’t taste it. Thank you for this recipe, very much a keeper!
Mary Brogdon says
Made them three times and they’re delicious. the dough stays soft. Not sure how long they stay fresh never have any left to find out! Big Yes!
Michelle says
This is a must for Christmas morning brunch and was better than the recipe I’ve been using for the past 15 years or so. I discovered the proof feature on my oven which cut the rise time in half. The directions don’t mention where to put the salt so I put it in at step 2. I panicked when my twelve slices filled only half the pan but I spread them out and all was well after baking. Absolutely delish! I’ve always had good success with any Preppy Kitchen recipe and is quickly becoming my go to site.
Cathi R. says
Looks so yummy! I can’t wait to make them.
Jess says
Delicious and very simple to make. We’re a big hit for Christmas breakfast