
This post may contain affiliate links. Please read our disclosure policy.


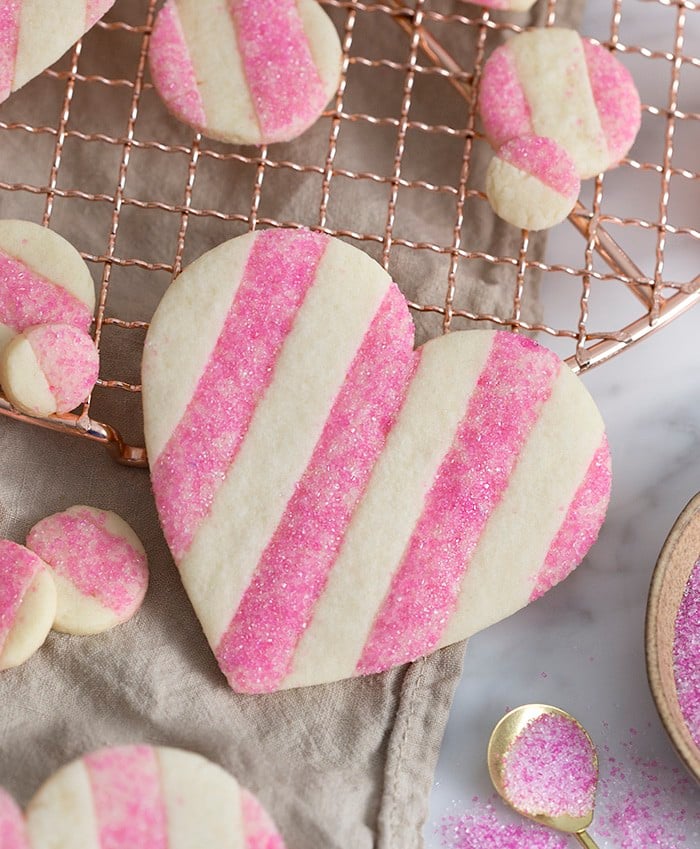
Beautiful striped pink and white heart-shaped Valentine cookies with a little extra sparkle make for a scrumptious treat!
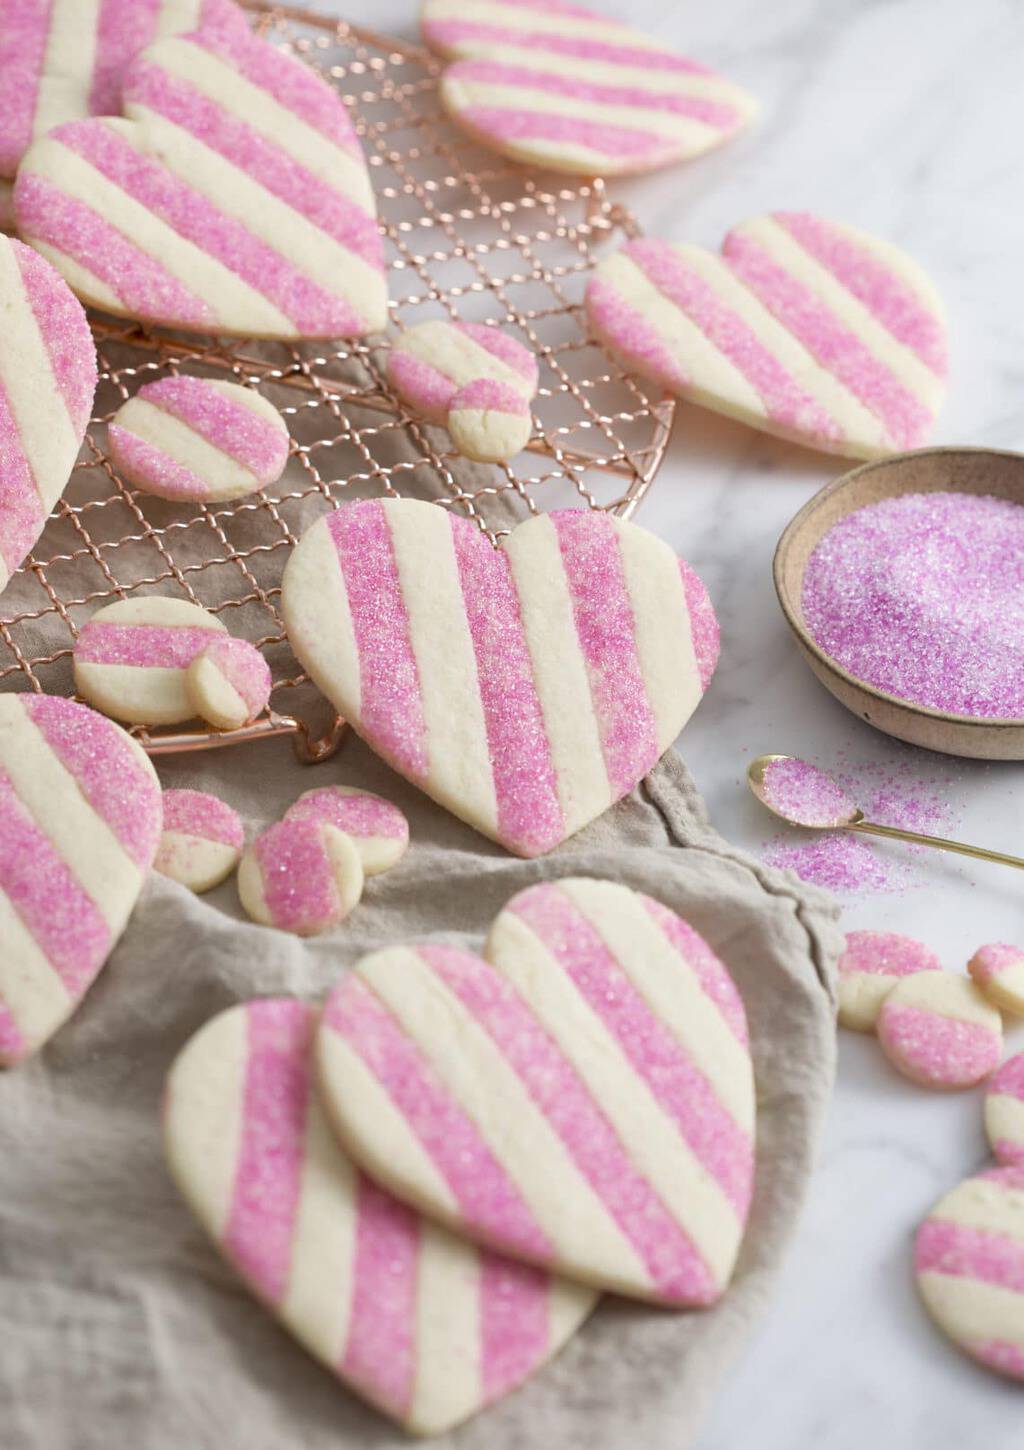
These Valentine cookies come out of the oven fully decorated! All the color and wow factor without the need to mix up batches of royal icing! I made them with some pink sanding sugar rolled into the pink stripes for an extra sparkly pop but they look just as nice plain.
Frequently Asked Questions
HOW DO YOU GET SUGAR COOKIES TO HOLD THEIR SHAPE?
The BEST way to get cookies to hold their shape is to add a few tablespoons of cornstarch to the dry ingredients. This will drastically cut down on the chill time while also making the dough easier to handle and of course spread less.
CAN I LEAVE SUGAR COOKIES OUT OVERNIGHT?
You can definitely leave cookies out overnight but it’s best to keep them in an airtight container or well-wrapped in plastic. Exposure to air can degrade the texture and flavor over time.
What can I do if I can’t find pink sanding sugar?
- You can use regular white sanding sugar or plain granulated sugar. The pink dough will show through but you’ll still have some nice sparkle and crunch.
- MAKE sanding sugar! Add 1/4 cup of sugar to a sealable plastic bag then add a few drips of food coloring. Seal the bag and mash the sugar into the dye with your fingers until the color is distributed. If the sugar is a bit wet then spread it out on a baking sheet to air dry.
How do You Make Striped Cookies?
- Making striped cookies is so fun, they come out of the oven fully decorated and gorgeous. Basically you mix up two batches of cookie dough. It’s easiest to add the coloring to the creamed butter mixture and then add the dry in.
- Chill the rolled out dough, cut into strips and place together, then roll again, chill if needed and cut onto shapes!
How to Make Valentine’s Cookies
For these cookies you can either make two batches of dough one uncolored and one pink, OR you can mix up a big batch and use a scale to divide the wet and dry ingredients in two. I did the later in the recipe video but it’s actually easier to make the separate batches as I’ve don in the step below.
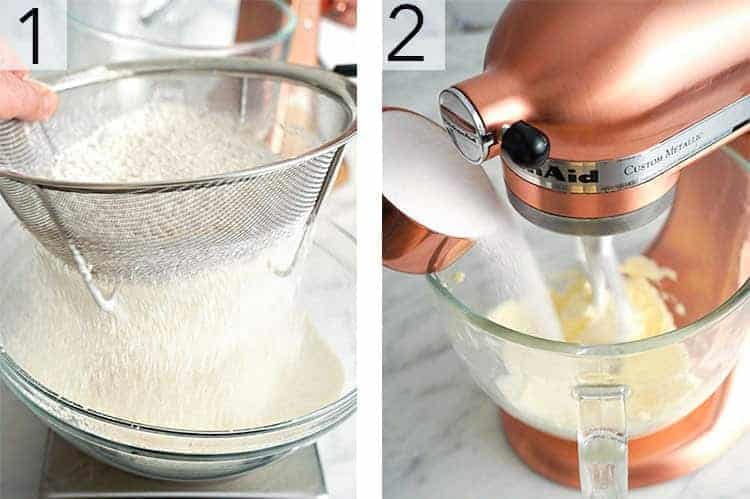
1. Sift the flour, cornstarch and salt. Give it a whisk so that everything is incorporated.
2. In a stand mixer fitted with a paddle attachment cream butter, and granulated sugar together until light and fluffy.
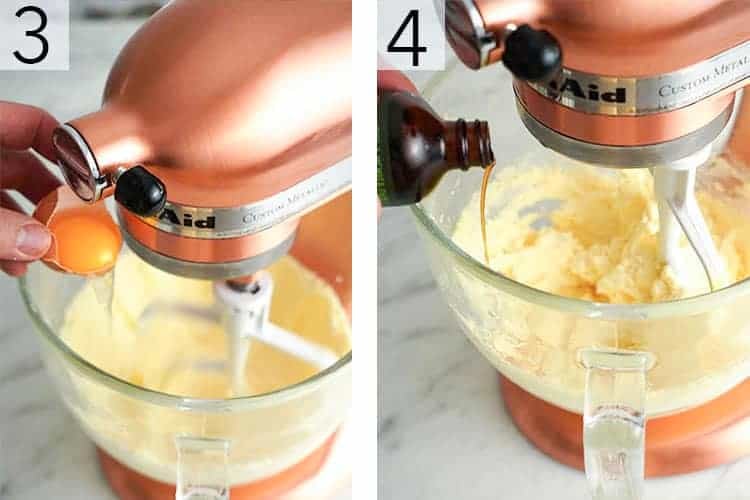
3. Add the eggs to the sugar/butter mixture making sure each egg incorporates before adding the next.
4. Scrape the bowl down then mix in the vanilla.
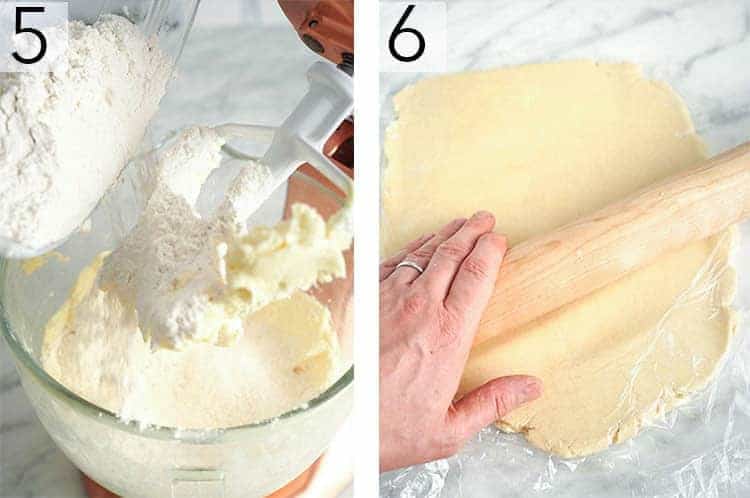
5. Add the dry mixture and mix on low until almost combined. Scrape the bowl down one last time and mix until combined.
6. When the dough is ready, roll out to about 1/4 inch thick. I like to roll the dough out between two sheets of plastic wrap for easy cleanup. Transfer your dough to a cookie sheet and place in the fridge to chill.
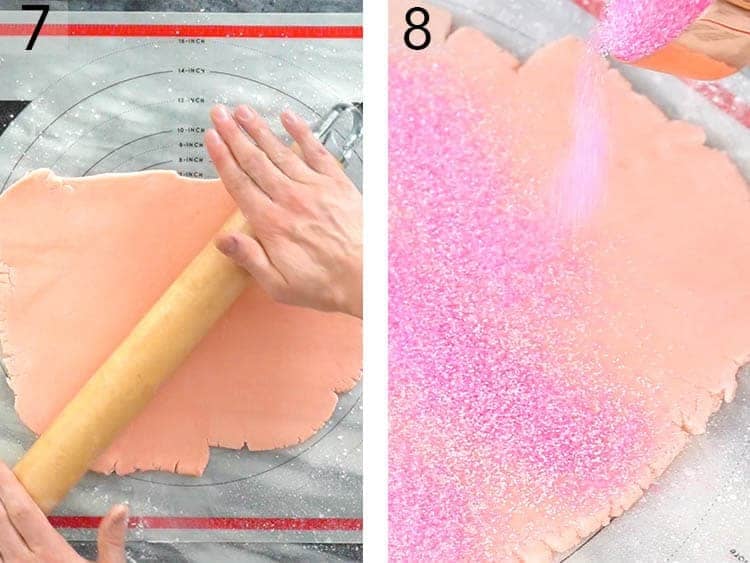
7. Now it’s time to make your second batch of dough. Repeat the above steps but add some soft pink food coloring to the butter and sugar mixture in step four. The dough will lighten up a but after the flour is added so go for a bit more saturated.
8. Add a layer of pink sanding sugar onto the pink dough then use a rolling pin to gently press the sugar into the dough. Transfer to the fridge to chill (20 minutes should be enough).
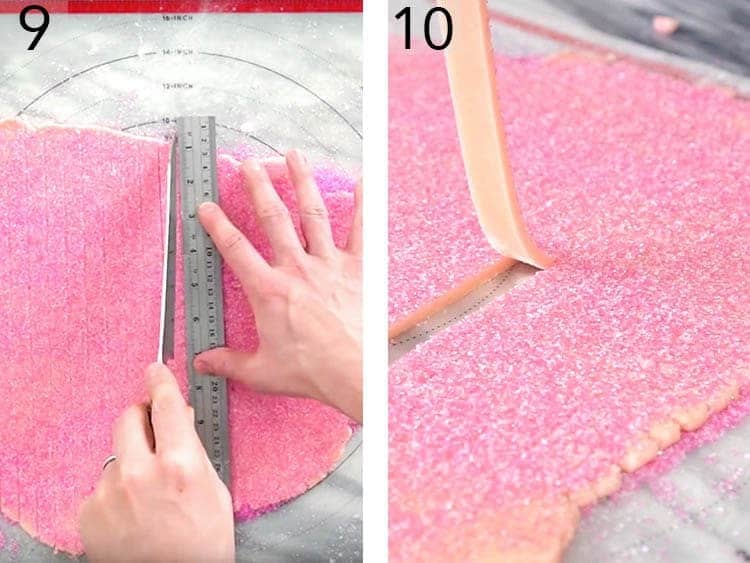
9. Once the dough has chilled use a ruler and a sharp knife to cut ½ inch strips out of both batches of the dough. Return the dough to the refrigerator while you cut the next batch.
10. Carefully lift the chilled dough strips as you begin assembly. If they break it’s totally fine just place back together in the next step.
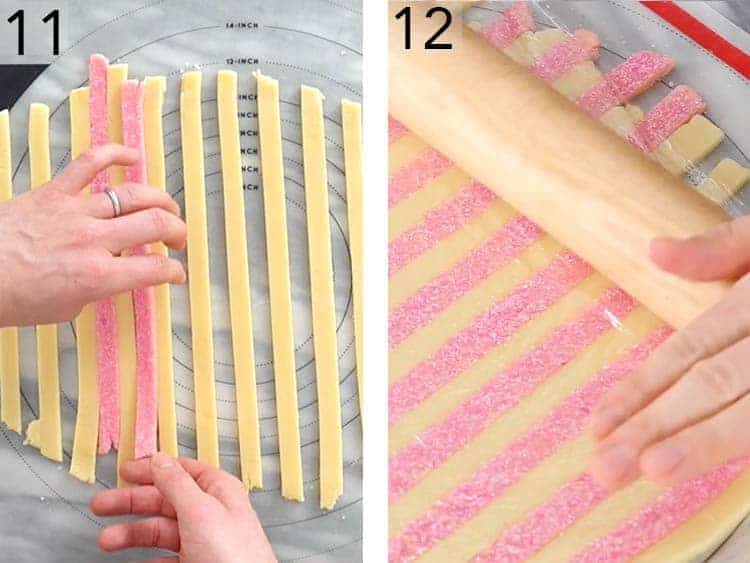
11. Place the dough strips together in alternating colors. Use a knife or bench scraper to tap them together as needed. They need to be touching! All of this works best if the dough is cold.
12. Lay a piece of plastic wrap or parchment paper onto the striped dough and gently roll out. This step helps glue together the dough strips Place the dough in the fridge to chill one last time then preheat the oven to 375 degrees F.
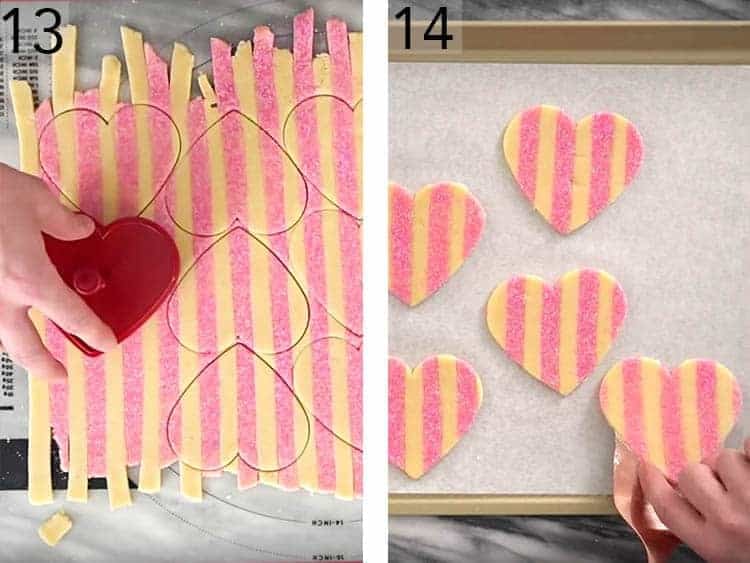
13. Use a heart-shaped cookie cutter to cut the dough. Try to waste as little dough as possible. I will use a small circle cutter to cut little cookies which I bake separately so almost not dough goes to waste.
14. Carefully transfer the hearts onto a silpat or parchment-lined baking sheet and bake at 375F for about 12 minutes, let them cool then enjoy!

A FEW TIPS
- I’ve made these cookies without the sanding sugar and they’re super-pretty so feel free to omit if you can’t get ahold of pink sanding sugar?
- If the cookie dough is warming up and becoming difficult to handle then place in freezer or fridge to chill until firm. It’s best to work on a sheet of plastic wrap or a pastry mat so you can move the dough to and from the fridge easily.
- You’re going to end up with a fair amount of scraps after you cut the cookies out of you’re striped dough. I used smaller circle cutters to use as much of the dough as possible, then balled up the rest, rolled it out and had some crazy looking but tasty scrap cookies for snacks.
- You can make this dough a few weeks in advance and keep it in the freezer, provided it’s well-wrapped. When you’re ready to use it just thaw a bit, cut your cookies and toss into the oven.
- The best time to roll that sanding sugar on is when the dough has warmed up after the final roll out. If the dough is too cold the sanding sugar won’t stick.
If you’ve tried this valentine’s day cookie recipe then don’t forget to leave a rating and let me know how you got on in the comments below, I love hearing from you!
Valentine Cookies

Ingredients
INGREDIENTS
- 1 cup unsalted butter 227g, unsalted, room temp
- 1 cup granulated sugar 234g
- 2 eggs
- 4 cups all-purpose flour 500g, sifted
- 3/4 cup cornstarch 80g, sifted
- 3/4 teaspoon kosher salt 4g
- 1 tablespoon vanilla extract 15mL
- 1/4 cup pink sanding sugar 50g
- few drops pink food coloring
Instructions
- It's easiest to make two separate batches of cookie dough; one uncolored and one pink just use half the ingredients for each batch. You can however make a big batch of dry and a big batch of wet ingredients then divide in half using a scale, color one and mix. In these instructions we will be making two batches starting with the uncolored batch.
- Sift 2 cups flour, 40g cornstarch, and about 1/3 tsp salt into a large bowl then whisk to incorporate.
- In a stand mixer fitted with a paddle attachment cream 1/2 cup room temperature butter, and 1/2 cup sugar together.
- Mix in 1 1/2 tsp vanilla extract, then one egg to the sugar/butter mixture.
- Add 1 egg to each sugar/butter mixture.
- On low, mix in dry mixture until almost combined. Scrape the bowl down then mix once more until just combined.
- Roll out to a 1/4 inch thickness then transfer onto a baking sheet and place in refrigerator to chill. I like to roll my cookie dough between two layers of plastic for ease of transfer and clean up.
- Now it's time to make the pink batch. Repeat the above steps but add in a few drops of soft pink food coloring to the butter sugar mixture along with the vanilla.
- Roll out as before and sprinkle about ¼ cup pink sanding sugar onto the pink batch. Give a gentle roll to press the pink sugar into the dough.
- Cover with plastic, transfer to a baking sheet and chill for at least 20 minutes to firm up.
- Once the dough has chilled use a ruler and a sharp knife to cut ½ inch strips of dough. Return to fridge while you work on the next batch.
- Layer pink and white stripes so that they are touching.
- Cover dough with a sheet of plastic wrap or parchment paper then roll to create a seal. Transfer to the fridge to chill on last time.
- Preheat to 375 degrees F.
- Cut cookies with a heart shaped cutter.
- Carefully lace cookies on a baking sheet lined with parchment paper or a silicone baking sheet.
- Bake for about 12 minutes then allow to cool before enjoying.
Notes
- I've made these cookies without the sanding sugar and they're super-pretty so feel free to omit if you can't get ahold of pink sanding sugar?
- If the cookie dough is warming up and becoming difficult to handle then place in freezer or fridge to chill until firm. It’s best to work on a sheet of plastic wrap or a pastry mat so you can move the dough to and from the fridge easily.
- You’re going to end up with a fair amount of scraps after you cut the cookies out of you’re striped dough. I used smaller circle cutters to use as much of the dough as possible, then balled up the rest, rolled it out and had some crazy looking but tasty scrap cookies for snacks.
- You can make this dough a few weeks in advance and keep it in the freezer, provided it’s well-wrapped. When you’re ready to use it just thaw a bit, cut your cookies and toss into the oven.
- The best time to roll that sanding sugar on is when the dough has warmed up after the final roll out. If the dough is too cold the sanding sugar won't stick.
Nutrition
Have you tried this recipe? Tag me today!
Mention @preppykitchen and tag #preppykitchen!


