
This post may contain affiliate links. Please read our disclosure policy.


My kitchen fundamentals guide to measuring accurately solves the problem of inconsistent cooking and baking! We cover proper techniques for measuring common dry and liquid ingredients, the difference between weight and volume, and my kitchen scale technique that turns guesswork into consistent results in baking and cooking.
A recipe is a set of weights in ratio to each other. Whether the recipe author wrote it in grams or in cups, what they tested was a specific amount of each ingredient. Weights are most commonly associated with baking. The weight difference in a cup of flour gets the most attention because cakes and cookies are less forgiving, but the same principle quietly ruins savory cooking, too.
A “cup” of rice ranges from 180 to 220 grams, depending on grain length and how packed the cup is. That’s enough to throw off the water ratio, making your rice sticky or crunchy. Brines and cures fail when “two tablespoons of kosher salt” means very different amounts of actual salt depending on which brand you bought. Pasta water salinity, marinade balance, cake tenderness, frosting consistency—all of them assume the cook measured the way the developer measured. When you don’t, the dish shifts in flavor and texture.
I taught math and science before I was a cookbook author, so when I started writing recipes for other people to cook, I wanted to know exactly how much variability my readers were introducing. So, I tested three different methods for measuring flour, packing vs. not packing brown sugar, using the wrong measuring cup type for the ingredient you are portioning, and more. These tests helped me understand exactly what you might be doing at home differently than me, and how I can best write my recipes to give you the same, consistent results.
In this lesson, I’ll walk you through what’s actually going wrong with volume measurements, when to reach for a scale (almost always), and how to measure dry ingredients accurately when you don’t have a scale. We’ll also cover how to handle liquids and fats differently, why salt type and brand matter more than for any other ingredient, and how to measure chunky or dry ingredients. I have also included reference tables with the cup-to-gram weights I use most across baking and savory cooking, so you can easily make your own conversions. By the end, you’ll be able to follow any recipe and know your measurements aren’t introducing variability into the result.
“This article literally changed how I cook and bake! I immediately bought a scale and can’t believe I ever lived without it. My cookies spread right, cakes aren’t dry, pasta is properly salted now, and my rice is perfectly fluffy every time. Thank you for helping me understand the difference that weighing my ingredients makes!”
Susan
Why Measuring Correctly Matters
Recipes are calibrated to weights even when they’re written in volume. A “1 cup of flour” instruction is based on how the developer measured that cup. The developer may have sprinkled the flour into the measuring cup and then leveled it off. If you scooped flour straight from the bag into your measuring cup, you may have overpacked the flour by an extra ¼ cup. When measurements shift in one direction, three things happen, and they show up in different ways depending on what you’re making.
In baking, too much flour means dense cookies, dry cake, sunken muffins, and stiffer bread. Too little flour means cookies that spread into puddles and cakes that fall. Too much sugar changes the spread, structure, and browning. Too little butter means less spread or a dry texture.
In savory cooking, the failure points are different, but the root cause is the same. Too much salt in a brine means a mushy, over-cured roast chicken; too little means a chicken that is dry and tastes like nothing. The wrong rice-to-water ratio means crunchy rice on top or a sticky paste on the bottom. A dressing made with the wrong oil-to-acid ratio breaks instead of emulsifying. Pasta water that’s “salted” is meaningless without knowing how salty your particular salt is (yes, there are differences!).
When ingredients were measured incorrectly, the recipe didn’t fail; the measurement did.
This is why most professional recipes—and increasingly more home cooking recipes—list many ingredients in grams. A scale removes the variable. Two cooks in two different kitchens with two different styles of measuring and two different brands of ingredients will both put exactly 240 grams of flour and 200 grams of sugar into a recipe if they’re using a scale. They’ll make the same dish.
Weight vs. Volume: Which Is More Accurate?
Weight is dramatically more accurate. Volume measurements are subject to two big sources of error:
- The first is how packed the ingredient is. A scoop of flour straight from the bag is more compressed than flour sprinkled into the cup first. Brown sugar packed tightly into a cup contains nearly 32% more sugar by weight than brown sugar loosely spooned in.
- The second is how precisely you fill the cup. Filling it below the rim can leave you with about 10% less than you need. Add a heaping versus a level scoop, and you’ve added up to 20%.
Weight has neither problem. Flour weighs the same whether it’s compressed, sifted, or freshly opened. The reading on the scale doesn’t lie.
That said, volume measuring works fine for some things. Liquids, like water, milk, and oil, measure consistently by volume because they’re not compressible. Small amounts (½ teaspoon baking powder, ¼ teaspoon dried thyme) are easier to scoop than to weigh on most home scales, which often aren’t precise enough below a few grams. The problem is specifically with packable, compressible dry ingredients—flour, powdered sugar, brown sugar, cocoa powder, rice— where compression, shape, and scoop technique introduce most of the variability. The salt-brand discrepancy is also a factor, especially when you get in larger amounts.
My rule: weigh anything you’re using more than ¼ cup, plus salt for brines, cures, and bread. Scoop teaspoons and tablespoons for everything else. With measurements above ¼ cup, a larger amount in the recipe means any variation can be greater, which will have a bigger impact on the overall dish. The exception: easily pourable, thin liquid ingredients. You can weigh them, but it’s not necessary. And chopped vegetables for things like stews, sauces, etc., where the impact of a few extra or fewer pieces won’t be noticeable.
Here are the basic US to metric conversions to know for converting any liquid or weight:
- 1 cup (US volume) → 240 milliliters (metric volume)
- 1 fluid ounce (US volume) → 29.57ml (metric volume)
- 1 pound (US weight) → 454 grams (metric weight)
- 1 ounce (US weight) → 28.35 grams (metric weight)
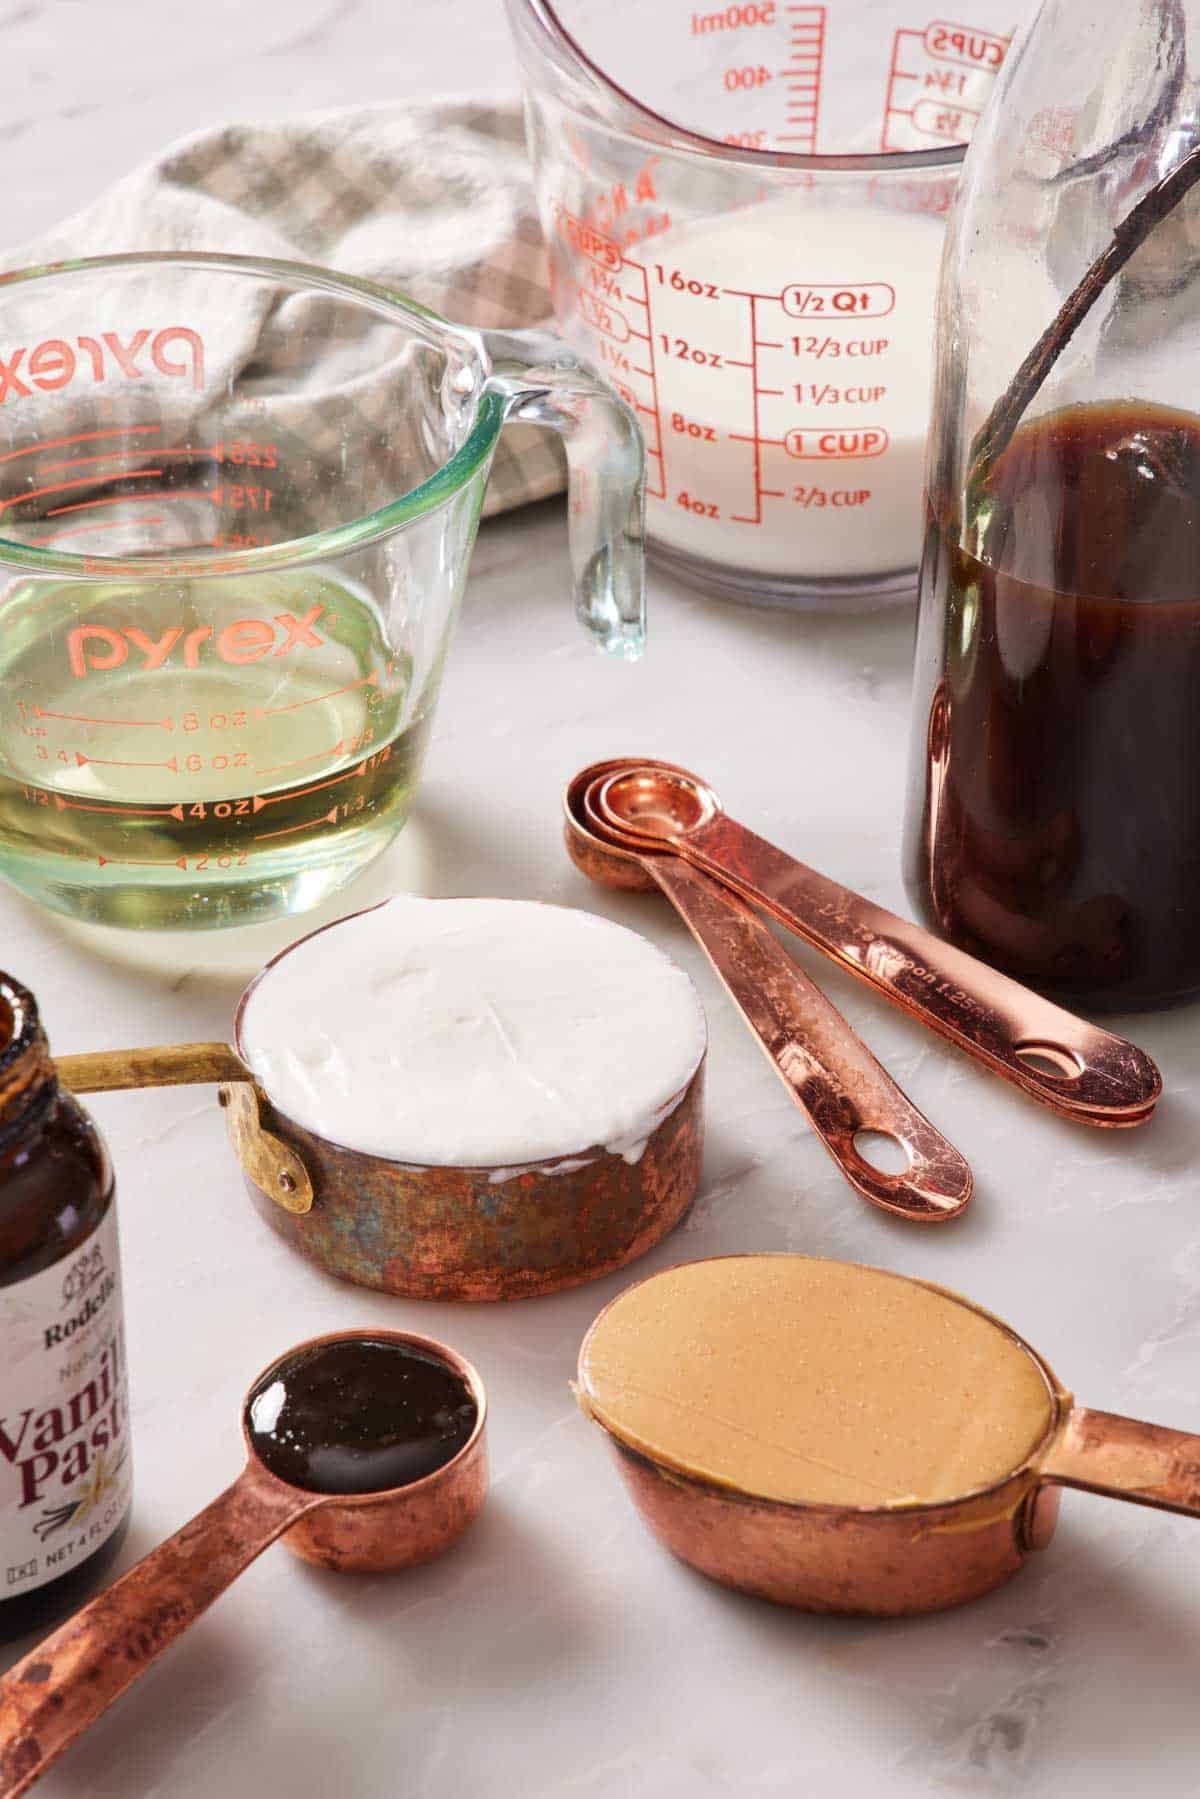
Equipment You Need
The right tools matter, and you don’t need a lot of them.
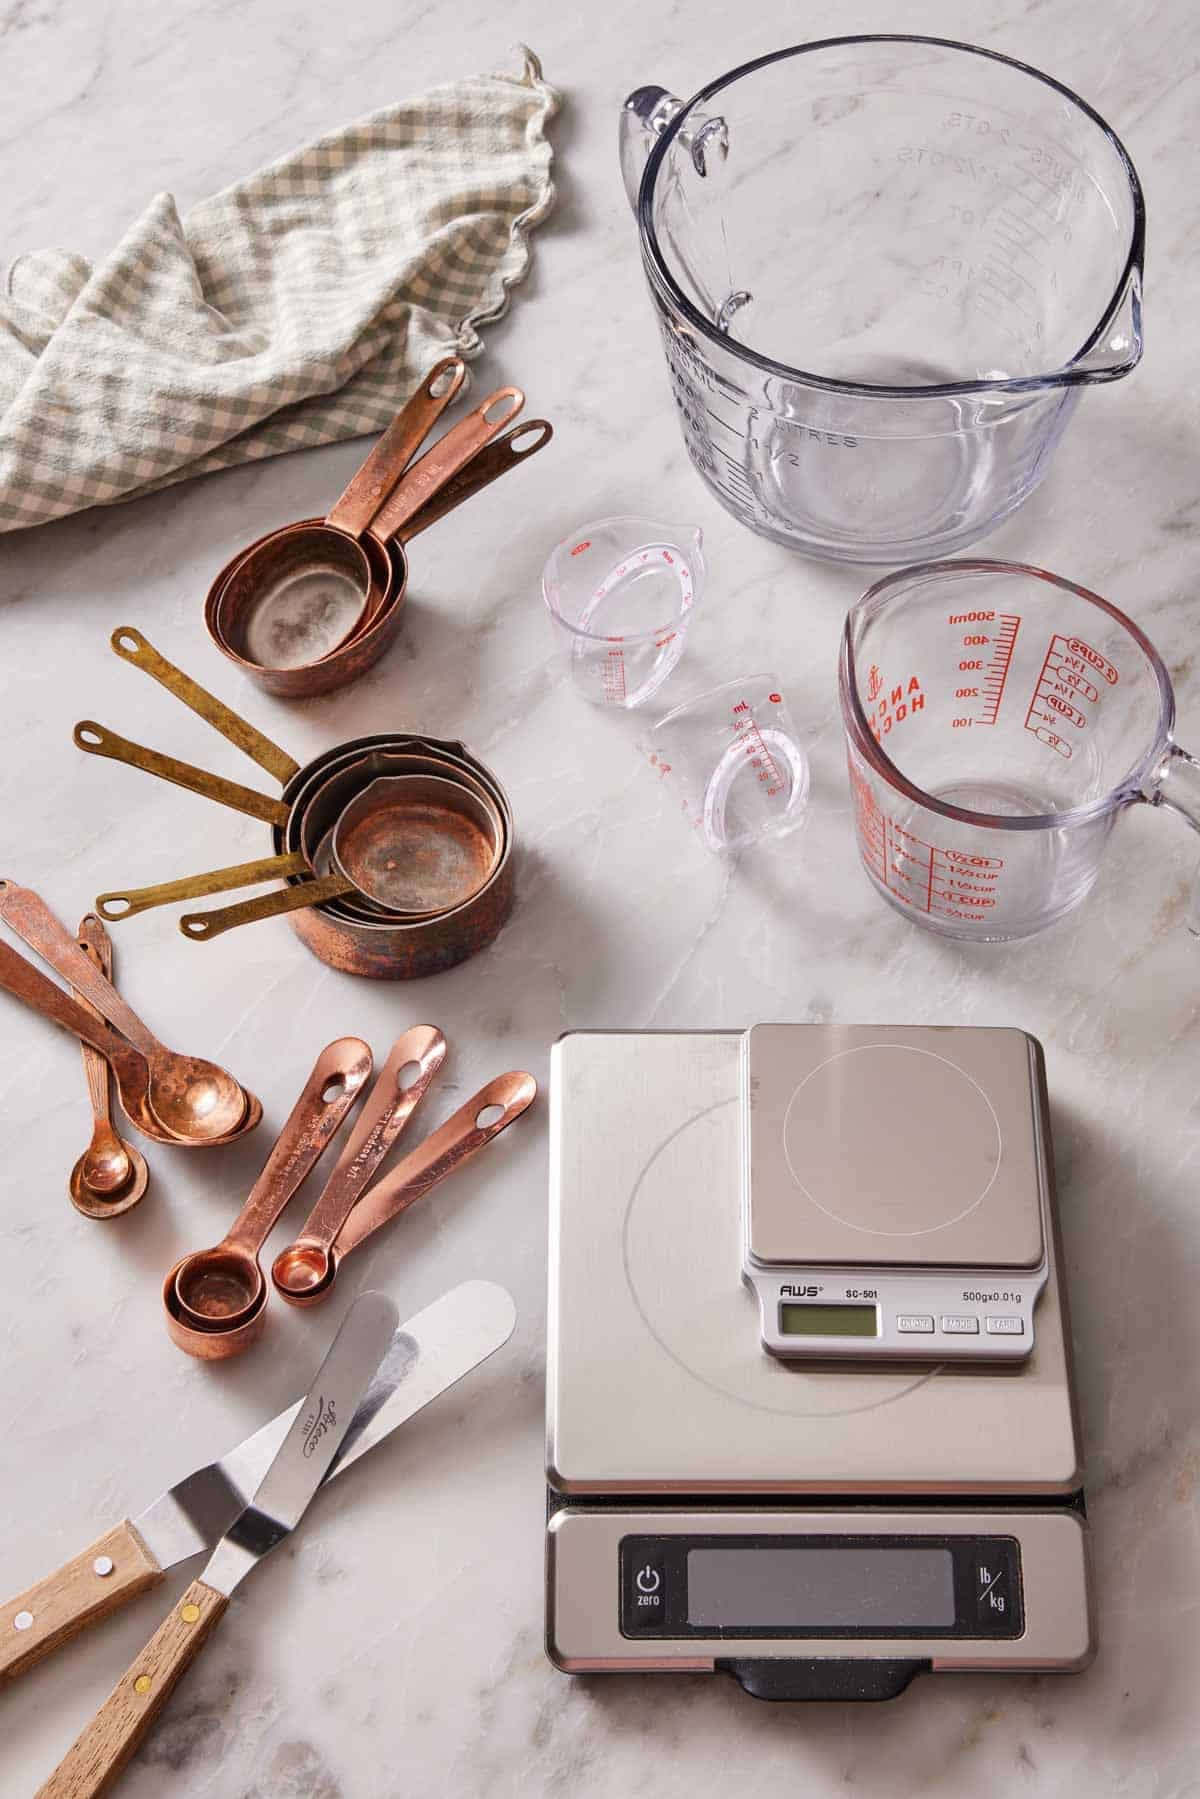
A digital kitchen scale — This is the single biggest upgrade you can make to your kitchen and cooking habits! I use it for cooking, not just baking. A scale that reads to 1 gram costs $15-50, is small enough to live in a drawer, and pays for itself the first time you avoid wasted ingredients from a failed bake or a wrecked brine. Look for one with a tare button (zeroes out so you can stack ingredients in a single bowl) and a unit-toggle (grams ↔ ounces). I keep mine on the counter because I use it daily.
Some scales read to 0.1g or 0.01g. I recently added a diamond scale (highly sensitive to .01g) for my recipe testing, but this is overkill for most home use. If you get really into baking, especially bread baking, it can be helpful! But if you are starting out, a standard scale works great. I have an OXO Good Grips and KitchenAid Dual Platform food scale for my everyday baking and cooking.
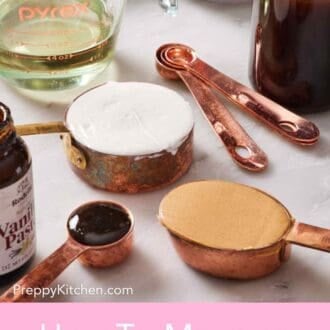
Dry measuring cups — a nesting set of metal or sturdy plastic cups: ¼ cup, ⅓ cup, ½ cup, 1 cup. The defining feature is a flat top edge, so you can level off ingredients with a knife. They don’t need to have a spout or any special features, but I do recommend ones with a handle for easy use.
Liquid measuring cups — A clear glass or plastic cup with measurement markings on the side and a pour spout. Pyrex’s 1-cup and 2-cup measures are my standard. The defining feature: measurement lines with US volume (cup/fluid ounces) and metric volume (liters) are the most helpful across all recipes. OXO also makes small liquid cups (¼ cup) that I love for measuring out liquid tablespoon amounts.
Measuring spoons — A nesting set with at least ¼ tsp, ½ tsp, 1 tsp, and 1 tbsp. Some sets include ⅛ tsp and ½ tbsp, which earn their place once you start cooking from recipes with spice rubs and small additions. Make sure your set has flat rims for easy leveling.
A bench scraper or straight-edged knife — for leveling dry ingredients off the top of a measuring cup. A butter knife works fine as long as the back is perfectly straight, not curved.
Important note: Dry and liquid measuring cups are not interchangeable, and this confuses a lot of home cooks. A 1-cup dry measure and a 1-cup liquid measure hold the same volume, BUT they’re built differently. Liquid measures have the line below the rim, so liquid doesn’t slosh out; dry measures fill to the rim, so you can level them off easily. Using a liquid measure for dry ingredients makes leveling impossible and adds variability. Using a dry measure for runny liquids is messy and easy to spill. Use the right tool for the ingredient for the best success.
How To Measure Dry Ingredients
The right method depends on the ingredient. Here’s how to measure each common one accurately.
How To Measure Flour
This is the one that breaks the most bakes. The two acceptable methods, in order of accuracy:
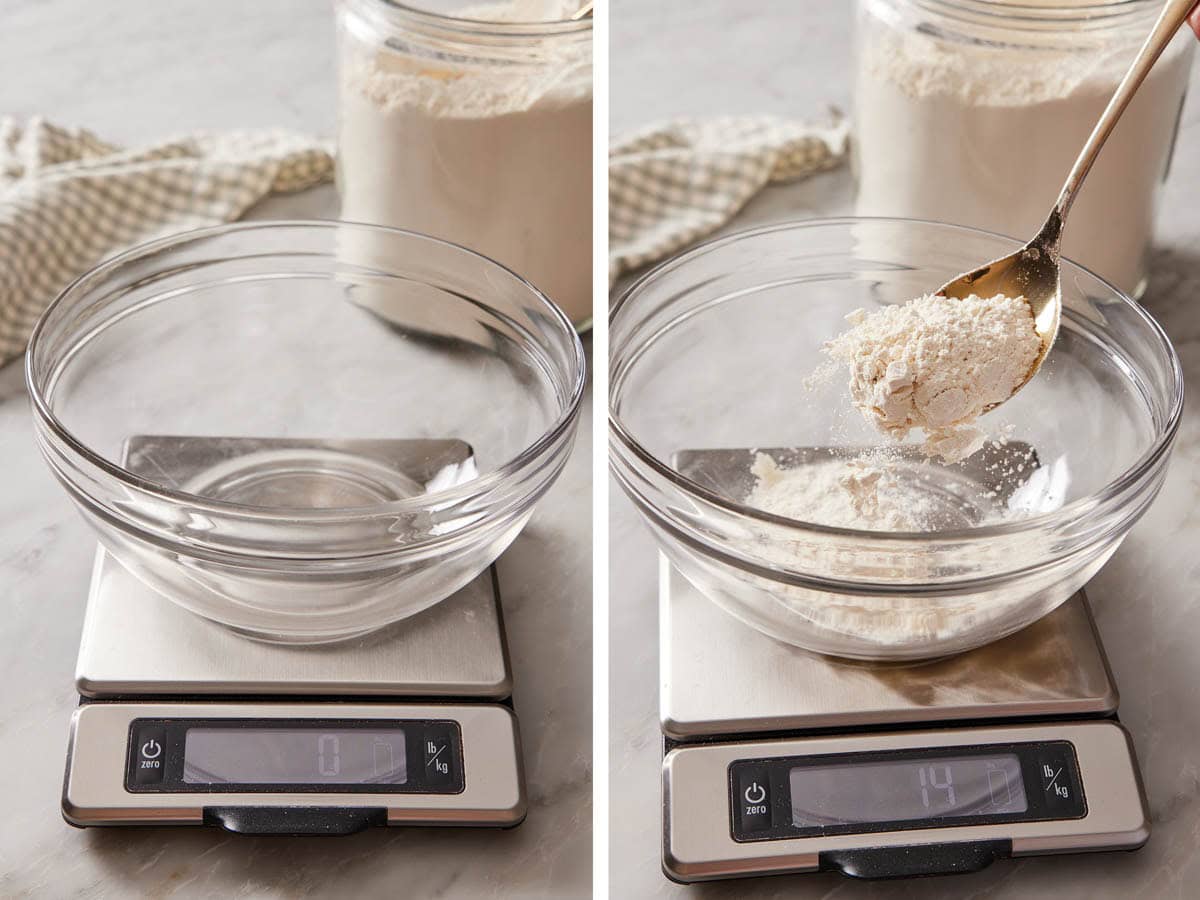
Method 1 — Use a scale (most accurate):
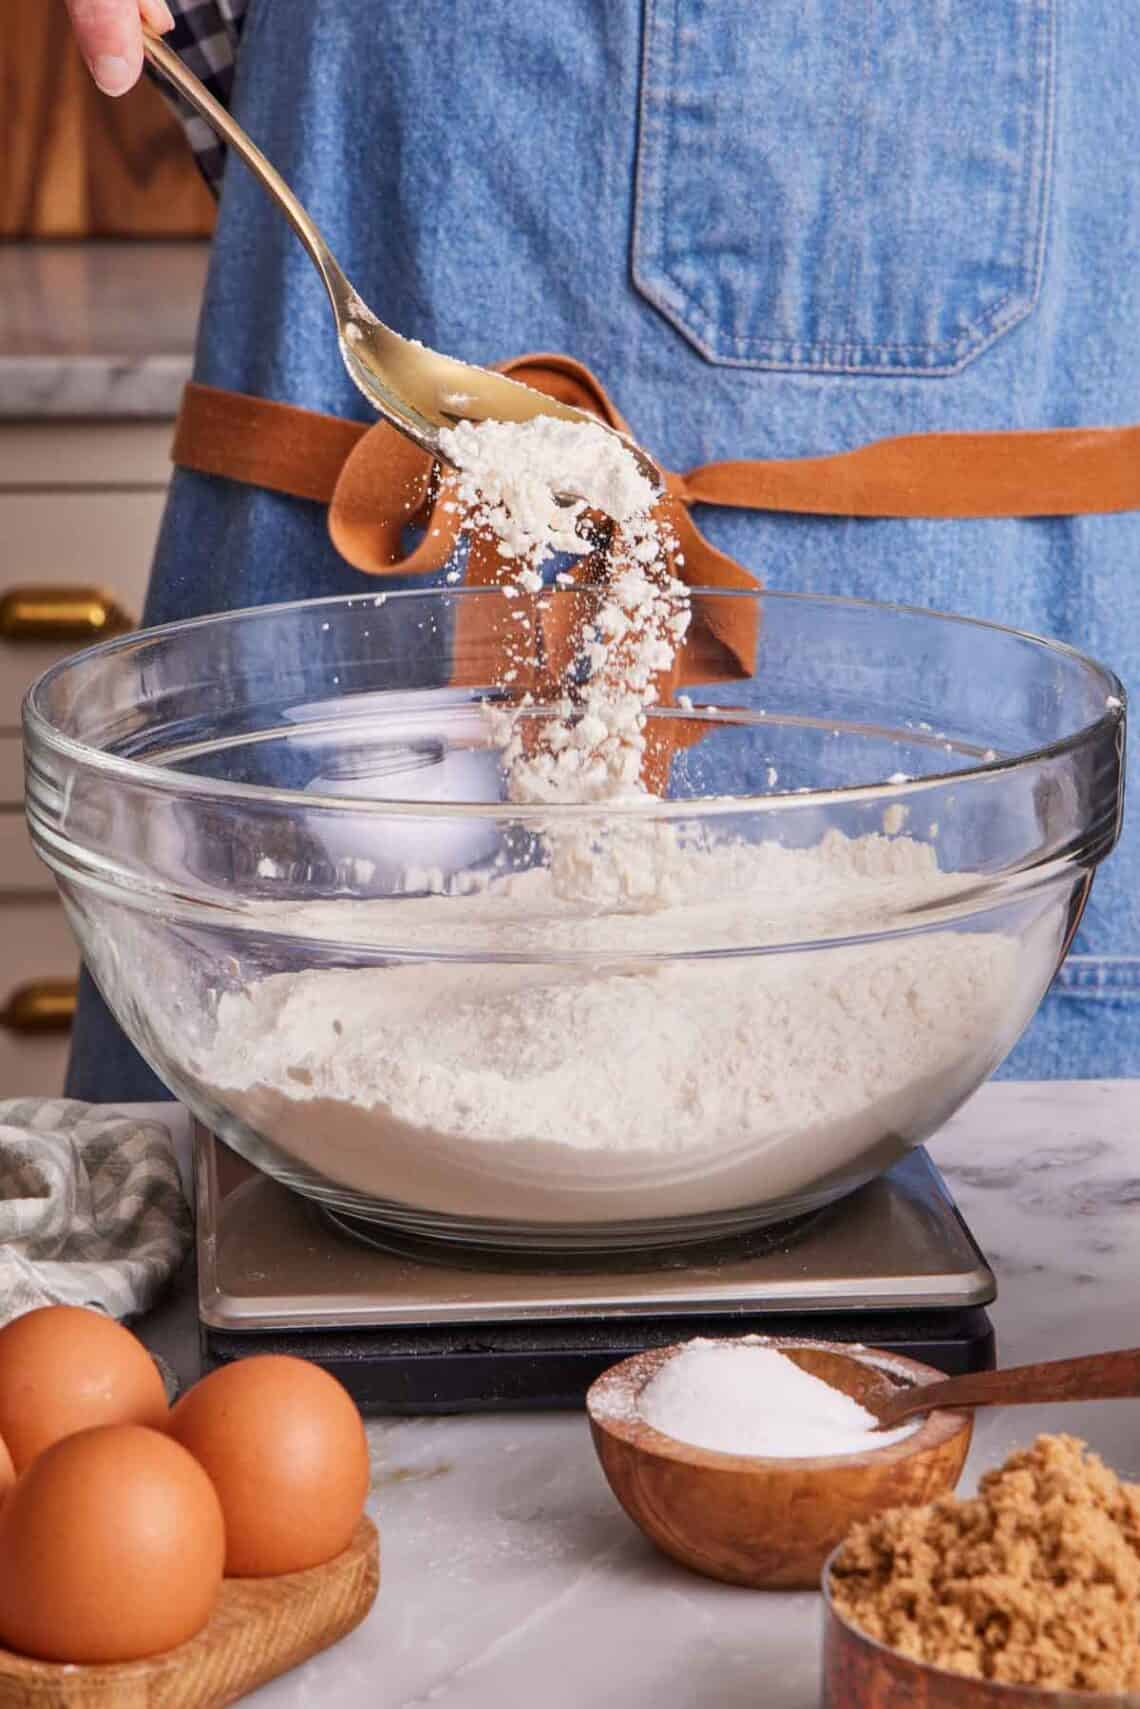
1. Place an empty bowl on the scale. Make sure your measurement type is set to grams or ounces, depending on your recipe.
2. Tare to zero. This will eliminate the weight of the bowl on your scale, so it starts at zero.
3. Spoon flour into the bowl until the scale reads the total target weight. I use 120g per cup of all-purpose flour, but check your specific recipe—some developers calibrate to 125-130g. Always follow your recipe’s specific measurements. If you are adding more ingredients by weight, tare the scale again, with the flour in the bowl so it resets to zero, and proceed.
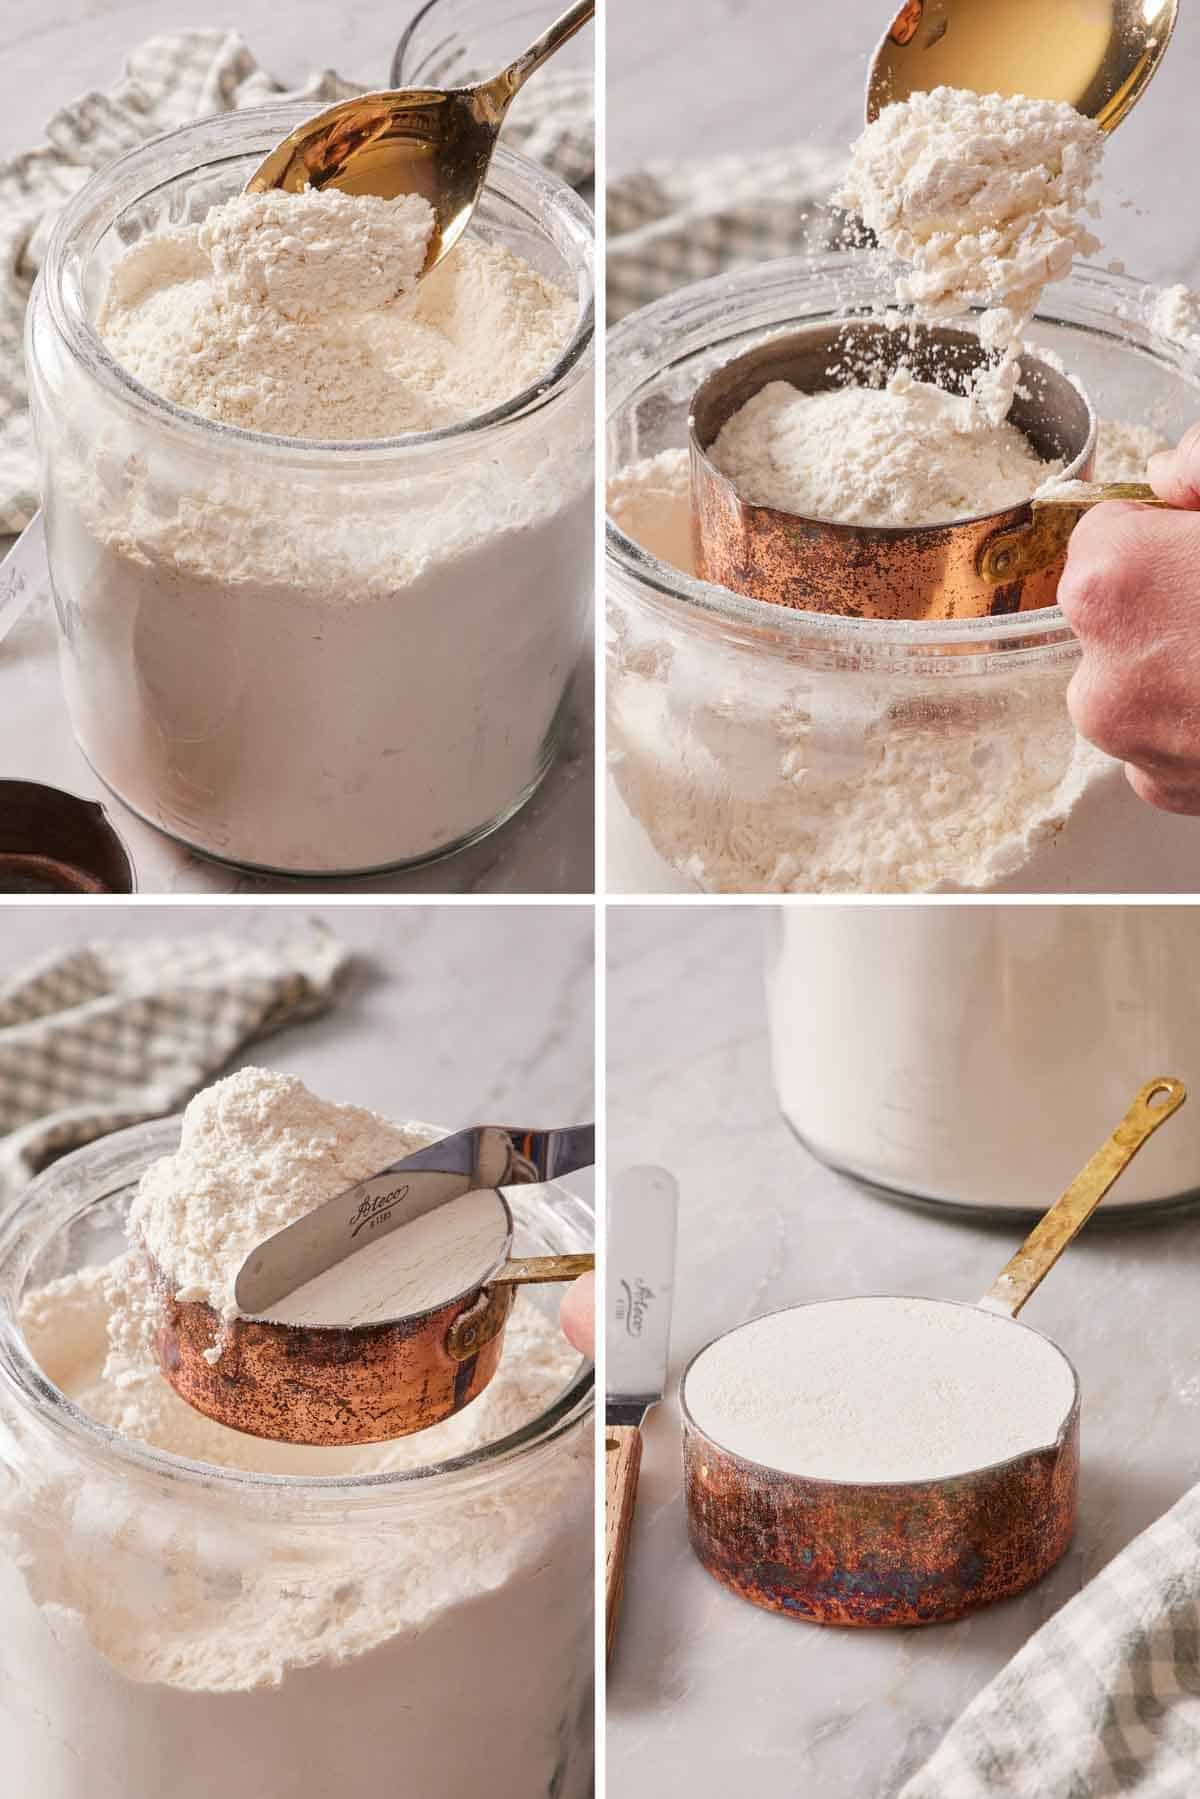
Method 2 — Spoon and level (acceptable if no scale):
1. Fluff the flour first. Use a spoon or whisk to stir up the flour in the bag or container—this decompresses it and removes any settled clumps.
2. Spoon the flour gently into the measuring cup. Don’t scoop directly from the bag with the cup itself—that compacts the flour. (See my test comparison below!)
3. Level off with a straight edge. Drag the flat side of a knife or bench scraper across the top of the cup to remove the excess.
The two methods to avoid:
Scoop and dump. Plunging the measuring cup into the flour bag and shaking off the excess. This method measures by 10-20% on average.
Tap and shake. Tapping the cup to settle the flour, then adding more. Settling compresses the flour, so you can end up with even more than scoop-and-dump.
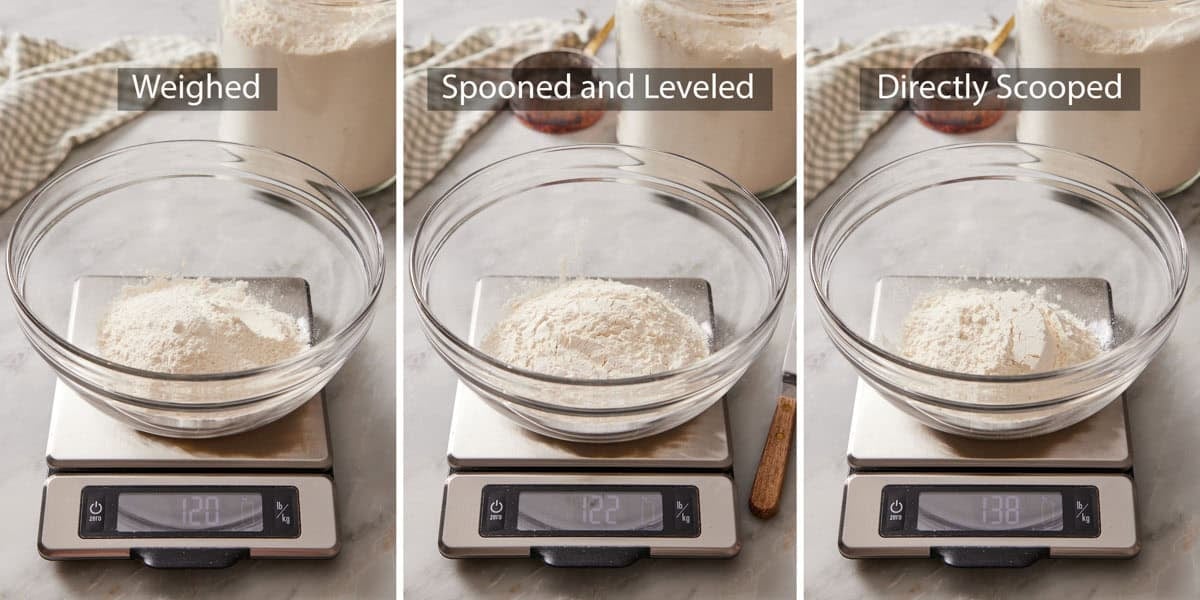
I tested the three common methods for measuring flour to show you how the weight varies. I weighed 1 cup of flour using my standard 120g measurement, showing the ideal way to measure flour. For the second method, I did the scoop and level method, then weighed the flour in the scoop, getting 122g—almost exactly the same. For the third method, I scooped directly into the container, shook the scoop so excess fell off, then leveled the top. I weighed the flour and got 138g—that is almost 14% more flour. If I measure flour that way for a cake recipe that calls for 3 cups (360g) of flour, I would have actually used 414g, or almost an additional ½ cup of flour. The fix: weigh your flour, or use the scoop and level method if you don’t have a scale.
How To Measure Powdered Sugar
Powdered sugar (also called confectioners’ sugar) clumps when stored, so every measured cup can end up with hidden air pockets and small lumps. I recommend sifting it before measuring for accurate results. Then either weigh it (about 120g per cup) or spoon and level like flour. Don’t pack powdered sugar into a measuring cup. Treat it just like flour.
How To Measure Granulated Sugar
Granulated sugar is more forgiving than the others because it doesn’t clump or compress very easily. Scoop directly into the measuring cup and level off with a straight edge. Or weigh it: a cup of granulated sugar is about 200 grams.
How To Measure Brown Sugar
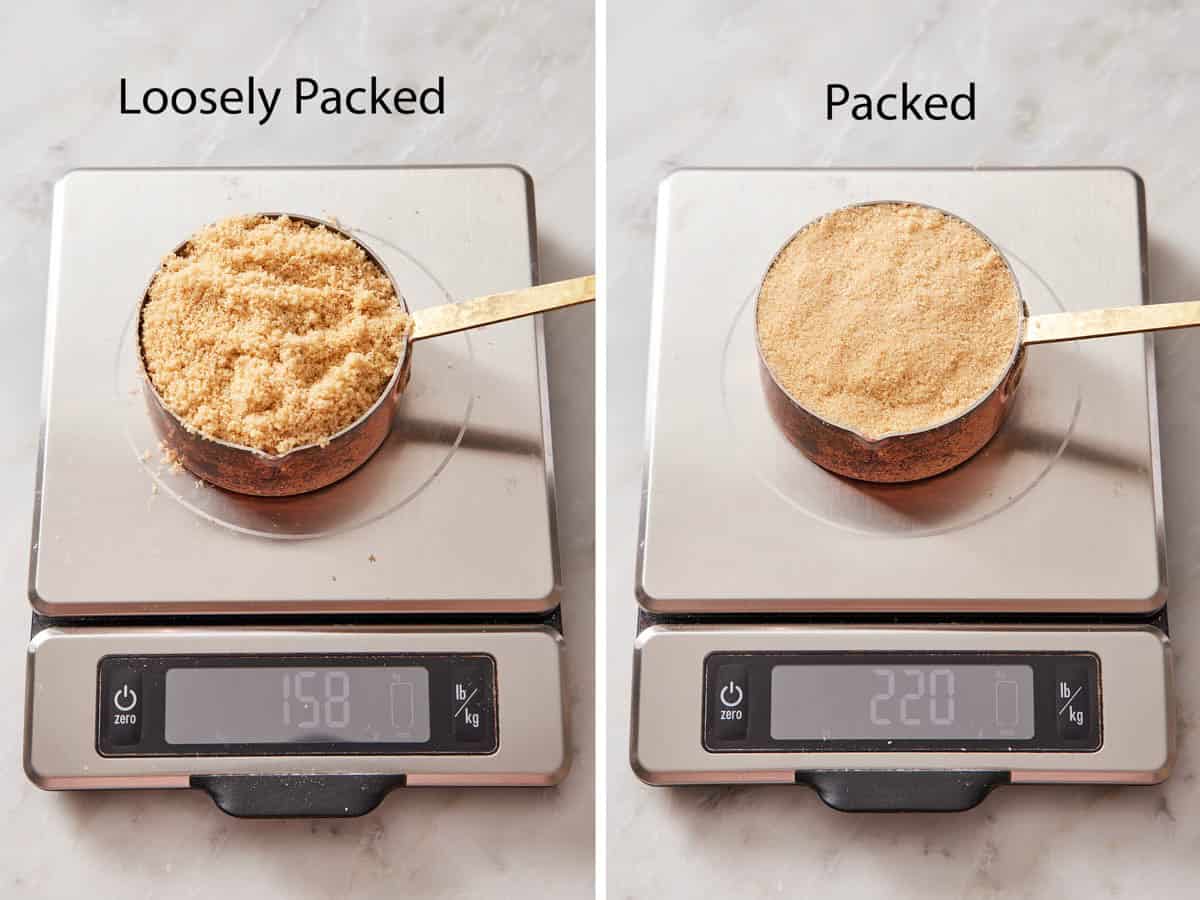
Brown sugar is the exception to the no-packing rule. Because of brown sugar’s moisture content and stickiness, it tends to pile up and hold air gaps very well—it doesn’t settle the way granulated sugar does. Pack brown sugar firmly into the measuring cup unless the recipe specifies otherwise. Press it down with the back of a spoon until it holds the shape of the cup when you turn it out. That “packed” measurement is what most recipes assume, even if they don’t state it in the ingredient list. You don’t need to press hard, but be firm enough that you are certain you have removed air gaps.
A cup of packed light brown sugar weighs about 220 grams; a cup of loosely-spooned brown sugar weighs about 158 grams. The difference is huge (about 32% or ⅓ cup).
If your brown sugar has hardened into a brick (which happens when air gets in the container), the easy fix is to put it in a sealed bag with a damp paper towel for a few hours and then break it apart. Check out my post on how to soften brown sugar for more ideas.
How To Measure Cocoa Powder
Cocoa powder behaves like powdered sugar. It clumps in storage and compacts when measured. Sift it first, then spoon and level, or weigh (about 100 grams per cup for unsweetened cocoa of any type). Don’t scoop directly from the container.
How To Measure Wet Ingredients
Liquids are the easiest ingredients to measure accurately because they don’t compress or pack. Two rules:
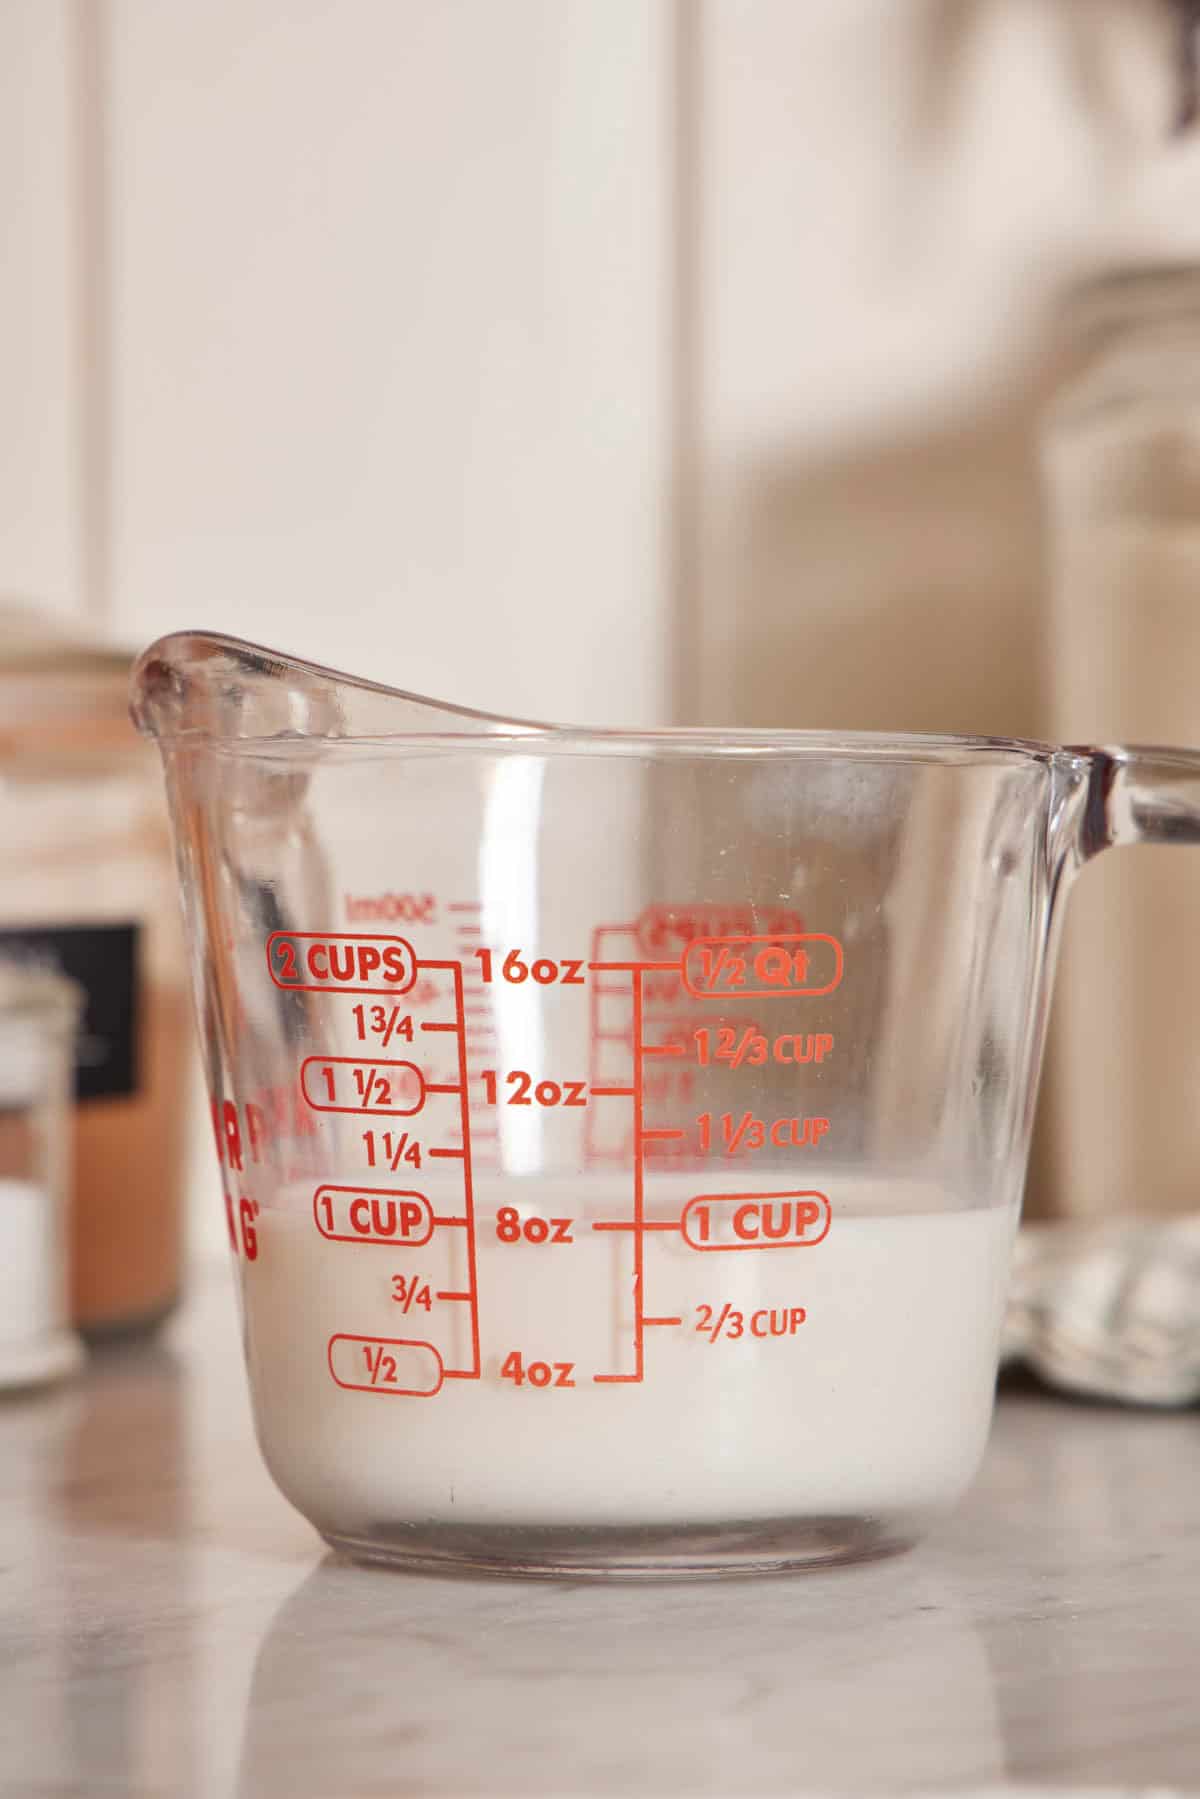
Use a liquid measuring cup, not a dry one. Liquid cups have measurement lines below the rim and a pour spout. Filling a dry cup with liquid to the rim and trying to move it across the counter to your bowl or pot is asking for a spill. Plus, it’s harder to tell if your liquid is actually filled to the top of the rim, just below it, or has domed from surface tension.
Read the measurement at eye level, not from above. Liquid surface tension creates a small curve called a meniscus—the liquid sits slightly higher at the edges than in the middle. Read the measurement at the bottom of the meniscus (the lower curve in the middle), with your eye level with the line on the cup. You will easily be able to see this line in a clear liquid measuring cup with distinct measurement markings. Reading from above will consistently give you a slightly low measurement, because the line on the side of the cup will appear below the rim of the water you see from the top.
For very small amounts of liquid (less than ¼ cup), use measuring spoons rather than a liquid cup. The markings on cups aren’t precise enough at the small end, and may not even be there for less than ¼ cup (60ml).
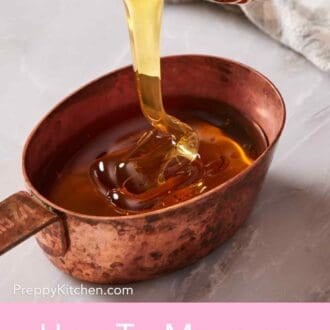
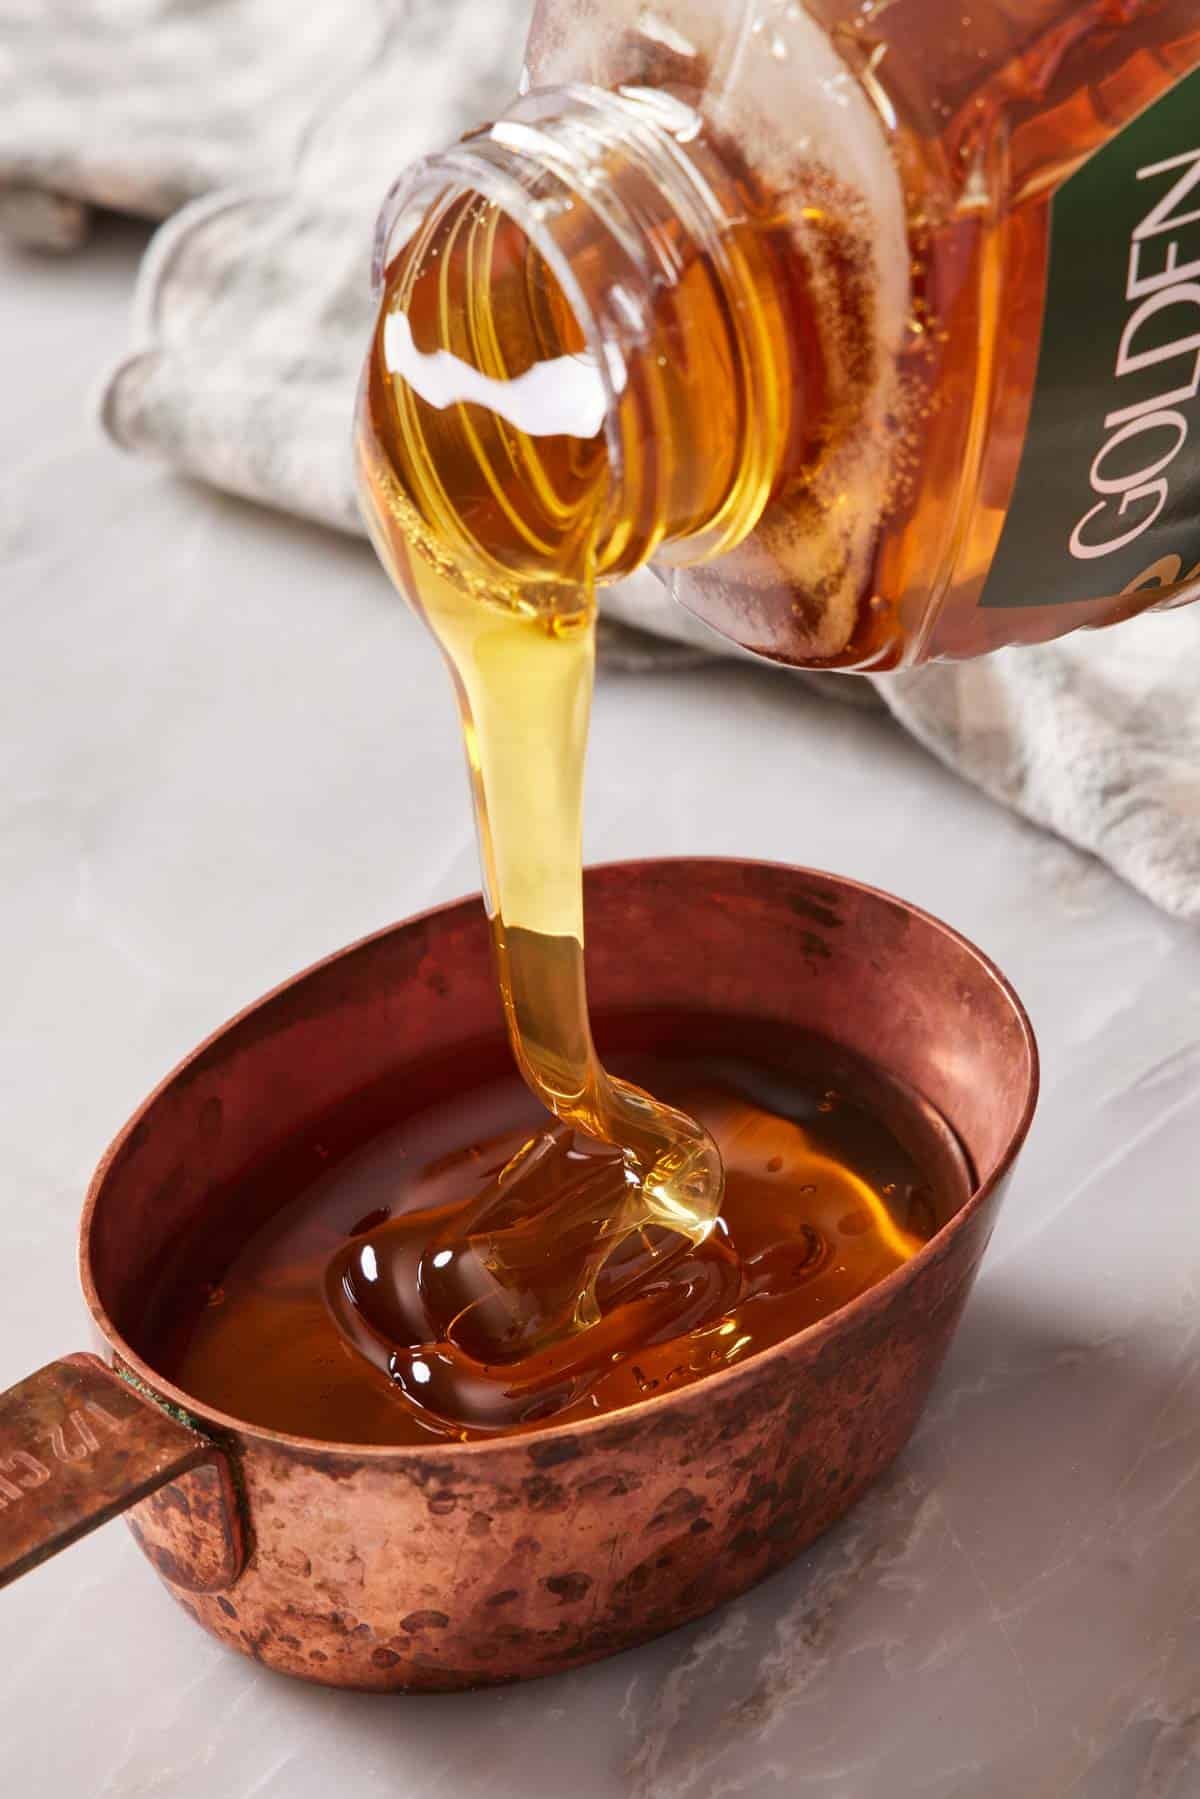
An exception: I will use dry measuring cups for very thick or sticky liquids like honey, syrup, and molasses. Pasty wet ingredients like sour cream, yogurt, or peanut butter fall in this same category. These sticky ingredients cling to the cup, so you need to be sure to scrape the cup well, or you’ll lose ~10% to residue. I find it easier to clean the dry scoop out, which is why I use them. If a recipe calls for sticky liquids, either weigh them on a scale or coat the inside of the measuring cup with a thin film of neutral oil first so the liquid releases cleanly when poured.
How To Measure Butter And Other Fats {#fats}
Stick butter (the easiest case). US sticks of butter are wrapped with measurement markings printed on the wrapper. One stick = ½ cup = 8 tablespoons = 113 grams. Cut along the wrapper marks for accurate amounts.
Block butter (no markings). Weigh it on a scale, or use the water displacement method described below. Weighing is the most accurate, though.
Softened butter. Measure butter cold (with stick markings or a scale), then soften it. If you need to measure softened butter by volume, spread it into a dry scoop and level it off—this adds the risk of trapped air bubbles, though, so it’s a last resort.
Liquid fats (oils, browned butter). Measure like any other liquid, in a liquid measuring cup or on a scale.
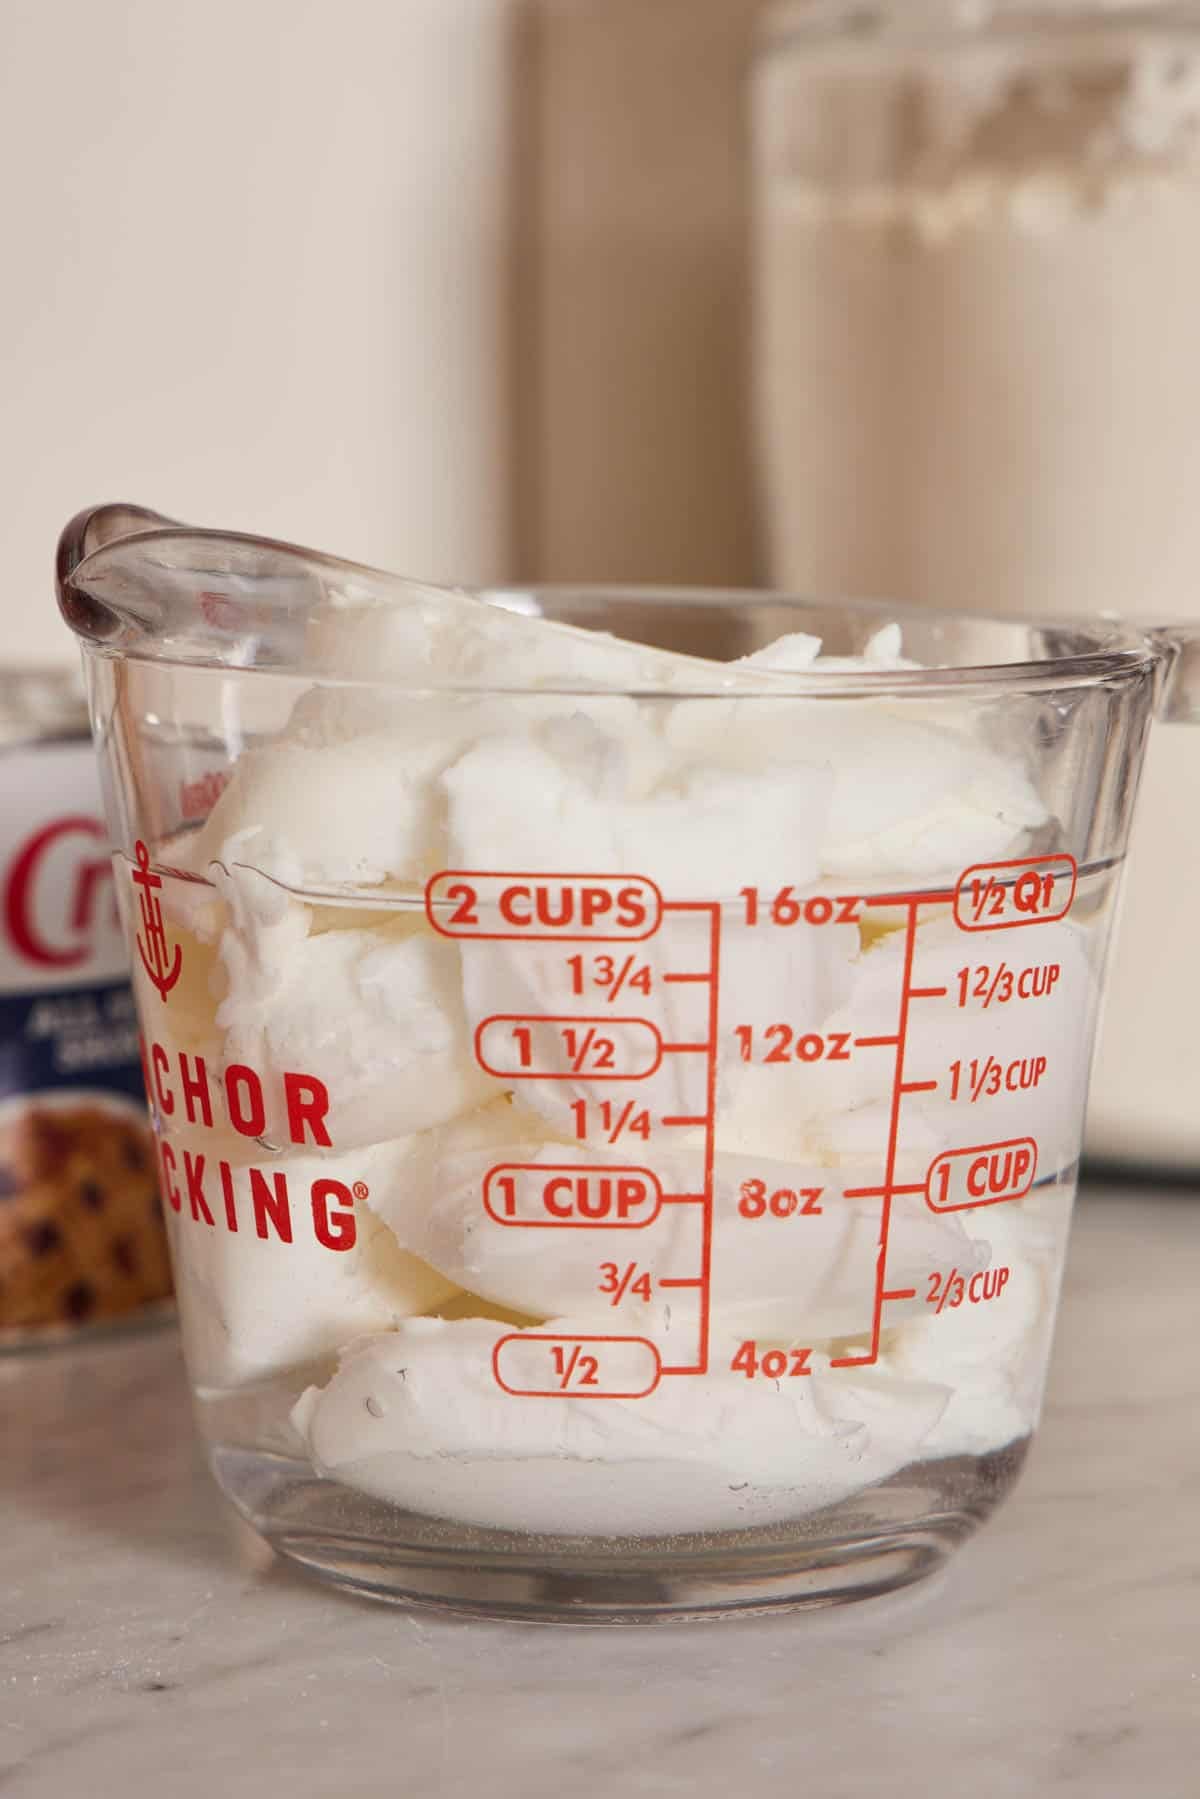
Solid fats with no wrapper (shortening, lard). The scale is the best method. To measure by volume, use the water displacement method. Fill a liquid measuring cup with cold water to a level below your target volume. Add solid fat in chunks until the water rises to the target volume. The amount of fat added equals the difference.
For example, to measure 1 cup of shortening: fill a liquid measuring cup with water to 1 cup, add shortening until the water line reaches 2 cups. This means you’ve added 1 cup of shortening (enough to displace the volume by an additional cup).
Why Salt Has To Be Weighed
Salt is the ingredient where the brand on the box matters more than any other single ingredient. A tablespoon of Morton kosher salt weighs almost twice what a tablespoon of Diamond Crystal kosher salt weighs, even though both boxes say “kosher salt” on the label. Fine table salt is heavier still. The volume is identical, but the amount of actual salt is dramatically different.
This makes salt the one ingredient where weight measurement isn’t just more accurate than volume—it’s the only way to get consistent results across brands. A recipe written for Diamond Crystal will be aggressively over-salted if you measure the same volume of Morton; a recipe written for Morton will be flat and dramatically under-salted if you switch to Diamond Crystal.
I do not often include salt weights for small teaspoon amounts because most home food scales do not accurately measure that low a gram amount. If you want to be extremely precise, consider getting a diamond scale and weighing small amounts of salt using the conversion chart. For the full breakdown of salt brands, which salt to use for cooking versus baking, when each one matters, and the complete conversion table for swapping one brand for another, see Academy: Salt 101 — Understanding Different Types of Salt.
For the purposes of this lesson, the takeaway is short: if a recipe specifies a salt brand, follow the specification. If it doesn’t and the amount is critical (brine, cure, bread dough, certain baking recipes), weigh by gram rather than measuring by volume.
How To Measure Rice, Pasta, And Grains
Grains and pasta are more forgiving by nature—a small ratio shift doesn’t always ruin them the way it ruins a cake. But if you’ve ever wondered why your rice keeps coming out crunchy on the bottom, or your pasta water never tastes right, the answer is usually a measurement mismatch.
Rice. The weight of rice varies by type. Long-grain white or brown rice runs about 195 grams per US cup; short-grain (sushi) rice is closer to 200g; arborio is around 180g. I recommend you weigh it and use the water ratio the rice brand, recipe, or appliance manufacturer gives, rather than the cup-to-cup default.
Dried pasta. Pasta is portioned and sold by weight on every pasta box, and is typically called for by box or weight (grams, ounces, or pounds) in recipes. Volume measurements for dried pasta are unreliable because pasta shapes pack differently—a cup of penne contains a different weight than a cup of fusilli, which contains a different weight than a cup of orzo. If you are trying to portion out dried pasta for scaling a recipe, weigh it. For long pasta like spaghetti, a useful shortcut is a coin-sized bundle (a US quarter’s diameter) per person, but weight is more accurate.
Pasta water salt. My standard ratio for salting pasta water is 5g kosher salt per quart of water. Typically, you will use 20g (or 1 tablespoon plus 1 teaspoon of Morton’s kosher salt) in a gallon of pasta water (enough to cook 1 pound of pasta well). This is enough salt to season the pasta as it cooks without making the dish taste overly salty.
Other grains. Farro, barley, quinoa, and oats follow the same principle as rice. Weigh the grain, use the recipe or brand’s water ratio, and ignore cup-to-water conventions.
Measuring Small Amounts
For amounts of 3 tablespoons or less, measuring spoons are more accurate than a kitchen scale. Most home scales aren’t very precise below 5 grams, and ½ teaspoon of baking powder weighs about 2g, within the scale’s margin of error.
The technique:
- Dry ingredients (baking soda, spices, salt): scoop and level, just like dry measuring cups.
- Liquid ingredients (extract, oil, vinegar): fill to the rim. The surface tension keeps the liquid in.
- Sticky ingredients (honey, vanilla bean paste): fill to the rim, then scrape into your bowl with a small spatula or finger to get every drop.
Don’t measure these small amounts over the bowl or pot you’re cooking in. It looks efficient, but if your hand slips, you can dump way more than the recipe calls for. Measure over a separate small bowl or piece of parchment, then add to your mix. I learned this the embarrassing way with cayenne and a pot of chili for guests!
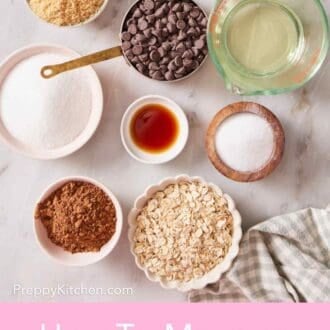
Common Conversions Reference
Here are the cup-to-gram conversions for the ingredients I use most. Bookmark this table if you bake or cook from recipes written in cups but want to start using a scale!
The following conversions are measurements I have recorded from real-life testing. Some of these may not match your specific product labels. For example, rolled oats are often listed as 80g per cup on nutrition labels. In reality, 80g of oats does not fill a 1 cup dry measuring scoop—112g of oats does. So, my standard is 112g per cup. This type of conversion is more realistic and has the smallest variable between measurement types. This way, someone measuring by volume will get the closest result to the weight given.
These are the weights I use across my recipe development. If a specific recipe specifies different weights (some developers calibrate flour to 130g per cup), follow the recipe’s specific weights, not these. The point is consistency within a single recipe.
Baking Ingredients
These are the ingredients I use most often in cookies, cakes, frosting, muffins, breads, and more, that are best measured by weight.
| Ingredient | 1 Cup = | ½ Cup = | ¼ Cup = |
| Butter (all types) | 227g | 113g (1 stick) | 57g |
| Cream cheese (block) | 226g | 113g | 56g |
| Cocoa powder (unsweetened) | 100g | 50g | 25g |
| Chocolate chips (regular size) | 180g | 90g | 45g |
| Chocolate chips (mini) | 190g | 95 | 47g |
| Coconut, shredded (sweetened) | 100g | 50g | 25g |
| Cornstarch | 128g | 64g | 32g |
| Dried fruit, small or chopped (cranberries, raisins) | 160g | 80g | 40g |
| Flour, All-purpose flour (spoon and level) | 120g | 60g | 30g |
| Flour, Bread flour | 130g | 65g | 33g |
| Flour, Cake flour (unbleached) | 120g | 60g | 30g |
| Flour, Cake flour (bleached) | 112g | 56g | 28g |
| Flour, Whole wheat flour | 125g | 63g | 32g |
| Flour, Almond | 112g | 56g | 28g |
| Graham cracker crumbs | 120g | 60g | 30g |
| Marshmallows, mini | 56g | 28g | 14g |
| Nuts, halved—pecans, walnuts | 120g | 60g | 40g |
| Nuts, shelled—almonds, pistachios, peanuts | 140g | 70g | 35g |
| Nuts, chopped, sliced, or slivered | 120g | 60g | 30g |
| Oats, Rolled/old-fashioned | 112g | 56g | 28g |
| Oats, Quick cooking | 100g | 50g | 25g |
| Sugar, Granulated | 200g | 100g | 50g |
| Sugar, Light brown (packed) | 213g | 106g | 53g |
| Sugar, Dark brown (packed) | 213g | 106g | 53g |
| Sugar, Powdered (sifted) | 120g | 60g | 30g |
| Sugar, Superfine or caster | 210g | 105g | 52g |
| Sourdough starter | 240g | 120g | 60g |
Savory Cooking Ingredients
These are the most common savory ingredients I measure by weight. The standard printed on the label may vary slightly by brand or variety (basmati vs. jasmine), but these are a good average and will work well in your recipes.
| Ingredient | 1 Cup = | ½ Cup = | ¼ Cup = |
| Pasta, dried (varies by shape) | weight varies | — | — |
| Rice, Long-grain (dry) | 195g | 98g | 49g |
| Rice, Short-grain (dry) | 200g | 100g | 50g |
| Rice, Arborio (dry) | 180g | 90g | 45g |
| Salt, Diamond Crystal kosher | 144g | 72g | 36g |
| Salt, Morton kosher | 240g | 120g | 60g |
| Salt, Fine table or sea salt | 272g | 136g | 68g |
| Cheese, Parmesan (grated) | 80g | 40g | 20g |
| Cheese, shredded blocks (cheddar, jack, etc.) | 100g | 50g | 25g |
| Breadcrumbs, Panko | 60g | 30g | 15g |
| Breadcrumbs, Dry | 132g | 66g | 33g |
Liquids And Sticky Ingredients
Many of these liquids are fine to measure by volume in recipes. Measuring by weight can be helpful to eliminate additional scoops and dishes to wash, or if you are making a very precise recipe with specific ratios (like some bread baking, which uses precise hydration percentages).
| Ingredient | 1 Cup = | ½ Cup = | ¼ Cup = |
| Water | 240g | 120g | 60g |
| Milk (whole) | 240g | 120g | 60g |
| Heavy cream | 227g | 113g | 56g |
| Oil, Vegetable or Canola | 216g | 108g | 54g |
| Oil, Olive oil | 216g | 108g | 54g |
| Honey | 340g | 170g | 85g |
| Maple syrup | 32g | 160g | 80g |
| Molasses | 340g | 170g | 85g |
| Sour Cream | 240g | 120g | 60g |
| Greek yogurt | 240g | 120g | 60g |
| Peanut butter (no-stir) | 264g | 132g | 66g |
Frequently Asked Questions
For dry, compressible ingredients like flour and cocoa powder, weigh them on a digital scale (most accurate) or use the spoon-and-level method. Fluff the ingredient first, spoon it gently into a dry measuring cup, and level off with a straight edge.
For liquids, use a liquid measuring cup and read the measurement at eye level at the bottom of the meniscus curve.
For salt where the amount really matters (brines, certain baked goods), weigh by gram rather than measuring by volume—different salt brands weigh very different amounts per teaspoon.
A US cup is 240 milliliters by volume, but the weight depends entirely on the ingredient. One cup of all-purpose flour weighs 120g; one cup of granulated sugar weighs 200g; one cup of long-grain rice weighs 195g. The world also has multiple cup definitions—Imperial 284 mL, metric 250 mL, Japanese 200 mL—which is part of why weight measurements are more reliable across recipe sources.
The 3-2-1 rule is a classic baking ratio used for shortcrust pastry and shortbread—3 parts flour, 2 parts fat (usually butter), 1 part sugar, all measured by weight. It’s an example of how recipes built on weight ratios scale up and down predictably; the rule fails entirely if you try to apply it by volume because the three ingredients have very different densities.
They hold the same volume but are built differently. Liquid measuring cups have measurement lines below the rim and a pour spout so liquid doesn’t spill when filled to the line. Dry measuring cups fill to the rim with a flat top edge so you can level off ingredients with a knife. Using a liquid measure for dry ingredients makes leveling impossible; using a dry measure for liquid is messy and inaccurate. Use the right tool for the ingredient.
Yes, and it’s the single best $20 you can spend on kitchen gear. A scale eliminates the biggest source of measurement error, lets you follow professional recipes (which are increasingly written in grams), works faster than washing multiple measuring cups, and matters as much for savory cooking (salt for brines, rice ratios, sauce balance) as it does for baking.
More Tutorials To Try
Foundational techniques that pair well with this lesson:
- Academy: Salt 101 — Understanding Different Types of Salt — the ultimate reference on salt brands, types, and which one to use when
- Academy: Essential Kitchen Tools & Utensils — the kit that runs the rest of your kitchen
- Academy: Mise En Place — the workflow that follows measurement
- Academy: Salted Vs. Unsalted Butter — because salt content varies between butter brands and changes recipes
If you’ve tried this how to measure ingredients correctly lesson, then don’t forget to rate it and let me know how you got on in the comments below. I love hearing from you!


