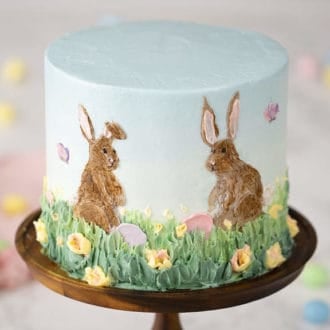
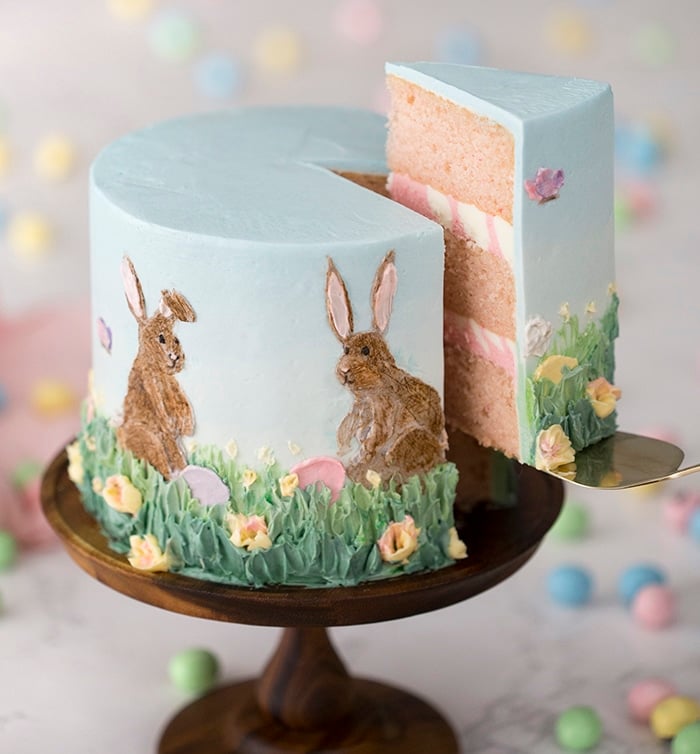
I love spring and Easter so what better way to celebrate than a moist fluffy vanilla cake filled with lemon and raspberry buttercream and covered in creamy Swiss meringue buttercream with a whole Easter scene bunnies, eggs and all painted in buttercream, NO fondant!
Some tips to make this Easter Bunny Cake
- Be sure to chill the cake after the crumb coat, and the smooth coat are completed. You can pop the cake into the fridge at any point when you’re working on it if thing get soft. It Makes decorating much easier!
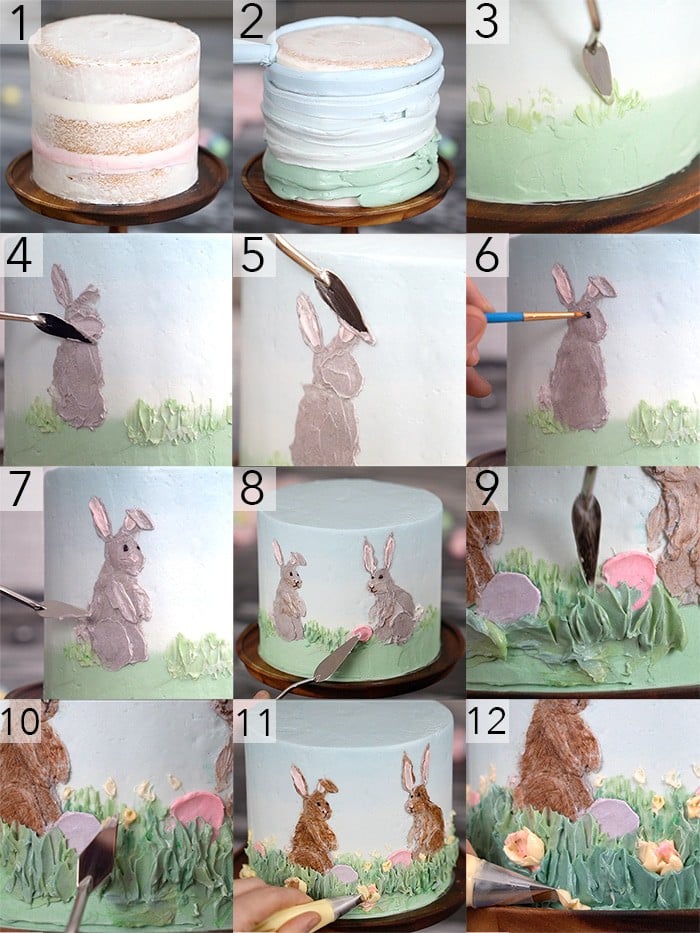
- Gel food colorings will change color when you chill the cake and rework the surface. You will notice my bunnies started grey and became brown.
- If you’re not using 6-inch pans, double the recipe for 8-inch pans or triple the recipe for 9-inch pans.
- If you see little clumps of butter after you mix the wet ingredients don’t panic, it all works out by the time you mix in the dry ingredients. You can even use melted butter and warm the milk and sour cream up a bit if you like.
- You can substitute whole milk yogurt for the sour cream if desired, I do it all the time and can’t really tell the difference.
- To get FLAT layers that are moist inside and out try using cake strips! You can buy a set on the shop page or make your own from foil and paper towels at home. I made a whole blog post on it so check it out if you’re interested!
- If you don’t want to make Swiss buttercream you can use the American variety. I just prefer the smoothness and taste of the meringue-based frosting. I know it’s a pain to make two different types of frosting though!
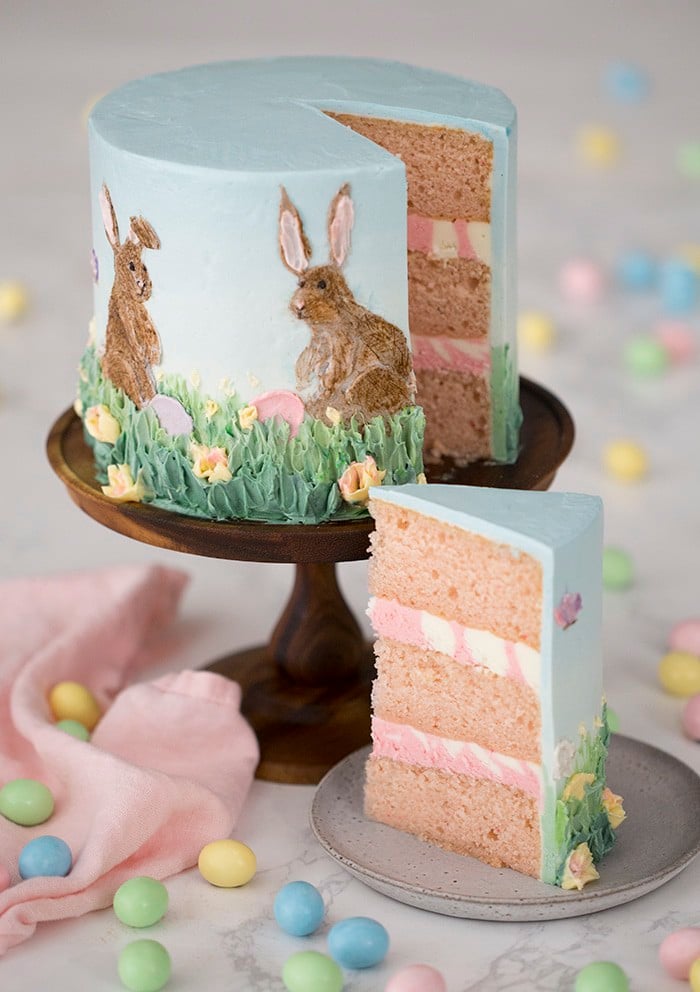
- To pipe the two-tone frosting you fill one bag (1/2 way full) with yellow frosting, one bag with pink frosting and then put both bags in a third piping bag. No need for a tip, just snip about an inch off each bag.
If you’re intimidated by cake decorating check out my How to Decorate a Cake post, it has lots of helpful tips and a full how to video.
I mixed up a bit of green and several shades of blue to add a subtle ombré to the sky and soft green for the grass in the distance, it was a simple and easy way to make the cake look a bit more realistic. All that grass with flowers scattered about in the foreground helps create a realistic foreground too.
Steps to Make this Bunny Cake
- Crumb coat your cake and chill until the frosting is set. It’s easier to work on a firm, stable surface. You can pop the cake to chill in the fridge at any point if things feel too soft.
- Divide your Swiss buttercream into several batches. Color one green and then create three shades of blue by using different amounts of the same food coloring. Add the green buttercream on bottom then the blue shades from light to most saturated. Smooth the buttercream and chill the cake.
- When painting with buttercream you generally go from back to front so it’s best to work on the grass in the distance first. Use a light shade of green for this part. Apply with a small palette knife dragging the buttercream up to create the grass.
- Now it’s time for those bunnies first. Use a palette knife to make the ears and body, add buttercream and give it a rough smooth.
- Use light pink for the inside of the ears and if you have a floppy ear just apply some more of the brown buttercream on top.
- You can smooth the “fur” out with a filbert brush and some gentle strokes. Apply the eyes and other details for the face with small round brushes.
- Continue adding the parts of the bunnies that have some relief like the arms and legs.
- A palette knife can also easily paint in some colored Easter eggs. Focus your attention to the top as the bottom will be obscured by grass.
- Use a more vivid green and deeper stroked from your knife to paint grass in the foreground.
- I popped in some yellow flowers with a flick of my knife. Pale in the background and more saturated in front.
- As you work toward the front a petal tip can be used to create some more three dimensional flowers. I used a warmer orange for the centers as well.
- Finish the foreground with another later of grass and a few more flowers in the very front. The cake can be chilled now or served.
If you’ve tried this easter cake then don’t forget to rate the recipe and let me know how you got on in the comments below, I love hearing from you!
Bunny Cake
Video
Ingredients
For the Cake:
- 1 2/3 cups all-purpose flour 200g
- 1 cup granulated sugar 200g
- 1/4 tsp baking soda 1g heaping
- 1 tsp baking powder 4g heaping
- 3/4 cup unsalted butter 171g room temperature
- 3 egg whites room temperature
- 1 tbsp vanilla extract 15mL
- 1/2 tsp salt 3g
- 1/2 cup sour cream 120mL room temperature
- 1/2 cup whole milk 118mL room temperature
For the Interior Buttercream:
- 1 lb confectioner's sugar 454g
- 2 sticks unsalted butter 226g
- 1/2 cup heavy whipping cream 118ml
- 1 tsp vanilla extract 5mL
- Food coloring if desired
- 1 tbsp lemon zest minced
- 2 tsp lemon juice
- 2 tbso raspberry juice
For the Swiss Meringue Buttercream:
- 5 egg whites at room temperature
- 2 cups unsalted butter 452g at room temperature
- 1 ½ cups granulated sugar 300g
- 1 pinch kosher salt
- 1 tsp vanilla extract
Instructions
For the Cake:
- Butter and flour three 6-inch pans. I use damp cake strips on my pans for more even baking as well. Preheat oven to 340F.
- Sift the dry ingredients together in a large bowl. In a separate bowl, beat the wet ingredients together.
- Add the wet to the dry and mix until combined. Divide the mixture evenly into the cake pans. I like to use a kitchen scale to measure for even layers.
- Bake for 30 -35 minutes or until the centers are set and springy.
- Let the layers cool in the pans for about 4 minutes, then dump each layer out onto a cooling rack.
For the Interior Buttercream:
- Beat the room temperature butter until light and fluffy. Add the confectioners' sugar, vanilla, food coloring and heavy cream. Mix together until a desired consistency is reached. Divide into two batches. Mix lemon zest and and a few teaspoons of lemon juice (optional) into one. Mix raspberry juice into the other. Transfer to piping bags.
- For the Assembly:
- Pipe buttercream between the cake layer. Cover the cake with a thin layer of buttercream.
- Use an offset spatula and a bench scraper to smooth the frosting.
For the Swiss Meringue Buttercream:
- Add egg whites, sugar and salt in a bowl.
- Give the mixture a brief whisk.
- Place the bowl over a pan of simmering water. Make sure the water does not touch the bowl.
- Whisk the egg whites occasionally while it warms up. When the mixture has warmed, whisk it constantly. You will heat the mixture until it reaches an internal temperature of 160ºF or until it's not grainy between your fingers.
- Transfer the bowl to a stand mixer, mix with a whisk attachment until you get room temperature glossy peaks.
- Switch to a paddle attachment and while the mixture is running on low, add tablespoon sized dollops of room temperature butter making sure to let the butter incorporate before you add the next piece. Once all the butter is incorporated, go ahead and add the vanilla extract. You can transfer it to a piping bag or to a ziplock bag to store in the freezer.
For the Decoration
- Crumb coat your cake and chill until the frosting is set. It's easier to work on a firm, stable surface. You can pop the cake to chill in the fridge at any point if things feel too soft. Divide your Swiss buttercream into several batches. Color one green and then create three shades of blue by using different amounts of the same food coloring.
- Add the green buttercream on bottom then the blue shades from light to most saturated. Smooth the buttercream and chill the cake.
- When painting with buttercream you generally go from back to front so it's best to work on the grass in the distance first. Use a light shade of green for this part. Apply with a small palette knife dragging the buttercream up to create the grass.
- Now it's time for those bunnies first. Use a palette knife to make the ears and body, add buttercream and give it a rough smooth.Use light pink for the inside of the ears and if you have a floppy ear just apply some more of the brown buttercream on top. You can smooth the "fur" out with a filbert brush and some gentle strokes. Apply the eyes and other details for the face with small round brushes. Continue adding the parts of the bunnies that have some relief like the arms and legs.
- A palette knife can also easily paint in some colored Easter eggs. Focus your attention to the top as the bottom will be obscured by grass. Use a more vivid green and deeper stroked from your knife to paint grass in the foreground.I popped in some yellow flowers with a flick of my knife. Pale in the background and more saturated in front. As you work toward the front a petal tip can be used to create some more three dimensional flowers. I used a warmer orange for the centers as well. Finish the foreground with another later of grass and a few more flowers in the very front. The cake can be chilled now or served.
Notes
- Be sure to chill the cake after the crumb coat, and the smooth coat are completed. You can pop the cake into the fridge at any point when you're working on it if thing get soft. It Makes decorating much easier!
- Gel food colorings will change color when you chill the cake and rework the surface. You will notice my bunnies started grey and became brown.
- If you’re not using 6-inch pans, double the recipe for 8-inch pans or triple the recipe for 9-inch pans.
- If you see little clumps of butter after you mix the wet ingredients don’t panic, it all works out by the time you mix in the dry ingredients. You can even use melted butter and warm the milk and sour cream up a bit if you like.
- You can substitute whole milk yogurt for the sour cream if desired, I do it all the time and can’t really tell the difference.
- To get FLAT layers that are moist inside and out try using cake strips! You can buy a set online or make your own from foil and paper towels at home. I made a whole blog post on it so check it out if you’re interested!
- If you don't want to make Swiss buttercream you can use the American variety. I just prefer the smoothness and taste of the meringue-based frosting. I know it's a pain to make two different types of frosting though!
- To pipe the two-tone frosting you fill one bag (1/2 way full) with yellow frosting, one bag with pink frosting and then put both bags in a third piping bag. No need for a tip, just snip about an inch off each bag.
Nutrition
IF YOU LOVE THIS RECIPE TRY THESE OUT!


Bea says
Such a beautiful cake! I love that you used buttercream and not fondant. Definitely want to make this and keep you posted as to what happens..
Janette Bibby says
Beautiful cake! But I don’t see the lemon raspberry part of the filling. Did I miss something?
jkanell says
Updated that! Thanks for pointing out 🙂
Kristin says
So beautiful! Thank you for doing a video and showing us how to paint and decorate the cake! I can’t wait to try this out for Easter!!!
Lori Grey says
Great, thanks!
Lauren says
Hi John,
I painted my cake yesterday! My bunny didn’t come out as adorable as yours did, so I painted more Easter eggs instead. I also couldn’t figure out the two different colored frosting on the inside so I just made it all pink. My husband was impressed but cut into it an hour later. I was upset.
Thank you for your wonderful ideas!
Elyse says
This cake is so pretty on the outside AND the inside. I can’t wait to paint my own bunny cake. Thanks for this great idea!
Donna B Oliphint says
Beautiful cake! What happened to the raspberry and lemon icing in the center?
Anne says
John, your talent is ridiculous!!! What a stunning cake!!! I just ? love it.
jkanell says
Thank you Anne!
Lori Grey says
What do you use to flavor the raspberry and lemon buttercream?
John K. says
Hi Lori,
I used raspberry juice and fresh squeezed lemon juice to flavor the buttercream.
Best,
John
Mary Beth says
Your cakes are always so beautiful!