
This post may contain affiliate links. Please read our disclosure policy.
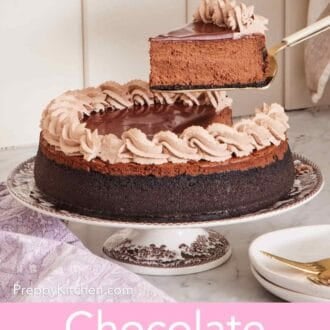
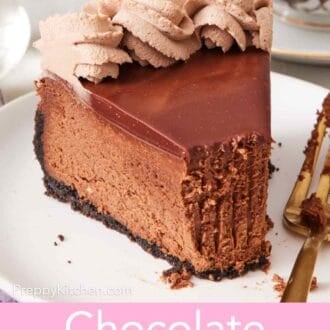
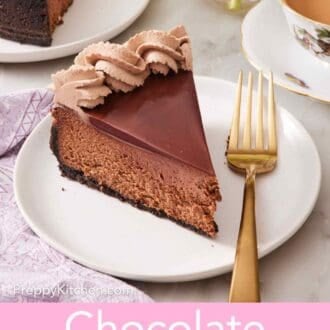
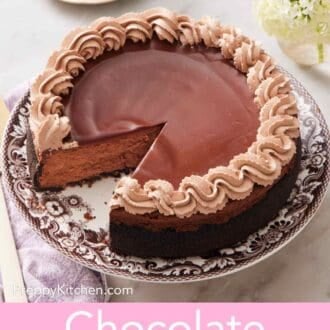
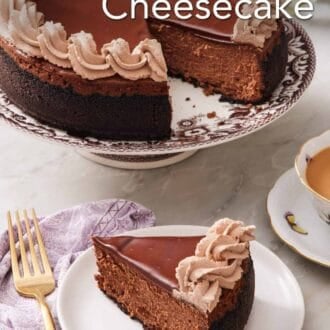
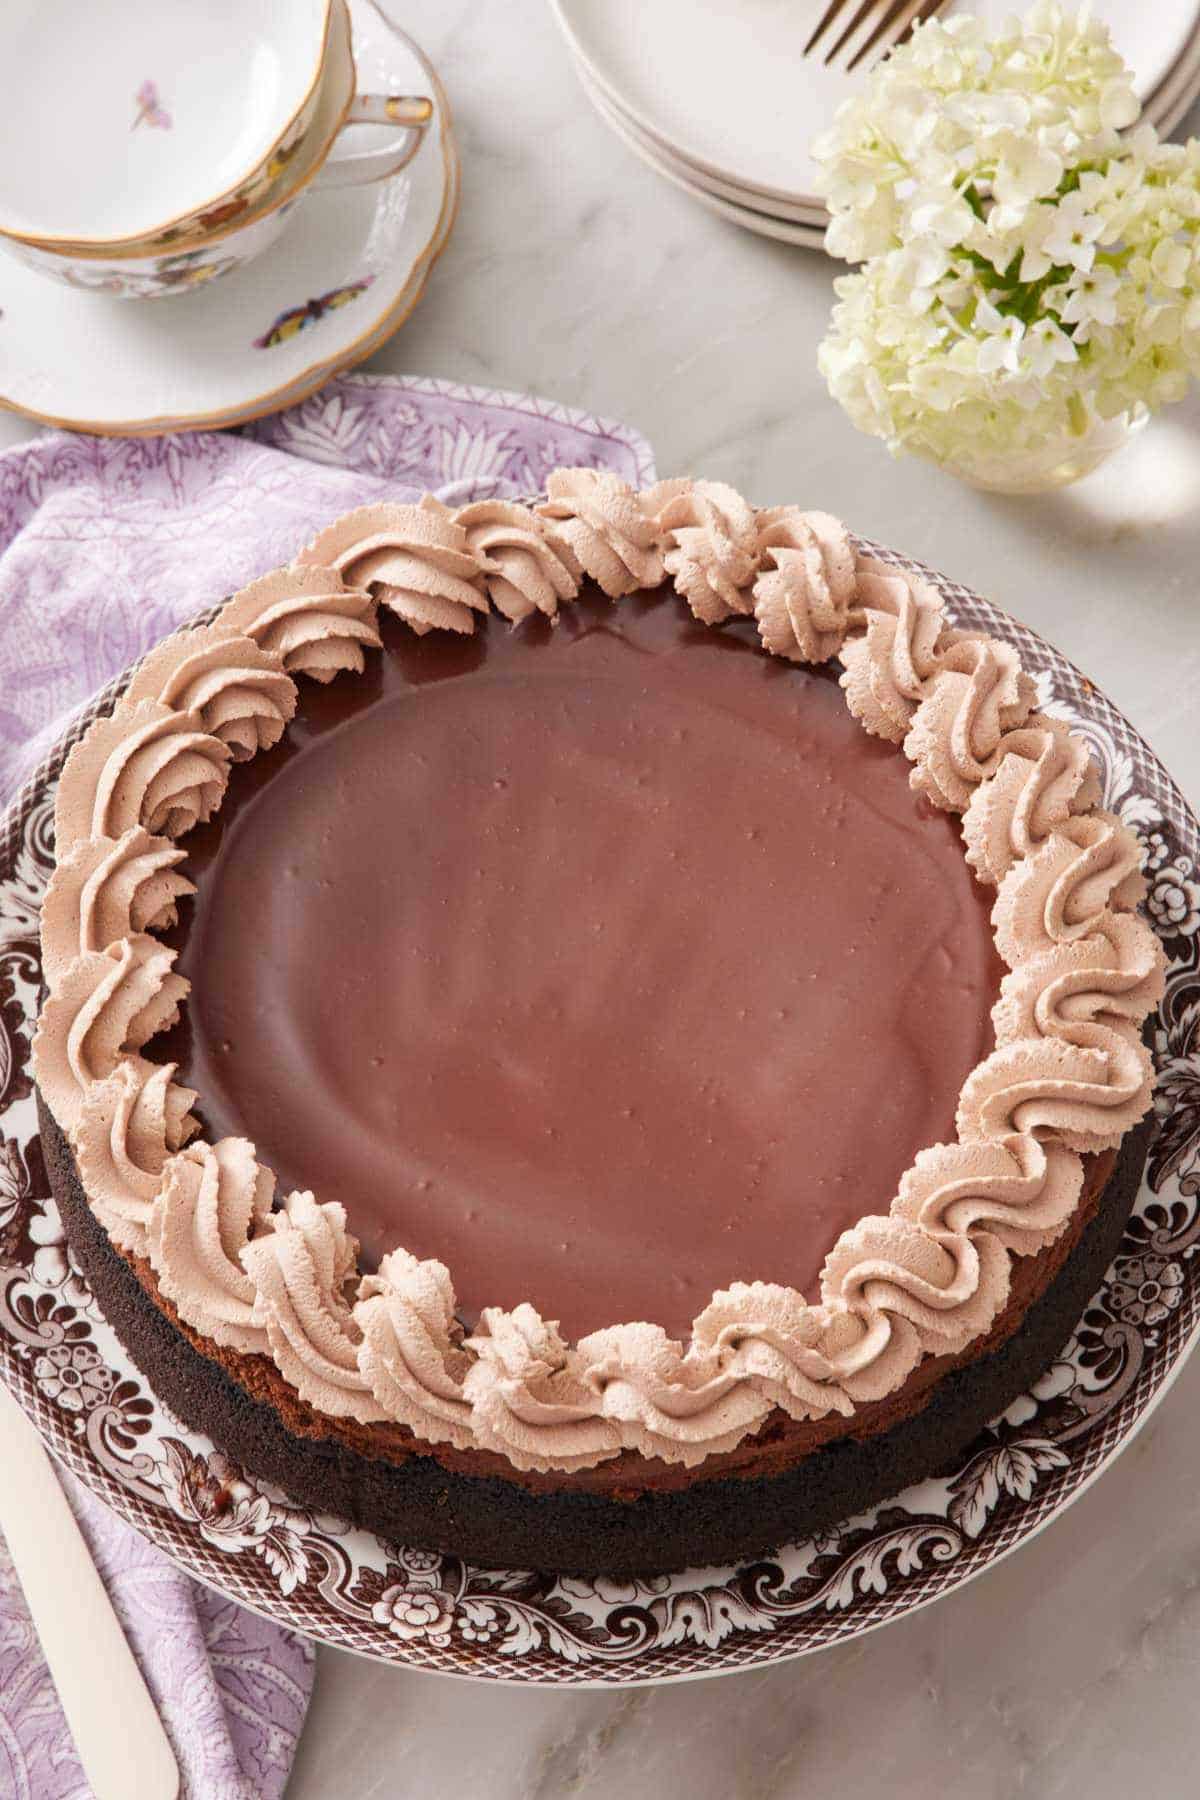
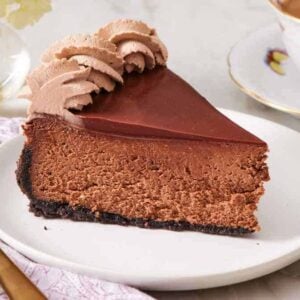
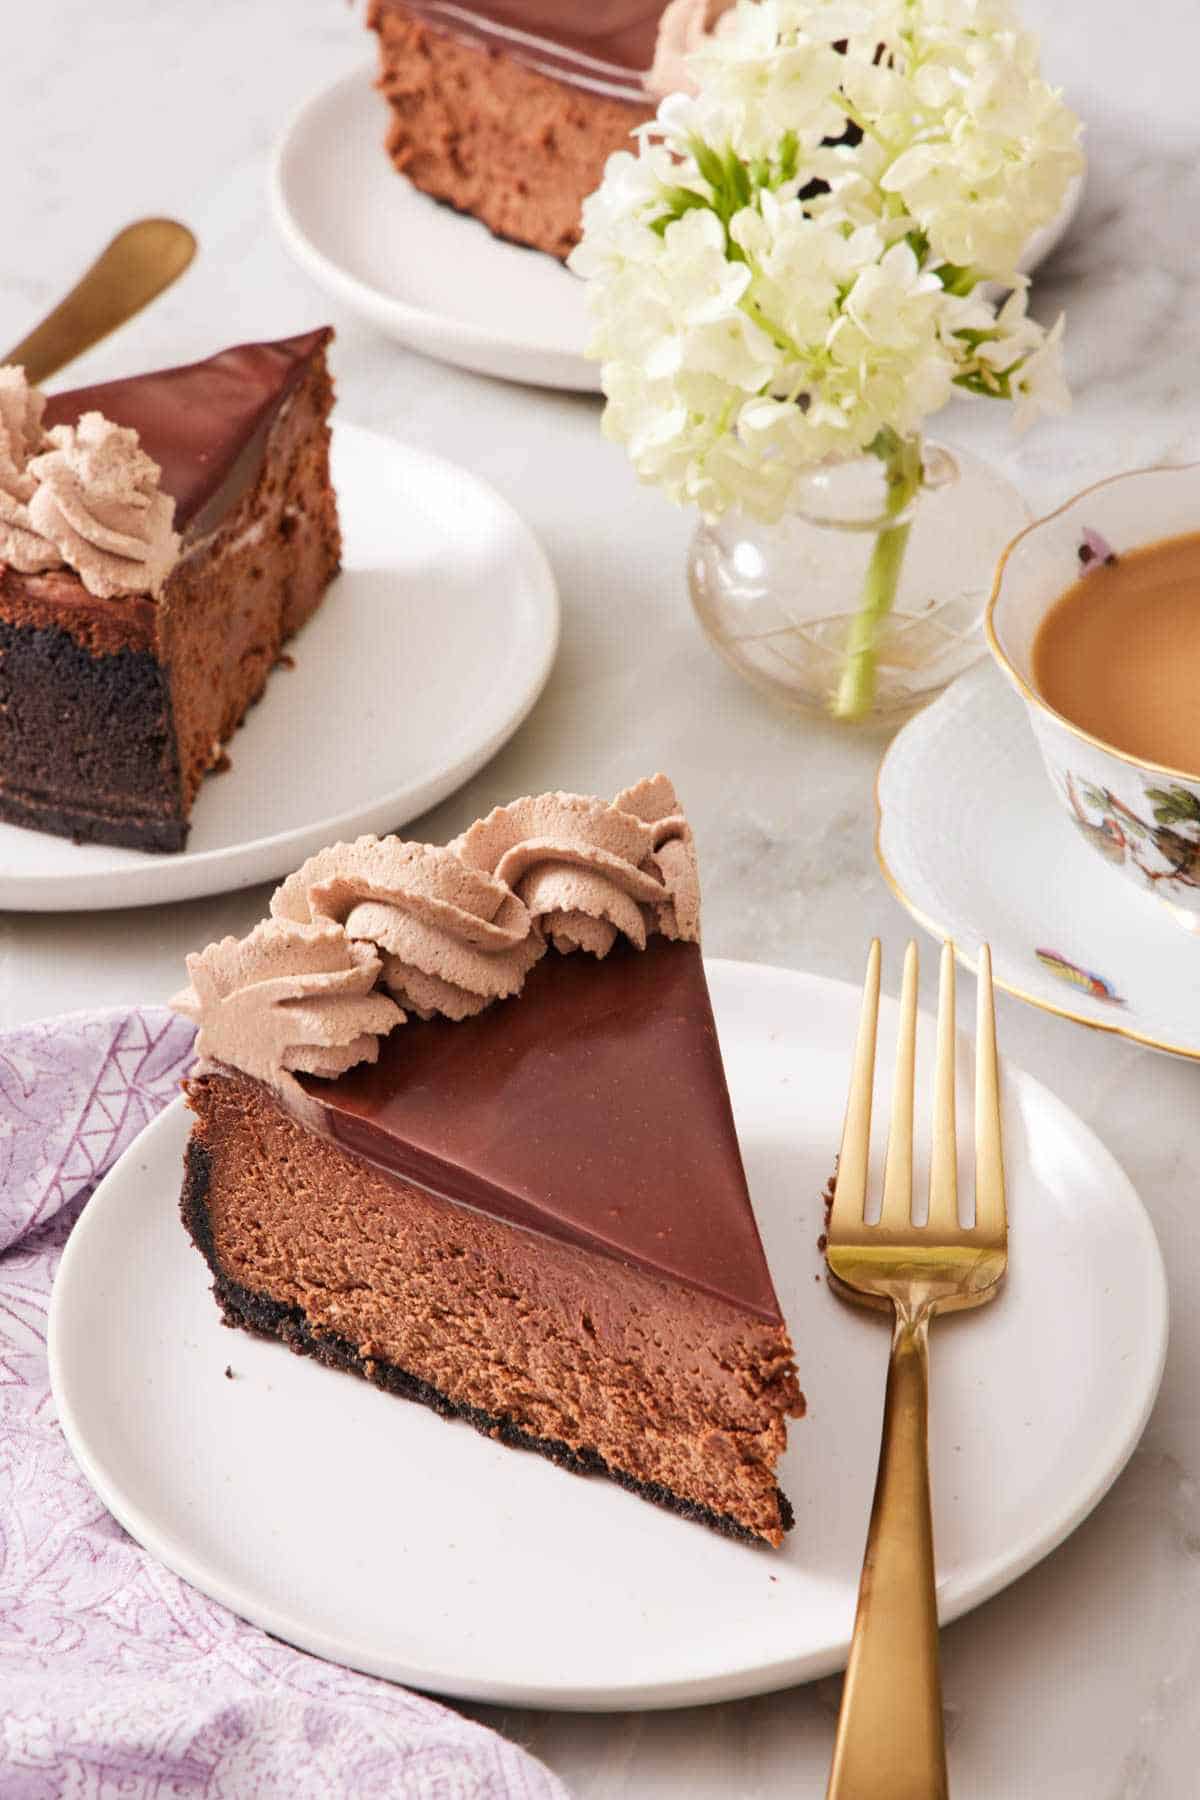
Decadent and rich, this Chocolate Cheesecake recipe is just the thing to impress the chocolate lovers in your life. It has a chocolate cookie crust, velvety filling infused with real melted chocolate, glossy ganache topping, and dollops of chocolate whipped cream—all baked crack-free without a water bath.
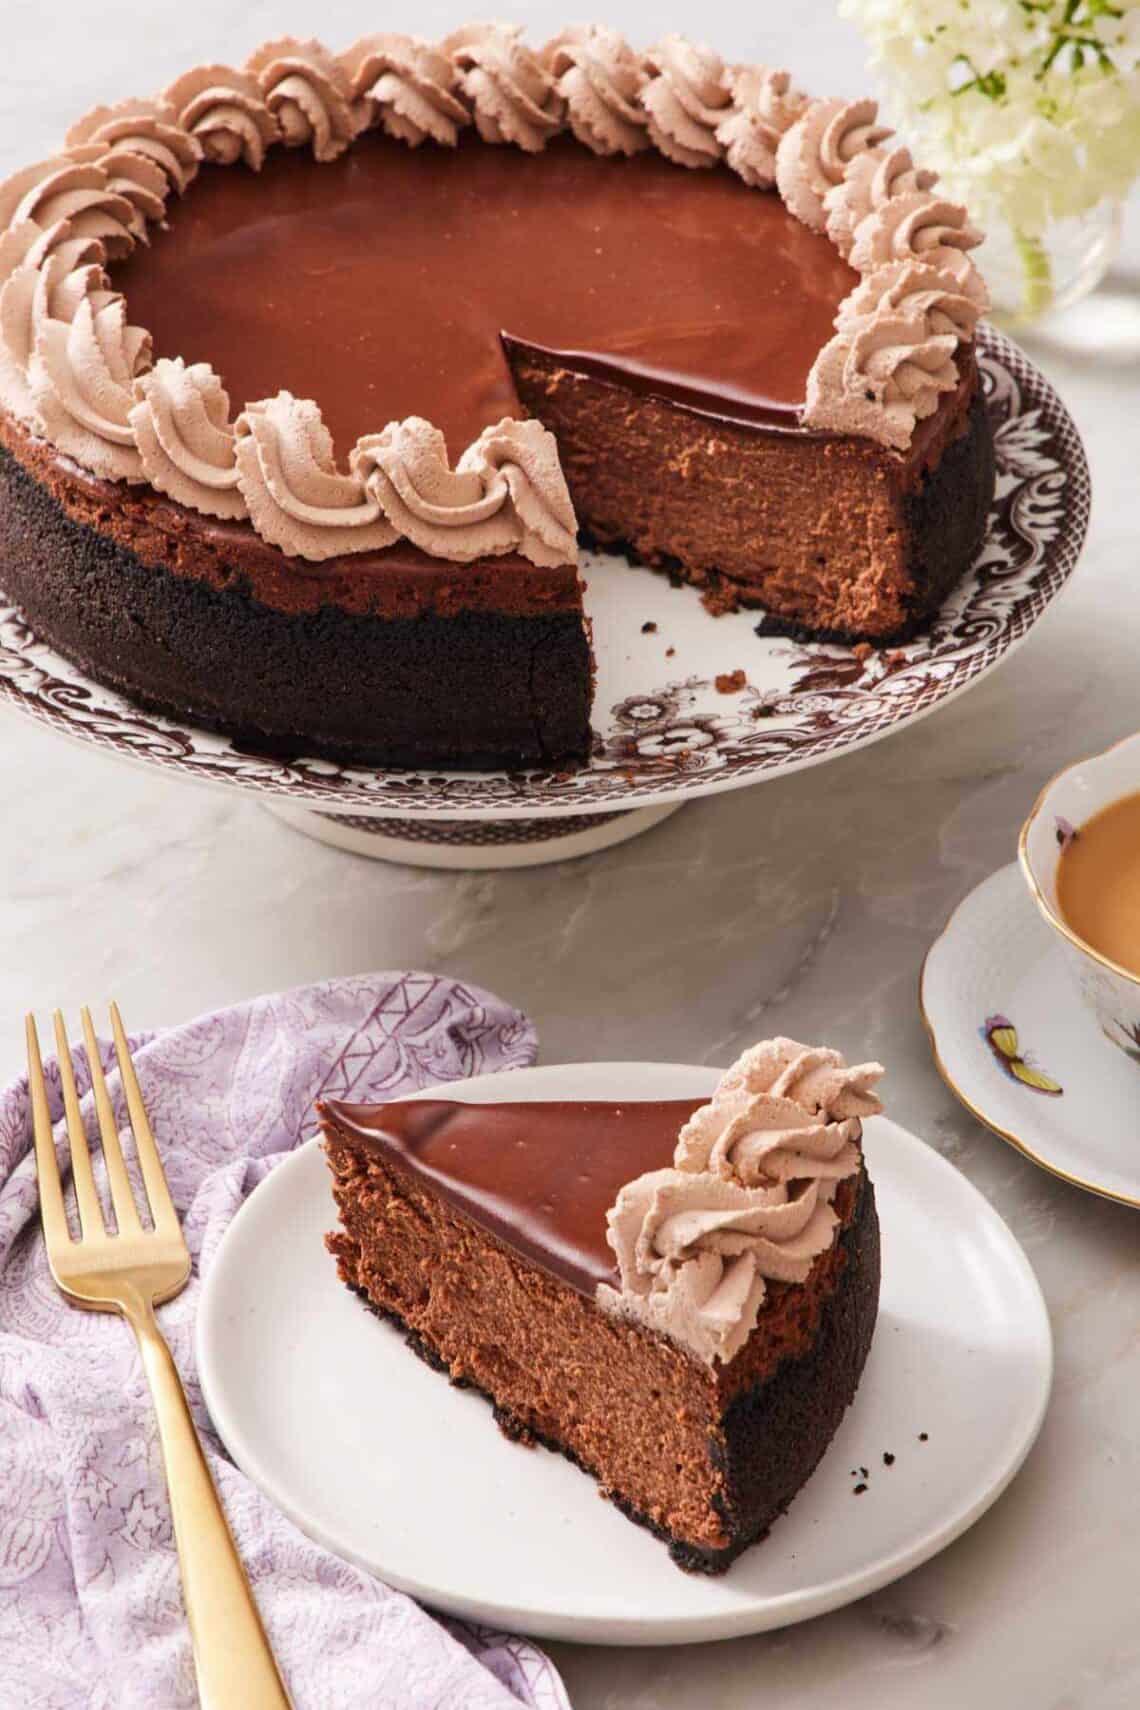
My chocolate cheesecake is a decadent, chocolatey dream. There’s chocolate in every element, from the crust to the whipped cream piped on top. I recently retested this recipe to deal with an issue I saw many readers experience: cracks on the surface. While my popular recipe remains the same, I made a few small tweaks to the baking method to help account for variations in different ovens. It bakes lower and slower with a clever foil cover and separate water pan trick that gives you all the benefits of a water bath without the hassle of one.
“20/10 recipe. My family LOVED it with Christmas dinner and asked me to make it again. This is my new go to recipe when I want to show off.”
Kayley
Why You’ll Love My Updated Recipe
There are so many reasons to love my chocolate cheesecake recipe!
- Real rich chocolate, not cocoa powder. Bittersweet and semi-sweet bars are melted right into the batter, plus a layer of ganache on top. The flavor is genuinely deep, not the muted, dusty taste you sometimes get from cocoa-only versions.
- Crack-free without the fuss of a water bath. No wrapping the springform pan in foil and praying water doesn’t seep in. My new foil-cover-plus-pan-of-water method gives you gentler heating and the same humidity benefits with none of the soggy-crust risk.
- Make-ahead friendly. It needs to chill overnight anyway, and it freezes beautifully for up to 3 months. Bake it, wrap it, save it for later.
Key Ingredients
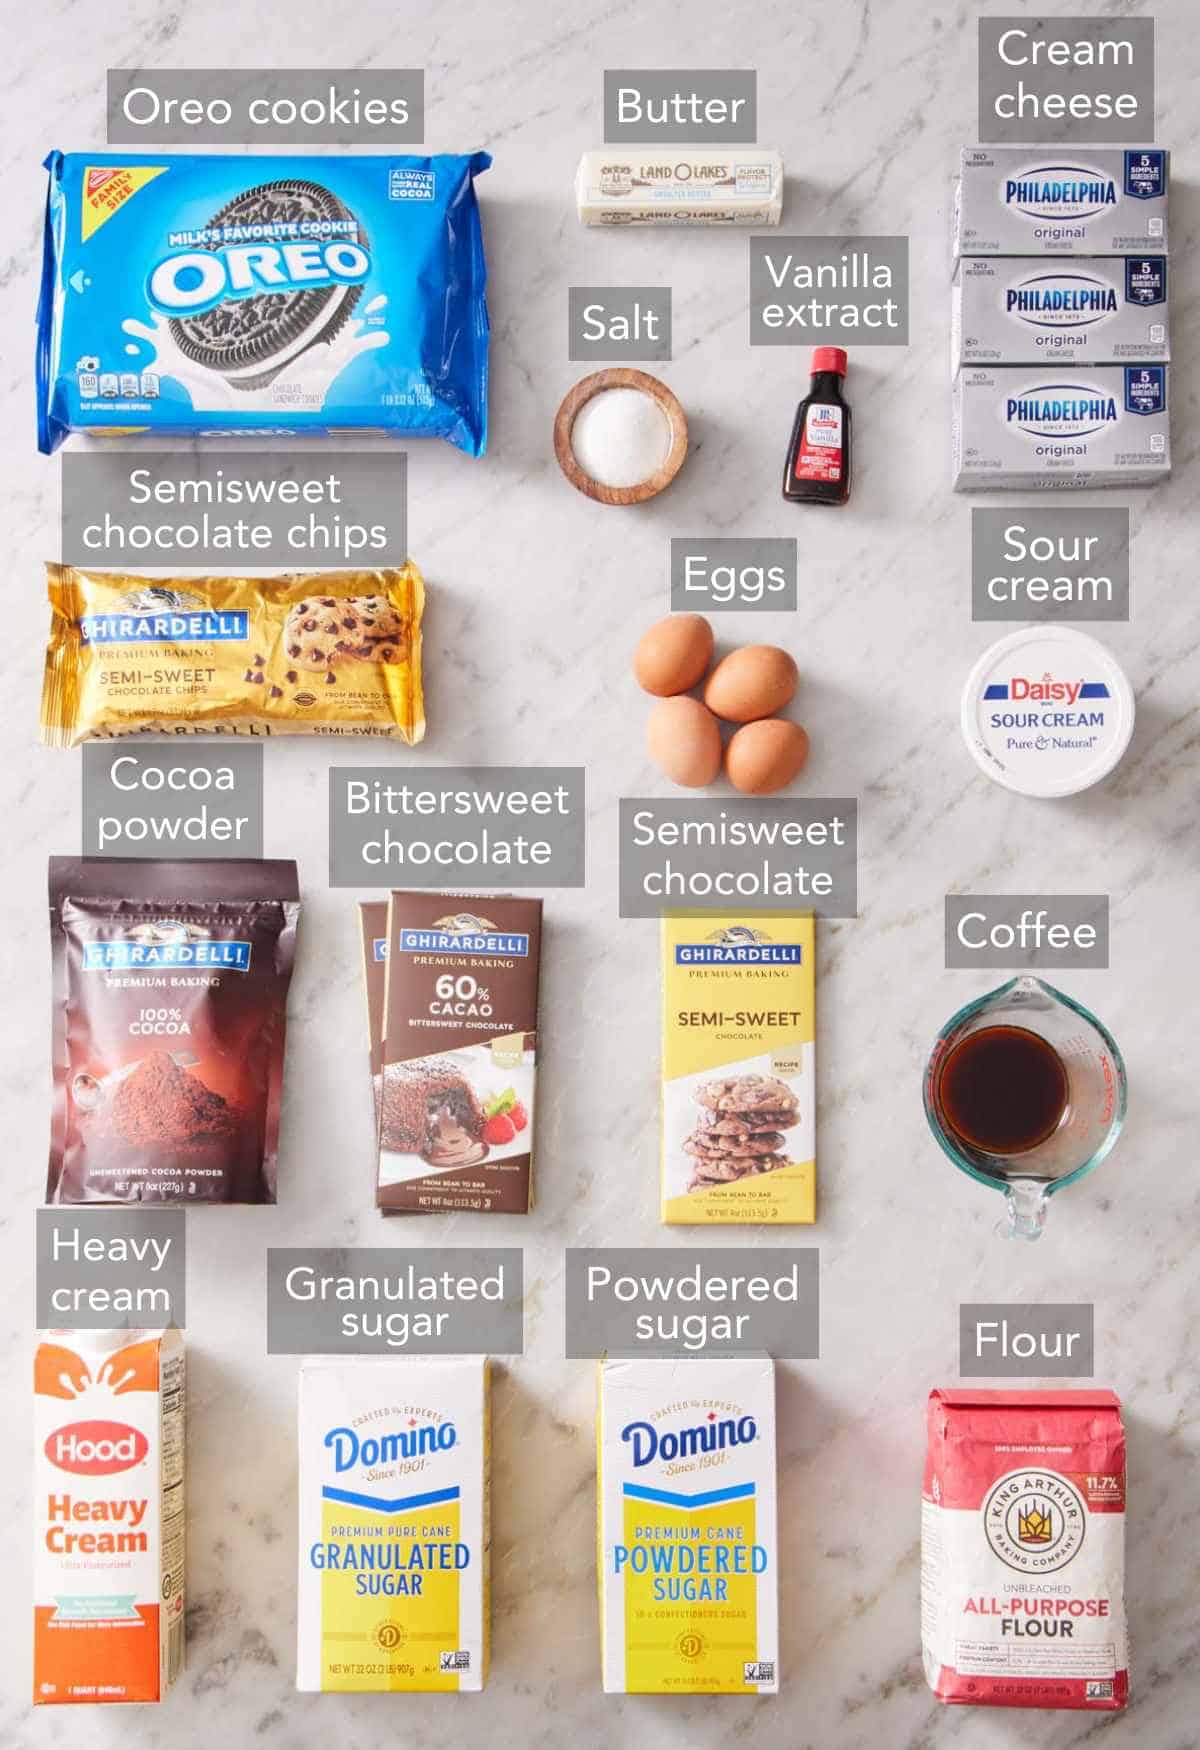
These are the main ingredients you need to make the best chocolate cheesecake recipe. You can find the full list of ingredients and measurements in the recipe card below.
Crust — to make the Oreo chocolate cookie crust, all you need is Oreos and melted butter. Don’t spend time scraping out the cream filling; it helps the crust hold together.
Chocolate — real chocolate goes into the cheesecake batter; not chocolate morsels or cocoa powder. Chopped bittersweet chocolate and semi-sweet chocolate bars make the smoothest filling. And the combination gives you depth of flavor without being too bitter. I also tested it with high-quality real chocolate chips (Ghirardelli brand) and the texture turned out great, so you can make that swap if needed.
Coffee — a small amount of brewed coffee enhances and deepens the chocolate flavor, making everything taste more complex without tasting like coffee. If you don’t want coffee in your dessert, you can swap it for an equal amount of milk, cream, or water.
Cream cheese — blocks of full-fat cream cheese are the best option for a rich, velvety filling. I have tested cheesecakes with low-fat cream cheese before and the texture always turns out disappointing: dense and a bit grainy cheesecake. Spreadable tub cream cheese won’t work either.
Sugar, sour cream, eggs, flour — granulated sugar sweetens the filling, room-temperature sour cream adds tang and creaminess, eggs give the filling its custard-like set, and a small amount of all-purpose flour helps stabilize the batter. You can swap the flour for cornstarch if you’d like a gluten-free filling.
Chocolate ganache — to make the easy ganache, you just need semisweet chocolate chips and heavy cream. A simple two ingredient topping!
Chocolate whipped cream — decadent chocolate whipped cream made with heavy cream, powdered sugar, cocoa powder, and vanilla extract is the perfect finishing touch on this impressive dessert.
A Crack-Free Cheesecake Without A Water Bath
My original recipe worked great for most people, but some readers commented saying their chocolate cheesecakes cracked. My team and I retested the recipe 7 times so we could understand what was actually causing it. It came down to two things: surface moisture and oven temperature. Here’s what works without a water bath:
Foil covering hack: Cover the springform pan tightly with foil for the first hour of baking. The cheesecakes I baked uncovered consistently developed a thin, set crust on top. Once that crust forms, the filling underneath cools at a different rate and the difference in surface tension can form cracks that split open as the filling shrinks. The foil traps some moisture and keeps the surface tacky during the critical first hour. When you remove it for the last 40-50 minutes, the surface sets evenly with the filling underneath.
A pan of water in the oven: The cheesecake doesn’t go in the water—that’s a real water bath (bain marie) and is messy and a hassle. Instead, set a large dish of hot water on the rack below the cheesecake. You get the humidity benefits (which is what actually prevents cracking) without the risk of water seeping into the springform pan and making your crust soggy.
Low and slow: I dropped the oven temperature slightly to account for the fact that home ovens can vary by 25°F or more from their dial reading. A gentler bake keeps the center from puffing aggressively, which is what causes the cheesecake to deflate and crack as it cools. The added foil cover also insulates the filling for a gentler rise in temperature.
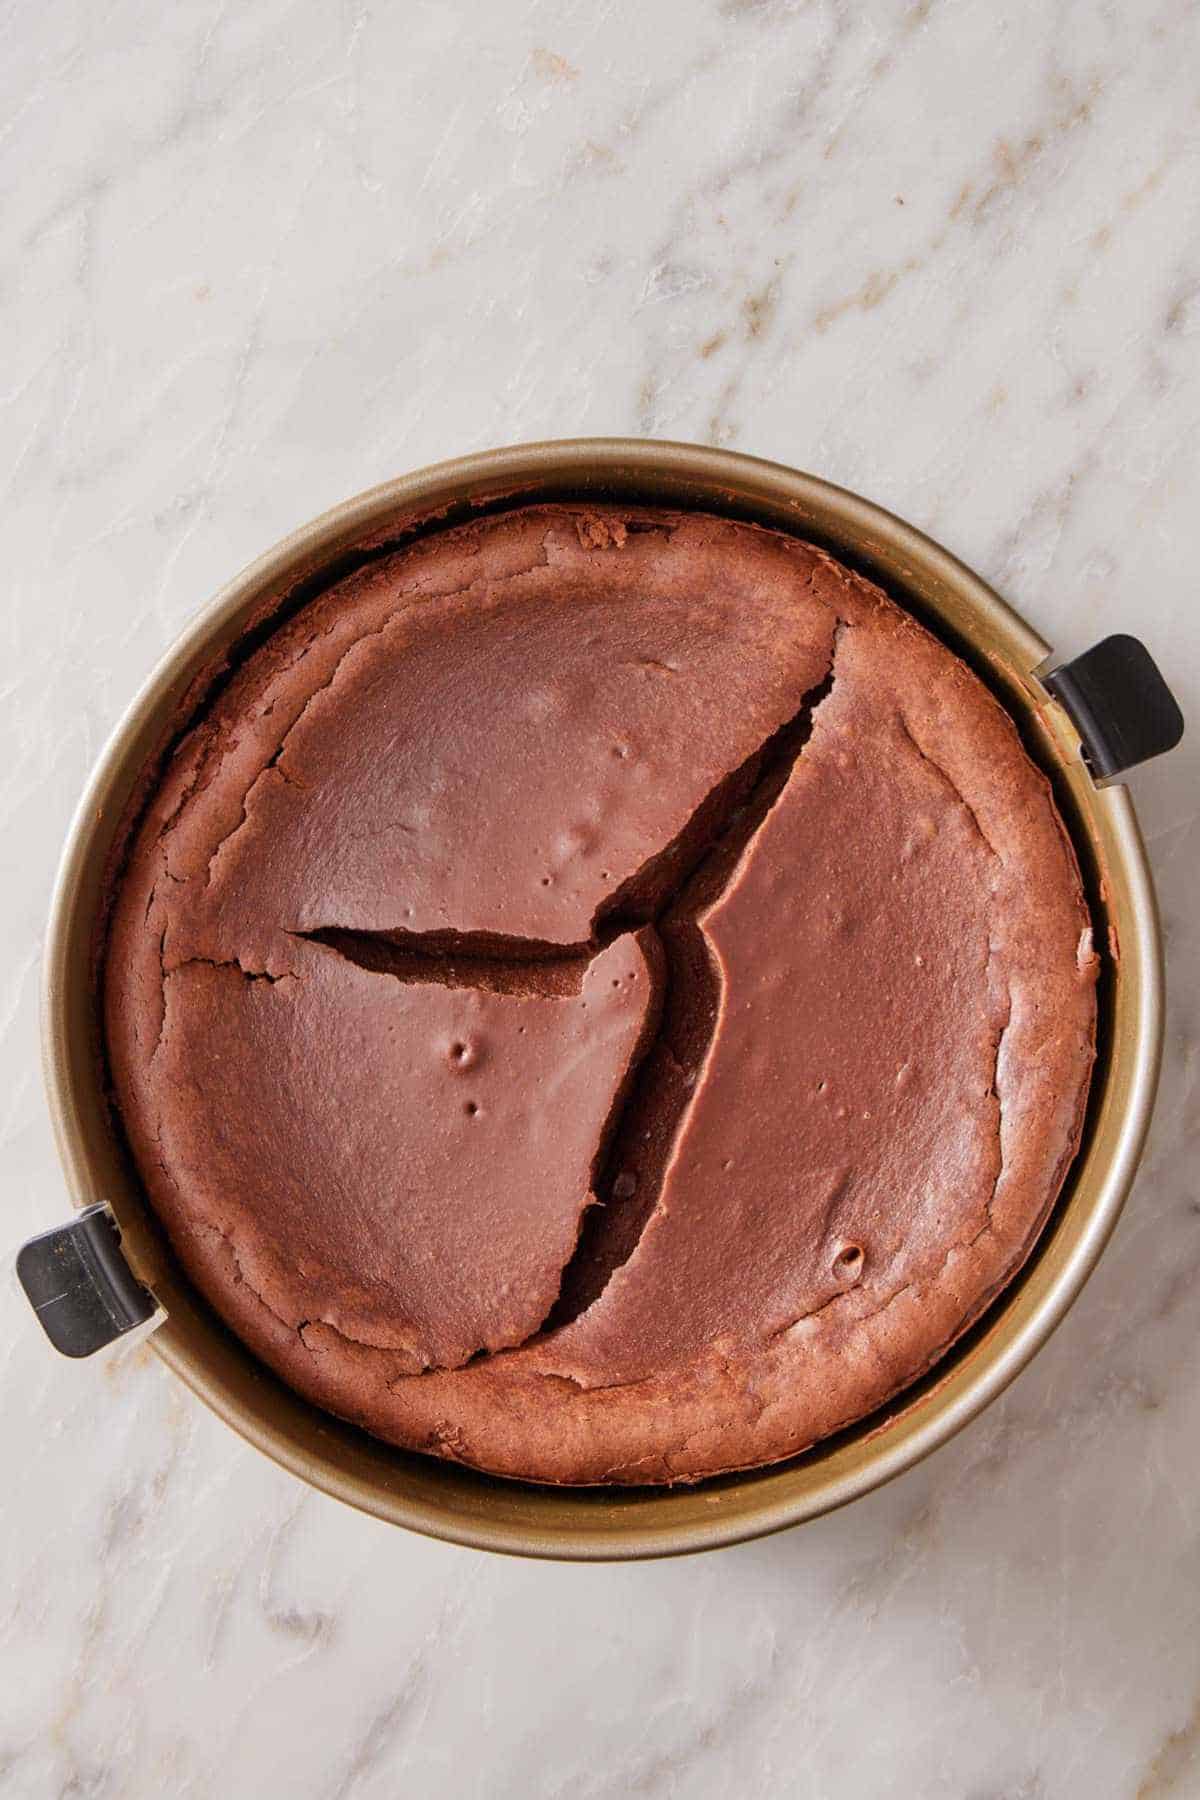
One thing not to do: Don’t use a thermometer. Many recipes give a doneness temperature so you can insert an instant-read probe and know for certain that your cheesecake is done. I tried this multiple times, testing internal temps of 145°F, 155°F, and 165°F, and every single time, the cheesecake cracked as it cooled, starting from the puncture hole (see the image below). Even though the cheesecakes varied by 20°F internally, all three set up with the same smooth, creamy texture. My conclusion? It’s not worth poking. Use the jiggle test instead: edges set and slightly puffed, center still has a wobble.
Variations and Topping Ideas
You can stick with the recipe, or change it up for something different. Here’s how:
- Swap the crust: Use the graham cracker crust from my classic cheesecake recipe instead. Or swap regular Oreos for flavored Oreos or Biscoff cookies. You can also use gluten-free Oreos.
- Skip the chocolate topping: A fruit topping like strawberry sauce, cherry pie filling. Or, fresh berries and whipped cream are always a winner on cheesecake.
- Add caramel: A drizzle of homemade caramel sauce adds a lovely sweetness and takes just 10 minutes to make. You can add this over the ganache for another flavor dimension, or replace the ganache with it.
- Espresso boost: If you love a coffee-chocolate combo, replace the brewed coffee with espresso or add 2 teaspoons instant espresso powder.

Pro Tips For Making This Recipe
Room-temperature ingredients are non-negotiable. I tested cheesecake with cream cheese straight from the fridge once just to see how much it actually mattered. The batter was lumpy and never fully smoothed out, and the lumps stayed visible after baking. Give the cream cheese about two hours on the counter, or cube and microwave in 10 second-intervals at 50% power. Do the same for sour cream. For the eggs, soak them in a bowl of warm water for 10 minutes. Don’t pre-warm the heavy cream though; you will heat it separately for the ganache, and cold cream is what whips into stiff peaks for the topping.
How to tell when the cheesecake is done? Do the jiggle test. Carefully jiggle the pan towards the end of the bake time and look at how the center moves. The edges of the filling should be set and puffed, but the middle should look shiny and have a slight wobble to it still. Remember, don’t poke it or you can create a starting point for cracks.
The two tricks for clean slices. First: chill overnight. A few hours isn’t enough for picture-perfect cuts. Second: Use a sharp knife and run it under hot water, then wipe it dry. Wipe the blade clean between every slice, too.
How To Make Chocolate Cheesecake
Below, I’ve highlighted portions of the recipe in step-by-step process images along with instructions for making this rich chocolate cheesecake. You can find the full set of instructions in the recipe card below.
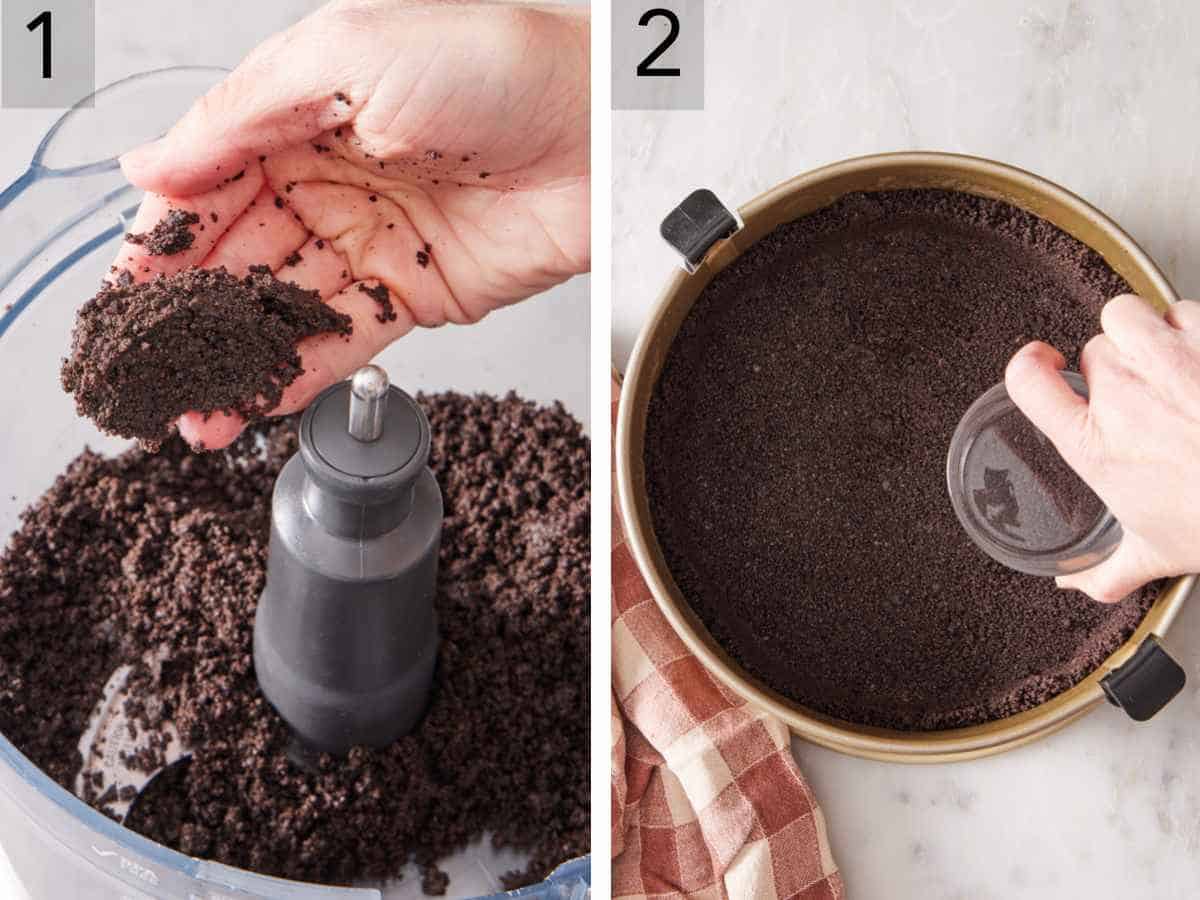
1. Make the crust: Pulse the Oreos in a food processor until they resemble sand. While pulsing, drizzle in the melted butter. The crust mixture should hold together when squeezed. If it doesn’t, add 1 more tablespoon of butter and stir.
2. Press the Oreo cookie crust mixture into a 9-inch springform pan using a glass to press the mixture firmly into the pan and 1-inch up the sides. Bake at 350ºF for 10 minutes. Remove it from the oven and let it cool in the pan. Reduce the oven temperature to 300ºF and make sure one oven rack is positioned in the bottom of the oven and another in the middle.
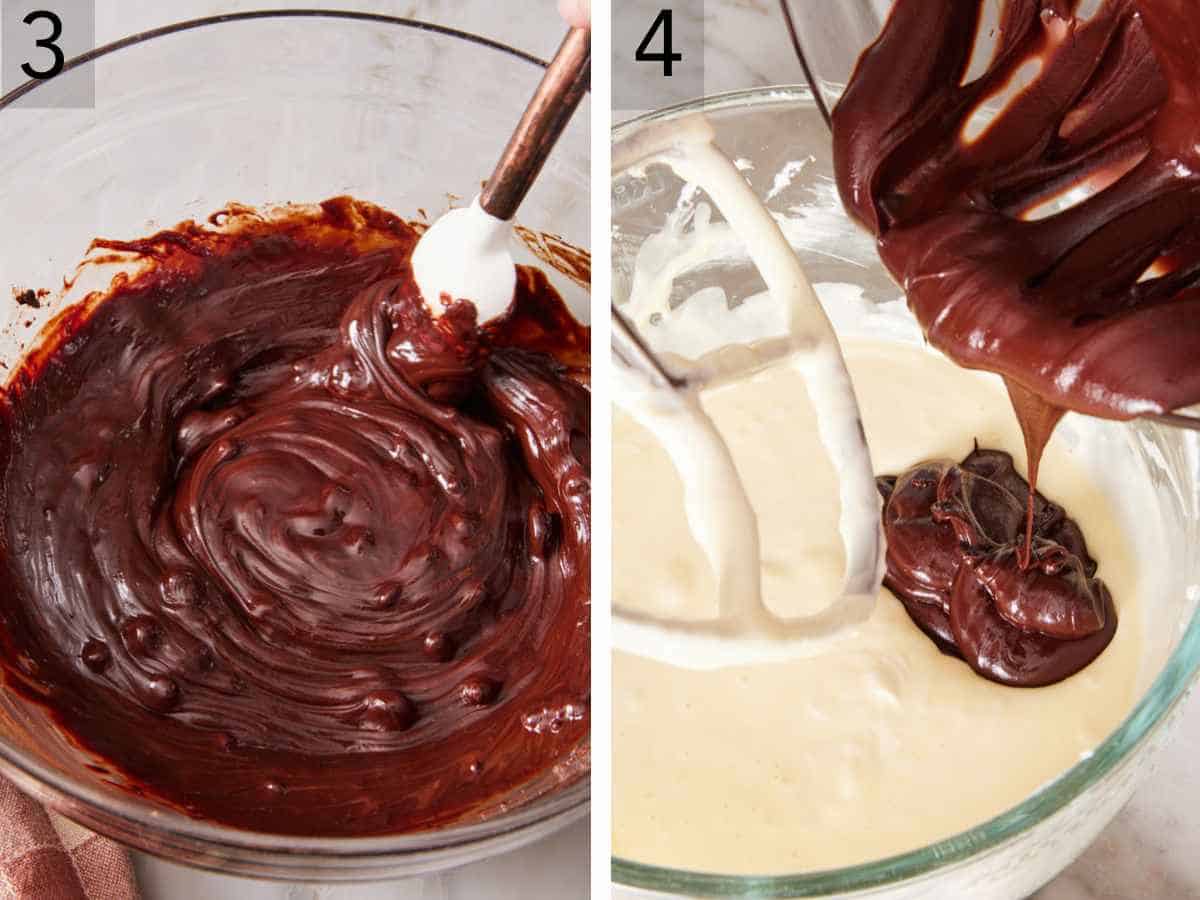
3. Melt the chocolate: Melt the chopped chocolate with the hot coffee in the microwave in 10- to 20-second increments until the chocolate melts fully. Set aside for now.
4. Make the batter: To the bowl of a stand mixer fitted with a paddle attachment (or a large bowl with a hand mixer), mix the softened cream cheese on medium speed until creamy. Add the white sugar and salt and mix to combine, then add the vanilla extract and sour cream and keep mixing until combined. Reduce the speed to medium-low and add the eggs one by one, topping and scraping down the bowl as you go. Add the melted chocolate and mix until almost fully combined.
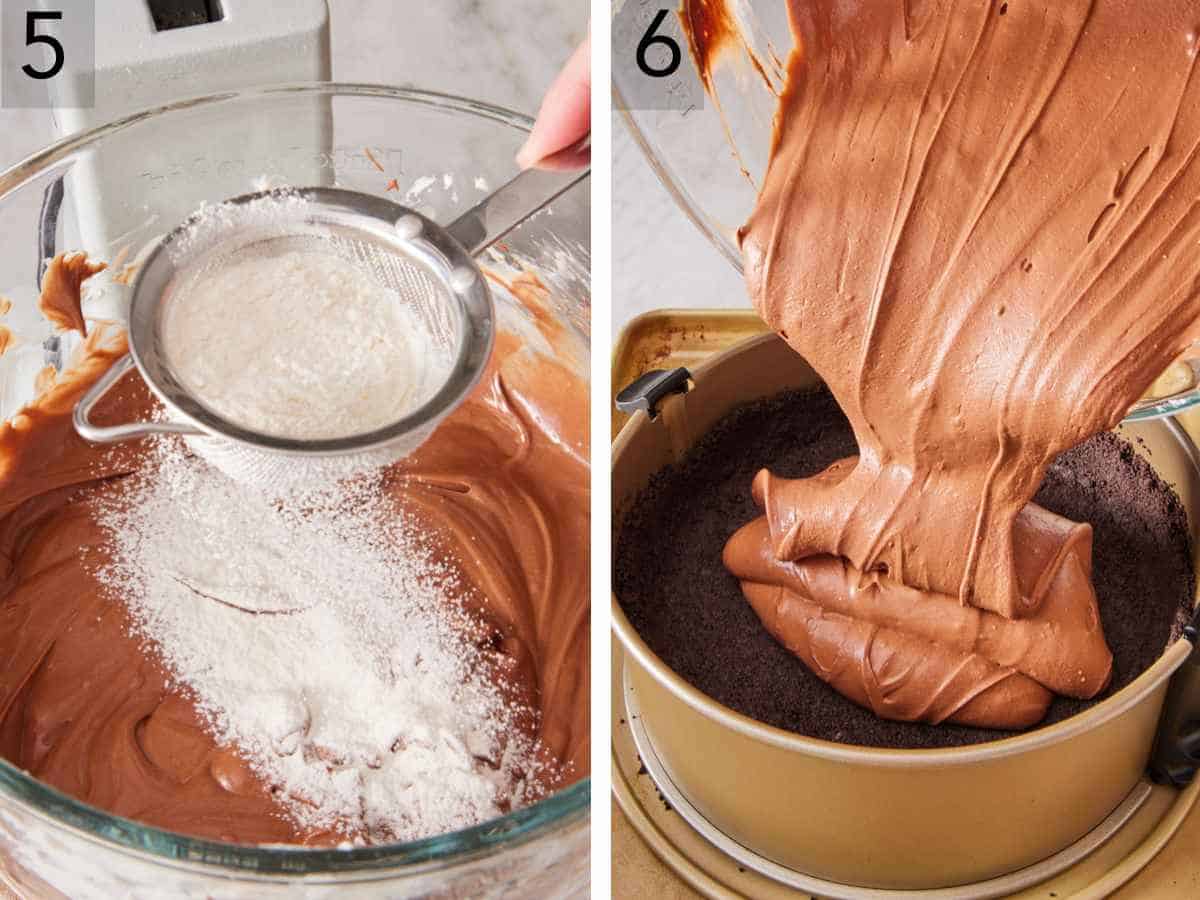
5. Sift in the flour and mix on low speed until the flour incorporates fully.
6. Pour the chocolate cheesecake batter into the cooled Oreo crust and smooth out the top.
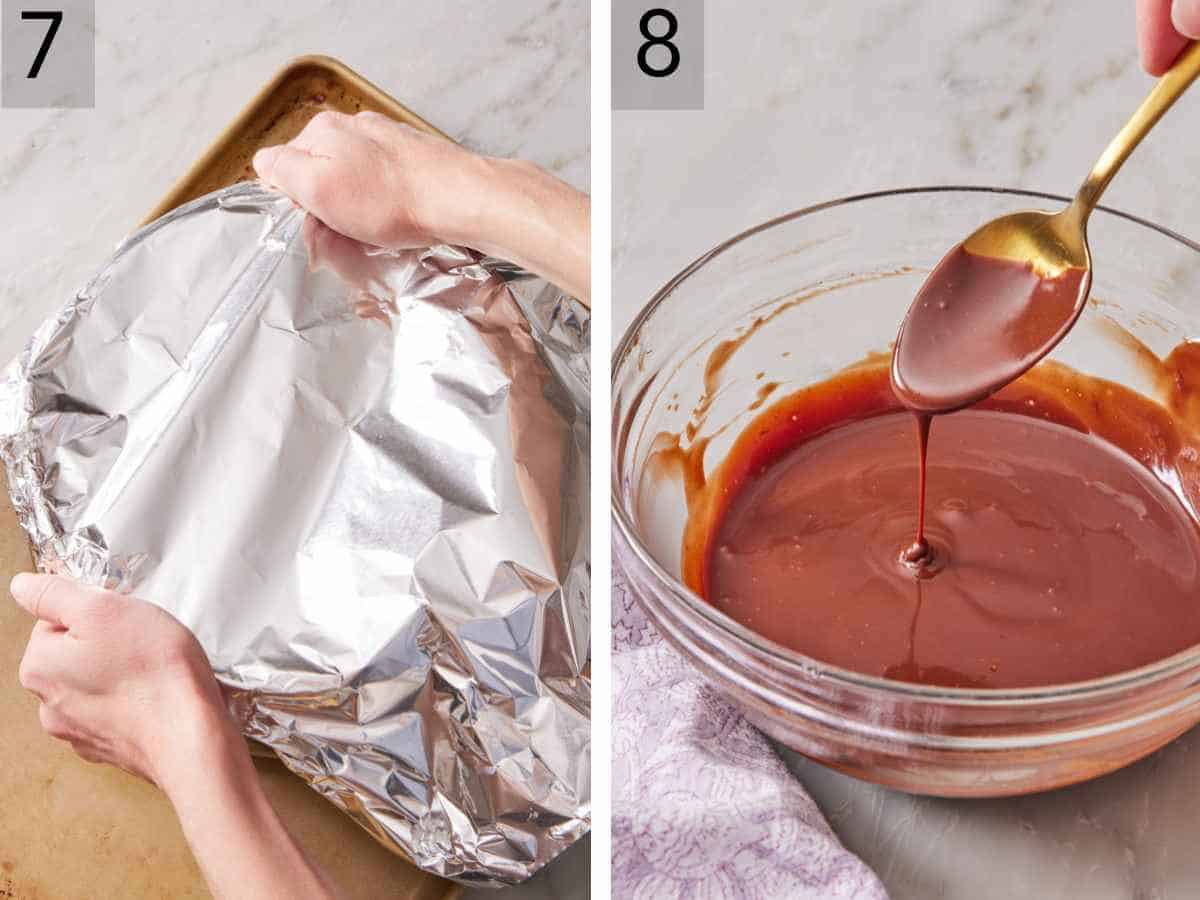
7. Cover and bake the cheesecake: Tightly cover the top of the springform pan with foil. Set a large dish of hot water on the bottom oven rack. Place the cheesecake on a rimmed baking sheet on the center rack. Bake at 300°F for 1 hour, then carefully remove the foil and bake another 40–50 minutes. Edges will be set and puffed, and the center has a slight wobble. Turn off the oven, crack the door slightly, and let the chocolate cheesecake cool for 1 hour. Then cool it at room temperature for another hour.
8. Chill and top: Cover and place the cheesecake in the fridge to chill overnight. The next day, make the chocolate ganache. Heat the cream and pour it over the chocolate chips. Stir until the chocolate melts and is smooth. Cool for 5 minutes.
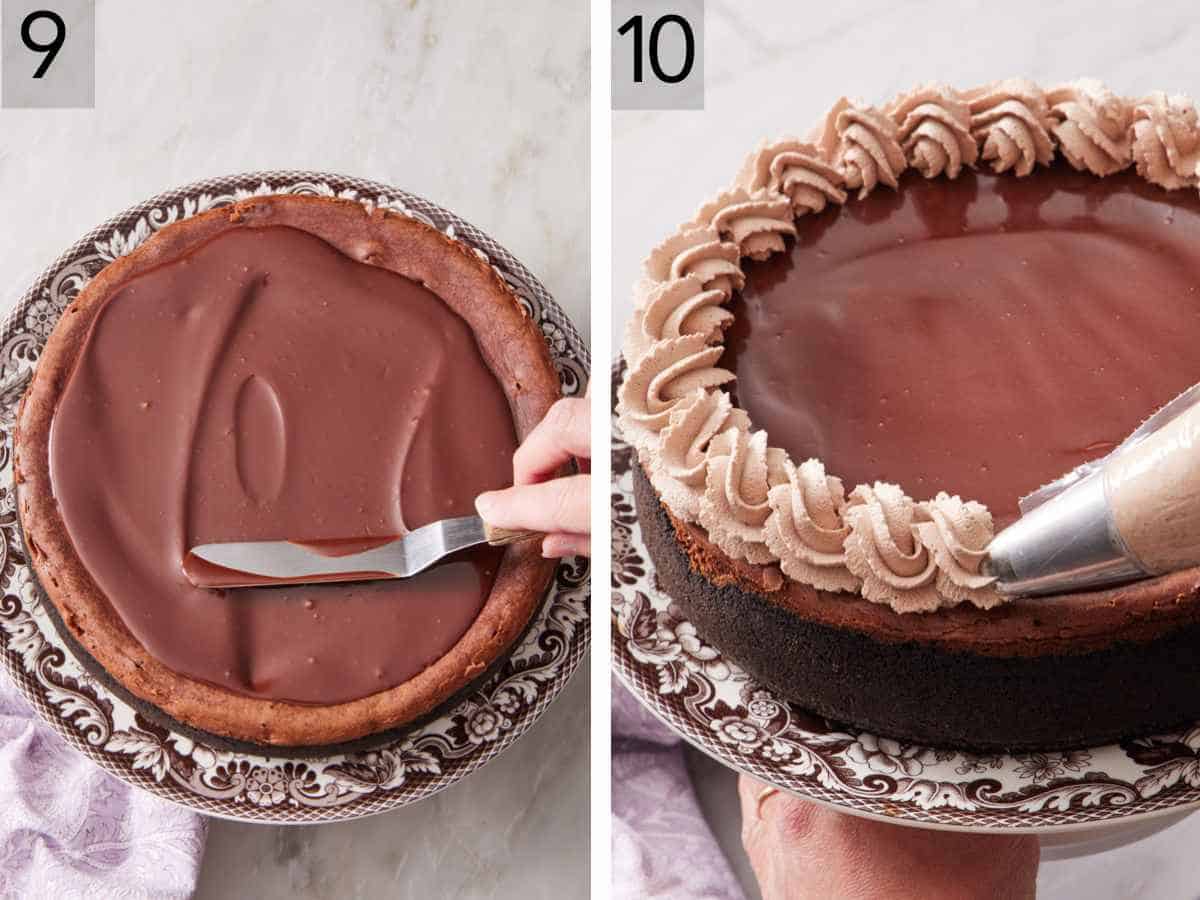
9. Spread the chocolate ganache over the top of the cheesecake, and pop it back into the fridge to set while you work on the chocolate whipped cream.
10. Whip the heavy cream, powdered sugar, cocoa powder, and vanilla until stiff peaks form, then transfer the whipped cream to a piping bag fitted with a closed star piping tip (Ateco 846). Pipe a ring or dollops around the edge of the cheesecake. Slice and serve.
Chocolate Cheesecake Recipe
Equipment
- Electric hand or stand mixer
- Mixing Bowls
- 9 inch springform pan
Ingredients
For the Crust:
- 24 Oreo cookies (270g)
- 4 tablespoons unsalted butter melted (56g)
For the Filling:
- 2 (4-ounce/113g) bars bittersweet chocolate chopped
- 1 (4-ounce/113g) bar semi-sweet chocolate chopped
- ¼ cup hot brewed coffee (60ml)
- 3 (8 ounce/227g) packages cream cheese room temperature
- 1 cup granulated sugar (200g)
- ¼ teaspoon salt
- ¼ cup sour cream room temperature (60g)
- 1 tablespoon vanilla extract
- 4 large eggs room temperature
- 3 tablespoons all-purpose flour
For the Ganache
- ½ cup semisweet chocolate chips (90g)
- ⅓ cup heavy cream (80mL)
For the Chocolate Whipped Cream
- 1 cups heavy cream (240mL)
- ¼ cup powdered sugar (30g)
- 1 tablespoon natural unsweetened cocoa powder
- 1 teaspoon vanilla extract
Instructions
For the Crust:
- Preheat the oven to 350ºF.
- To the workbowl of a food processor add the oreo cookies. Pulse for 30 seconds or until they resemble sand. While pulsing drizzle in the melted butter, the mixture should hold together when squeezed if it does not add 1 more tablespoon of melted butter and stir to combine.
- Transfer the mixture to a 9-inch springform pan and spread into an even layer. Using a flat-bottomed glass or measuring cup firmly press into the bottom of the pan and 1 inch up the side.
- Bake the crust for 10 minutes or until fragrant and it appears dry. Remove from the oven and place on a cooling rack while you make the filling.
- Reduce oven temperature to 300ºF. Position one oven rack in the bottom of the oven and another in the middle of the oven.
For the Filling:
- Place the bittersweet and semisweet chocolate in a medium microwave safe bowl. Pour the hot coffee over top and microwave in 10-20 second bursts, stirring in between until fully melted, about 35 to 45 seconds. Set aside.
- In the bowl of a stand mixer fitted with a paddle attachment or a large bowl with a hand mixer, place the cream cheese. Mix on medium speed for 2 minutes until creamy. Add the sugar and salt and continue mixing on medium for 1 minute until well combined. Add the sour cream and vanilla extract and mix until combined.
- While mixing on medium-low, add the eggs one at a time, scraping down the bowl as needed. Pour in the melted chocolate and mix once more until almost fully combined. Scrape down the bowl and sift the flour on top of the batter. Mix again on low speed until the flour disappears, stopping to scrape down the bowl to ensure everything on the sides of the bowl is fully incorporated.
- Pour the batter into the crust and smooth out the top with an offset spatula. Tightly cover the pan with foil, making sure it doesn’t touch the top of the cheesecake.
- Place a large baking dish on the bottom rack of the oven and fill it halfway with hot water. Place the cheesecake on a rimmed baking sheet on the center rack above it.
- Bake at 300ºF for 1 hour. Carefully remove the foil and continue baking for another 40 to 50 minutes, or until the edges are puffed and appear matte about 2-inches in and the center is shiny with a slight wobble. (The center may still look concave and not puff- that’s okay! If any cracking starts to appear on the edges after 40 minutes, it’s time to turn the oven off.)
- Turn the oven off. Crack the door open slightly by placing a wooden spoon in the opening and let the cheesecake cool in the oven for 1 hour. Remove the cheesecake from the oven and let cool for an additional hour at room temperature before covering and placing it into the refrigerator to chill overnight.
For the Ganache:
- Once the cheesecake has cooled, place the semisweet chocolate in a small microwave safe bowl. Heat the cream in the microwave until steaming, about 35 seconds. Pour over the chocolate chips and stir until melted and smooth (if the chocolate is not fully melted microwave at half power for 30 second bursts stirring in between each until fully melted. Allow to cool for 5 minutes.
- Spread the ganache into an even layer over the top of the cheesecake and return to the refrigerator to set while you make the whipped cream.
For The Whipped Cream:
- To the bowl of your stand mixer fitted with a whisk attachment or a large bowl with a hand mixer, add the cream, powdered sugar and vanilla. Sift in the cocoa powder, and whisk just to combine.. Mix on medium speed for 1 to 1 ½ minutes until stiff peaks form.
- Transfer to a piping bag fitted with a closed star piping tip (Ateco 846). Pipe a ring or dollops around the edge of the cheesecake. Slice and enjoy, the cheesecake will last up to 5 days in the refrigerator.
Notes
- Don’t beat the filling above medium-low speed. A higher speed will incorporate more air which will make the filling puff up during baking and crack as it cools.
- Some butter may leak out of the pan during baking. This happened on some of my tests and not on others. It didn’t affect the texture or taste of the cheesecake. The rimmed baking sheet underneath will catch any leaks if they do occur.
- Don’t worry if your cheesecake looks wet in the center after baking. The center should look a bit shiny on the surface. It will continue to cook a bit when the oven turns off and it will firm up as it cools.
Nutrition
Have you tried this recipe? Tag me today!
Mention @preppykitchen and tag #preppykitchen!
Storing Chocolate Cheesecake
Refrigerator: Cover and refrigerate for up to 5 days. If you leave the cheesecake in the pan, place a paper towel on top of the pan and cover with plastic wrap or foil—this absorbs condensation and keeps the surface from getting marred by water droplets.
Make-ahead: You can bake the cheesecake 2 days before serving. Let it cool in the pan, cover (paper towel + plastic/foil), and refrigerate. Add the ganache and whipped cream the day you serve it.
Freezer: This cheesecake freezes beautifully without the chocolate whipped cream (whipped cream turns watery and deflates when thawed). After it’s chilled and set, with or without the ganache, wrap in two layers of plastic plus aluminum foil, and pop it into a freezer bag (if you have an extra-large one) for extra protection. You can also wrap and freeze individual slices. It’ll keep for 3 months. Thaw overnight or for about 8 hours in the refrigerator.
Troubleshooting and FAQs
Three usual suspects: over-mixing (too much air in the batter causes it to puff and deflate), opening the oven mid-bake (cold air rushes in and shocks the surface), and rapid cooling (the surface contracts faster than the center). The fixes are baked into this recipe. Keep the mixer at medium-low, leave the oven door closed except for the jiggle test at the end, and let it cool gradually in the oven, then on the counter, then in the fridge.
No. The cream filling is sticky and helps the crust hold together. Toss the whole cookies—cream and all—into the food processor.
A 3-inch deep 9-inch round cake pan will work, but you won’t be able to remove the cheesecake from the pan. Instead, slice it in the pan and remove each slice.
Yes, that’s the whole point of this updated method! The foil cover for the first hour plus a pan of water on the rack below give you the same humidity benefits a water bath provides, without the risk of water seeping into your springform pan.
More Cheesecake Recipes To Try
I have loads of cheesecake recipes on the blog if you want to keep exploring:
- Basque Cheesecake is the trendy crustless cheesecake that’s burnished on top—caramelized, custardy, and surprisingly easy.
- Blueberry Cheesecake is a bright, jammy alternative with a homemade blueberry topping and fresh berries that ribbon through every slice.
- Oreo Cheesecake is the move if you want Oreo flavor throughout, not just in the crust.
- Chocolate Cheesecake Brownies are the bar version with a fudgy brownie base, chocolate cheesecake swirl, and no springform pan required.
- No-Bake Cheesecake is my 9-ingredient blank canvas. Top it with fresh fruit, chocolate sauce, or caramel.
- Mini Cheesecakes are bite-sized, handheld, and perfect for parties.
- Strawberry Cheesecake has a buttery graham cracker crust, creamy filling, and jammy strawberry topping. No water bath required.
- Raspberry Cheesecake is rich and creamy with a sweet-tart raspberry sauce swirled throughout.
If you’ve tried this chocolate cheesecake recipe, then don’t forget to rate it and let me know how you got on in the comments below. I love hearing from you!


