

This post may contain affiliate links. Please read our disclosure policy.





Sweet and tart lemon bars have a tender shortbread crust and a smooth lemon custard filling. I retested this recipe and include my pro tips for avoiding common mistakes so you can bake perfect lemon bars every time!
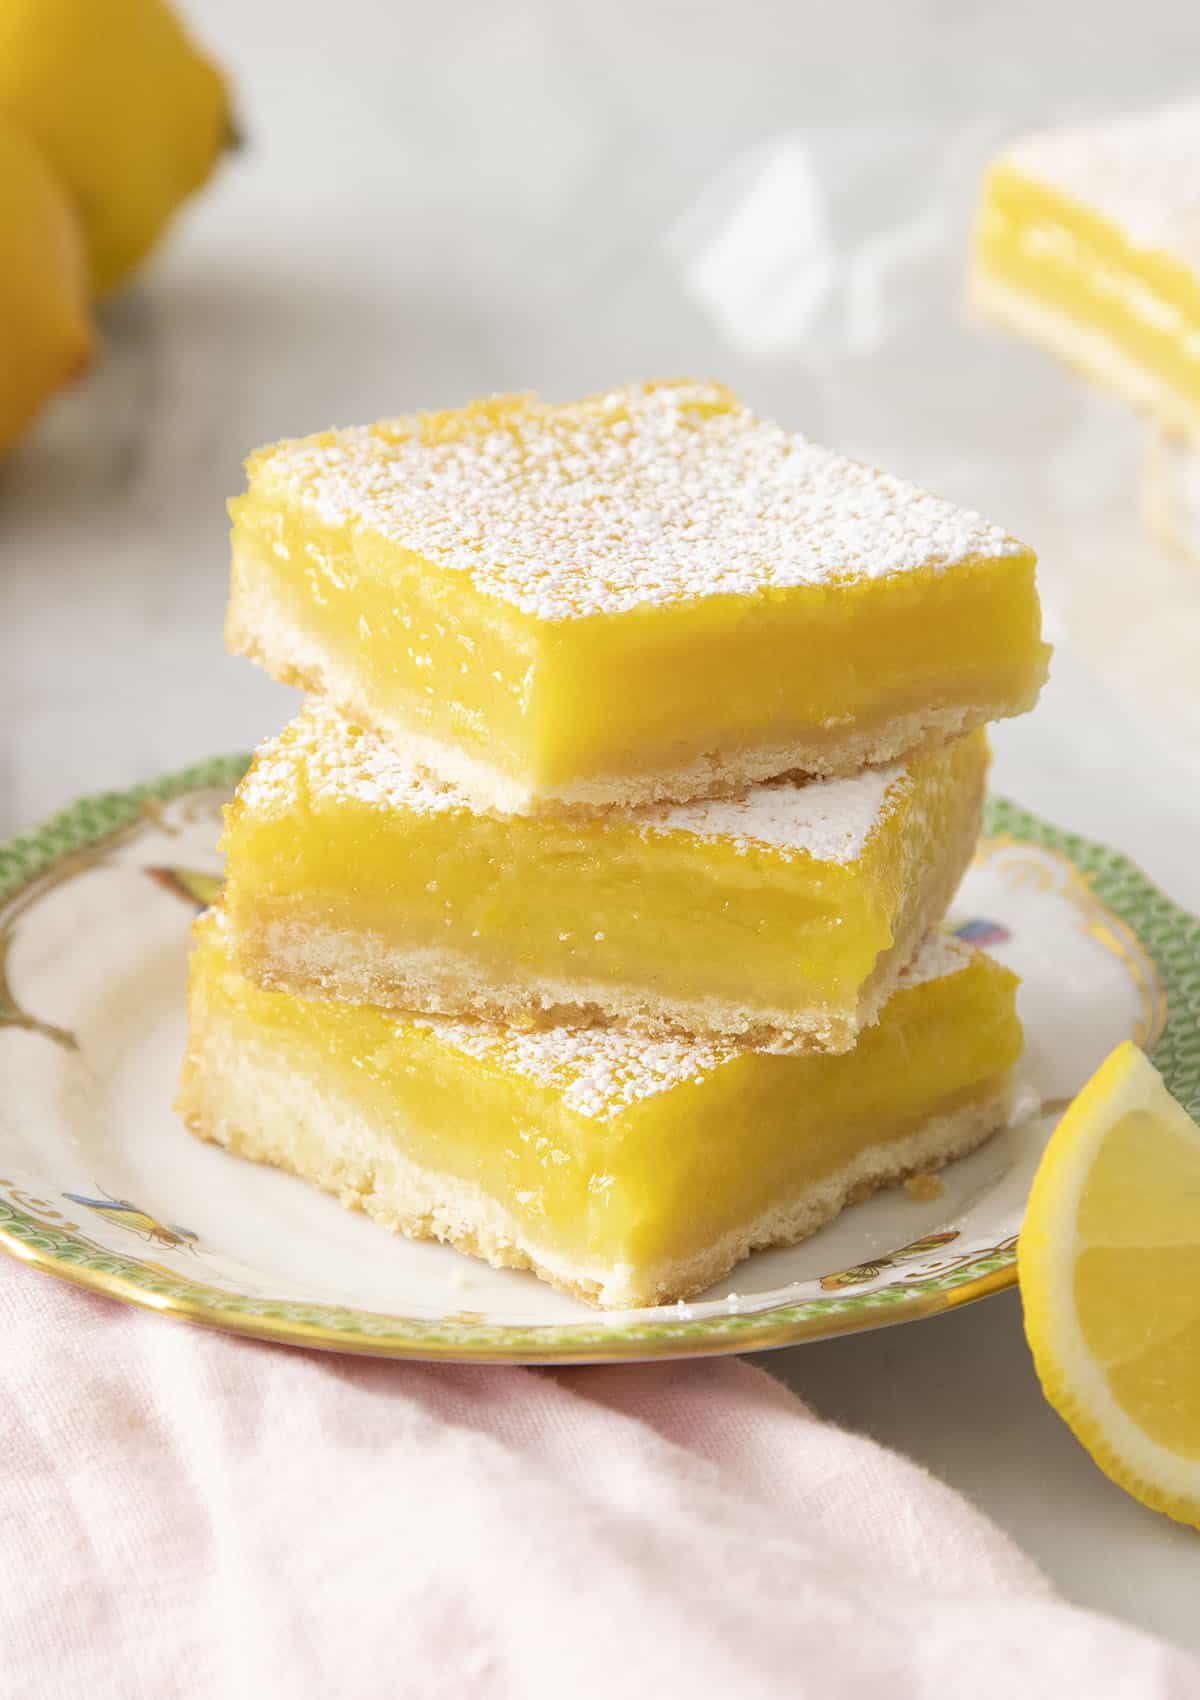
Lemon bars are the dessert I get asked about more than almost anything else on this site. This recipe has been a reader favorite for years, but there was one common issue with lemon bars that I was often asked about: the crust would sometimes float! You’d pull the pan out of the oven and find a pale slab of shortbread sitting on top of the filling instead of underneath it. This isn’t unique to my recipe—lemon bars have a very thin custard poured on top of a shortbread crust, and that can naturally lead to some interesting things happening in the oven.
I retested my recipe specifically to solve that, and it all comes down to how the crust is pressed into the pan. I tweaked the recipe and increased the crust dough so there’s enough to easily press into a gap-free layer, and the filling stopped finding its way underneath. What’s below is that retested version. I’ve also written out the most common things that can go wrong—the floating crust, foam on top of the curd, the knife drags while cutting—and what to do about each so your lemon bars turn out perfectly every time!
“Wow!!!! The most amazing lemon bars I have ever made. I wouldn’t change a thing! Very lemony and the shortbread is very tender. Thank you for sharing!”
Traci
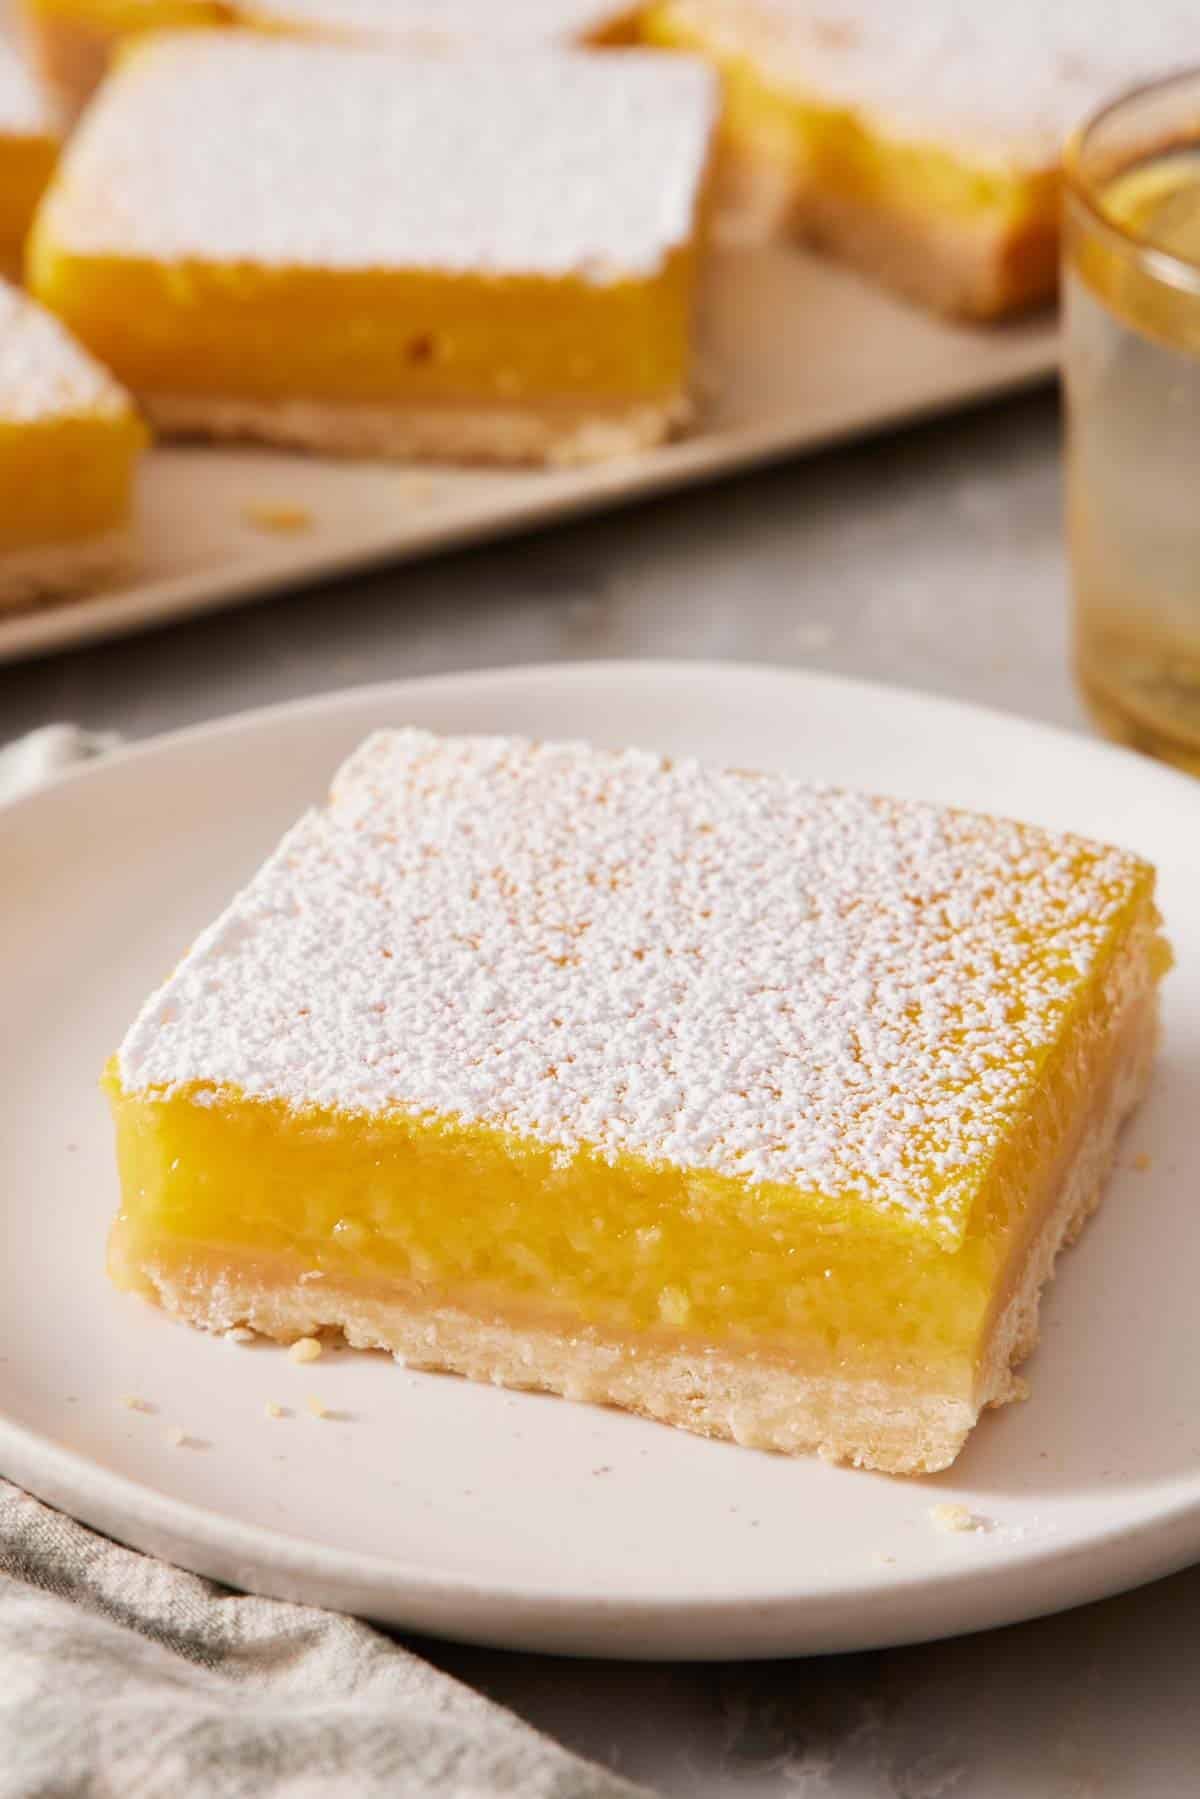
Why This Lemon Bar Recipe Works
Three things separate these from a mediocre lemon bar, and none of them are complicated.
- The zest is blended with the sugar first. Before anything else, the granulated sugar gets pulsed with the zest until it turns a pale, even yellow and smells like the outside of a lemon. Sugar crystals are abrasive, so pulsing them against the peel tears it apart and drives the oils into the sugar instead of leaving them in shreds. Lemon juice carries the acid, but most of what you register as lemon flavor is the zest oil, and this step greatly amplifies that.
- The crust is deliberately thicker. My updated recipe has a thicker base than most recipes call for, and that’s the point. It gives you enough dough to press right into the corners and up against the pan walls with no thin patches. It’s also heavier and less likely to end up on top from sheer mass. The result is a delicious, buttery shortbread cookie-like base with lemon curd on top.
- The filling goes on hot. Pour the filling onto the crust the moment it leaves the oven. The residual heat starts setting the underside of the custard immediately, so the filling bakes evenly top to bottom instead of the base lagging behind. I tested this with a cold crust and a hot crust, and the hot crust version was evenly textured throughout the filling. The cold crust version was still good, but it had a thin line of looser custard against the crust, which made the bars seem a bit wet and turned the crust soggy after a day.
Key Ingredients
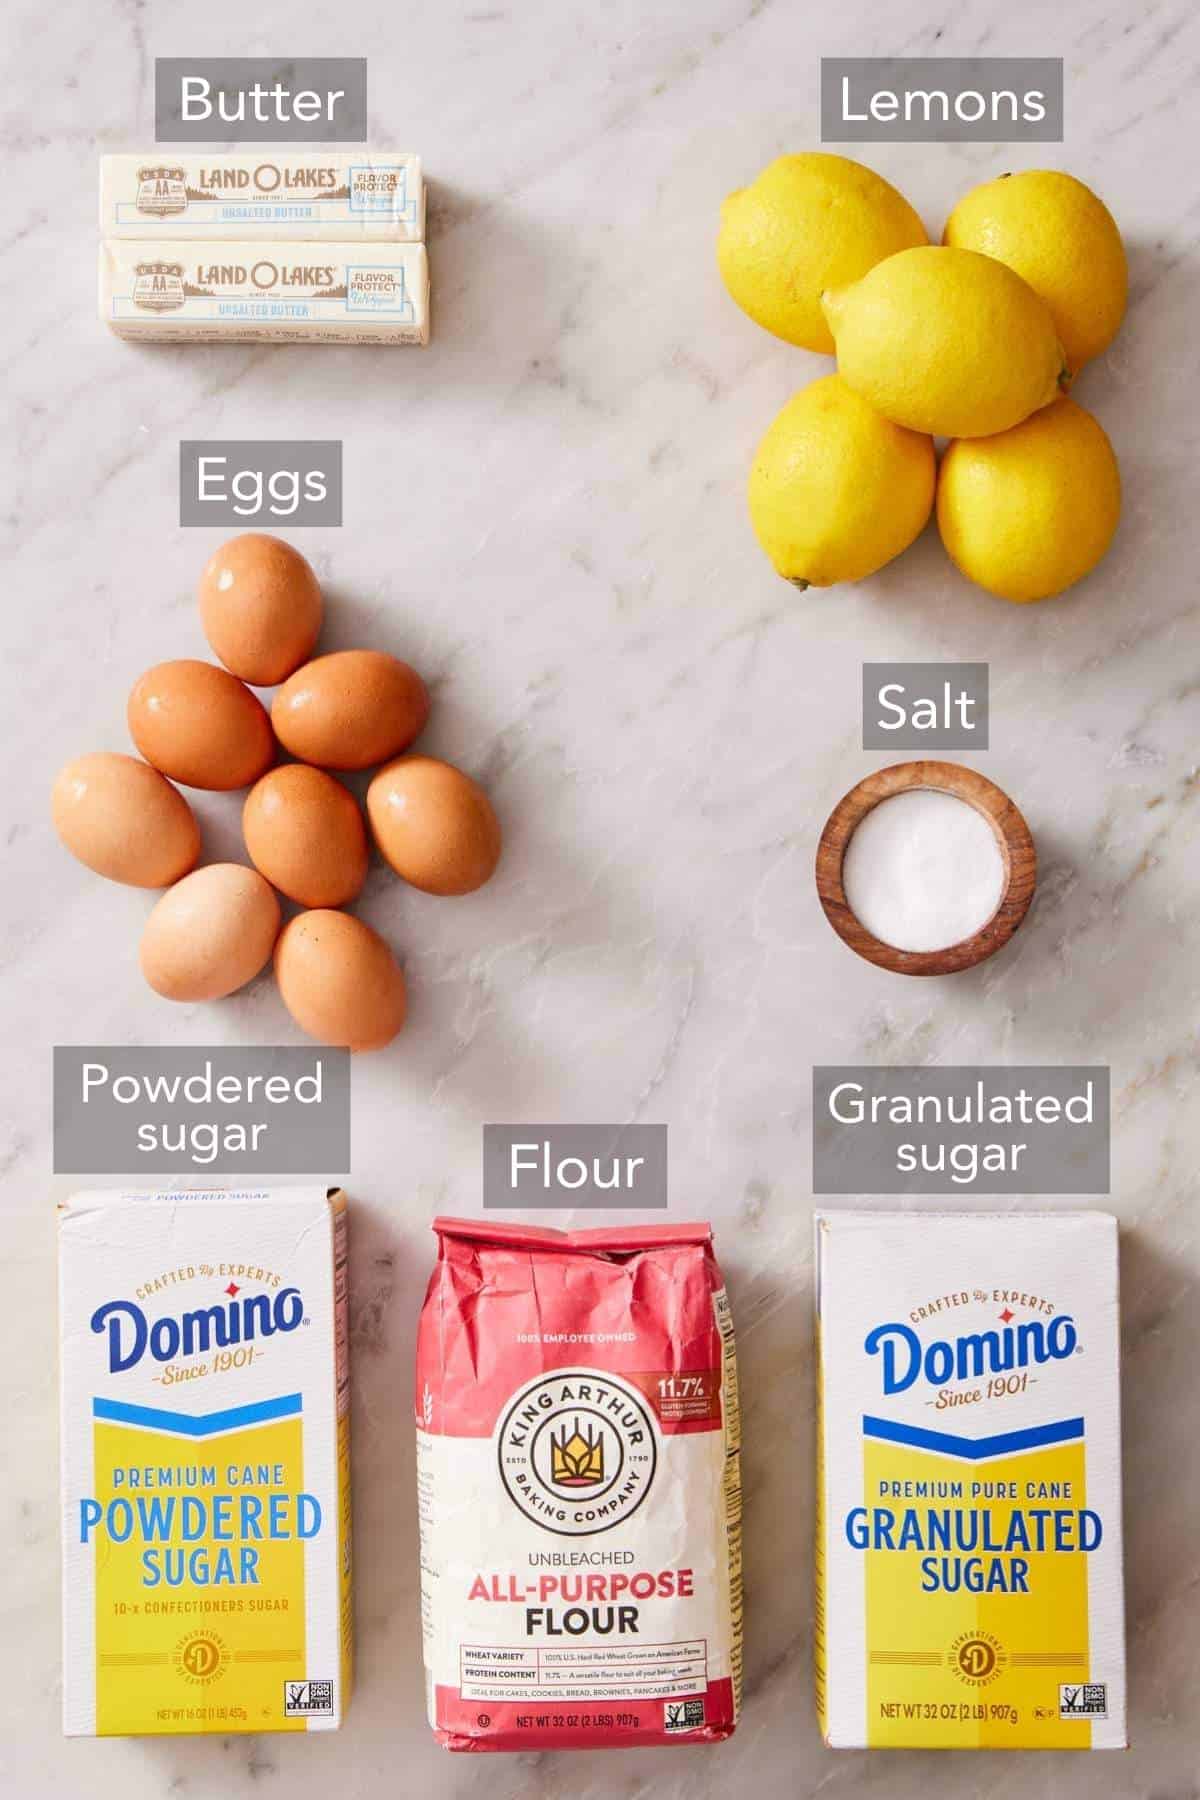
These are the main ingredients you need to make lemon bars. You can find the full list of ingredients and measurements in the recipe card below.
Fresh lemons — you’ll need roughly 4-5 for the zest and another 4-5 for the juice. I recommend buying a couple of extra because some lemons can be drier inside, and you may need an extra to get the right amount of juice. Fresh is also a must—bottled juice has lost the volatile oils that make lemon taste like lemon, and it leaves out zest entirely, which is essential to the best flavor.
Unsalted butter, melted — I specify unsalted because salt levels vary by brand, and I’d rather control it. If salted butter is what you have, leave out the ½ teaspoon of added salt. I test with Land O’Lakes. (See Academy: Salted Vs. Unsalted Butter for more details on the differences and how to swap them.)
Large eggs — this filling is a baked custard, and the eggs are the main structure. Without them, you have lemon syrup. Bring the eggs to room temperature (about 30 minutes on the count is fine) before whisking the filling together. Cold eggs don’t combine as easily. If you’re short on time, soak them in a bowl of hot tap water for 10 minutes.
Granulated sugar — this sweetens the filling, but it also works with the eggs to set the filling. The sugar molecules actually bind with the egg proteins to make the right custard texture, so don’t reduce it.
All-purpose flour — you will use this for both the crust and the filling. In the filling, flour serves as a thickener to give the custard enough body to slice. I use King Arthur. Weigh it if you can! A heavy-handed scoop can make the crust too dry or the custard too thick. (See Academy: How To Measure Ingredients Correctly to learn the fluff and level method if you don’t have a scale.)
Salt — my recipes use Morton fine sea salt. Regular table salt substitutes 1:1. (See Academy: Salt 101 if you have a different type and how to convert it for the right balance of flavor.)
How To Make Lemon Bars
Below, I’ve highlighted portions of the recipe in step-by-step process images along with instructions for making homemade lemon bars. You can find the full set of instructions in the recipe card below.
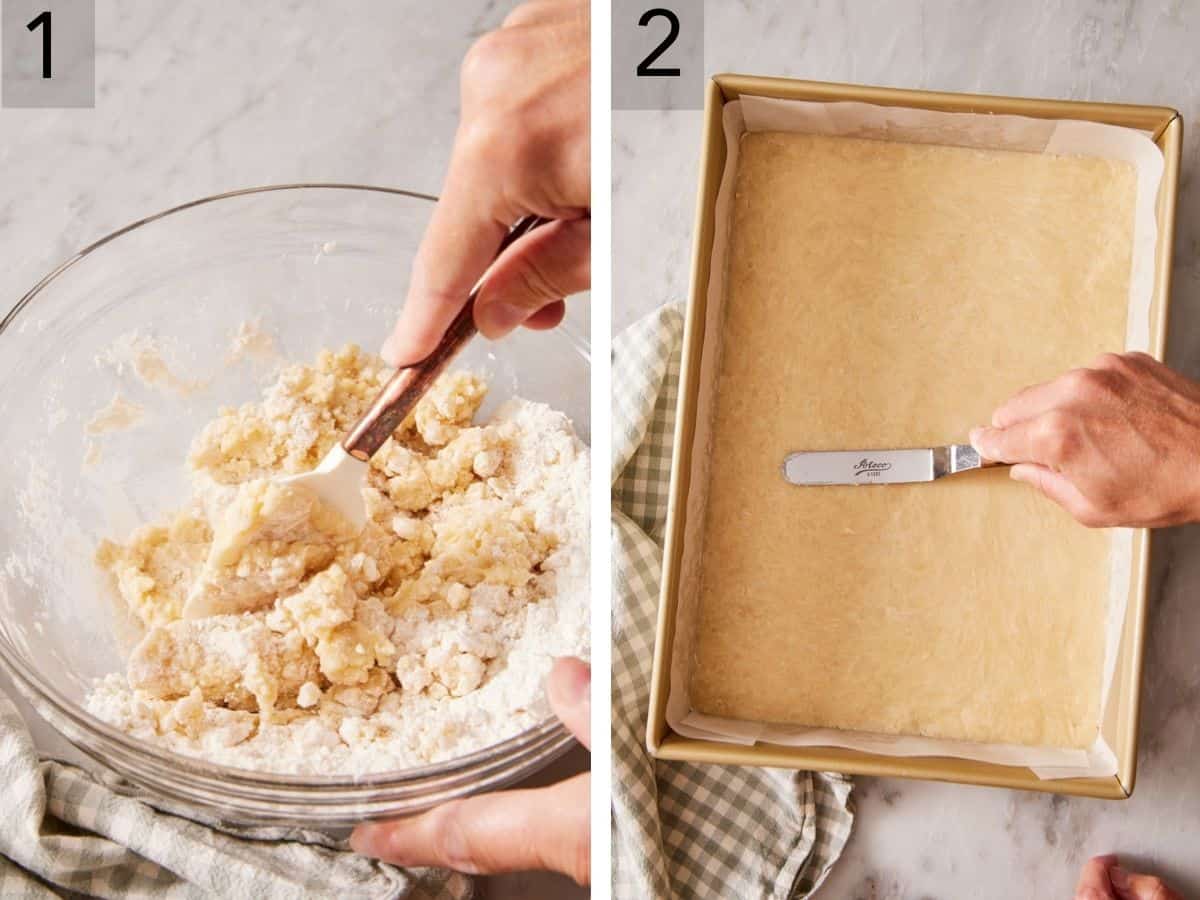
1. Make the crust. Whisk the flour with the powdered sugar and salt in a large bowl, pour in the melted butter, and mix with a spatula until it comes together as a thick, sandy dough. (You could do this in a stand mixer with a paddle attachment, too.) I add a teaspoon of vanilla to the butter when I’m looking to jazz these up a bit!
2. Press the dough into the pan in a flat, even layer, working it into the corners and up against the sides. Look for cracks and press them closed. I like to run an offset spatula over the crust to give it a final, smooth top. This will help close up any small gaps, too. Bake for about 22 minutes, or until the surface is light gold and the edges start to brown. I often give it an extra five minutes when I want a crisper base.
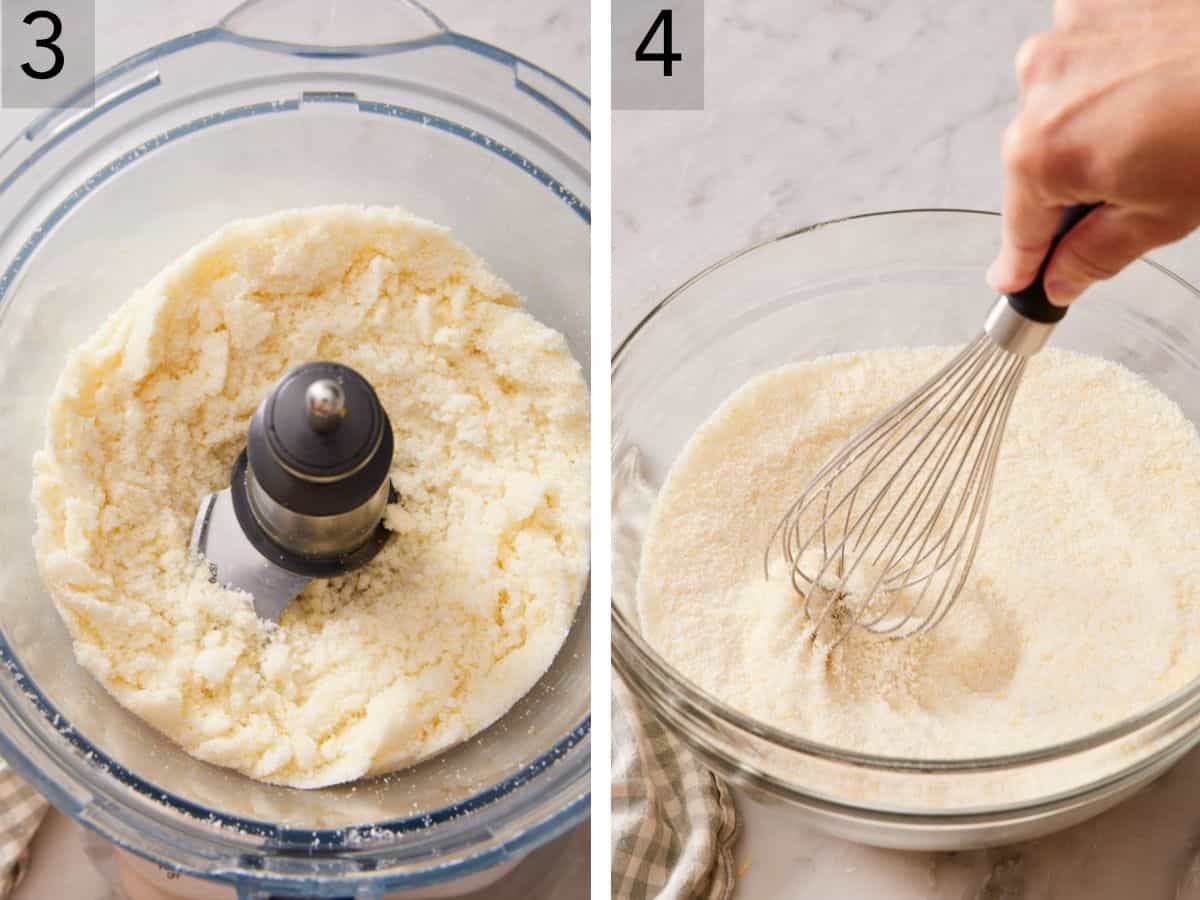
3. Make the lemon sugar while the crust bakes: pulse the sugar and zest in a food processor until uniformly pale yellow. (No processor? Massage the minced zest into the sugar with your fingertips until it’s moistened and aromatic.) Transfer the sugar to a large mixing bowl.
4. Whisk the lemon sugar with the remaining flour until no pockets of flour remain. Use your fingers to break up any lumps, if needed.
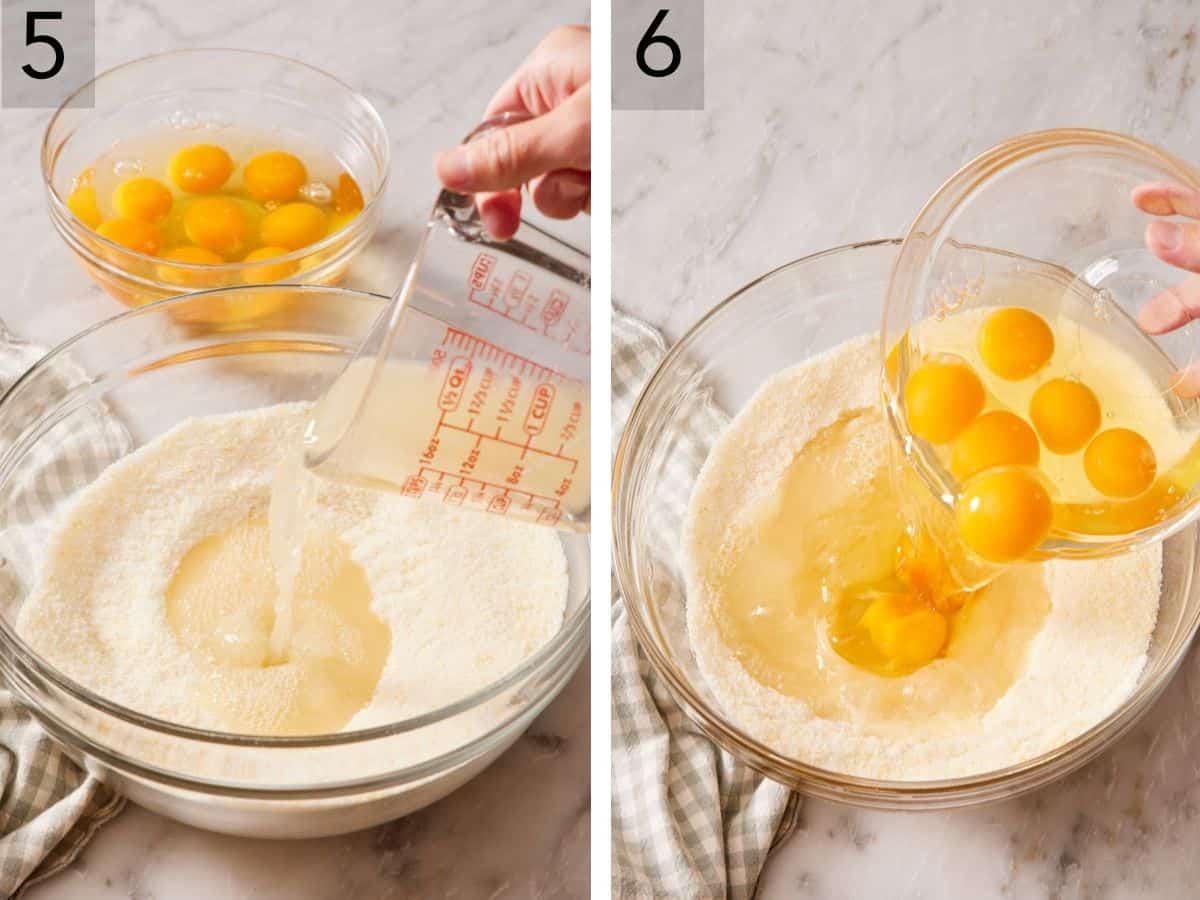
5. Add the lemon juice to the sugar mixture. I strain the juice to remove the seeds, but I don’t worry about some pieces of pulp being in the juice.
6. Add the eggs to the sugar mixture and lemon juice. Make sure they are at room temperature so they incorporate easily with the other ingredients.
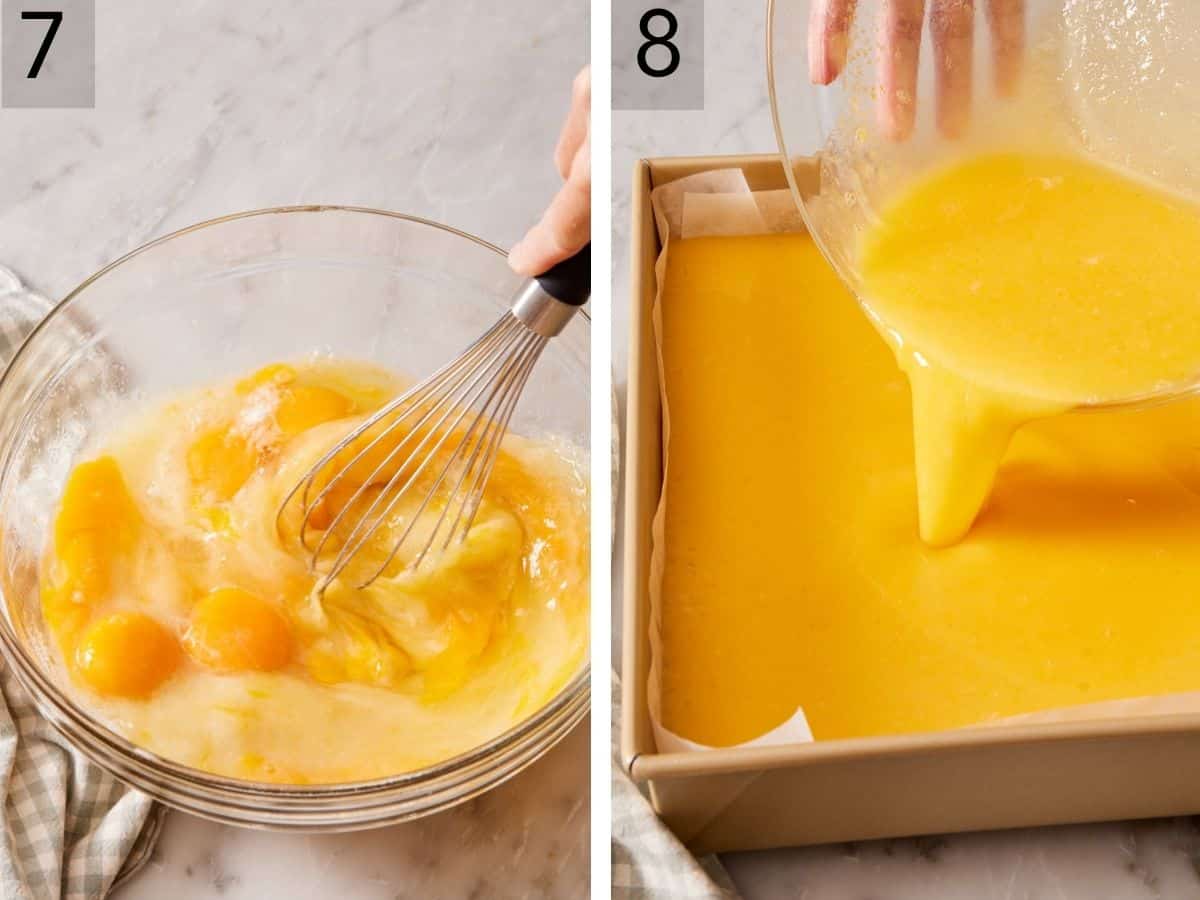
7. Whisk well. You want to make sure all of the flour is well moistened, and no lumps are hiding in the filling. If your crust is still baking, just set the filling aside. This will actually give time for any foam that formed during whisking to dissipate.
8. Pour the filling over the hot crust and bake for about 25 minutes, rotating the pan halfway through baking. (This helps it cook evenly since ovens typically have hot spots.) It’s done when the edges are set, and the center barely jiggles when you nudge the pan. Cool one hour at room temperature, then chill two. Don’t shortcut this step! A warm bar doesn’t slice cleanly. The cold temperature helps the custard finish setting to form its final texture.
The Most Common Mistakes
A foamy white layer on top. Whisking the eggs naturally beats air into the filling, and some of it rises and sets as a pale, bubbled surface. It’s purely cosmetic, and powdered sugar hides it completely. I have tested straining the filling to reduce the foam, and it works. I didn’t want to add the extra step to the recipe since it doesn’t affect the overall outcome of the lemon bars. But if you’d like to, you can strain the lemon filling after whisking it, before pouring it into the pan. It will remove some of the lemon zest pieces, so keep that in mind.
A center that’s still loose. Give it a few more minutes in the oven. The bars keep setting as they cool, so a center that jiggles slightly is fine, but if it’s sloshing around, it needs more oven time. Judge by the nudge, not the clock. But don’t be tempted to go too far the other way. The surface can brown or crack, so pull it before that happens.
The Crust Floats To The Top
This is a less common issue, but it happens, and it has a much more drastic effect on the finished bars when it does. If you don’t properly press in the crust mixture, the shortbread ends up sitting on top of the filling like a pale lid. But it isn’t magically rising to the top in the oven. What’s actually happening is the filling is running underneath it through a thin patch, a crack, or the seam where the crust doesn’t quite meet the pan wall, and lifting the slab as it bakes.
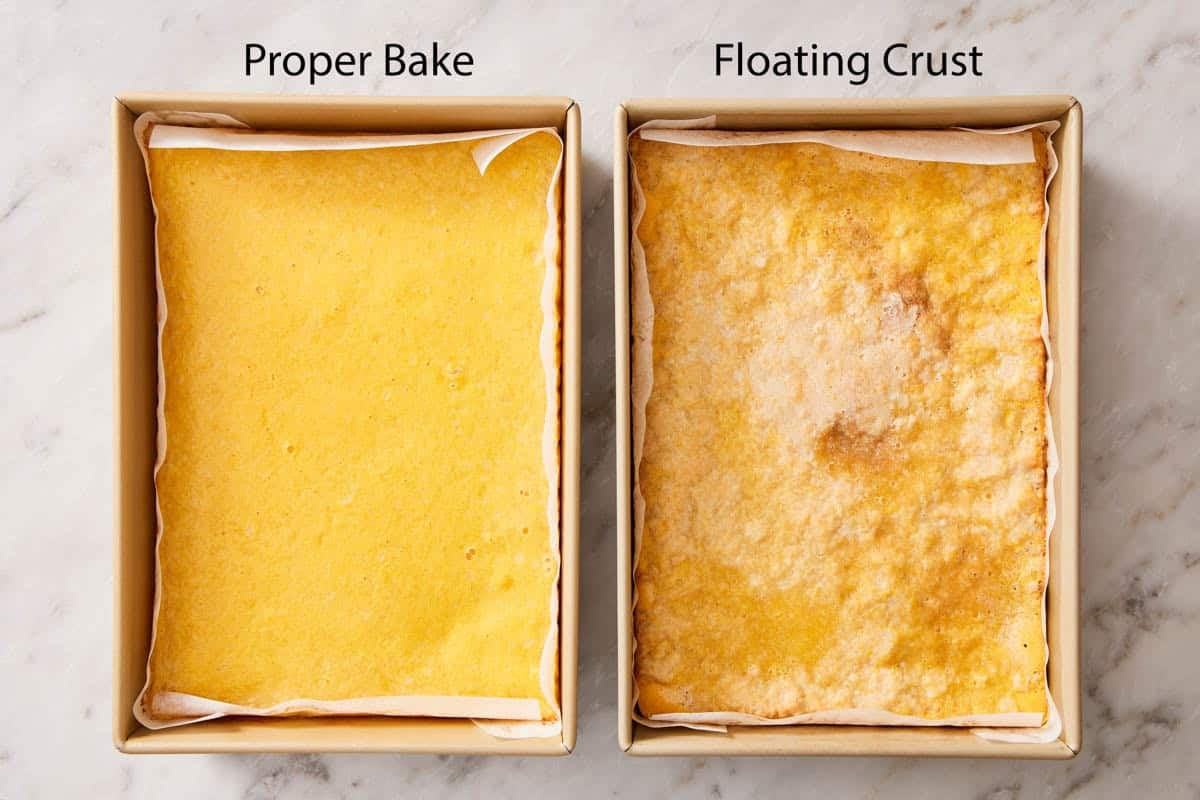
I tested two batches of lemon bars to show exactly why this occurs. One crust was firmly pressed into the pan in an even layer without cracks (like the recipe directs). The other crust was loosely packed, leaving thin spots, holes, and some gaps around the edges. I baked both crusts, and you can see very noticeable spots in the loosely pressed crust where the bake is uneven and has a lot of holes throughout.
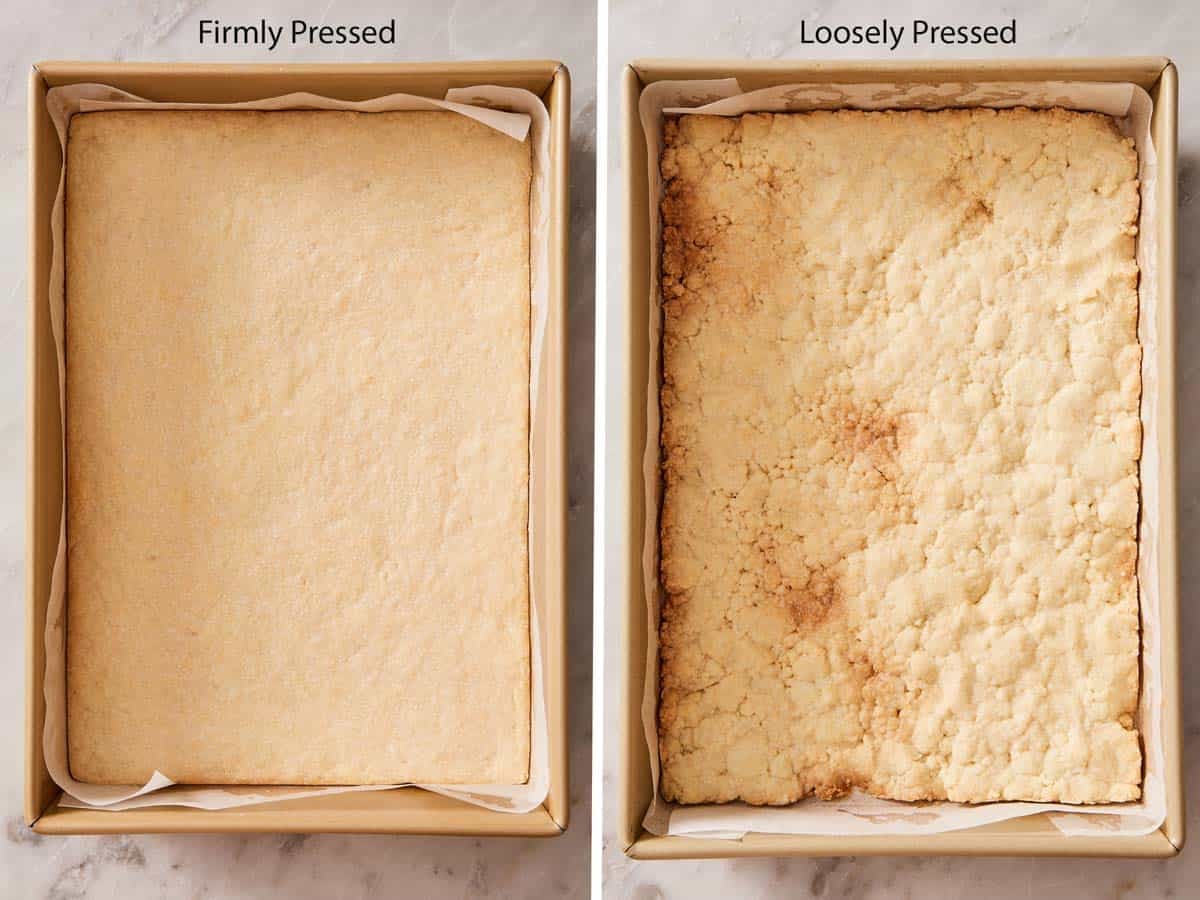
I topped both with the lemon filling and baked them again. When the loosely packed crust test came out of the oven, it looked so bizarre! The surface of the filling looked very bumpy and browned in spots. The firmly packed crust had an even, smooth, custardy top.
When I sliced into each test, I could clearly see what happened. The loosely packed crust moved to the top with the filling underneath. Some parts of the crust had also broken apart and were mixed into the lemon filling. The firmly packed crust baked up perfectly, slicing cleanly with the shortbread crust on the bottom and a smooth, perfectly set lemon filling on top.
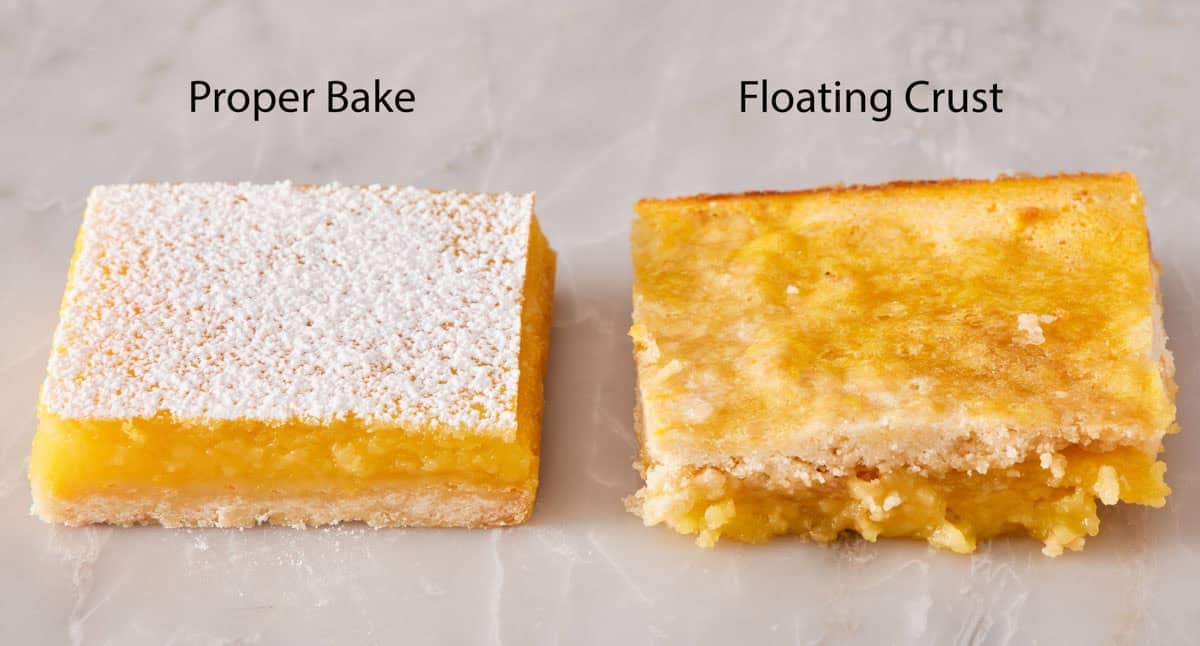
This is why I changed the crust quantity. The old recipe worked 99% of the time, but with a smaller amount of the crust mixture, it was easier to get cracks or gaps, leading to the floating crust. To avoid this: Press firmly, work the dough into the corners, run your thumb along the perimeter so there’s no channel, and pinch any crack closed before it goes in the oven.
Pro Tips For The Best Lemon Bars
If you don’t have a food processor, you can rub the zest and sugar together by hand. Combine them both in a large mixing bowl, then rub the mixture with your hands for a few minutes. The sugar should feel damp throughout the bowl and be very fragrant. This will leave the zest in slightly larger pieces, but they soften in the oven, so you should notice them!
Always zest before you juice! Zesting a squeezed half is miserable and quite difficult. Roll them firmly on the counter first to get more juice out, then use a microplane or the small holes of a box grater to finely grate the yellow part of the peel.
Fully line your pan for easy removal. Grease the pan lightly first so the paper grips, and cut a sheet of parchment large enough so it goes up and lies flat against all sides of the pan, not just covering the bottom. See my Academy lesson: How to Line a Cake Pan with Parchment Paper for specific instructions on fully lining a rectangular baking pan.
Making A Smaller Batch
If you want to make small batch lemon bars, halve the recipe! This works in an 8×8-inch pan. The surface area of a 9×13-inch pan is 117 square inches (half of that is 58½-sq.in). An 8×8-inch pan is 64 sq. in. Halving the recipe means it will fit comfortably in an 8×8 pan at a slightly thicker depth. Halve every ingredient amount and keep the oven at 350°F. The bake time may increase by 2-3 minutes for the crust and the filling since they will be slightly thicker.
Lemon Bars Recipe

Equipment
- 9×13-inch pan
- Food Processor
Ingredients
- 3½ cups all-purpose flour divided (420g)
- ¾ cup powdered sugar (90g), plus more for dusting
- ½ teaspoon salt
- ¾ cup + 2 tablespoons unsalted butter melted (200g)
- 3 tablespoons lemon zest (4-5 lemons)
- 3 cups granulated sugar (600g)
- 8 large eggs room temperature
- 1 cup fresh lemon juice (240ml) (4-5 lemons)
Instructions
- Heat the oven to 350°F. Lightly grease and then fully line a 9×13-inch baking dish with parchment paper.
- Whisk together 3 cups (360g) of flour with the powdered sugar and salt, then pour in the melted butter and mix with a silicone spatula until well combined. (You can also do this using a stand mixer with a paddle attachment. If you’d like a dash of vanilla can be added in with the butter at this step.)
- Sprinkle the dough into your lined pan and press firmly into a flat layer, ensuring there are no cracks. Bake at 350°F for 20 to 25 minutes or until a light golden color.
- While the crust is baking, add the sugar to the bowl of a food processor and add the lemon zest. Pulse until the zest is fully incorporated and sugar is a light yellow color. If you don’t have a processor just mince the zest and mix with the sugar in a bag or bowl.
- Add the sugar and the remaining half cup of flour to a large bowl and mix well. (You can sift together however and zesty sugar bits will need to get dumped out of the sifter as they might clog things up and not go through.)
- Pour in the lemon juice and add the eggs, then mix very well until completely combined.
- Pour the filling onto the warm crust then transfer to oven and bake for about 25 minutes, turning halfway through the bake. Remove from oven and allow to cool for an hour before chilling in the refrigerator for two hours.
- Remove the bars from the pan. Dust with powdered sugar and cut into bars using a clean, sharp, damp knife. Clean and re-wet the knife after each cut.
Notes
- Has your crust ever floated to the top? This is a surprising but not uncommon thing to happen to lemon bars, generally! This can occur when there are small gaps in the bottom crust– which can form from not pressing it in fully or evenly– and some of the filling seeps under the crust during baking, pushing the crust up to the top. I retested and tweaked my recipe to be as fool proof as possible so that doesn’t happen to you! I increased the amount of crust dough to ensure there is plenty for even coverage so you don’t have any potential gaps and the filling won’t leak through.
- Be sure to press the crust firmly into the bottom of the pan and all the way up to the edges of the pan, without any cracks. If you see any cracks, press the crust to fill them in. Those small cracks or large gaps between the crust and the sides of the pan can give room for the filling to go under the crust and cause the crust to float to the top.
- Pour the filling on the crust while it is still hot from the oven. The residual heat from the crust helps to jump start the cooking, ensuring the filling bakes evenly.
Nutrition
Have you tried this recipe? Tag me today!
Mention @preppykitchen and tag #preppykitchen!
How To Store
Refrigerated. This is a baked egg custard, so treat it as perishable. Put a plate out for a party and return the rest to the fridge. Covered and cold, they keep well for several days.
Frozen. You can freeze the whole slab in the pan, tightly wrapped. Or cut the bars first, freeze spread apart in a single layer until firm, then wrap individually and bag them for up to three months. Thaw in the refrigerator and dust just before serving.
Dust before serving. Powdered sugar sifted onto bars that then go into the fridge draws moisture out of the filling and turns tacky or can completely disappear. Dust them after chilling or again if serving leftovers.
Frequently Asked Questions
I do not recommend reducing the sugar. The sugar isn’t only for sweetness. It works with the eggs to set the filling, so cutting it changes texture rather than just taste. If you take it down, the filling will be firmer and more eggy. If you want less sweetness without touching the structure, add more zest or an extra pinch of salt.
Yes. It’s an egg custard filling, so it follows the FDA’s two-hour room-temperature limit—don’t leave perishable food at room temperature longer than two hours, or one hour above 90°F (FDA, “Are You Storing Food Safely?”). They’re good cold or at room temperature, so serve them however you like — just don’t leave the pan out all afternoon.
Yes. Meyer lemons are sweeter and more floral than the standard Eureka variety and substitute directly for both juice and zest, giving you a mellower bar. Lime, key lime, grapefruit, and orange all work as well. With a sweeter citrus like orange, keep ¼ cup (60ml) of lemon juice in the total so there’s still some tartness.
No. Use a microplane or the small holes on a box grater to very finely cut the zest off the lemon. Massage it into the granulated sugar with your hands until the sugar is moistened and fragrant. The zest won’t be as finely chopped, but the flavor will be the same.
Yes, and they’re easier to cut that way. Bake, cool, chill overnight, then cut and dust just before serving.
More Recipes To Try
Try one of these other lemon dessert recipes next:
- Lemon Curd — the stovetop version of this filling, for tarts, scones and layer cakes.
- Lemon Tart — the same shortbread-and-curd pairing built on a French pâte sucrée base.
- Lemon Blueberry Cake — lemon layers with blueberries folded through and cream cheese frosting.
- Lemon Crinkle Cookies — soft, crackled cookies rolled in powdered sugar for the same tart-sweet contrast.
- Lemon Cake — my go-to lemon layer cake when bars aren’t enough of an occasion.
If you’ve tried this lemon bars recipe, then don’t forget to rate it and let me know how you got on in the comments below. I love hearing from you!






