
This post may contain affiliate links. Please read our disclosure policy.


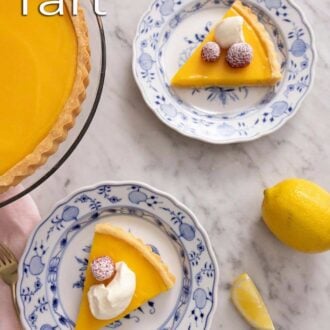

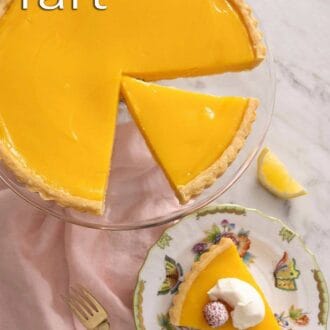


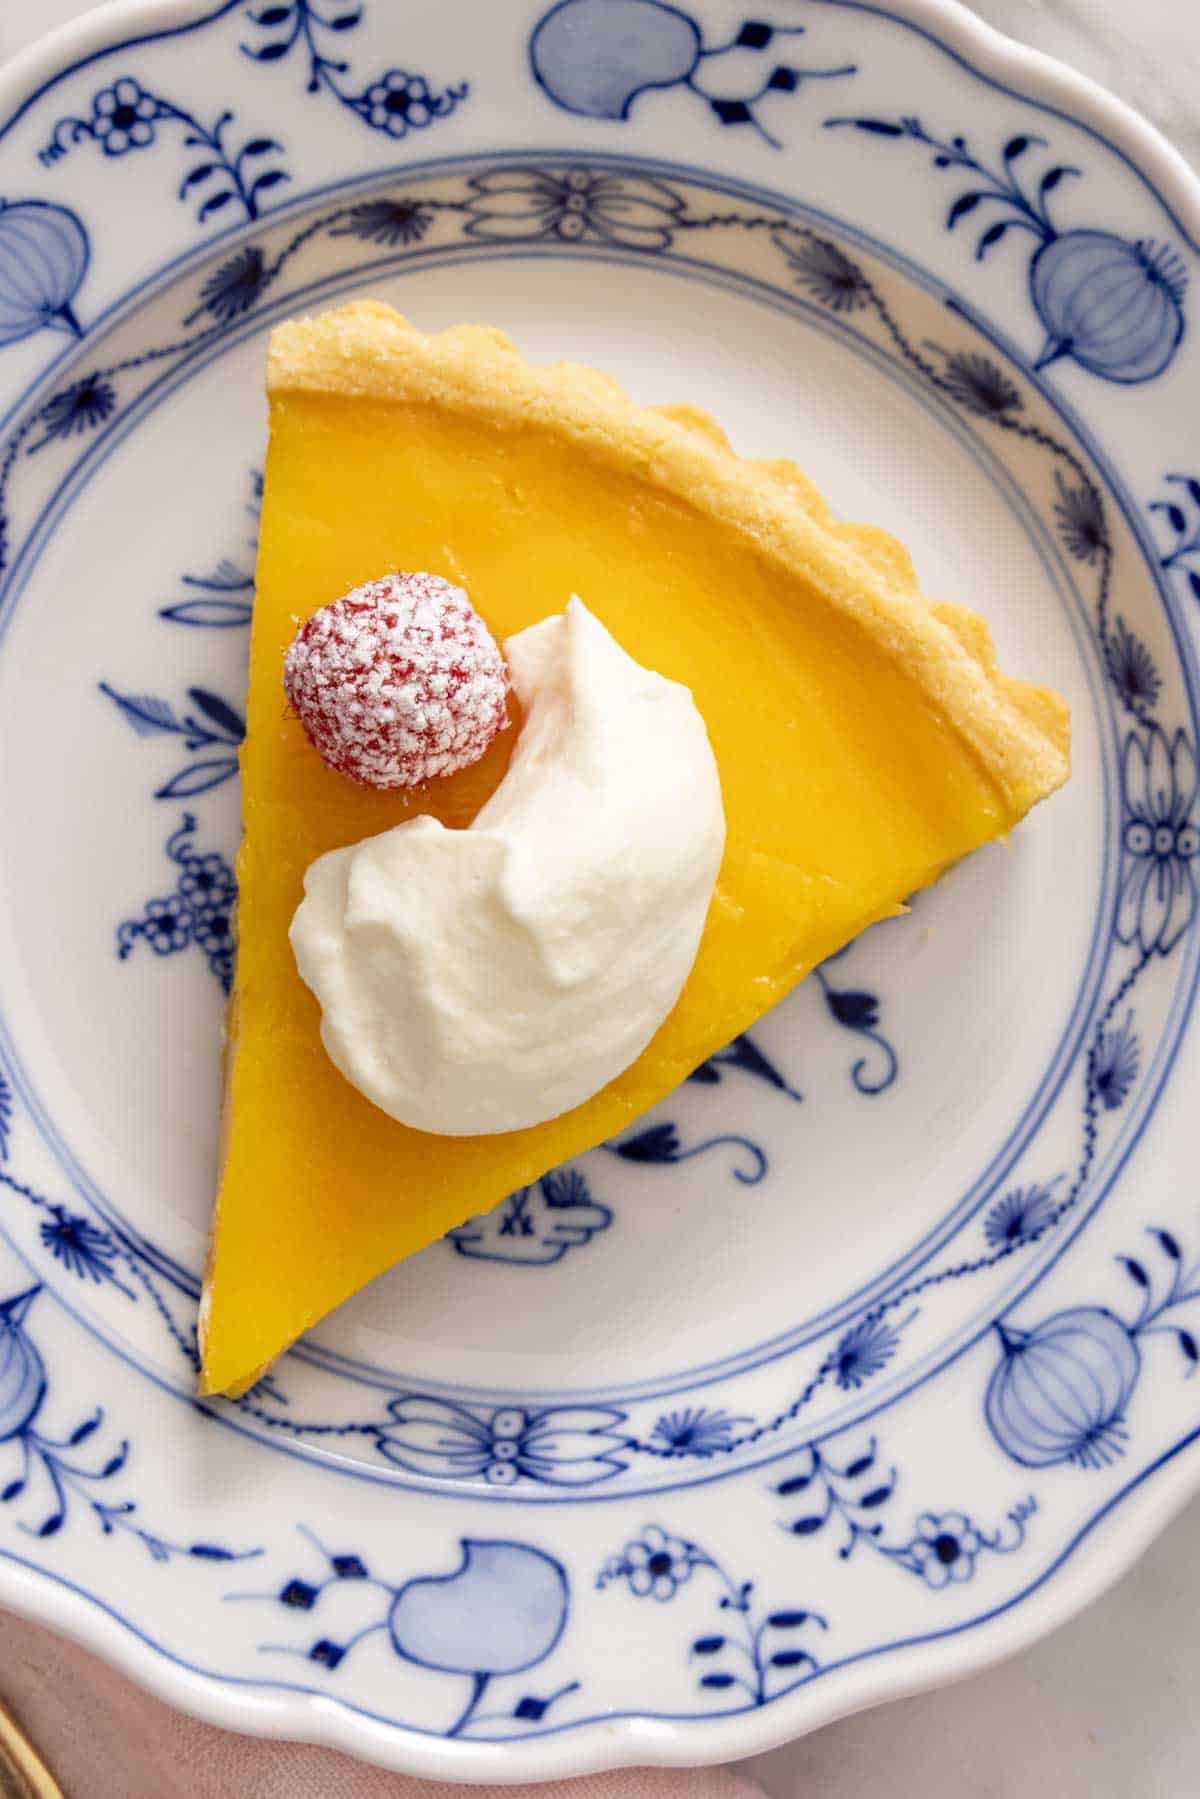
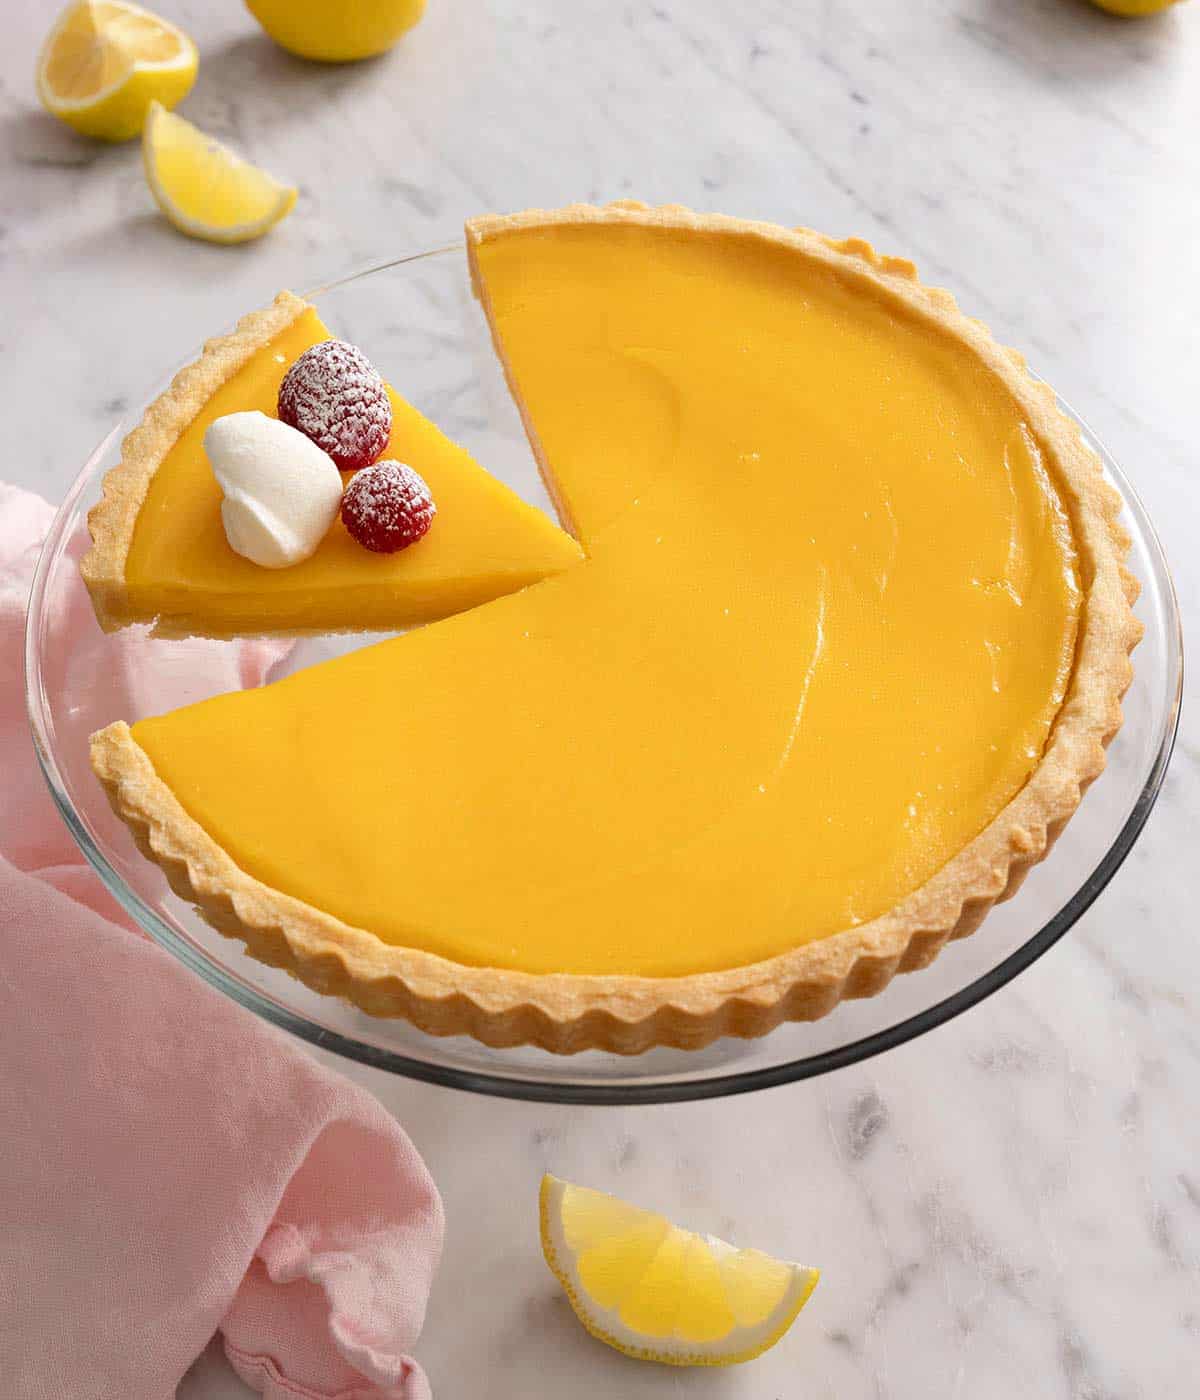
This Lemon Tart has a buttery shortbread crust filled with bright, silky lemon curd. Based on the classic French tarte au citron, the recipe is easy enough for the home kitchen while still being restaurant-worthy in look and flavor—surprisingly straightforward to make.
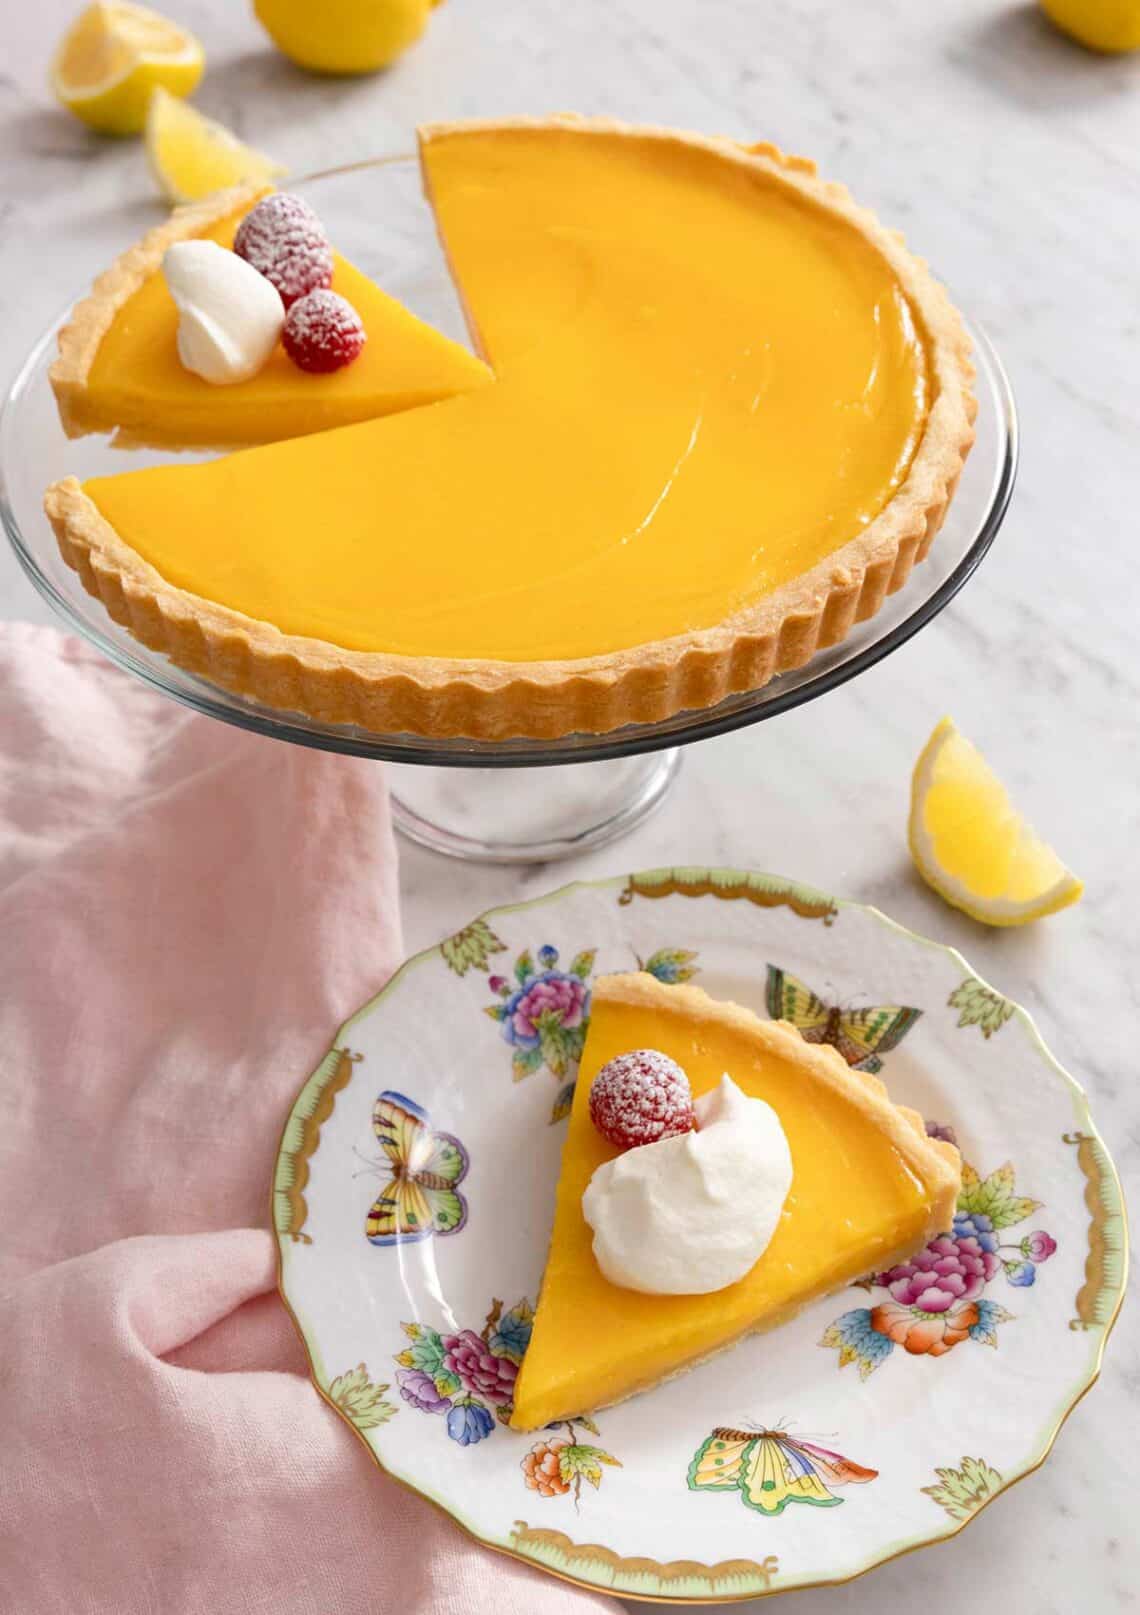
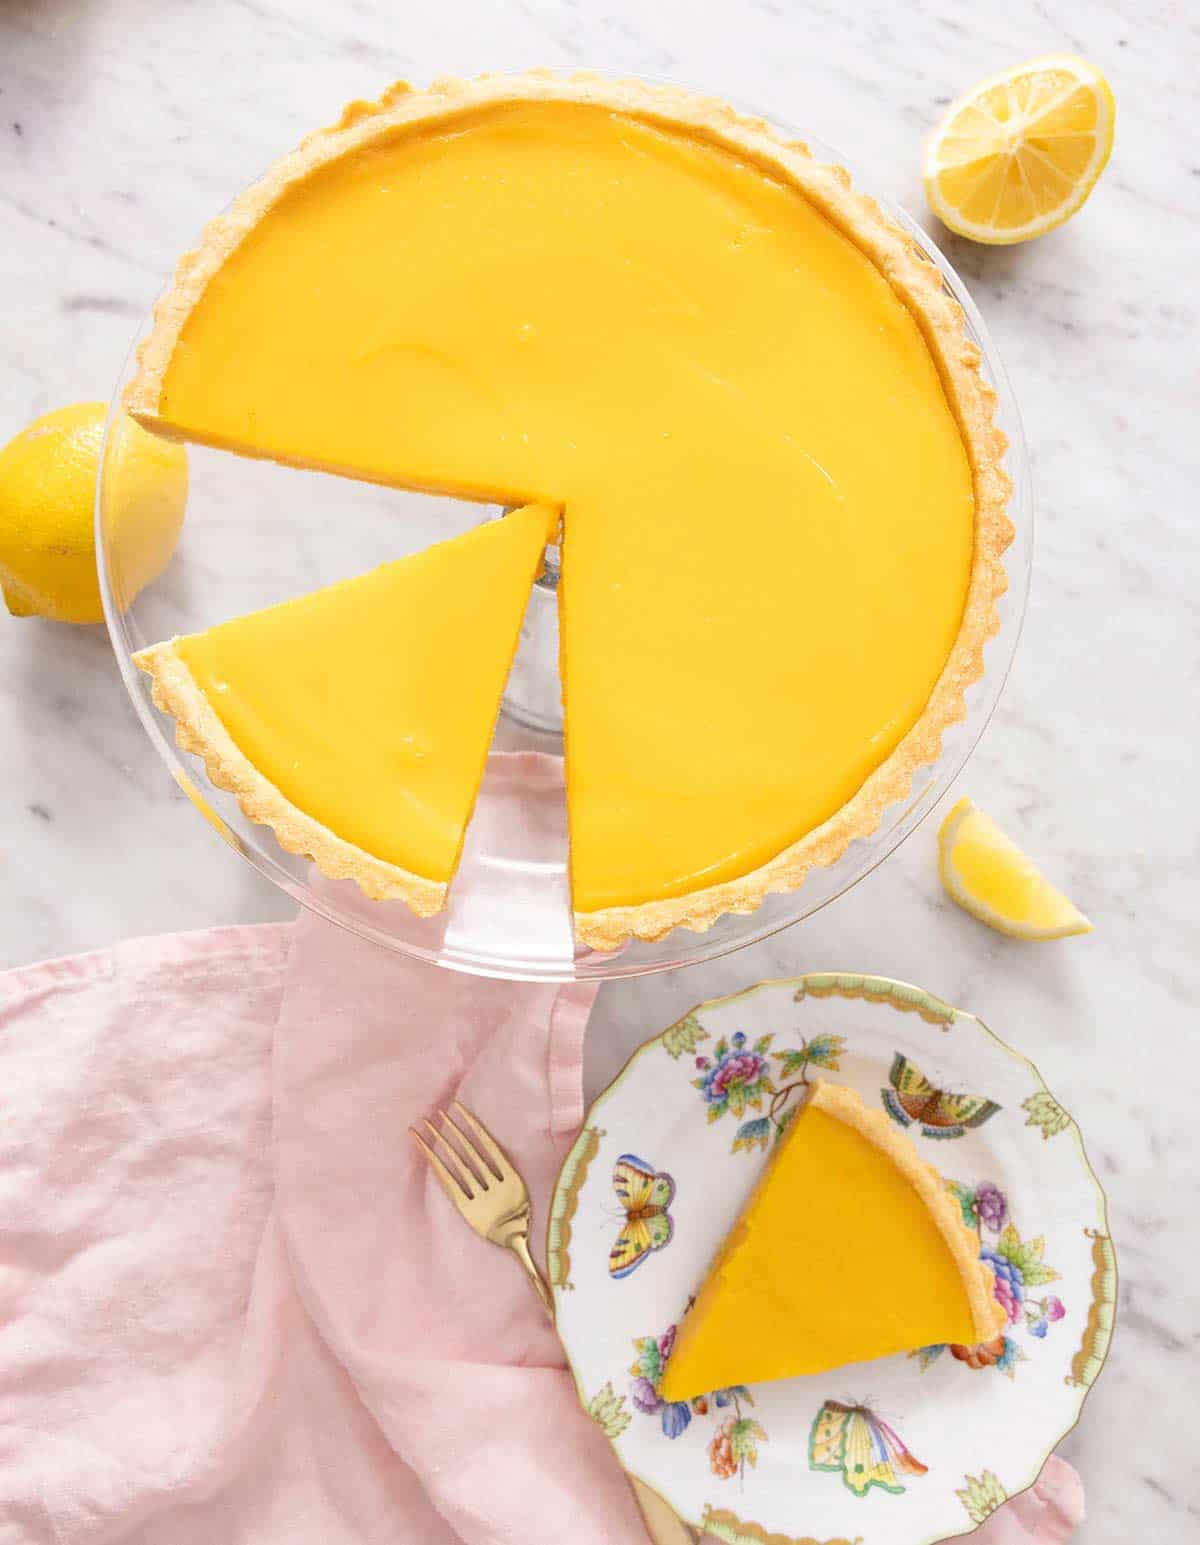
There’s a reason the lemon tart has been on French pâtisserie counters for centuries. A perfectly baked lemon curd tart is one of the most elegant things you can put on a table—a glossy, vibrant yellow curd set inside a crisp, buttery shortbread crust, bright enough to wake up your palate after a heavy meal.
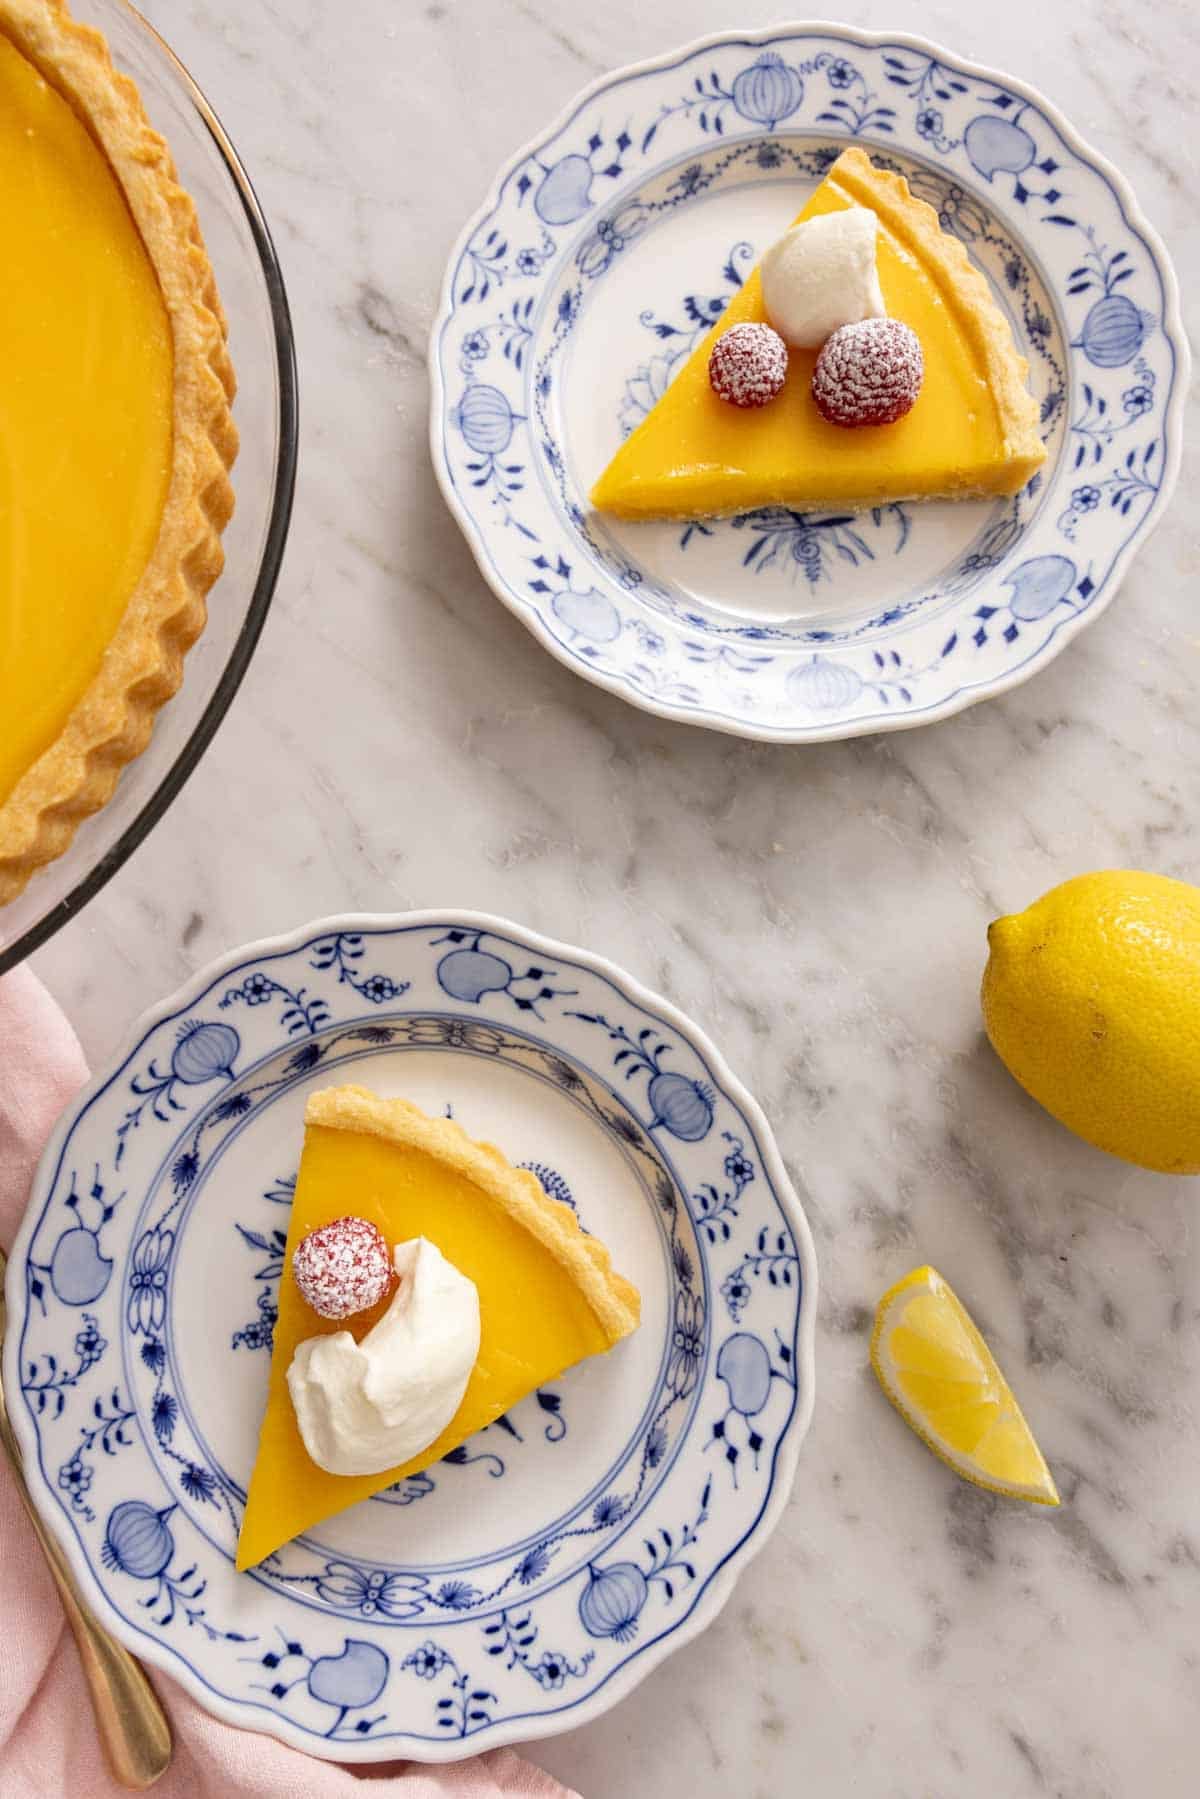
The recipe below is based on the classic French tarte au citron. My version uses a stovetop-cooked curd with a brief oven finish, giving you clean slices with less baking time and the security to know your tart filling will set. This tart is perfect served as-is or with a simple dollop of whipped cream and fresh berries (no need for meringue here!).
“I absolutely loved this lemon tart recipe. The instructions were clear and easy to follow, and the end result exceeded my expectations. The filling was smooth, bright, and perfectly tangy, and the crust turned out beautifully. I’ll definitely be making this again!”
Jordyn
Why this lemon tart works
Three things separate a great lemon tart from a mediocre one, and none of them are complicated:
- A pâte sucrée (sweet, shortbread-like) crust, not pie dough. The classic French tart crust is firmer and crisper than American pie dough—sweetened, enriched with an egg yolk and cream, and worked just enough to come together. It holds the curd cleanly without going soggy, and the texture is shortbread cookie-like rather than flaky. The egg yolk + heavy cream binder is what gives it that distinct snap.
- A stovetop-cooked curd, finished briefly in the oven. Cooking the curd on the stovetop first gives you control over thickness—you can see exactly when it sets. A final 10 minutes in the oven just sets the edge and top surface so the lemon filling holds a clean slice. The result is silky, not gelled or rubbery. This hybrid method isn’t the oldest French technique, but it’s the one most modern pâtissiers use and the one that’s most forgiving for a home kitchen.
- Fresh lemon juice and zest. The juice carries the acidity; the zest carries the perfume and flavorful natural oils. Most of what you taste as “lemon” in a great tart is actually the zest. If you skip it, the tart tastes flat no matter how much juice you use.
Key Ingredients
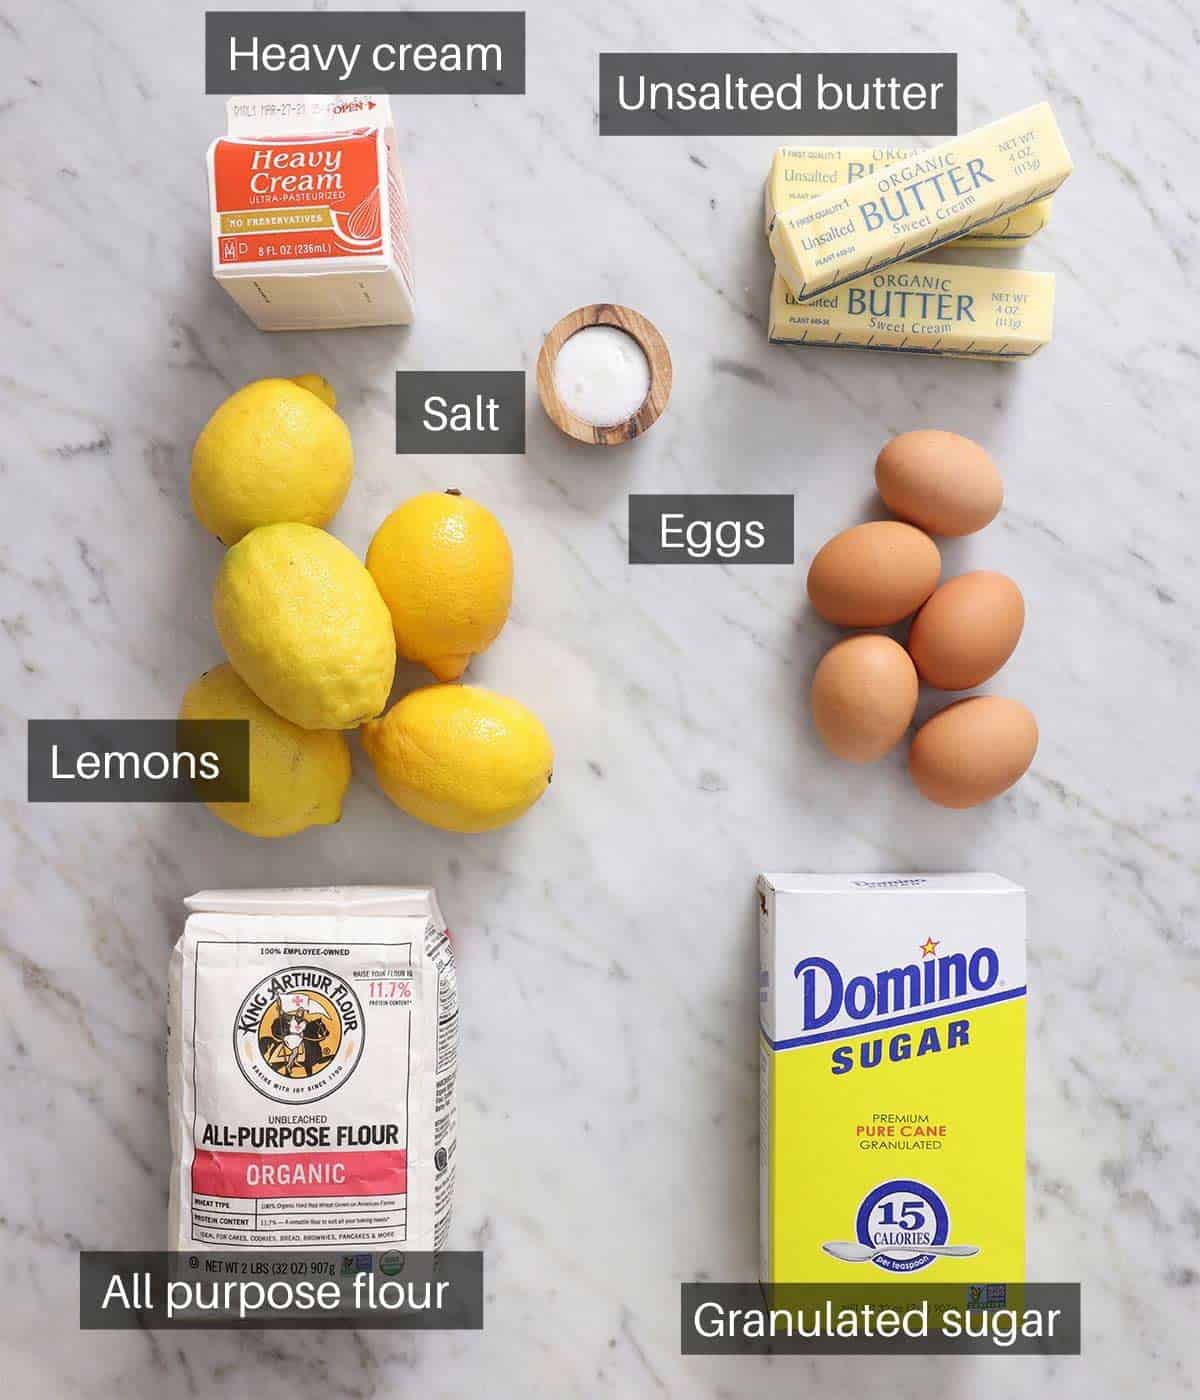
Full quantities are in the recipe card below. Here’s why I use each ingredient for the crust and the lemon curd filling.
For the crust:
- All-purpose flour — the base for the short-crust pastry. Spoon and level or weigh it so your crust has the right texture without being too dry and crumbly.
- Granulated sugar — there’s just enough to sweeten the crust and contribute to browning without making it too sweet, like an actual cookie.
- Salt — a touch of salt enhances the flavor of the butter and makes the crust taste less floury. (It will not taste salty!) My recipes use Morton fine sea salt, but you can substitute regular table salt 1:1.
- Cold unsalted butter — the butter being cold is non-negotiable. Cold butter is what produces the pea-sized pieces that hold their shape and keep the crust tender rather than tough. If your butter softens while you’re working, pop the dough bowl into the fridge for 10 minutes before continuing.
- Egg yolk and heavy cream — these two ingredients combine to form the binder for the crust. The fat from both is what makes the crust feel rich rather than dry, and the fat helps reduce gluten formation. They contribute water as well, which hydrates the flour just enough not to be tough.
For the curd:
- Whole eggs and extra yolks — whole eggs and egg yolks give the curd body, silkiness, and that deep golden color. They are also essential to thickening the curd properly for a sliceable filling. When the eggs reach above 160F, the proteins begin to coagulate, and the mixture transforms from soupy into a thick, luscious curd.
- Granulated sugar — balances the acid from the lemons without burying it. The filling should taste tart but still be palatable. It also helps the curd set up with the proper texture. Without any sugar or even using less, the curd would be gummy rather than smooth and silky.
- Unsalted butter — butter transforms a curd into a velvety texture that melts on the tongue, instead of being jammy. Temperature doesn’t matter here since the butter is being melted.
- Fresh lemons — you will need about 3 to 4 medium lemons, depending on size. Bottled juice tastes flat here, and you need the zest for the best flavor, so please use fresh lemons! Roll the lemons firmly on the counter before juicing to release more juice from the membranes. Zest the lemons before you juice them, too. It is much easier to zest a whole fruit than a halved and squeezed one. Use a microplane or the small holes of a box grater and only get the bright yellow part of the peel; avoid the bitter white pith underneath.
Equipment Needed
To make a proper tart, you need a few specific tools.
9-inch tart pan with a removable bottom — this is non-negotiable. A removable base is what lets you lift the tart out cleanly for slicing. A pie dish will not work. The sloped sides don’t hold the crust the same way during baking; it’s deeper than a tart pan, and the presentation won’t be right.
Fine mesh sieve — for straining the curd. Even with careful tempering, tiny bits of cooked egg can easily show up in the curd, and the sieve catches them. Skip this step, and the curd will likely look slightly speckled or lumpy.
Pastry cutter or your hands — for working butter into the crust. Hands are fine if you work quickly. Body heat softens the butter, so move fast, or use a pastry cutter.
Microplane or fine grater — for the lemon zest. Using a coarser grater can pull the white pith, leaving bitter flecks in the curd. A microplane, or the smallest holes on a box grater, catches only the yellow part of the peel.
How To Make A Lemon Tart
Full instructions are in the recipe card below. Here’s what’s happening at each step.
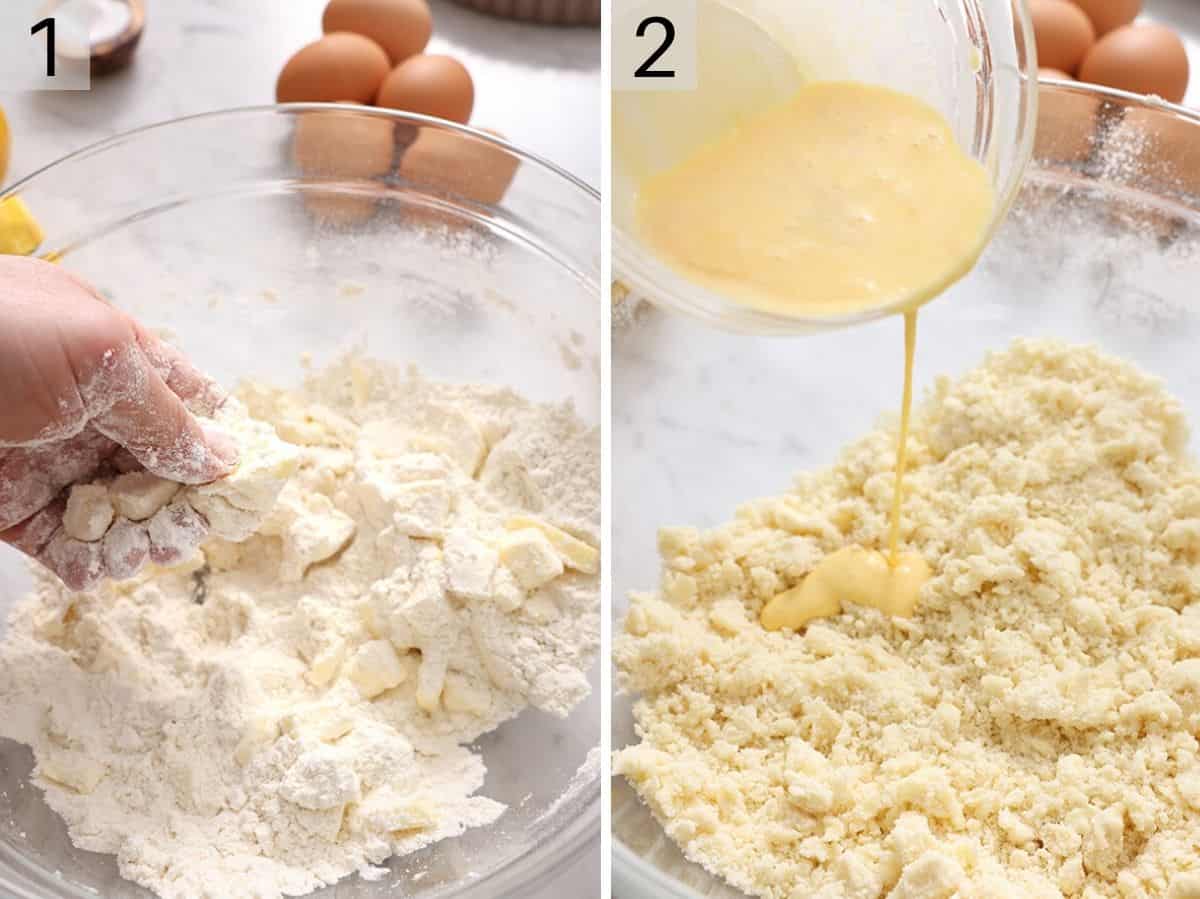
1. Make the crust by cutting cold butter into the flour. Whisk together the flour, sugar, and salt, then toss in the cold cubed butter. Use a pastry cutter or your fingertips, working until you have a crumbly mix with pea-sized butter pieces visible throughout. The butter needs to be cold at this stage, or it will melt or turn very soft and make the dough pasty, and your crust will be tough and dense.
2. Whisk the egg yolk and cream together. This is your binder that will hold the crust together. Add the cream mixture to the flour mixture, and stir it with a fork—you don’t want to use your hands here because they warm the butter. Once it just starts to clump together and no big pockets of dry flour remain, knead briefly in the bowl until it forms one ball. (Just a few presses, not a workout!) Shape into a disk, wrap, and chill for 1 hour. This rest does two things: it relaxes the gluten you just developed (less shrinkage in the oven) and re-firms the butter (better texture).
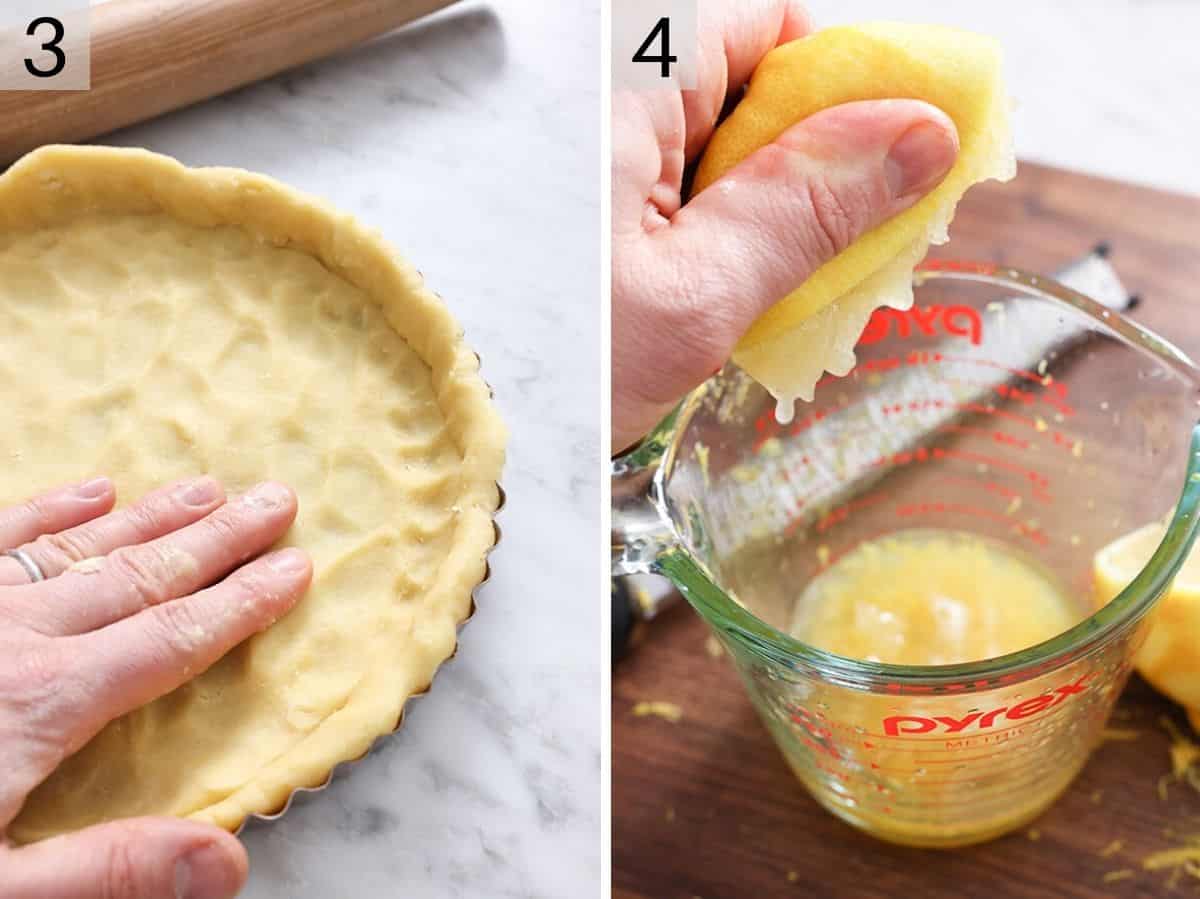
3. Roll, press into the pan, and freeze for 30 minutes. Roll the chilled dough on a lightly floured surface, then carefully transfer it to your tart pan. Press into the corners and up the sides of the fluted pan, and trim it flush with the top edge. Prick the bottom with a fork, and freeze. (This is the second critical chill, and it prevents the crust from sliding down the sides during blind baking.) Place the frozen crust on a baking sheet, and bake at 375°F for about 20 minutes until lightly golden. Remove from the oven and reduce the temperature to 350°F.
4. Make the curd while the crust bakes. Start by whisking the eggs and extra yolks together in a medium bowl. Set this aside next to a fine mesh sieve over a second clean bowl.
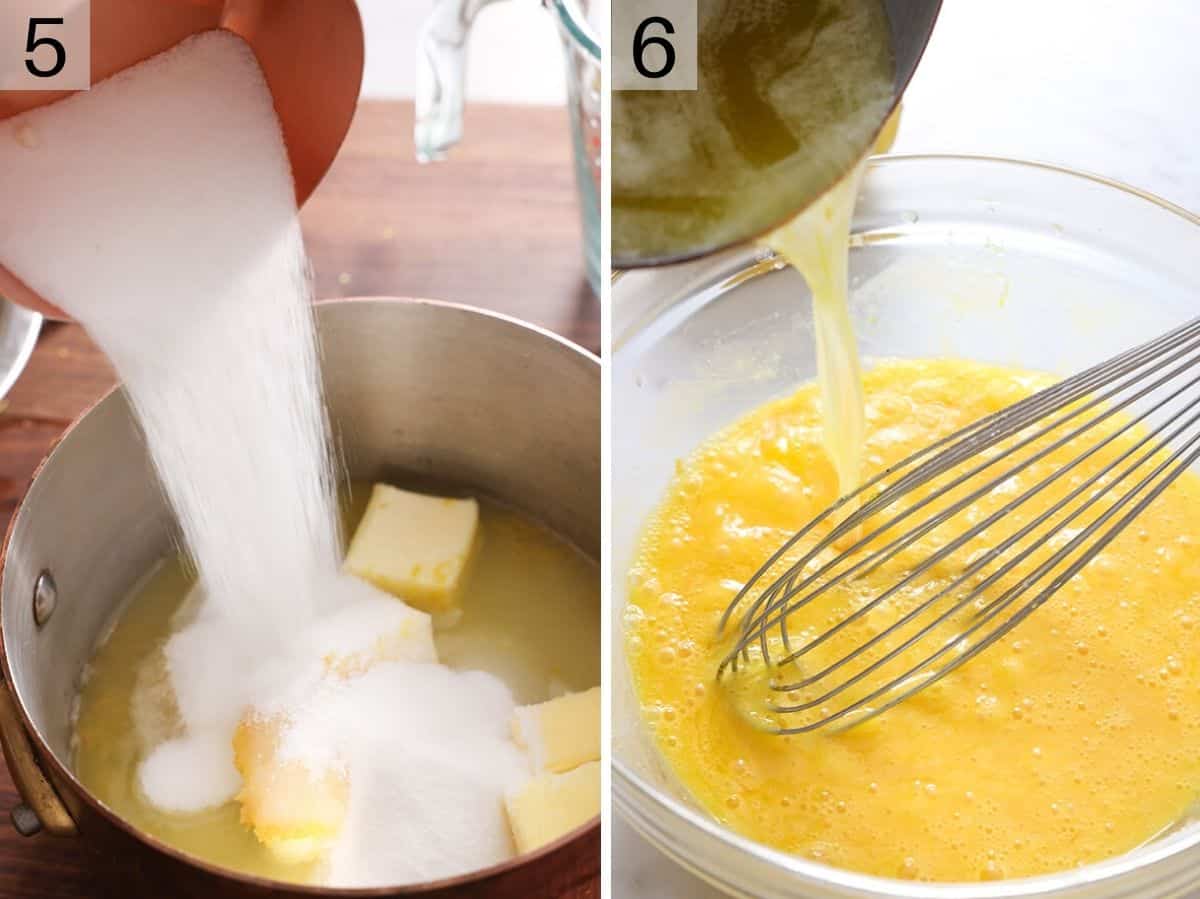
5. Heat sugar, butter, lemon juice, and zest in a medium pot over medium heat, stirring often. Cook just until the butter is melted and the mixture starts to bubble at the edges. Signs of bubbling mean the mixture is hot enough to have melted the sugar. Remove from heat.
6. Temper the eggs. Slowly drizzle the hot butter mixture into the egg mixture while whisking constantly. “Slowly” is the operative word—pour it in fast, and you’ll scramble the eggs. A steady thin stream while whisking gently brings the eggs up to temperature without curdling or setting them.

7. Return everything to the pot over low heat. Whisk constantly once it’s back on the stove. The curd will thicken gradually—when it just starts to bubble and coats the back of a wooden spoon, it’s done (a finger drawn across the back of the spoon should leave a clear trace in the curd). This is usually around 170°F, if you’re checking with a thermometer. Don’t let it boil hard; that curdles the eggs and will make your curd lumpy and grainy.
8. Strain through the sieve. This catches any tiny cooked-egg bits and gives you the silky texture that defines a great curd. Don’t skip this. Pour the curd into the tart shell, smooth the surface, and bake for 10 minutes at 350°F until the edge is just set. The center should still have a slight wobble, like softly set Jello. It will continue setting as it cools. Cool for 1 hour at room temperature, then refrigerate at least 2 hours before serving. The curd needs time to fully set. Cutting too early gives you a runny slice; refrigerating gives you the clean cut.
The Most Common Mistakes
After years of testing this recipe and answering reader questions, three problems come up over and over:
Runny tart that doesn’t set: two causes—cooking and chilling issues. Either the curd wasn’t cooked long enough on the stovetop, or the tart wasn’t refrigerated long enough before slicing. When cooking, the curd should clearly coat the back of a spoon and leave a clean trace before you take it off the heat. To test, dip the spoon in the curd, swipe your finger through it, then hold the spoon vertically. If it doesn’t move, you’re set! If it does, keep cooking for another minute and check again. When chilling, the curd needs 2 hours minimum in the fridge to set fully—pull it too early and the curd will ooze or weep out of the slice.
Cracked curd surface: over-baked. If the surface turns brown or cracks like a desert floor, you went too long in the oven. The bake is finished when the edge is just set, and the center still wobbles slightly and looks glossy. Pull it then, not when the center is firm.
Tough crust: over-worked dough. The butter pieces should still be visible when you add the yolk-cream mixture. If you’ve cut them in until the mixture looks like sand, you’ve gone too far. Or, if you mix the dough so much after the egg and cream mixture is added that it is pasty or feels like sticky cookie dough, then you have overworked it and likely developed too much gluten in the process. Another cause is too much flour from scooping and dumping when measuring the flour. Switch to weighing or the fluff-and-level method.

Pro Tips For The Best Lemon Tart
Slowly temper the eggs with the hot butter. Don’t rush this step! A slow, steady stream whisked into the eggs is how you get a smooth and silky curd. If you pour it in fast, the hot liquid will overwhelm the eggs and cause them to cook on contact.
You don’t need to press plastic wrap to the surface of the curd. I use that trick in many curd and pudding recipes to prevent a skin from forming. Since this tart goes in the oven, the top of the curd dries out and sets slightly from the heat of the oven—it’s not enough to be rubbery or unpleasant, but it eliminates the need to press plastic directly onto the curd. In fact, the plastic will mar the surface, so don’t cover it until you are saving leftovers.
Don’t use convection when baking the assembled tart. The hot air can dry out the surface of the curd and turn it rubbery or cause it to crack.
Lemon Tart Recipe

Ingredients
For the Crust
- 2 tablespoons cold heavy cream
- 1 egg yolk
- 1¼ cups all-purpose flour (150g)
- ¼ cup granulated sugar (50g)
- ¼ teaspoon salt
- ½ cup cold unsalted butter cut into small pieces (113g)
For the Curd
- 4 large eggs
- 2 large egg yolks
- 1 cup granulated sugar (200g)
- ½ cup unsalted butter cubed (113g)
- 2 tablespoons lemon zest (about 2 lemons)
- ½ cup fresh lemon juice (120ml, 3-4 lemons)
Instructions
For the Tart Crust:
- Whisk the egg yolk and cream together in a small bowl and set aside.
- In a large bowl, whisk together the flour, sugar, and salt. Add the cubed butter. Work the butter in with a pastry cutter or your clean hands. Once you have a crumbly mixture with roughly pea-sized pieces of butter throughout you can drizzle in the yolk cream mixture. Mix together with a fork or knife.
- Knead the dough together in the bowl a few times, just to bring it together into one ball. Then shape the dough into a disk, wrap tightly in plastic wrap, and chill for about an hour.
- Lightly flour your surface and roll the dough into a circle then transfer to a 9-inch tart pan (one with a removable base is preferable). Press the dough into the pan and up the sides, and trim any excess flush with the top edge of the pan. Pierce the crust all over the bottom with the times of a fork. Freeze for about 30 minutes.
- While the crust is freezing, preheat your oven to 375°F.
- Place the frozen crust on a baking sheet, and bake for about 20 minutes or until a light golden color. Remove the crust from the oven and reduce the oven temperature to 350°F.
For the Lemon Curd Filling:
- While the tart crust bakes, in a medium bowl combine the eggs and yolks then whisk together. Place a fine mesh sieve over a medium bowl. Set both aside.
- In a medium pot, combine the sugar, butter, lemon zest and juice and place over medium heat. Stir often until the butter is melted and the mixture just starts bubbling, then remove from heat. Slowly drizzle the hot butter mixture into the egg mixture while whisking vigorously.
- Pour the egg mixture back into the pot and place it over low heat, gently whisking constantly, until the mixture thickens and just starts to bubble, about 170F. (Your curd is done once it coats the back of a wooden spoon; you can swipe a finger across and a track will be left in the curd.)
- Strain the curd through the sieve into the bowl to remove any potential clumps of cooked egg. Then, pour the curd into your tart shell and smooth the surface. Bake for 10 minutes or until the edge is just set. Let the tart cool for an hour at room temperature, then refrigerate it for 2 hours before serving.
Notes
- The crust can puff a bit after baking. Just use a measuring cup to press the crust back into place. And if needed, coax the crust back up the side if it sank a bit.
- The lemon curd will thicken more as it cools. As long as you do the spoon test and the line holds, the curd will be thick enough once it backs and cools for slicing.
- How do I get clean slices? A hot knife. Run a long, sharp knife under hot water, dry it, and slice. Wipe between cuts. The heat melts through the curd cleanly instead of dragging it. A serrated knife will tear the curd; use a chef’s knife or a tart-slicing knife.
Nutrition
Have you tried this recipe? Tag me today!
Mention @preppykitchen and tag #preppykitchen!
How To Store
Refrigerate until ready to serve, and if you have leftovers. The fully chilled tart keeps in the refrigerator, covered, for up to 4 days, but is best if initially served within the first 24 hours. The crust can soften with time. Cover leftovers loosely with plastic wrap, or if you chill the whole tart for more than 6 hours, or store it in an airtight container.
The tart doesn’t freeze well. The curd separates as it thaws, and the texture turns grainy. For longer storage, freeze the par-baked crust alone (up to 3 months) and make the curd fresh the day you serve.
The unfilled, fully baked crust will keep at room temperature, tightly wrapped, for 2 days. This way, you can bake the crust ahead, and fill it the day of serving. You can also keep the crust unbaked and frozen for up to 3 months if tightly wrapped in a double layer of plastic wrap and foil.
Variations
This lemon tart recipe is easy to modify with other citrus, fresh fruit, or by switching up the size.
- Lemon-lime tart. Replace half the lemon juice with fresh lime juice and use 1 tablespoon lemon zest + 1 tablespoon lime zest. The lime cuts the sharpness slightly and adds a different kind of brightness.
- Meyer lemon tart. Meyer lemons are sweeter and more floral than regular Eureka lemons (the most common variety). Use them as a direct substitute for both the juice and zest in the recipe.
- Berry-topped tart. Once the tart is fully chilled, arrange fresh raspberries or blueberries on top before serving. This is a simple presentation upgrade with no main recipe changes.
- Mini lemon tartlets. Divide the dough between six 4-inch tart pans (same removable-base style). Blind bake for 12-15 minutes, then fill the tart shells with curd and bake for 6-8 minutes more. The whole batch makes 6 individual tartlets.
- Whipped cream finish. Pipe whipped cream around the edge of the tart just before serving for a more dressed-up presentation. Sweeten the cream lightly with a tablespoon of powdered sugar and a few drops of vanilla.
Frequently Asked Questions
A lemon tart is a French dessert: shortbread crust, lemon curd filling, no topping. A lemon meringue pie is an American dessert: flaky pie crust, lemon curd filling, topped with a tall cloud of toasted meringue. They share a similar curd filling, but the structure, crust, and presentation are completely different. I have a separate Lemon Meringue Pie recipe for the meringue version if you’d like to try it!
Technically, yes, but the flavor will be noticeably flatter. Bottled lemon juice has lost most of the volatile oils that give fresh lemon its bright character, and bottled juice often includes preservatives that contribute a slightly metallic taste. It also prevents the use of lemon zest, which contributes the punchiest lemon flavor to the curd. For a recipe like this, where lemon is the entire point, use fresh.
Yes. The fully assembled and chilled tart holds in the refrigerator for up to 4 days, but it is best if served within the first 24 hours. The crust can start to lose its crispiness with time. You can also blind-bake the crust up to 2 days ahead (store tightly wrapped at room temperature) and make the curd the day of serving for the freshest presentation. The unfilled crust freezes for up to 3 months.
Two reasons: not enough chill time, or the dough was over-worked. Both let the gluten relax and reduce contraction during baking. Chill the dough for an hour before rolling, then freeze the pressed-in shell for 30 minutes before baking. And handle the dough as little as possible—once it comes together, stop kneading it.
You can substitute the butter in both the crust and the curd with a high-quality plant-based butter (like Miyoko’s, Melt, or Earth Balance buttery sticks). Substitute the heavy cream in the crust with coconut cream from the top of a can of full-fat coconut milk or a full-fat dairy-free milk. The flavor will be slightly different from the non-dairy swaps, but the textures will be just about the same!
More Lemon Desserts
If you’ve got lemons to use, try one of these dessert recipes:
- Lemon Bars — same flavors with a shortbread base that’s easier and faster
- Lemon Curd — the filling on its own, useful for so many things
- Lemon Cake — a two-layer cake with lemon buttercream
- Lemon Cupcakes — same flavor profile, individual portions
- Lemon Meringue Pie — the meringue-topped American cousin to this tart
If you’ve tried this lemon tart recipe, then don’t forget to rate it and let me know how you got on in the comments below. I love hearing from you!


