
This post may contain affiliate links. Please read our disclosure policy.


What Does Your Favorite Holiday Dessert Say About You? This holiday season, I’ve teamed up with my friends at Truvia® to reveal what your go-to dessert says about your holiday hosting style. And I’m sharing how to revolutionize some holiday classics to have all of the festive flavor and wow factor with less sugar by swapping in Truvia Sweet Complete Sweeteners – the zero-calorie sweeteners that measure cup for cup like sugar in all your favorite holiday recipes.
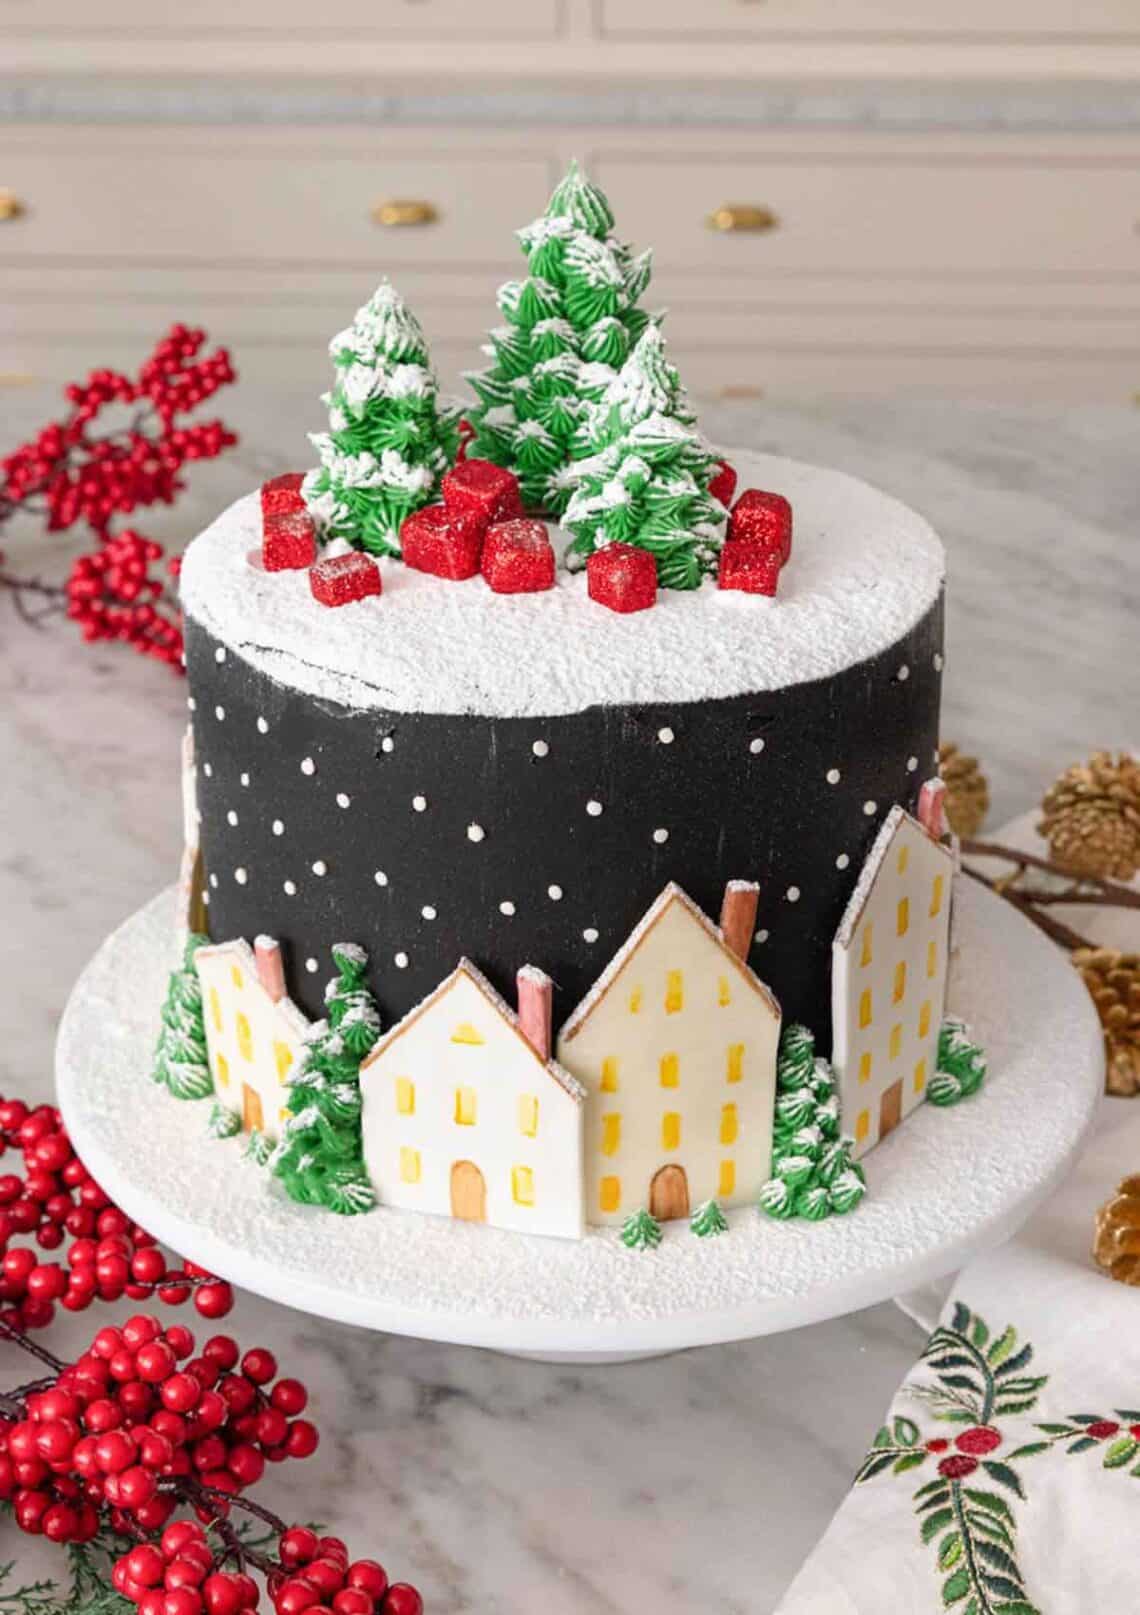
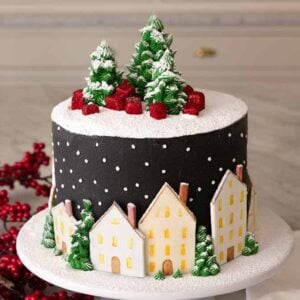
Spruced Up Triple Chocolate Fudge Cake
What You Need to Make This Recipe
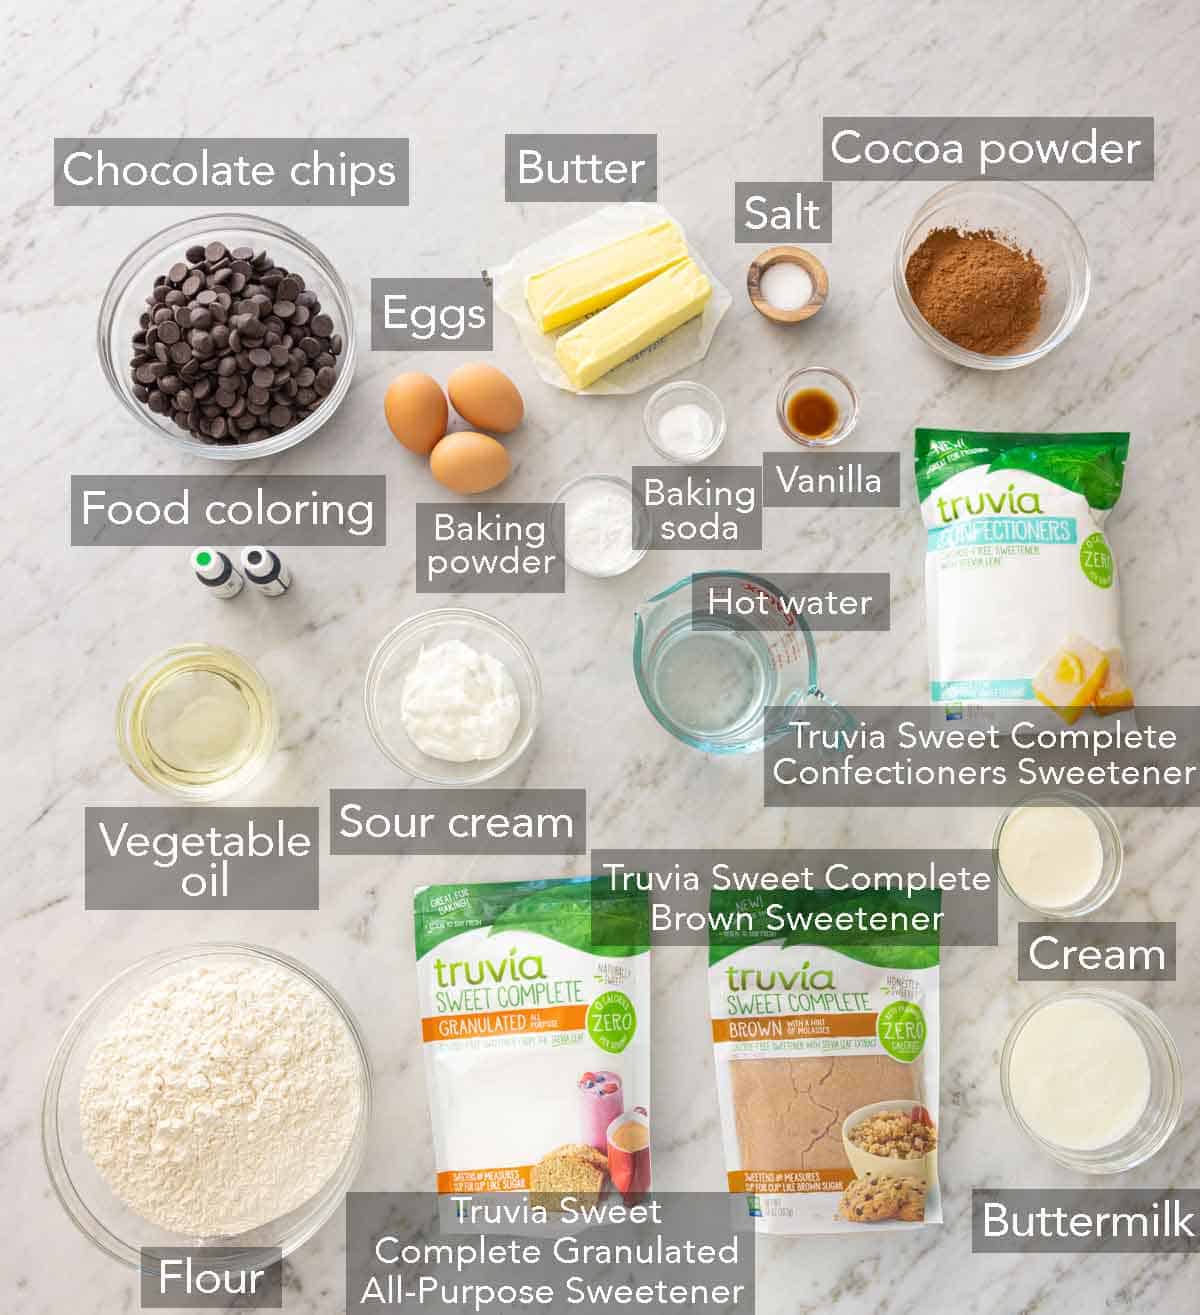
Sour cream — the sour cream gives the cake a very tender and moist crumb plus a tangy flavor. It adds moisture without increasing the liquid content and adds fat for creaminess. Don’t have sour cream? You can make your own by following my homemade sour cream recipe.
Buttermilk — similar to sour cream, buttermilk adds additional tangy flavor to your cake and keeps it super moist. If you don’t have buttermilk, see my easy post on making buttermilk at home.
Truvia Sweet Complete Granulated All-Purpose Sweetener — this stevia-based sweetener bakes and browns in recipes and has zero calories per serving.
Truvia Sweet Complete Brown Sweetener — the hint of molasses in this brown sweetener provides a warm and rich taste to the cake.
Butter — make sure to use unsalted butter as you don’t want salty buttercream. The butter must be at room temperature to combine with the Truvia Sweet Complete Confectioners Sweetener to make a smooth buttercream.
Decorations — to make your cake look like mine, you will need marzipan, fondant, or white chocolate modeling clay, sugar or waffle cones, edible glitter, and food coloring.
How to Make Triple Chocolate Fudge Cake
1. Sift together the dry ingredients into a stand mixer’s bowl and whisk to combine.
2. In a separate bowl, combine the wet ingredients.
3. Combine the wet and dry ingredients and mix on low before distributing the batter evenly to three prepared pans and baking for 35 minutes. Allow them to cool before decorating.
4. Make the chocolate buttercream by combining warm cream with the chocolate chips. Stir to combine before setting aside to cool to room temperature.
5. Whip the butter for about 2 minutes using a paddle attachment and beat in the Sweet Complete Confectioners slowly until you have a nice, even consistency. Mix in the cooled chocolate ganache. Reserve ¾ cup chocolate buttercream and dye black.
6. Whip the butter for about 2 minutes using a paddle attachment and slowly beat in the Sweet Complete Confectioners. Add in the salt, vanilla, and green food coloring. Mix until you have a nice, even consistency.
7. Make the houses by placing marzipan, fondant, or white modeling clay onto a rolling mat, sprinkle with Sweet Complete Confectioners, and roll out with a rolling pin. Use a knife or cookie cutter to cut out your house shapes. Place them on a wire rack and let them dry out. Once dry, paint on windows, doors, and chimneys with a paintbrush and food coloring.
8. Make the trees by lightly wetting your cones with water to prevent them from cracking. With a serrated knife, cut cones to desired tree sizes. Pipe the green buttercream using a 4B star tip onto the surface of the cones to make star-shaped dollops.
9. Make the presents by cutting out and shaping fondant into small cubes. Lightly dampen with water and toss in red edible glitter.
10. Assemble the cake by piping chocolate buttercream between each layer. Pipe the chocolate buttercream on the outside of the cake. Smooth with a bench scraper and offset spatula. Chill so the buttercream firms up before piping on the remaining dyed chocolate buttercream. Smooth with a bench scraper and offset spatula.
11. Place houses around the perimeter of the cake, leaving space in between some for piping trees. Pipe small trees in between houses using a 32 star tip. Place white confetti sprinkles around the outside of the cake to look like stars. Add cone trees to the top of the cake. Generously dust the cake in Sweet Complete Confectioners to look like snow. Add presents to the top of your cake.

What This Dessert Says About How You “Holiday”: You’re The Host with the Absolute Most
- A minimalist you are not. More is always more!
- Your menu inspiration is straight from the pages of Vogue – you’ve definitely served edible gold leaf.
- You’re the toast of the party and the after party.
- Like the cakes you’re famous for, the intricacies of your holiday decor have guests talking for weeks.
Swap ‘Til You Drop Peppermint Cutouts
What You Need to Make This Recipe
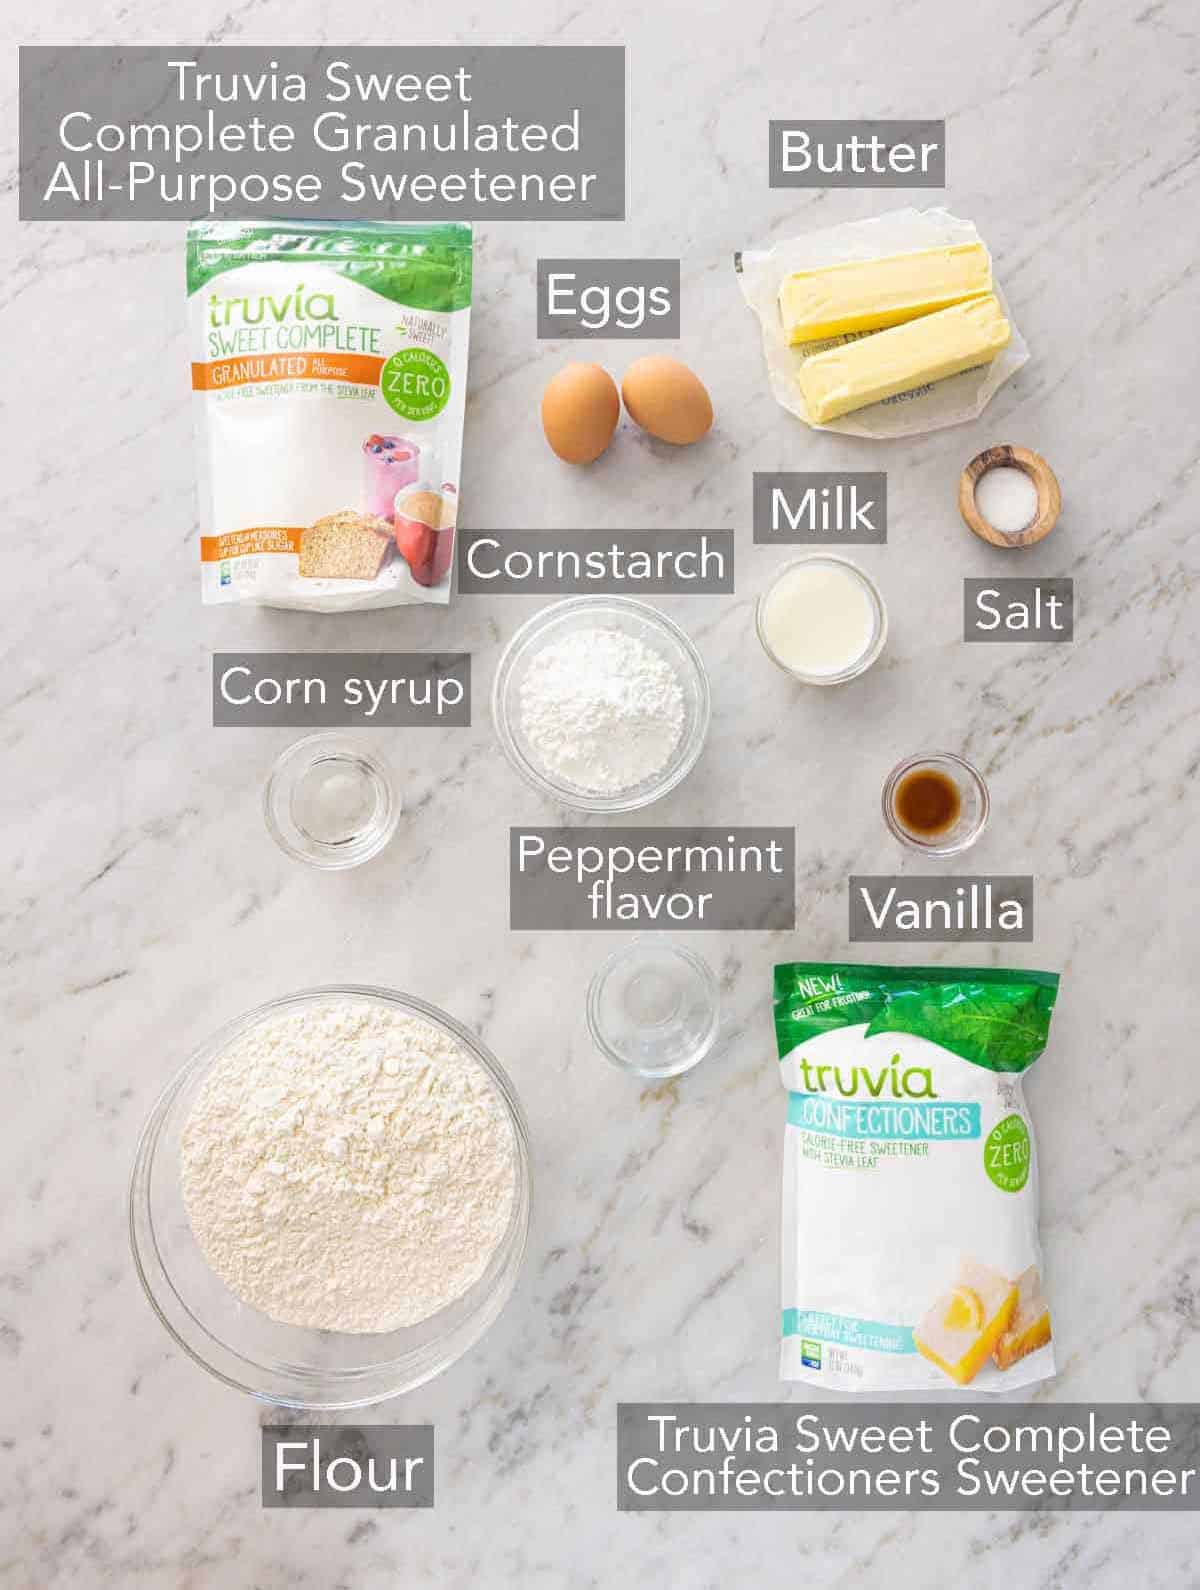
Cornstarch — adding cornstarch to the cookie batter helps create a crumbly and tender texture.
Butter — use unsalted butter for these cookies as there is already salt added to the recipe. Different brands of salted butter have different amounts of salt, so adding measured salt is best to be consistent.
Truvia Sweet Complete Granulated All-Purpose Sweetener — Truvia makes for a perfect one-for-one swap where granulated sugar is used.
Peppermint extract — don’t skip the extract! The peppermint is added to both the cookies and icing for a festive flavor.
Corn syrup — I add a little corn syrup to my icing made with milk and Truvia Sweet Complete Confectioners Sweetener, as it gives the icing more of a glossy and luscious finish.
How to Make Peppermint Cutouts
1. Sift the flour, cornstarch, and salt in a large bowl. Whisk to combine.
2. In your standing mixer, cream the butter and Sweet Complete Granulated together. Add the eggs one at a time into the mixture. Add 1 teaspoon vanilla extract.
3. Pour in the flour mixture and mix until everything is well incorporated.
4. Put the dough in a plastic bag, flatten it together, then chill it in the refrigerator, so it firms up.
6. Once chilled, place it on a rolling mat, sprinkle with flour, and roll out with a rolling pin.
7. Use cookie cutters to cut out your cookies, transfer them to a non-stick baking sheet, and bake for 12 minutes.
8. Make the icing by sifting the Sweet Complete Confectioners, then mix in the corn syrup and extract. Add milk 1 teaspoon at a time until desired consistency is reached. Add food coloring a little at a time until you reach your desired color.
9. Pipe icing onto your cooled cookies in desired festive designs and set them aside to set.
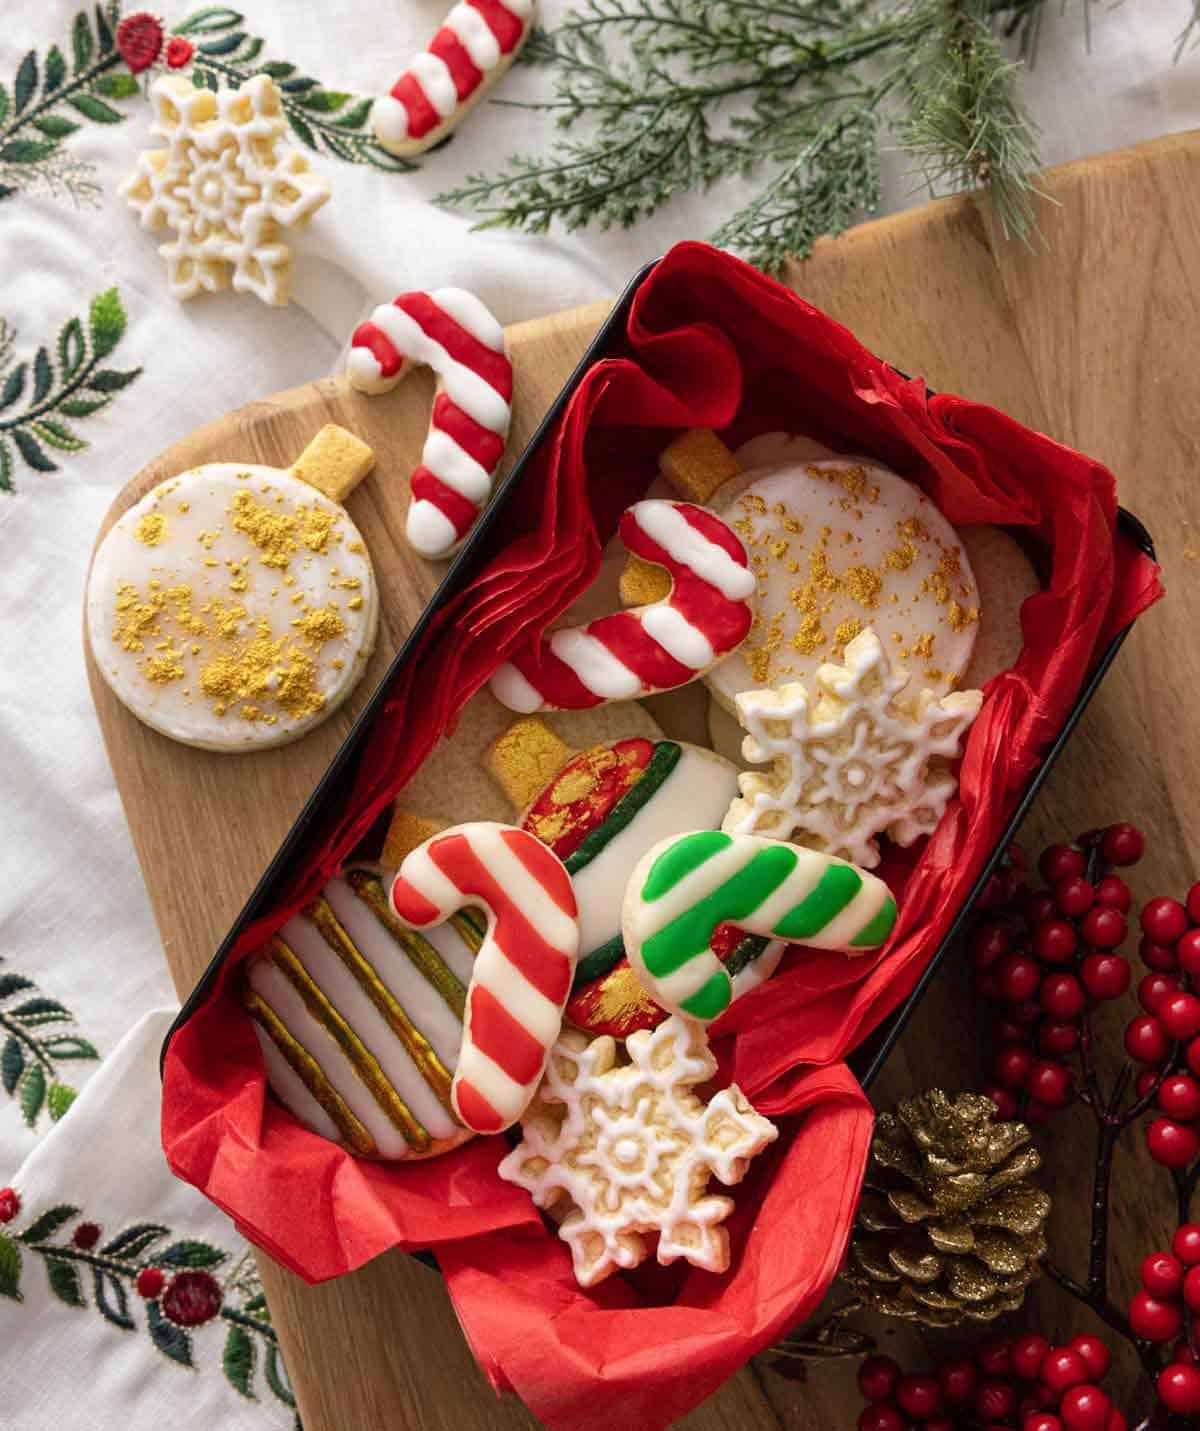
What This Dessert Says About How You “Holiday”: The TikTok Trendsetter
- You’re the party everyone wants an invite to. You’re about heavy apps, cookie exchanges, spirits, and casual vibes.
- Your menu is eclectic and semi-homemade. You get recipe inspiration from TikTok! And while you know entertaining is an art form – simplicity is key.
- You keep things lively with the latest holiday music, hot conversation and even an adult card game.
- Your entertaining style is simple, fun and always on-trend.
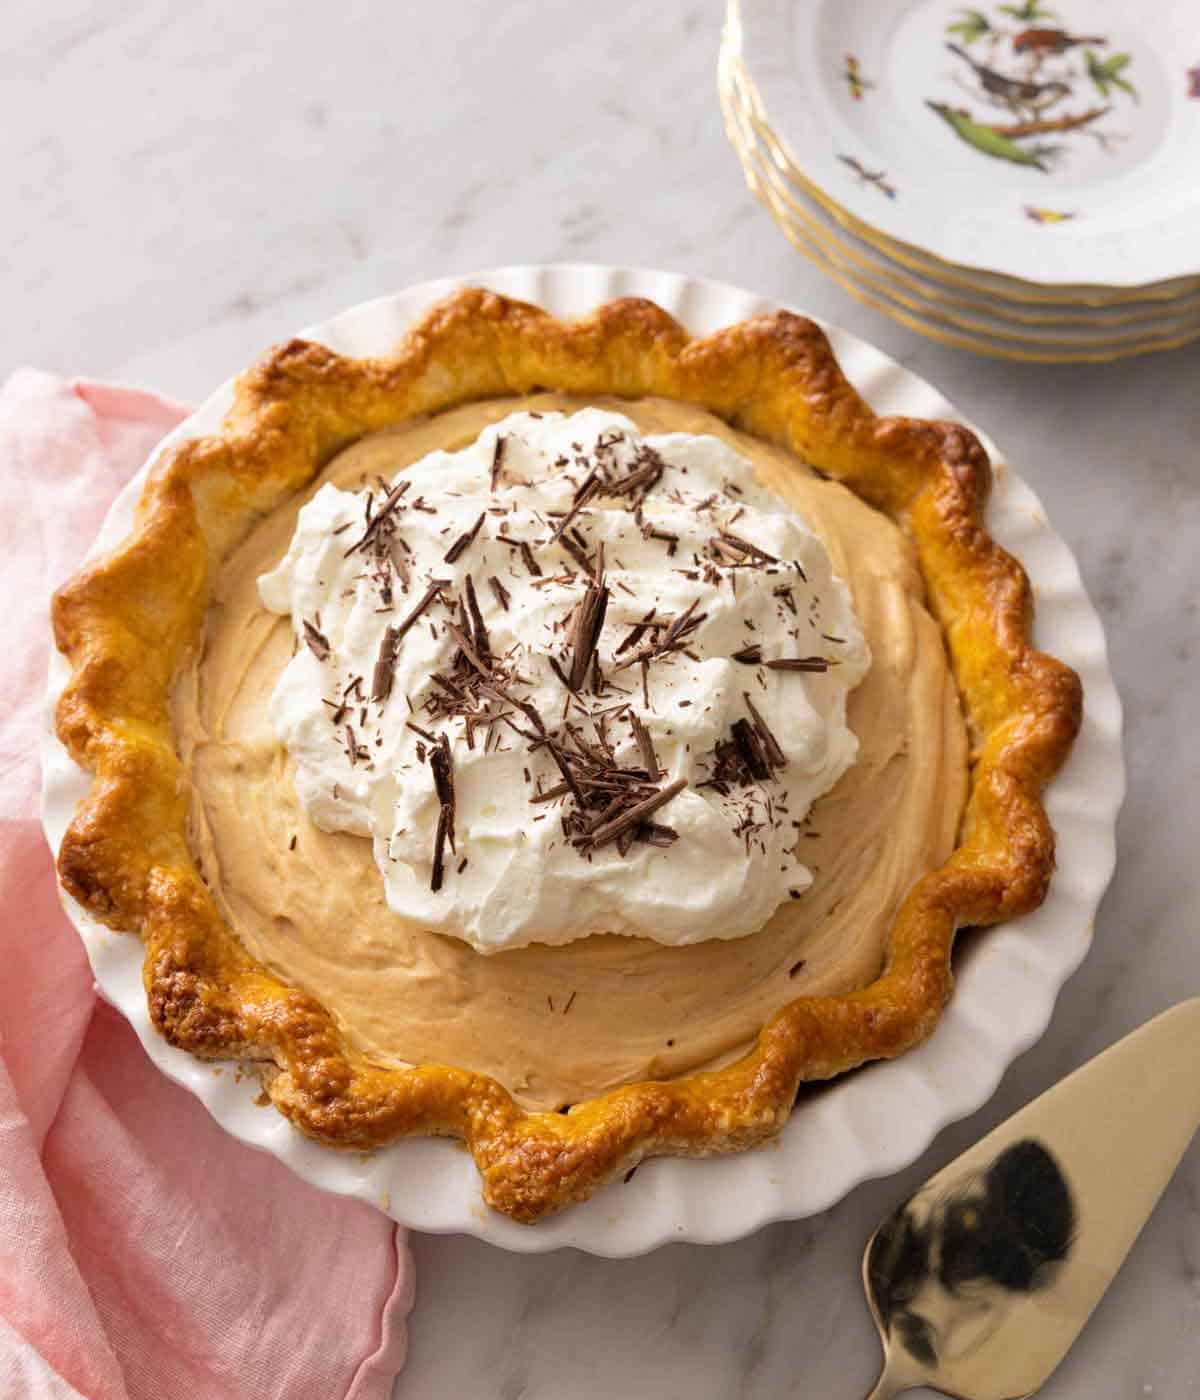
I’m Dreaming of a Peanut Butter Bliss Pie
What You Need to Make This Recipe
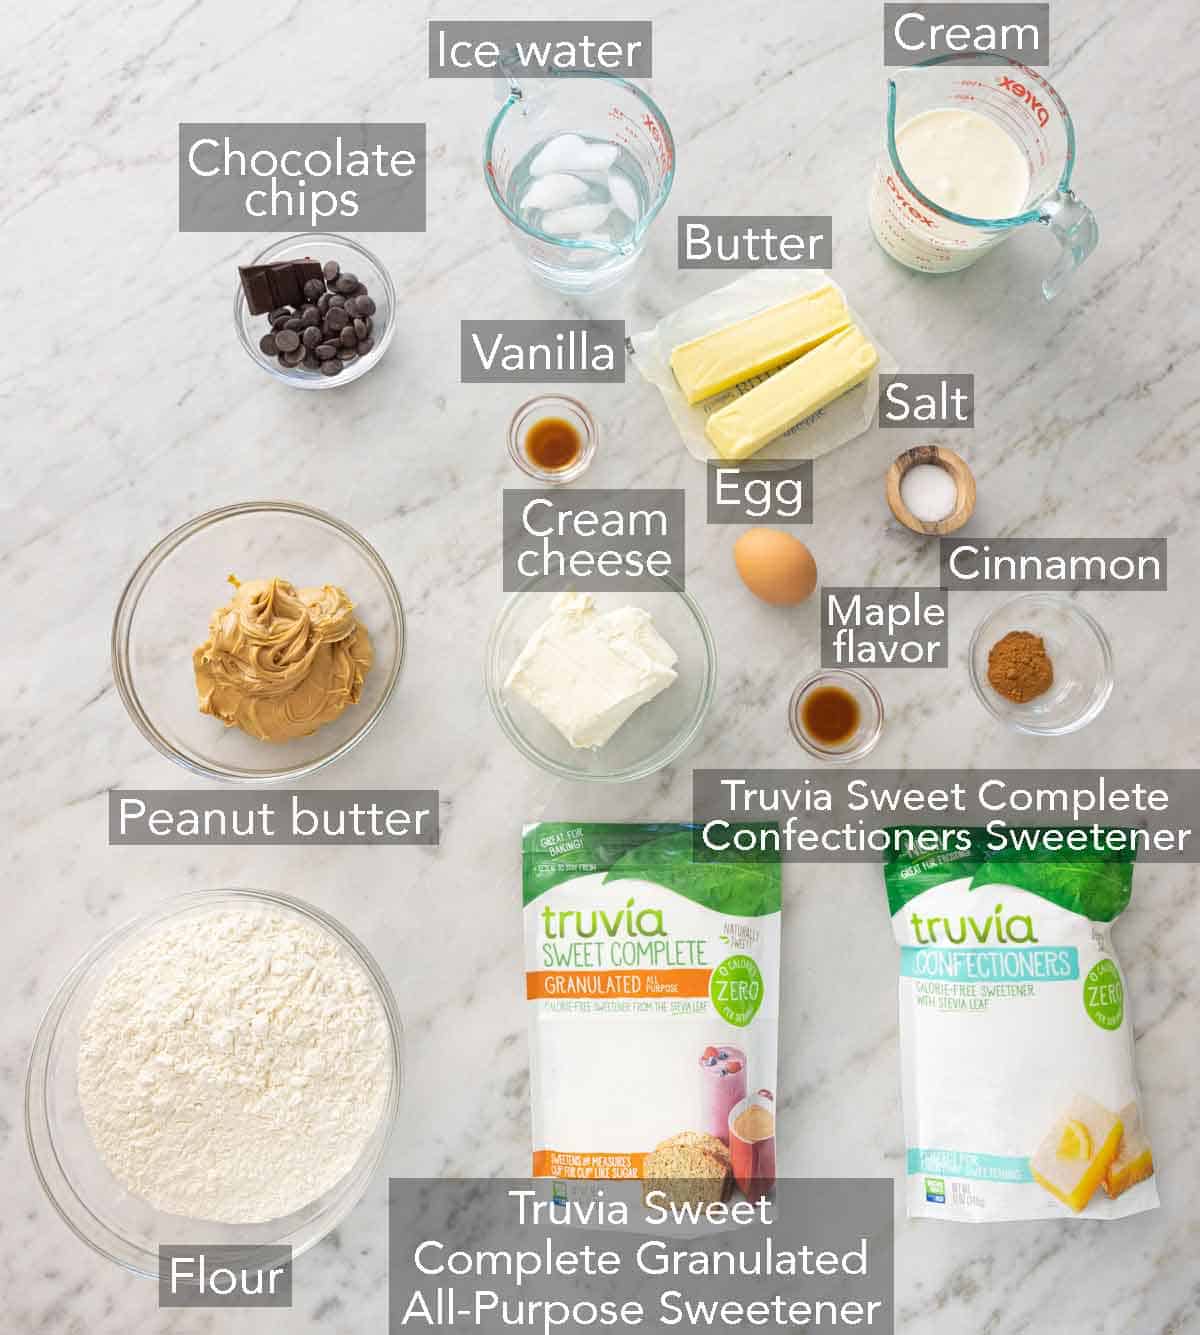
Butter — To get a flaky pie crust, the butter must be cold. If the butter is warm, the butter will combine with the flour, leading to a tough or cracker-like pie curst.
Truvia Sweet Complete Granulated All-Purpose Sweetener — this helps make the pie crust tender and easier to work with. Without it, you risk breaking the pie crust when you transfer it to your pie dish.
Chocolate chips — for a delightful surprise when you bite into this peanut butter bliss pie, add a layer of melted chocolate mixed with cinnamon at the bottom of the pie crust.
Cream cheese — buy the brick cream cheese and not spreadable cream cheese from a tub.
Truvia Sweet Complete Confectioners Sweetener — you will need this for both the peanut butter filling as well as the whipped topping.
Peanut butter — creamy peanut butter is my go-to for the pie filling for the best texture. I do not recommend using natural or powdered peanut butter.
Heavy cream — I highly recommend using heavy cream and not half and half or milk for the filling and whipped topping. The high-fat content will yield a much creamier filling and a sturdier whipped topping.
How to Make Peanut Butter Bliss Pie
1. Make the pie crust by combining the flour, Truvia Sweet Complete Granulated, and salt into a food processor and pulse briefly to mix. Scatter the butter over the top and pulse just until the mixture forms coarse crumbs about the size of peas. Drizzle ice water into the flour mixture while pulsing just until the dough starts to come together.
2. Transfer the dough onto a pastry mat or a floured surface and knead 2 to 3 times just to help it come together a bit. Gently flatten the dough into a one-inch thick disk and cover it in plastic wrap or a ziplock bag, then place it in the fridge to chill for about 30 minutes to an hour.
3. On a floured surface, flatten out into a circle at least 1 inch larger than the pie pan with a rolling pin. Transfer the dough to a pie dish.
4. With a small sharp paring knife, cut the dough 1 inch larger around than the pan. Fold the edge under and crimp the edge with either your fingers or the tines of a fork. Dock your pie crust. Add tin foil to keep your pie crust propped up. Bake for 15 minutes.
5. Take out the tin foil and brush the crust with the egg wash. Dock the pie crust with a fork or sharp knife and add a foil tent around the sides. Bake until the center of the crust is golden.
6. Add ¼ cup semi-sweet chocolate chips and the cinnamon to a small bowl and microwave on low power in 30 second bursts until mostly melted. Stir together, then spread over the bottom of the crust and set aside.
7. Make the filling by adding the peanut butter and cream cheese to a stand mixer and beat together until smooth. Add Sweet Complete Confectioners and beat until combined.
8. In a separate bowl, whip the cream until soft peaks form, then fold into peanut butter mixture.
Spoon or pipe filling into the cooled pastry crust. Smooth and chill for at least three hours.
9. Make the whipped topping by whipping the cold cream with Sweet Complete Confectioners, vanilla extract, and maple flavoring.
10. Add the whipped cream to the chilled pie. Arrange it into a mound that almost reaches the crust. Sprinkle shaved chocolate over the whipped cream and serve.
What This Dessert Says About How You “Holiday”: The Traditionalist with a Twist
- You love the classics. You’re all about the sit down dinner.
- Your menu is inspired by the people and traditions you love. Holiday ham anyone?!
- You’re the center of the party, making sure glasses are filled and everyone feels at home in your home.
- There’s a timeless feel to all that you do – from your holiday décor to your classic music selection. Yes, jazz is a thing during the holidays.
Pro Tips for Making This Recipe
- The water must be hot for the triple chocolate fudge cake. Hot water reacts to the cocoa powder and enhances the chocolate flavors.
- Always use real vanilla extract and not artificial vanilla for the best flavor.
- I recommend tapping the cake pans on your counter to pop any air bubbles.
- To tell if your pie crust dough is ready, place a spoonful in the palm of your hand and squeeze it together. If it forms into a clump, then it’s fine! If it’s still crumbly, then add a few more tablespoons of ice water.
- If your dough cracks while rolling, then pinch together and let it rest a minute or two.
Frequently Asked Questions
How do I prepare these desserts in advance?
For the cake, bake in advance and allow it to cool. Once cooled, wrap the cake layers in plastic wrap and freeze until ready to use. Fondant and marzipan decorations can be made at least a week in advance and stored in a cardboard box so they can breathe.
For the cookies, the dough is freezer-friendly. Simply store it in an airtight freezer-safe bag. When ready to bake, thaw overnight in the fridge before rolling out and baking as instructed.
The pie crust can be made in advance and frozen for up to 4 months when tightly wrapped in plastic. The entire pie can be frozen as well, minus the whipped topping.
How do I store leftovers?
Store leftovers in an airtight container. While you can store the triple chocolate fudge cake and peppermint cookies at room temperature, the peanut butter bliss pie should not be left out. Keep the peanut butter bliss pie in the fridge.
If you’ve tried these Holiday Recipes, then don’t forget to rate the recipe and let me know how you got on in the comments below, I love hearing from you!
Spruced Up Triple Chocolate Fudge Cake
Equipment
- Mixer
- 8 inch cake pans
Ingredients
For the Cake:
- ½ cup sour cream
- 1 cup buttermilk
- 3 large eggs
- 1¼ cups hot water
- ¾ cup vegetable oil
- 1 tablespoon vanilla extract
- 3 cups all-purpose flour
- 1 cup Truvia Sweet Complete Granulated All-Purpose Sweetener
- 1 cup Truvia Sweet Complete Brown Sweetener
- ½ cup cocoa powder
- 1½ teaspoons baking powder
- 1 teaspoon baking soda
- 1 teaspoon kosher salt
For the Chocolate Buttercream:
- 1½ cups cream
- 1 cup butter
- 30 ounces bittersweet chocolate chips
- ¼ cup Truvia Sweet Complete Confectioners Sweetener
- Black food coloring
For the Green Frosting:
- 1 cup unsalted butter room temperature
- 2 cups Truvia Sweet Complete Confectioners Sweetener
- 1 teaspoon vanilla extract
- 1/4 teaspoon salt
- Green food coloring
For the Houses:
- Marzipan, fondant, or white chocolate modeling clay
- Food coloring
For the Trees:
- 3 sugar or waffle cones
For the Presents:
- Fondant
- Red edible glitter
Instructions
For the Cake:
- Preheat oven to 350F. Butter and flour 3 eight-inch cake pans.
- Sift together the dry ingredients into the bowl of a stand mixer and whisk to combine.
- Add the wet ingredients into a large bowl and whisk together.
- Add the wet ingredients to the dry ingredients.
- Whisk to combine then mix on low for about a minute.
- Distribute batter evenly to the three pans and bake for about 35 minutes at 350F (176C) or until a toothpick inserted in the center comes out clean.
- Allow time to cool for 10 minutes then invert onto wire racks to cool fully.
For the Chocolate Buttercream:
- In a small bowl, microwave the cream for 40 secs on half power until hot. Pour over bitter-sweet chocolate. Stir to combine then set aside to cool to room temperature.
- Whip the butter for about 2 minutes using a paddle attachment (in a stand mixer).
- Scrape the bowl down and beat in the Sweet Complete Confectioners slowly.
- Mix until you have a nice, even consistency.
- Beat in the melted and cooled chocolate ganache.
- Reserve ¾ cup chocolate buttercream and dye black.
For the Green Frosting:
- Whip the butter for about 2 minutes using a paddle attachment (in a stand-up mixer).
- Scrape the bowl down and beat in the Sweet Complete Confectioners slowly.
- Add in the salt, vanilla, and green food coloring.
- Mix until you have a nice, even consistency.
For The Houses:
- Place marzipan, fondant, or white modeling clay onto a rolling mat, sprinkle with Sweet Complete Confectioners and roll out with a rolling pin.
- Use a knife or cookie cutter to cut out your house shapes. Take away extra scraps to re-roll for more houses.
- Place them on a wire rack and let dry out.
- Once dry, paint on windows, doors, and chimneys with a paintbrush and food coloring.
For the Trees:
- Lightly wet your cones with water to prevent from them cracking.
- With a serrated knife cut cones to desired tree sizes.
- Pipe the green buttercream using a 4B star tip onto the surface of the cones to make star-shaped dollops. Start at the bottom and working to the top.
For The Presents:
- Cut out and shape fondant into small cubes.
- Lightly dampen with water and toss in red edible glitter.
For the Assembly:
- Pipe chocolate buttercream between each layer.
- Pipe the chocolate buttercream on the outside of the cake. Smooth with a bench scraper and offset spatula.
- Chill so the buttercream firms up, about 20 minutes.
- Pipe on the remaining chocolate buttercream that has been dyed black. Smooth with a bench scraper and offset spatula.
- Place houses around the perimeter of the cake, leaving space in between some for piping trees.
- Pipe small trees in between houses using a 32 star tip.
- Place white confetti sprinkles around the outside of the cake to look like stars.
- Add cone trees to the top of the cake.
- Generously dust the cake in Sweet Complete Confectioners to look like snow.
- Add presents to the top of your cake.
Notes
- The water must be hot for the triple chocolate fudge cake. Hot water reacts to the cocoa powder and enhances the chocolate flavors.
- Always make sure ingredients like baking soda and baking powder are fresh. Expired leavening agents will not yield the same results.
- Always use real vanilla extract and not artificial vanilla for the best flavor.
- I highly recommend using a scale to measure your flour. However, if you don’t have a scale, be sure to fluff your flour with a spoon and then spoon it into your cups before leveling it off with a knife. This method is the best way to measure flour without overpacking the measuring cup.
- You can use cake strips to help your layers come out evenly. Cake strips work by keeping the outside edge of the pan cooler to ensure that the entire cake rises at the same rate, preventing a dome from forming in the middle. If you don’t want to purchase a set, check out my post on getting flat cake layers to learn how to DIY the strips.
- The eggs should be at room temperature to ensure they incorporate evenly into your batter without accidentally over-mixing. If you forgot to bring out your eggs, you could quickly bring them to room temperature by placing them in a large bowl and covering them with warm tap water for 5 minutes.
- I recommend tapping the cake pans on your counter to pop any air bubbles.
Nutrition
Have you tried this recipe? Tag me today!
Mention @preppykitchen and tag #preppykitchen!
Swap ‘Til You Drop Peppermint Cutouts

Equipment
- Mixer
- Baking Sheet
- Cookie cutters
Ingredients
For the Cookies:
- 4 cups flour sifted
- ⅓ cup cornstarch
- ¾ teaspoon salt
- 1 cup unsalted butter
- 1 cup Truvia Sweet Complete Granulated All-Purpose Sweetener
- 2 eggs
- 1 teaspoon vanilla extract
- ½ teaspoon peppermint flavor
For the Icing:
- 1 cup Truvia Sweet Complete Confectioners Sweetener
- 1½ tablespoons milk
- 2 teaspoons light corn syrup
- ¼ teaspoon peppermint extract or almond extract
- Food coloring
Instructions
- Sift the flour, cornstarch, and salt in a large bowl. Give it a whisk.
- In your standing mixer fitted with a paddle attachment, cream the butter and Sweet Complete Granulated together.
- Add the eggs while mixing. Scrape down sides of the bowl.
- Add 1 teaspoon vanilla extract.
- Pour in the flour mixture and mix until everything is well incorporated.
- Put the dough in a plastic bag, flatten it together, then chill it in the refrigerator so it firms up.
- Once the dough is chilled, place it on a rolling mat, sprinkle with flour, and roll out with a rolling pin. Move the dough around so to prevent it from sticking.
- Use cookie cutters to cut out your cookies. Take away extra scraps to re-roll for more cookies.
- Place them on a non-stick baking sheet and bake at 375F for 12 minutes.
For the icing:
- Sift Sweet Complete Confectioners, then mix in the corn syrup and extract.
- Add milk 1 teaspoon at a time until desired consistency is reached.
- Add food coloring a little at a time until you reach your desired color.
For the Assembly:
- Pipe icing onto your cooled cookies in desired festive designs and set aside to set.
Notes
- Make sure the eggs are at room temperature to ensure they incorporate evenly into your batter. Quickly bring them to room temperature by placing them in a large bowl and covering them with warm tap water for 5 minutes.
- I recommend using a scale to measure your flour to avoid overpacking it, which leads to dry cookies. However, if you don’t have a scale, fluff your flour with a spoon and then spoon it into your cups before leveling it off with a knife. This method is the best way to measure flour without overpacking the measuring cup.
Nutrition
Have you tried this recipe? Tag me today!
Mention @preppykitchen and tag #preppykitchen!
I’m Dreaming of a Peanut Butter Bliss Pie

Equipment
- Pie Dish
- Food Processor
- Mixer
Ingredients
For the Crust:
- 2½ cups all-purpose flour 300g
- ¼ teaspoon salt
- 1 cup unsalted butter cold, cut into cubes 226g
- 5-6 tablespoons ice water 15mL
- ¼ cup Truvia Sweet Complete Granulated All-Purpose Sweetener
For the egg wash:
- 1 egg
- 1 tablespoon cream
For the Crust Inside Bottom Layer:
- ¼ cup bittersweet chocolate chips
- ½ teaspoon cinnamon
Filling:
- 8 ounces cream cheese room temperature
- 1 cup Truvia Sweet Complete Confectioners Sweetener divided
- 1 cup creamy peanut butter
- 1 cup heavy whipping cream
- 1 teaspoon vanilla extract
For the Topping:
- 2 cups heavy cream cold
- 2 tablespoons Truvia Sweet Complete Confectioners Sweetener
- 1 teaspoon vanilla extract
- ½ teaspoon maple flavor
Instructions
For the Crust:
- In a food processor, combine the flour, Truvia Sweet Complete Granulated All-Purpose Sweetener, and salt and pulse briefly to mix (you can also do this by hand with two forks). Scatter the butter over the top and pulse just until the mixture forms coarse crumbs about the size of peas.
- Drizzle ice water into the flour mixture while pulsing just until the dough starts to come together.
- Transfer the dough onto a pastry mat or another floured surface and knead 2 to 3 times just to help it come together a bit. Gently flatten the dough into a one-inch thick disk and cover it in plastic wrap or a ziplock bag, then place it in the fridge to chill for about 30 minutes to an hour.
- Preheat oven to 425°F. Line a baking sheet with parchment paper.
- With a rolling pin, on a well-floured surface, roll chilled dough into a circle at least 1 inch larger than the pie pan, rolling from the center to the edge, turning and flouring the dough.
- Fold the dough in half and ease it into the pie pan without stretching at all and unfold to fit the pan. With a small sharp paring knife, cut the dough 1 inch larger around than the pan.
- Fold the edge under and crimp the edge with either your fingers or the tines of a fork. Dock your pie crust. Add tin foil to keep your pie crust propped up. Bake at 425°F for 15 minutes.
- Make the egg wash by mixing the egg and a dash of heavy cream together. Take out the tin foil and brush the crust with the egg wash. Now dock the pie crust with a fork or sharp knife and add a tent of foil around the sides.
- Bake for 15 minutes at 425°F then reduce temperature to 375°F and bake until the center is golden. Once the center is golden, remove the pie crust from the oven.
- Add ¼ cup semi-sweet chocolate chips and the cinnamon to a small bowl and microwave on low power in 30 second bursts until mostly melted. Stir together then spread over the bottom of the crust and set aside.
For the Filling:
- Add the peanut butter and cream cheese to a stand mixer fitted with a paddle attachment and beat together until smooth.
- Add Sweet Complete Confectioners and beat until combined.
- In a separate bowl, whip the cream until soft peaks form then fold into peanut butter mixture.
- Spoon or pipe filling into the cooled pastry crust. Smooth and chill for at least three hours.
For the Whipped Cream:
- Whip the cold cream with 2 tablespoons of Sweet Complete Confectioners, vanilla extract, and maple flavoring.
For the Assembly:
- Add the whipped cream to the chilled pie. Arrange it into a mound that almost reaches the crust.
- Sprinkle shaved chocolate over the whipped cream and serve.
Notes
- To tell if your pie crust dough is ready, place a spoonful in the palm of your hand and squeeze it together. If it forms into a clump, then it’s fine! If it’s still crumbly, then add a few more tablespoons of ice water.
- If your dough cracks while rolling, then pinch together and let it rest a minute or two.
- If possible, use a scale to measure your flour for the pie crust. Too much flour will yield a crumbly crust. If you do not have a scale, fluff the flour and spoon it into the measuring cups to avoid overpacking them.
Nutrition
Have you tried this recipe? Tag me today!
Mention @preppykitchen and tag #preppykitchen!


