

This post may contain affiliate links. Please read our disclosure policy.





This beginner-friendly sourdough recipe does not require kneading, takes very little hands-on prep time, and has straightforward and clear steps. With my tested steps, timing, and tips, you’ll be able to make the perfect loaf the first time.
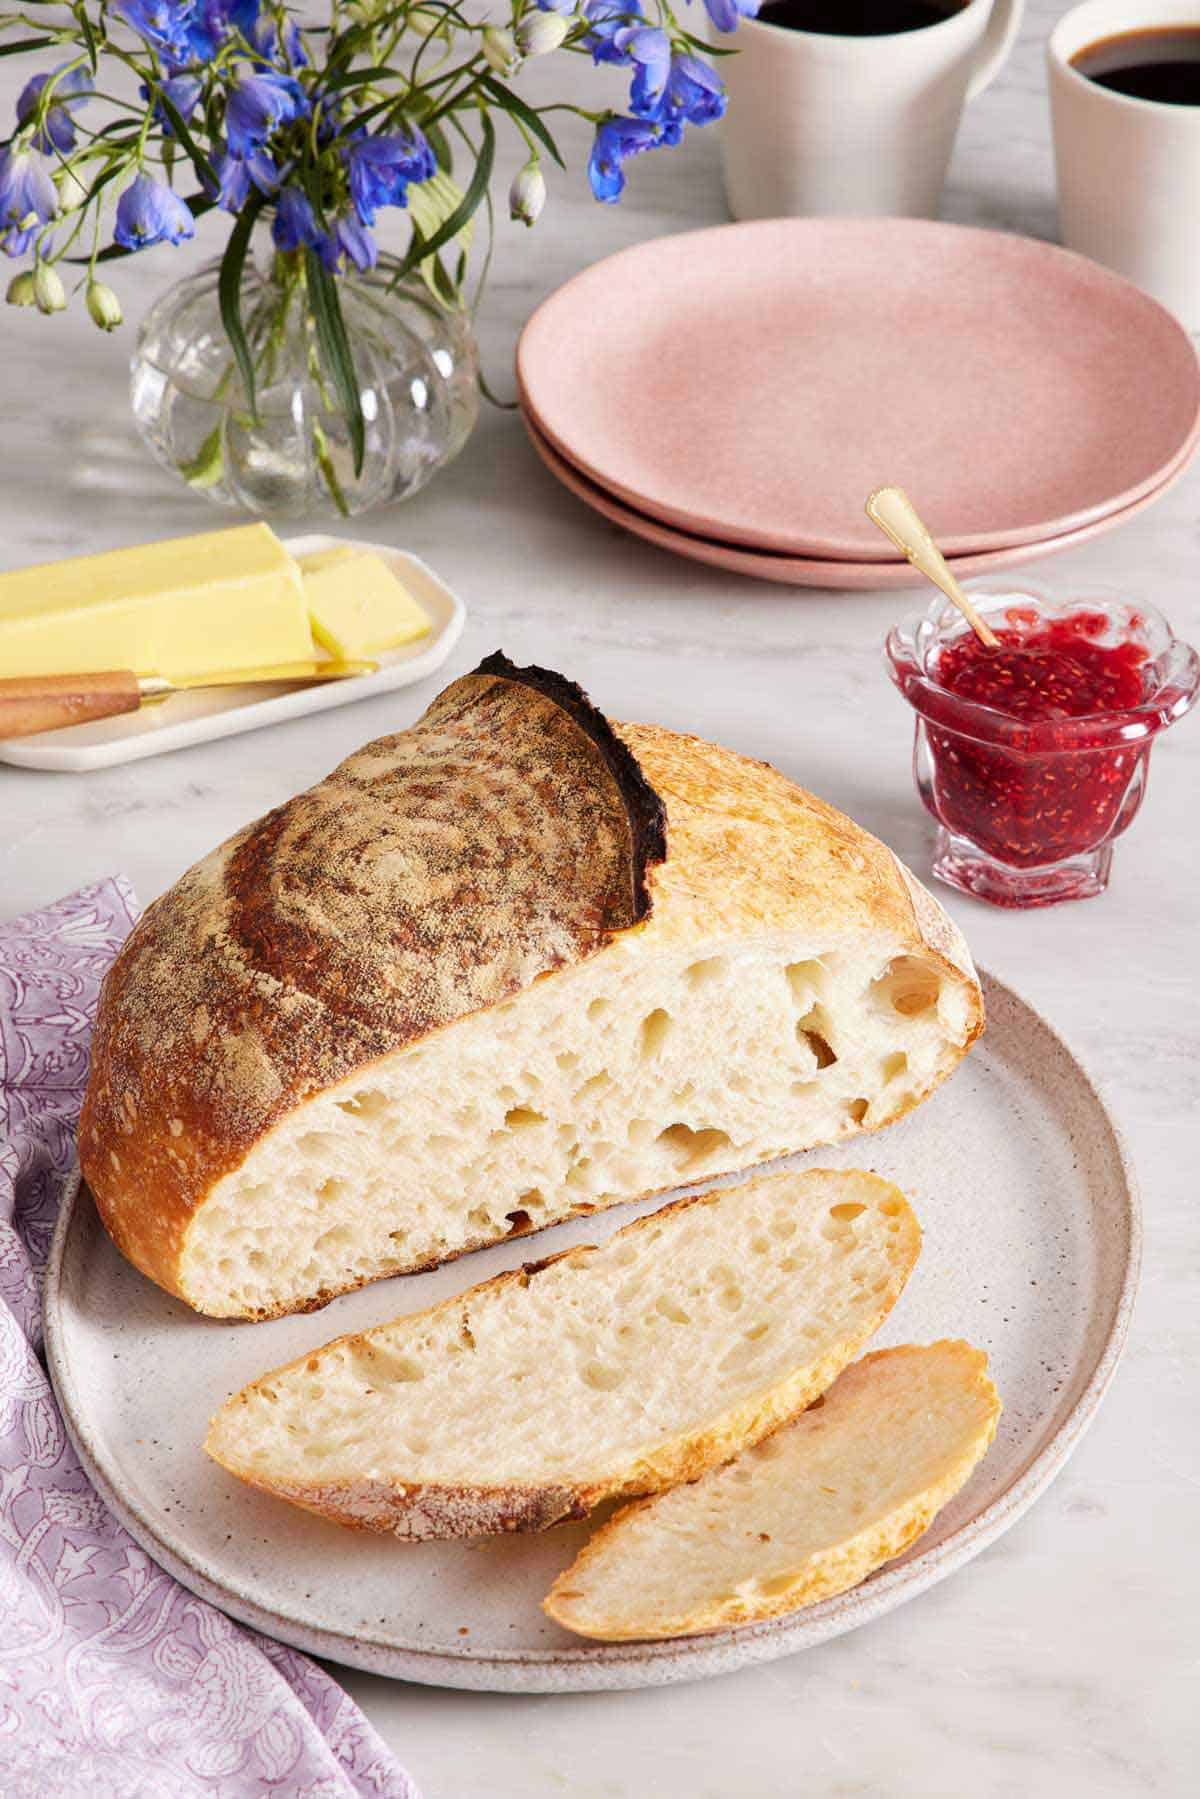
To make sourdough bread, you only need four ingredients with no kneading required. It’s quite simple. What makes sourdough feel challenging is not the ingredient list. It’s that almost every instruction is a range rather than a number. Sourdough is more about feel than precision, and so many recipes neglect to tell you how to read the dough well enough to pick a point inside that range.
My recipe does that! Below you will find the recipe, and within the post, the specific things I have learned baking this loaf over and over. What 20 minutes between folds actually feels like, what a 68°F versus a 75°F kitchen actually does to a 6 to 12 hour bulk rise, and why the loaf I pulled out of the oven at 209°F was already past where I wanted it.
You need an active starter to begin. If you do not have one yet, start with my sourdough starter, which takes about a week, then come back (or ask for discard from a friend!). Once you have that, it’s time to get started.
“Your recipes are just amazing. Followed it to the T and it turned out perfect. I have struggled to bake for years but your attention to details and explaining the why behind it has transformed me from a buyer to a baker!”
Andrea
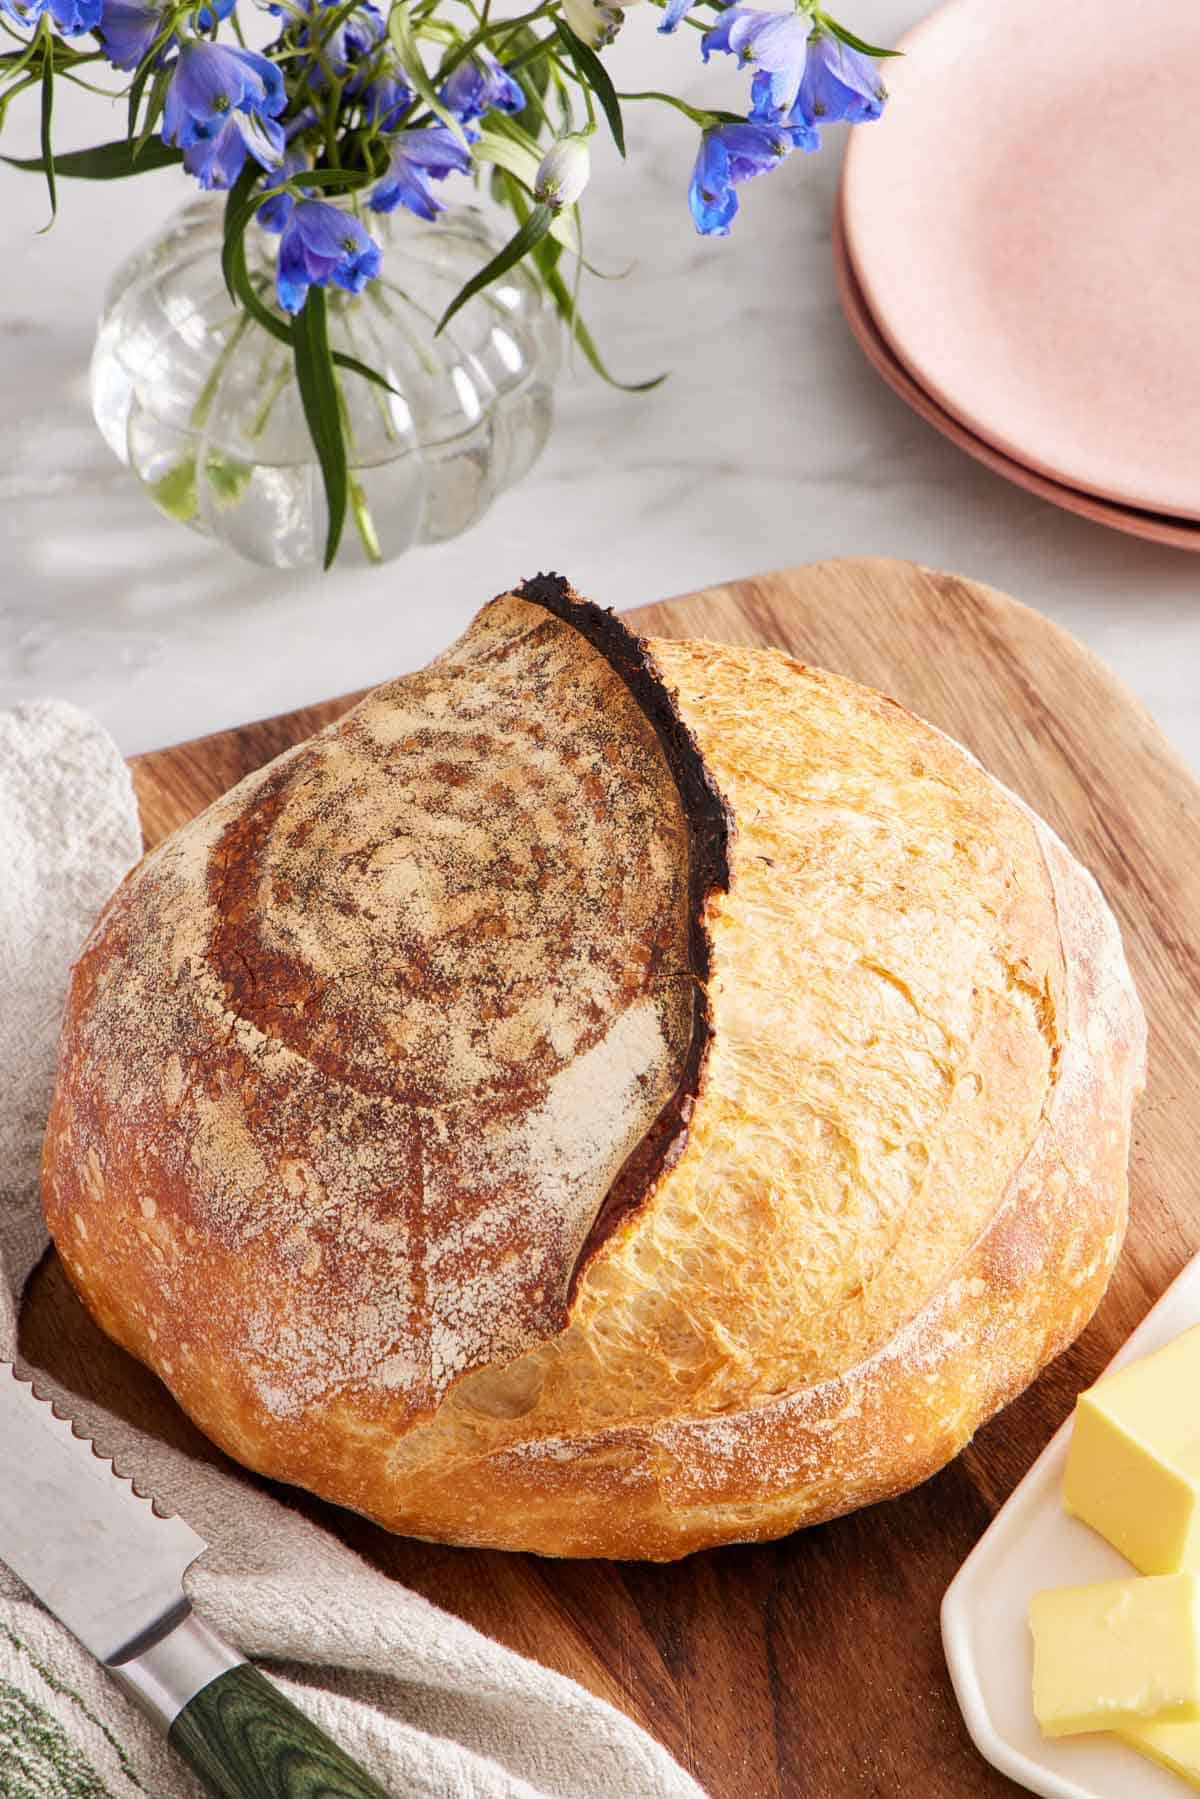
Why This Dough Is Easier to Handle Than Most
Most of my readers comment on this post and mention how they were shocked at their first-time success making sourdough bread following my recipe. This comes down to two key components in how the recipe is designed: hydration and salinity.
Lower Hydration
If you run the numbers on my recipe, you’ll see that the bread dough is roughly 66% hydration. (The total flour is 560g, and the total water is 370g once you count the 60g of each that come in with the starter. Divide the total water by the total flour to get the overall hydration.)
Most beginner sourdough recipes are above 70%. That four to five percentage point difference is the main reason this loaf is more forgiving. A wetter dough is generally harder to handle—it spreads faster, sticks more easily, and doesn’t allow for hesitation during shaping. At 66%, this dough holds a ball shape more easily, takes surface tension willingly, and doesn’t just completely slump into a puddle on the counter while you figure out what your hands are doing. You give up a little of the wide-open irregular crumb that higher hydration produces, but for a first loaf, that is a good trade.
Higher Salt Percentage
The salt is on the higher side, at 16g, which works out to about 2.9% of the total flour weight against the roughly 2% that is the average for most bread recipes. I did this for two reasons. First, it tastes better! Salt = flavor, and the added salt made it taste more complex, bringing out the sour qualities of the bread better.
Second, salt slows fermentation and strengthens the dough. By slightly slowing fermentation, the window between under- and over-proofed is wider, so you have more room to plan it around your schedule. This is ideal for a first-time baker!
The stronger dough means the gluten network is more robust, so the texture of the bread is better without as many folds or kneading. To get technical, gluten molecules have a positive charge and like charges want to push away from each other. Salt neutralizes that, so they no longer want to repel, and instead they bond, forming a tighter structure. This doesn’t typically start to happen until the salt is over 2% in the dough.
So by using 16g (2.9% instead of 12g (2%), you get a tastier, chewier bread with a better crumb structure and a more forgiving timeline to help the bread fit your schedule and not the other way around.
What You Need: Ingredients & Equipment
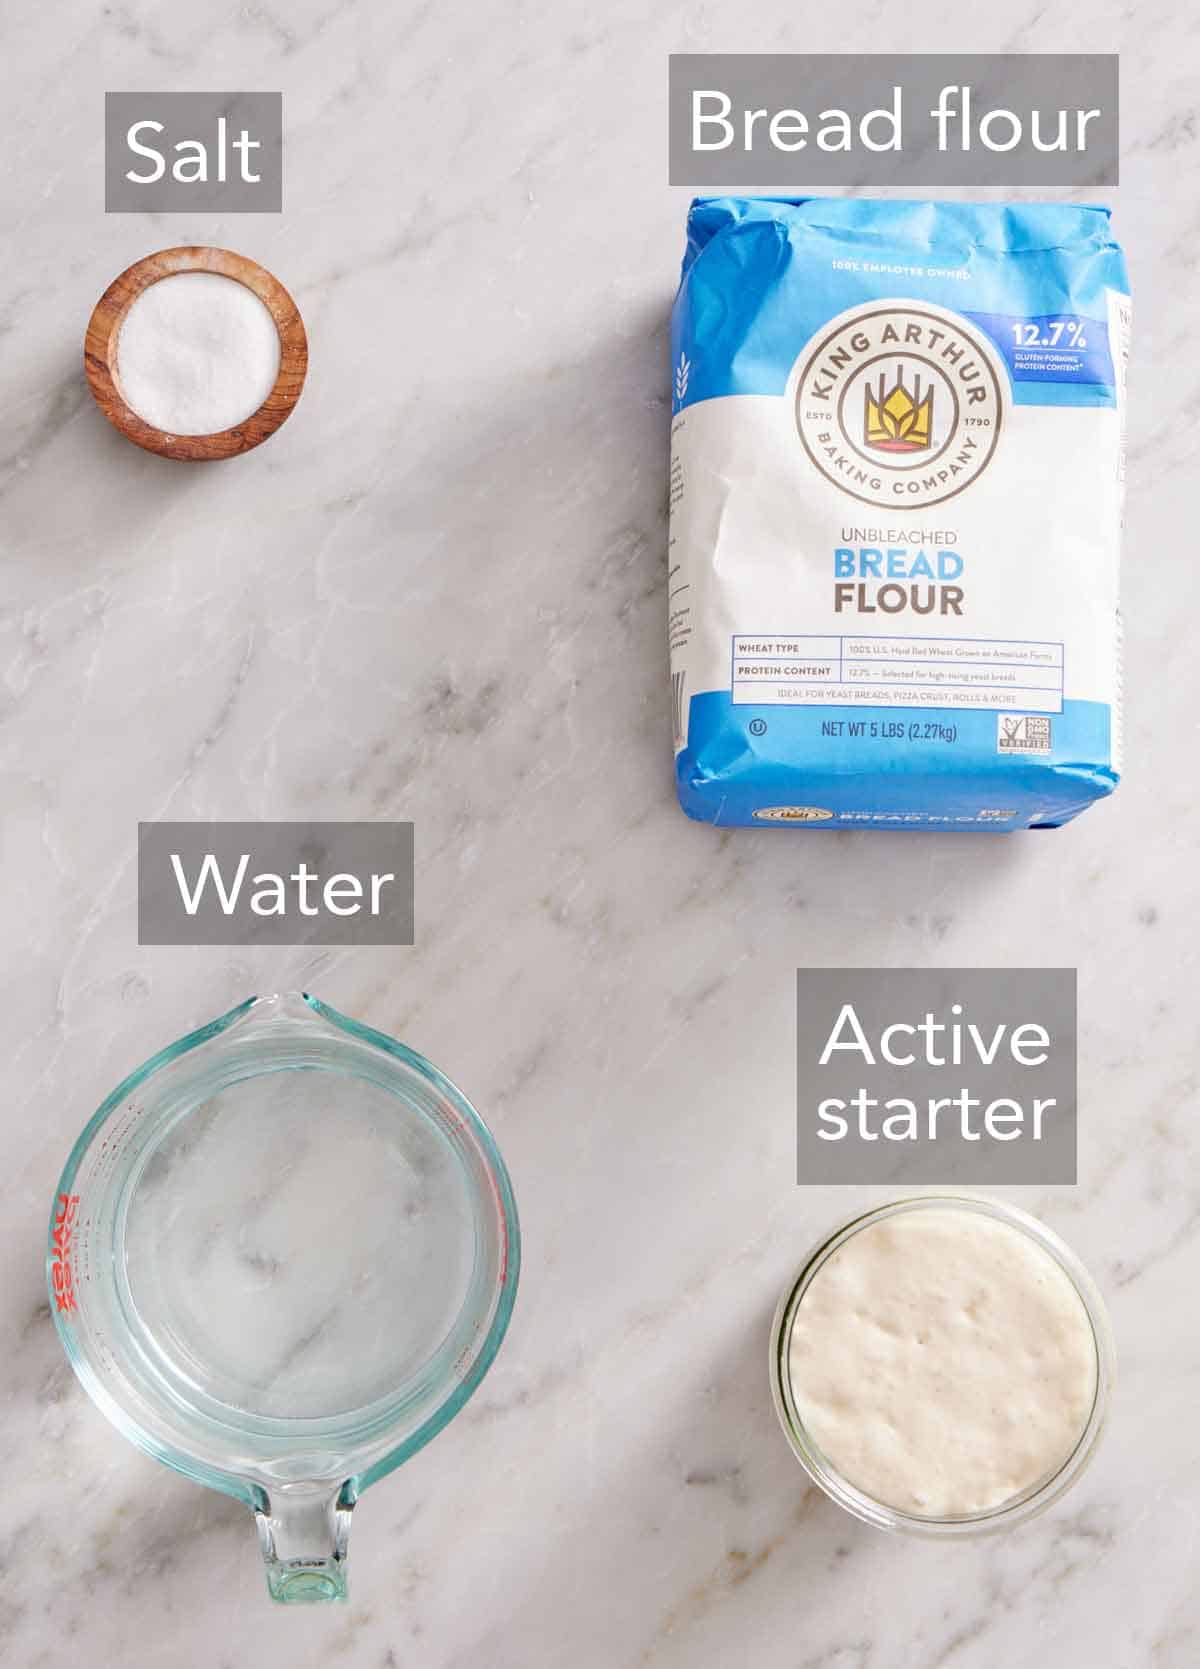
These are the main ingredients you need to make homemade sourdough bread. You can find the full list of ingredients and measurements in the recipe card below.
Bread flour — the higher protein content (about 12-14%) is what gives you the chew and the structure to hold a tall loaf. All-purpose works and the bread will still be good, just softer and less chewy, with no change to the water. You can also use part AP flour with bread flour if you prefer a softer texture. Replacing 10-25% will give a good balance between them both without sacrificing all of sourdough’s signature chewiness.
Filtered water — chlorinated tap water can knock back the good bacteria in your starter. Water from a fridge or drinking water filter is sufficient, though you can use bottled if you’d like. If filtered water is not easily accessible, leave tap water uncovered overnight in the fridge and much of the chlorine gases off.
Active starter — it needs to be fed and at its peak. More on that below! Make sure you aren’t using discard that has been sitting around in your fridge for a long time and is weak.
Fine sea salt — fine salt dissolves the best in the water. I like sea salt for its neutral flavor, but any fine salt will work. I also highly recommend you weigh it. Salt volumes vary enormously by crystal size, and getting this wrong changes your fermentation timeline and texture of the bread, not just the flavor. Learn more about the different types of salt in my Academy lesson: Salt 101.
Equipment
There are a few basic things you need to make a good loaf of sourdough at home. You do not need to buy anything special! If you happen to have specific bread-making tools, you can use them, but I will give you instructions for using common kitchen tools.
Dutch oven — a cast iron pot is ideal. If yours is enamel with a white interior, use one you do not mind discoloring, because an hour at 500°F can turn the white coating inside brown. It should not damage enamel in good condition, but it will not look new afterward. If you have a seasoned Dutch oven, you can use it without any risk of discoloration! If you have a specific bread oven, you can also use that too. The lower sides make it easier to add and remove the loaf to the hot pot.
Colander and a smooth kitchen towel, or banneton — a colander lined with a flour sack towel (or other smooth kitchen towel) works great without having to buy special equipment. If you have a banneton (bread proofing basket), you can use it too!
Sharp knife or bread lame — use this to score the dough, which will let it rise properly during baking.
Getting Your Starter Ready
Feed your starter 6-12 hours before you plan to mix the dough, and use it when it has risen and is just beginning to fall back. That is the peak, and when you know the starter will be very active in your dough. Mark the jar at the level right after feeding so you can see how far it climbed. A refrigerated starter that was fed, activated, and chilled works too, if used within 3 to 4 days.
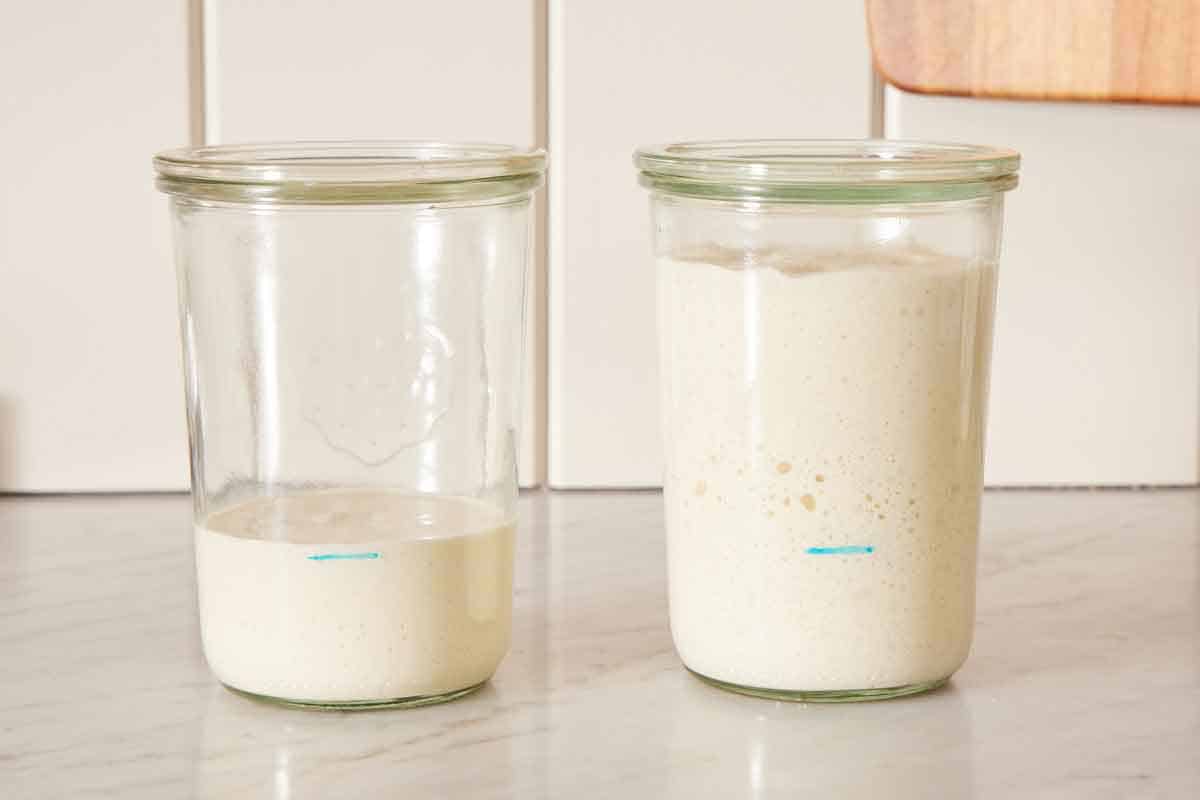
For the full feeding schedule, how to build one from scratch, and how to keep it alive long term, my sourdough starter post covers all of it. As you feed and discard it for this recipe, you’ll have more than the 120g needed. Use the extra for sourdough pancakes, sourdough waffles, sourdough biscuits, or sourdough pizza crust.
How To Make Sourdough Bread
Below, I’ve highlighted a quick overview of how to make sourdough bread in step-by-step process images. Use this as a quick reference to the overall process! Each section is further explained below and in the recipe card below.
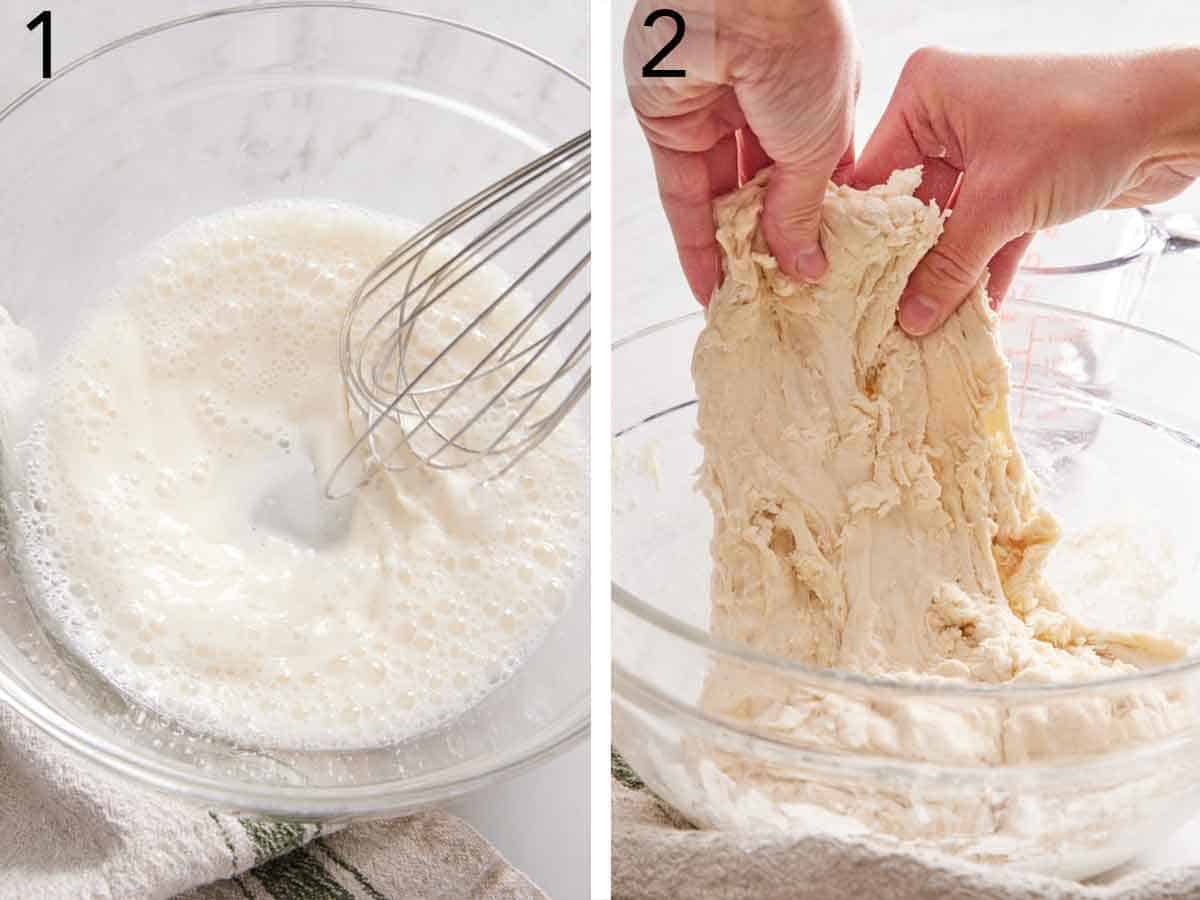
1. Mix the dough: Whisk the water and starter together, add the flour and salt, and stir until shaggy. Cover and rest 1 hour. This is a variation on autolyse: the flour hydrates, gluten begins to form on its own, and you skip kneading entirely.
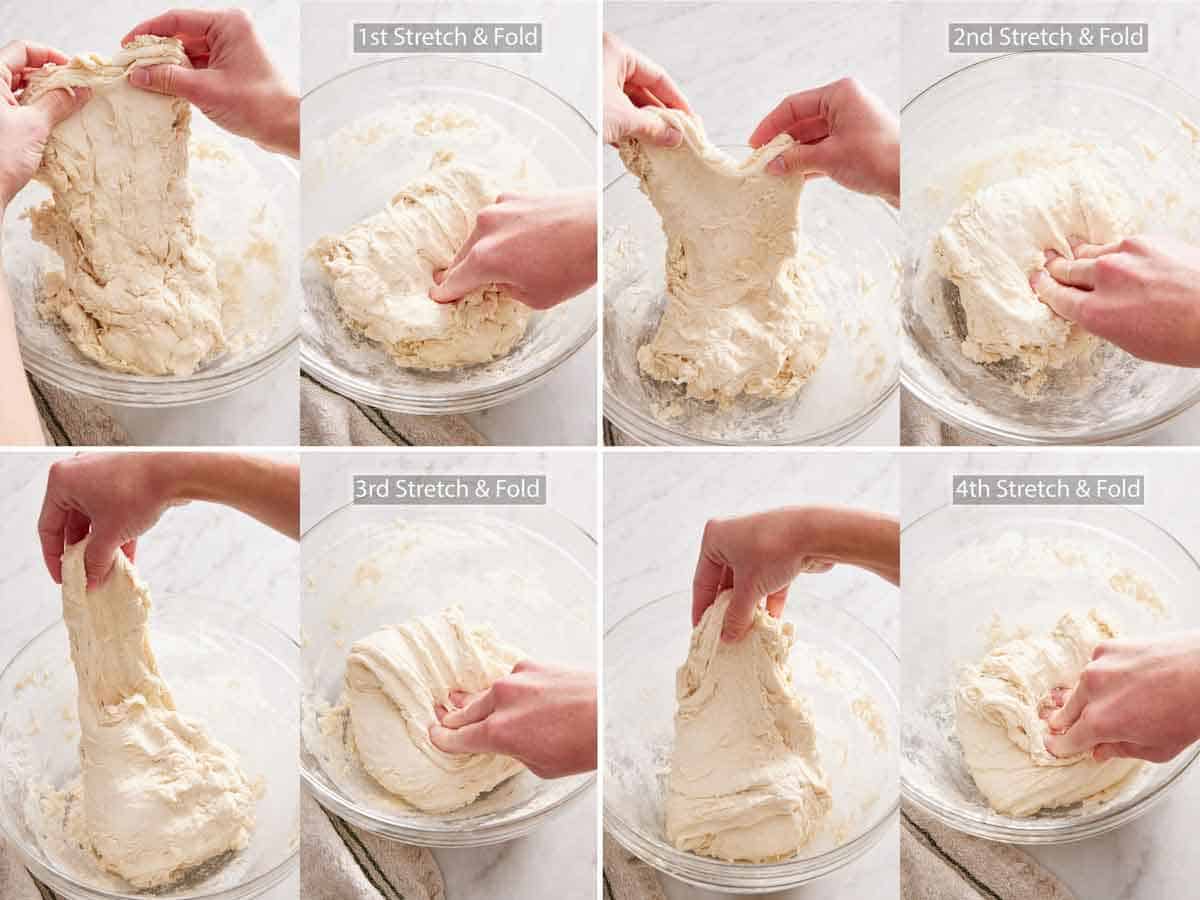
2. Stretching and Folding. Do your first set of stretches and folds, then rest 20 minutes and repeat. This step will gently help with gluten development, improving the dough’s elasticity and strength. This is done instead of kneading (and is much easier!).
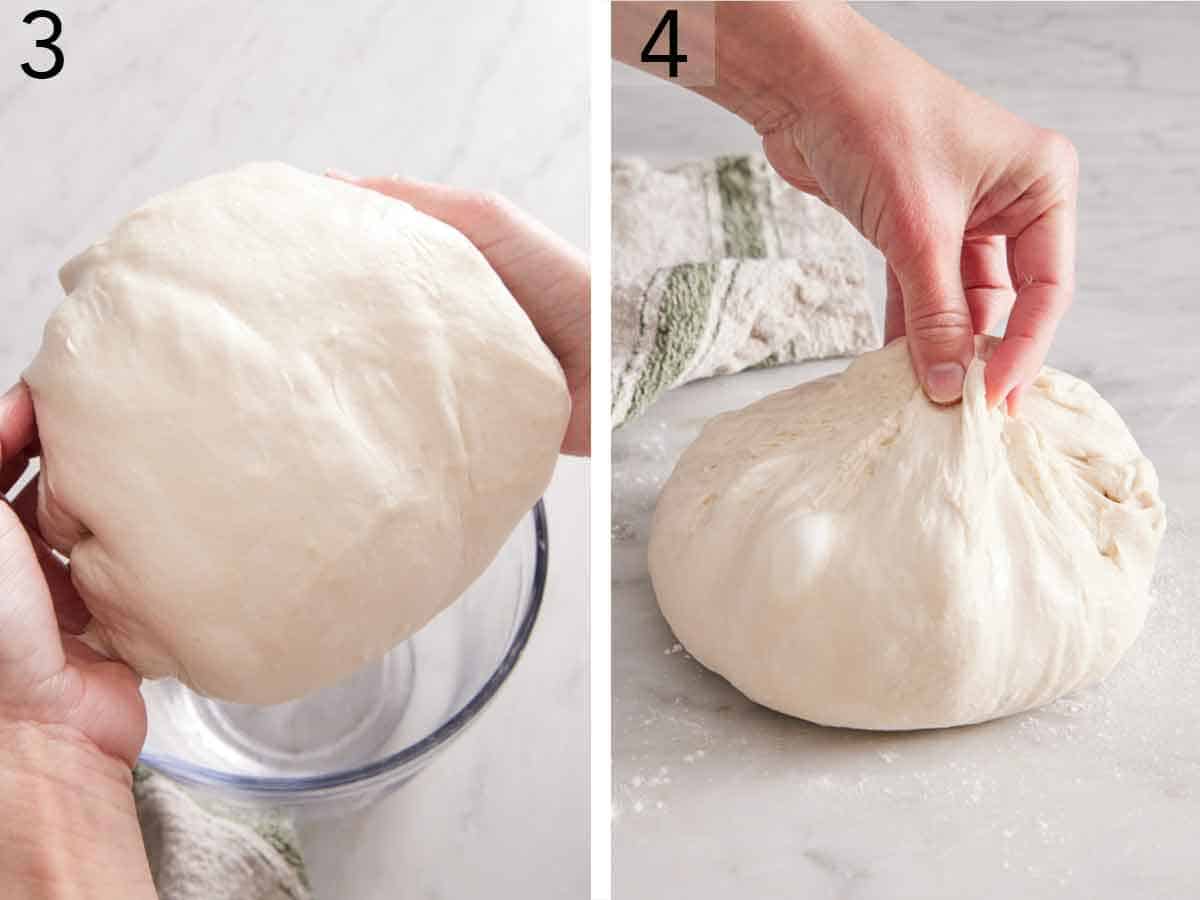
3. Bulk Rise (or Bulk Fermentation): Shape into a ball, cover, and bulk rise 6 to 12 hours at 68°F to 75°F. This step is all about flavor development and aerating the dough.
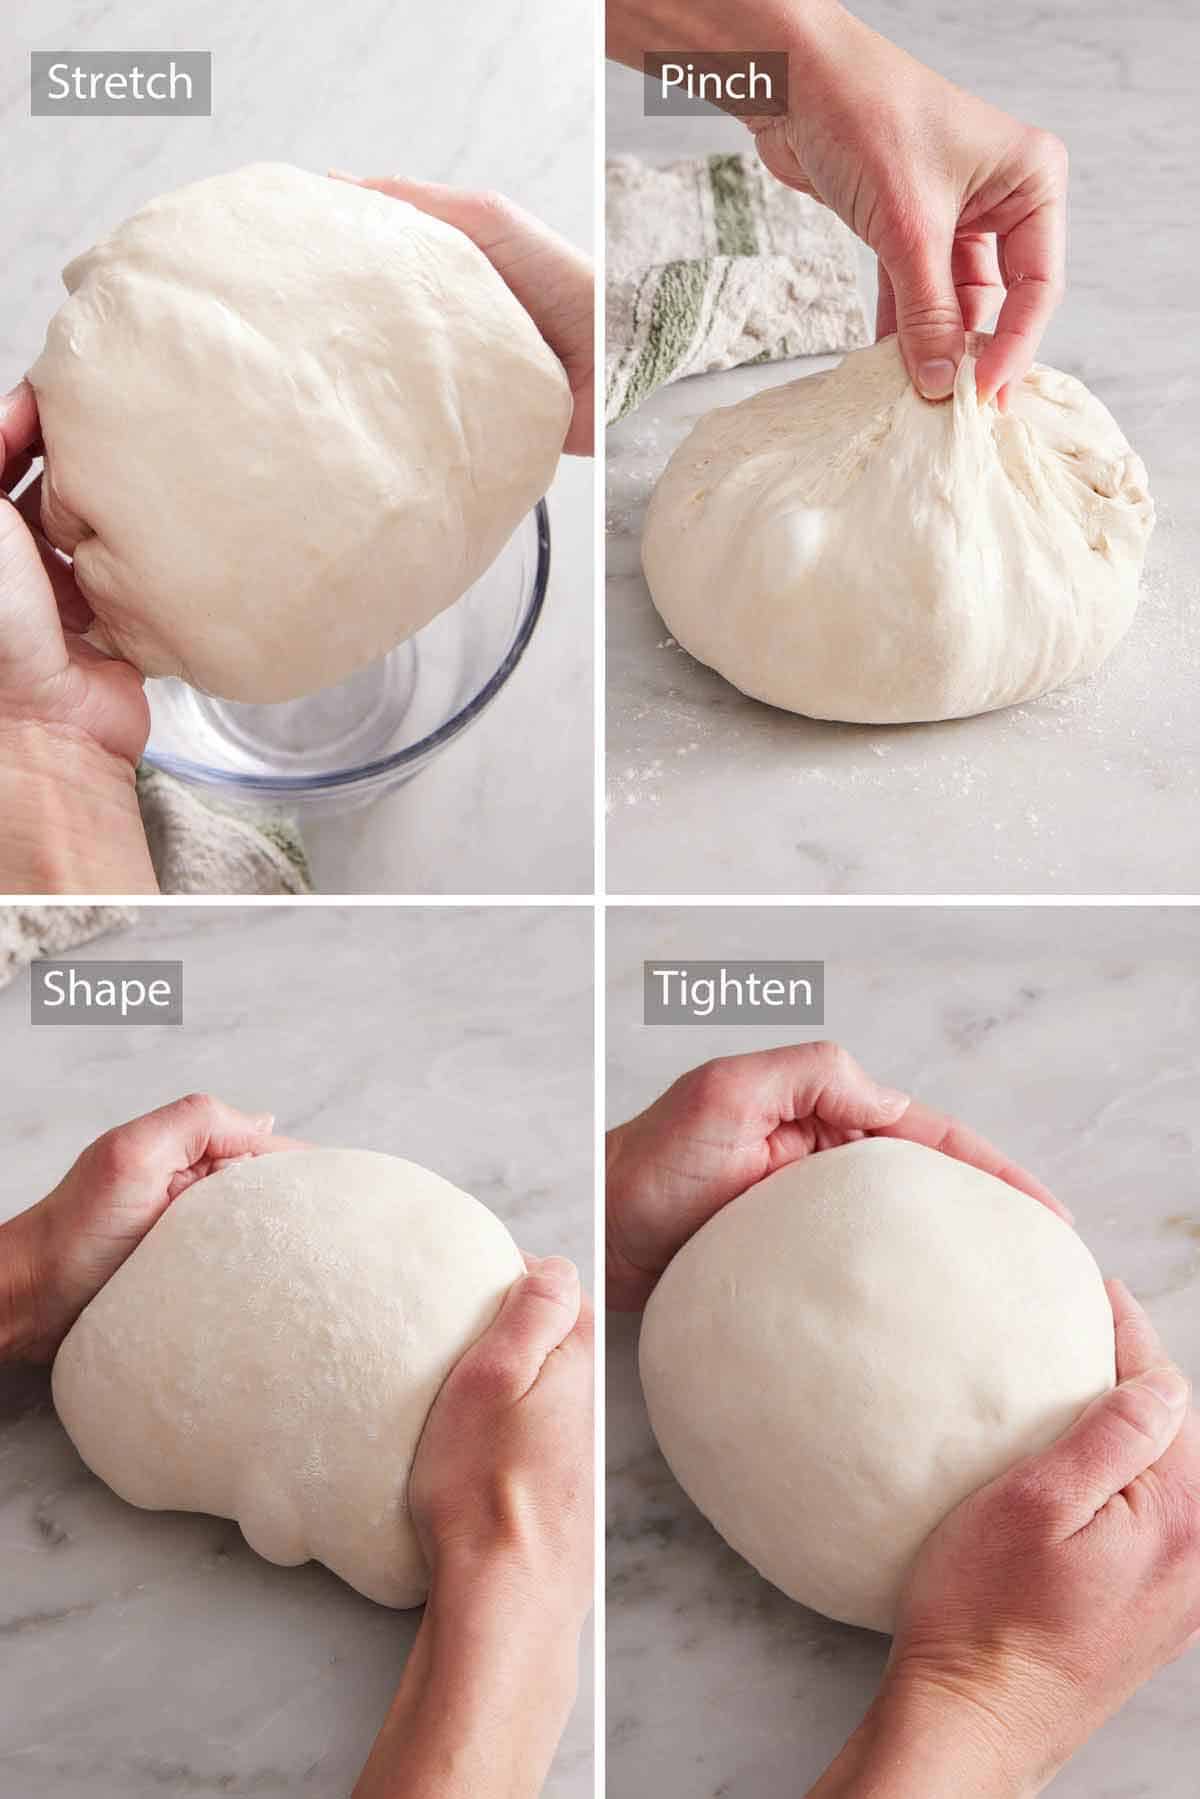
4. Shape the dough: After the bulk rise, lift the dough up and out of the bowl, stretch it so it hangs over your hands, then set it down on the counter. Flour the top, flip the dough over, and pinch the edges into the center like closing a sack.
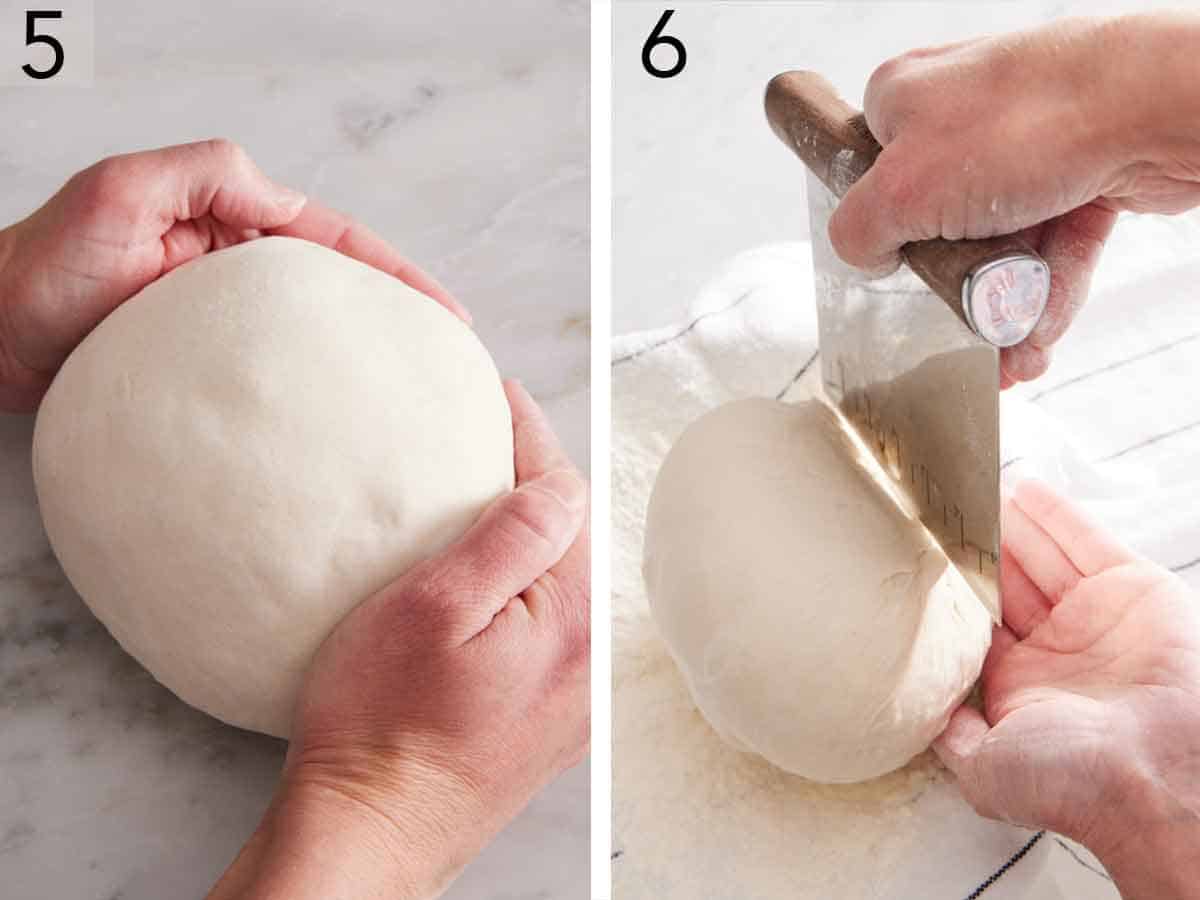
5. Build surface tension: Flip the dough ball seam side down and drag the ball toward you in short pulls, rotating between each, until the surface is taut. Dust the top with flour.
6. Final Rise: Set it top-side down in a colander lined with a floured towel. Let the dough rest and rise for 30 minutes at room temperature, then refrigerate it for at least 1 hour while a Dutch oven preheats at 500°F.
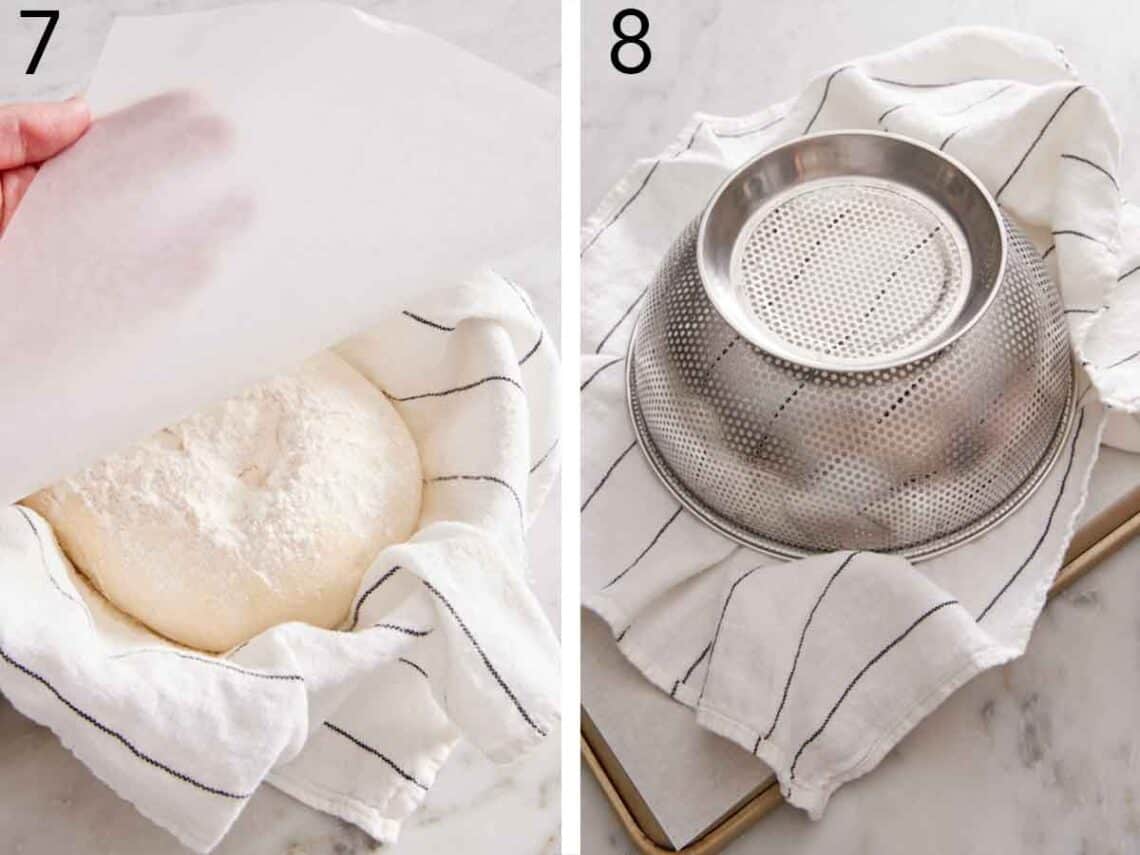
7. Invert the chilled loaf by placing a sheet of parchment paper on top and then a cookie sheet (this just helps you handle it better). Flip the pan and the colander over.
8. Remove the colander and carefully peel back the towel. If you want a very distinct design on top, you can sprinkle a light dusting of flour on top.
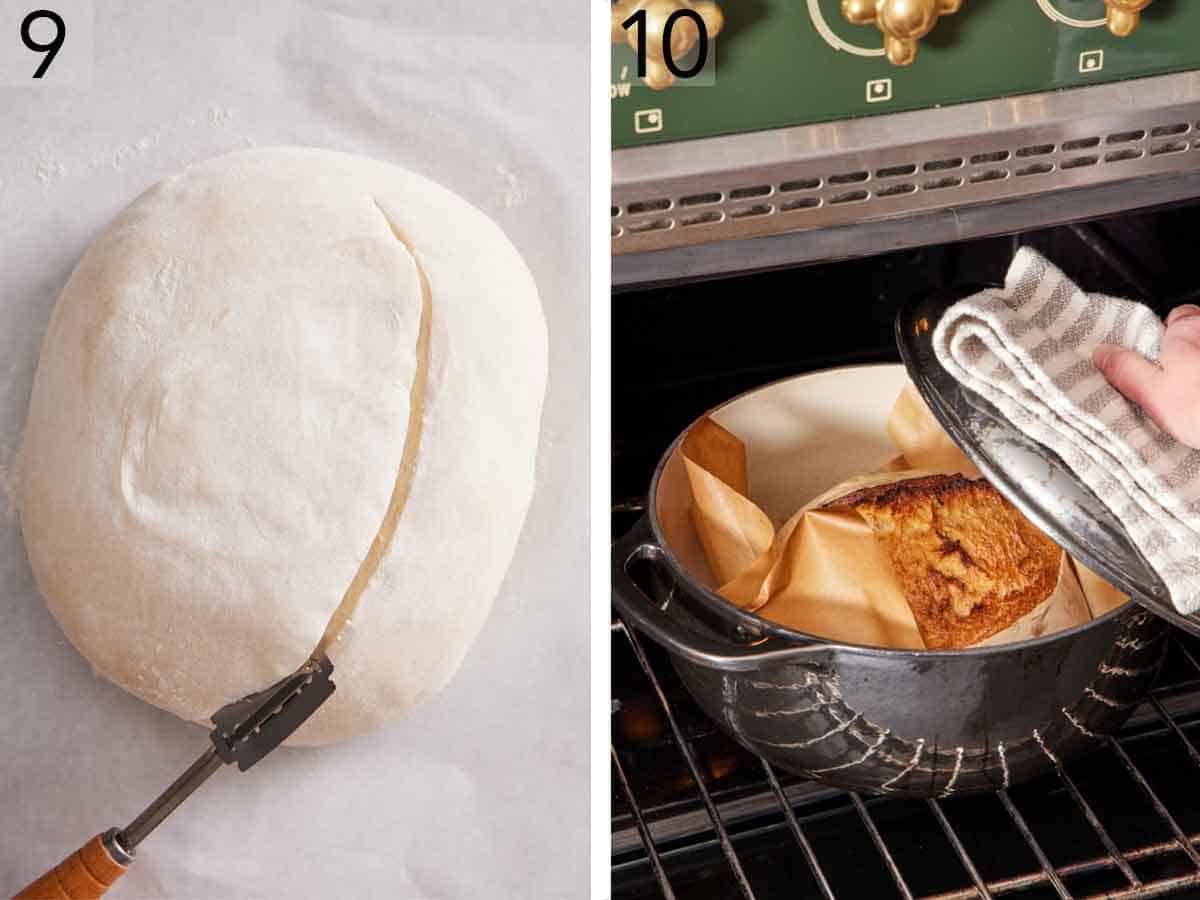
9. Score to release tension. Score the top, and carefully lower it into the hot pot using the parchment as handles. Place the lid on and return the pot to the oven.
10. Bake: Bake 20 minutes at 500°F, then drop to 450°F and remove the lid. Continue baking about 20 minutes more until deeply browned and 195°F to 205°F inside. Remove the bread from the pot and let it cool completely on a wire rack before slicing.
Stretch and Fold: How Many, and How Long Between
Four sets is my default—through all my testing I found that it produces a chewy bread but keeps down the amount of time I have to babysit the dough. Six sets will add another 40 minutes onto the schedule but produces a stronger gluten network. So if you like a supremely chewy sourdough, you can go up to 6 rounds. Both are good breads!
The time between sets matters here. I have tried to rush it and cut the rest between sets to 15 minutes, but I found the dough fought me and was too resistant to stretching. It needed more time for the gluten to relax. 20 minutes is the sweet spot, and by the third set of stretching and folding, the dough stretches more smoothly and can stretch farther before it wants to tear than it does at the beginning. So be patient! If your dough still feels springy at 20 minutes, wait another 5. (A colder environment can make the intervals longer.)
Wet your hands in cold water before every fold. Keep a measuring cup of it next to the bowl. The water helps your fingers slide under the dough and release it cleanly. Dry fingers will stick and tear it. Start at 12 o’clock, pull up, stretch that section of dough over the center, and lay it down. Turn the bowl 90 degrees and repeat. Do this all the way around the bowl, then cover and let it rest for 20 minutes.
Reading the Bulk Rise
This step separates a good loaf from a dense one, and it is the key part of the recipe where feel matters more than concrete numbers. It’s a time range, so you need to know what to look for rather than rely on the clock.
What “risen” looks like
The dough should jiggle as one mass when you shake the bowl, sit visibly domed rather than flat, and show large bubbles under the surface. The overall volume of the dough will be close to doubled. Proofing in a straight-sided container with volume markings makes this much easier to see.
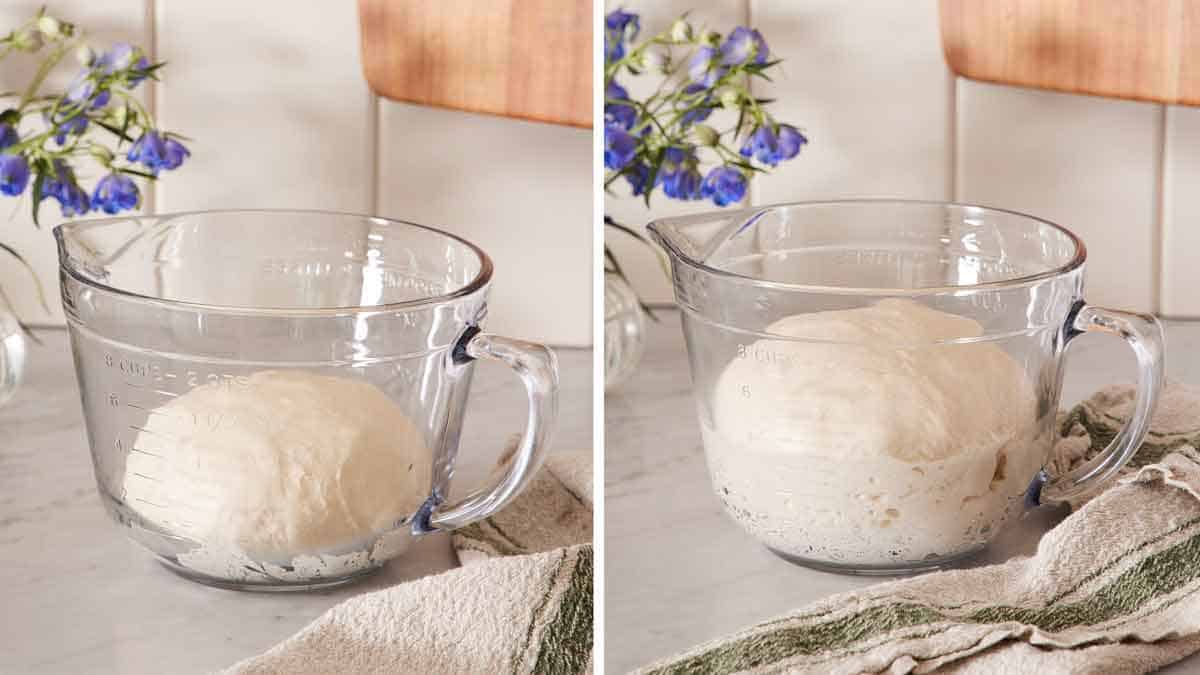
You can also do the poke test. Flour a finger, or use the end of a wooden spoon, and press into the top of the dough about half an inch. If it mostly springs back (refills the dent), it means it’s ready. If it stays put and feels dense, keep rising and check hourly. If it deflates or feels slack and soupy, it has gone past and overproofed. (If the latter happens, I bake it anyway! It will be flatter, but it will taste good. You can always make it into croutons or breadcrumbs.)
How temperature affects rise times
Sourdough ferments quickly in warm temperatures and slowly in cold temperatures. The 6 to 12 hour range for dough rise times is not intended to be vague, but rather it’s a sliding scale based on the ambient temperature where the dough is rising. On one test in the winter, I left the dough to bulk rise in a spot on my counter that was about 68°F, and the dough was ready in a little under 10 hours. In another test that same week, I put the loaf in my oven proofing drawer (about 75°F), and it was done in about 6 hours.
So pick your environment to fit your schedule if possible. Choose a warm spot on the counter or in the oven with the light or the Bread Proof setting on to bake it sooner. To drag out the time, place it in a cooler spot in the room, or place it in the fridge to bake it in a day or two (more on cold fermentation in the fridge, below).
Shaping for Surface Tension
Shaping is actually less about making a pretty ball. Its main function is about building a taut skin that holds the loaf upright instead of letting it spread, so it rises up instead of out, turning pancake-shaped.
Once the bulk dough has risen, dip both hands in cold water, and slide them under the dough. Lift it a foot or two out of the bowl so it drapes and stretches under its own weight. Set it down on the counter. Flour the top, flip it, and pinch every edge into the center. Flip again so the seam is down.
Now cup your hands around the far side and pull the ball toward you a few inches. The friction against the counter drags the underside, tightening the top. Rotate it a quarter turn and pull again. Do this eight to ten times to get a nice, tightened ball. You will feel it: the dough stops feeling slack and starts feeling like it is resisting your pulls. You can also poke the top of the dough, and it should feel very bouncy with distance, springy back quickly. That resistance is the surface tension on the dough ball that you are after!
Cold Retard: Where the Sour Comes From
Most beginner sourdough bakers expect that when they bake a loaf with starter, it will be distinctly sour. But that sourness comes with time. A same-day loaf risen in a warm spot is a good loaf, but isn’t going to be very sour. My first test loaf, I bulk-rose for 6 hours in an oven with the light on, then baked it two hours later. It came out with a solid crust and a chewy, nicely open crumb, but almost no tang.
Sourness comes from time and cold. Chilling shifts the balance in the culture toward the acid-producing bacteria and away from the fast-working yeast, so the dough keeps developing flavor long after it has stopped rising much. The more time you let it chill, the more sour it will be. The cold temperature also slows down the yeast, so you can keep it in the fridge for many hours to let that flavor develop. An added bonus: the gluten network also strengthens during the cold rest, so it is able to better hold the bubbles from the yeast for a more even structure.
If you want a very sour sourdough, plan to give your dough a long rest in the fridge. There are two times you can do this in the process, and you can do one or both:
Cold bulk rise. After the last fold, refrigerate the bowl of dough for up to 24 hours, then bring back to room temperature before shaping the loaf.
Cold final rise. Shape the loaf, put the covered colander in a sealed bag, and refrigerate it for up to 36 hours. This is the one I do for most, because I can front-load the work and then have a loaf sitting in the fridge ready to bake off. Plus, a shaped cold loaf is also much easier to score and handle.
What Happens If I Underproof The Dough?
Dough that is under-proofed will yield sourdough bread with a much tighter, denser crumb structure inside the loaf. The crust will have fewer bubbles and will be tough and firm, and neither the bread nor the crust will have the correct chewy texture. In extreme cases, the sourdough loaf can bake up so dense that the inside is totally gummy and doesn’t rise at all.
I tested this with two loaves of sourdough bread. I made the doughs at the same time and let them Bulk Rise for 6 hours at room temperature. For the first loaf, I shaped it and then immediately chilled it for 1 hour in the fridge while the oven preheated. For the second loaf, I shaped it, let it rise at room temperature for 30 minutes, then chilled it for 1 hour before baking.
The results: You can see in the image below that the under-proofed first loaf baked with a tighter crumb structure. The texture was denser and less springy when you ate it. The 30-minute rise for the second loaf allowed time for the yeast to build carbon dioxide again throughout the loaf (some deflates when the loaf is shaped), so the crumb structure was more open. This resulted in a texture that felt springy and chewy without being too dense or gummy.
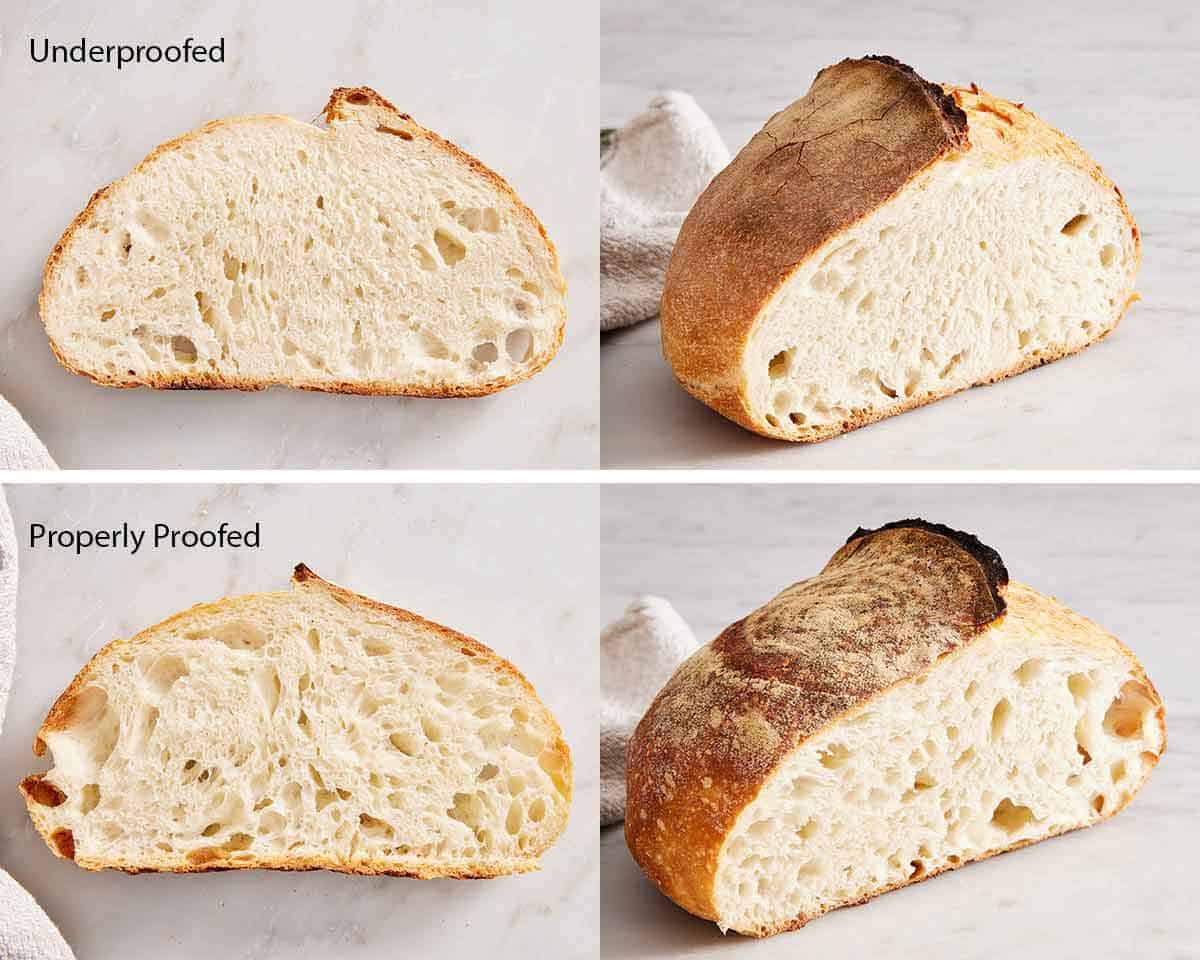
Proper rising, both bulk and after shaping, produces more carbon dioxide bubbles in the dough, so the structure inside the bread is lighter, more airy, and has lots of pockets throughout. The crust will also have lots of little bubbles on the surface, too, and be chewy rather than hard and tough.
Baking The Perfect Loaf
There are two things that help bake the best loaf: a lidded pot and checking the internal temperature of the finished loaf. The lid traps steam and keeps the crust soft for the first stretch of the bake so the loaf can expand fully before the exterior sets. (This rapid final rise during the first part of baking is called “oven spring.”) If you take the lid off too early, you will halt this expansion. If you leave it on for the full bake, you’ll never get a crisp crust, and it will be very pale. For my recipe, 20 minutes at 500°F with the lid on, then 450°F uncovered for about 20 more minutes works perfectly.
Color is a decent guide, but the thermometer is better. The finished loaf should be 195°F to 205°F in the center. On one test, I let a loaf go to 209°F, and while it was perfectly edible, the crumb was drier than I wanted. What I love about sourdough is that signature chewy interior that feels moist but not wet. Baking it over 205°F dried it out too much, so the slices felt overbaked or like they were already a day old. Start checking a few minutes early for your first bake.
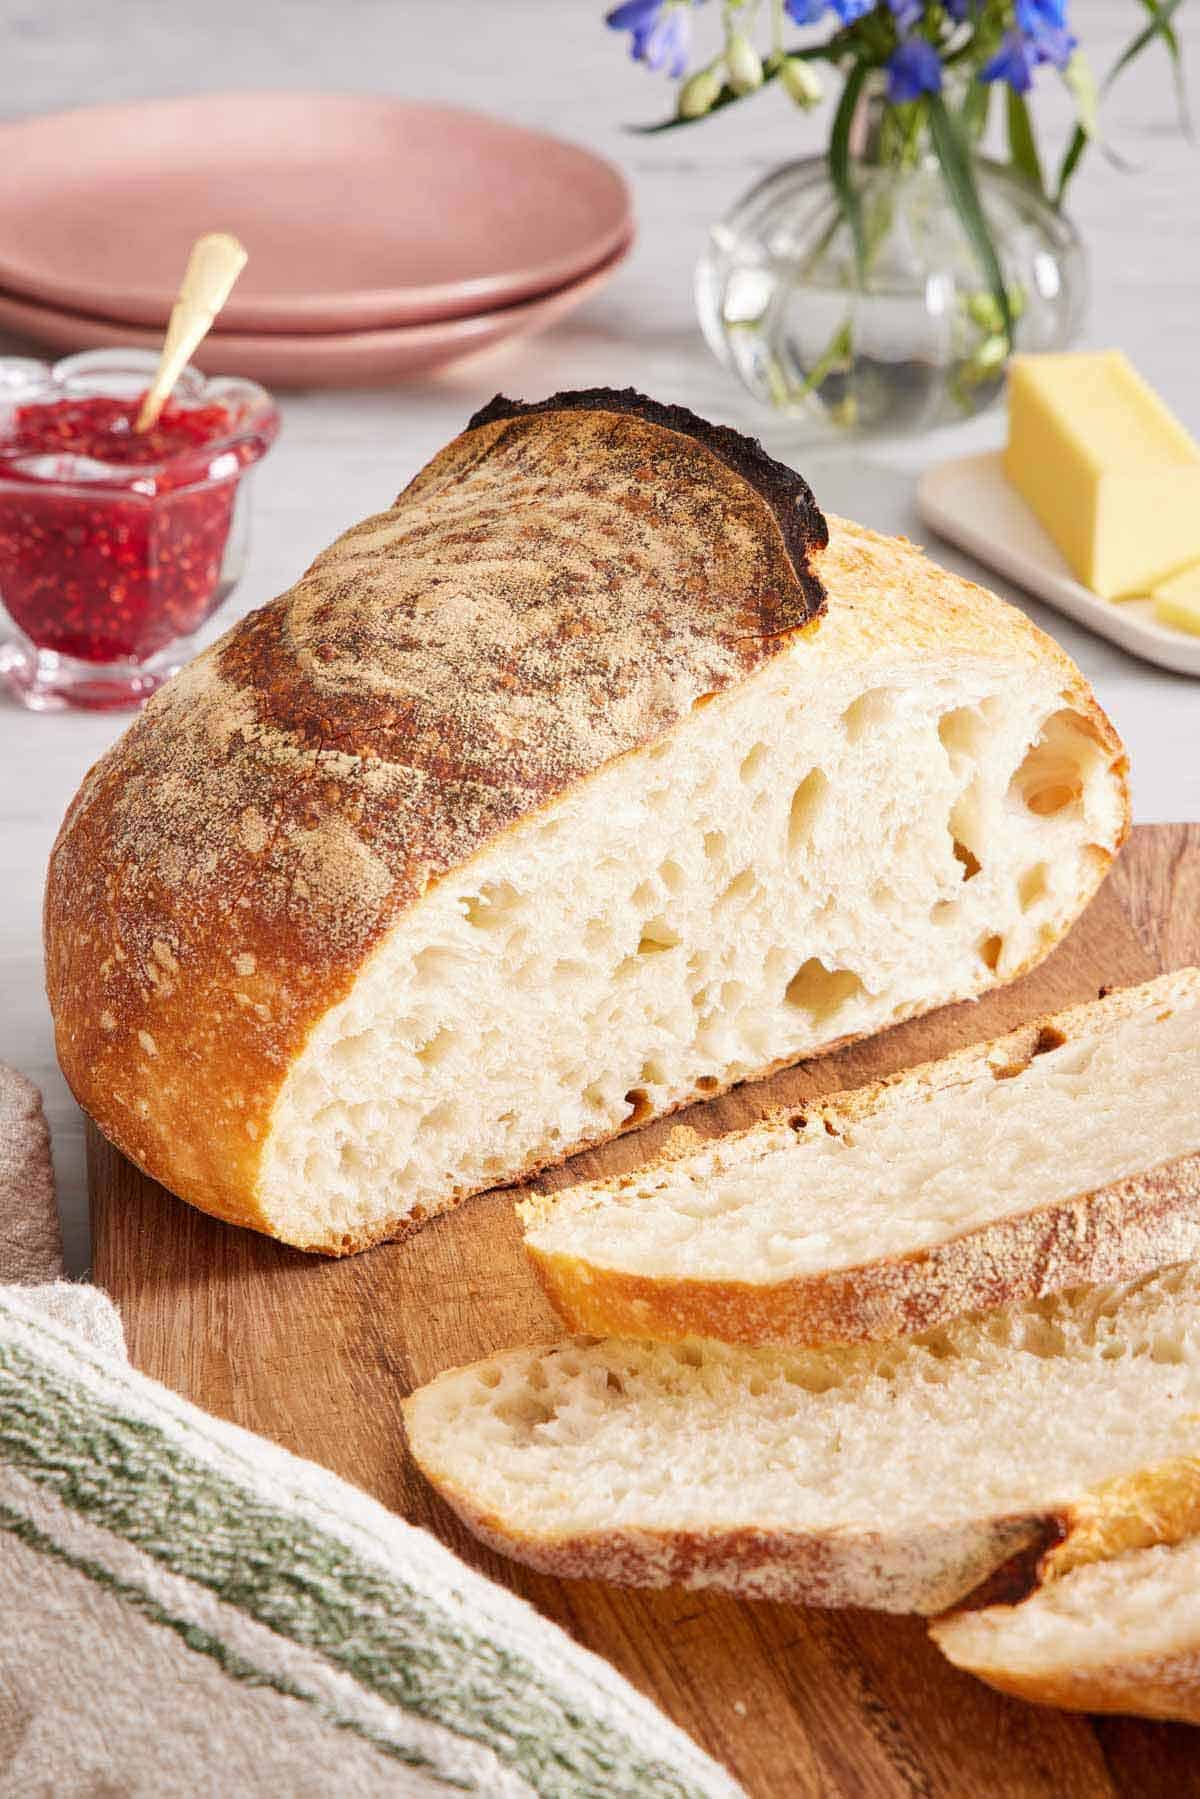
The hardest part? Letting it cool completely! But it’s important. The starch from the flour is still setting as the loaf cools, and cutting into a hot loaf gives you a gummy, pasty crumb along the knife cut. It will also cause your bread to dry out faster as it steams and releases moisture from a large cut area. Let it cool for at least an hour for the best texture.
Pro Tips For The Best Sourdough Bread
Weigh everything. Sourdough is a ratio, and cups do not measure ratios reliably. A scale also means fewer dishes! If you don’t have a scale, learn the best technique for measuring cups of flour for the most accurate results in my Academy lesson: How to Measure Ingredients Correctly.
Use a straight-sided container for the bulk rise. Judging “doubled in size” in a round mixing bowl is a bit of guesswork. If your container doesn’t have straight sides, use one that has volume measurement markings on the outside, like a large measuring bowl.
Want to flavor your loaf? Herbs and ground spices can go in at the start, but chunky mix-ins like cheese, dried fruit, nuts, or seeds should go in later. Add them at the start of the third set of folds, then do an extra set (a total of 5) to make sure they are distributed evenly. For herbs and spices, add up to 2 tablespoons. For chunky ingredients, keep them to 1 cup or less.
How To Store A Sourdough Loaf
Sourdough bread keeps at room temperature for a maximum of 2 days after baking. Store it in a bread box or bread bag if you have one, or a paper bag with the cut side down on your counter. If your loaf feels stale after a day or two, run the whole loaf under tap water for about 3 seconds to coat the crust and bake at 300°F for 6-10 minutes. This will rehydrate the interior crumb and crisp the crust.
Do not refrigerate the baked loaf. Cold temperatures make bread go stale much faster than at room temperature. Staling happens because the starches naturally recrystallize and release moisture. The cold temperature of a fridge causes this process to happen much more quickly.
Freeze it to store homemade sourdough bread longer. Freezing actually locks in the freshness! (It freezes the starch so it doesn’t change form.) I like to freeze slices so I can grab a serving or two as I need. Separate slices with parchment paper to prevent sticking, and store in a freezer bag for up to 1 month. Slices are more susceptible to freezer burn, so if you want to freeze it for longer, a whole loaf keeps well for up to 3 months.
Sourdough Bread Recipe

Equipment
- mixing bowl
- Collander or shallow bowl
- Kitchen towel
- Dutch oven
- Sharp knife or bread lame
Ingredients
- 310 grams warm filtered water (90F) (1⅓ cups minus 2 teaspoons/310ml)
- 120 grams active starter (See Notes) (about ½ cup)
- 500 grams bread flour (4 cups plus 2 tablespoons)
- 16 grams fine sea salt (about 2 teaspoons)
Instructions
Make the Dough:
- In a large metal or glass bowl, whisk together the water and starter until mostly combined. Add the flour and salt. Stir together by hand or with a spatula until the mixture is very shaggy but most of the flour is mixed in.
- Cover with a damp kitchen towel or plastic wrap and let it sit at room temperature for 1 hour. (This helps with flavor and kick-starts gluten development.)
Stretch and Fold:
- Fill a bowl or measuring cup with several inches of cold water. Uncover your dough.
- With the dough bowl directly in front of you, dip your fingers into the water, and then slide them under one edge of the dough down to the bottom of the bowl. (I like to start at the top of the bowl, or 12 o’clock.) Pull that section of dough up, stretch it over the center, and press it down into the dough to help hold it in place. Turn the bowl 90°, or a quarter turn, and repeat 3 more times until you’ve made 4 folds and turns.
- Recover the bowl and rest for another 20 minutes.
- Repeat the stretch and fold process again. At this point, you can repeat the stretch and fold sequence two more times or you can move on to the rise. (Continuing to stretch and fold will develop a stronger gluten structure resulting in a chewier loaf with a more even crumb structure inside. The flavor and texture will be great either way, so it’s up to your preference and time!)
Bulk Rise:
- After the final stretch and fold, shape your dough into a ball. If your bowl is crusted with flour, scrape it clean or transfer your dough to another bowl. Cover and let the dough rise until well puffed, 6 to 12 hours, ideally in a place that is 68°F to 75°F. (See notes on Bulke Rise Time.)
- To test if the dough has risen enough, dip your finger in flour and poke the top of the dough. If it mostly springs back, it’s ready! If it holds the indentation without any movement or feels very dense, continue letting it proof and test it every hour. If it looks deflated or very soft, it is likely over-proofed; I’d still continue and bake it! It may bake up flatter but should still taste great.
Shaping the Dough:
- Stretch: Dip both hands in cold water. Slip your fingers under the dough on either side and lift the dough up about a foot or two above the counter. It should essentially be draped over your hands. (If the dough is sticking to the bowl, use a dough scraper or a spatula to loosen it.) Place it on the counter.
- Pinch: Sprinkle the top of the dough lightly with flour, and flip it over so the floured side is down. Pinch all of the edges into the center, like you are bundling up a sack.
- Shape: Flip the dough over so the seams are on the counter. With your hands cupped around the top of the loaf, gently pull the dough ball towards you, tightening the shape. Continue this motion by rotating the dough so that the edges are tightened all around and it forms a nice ball. (You will do this 8-10 times to form a good, tight ball.) Lightly dust the ball with flour.
- Line a bowl or colander with a clean smooth kitchen towel and dust generously with flour. With the help of your dough or bench scraper, carefully pick up the dough ball and flip it over, so the top or smooth side is down in the towel. Cover and rise at room temperature for 30 minutes. (You can also place the dough in a large plastic bag and seal it, then refrigerate for up to 36 hours. The cold slows the rise and ages the yeast, resulting in a more sour, deeper flavored loaf.)
- After the 30-minute rise, place the loaf in the refrigerator while the oven preheats (at least 1 hour).
Bake:
- Place a large cast-iron Dutch oven or large heavy-duty oven-safe pot with the lid on in the oven. Preheat the oven to 500°F for 1 hour. (If you have chilled your loaf for more than 1 hour, remove it from the refrigerator while the oven preheats.)
- When ready to bake, remove the loaf from the fridge. Uncover and lightly flour the loaf. Place a piece of parchment paper on top of the bowl and a baking sheet over that. Invert so that the dough falls onto the paper. Remove the bowl and towel.
- Using a sharp knife or razor blade, make a shallow cut down the length of the loaf or cut in a decorative design.
- Carefully remove the pot from the oven. Using the parchment paper as handles, place the loaf inside the pot and cover with the lid. (If the parchment is hanging out of the pot, just firmly press the lid down to seal it.)
- Bake for 20 minutes. Reduce the oven temperature to 450°F.
- Carefully remove the lid and continue baking until the crust is a deep golden brown or the internal temperature is 195°F to 205°F, about 20 minutes more. Use the parchment and a spatula to lift the bread out of the pot and place the loaf on a wire rack to cool completely before slicing.
Notes
- Active starter: I recommend feeding your starter several hours before you want to start your sourdough loaf. You can use a refrigerated starter that has been fed, then chilled within 3 to 4 days of being fed. Otherwise, feed your starter, then look for it to rise, then start to fall. You want to use it when it’s “hungry,” aka when it’s risen up and starting to deflate again.
- Bulk Rise Time: The colder the environment, the longer it will take to rise, and vice versa. In the summer, I leave it on the counter. In the winter, I’ll place it in a proofing drawer or in the oven with the light on. You can also choose your environment based on when you want to bake the bread. If you made the dough in the morning and want to bake it in the evening, put it in a warm spot to rise. If you want to slow it down and bake it a day or two later, pop it in the fridge.
- Use rice flour for dusting the loaf if you have it. It doesn’t burn at the high oven temperature so it produces a really pretty top crust. This is totally optional though!
- Dutch oven: If you have a seasoned (non-enamel) cast iron Dutch oven, I recommend using that. If you only have enamel, use an old one or buy one specifically for bread making. Because the pot goes in the oven at a very high temperature for a long period of time, it will likely discolor the inside and/or outside coating. It shouldn’t cause damage to enamel that is in good condition, but it will change the appearance.
- Let the sourdough bread cool completely before slicing. Slicing it while it is still hot can lead to it feeling gummy and drying out faster.
Nutrition
Have you tried this recipe? Tag me today!
Mention @preppykitchen and tag #preppykitchen!

Frequently Asked Questions
Yes. Just note that all-purpose has less protein, so the dough will develop less gluten and the loaf comes out softer with less chew and slightly less height. A half-and-half split of bread and all-purpose is a reasonable middle ground. There’s no need to adjust the water/hydration either.
Yes, if you start with a starter that is already at peak and keep the dough warm. Mix in the morning, bulk rise somewhere around 75°F, shape it in the late afternoon, and bake that evening. The loaf will be good, and it will be mild. Just remember that a shorter timeline means less flavor development, so it’s a trade-off.
Take it straight from the fridge when you turn the oven on and leave it out while the pot preheats, about an hour. Do not let it come fully to room temperature and do not give it more time to rise. Colder dough is firmer, holds its shape in the pot, and scores far more cleanly than room-temperature dough.
To make two small loaves, divide after the bulk rise, then shape each piece with the same pinch-and-drag method. Cut the covered bake time to 15 minutes and the uncovered bake to 10 to 15 minutes, but test the internal temperature to make sure your loaf is done.
For rolls, this is a lean dough and isn’t enriched at all (meaning there is no fat in the dough), so it makes a firm crust. If you want to make sourdough dinner rolls, replace the dry yeast in my dinner rolls recipe with 20% active sourdough starter. For that recipe, you will need 84g of starter. Then account for the flour and water added (42g of each) and subtract that from both the total flour and the milk. This will keep your rolls at the right hydration. The rise times will be much longer, so use the visual indicators given in the recipe!
No, but you do need a pot with a lid. Any heavy oven-safe pot with a tight lid works, as does a lidded bread baker. The lid traps the dough’s own steam, which is what gives you the oven spring and the crackling crust. An uncovered loaf on a sheet pan will bake, but it will be flatter. You can also place a large steel bowl over the loaf on a sheet pan to help with oven spring; it just won’t rise as well as a Dutch oven.
More Recipes To Try
Expand your bread baking skills with one of these bread recipes:
- Artisan Bread — same no-knead Dutch oven method with commercial yeast, ready in a few hours instead of a day.
- Ciabatta — an airy loaf that uses the same fold-and-stretch technique and a long cold ferment to produce an open texture and deep flavor.
- Focaccia — an easy, no-knead bread that can be customized with herbs and toppings.
- Rye Bread — another naturally sour, dense-crumbed loaf, and a good next step after this one.
- White Bread — a classic sliced sandwich bread that can be made and baked in a few hours.
If you’ve tried this sourdough bread recipe, then don’t forget to rate it and let me know how you got on in the comments below. I love hearing from you!






