
This post may contain affiliate links. Please read our disclosure policy.
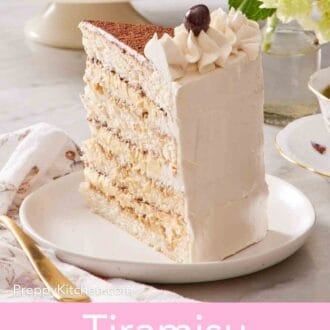
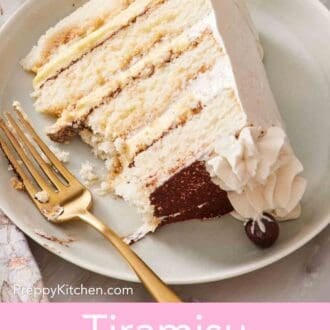
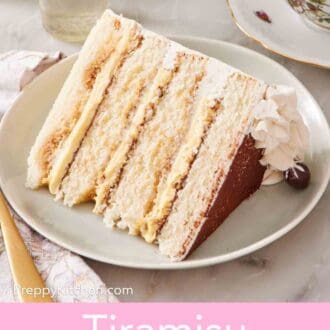
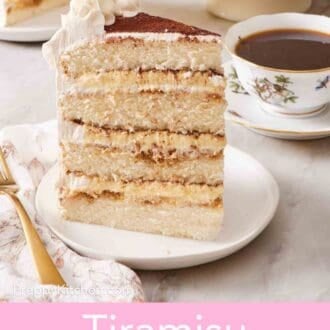
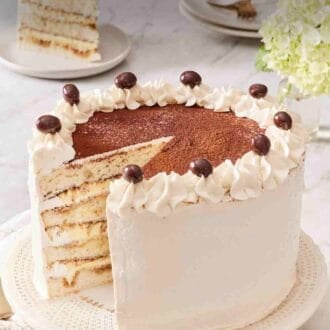
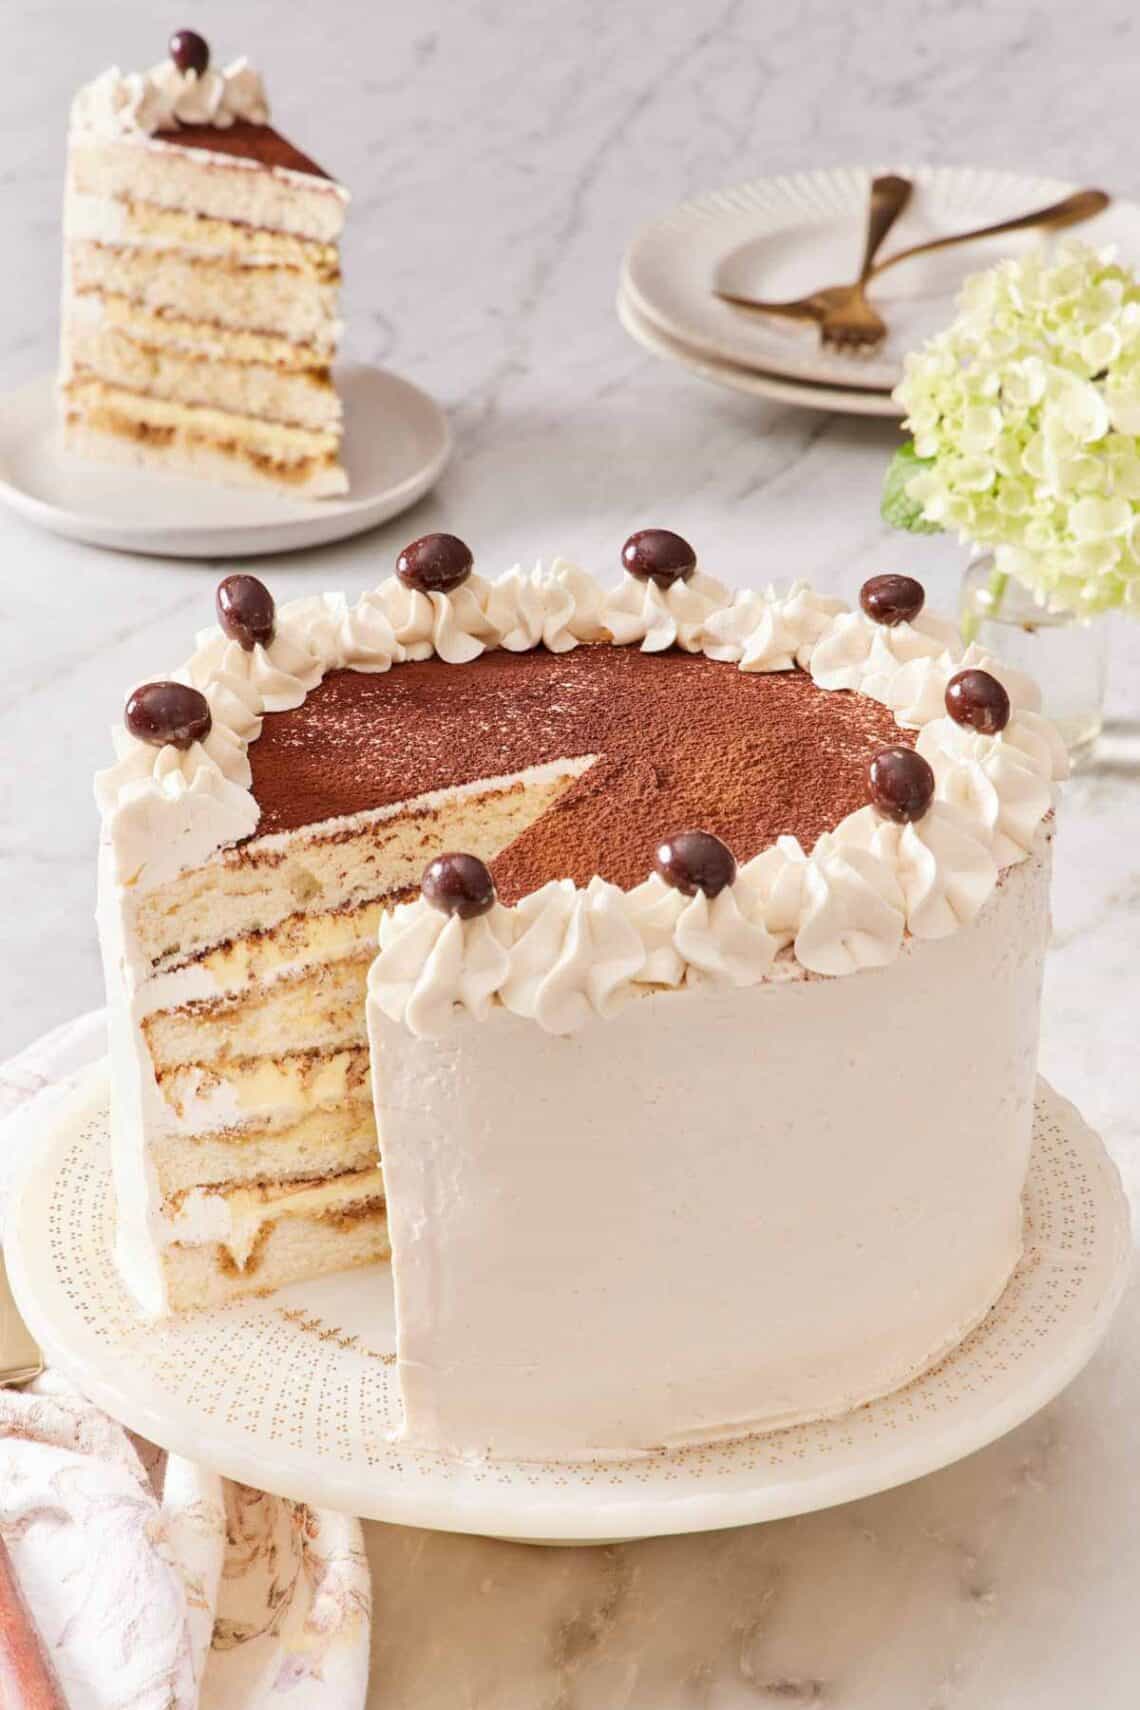
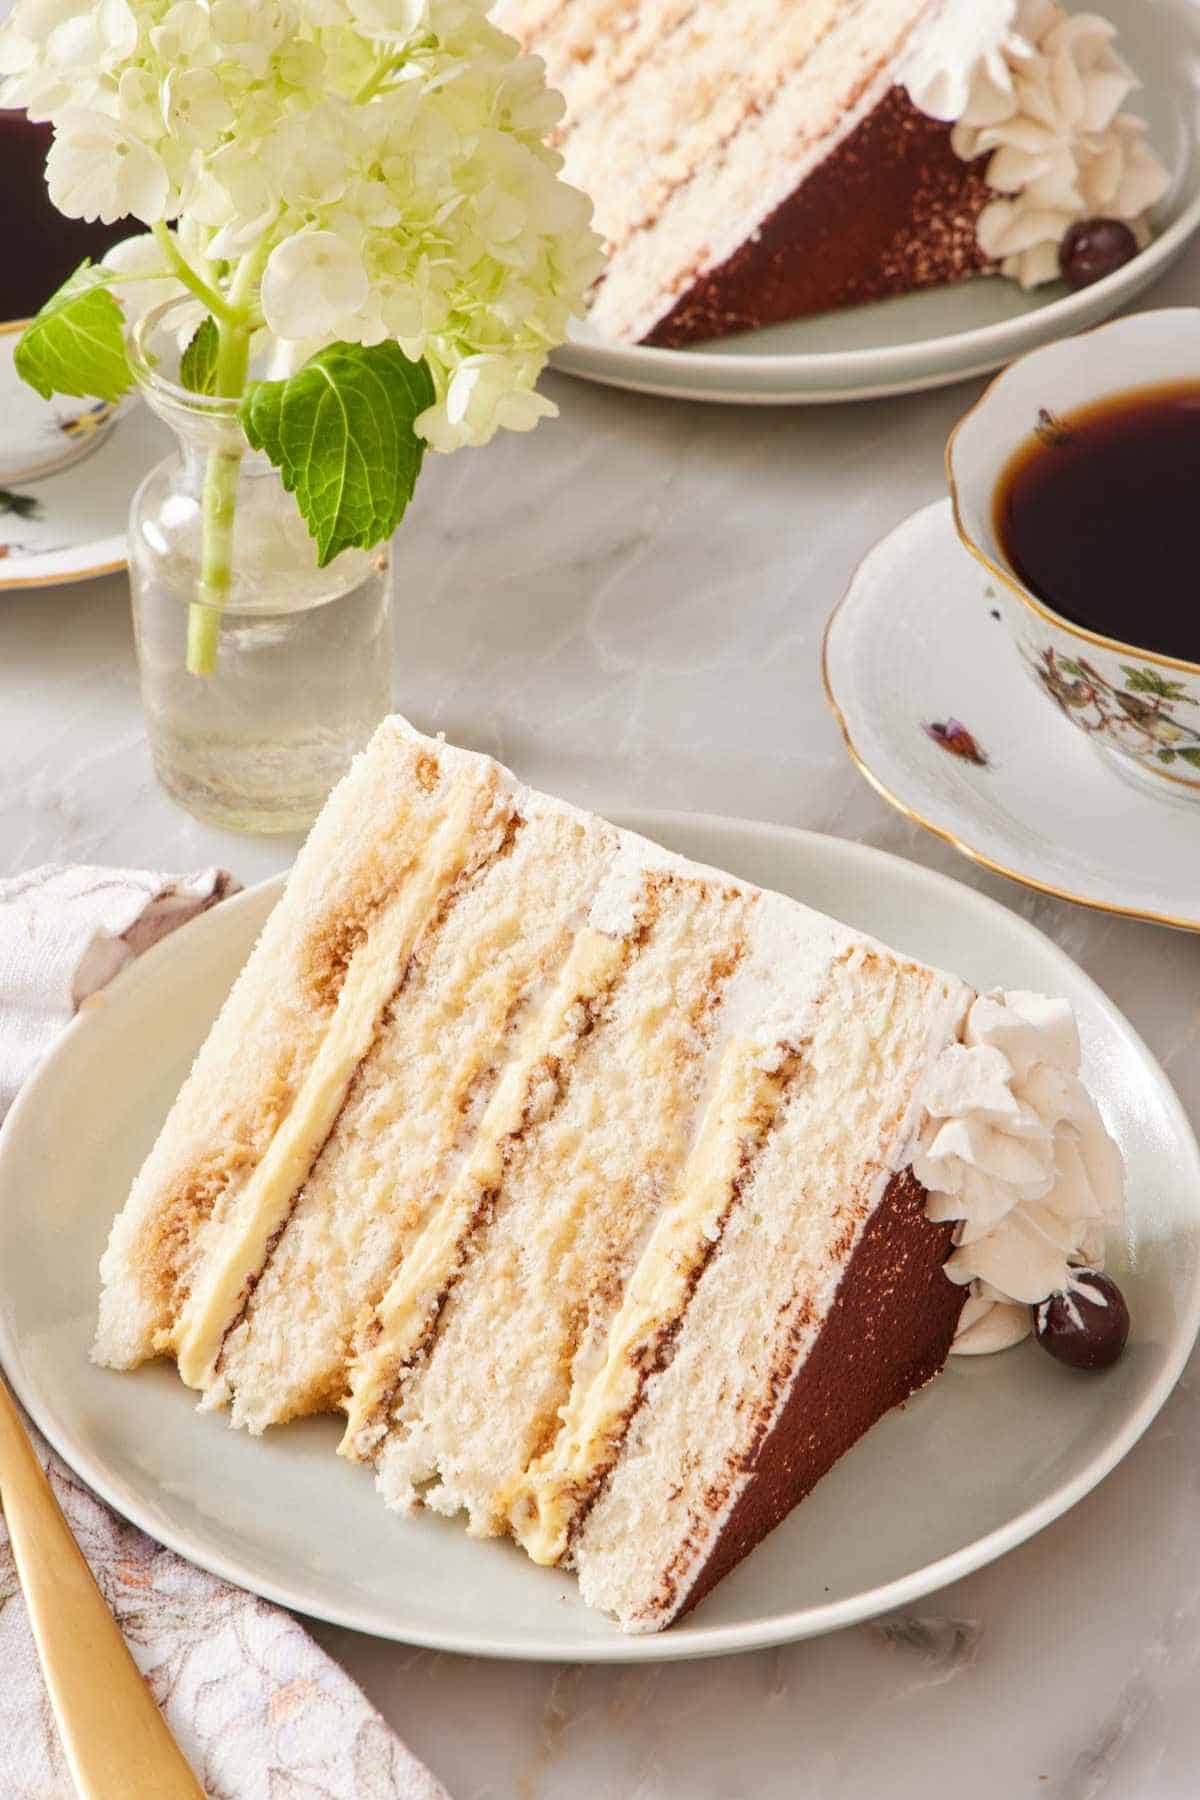
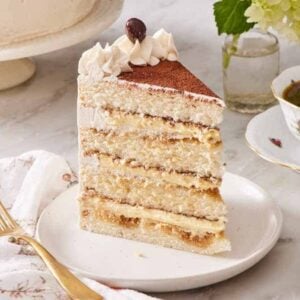
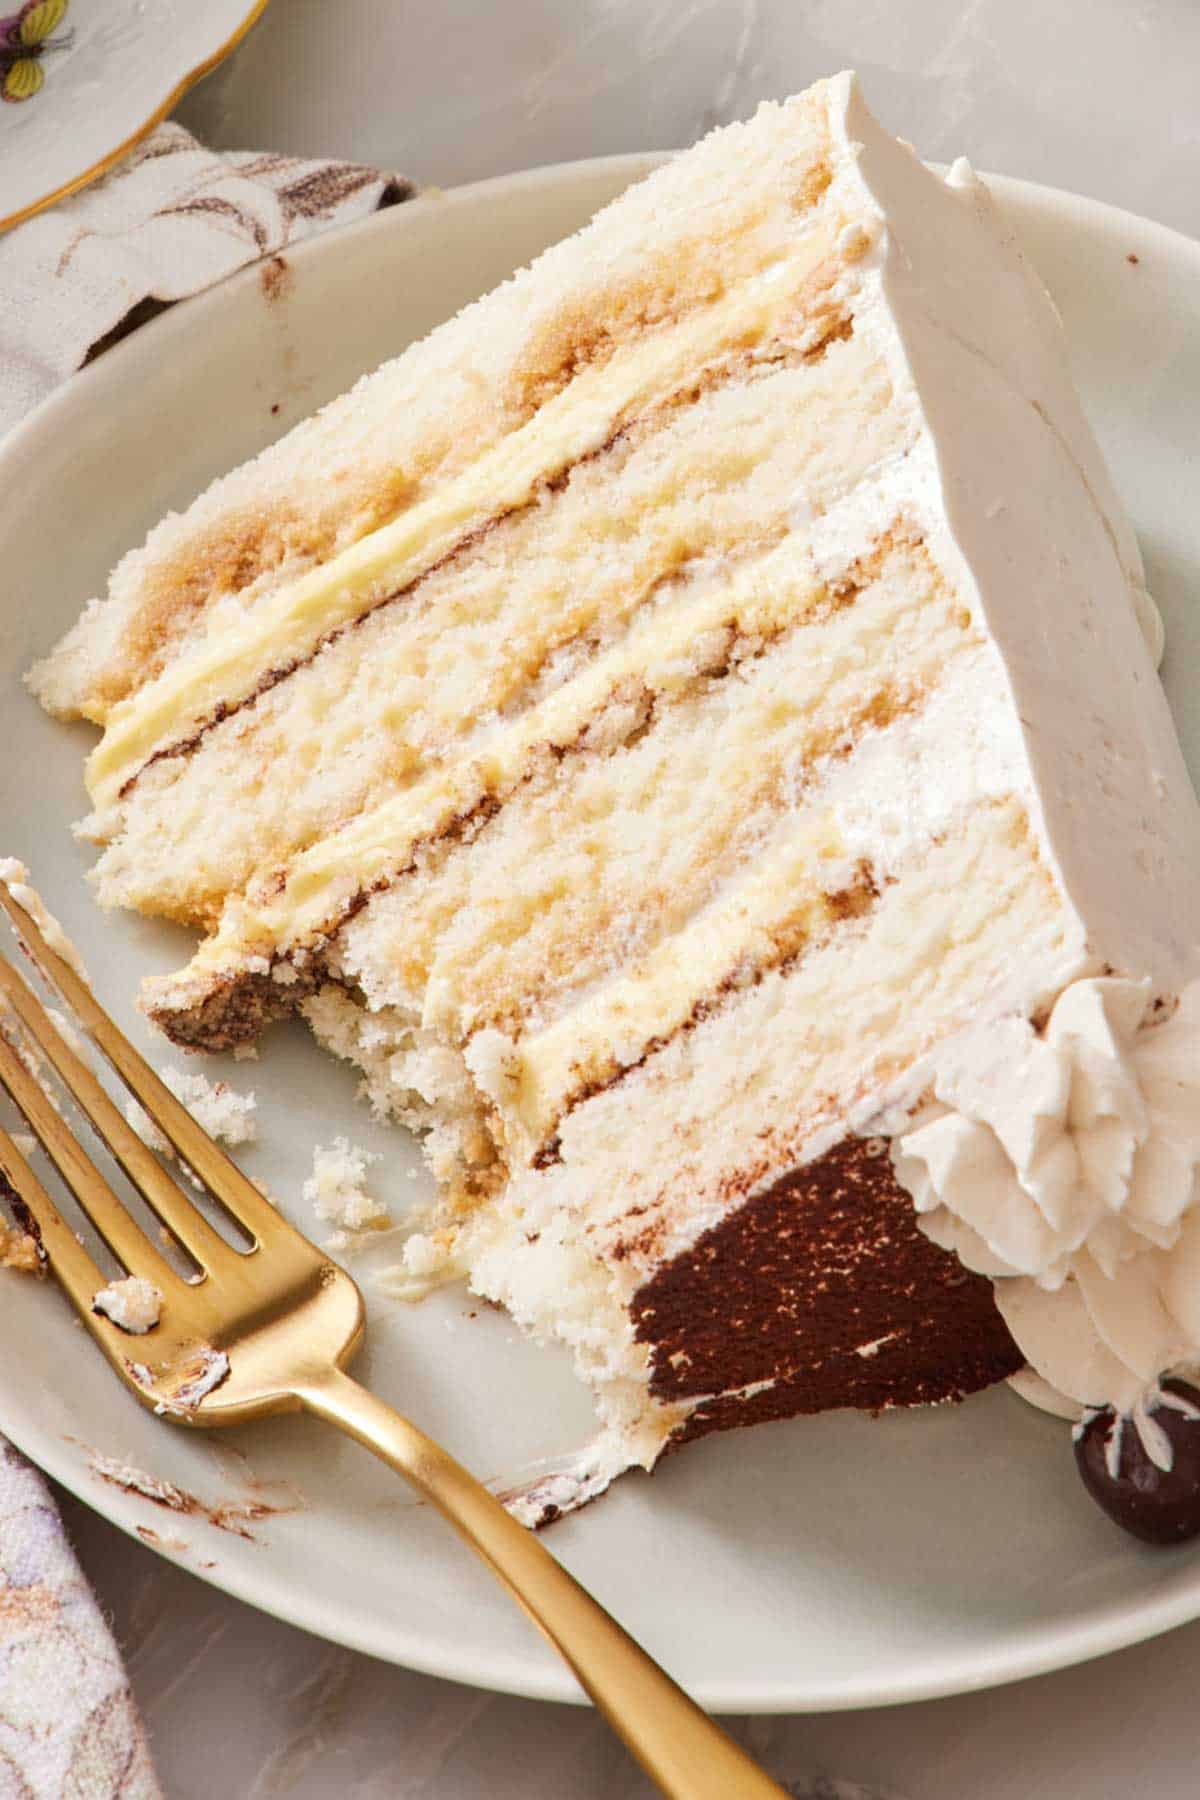
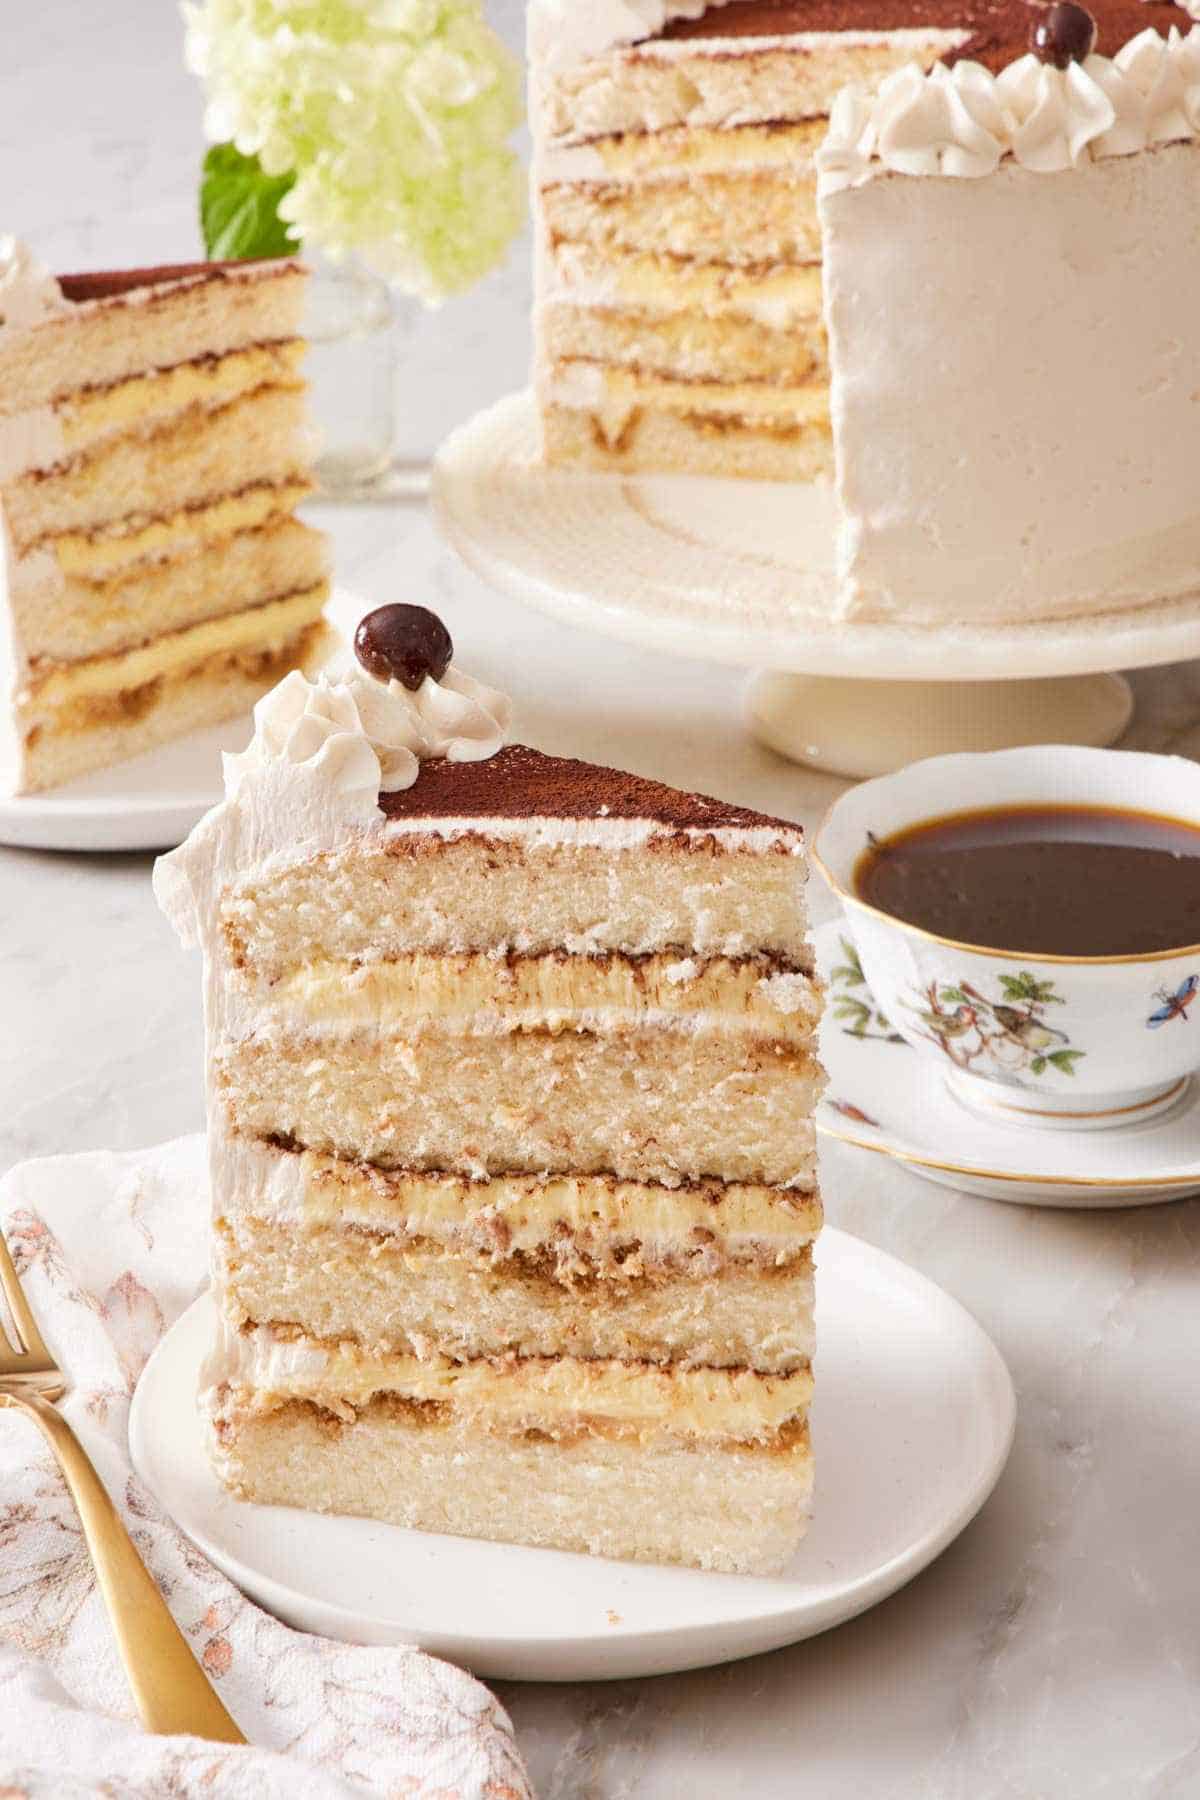
My tiramisu cake recipe turns the iconic Italian dessert into a stunning layer cake. Four layers of fluffy vanilla sponge are soaked in coffee and liqueur, stacked with a luxurious mascarpone custard between each layer, and finished with an espresso Swiss meringue buttercream. This is a dessert your guests will remember!
This tiramisu cake was one of the very first cake recipes I made for Preppy Kitchen! I’m proud of the original recipe I posted in 2017, but I’ve retested and updated the recipe after years of reader questions and dialing in the trouble spots. The mascarpone filling is firmer making it easier to slice. I added troubleshooting tips for the buttercream. Increase the size so that the time and love you put into this cake can feed more people. And I’ve added metric weight measurements for more of the ingredients, so you have perfect results every time.
If you’re wondering, “Does this actually taste like tiramisu?” The answer is yes! The coffee-soaked tender sponge cake perfectly mimics the soaked lady fingers. The mascarpone custard between the layers has the same flavor profile as in a classic tiramisu, but is stable enough to layer and slice. And since tiramisu doesn’t typically have a frosting, I chose a Swiss meringue buttercream to coat the cake so that it wasn’t overly sweet, and kissed it with more espresso.
“The multiple components of this cake took a bit of time, but it was so worth it. This tasted so much like real tiramisu. I made it for my wife for her birthday, and she now wants me to make it every year. Thanks for helping make her happy and me look like a genius baker!”
Maggie
Why This Recipe Works
When I first developed this recipe, I wanted it to stand out and be a true representation of tiramisu, not just a vanilla cake with coffee buttercream. I recently updated the recipe to scale up the size and address a few reader concerns. Here’s what’s different and why you’ll love it:
- The sponge is built to absorb syrup without disintegrating. The reverse-creaming method creates a slightly tighter crumb that holds plenty of coffee syrup without falling apart.
- The mascarpone filling is a custard, not whipped cream. A cooked egg yolk, milk, and cornstarch base gives the filling structure that whipped cream-based fillings can’t match. Classic tiramisu filling is made with mascarpone and an Italian custard, zabaglione (zabaione). Using a custard base means the filling holds its shape, carries the coffee flavor well, and tastes more like the dessert it’s modeled on.
- The coffee Swiss meringue buttercream is stable enough to hold this cake together. Silky and not cloyingly sweet, it’s sturdy enough to hold the filling and coffee-soaked layers and piped detail at room temperature.
- A bigger cake to serve more people. I decided to increase it from the original 6-inch size to an 8-inch cake. It now serves more people for the same amount of time and effort!
What Goes Into A Tiramisu Cake
The full ingredient list with quantities is in the recipe card below. Here’s how each component is working in the recipe and why I chose it.
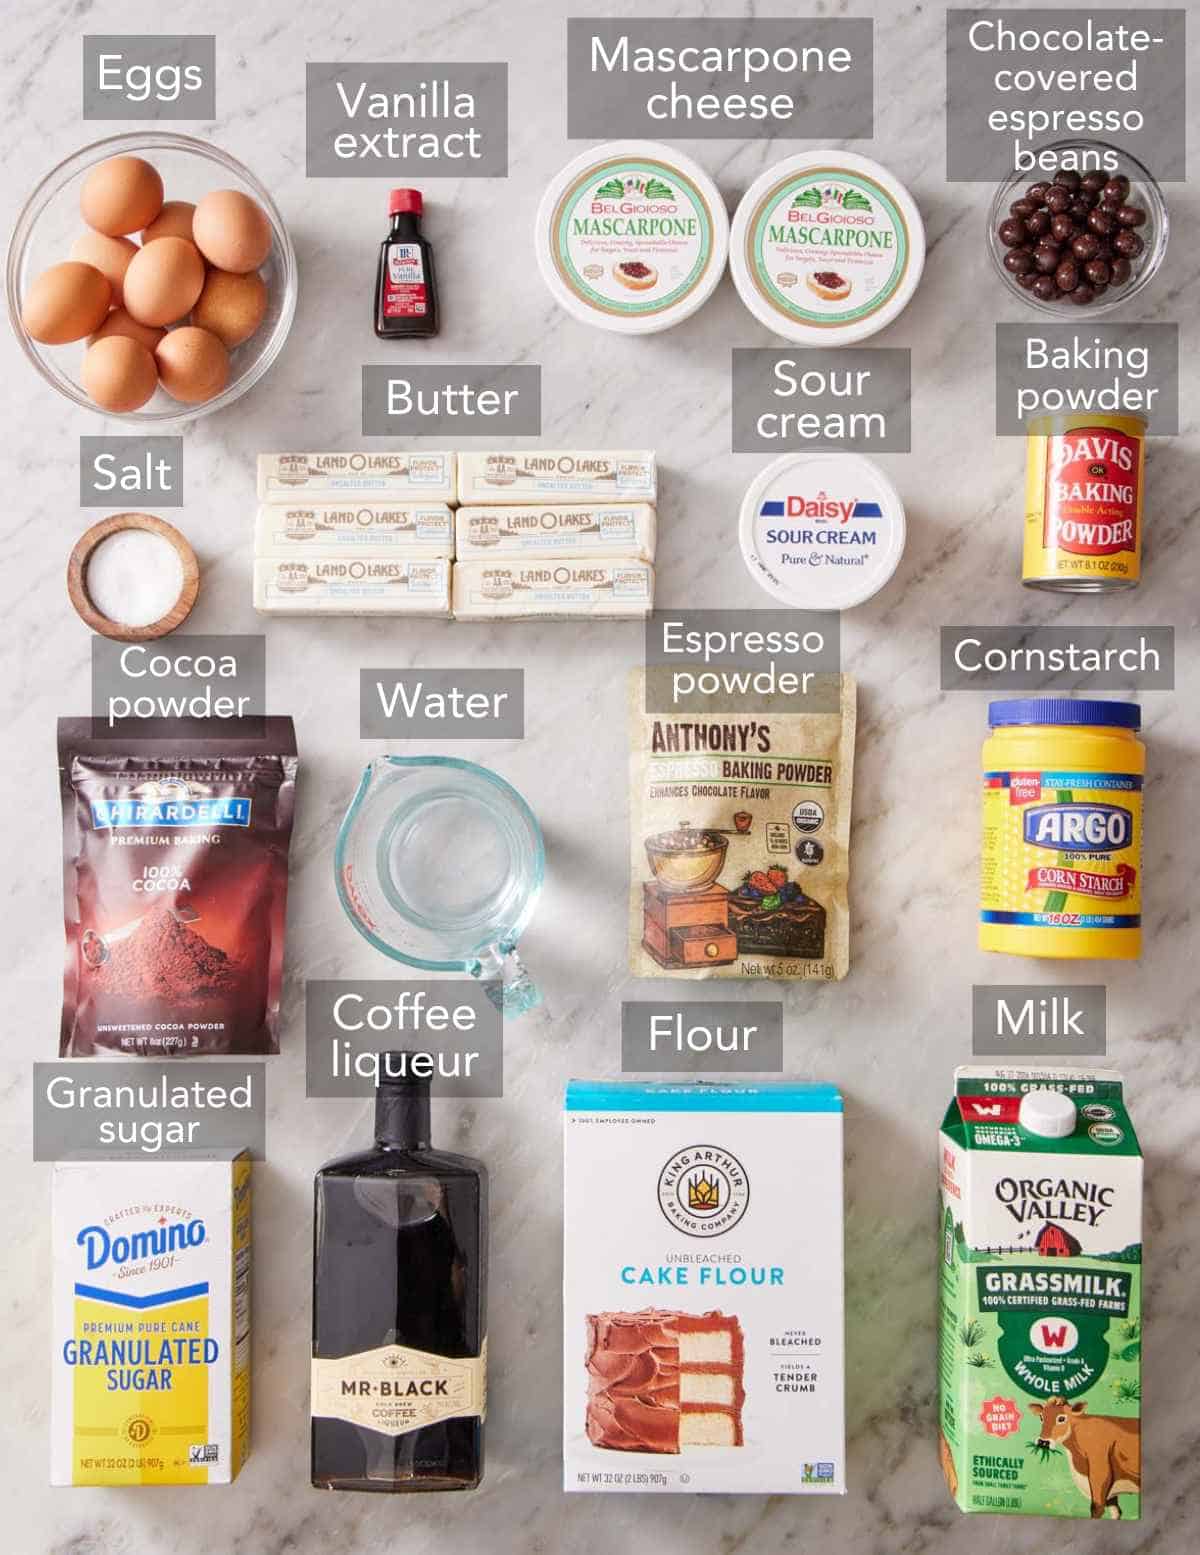
Cake flour — cake flour has a lower protein content (7-8%) than all-purpose flour (10-12%), which means less gluten development and a more tender, syrup-absorbing crumb. I use King Arthur unbleached cake flour. If you have bleached cake flour, measure by weight or adjust the total volume to 3¼ cups. Bleached cake flour is lighter and fluffier per cup (112g/cup), so its volume differs from that of unbleached flour. (This is a good example of why weighing ingredients is the most helpful and accurate!)
Sour cream + whole milk — sour cream’s acidity tenderizes the gluten and adds a tang that cuts the sweetness, plus the added fat keeps the cake moist and tender. Whole milk provides the moisture the batter needs to hydrate properly.
Eggs — egg whites in the cake batter give the layers a lighter, paler crumb that contrasts more dramatically with the dark coffee soak and the cocoa dusting on top. Egg whites are also used to make the silky meringue base for the buttercream. Save the yolks for the mascarpone custard—the recipe is designed to use all of the yolks you’ll separate from the cake’s egg whites. You will have some yolks left from the frosting egg whites. (Save them to make a curd or rich omelet.)
Mascarpone cheese — this is the star ingredient that makes the perfect filling texture and flavor. Mascarpone is a triple-cream Italian cheese with a milk-fat content around 60-80% (substantially higher than cream cheese at about 33%), which is what gives it that velvety, spreadable, almost buttery texture that’s hard to replace. If your local store doesn’t carry it, see the Substitute notes below for a suitable replacement.
Coffee liqueur — I use Mr. Black’s liqueur most often, but Kahlúa or Tia Maria both work beautifully and bring slightly different coffee notes. Another brand of coffee brandy works too if that’s what you have. If you’re serving this cake to people who don’t drink, see the Substitutes section below for nonalcoholic options.
Espresso powder (not instant coffee ) — espresso powder (like Anthony’s or DeLallo) is concentrated and dissolves quickly into hot water. Instant coffee is weaker and more bitter. For 1½ teaspoons of espresso powder in the syrup, you need about 1 tablespoon of instant coffee to get an equivalent flavor. The flavor profile isn’t as nice, but it works in a pinch.
Unsweetened cocoa powder — this is just for dusting, so either natural or Dutch-processed works. Natural cocoa isn’t as rich, which I prefer in this cake, so it complements the coffee without overpowering it. Don’t use sweetened cocoa powder—it’ll turn sticky because of the added sugar.
Substitutes That Work (And One That Doesn’t)
Here are some good substitutes for key ingredients in the cake and filling:
| Ingredient | Substitute | Notes |
| Mascarpone | One 8-ounce container of mascarpone can be substituted with 8 ounces full-fat cream cheese + ¼ cup heavy cream + 2 tbsp soft unsalted butter, beaten until smooth. | (Double this swap for the cake filling.) The cream cheese tang can be detectable to a sensitive palate, but most people won’t notice. |
| Sour cream | Full-fat plain Greek yogurt in an equal amount. | Fat-free yogurt can make the cake drier; 5% is ideal. |
| Coffee liqueur | Dark rum (the classic tiramisu substitute), or coffee brandy. | Non-alcoholic: replace the liqueur in the filling, buttercream, and syrup with cooled espresso or cold brew concentrate. The flavor shifts more toward coffee-flavored cake rather than tiramisu specifically, but it’s still excellent. |
| Cake flour | 1 cup minus 2 tbsp all-purpose flour + 2 tbsp cornstarch. Follow my Cake Flour Substitute guide for more details on making this swap. | The texture won’t be quite as tender, but it still works well. |
| What doesn’t work | Cream cheese alone in place of mascarpone. | Without the heavy cream and butter additions, it’s too tangy and not fatty enough, so the filling tastes like cheesecake batter. |
Baking Flat and Sturdy Cake Layers
Cake layers that have domes in the middle make this multi-layer cake harder to assemble. Domes mean uneven layer thickness, filling that slides or oozes out, and a finished cake that leans. To prevent this, use cake strips! These fabric strips are soaked in water and wrapped around the outside of the pan to help the batter rise evenly. It works by keeping the outer edge of the batter cooler while the center bakes through, so the layers rise evenly with flat tops instead of domed ones.
You can buy fabric cake strips or make your own from foil and folded paper towels at home. I have a how to bake flat cake layers tutorial that walks through the DIY version step-by-step, and gives you tips on using the fabric kind.
If you skip the strips, you can level the layers with a serrated knife after they cool. It works, but you’ll waste 10-15% of each layer from trimming, which, on a four-layer cake, adds up. Cake strips are worth the small upgrade, especially if you bake layer cakes often.
The Mascarpone Filling Problem (And How I Fixed It)
The biggest change I made between my original recipe and this updated one is in the filling. The original used the classic tiramisu method of making a zabaglione and folding it into mascarpone. It has a beautiful flavor, but the filling frequently turned out too soft or runny for many readers. The temperature and timing were more critical in that method and left more room for error.
The fix: a cornstarch-stabilized custard. I switched the method to make a more traditional hot milk and egg yolk custard, adding cornstarch to help stabilize the protein structure. One teaspoon of cornstarch in the egg yolk mixture isn’t enough to taste, but it gives the filling enough body to hold up under the weight of three stacked cake layers and cuts cleanly without falling apart when serving.
Why I Use Swiss Meringue Buttercream
To be upfront, Swiss meringue is definitely more work than a classic American buttercream (25-30 minutes versus 10). But I use it here for three reasons: it’s significantly less sweet, which matters on a cake that already has sweetened mascarpone filling and a coffee-liqueur soak, and when it isn’t a typical element in tiramisu; it has a smoother texture that pipes cleanly but is also very sturdy; and it carries coffee and espresso flavoring better than American buttercream’s high sugar content allows.
If you’ve never made Swiss meringue buttercream and you’re nervous, I have a full Swiss meringue buttercream tutorial on the site that covers troubleshooting in more depth than I can fit here. One thing to know going in, though: the buttercream will most likely look broken at some point during the butter addition. It can go from silky to soupy to curdled, then back to silky. Keep the mixer running—it always comes back! (Check out the FAQs below for specific troubleshooting if your frosting stays runny.)
For when you absolutely don’t have time for Swiss, American buttercream does work on this cake, but I suggest reducing the sugar in the buttercream by about a cup to keep the overall sweetness from overpowering the coffee notes.

The Coffee Soak: How Wet Is Too Wet?
The coffee soak is what makes this truly mimic a tiramisu in cake form. Done right, each layer tastes like a soaked ladyfinger; done wrong, the cake either tastes like vanilla with a hint of coffee or it falls apart when sliced.
Use the right amount: a third of the total syrup is used on each layer (about 5 tablespoons per layer). The top layer doesn’t get soaked, so it can stay dry for the buttercream coating to stick.
To avoid oversoaking, I apply the syrup with a pastry brush rather than drizzling it, because brushing distributes the liquid more evenly across the cake surface. A drizzled syrup tends to puddle in spots and leave dry spots elsewhere, making some parts of the cake too soggy, and it falls apart when sliced.
How To Make Tiramisu Cake
Below, I’ve highlighted portions of the recipe in step-by-step process images along with written instructions. You can find the full set of instructions in the recipe card below.

1. Make the cake layers. Whisk together the milk, sour cream, egg whites, and vanilla to make the wet mixture that will be beaten into the cake batter. Set that aside for now. In your stand mixer bowl with the paddle attachment, mix the flour, sugar, baking powder, and salt. Then run the mixer on low speed, add the butter a tablespoon at a time. Once all of it is added, it should look like coarse crumbs. Then, drizzle in half of the wet mixture. Stop, scrape down the bowl, and turn it back on low speed. Mix in the rest of the wet mixture, then increase the speed to medium, beating until the batter looks nice and fluffy. Transfer the batter to two 8-inch round cake pans (greased and lined with parchment, and wrapped with cake strips). Bake at 350°F for about 35 minutes or until a toothpick comes out of the center clean. Cook for 15 minutes in the pan, then invert onto a wire rack to cool completely.
2. While the cakes bake and cool, make the filling. Heat the milk just until it steams and forms some bubbles at the edge of the pan (about 2-3 minutes). Whisk the egg yolks, sugar, and cornstarch together in a medium bowl, then temper the egg yolk mixture by slowly streaming in the hot milk while whisking. This is what keeps you from scrambling the eggs. Return the tempered egg mixture to the pot, and cook the custard back over medium-low to about 200°F. The custard should be thick and hold the trace of the whisk when pulled through it. If it’s still runny at 200°F, cook for another 30 seconds; if it’s lumpy, you’ve gone too hot, but the texture usually works okay after folding into the mascarpone.
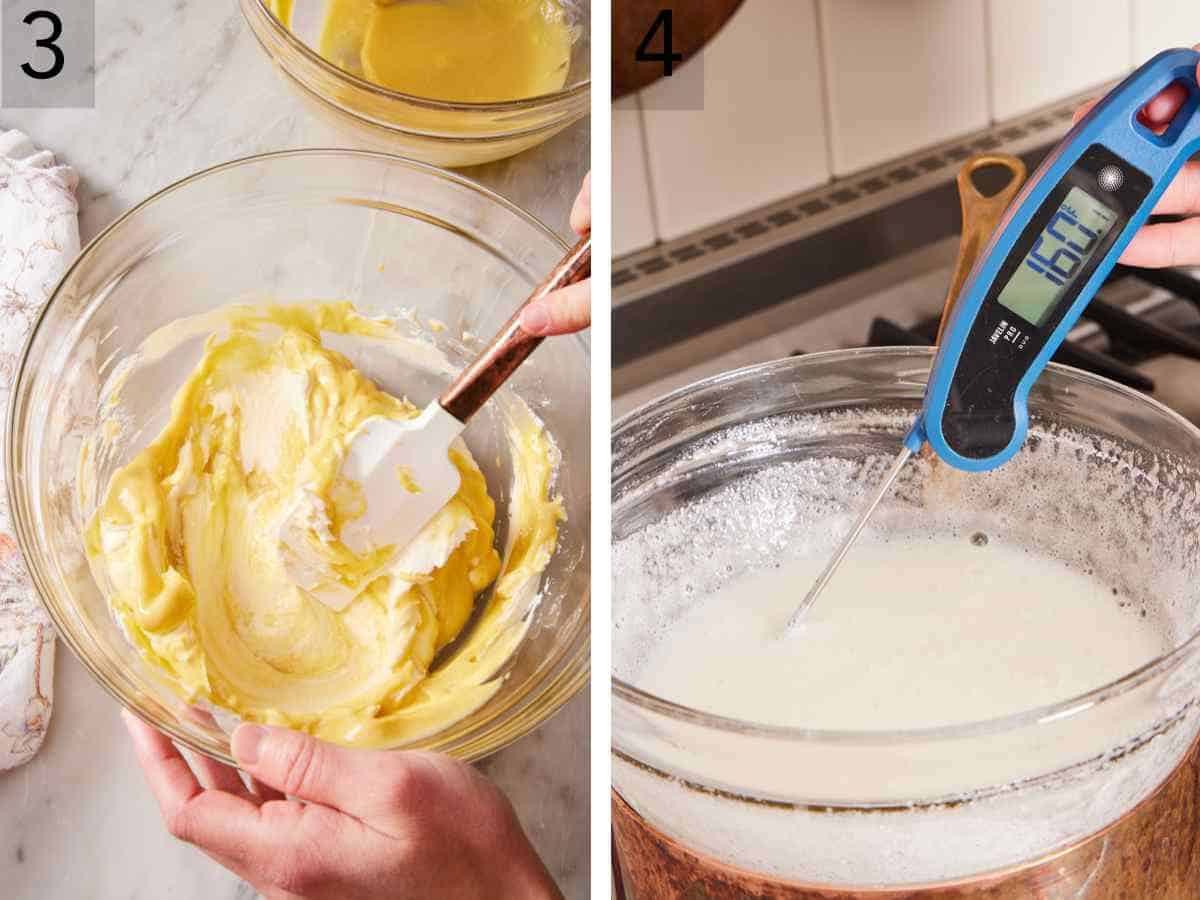
3. Cool the custard to room temperature (around 70-80°F) before folding in the mascarpone. Don’t skip this step! Too hot and the custard liquefies the mascarpone. Too warm, and the custard turns the mascarpone grainy. Both will cause you to lose the structure entirely. An ice bath drops the custard to room temperature in about 5 minutes if you’re short on time. Fold the mascarpone into the cooled custard in two stages—half first, then the rest—and stop folding the moment no streaks remain. Overworking mascarpone breaks the fat structure and gives you a grainy filling, so be brief and gentle.
4. Heat the egg whites and sugar for the Swiss meringue frosting. Whisk them together in a heat-safe bowl and place it over a pot of simmering water. Stir gently until the sugar melts, the egg whites start to get a bit foamy on top and feel syrupy, and the temperature reaches 160F. Transfer the egg whites to a mixer bowl and beat on high speed until glossy, stiff peaks form, and the meringue is very fluffy. Also, touch the bowl—it shouldn’t feel warm at all. If it does, keep beating, or the butter will melt when you add it in.
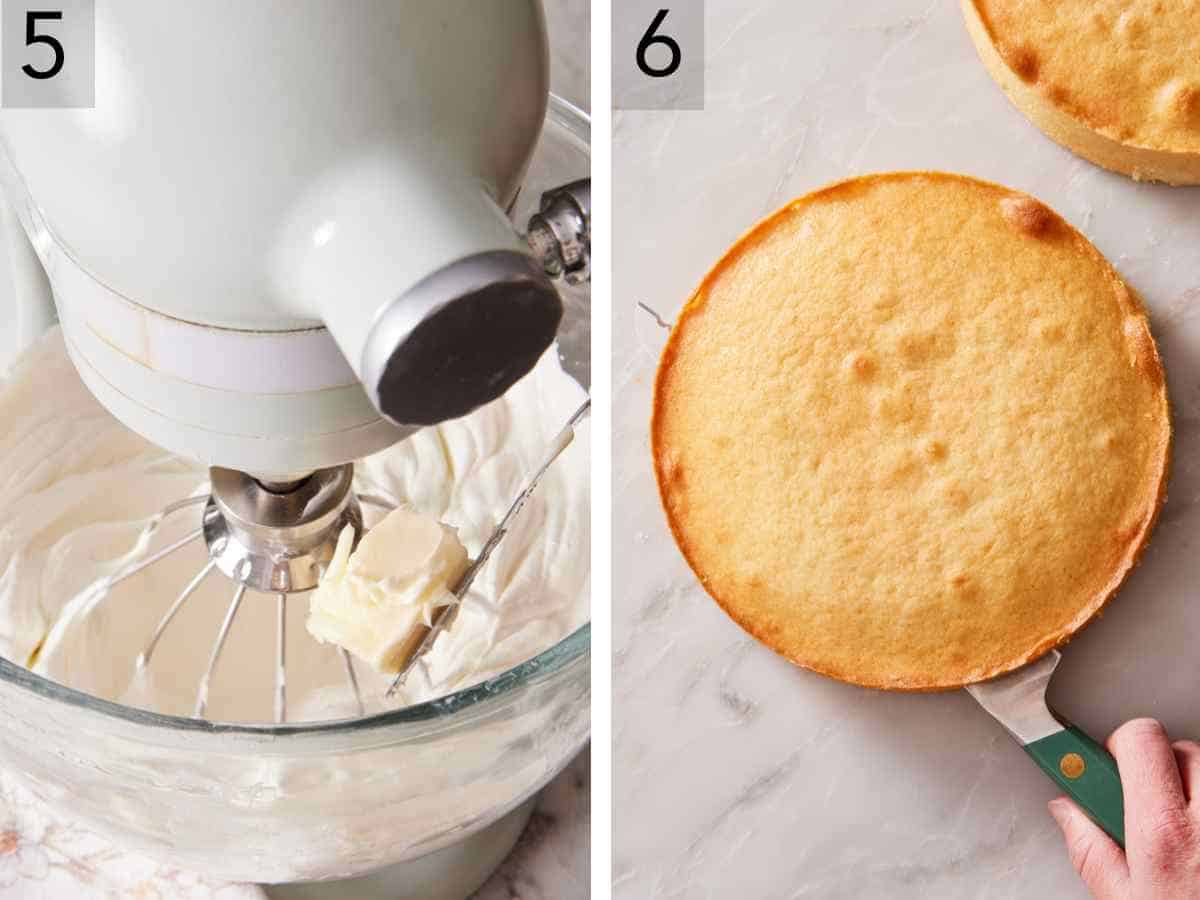
5. Mount the meringue with butter to make the frosting. Once the meringue is whipped, start adding the butter about a tablespoon at a time (no more than that). Mix each piece in before adding another. This process will take several minutes, so be patient. Once all of the butter is added, beat it on medium-high until it is stiff and fluffy, but spreadable. Transfer about ¾ cup to a piping bag with a large star tip (Ateco 846). Place another 1 cup in a piping bag, either with the tip snipped ½ inch or with a round 1A tip. Cover the rest.
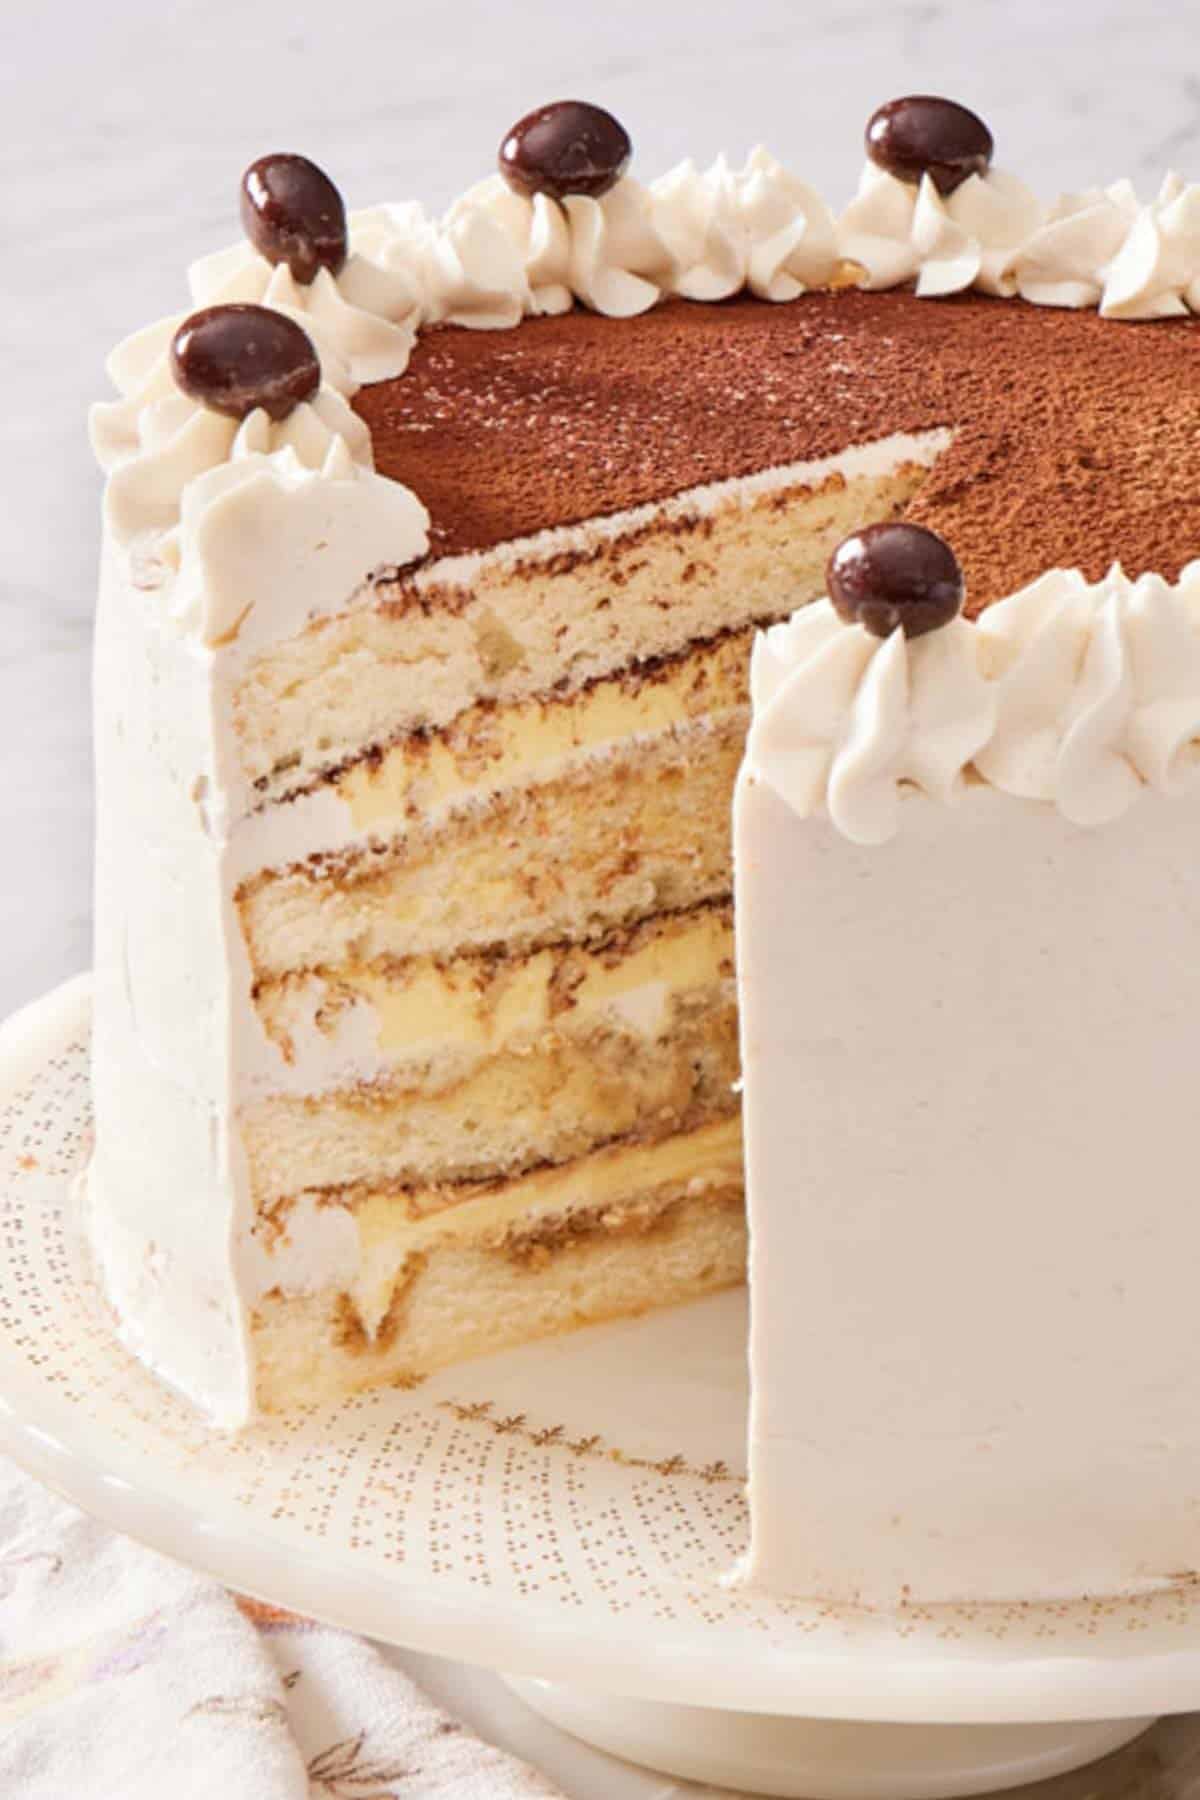
6. Start assembling the cake. Stir the hot water, espresso powder, and coffee liqueur together for the soak and set aside. Cut the cake layers in half through the center to make four thin layers. I suggest using a bread knife to cut through the cake without tearing it.
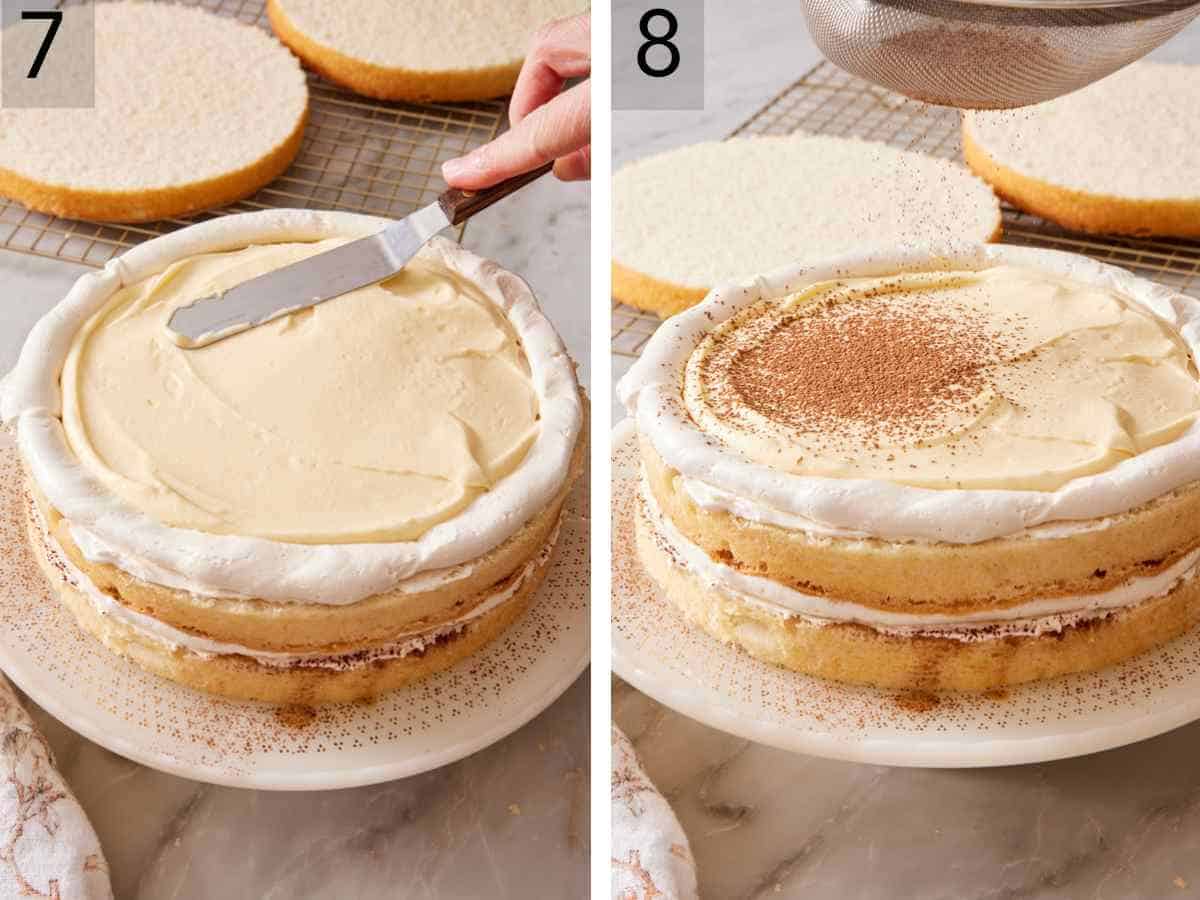
7. Place the first layer down on a cake stand (use the bottom half of one of the layers), placing it cut-side up. Brush a third of the coffee syrup on top. Spread a thin layer of frosting on top (about ¼ cup), then, using the round tip pastry bag, pipe a border on the edge of the cake to make a dam for the filling. Dollop a third (about 1 cup) of the mascarpone filling in the center of the cake and spread it to the edge to meet the frosting dam.
8. Dust the top lightly with cocoa powder, and continue building the cake layers. Once you get to the final cake layer, place it bottom side up so that you have a smooth, flat surface for the top of the cake. Spread the remaining buttercream all over the top and sides of the cake.
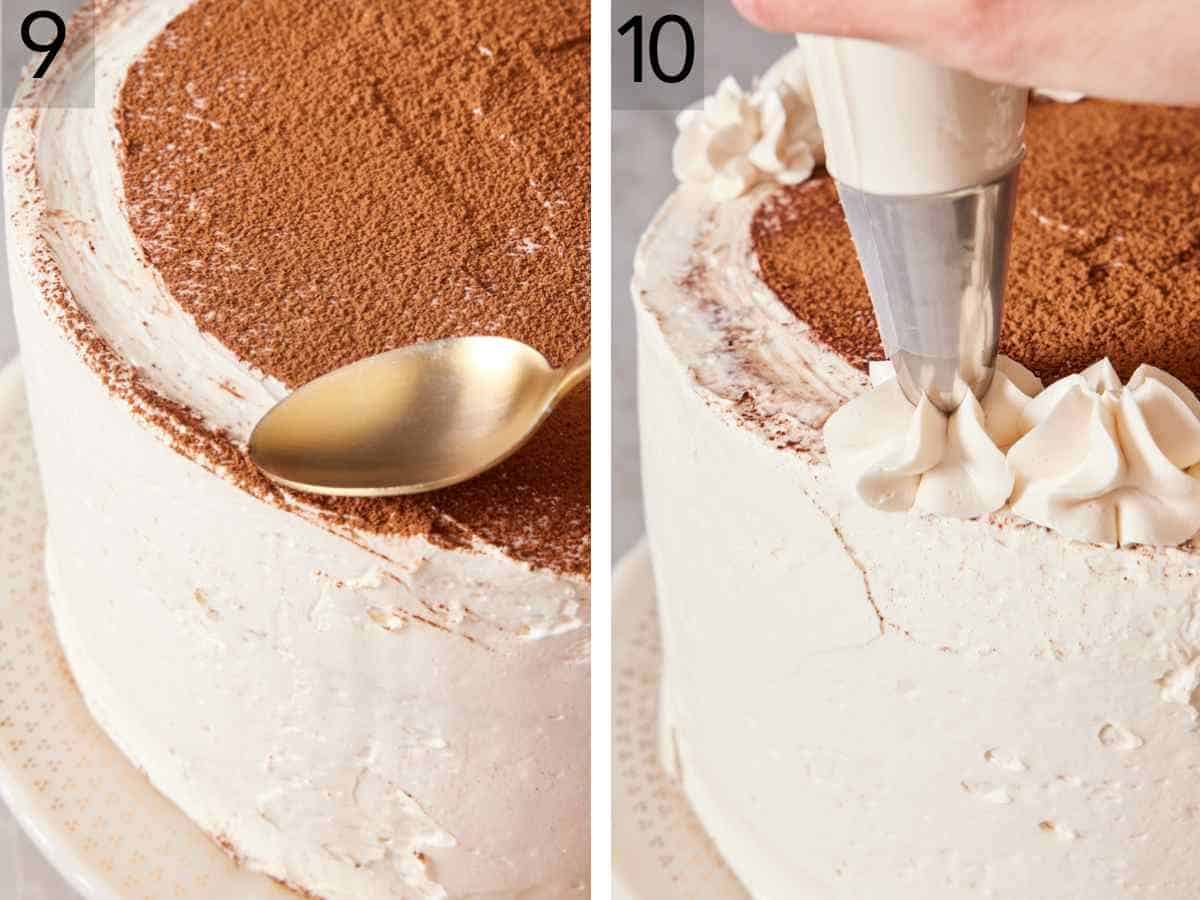
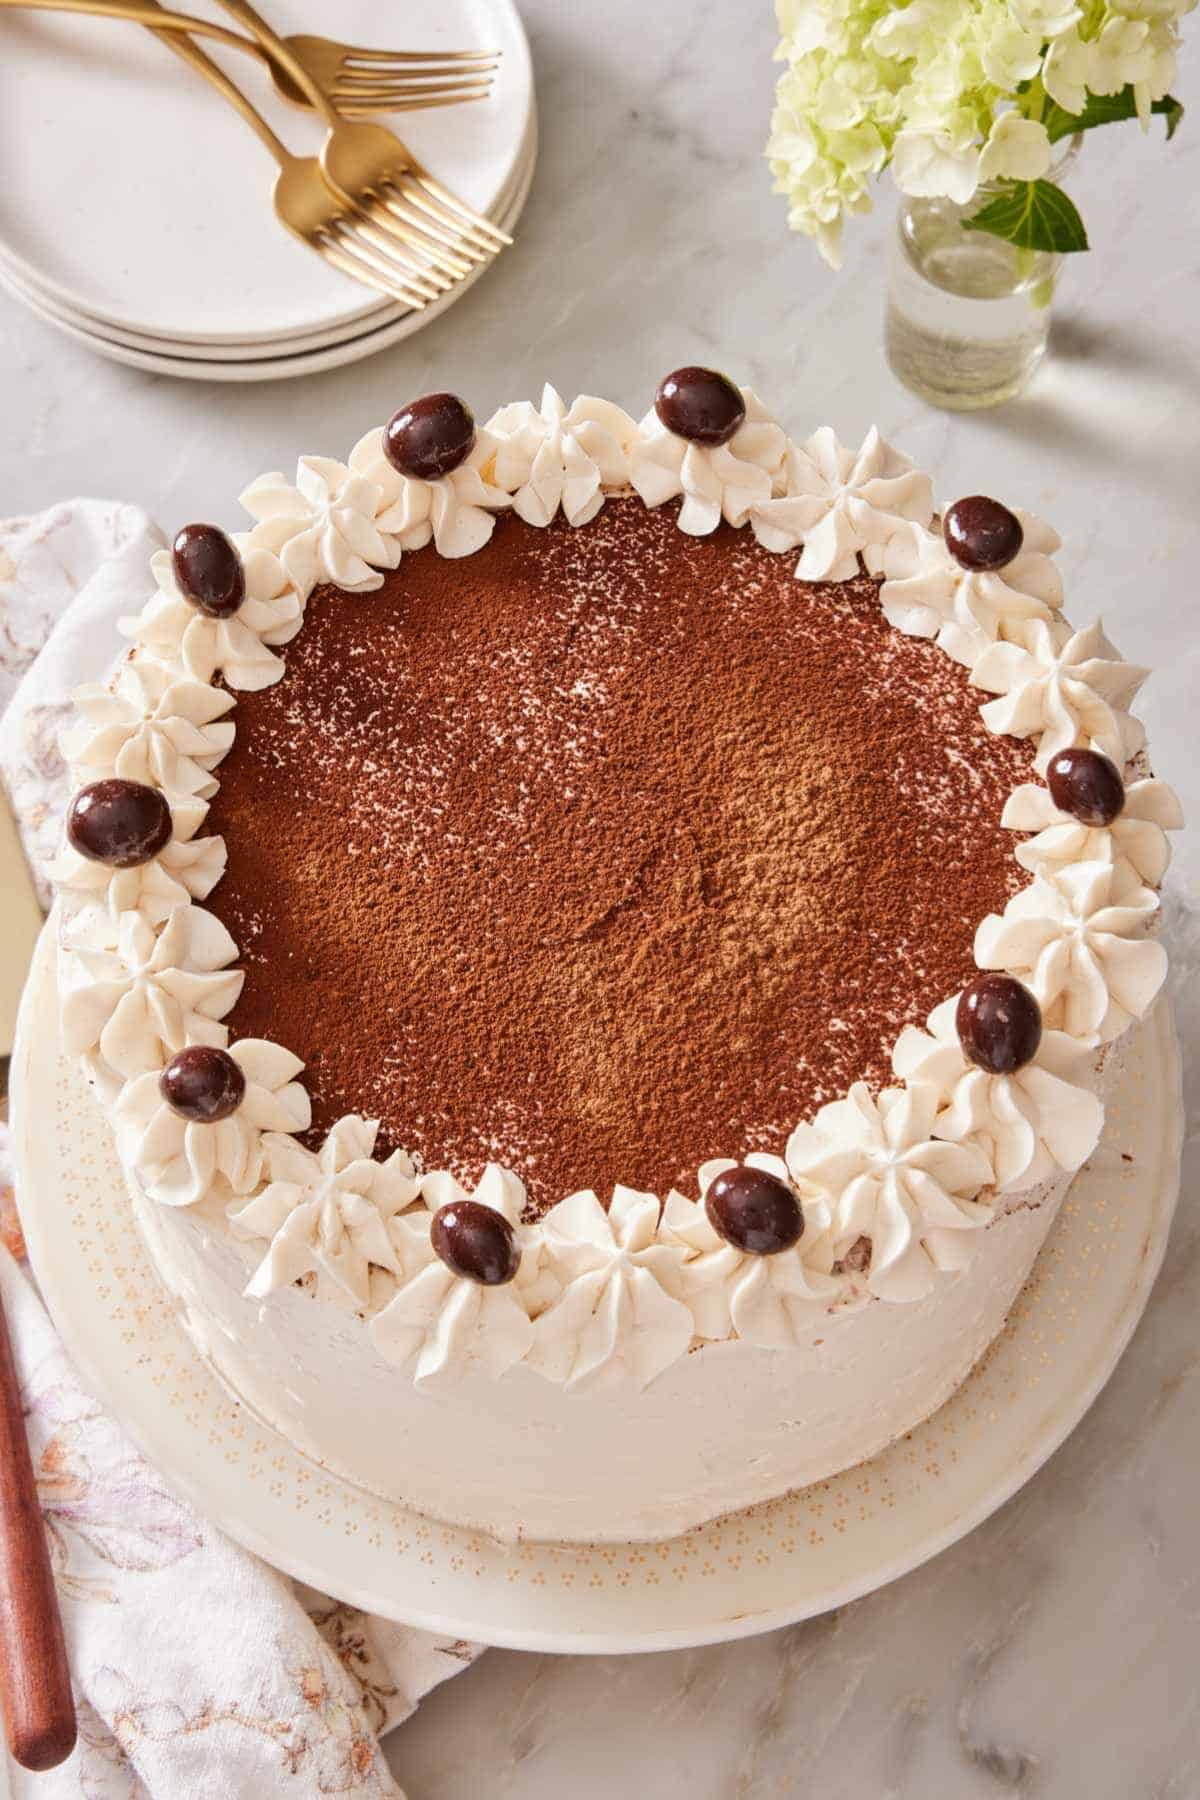
9. To decorate the cake, dust the top with cocoa powder. Using the back of a spoon, drag it just inside the edge of the cake to make a shallow channel. This will remove a strip of the cocoa powder, so the dollops of frosting will stick to the cake.
10. Pipe frosting dollops all around the edge of the cake and garnish with chocolate-covered espresso beans if you’d like. Chill the cake for at least 1 hour before serving, but it’s even better if you let it sit for 8-24 hours before slicing. The flavor gets better with time!
Pro Tips For Making Tiramisu Cake
Use room temperature ingredients across the board. Cold diary (eggs, milk, sour cream, butter) is the fastest way to seize a cake batter. These ingredients are firmer when cold and don’t incorporate together very easily. Pull the dairy out of the fridge an hour before you start. If you’re in a hurry, you can microwave the dairy in short bursts until it’s about 75°F. Soak the eggs in a bowl of warm water for 10 minutes, and follow one of my hacks for softening butter quickly to get the stick soft enough for the cake frosting.
Weigh ingredients whenever possible. I’ve put metric weights on this recipe specifically because cup measurements vary by 15-30% depending on how packed they are in the measuring cup. A kitchen scale gets you the same cake every time. The most error-prone ingredient is the cake flour—a fluffy versus packed cup measurement can differ by up to 30 grams per 1 cup, which is enough to throw off the texture noticeably.
Don’t add butter to the meringue until the bowl is cool to the touch. This is the most crucial step in making the frosting! It’s easy to get impatient, but make sure you whip it long enough that it won’t totally melt the butter when you add it. Adding butter to a hot or even warm (about 85°F) meringue will fully melt the butter and turn your frosting soupy. If this does happen, see how to fix it in the FAQs. Here’s the thing I love about Swiss meringue frosting—it’s very forgiving, and you can typically fix it with the right trick!
The cake must be completely cool before slicing into halves. Warm cake tears, even with a serrated knife. If you’re in a hurry, cool the cakes in the pan for 15 minutes, invert and cool for another 5 minutes on a rack, then transfer to the freezer for about 20 minutes. The cake can develop ice crystals on the surface, making it sticky when it comes back to room temp, but it will rapidly cool the layers.
Tiramisu Cake Recipe
Equipment
- Electric hand or stand mixer
- Mixing Bowls
- Small saucepan
- Piping tips
Ingredients
For the Cake:
- ½ cup whole milk room temperature (120ml)
- ½ cup sour cream room temperature (120g)
- 5 large egg whites room temperature
- 2 teaspoons vanilla extract
- 3 cups unbleached cake flour (360g)
- 2 cups granulated sugar (400g)
- 2 teaspoons baking powder
- ¾ teaspoon salt
- 1 cup unsalted butter very soft (226g)
For the Filling:
- 5 large egg yolks
- ½ cup granulated sugar (100g)
- 1 teaspoon cornstarch
- ¾ cup whole milk (180ml)
- 1 tablespoon coffee liqueur
- 16 ounces mascarpone cheese room temperature (452g)
For the Swiss Meringue Buttercream:
- 5 large egg white room temperature
- 1½ cups granulated sugar (300g)
- 1 pinch sea salt
- 2 cups unsalted butter softened (454g)
- 1 teaspoons vanilla extract
- 3 tablespoons coffee liqueur
For Assembly:
- ¾ cup hot water (180ml)
- 1½ teaspoon espresso powder
- 3 tablespoons coffee liqueur
- ¼ cup unsweetened cocoa powder (25g)
- 12 chocolate covered espresso beans (optional)
Instructions
For the Cake:
- Preheat the oven to 350ºF. Lightly grease two 8-inch round cake pans with baking spray and line the bottoms with parchment paper. I suggest wrapping the pans in soaked fabric baking strips for even, flat layers.
- In a large liquid measuring cup or medium bowl, whisk together the milk, sour cream, egg whites, and vanilla extract. Set aside.
- In the bowl of a stand mixer fitted with the paddle attachment, mix together the flour, sugar, baking powder, and salt. While mixing on low speed, add the butter 1 tablespoon at a time until the mixture looks like coarse crumbs, 30 seconds to 1 minute.
- With the mixer running on low, drizzle half of the milk mixture into the mixer, and mix just until it is fully combined. Stop and scrape the bowl down, then turn the mixer back on low and mix in the rest of the milk mixture. Beat on medium speed until the mixture looks fluffy, about 30 seconds. Scrape down the bowl and mix once more if needed.
- Divide the batter evenly between the two pans. Bake for 35 minutes or until a toothpick inserted comes out clean. Let the cakes cool in the pans for 15 minutes, then invert them onto a wire rack, remove the parchment paper on the bottom, and cool completely.
For The Filling:
- Place the milk in a small pot over medium heat and warm until the milk starts to steam and bubble slightly around the edges, about 2-3 minutes.
- Meanwhile, in a medium bowl, whisk together the egg yolks, sugar, and cornstarch until smooth. Set aside.
- Once the milk is hot, slowly whisk it into the egg yolk mixture until fully combined. Pour the mixture back into the saucepan and cook over medium-low heat, gently whisking constantly, until thickened, about 2 minutes. (The custard should hold the trace of the whisk when pulled through it and temp around 200°F.)
- Remove from heat and stir in the coffee liquor. Transfer the custard to a clean bowl, and press plastic wrap on top. Chill for 30 minutes to 1 hour, just until it is roughly room temperature (70-80F). To quickly cool it, you can put the bowl in an ice bath and stir the custard with a spatula until cooled, about 5 minutes.
- Once cooled, gently whisk the mascarpone in a medium bowl until smooth and fold half of the custard into it. Add the remaining half and and fold just until no streaks remain, cover and chill until ready to use.
For the Buttercream:
- Add the egg whites, sugar, and salt to a bowl that is large enough to sit on the pot of simmering water without touching the water. Give the mixture a brief whisk. Place the bowl on top of the pot. Gently stir the egg whites constantly, until they have reached 160F, about 8-10 minutes.
- Transfer the egg white mixture to the bowl to a stand mixer fitted with a whisk attachment. Beat on medium speed until the mixture becomes very fluffy, glossy, and has soft peaks, and the outside of the bowl feels barely warm to the touch, about 10-12 minutes.
- Reduce the mixer speed to medium-low, and add the softened butter 1 tablespoon at a time, making sure to let each piece of butter incorporate before you add the next one.
- Once the butter is incorporated, add the coffee liqueur and vanilla into the buttercream. Increase the mixer speed to medium-high and beat until the frosting is fluffy and stiff enough to spread, about 2-3 minutes. Stop and scrape the bowl down occasionally, as well. (If your frosting is runny at this stage, see the Notes for how to troubleshoot it by dropping the temperature.)
- Place ¾ cup (128g) of buttercream in a piping bag fitted with a large closed star tip (I used Ateco 846 tip). Place another 1 cup of buttercream in a piping bag fitted with a round tip (1A). Cover the rest of the frosting, and set aside.
For the Assembly:
- In a small bowl, stir together the water, espresso powder and coffee liqueur. Set the syrup aside to cool slightly.
- Cut the cooled cake layers in half horizontally, so you have four thin layers. Transfer the cooled, mascarpone custard to a piping bag.
- Place the first layer, cut side up, on a cake stand. Drizzle or brush a third of the coffee syrup (about 5 tablespoons) on top. Spread a thin layer of buttercream on top, then pipe a thin border around the edge of the cake using the reserved frosting with the round tip, creating a dam for the filling. Dollop a third of the mascarpone filling (1 cup) on top and spread it into a smooth layer out to the edge of the cake. Dust the top lightly with cocoa powder.
- Repeat again twice by starting with the cake layer cut side up, then adding the coffee syrup, frosting, mascarpone filling, and cocoa powder. For the final top cake layer, place it bottom side up for a smooth top.
- Cover the top and sides with a smooth layer of the buttercream. (You can scrape the side for a “naked” look, but if you love buttercream leave it as a nice thick layer!)
- Dust top with cocoa powder. Use the end of a spoon to remove a ring of cocoa powder from the edge of the cake’s top (this will allow your dollops to adhere). Pipe dollops of buttercream in the clean ring around the top, and garnish with chocolate covered coffee beans. Let the cake chill in the refrigerator for at least 1 hour before serving.
Notes
- If your buttercream is runny after adding the butter, the bowl is too warm. Refrigerate the bowl for 10-15 minutes, scrape down the bowl, then beat again on medium-high until silky. Or, place a bag of frozen peas or an ice pack on the outside of the bowl while beating. This will cool the mixture down rapidly.
- Pre-soaking fabric cake strips before wrapping the outside of the pans gives the flattest, most even layers.
- Set the finished cake out at room temperature before serving for the best texture and flavor. Swiss meringue buttercream gets very firm when cold. About 30 minutes is enough time for the frosting to soften slightly for the silkiest texture without getting too warm.
Nutrition
Have you tried this recipe? Tag me today!
Mention @preppykitchen and tag #preppykitchen!
Make-Ahead And Storage
This cake is, frankly, better on day two. The coffee soak penetrates the sponge more evenly after a night in the fridge, the mascarpone filling firms up for a cleanly sliceable texture, and the flavors integrate overall. If you’re making this for a dinner party, assemble it the day before and chill overnight.
Refrigerator: 4-5 days, covered in a cake dome or wrapped loosely in plastic. The mascarpone filling is a perishable component and shouldn’t sit at room temperature longer than 2 hours per USDA food safety guidelines for dairy-based dishes. If you’re transporting the cake, try to keep it cool or plan to refrigerate it when you get there.
Freezer: The unfrosted cake layers freeze cleanly for up to 3 months, wrapped tightly in plastic and foil; thaw overnight in the fridge before assembly. The frosting also freezes well in an airtight container for up to 1 month. Thaw overnight in the fridge, then bring to room temperature and beat it again until smooth and fluffy. The assembled cake or slices don’t freeze as nicely because of the custard filling. Once thawed, the filling’s texture turns grainy, and it releases a lot of liquid.
Bring to room temperature before serving. A cold tiramisu cake straight from the fridge tastes muted and feels dense. Pull the cake out about 30 minutes before serving and let it warm gently. The mascarpone softens, the coffee notes brighten, and the buttercream relaxes into the silky texture it’s meant to have.
Frequently Asked Questions
Two likely causes. First, and most common, the custard was still too warm when you folded the mascarpone in. Hot custard liquefies the fat in mascarpone, and you can’t recover the texture. The custard needs to be at 70-80°F (room temperature, not warm) before the mascarpone goes in. Second: overmixing it. Once the mascarpone is folded in and no streaks remain, stop. Continued mixing can break the fat structure and give it a grainy texture even if the temperatures are right.
Probably not. Most “runny buttercream” is just a warm buttercream. If it turns very runny or soupy, either the meringue was still too warm when you started adding butter, or you added the butter too quickly.
The fix: refrigerate the buttercream (in the mixer bowl) for 10-15 minutes, then beat again on medium-high for 2-3 minutes. You can also press a bag of frozen peas or an ice pack to the side of the bowl while mixing to help cool it down. The texture comes back nine times out of ten. If it doesn’t come back, the butter likely melted too much, ruining the meringue’s structure, and you’ll need to start the buttercream over.
It likely got too cold. This commonly happens if you try to cool it down because it was runny. Getting it too cold solidifies the butter too much, turning it clumpy and making the texture of the frosting grainy or appear greasy.
The fix: gently warm the side of the bowl by running hot water on it for a few seconds, or hitting it with a kitchen torch or hair dryer. Beat on medium-high speed for a minute, and repeat if needed. You should see the frosting turn silky smooth again fairly quickly.
Yes! For 6-inch pans, halve the recipe, and bake the cake layers for 25-30 minutes. For 9-inch pans, multiply the recipe by 1.5 (increasing it by 50%). Bake the cake layers for 30-35 minutes.
Classic tiramisu is a no-bake layered dessert built from espresso-soaked ladyfingers and mascarpone cream—there’s no flour, no butter, no oven involved. Tiramisu cake takes the same flavor profile (coffee, mascarpone, cocoa, liqueur) and translates it into a baked layer cake with a vanilla sponge instead of ladyfingers. They taste similar but have very different textures and presentations. If you want the original, my classic tiramisu recipe is the no-bake version.
More homemade Cake Recipes To Try
If you love this tiramisu cake, try these other Preppy Kitchen favorite cake recipes:
- Tiramisu Cupcakes — the same flavor profile in a single-serve cupcake format. Great for parties.
- Mocha Cake — coffee + chocolate layer cake for the coffee dessert lovers.
- Caramel Cake — moist vanilla layers with caramel buttercream. A southern classic.
- Ultimate Chocolate Cake — for when you want something deeply chocolate instead.
- Coffee Cake — a different style of coffee cake (cinnamon streusel, not espresso) but pairs perfectly with an espresso!
- Vanilla Cake — my master vanilla layer cake recipe; the cake mixing method is the same as this recipe, so it’s a great one to make if you love the texture of the tiramisu cake.
If you’ve tried this tiramisu cake recipe, then don’t forget to rate it and let me know how you got on in the comments below. I love hearing from you!


