
This post may contain affiliate links. Please read our disclosure policy.
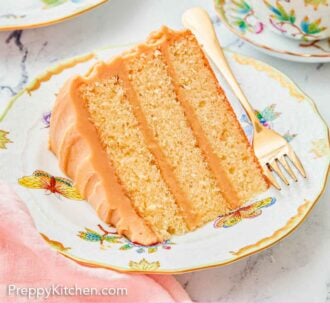
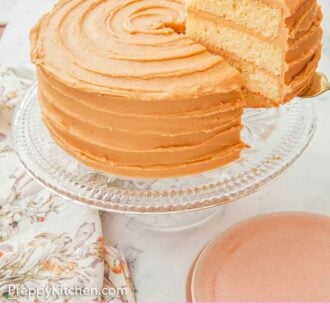

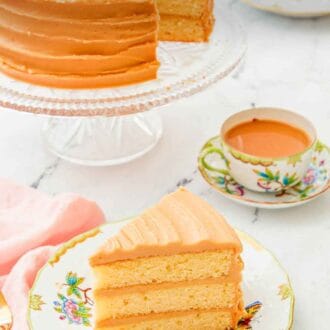
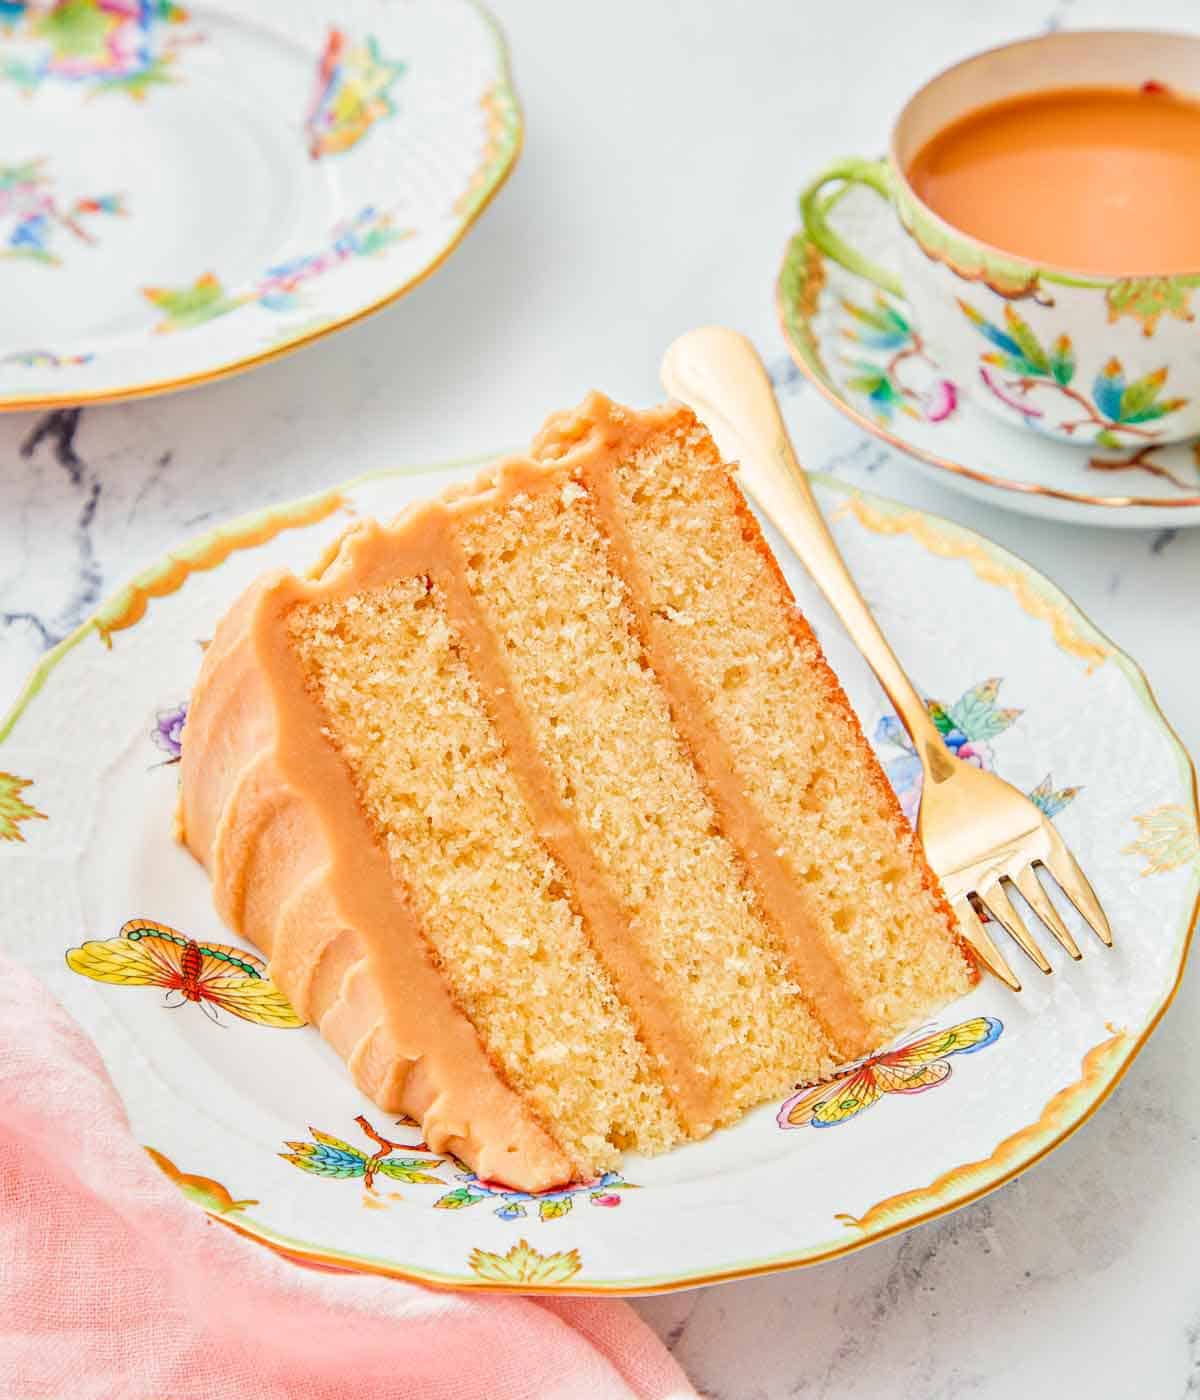
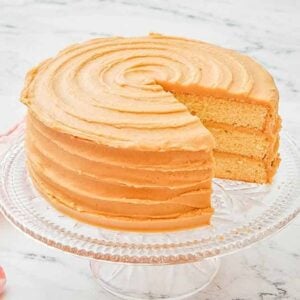
This Caramel Cake is a showstopping cake that’s fit for any occasion. This decadent dessert features three moist and tender cake layers filled and covered in a layer of rich caramel icing. This layered cake is perfect for the caramel lover in your life.

I am obsessed with how delicious this caramel cake recipe is! You get caramel flavor in every bite, but it’s not overly sweet, so you can eat the whole slice and then maybe a second! You will love how light and tender the cake is and how it contrasts deliciously with the rich, deep caramel flavor.
It’s perfect for the holidays, as this layered caramel cake always impresses my guests. It has a simple yet stunning presentation. Don’t let the cake layers intimidate you. This cake is so easy to assemble. You can even make it a couple of days in advance for stress-free entertaining. Want another caramel recipe? Try my caramel brownie recipe, caramel apple recipe, or millionaires shortbread recipe.
What You Need to Make This Recipe
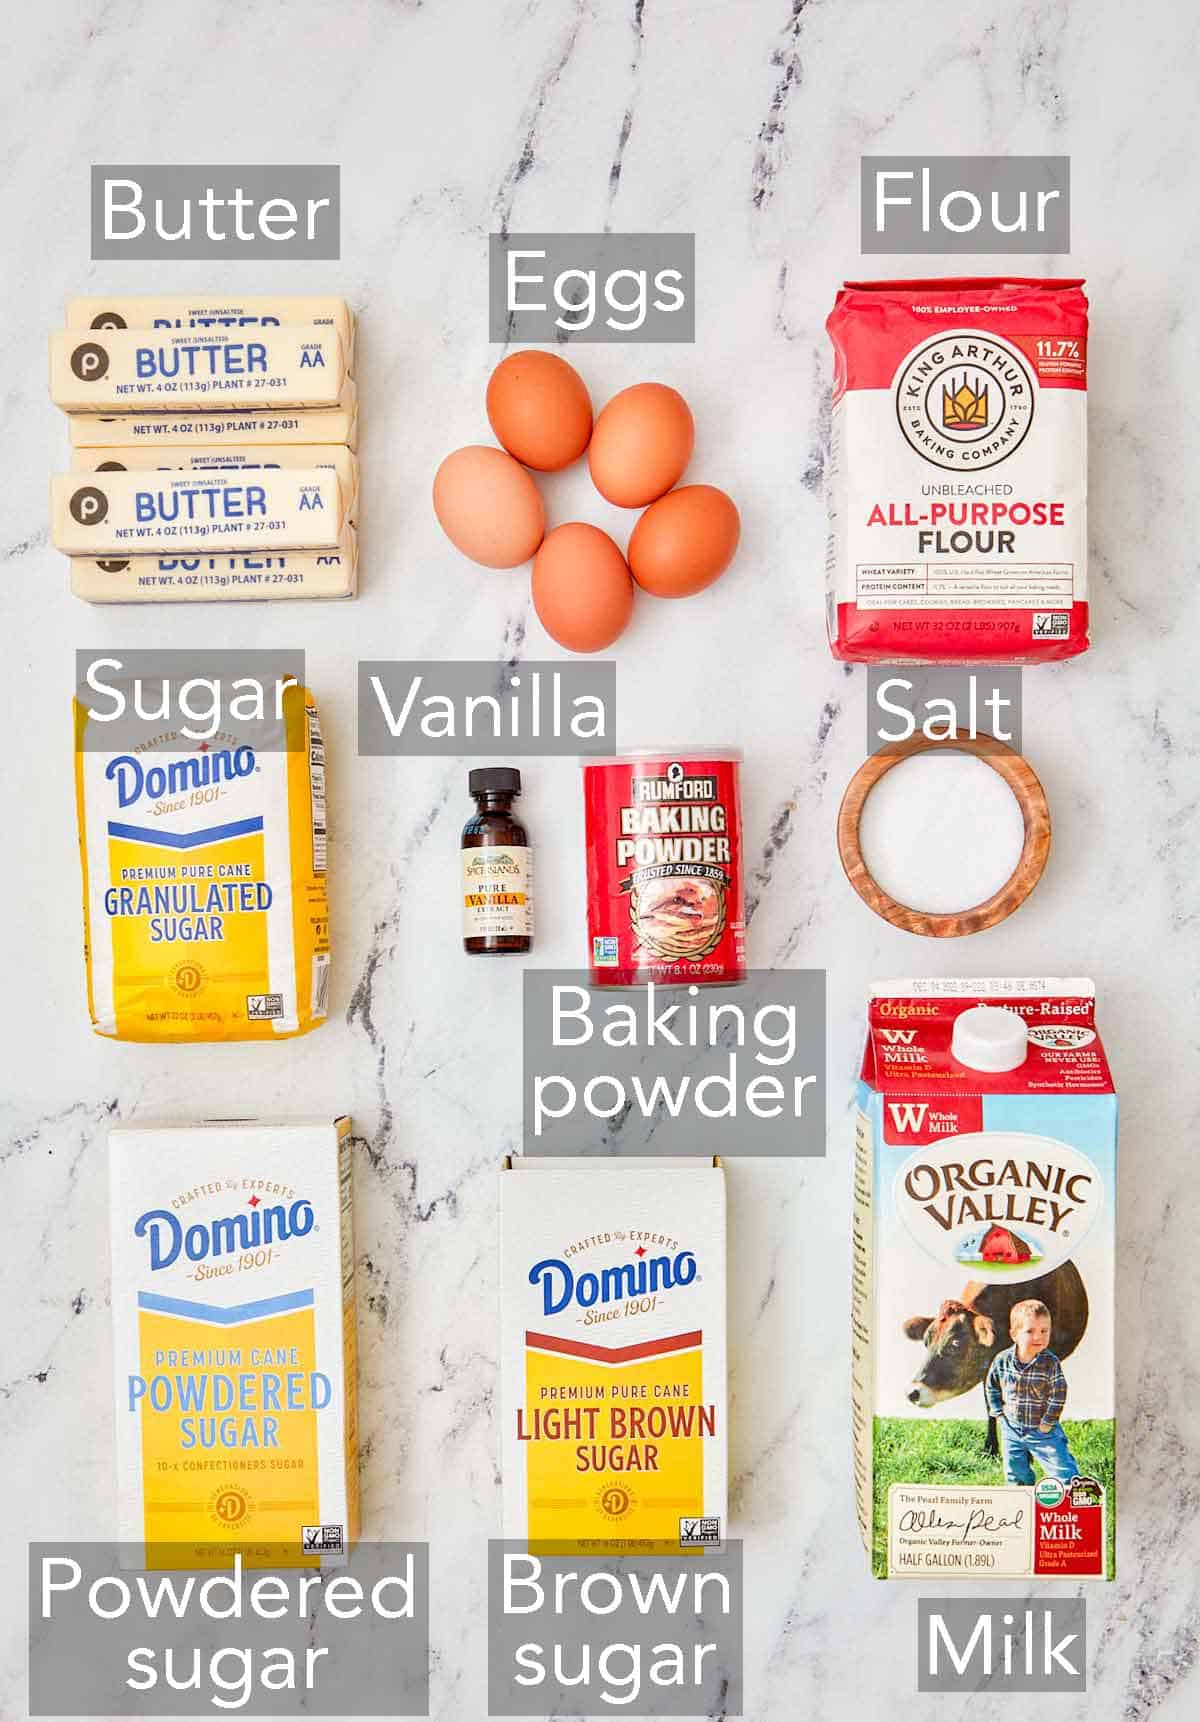
Flour — this cake uses all-purpose flour. I don’t suggest swapping it for another flour.
Baking powder — make sure this is not expired as it helps your cake layers from being dense and heavy.
Butter — I always recommend using unsalted butter as you will add measured salt to the batter. Be sure to bring the butter to room temperature. It needs to be soft enough to where your finger leaves a dent when you press into it. It will be difficult to beat the butter into a smooth and creamy consistency if it’s cold.
Sugar — this recipe calls for both granulated sugar and brown sugar. The granulated sugar gives you a tender and soft crumb, while the brown sugar creates the caramel sauce.
Eggs — the eggs provide structure, leavening, richness, color, and flavor to the cake layers. You’ll need all five.
Milk — make sure you buy whole milk. Whole milk will give you the best flavor and add moisture to the caramel cake.
Powdered sugar — you might find it labeled as confectioners’ sugar, icing sugar, and 10X, but they are all the same. If you’ve run out of powdered sugar, see my guide on how to make powdered sugar. The powdered sugar helps turn the caramel sauce into a more spreadable mixture by thickening it.
How to Make Caramel Cake
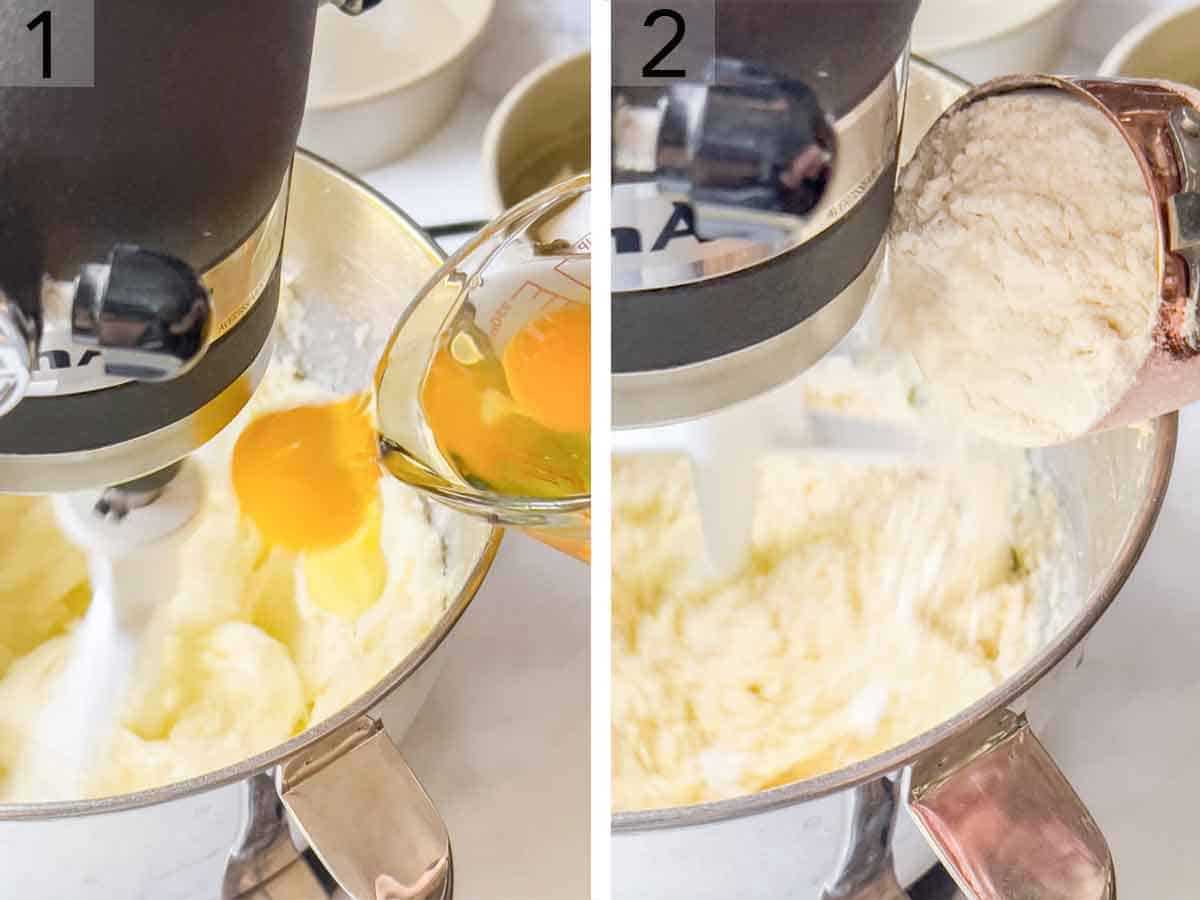
1. In the bowl of a stand mixer fitted with the paddle attachment, beat the butter on medium speed until creamy. Add the sugar and beat until light and fluffy before adding the eggs, one at a time, beating each one well before adding the next. Stop and scrape down the bowl occasionally during mixing. Beat in the vanilla.
2. In a medium mixing bowl, whisk together the flour, baking powder, and salt. With the mixer on low, add a third of the flour mixture.
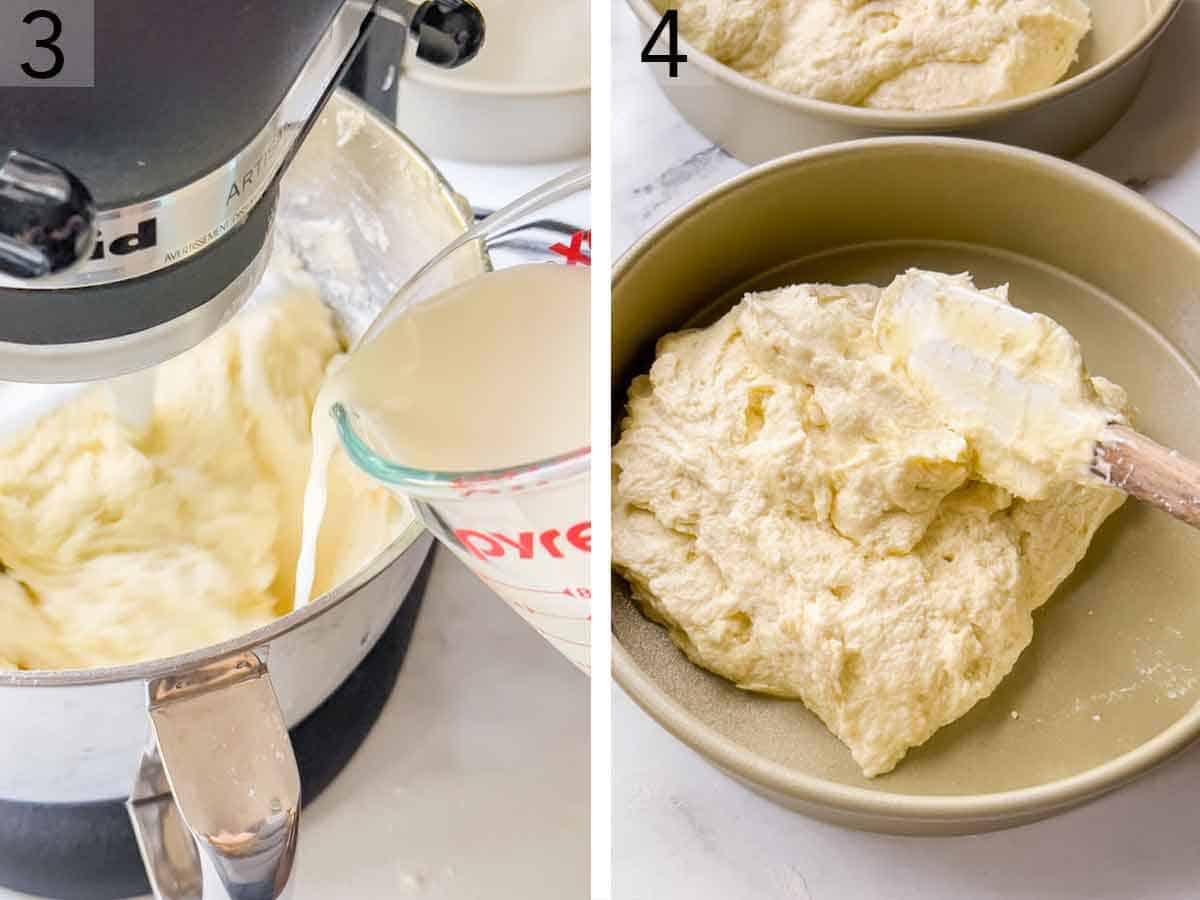
3. Add half of the milk. Repeat alternating with the remaining flour and milk until fully combined. Stop and scrape down the bowl a few times during mixing.
4. Divide the batter among the three greased and floured 9-inch cake pans. Bake for 30 to 35 minutes and let cool in the pans for 20 minutes.
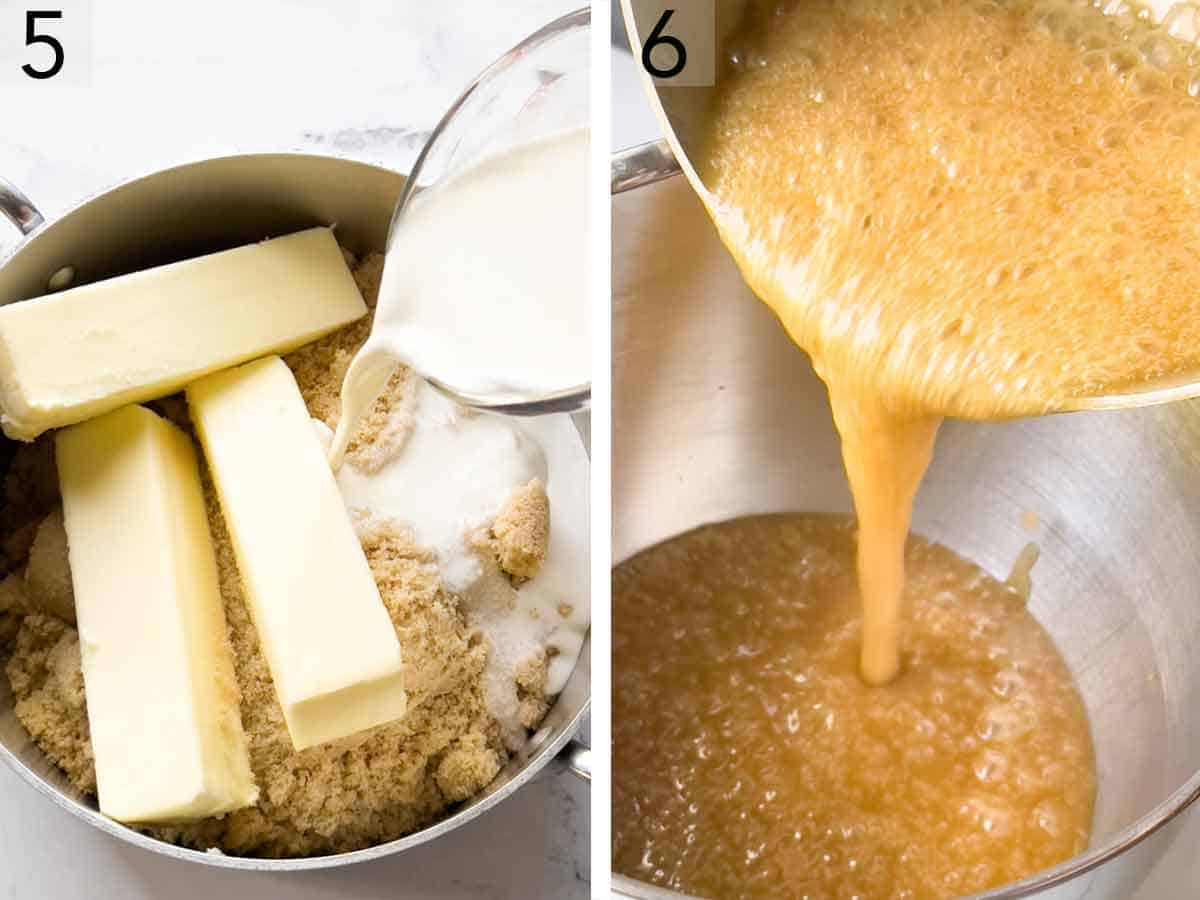
5. While the cakes are cooling, combine brown sugar, butter, milk, cream, and salt in a medium saucepan. Place over medium heat and bring to a boil, stirring frequently. Once boiling, stir constantly until the mixture reaches 230F to 235F, 5 to 10 minutes.
6. Transfer to a medium mixing bowl or the bowl of a stand mixer and let cool for 20 minutes or until starting to thicken (about 150F), stirring occasionally.
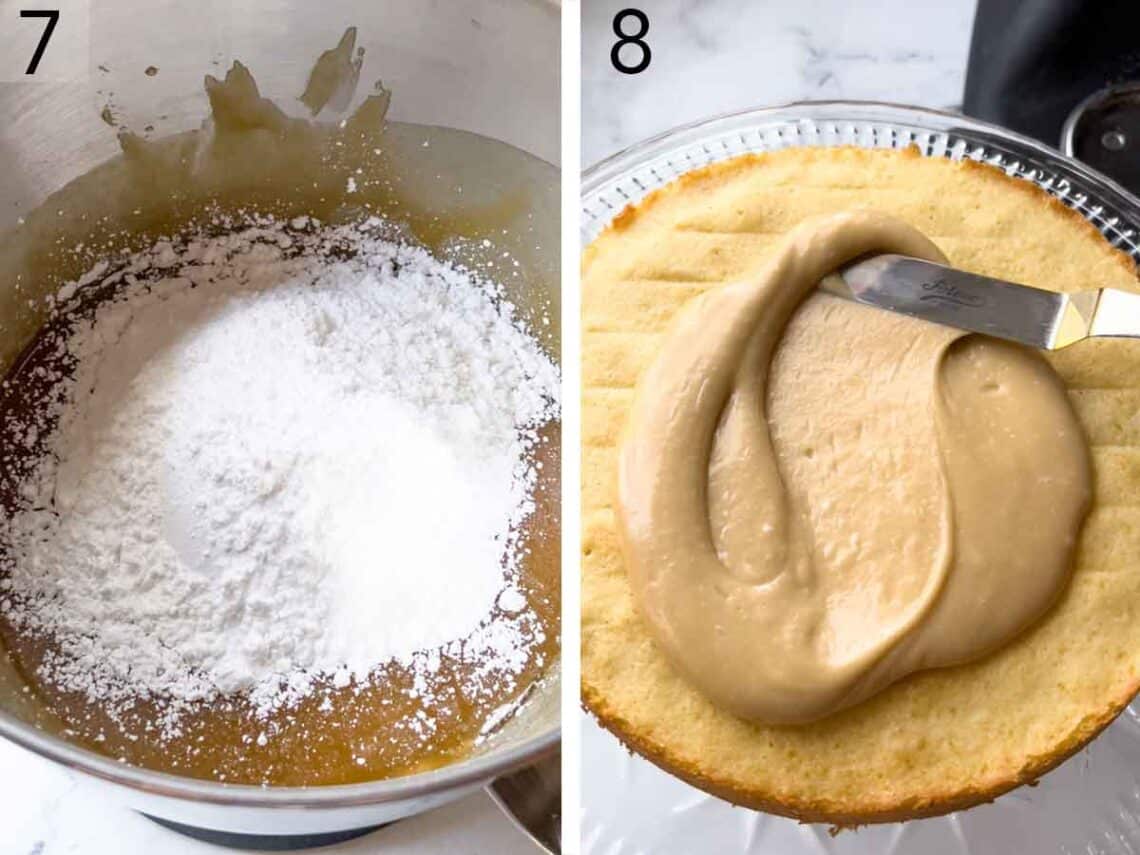
7. Beat on medium-high for 10 minutes and then add confectioners’ sugar and beat until thickened and spreadable but will still slowly pour.
8. Place one cake layer on a cake stand or serving plate. Pour enough icing over the top to cover it with a thin layer (about ½ cup) and spread the icing to the edge of the cake using an offset spatula. Smooth any drips off the side of the cake.
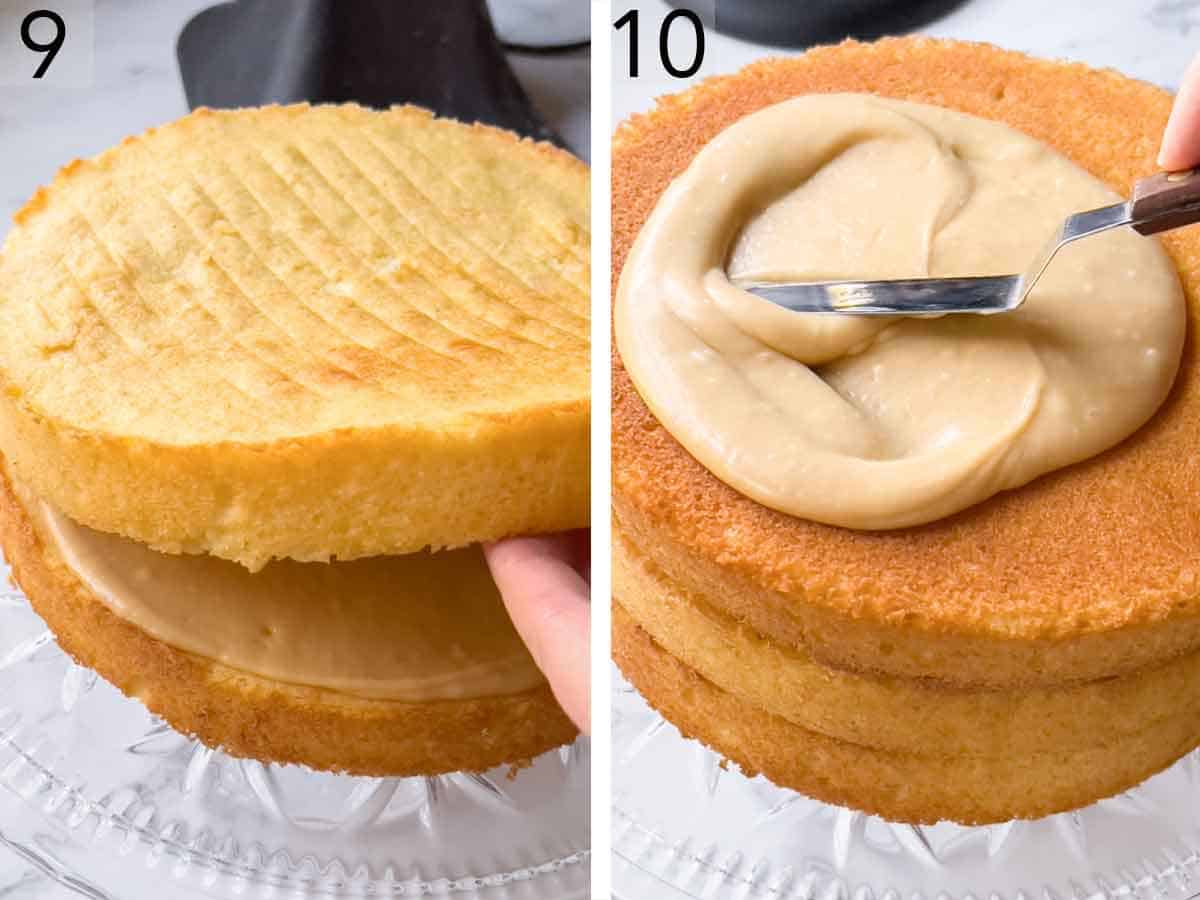
9. Top with another cake layer and repeat with the icing.
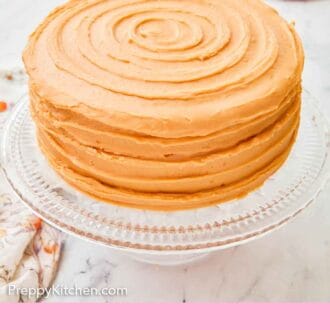
10. Place the remaining layer on top. Spread a very thin layer of icing on the outside of the cake to trap crumbs, then spread the remaining frosting all over the top and sides of the caramel cake. Refrigerate the caramel cake for 30 minutes or until the icing is set.
Pro Tips for Making This Recipe
- For darker caramel icing, use dark brown sugar.
- Make sure your saucepan for the caramel icing is deep. The mixture will bubble up in volume quite a bit while boiling.
- If your icing is still too runny after the confectioners’ sugar, it likely means the caramel didn’t boil for long enough or come up to temperature. That’s okay! Just keep adding confectioners’ sugar until it’s spreadable. If the icing is too thick, you can thin it out with a little extra milk.
- When frosting the cake, keep in mind that this is not buttercream! The icing may sag or drip after applying, so just continue smoothing it with a knife. If the icing starts to set up too fast, dip the spatula in hot water for a few seconds and continue frosting the cake. If the icing is still slowly moving once on the cake, you can keep spreading, and it will continue to set as it cools, or pop the cake in the freezer for 10 minutes to cool the surface down, then continue frosting it.
- If the tops of the cake layers come out domed, use a serrated knife to cut off the top of the domes so you can stack them without them falling off. If you’re concerned the layers will not be even, you can use cake strips. Cake strips work by keeping the outside edge of the pan cooler to ensure that the entire cake rises at the same rate, preventing a dome from forming in the middle. If you don’t want to purchase cake strips to make this caramel cake, see my guide on how to DIY cake strips.
- I highly recommend using a scale to measure your flour as it’s the most accurate method and will prevent you from ending up with dense cake layers. If you don’t have a scale, fluff your flour with a spoon and spoon it into your cups before leveling it off with a knife. This method prevents you from overpacking the measuring cup.
- If the ingredients were refrigerated, such as the eggs, milk, and butter, it’s best to bring them to room temperature before using them to prevent having to overmix the batter. Overmixing the batter will lead to a tough caramel cake.
- Give the cake layers time to cool. You can even make them in advance and keep them wrapped in the fridge. Cold cake layers are easier to assemble, and you won’t risk the caramel icing melting off.
- You can gently tap the cake pans on the counter to pop air bubbles in the batter.
- When stirring the caramel, make sure you scrape the sides of the pot throughout. This helps prevent the sugar from crystallizing and leading to a grainy caramel.
- Keep a close eye on the caramel, as it can quickly burn if you walk away from the stove. See my full post on how to make caramel.
- Caramel is hot! Be very caramel when working with it.
- Before placing the first cake layer, you can dab a couple of drops of caramel icing on the cake stand. The icing helps the cake layer stay in place, so it doesn’t slide off as you frost the cake.

Frequently Asked Questions
Store the cake covered at room temperature for up to 3 days. However, if you want to store it in the fridge, make sure you bring slices to room temperature before serving.
Yes, this caramel cake is freezer-friendly! You can freeze the assembled and frosted cake or individual slices. Wrap the cake or slices in a couple of layers of plastic before freezing for up to 3 months. Bring the cake to room temperature before you serve it. You can also freeze the cake layers to assemble the cake at a later date.
If you want a salted caramel cake instead, you simply have to do is add a bit of salt once you’ve finished making the icing. Add as much or as little as you prefer.
If you’ve tried this Caramel Cake recipe, then don’t forget to rate the recipe and let me know how you got on in the comments below, I love hearing from you!
Caramel Cake
Equipment
- 3 9" round baking pans
- Mixing Bowls
- Electric hand or stand mixer
- Medium Saucepan
Ingredients
For the Cake:
- 3¼ cups all-purpose flour (390g)
- 2 teaspoons baking powder
- ½ teaspoon salt
- 1½ cups unsalted butter softened (340g)
- 2½ cups granulated sugar (500g)
- 5 large eggs
- 1 tablespoon vanilla extract
- 1 cup whole milk (240ml)
For the Caramel Icing:
- 3 cups packed light brown sugar (660g)
- 1½ cups unsalted butter (340g)
- ½ cup whole milk (120ml)
- ½ cup heavy cream (120ml)
- ¾ teaspoon salt
- 1½ cups confectioners’ sugar (180g)
Instructions
For the Cake:
- Preheat the oven to 350F. Grease and flour three 9-inch round cake pans.
- In a medium mixing bowl, whisk together the flour, baking powder, and salt.
- In a large mixing bowl or the bowl of a stand mixer fitted with the paddle attachment, beat the butter on medium speed until creamy. Add the sugar and beat until light and fluffy, about 5 minutes. Add the eggs, one at a time, beating each one well before adding the next. Stop and scrape down the bowl occasionally during mixing. Beat in the vanilla.
- With the mixer on low, add a third of the flour mixture, followed by half of the milk. Repeat alternating with the remaining flour and milk until fully combined. Stop and scrape down the bowl a few times during mixing. Divide the batter among the prepared cake pans.
- Bake for 30 to 35 minutes or until the centers feel springy to the touch and the cakes start to pull away from the sides of the pans. Let cool in the pans for 20 minutes. Gently tap the pans around the sides and invert the cakes on a wire rack to cool completely.
For the Caramel Icing:
- While the cakes are cooling, combine brown sugar, butter, milk, cream, and salt in a medium saucepan. Place over medium heat and bring to a boil, stirring frequently.
- Once boiling, stir constantly until the mixture reaches 230F to 235F, 5 to 10 minutes. Transfer to a medium mixing bowl or the bowl of a stand mixer and let cool for 20 minutes or until starting to thicken (about 150F), stirring occasionally.
- Using a hand or stand mixer fitted with the whisk attachment, beat on medium-high for 10 minutes. Add the confectioners’ sugar and beat until thickened and spreadable but will still slowly pour. (It will continue to thicken as it cools.)
- Place one cake layer on a cake stand or serving plate. Pour enough icing over the top to cover it with a thin layer (about ½ cup) and spread the icing to the edge of the cake using an offset spatula. Smooth any drips off the side of the cake. Top with another layer and repeat with the icing.
- Place the remaining layer on top. Spread a very thin layer of icing on the outside of the cake to trap crumbs, then spread the remaining frosting all over the top and sides of the cake (See notes for tips about frosting the cake.) Refrigerate the cake for 30 minutes or until the icing is set. Store the cake covered at room temperature for up to 3 days.
Notes
- For darker caramel icing, use dark brown sugar.
- Make sure your saucepan for the caramel icing is deep. The mixture will bubble up in volume quite a bit while boiling.
- If your icing is still too runny after the confectioners’ sugar, it likely means the caramel didn’t boil for long enough or come up to temperature. That’s okay! Just keep adding confectioners’ sugar until it’s spreadable. If the icing is too thick, you can thin it out with a little extra milk.
- When frosting the cake, keep in mind that this is not buttercream! The icing may sag or drip after applying, so just continue smoothing it with a knife. If the icing starts to set up too fast, dip the spatula in hot water for a few seconds and continue frosting the cake. If the icing is still slowly moving once on the cake, you can keep spreading, and it will continue to set as it cools, or pop the cake in the freezer for 10 minutes to cool the surface down, then continue frosting it.
- If the tops of the cake layers come out domed, use a serrated knife to cut off the top of the domes so you can stack them without them falling off. If you’re concerned the layers will not be even, you can use cake strips. Cake strips work by keeping the outside edge of the pan cooler to ensure that the entire cake rises at the same rate, preventing a dome from forming in the middle. If you don’t want to purchase cake strips, see my guide on how to DIY cake strips.
- I highly recommend using a scale to measure your flour as it’s the most accurate method and will prevent you from ending up with dense cake layers. If you don’t have a scale, fluff your flour with a spoon and spoon it into your cups before leveling it off with a knife. This method prevents you from overpacking the measuring cup.
- If the ingredients were refrigerated, such as the eggs, milk, and butter, it’s best to bring them to room temperature before using them to prevent having to overmix the batter. Overmixing the batter will lead to a tough cake.
- Give the cake layers time to cool. You can even make them in advance and keep them wrapped in the fridge. Cold cake layers are easier to assemble, and you won’t risk the caramel icing melting off.
- You can gently tap the cake pans on the counter to pop air bubbles in the batter.
- When stirring the caramel, make sure you scrape the sides of the pot throughout. This helps prevent the sugar from crystallizing and leading to a grainy caramel.
- Keep a close eye on the caramel, as it can quickly burn if you walk away from the stove.
- Caramel is hot! Be very caramel when working with it.
- Before placing the first cake layer, you can dab a couple of drops of caramel icing on the cake stand. The icing helps the cake layer stay in place, so it doesn’t slide off as you frost the cake.
Nutrition
Have you tried this recipe? Tag me today!
Mention @preppykitchen and tag #preppykitchen!


