
This post may contain affiliate links. Please read our disclosure policy.

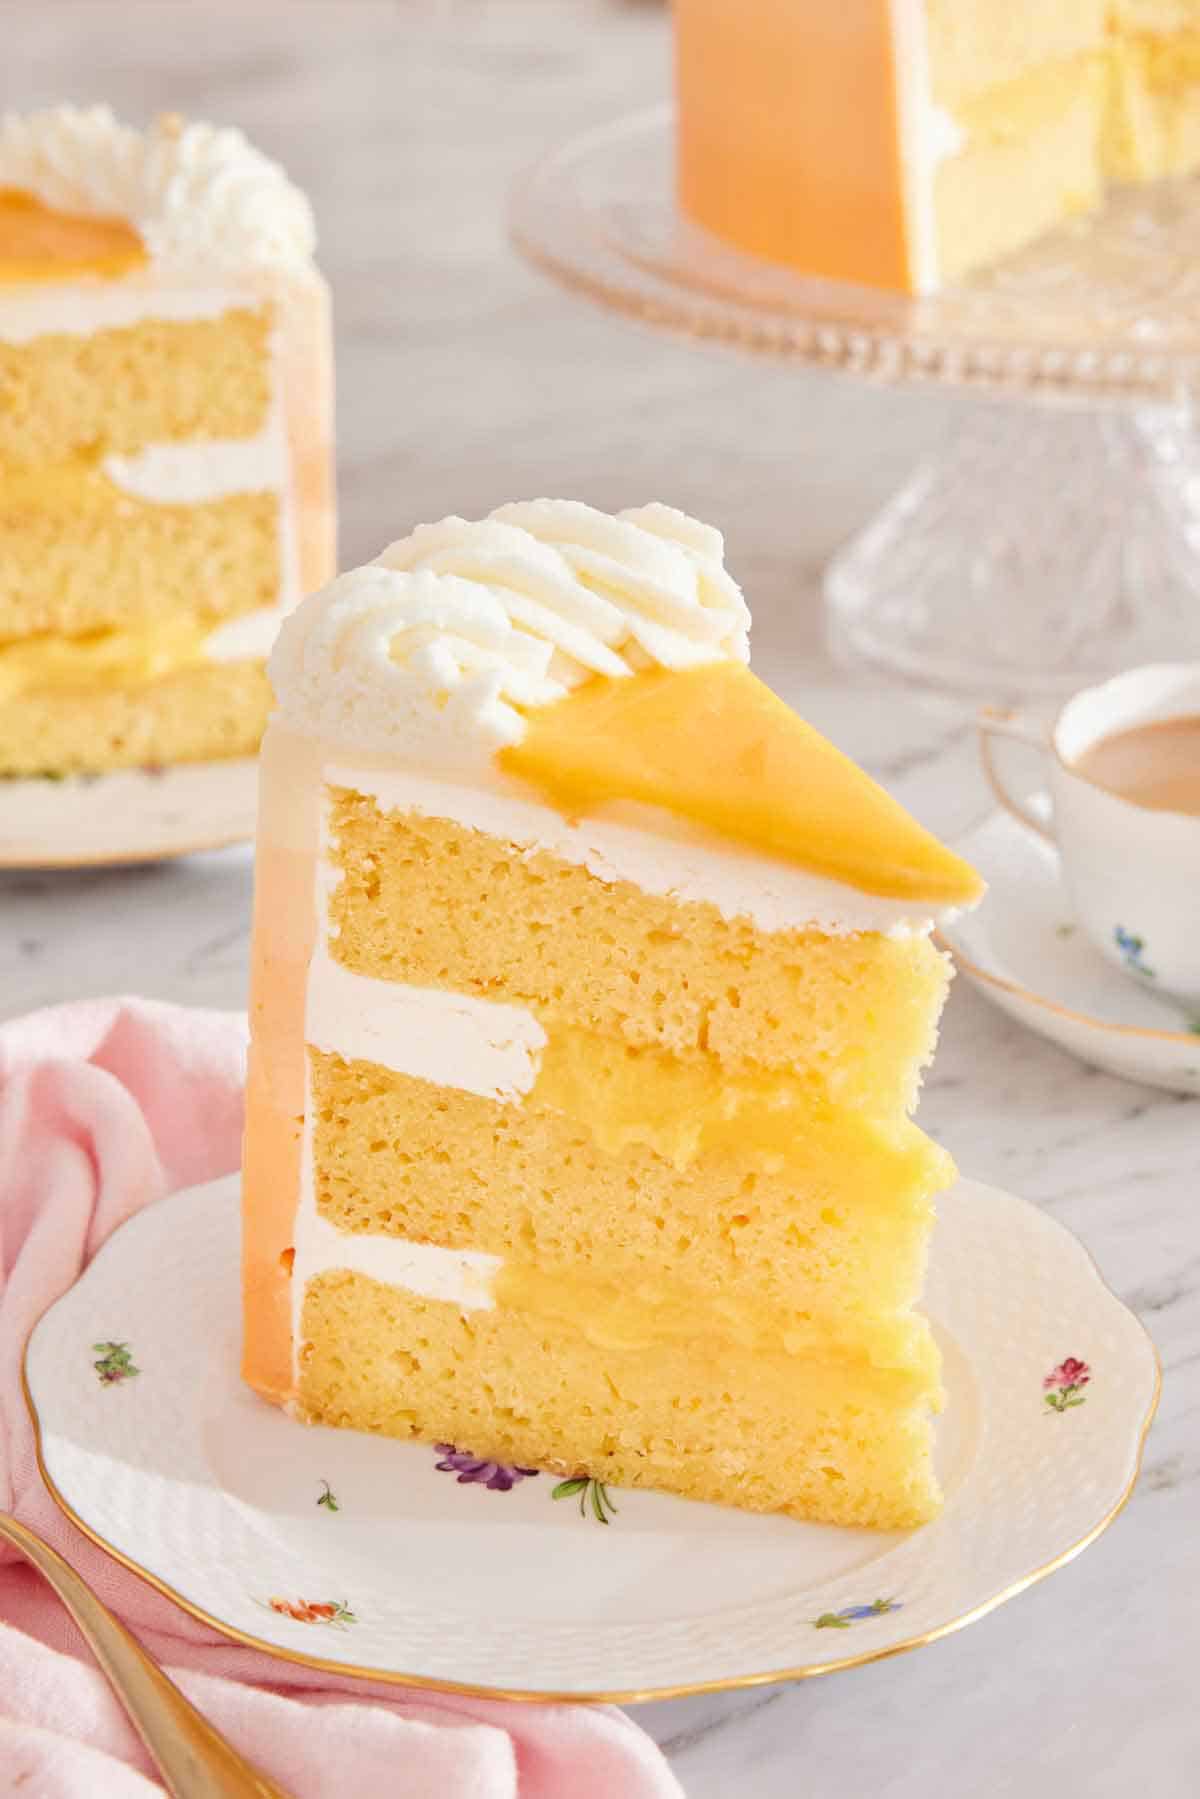
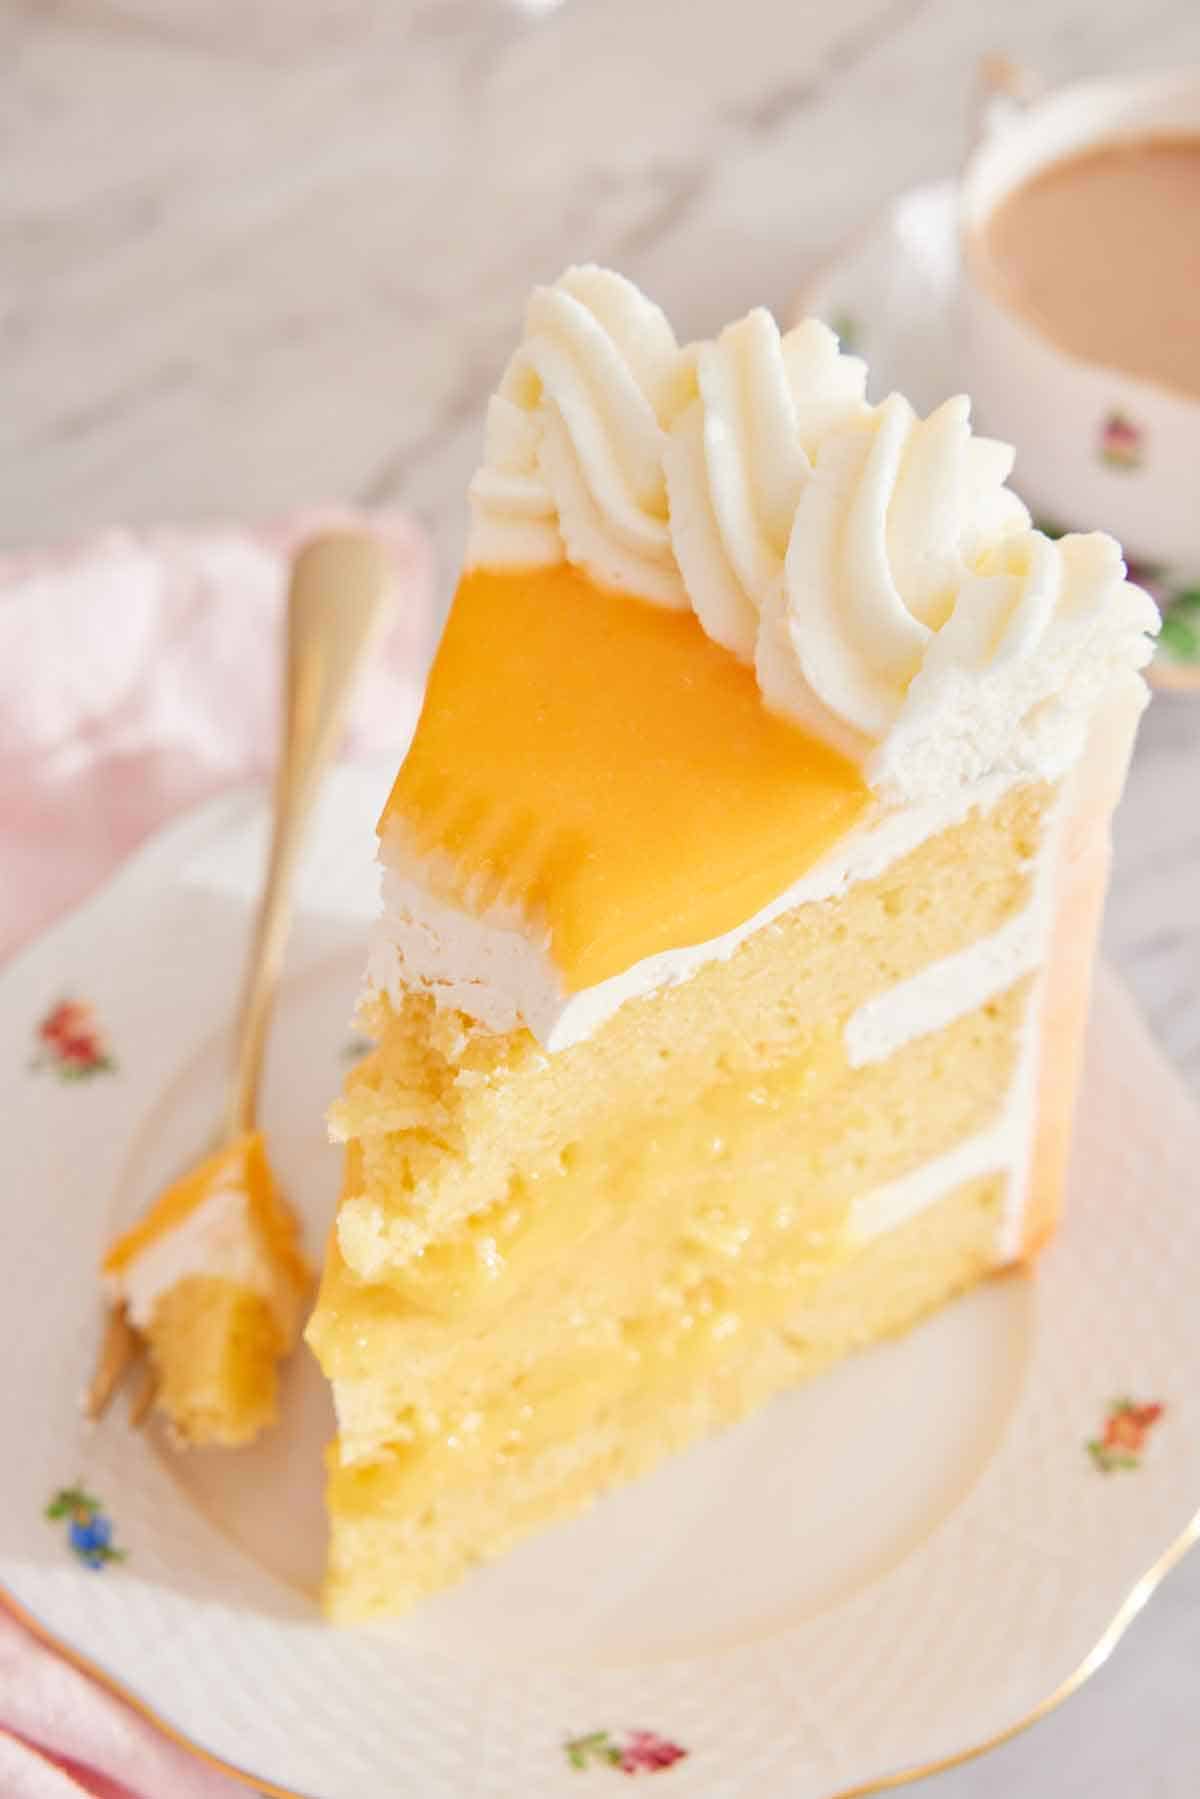
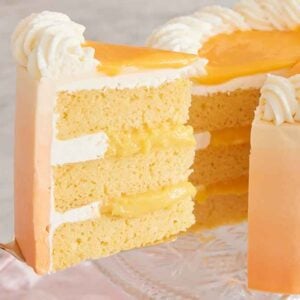
This Orange Creamsicle Cake will remind you of your favorite childhood frozen treat! It is a delightfully refreshing cake bursting with bright orange and vanilla flavors. Serve it up at your next summer party, picnic, or potluck, and watch it disappear fast.
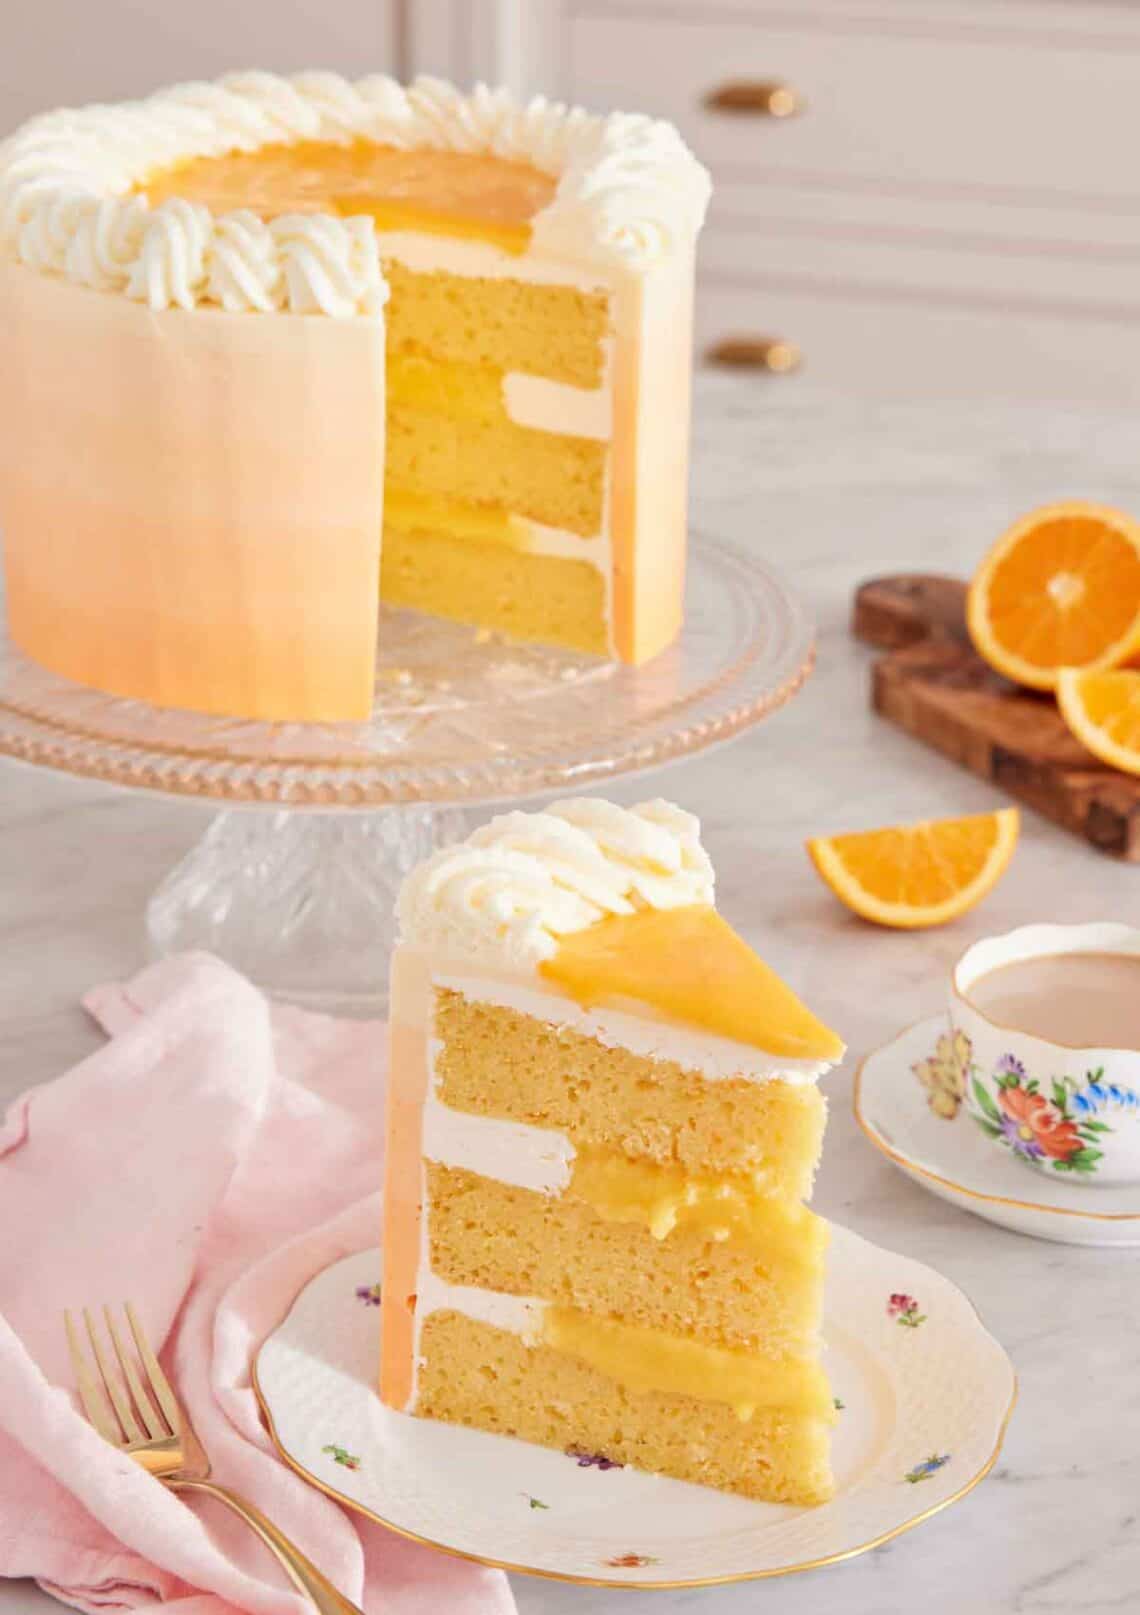
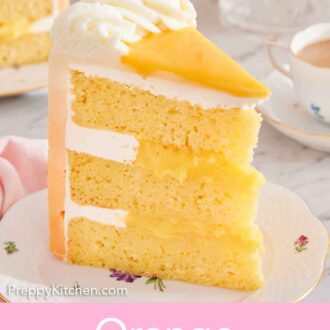
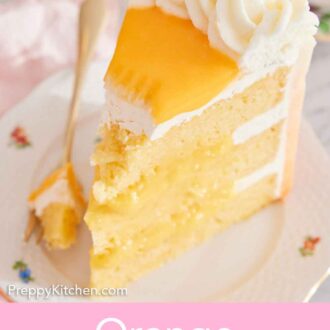
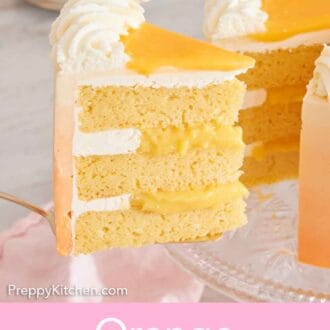
This orange creamsicle cake is an easy orange layer cake made without cake mix or boxed orange jello! It is not difficult to make from scratch with kitchen staples. Inspired by the childhood classic orange creamsicle (or dreamsicle, depending on your location), this cake is full of nostalgic citrus and vanilla flavors.
It’s the perfect summer treat, as the sweet orange flavor makes for a refreshing bite that everyone will want more of. Not only is there orange flavor in the cake, but there’s also an orange curd filling as well, so each bite is full of sweet, tangy, and creamy flavors. If you want another orange-flavored dessert recipe, then try my orange cake recipe, orange cookies recipe, or cranberry orange scone recipe!
What You Need to Make This Recipe
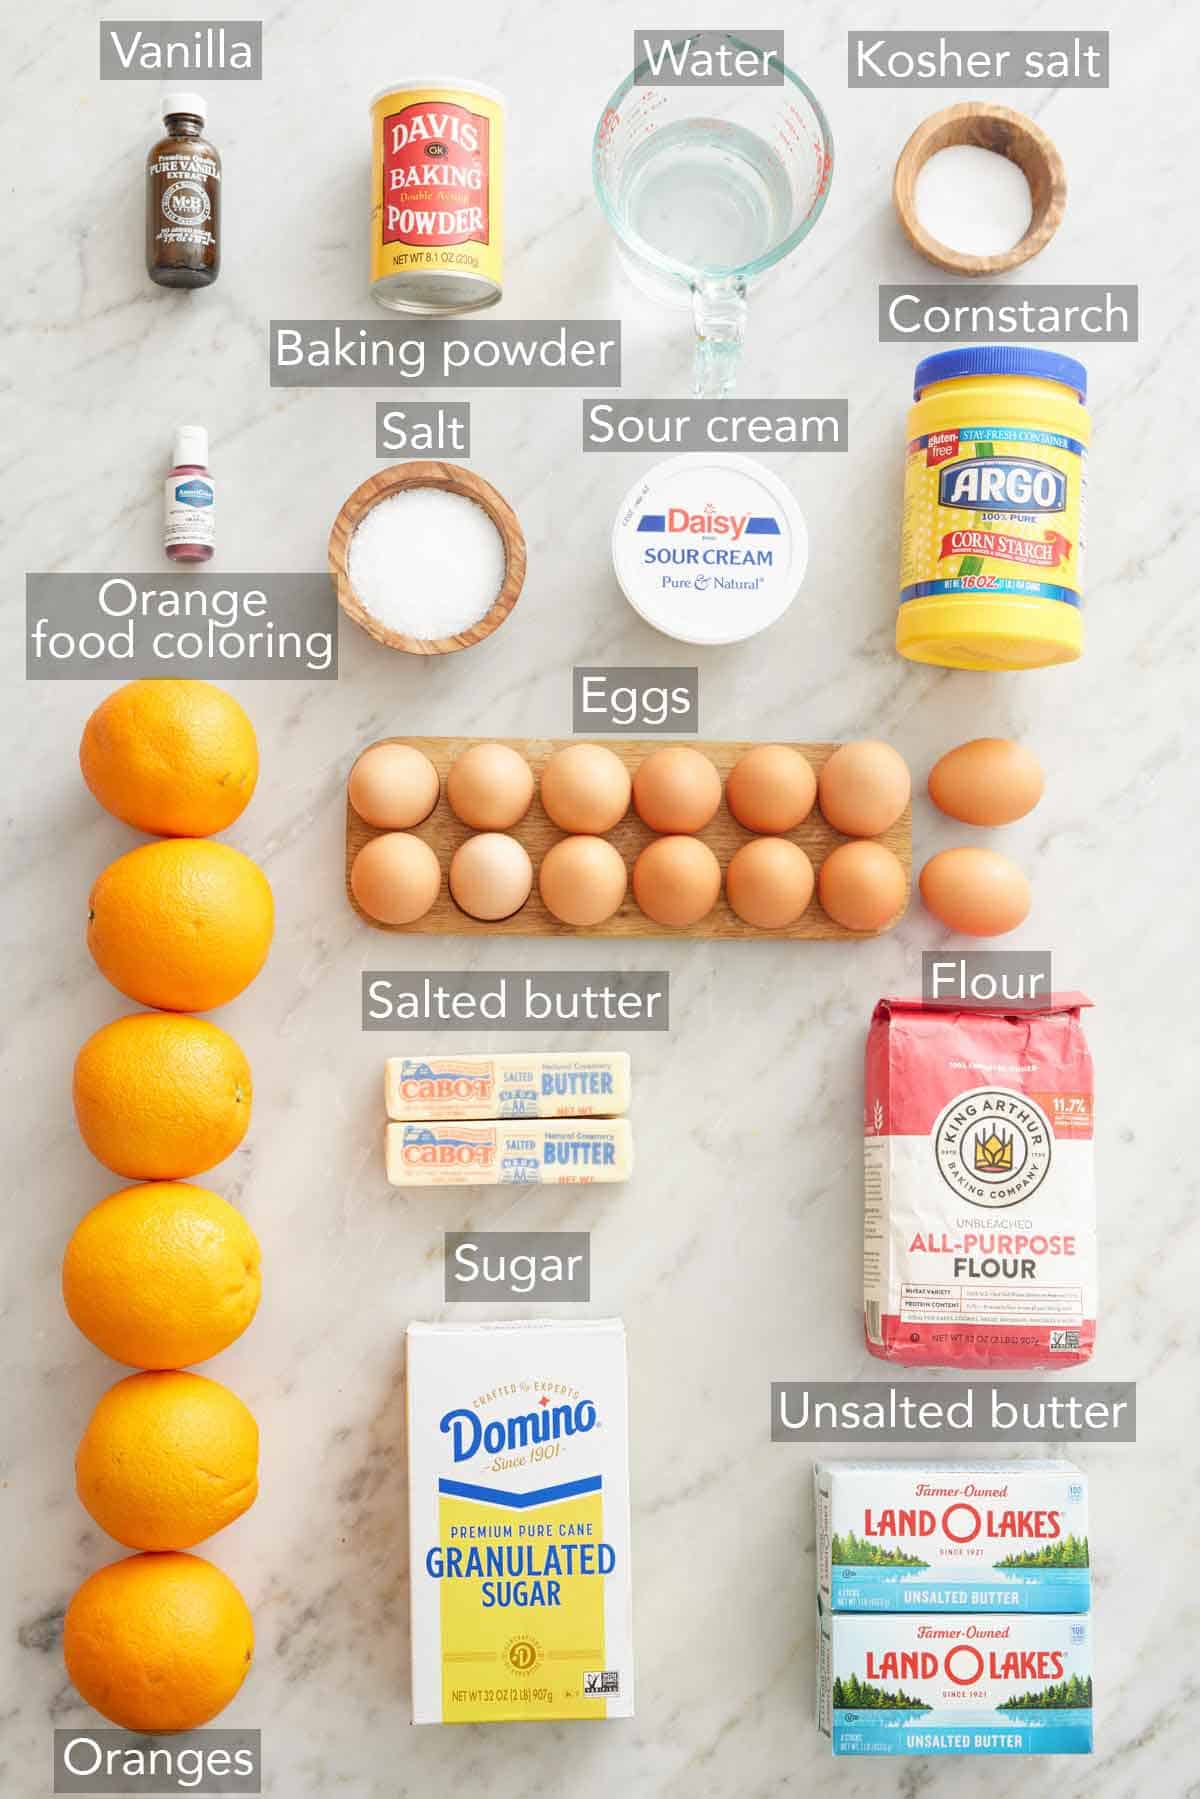
Sugar — you will need sugar for every component of this cake, so make sure you have enough. The sugar sweetens the orange mixture, keeps the cake soft and moist, and is turned into a sugar syrup to create the meringue buttercream frosting.
Flour — you do not need to use anything fancy for this creamsicle cake! All-purpose flour is all you need.
Cornstarch — cornstarch works to thicken the orange mixture.
Orange juice — fresh orange juice is ideal for the best orange flavor. Make sure to strain it to remove any pulp. You’ll need orange juice for both the filling and the cakes.
Eggs — again, make sure you have plenty of eggs on hand! You’ll need four egg yolks to create the rich filling, six eggs for the cake, and eight egg whites for the frosting.
Baking powder — make sure the baking powder is fresh. Using expired baking powder can lead to cake layers that don’t rise properly.
Butter — this cake calls for both salted and unsalted butter. Double-check the wrapper before you use them! You want to make sure you’re using unsalted butter for the frosting so it’s not overly salty!
Sour cream — using sour cream in the cake batter gives the cake a very tender and moist crumb, plus a delicious tangy flavor. If you don’t have sour cream then make your own using my homemade sour cream recipe.
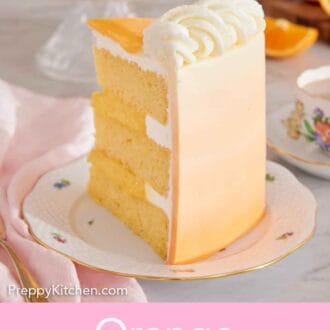
Food coloring — if you’d like to create an orange ombre frosting, then you’ll need orange food coloring.
How to Make Orange Creamsicle Cake
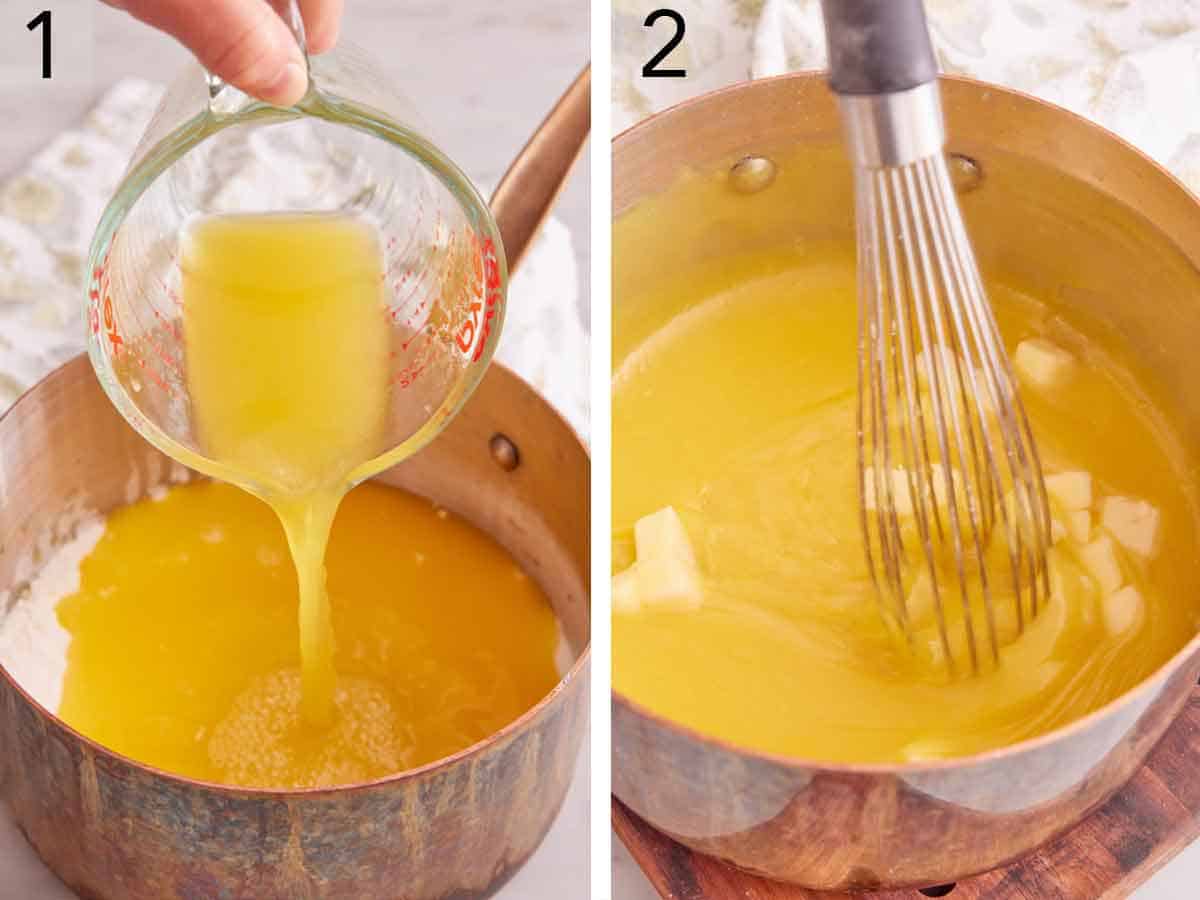
1. In a medium heavy-bottom pot, whisk together the sugar, flour, and cornstarch. Whisk in the orange juice and egg yolks until well combined. Set over medium-high heat and cook, stirring constantly, until the mixture boils and becomes thick and clear, and begins to bubble.
2. Remove from the heat and stir in the cubed butter. Transfer the filling to a bowl and press plastic wrap directly onto the surface of the filling and then chill until cold.
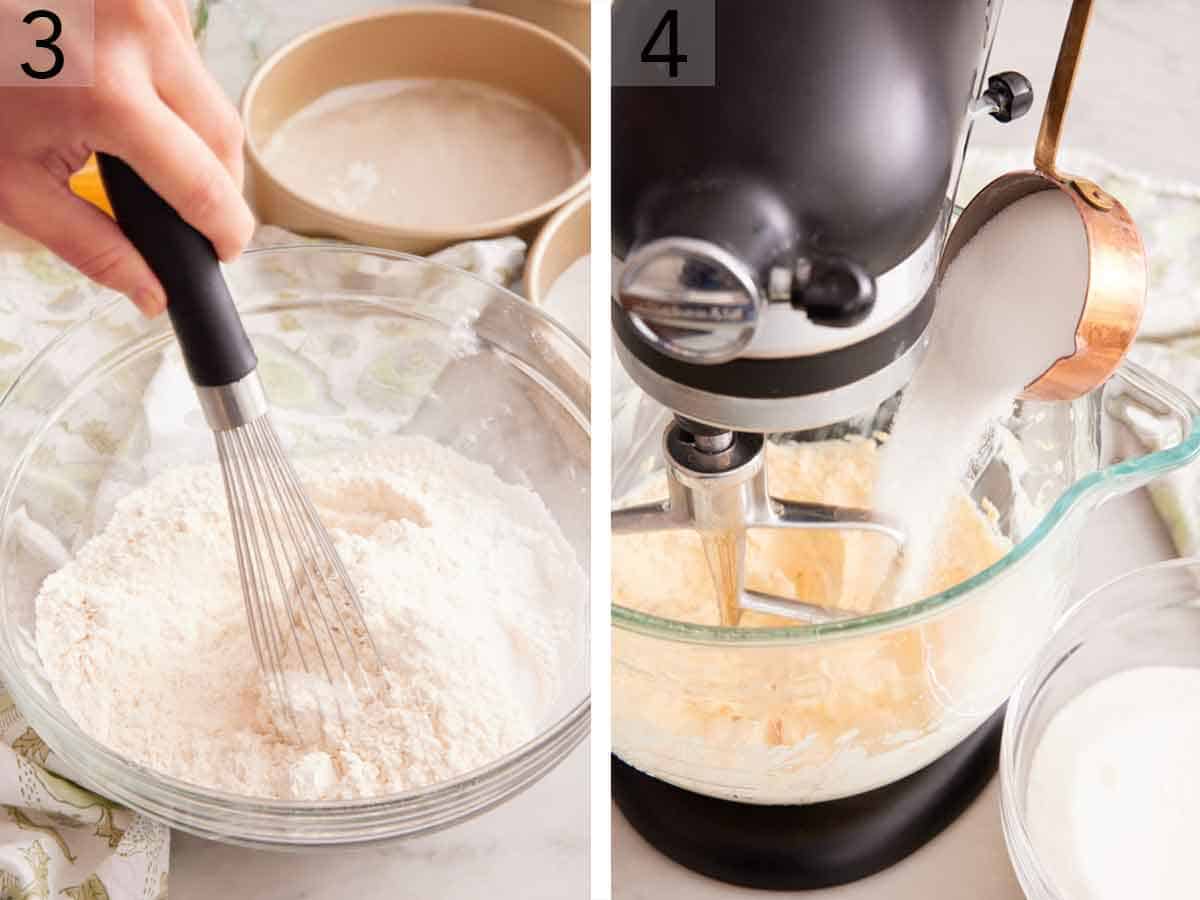
3. Combine flour, baking powder, and salt in a large bowl.
4. In a bowl of a stand mixer fitted with a paddle attachment, beat together the butter, sour cream, and orange zest on medium speed until well combined. With the mixer running, slowly add the sugar. Increase the speed to high and beat until the mixture is light and fluffy. Add the eggs, one at a time, mixing well and scraping down the sides between additions.
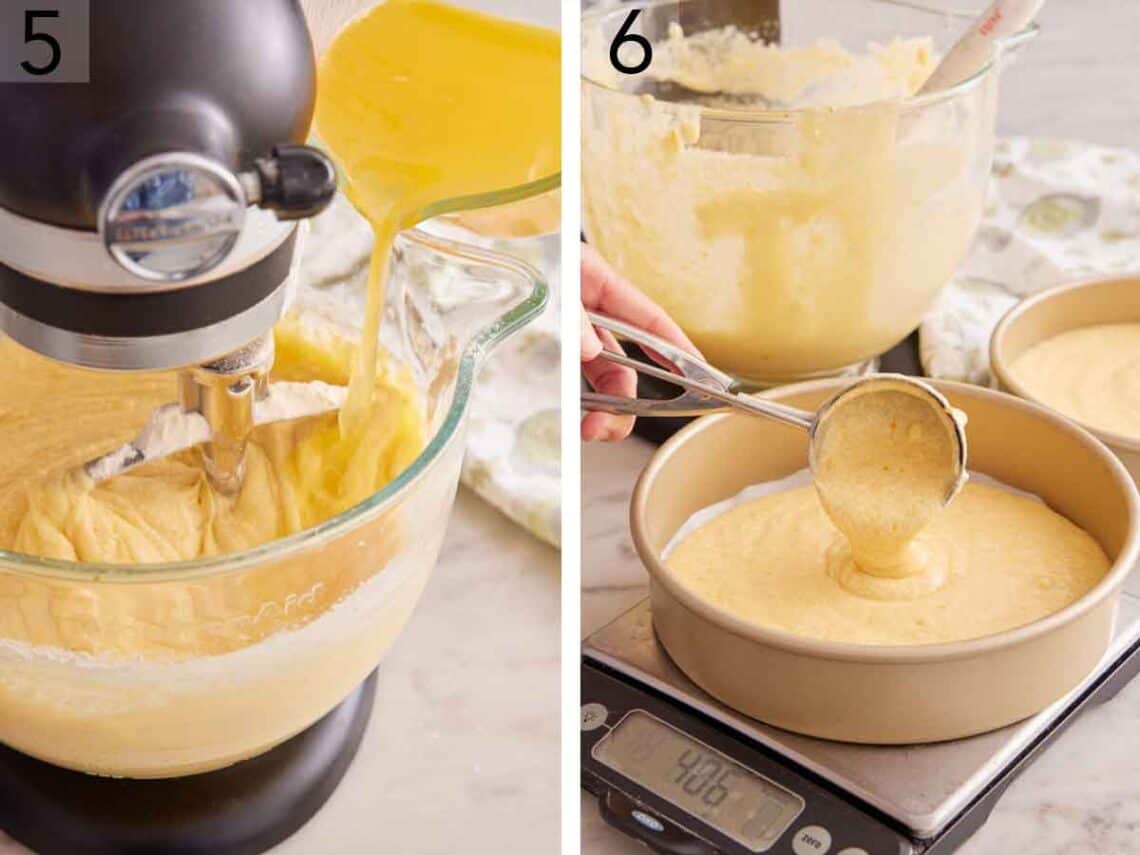
5. With the mixer on low speed, add the flour mixture in three additions alternating with the orange juice to the butter mixture.
6. Divide the batter among the greased 3 (8-inch) round cake pans. Bake for 30 minutes until a toothpick inserted in the middle comes out clean, rotating the cake pan positions after 20 minutes. Cool the cakes in the pans for 10 minutes, then invert the cakes onto a wire cooling and cool completely.
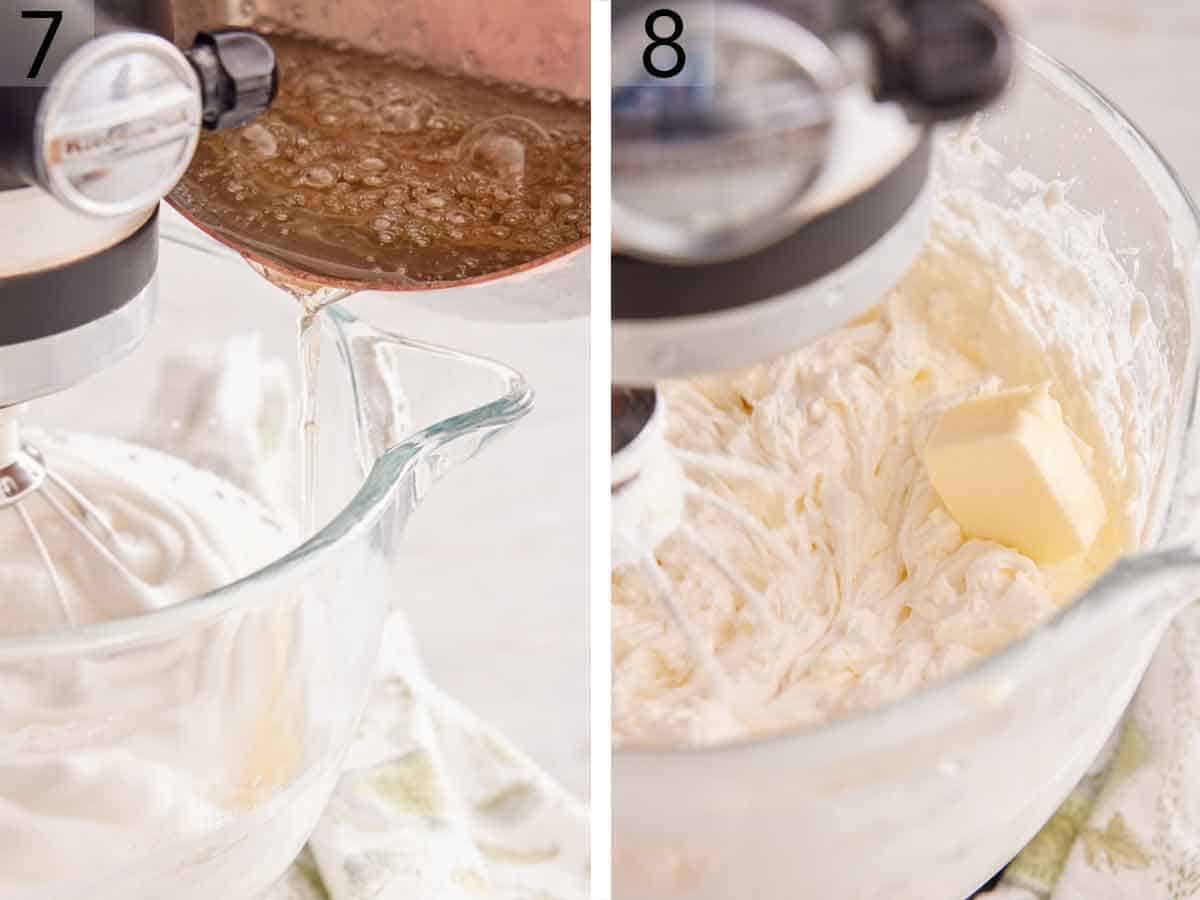
7. Combine the egg whites and ⅓ cup of sugar in the bowl of a stand mixer fitted with the whisk attached. Beat on medium-high speed until soft peaks form. Carefully drizzle the prepared sugar syrup into the bowl while the mixer is still running. Once combined, add the salt and increase the speed back to medium-high. Continue beating until the meringue is no longer warm to the touch.
8. With the mixer running, add the butter to the meringue, one piece at a time. Beat until the butter is combined and the frosting is smooth but stiff enough to spread. Beat in the vanilla.
Transfer about 1 cup of the frosting to a piping bag fitted with an 869 or other decorative piping tip and about 1 cup in a piping bag with about ½ inch snipped off the end.
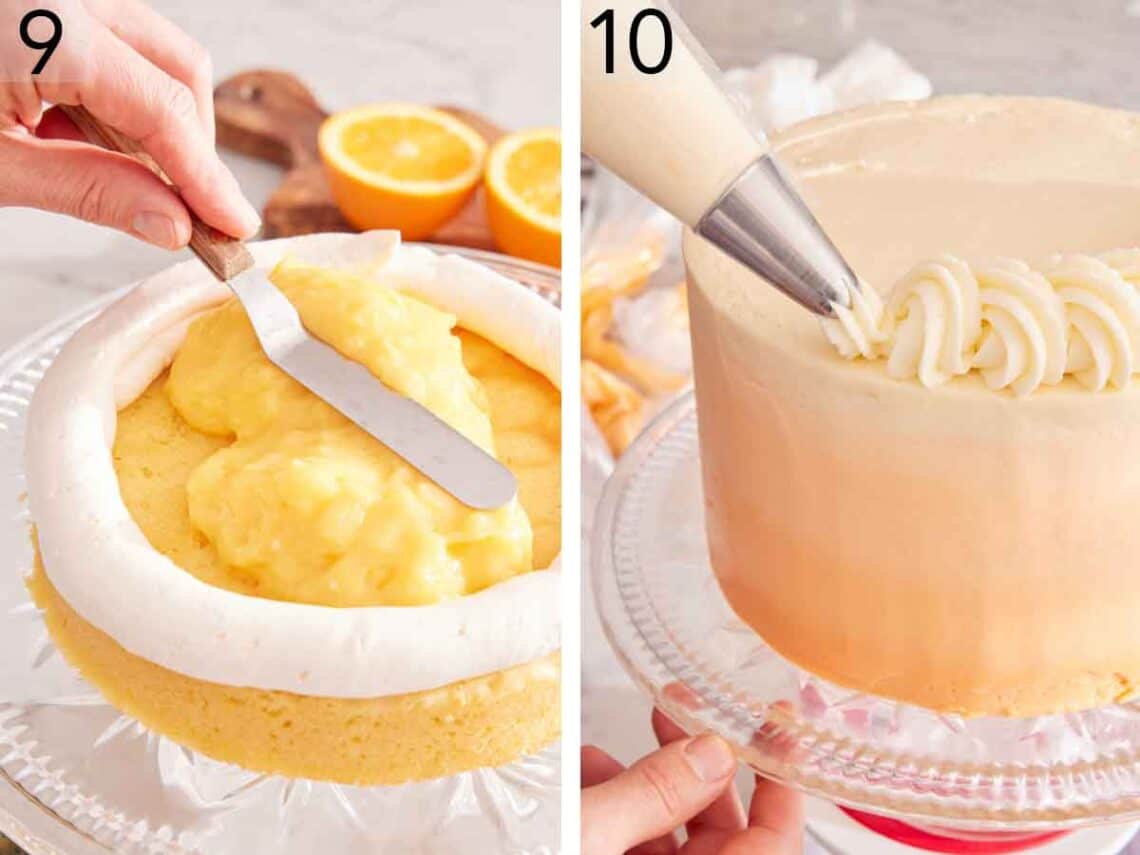
9. Place one cooled cake layer on a cake stand or plate. Using the frosting in the piping bag without the tip, pipe a single ring around the top edge of the cake, creating a frosting barrier. Spread ½ of the filling over the cake to the frosting barrier. Top with another cake layer. Repeat with more frosting and the remaining filling. Place the remaining cake layer on top.
10. Spread the remaining frosting on the outside of the cake in the desired pattern. Using the decorative piping tip, piping frosting on top of the cake. Refrigerate the cake for at least 30 minutes to set the frosting before slicing.
Pro Tips for Making This Recipe
- If the tops of your orange creamsicle cake layers are domed, then use a serrated knife to cut off the top of the domes so you can stack them evenly. Alternatively, use cake strips to help your cake layers come out evenly. Cake strips work by keeping the outside edge of the pan cooler to ensure that the entire cake rises at the same rate, preventing a dome from forming in the middle. If you don’t want to buy cake strips, then see my post on how to DIY cake strips.
- I highly recommend using a scale to measure your flour, as it’s the most accurate method. If you don’t have a scale, fluff your flour with a spoon and spoon it into your cups before leveling it off with a knife. This method prevents you from overpacking the measuring cup.
- Make sure to sift the dry ingredients to remove any lumps. This will help to keep the cake’s crumb soft and light.
- When zesting an orange, stop zesting once you reach the white layer, as the white is bitter.
- You can get more juice from your oranges by bringing them to room temperature and then rolling them on the counter to loosen up the insides.
- To ensure no air bubbles are in the cake batter, gently tap the cake pans on the counter a few times.
- Eggs are easier to separate when cold, but egg whites whip up easier for the frosting when they are closer to room temperature. I recommend separating them in advance if you have the time so the whites can then come to room temperature. In addition, allowing the egg whites to sit gives them a chance to relax, which improves their elasticity during the whipping process. You also want room temperature eggs when you prepare the cake batter so it incorporates easily without overmixing.
- It is essential to have a clean and dry bowl for whipping the egg whites for the frosting. The egg whites also cannot contain any egg yolk. If the bowl is not completely clean or yolk-free, then it will prevent your frosting from setting up.
Frequently Asked Questions
You can prepare the cake ahead of time by baking the cake layers a day or two before assembling the cake. Once cooled, wrap them up and store them in the fridge until you are ready to use them. You can also make the frosting ahead of time. The frosting lasts a week in the fridge. However, you will need to bring the frosting to room temperature and re-whip it before using it.
Store the cake for up to three days at room temperature. A cake dome is handy for keeping the cake covered without pressing down on the cake or piped frosting with plastic wrap.
You can freeze the cake layers with or without frosting. Wrap the cooled cake layers in plastic wrap and then place them in a freezer-safe bag. You can freeze them for up to three months. Thaw the frozen cakes at room temperature for a few hours before frosting. To freeze any leftover cake slices, wrap them in plastic wrap and store them in a freezer-safe bag or container for up to three months.
If you’ve tried this Orange Creamsicle Cake recipe, then don’t forget to rate the recipe and let me know how you got on in the comments below, I love hearing from you!
Orange Creamsicle Cake
Equipment
- 8″ cake pans
- Electric hand or stand mixer
- Mixing Bowls
- pot
- Piping bags
- Decorative piping tip
Ingredients
For the Filling:
- 1⅓ cups granulated sugar (266g)
- ¼ cup all-purpose flour (30g)
- 2 tablespoons cornstarch
- 2 cups fresh orange juice strained (from about 3 large oranges/480ml)
- 4 large egg yolks
- ¼ cup cold salted butter cubed (56g)
For the Cake:
- 4½ cups all-purpose flour (540g)
- 1 tablespoon plus 3 teaspoons baking powder
- 2 teaspoons salt
- ⅔ cup salted butter (152g)
- ⅔ cup sour cream (160g)
- 2 tablespoons grated orange zest about 3 large oranges
- 3 cups granulated sugar (600g)
- 6 large eggs
- 2 cups fresh orange juice strained (480ml)
For the Italian Buttercream:
- 3 cups granulated sugar (600g)
- ⅔ cup water (160ml)
- 8 large egg whites
- ¼ teaspoon kosher salt
- 4 cups unsalted butter softened and cut into 1-inch pieces (908g)
- 2 teaspoons pure vanilla extract
- 4 to 6 drops orange food coloring optional
Instructions
For the Filling:
- In a medium heavy-bottom pot, whisk together the sugar, flour, and cornstarch. Whisk in the orange juice and egg yolks until well combined.
- Set over medium-high heat and cook, stirring constantly with a whisk, until the mixture boils, about 5 minutes
- Continue stirring constantly, until the mixture will become thick and clear, and begins to bubble. Allow mixture to boil for 1 minute.
- Immediately remove from the heat and stir in the cubed butter. Transfer the filling to a bowl. Press plastic wrap directly onto the surface of the filling, and chill until cold, about 2 hours.
For the Cake:
- Position 2 oven racks towards the center fo the oven. Preheat the oven to 350°F. Butter and flour 3 (8-ch) round cake pans or spray with baking spray.
- Sift together the flour, baking powder, and salt into a large bowl.
- In a large mixing bowl or the bowl of a stand mixer fitted with a paddle attachment, beat together the butter, sour cream, and orange zest on medium speed until well combined, about 1 minute.
- With the mixer running, slowly add the sugar. Increase the speed to high and beat until the mixture is light and fluffy, about 2 minutes. Scrape down the sides of the bowl. Add the eggs, one at a time, mixing well and scraping down the sides between additions.
- With the mixer on low speed, add the flour mixture in three additions alternating with the orange juice to the butter mixture. Divide the batter among the prepared cake pans. (I also use cake strips on my pans for more even baking.)
- Bake for 30 minutes until a toothpick inserted in the middle comes out clean, rotating the cake pan positions after 20 minutes. Cool the cakes in the pans for 10 minutes, then loosen the layers by running a knife between the cake and the edge of the pan. Invert the cakes onto a wire cooling and cool completely.
For the Buttercream:
- In a medium saucepan, combine 2⅔ cups sugar and the water. Place over medium-high heat. Stir constantly until sugar melts and becomes clear.
- Bring to a boil. Insert a candy thermometer and boil, without stirring, until the temperature reaches 235°-240°F, about 8 minutes.
- While the syrup boils, combine the egg whites and the remaining 1/3 cup of sugar in a large mixing bowl or the bowl of a stand mixer fitted with the whisk attached. Beat on medium-high speed until soft peaks form.
- When the sugar syrup comes to temperature, carefully drizzle it into the egg whites while the mixer is running on medium speed.
- Once combined, add the salt an increase the speed back to medium-high. Continue beating until the meringue is no longer warm to the touch, about 10 minutes.
- With the mixer running, add the butter into the meringue, one piece at a time. Beat until the butter is combined and the frosting is smooth but stiff enough to spread. Beat in the vanilla.
- If desired, divide the buttercream into a few batches and added varying amounts of food coloring to create an ombre effect. Transfer about 1 cup of the frosting to a piping bag fitted with an 869 or other decorative piping tip and about 1 cup in a piping bag with about ½ inch snipped off the end.
For the Assembly:
- Place one cooled cake layer one a cake stand or plate. Using the frosting in the piping bag without the tip, pipe a single ring around the top edge of the cake creating a frosting barrier. Spread ½ of the Filling over the cake to the frosting barrier. Top with another cake layer. Repeat with more frosting and the remaining filling. Place the remaining cake layer on top.
- Spread the remaining frosting on the outside of the cake in the desired pattern. Using the decorative piping tip, piping frosting on top of the cake. Refrigerate the cake for at least 30 minutes to set the frosting before slicing.
Notes
- If the tops of your orange creamsicle cake layers are domed, use a serrated knife to cut off the top of the domes so you can stack them evenly. Alternatively, use cake strips to help your cake layers come out evenly. Cake strips work by keeping the outside edge of the pan cooler to ensure that the entire cake rises at the same rate, preventing a dome from forming in the middle. If you don’t want to buy cake strips, I have a post on how to DIY cake strips.
- I highly recommend using a scale to measure your flour, as it’s the most accurate method. If you don’t have a scale, fluff your flour with a spoon and spoon it into your cups before leveling it off with a knife. This method prevents you from overpacking the measuring cup.
- Make sure to sift the dry ingredients to remove any lumps. This will help to keep the cake’s crumb soft and light.
- When zesting an orange, stop zesting once you reach the white layer, as the white is bitter.
- You can get more juice from your oranges by bringing them to room temperature and then rolling them on the counter to loosen the insides up.
- To ensure no air bubbles are in the cake batter, gently tap the cake pans on the counter a few times.
- Eggs are easier to separate when cold, but egg whites whip up easier for the frosting when closer to room temperature. I recommend separating them in advance if you have the time. In addition, allowing the egg whites to sit gives them a chance to relax, which improves their elasticity during the whipping process. You also want room temperature eggs when you prepare the cake batter so it incorporates easily without overmixing.
- It is essential to have a clean and dry bowl for whipping the egg whites for the frosting. The egg whites also cannot contain any egg yolk. If the bowl is not completely clean or yolk-free, it prevents your frosting from setting up.
Nutrition
Have you tried this recipe? Tag me today!
Mention @preppykitchen and tag #preppykitchen!


