


Learn how to make buttery croissants from scratch! Croissants are one of my favorite pastries; I’ve even gone on an extensive search for Paris’s best croissants, tasting dozens of them across the city. They are one of the most iconic forms of French Viennoiserie! I will be honest upfront and say this is a more advanced baking recipe, but you don’t need years of practice to accomplish great results. This is the ultimate guide to baking homemade croissants— from the best butter to use to exploring what lamination is, why it’s important, and how to do it, and so much more. I explain every detail to help guide you and make the process as easy as possible.
This croissant recipe is a 2-day endeavor, so make sure you start working on it the day before you want to enjoy them! The dough needs plenty of time to chill between steps and rise before baking. On Day 1, you’ll focus on laminating and correctly prepping the dough. Day 2 is all about shaping and baking. My main note before you start is don’t be intimidated! My team and I have extensively tested this recipe to make sure this post has everything you need to succeed.
Table of Contents
- What To Know Before You Start
- What Is Lamination?
- Key Ingredients Needed
- The Importance Of The Butter Texture
- How To Make Croissants
- How Can I Tell When The Croissants Are Ready To Bake?
- What Happens If My Croissants Are Underproofed?
- Can I Freeze The Croissants Before Baking?
- Variations To Try
- Troubleshooting & Pro Tips For The Best Croissants
- How To Serve Homemade Croissants
- How To Store and Reheat
- More French Pastry Recipes To Try
What To Know Before You Start
Croissants have a reputation for being difficult to make, and while there are some techniques to follow, you can achieve great results with the right preparation. I’m here to guide you through each step of this croissant recipe! But before we begin, here’s how to set yourself up for success:
- Read through the recipe before you start making anything. This is what I always do when I begin any recipe. This way, I know exactly what to expect and how to be prepared. There are several steps to making croissants, but if you read through the recipe first, you can move into each one with confidence!
- This recipe will take two days. You will make the dough and butter block and laminate them together on the first day. Then, after an overnight chill, you will cut, shape, proof, and bake the croissants the next day.
- Mind the temperatures. Each stage will call out any specific temperatures or textures for ingredients or the dough. This is vital to achieving the proper layering and texture in the baked croissants.
- Set up your station before each stage. Prepping your area before each stage will make it easier! Have any tools needed set out and ready (I have them listed for each stage below!). You will need about 3 feet of countertop space to laminate the dough and roll, cut, and shape the croissants.
- Keep the dough in its relative shape when rolling it out. This means that when you start rolling out the chilled dough for lamination, keep the long sides long and the short sides short.

What Is Lamination?
Lamination is a baking technique where you repeatedly roll and fold a dough with cold butter, creating several thin layers of dough and butter stacked together. This process also helps develop the gluten in the dough. If you’ve made my homemade puff pastry, you’ve laminated dough before! While baking, the butter melts and steams in the oven, creating air pockets, which, in turn, push apart the layers of dough and create the iconic flaky layers and honeycomb texture croissants are known for.
My croissant recipe uses a letter fold, because the technique is basically the same as folding a business letter into thirds! A letter fold multiplies the layers by three each time you perform the fold. This recipe utilizes four rounds of folding, so you end up with over 80 layers in the end:
- 1st fold = 3 layers
- 2nd fold = 9 layers
- 3rd fold = 27 layers
- 4th fold = 81 layers
Key Ingredients Needed
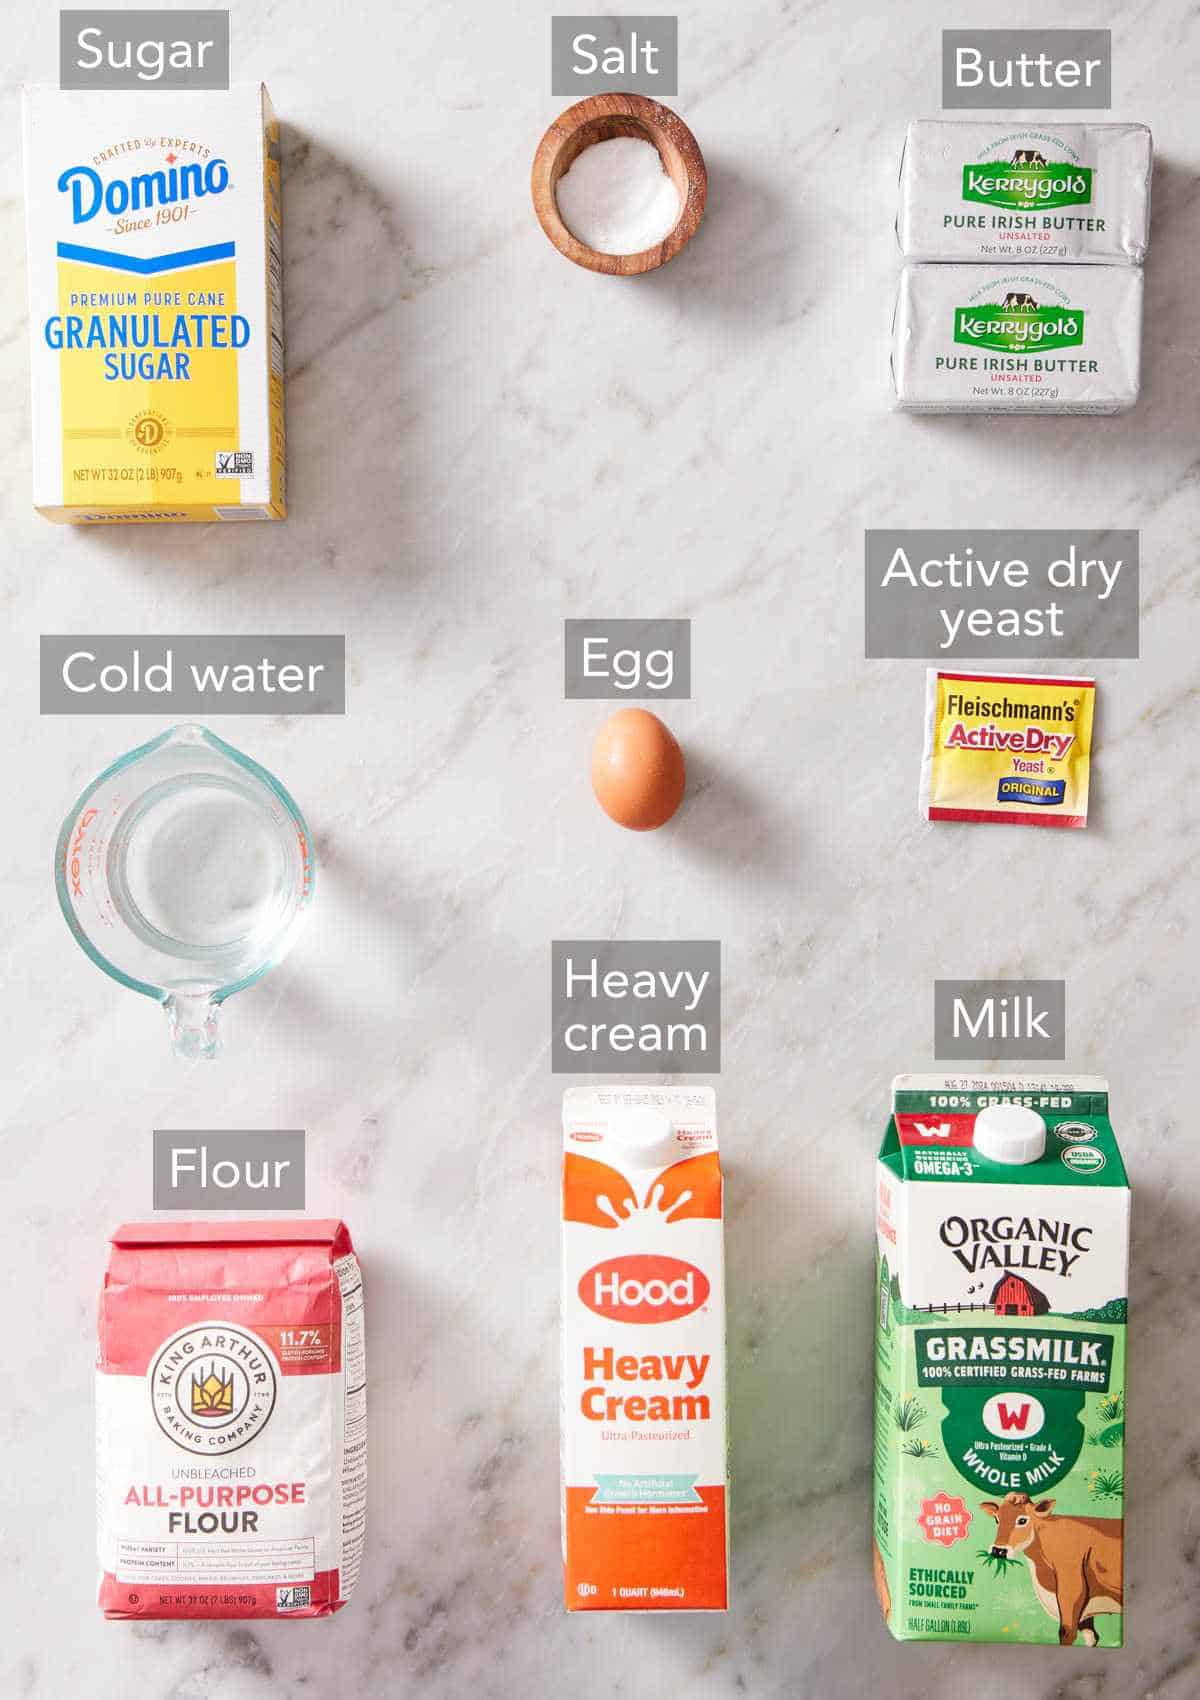
You only need a few ingredients to make the perfect croissants! You can find the full list of ingredients and measurements in the recipe card below.
Yeast — you’ll bloom active dry yeast by mixing it with warm whole milk and granulated sugar, before mixing it with the other dough ingredients. This is an important step to activating the yeast so it rises properly. Do not use rapid-rise yeast for this recipe— it will not work as it has to be treated in a different way and will rise too quickly for the chill time required.
Flour — all-purpose flour works great when making homemade croissants. It makes croissants that have a bit of chew but are not too chewy or tough once baked. Some recipes use bread flour, but I find that it develops too much gluten and makes the croissant less delicate.
Salt — not only does salt add flavor, it also enhances the structure of the bread by slightly slowing down the yeast growth in the dough. This means the yeast won’t rise too fast and overproof in the fridge, and the gluten strands can develop in a stronger way to support the gas bubbles produced by the yeast.
Unsalted Butter — European-style butter works best in this recipe. It has a higher fat content and less water than American-style butter, resulting in a more flavorful, tender dough. It’s also softer than American butter, even when cold. This makes it more pliable, so it is easier to roll during lamination. American butter is firm and hard when cold, so it often breaks apart when rolling the laminated dough, which can break through the dough or cause uneven lamination.
The Importance Of The Butter Texture
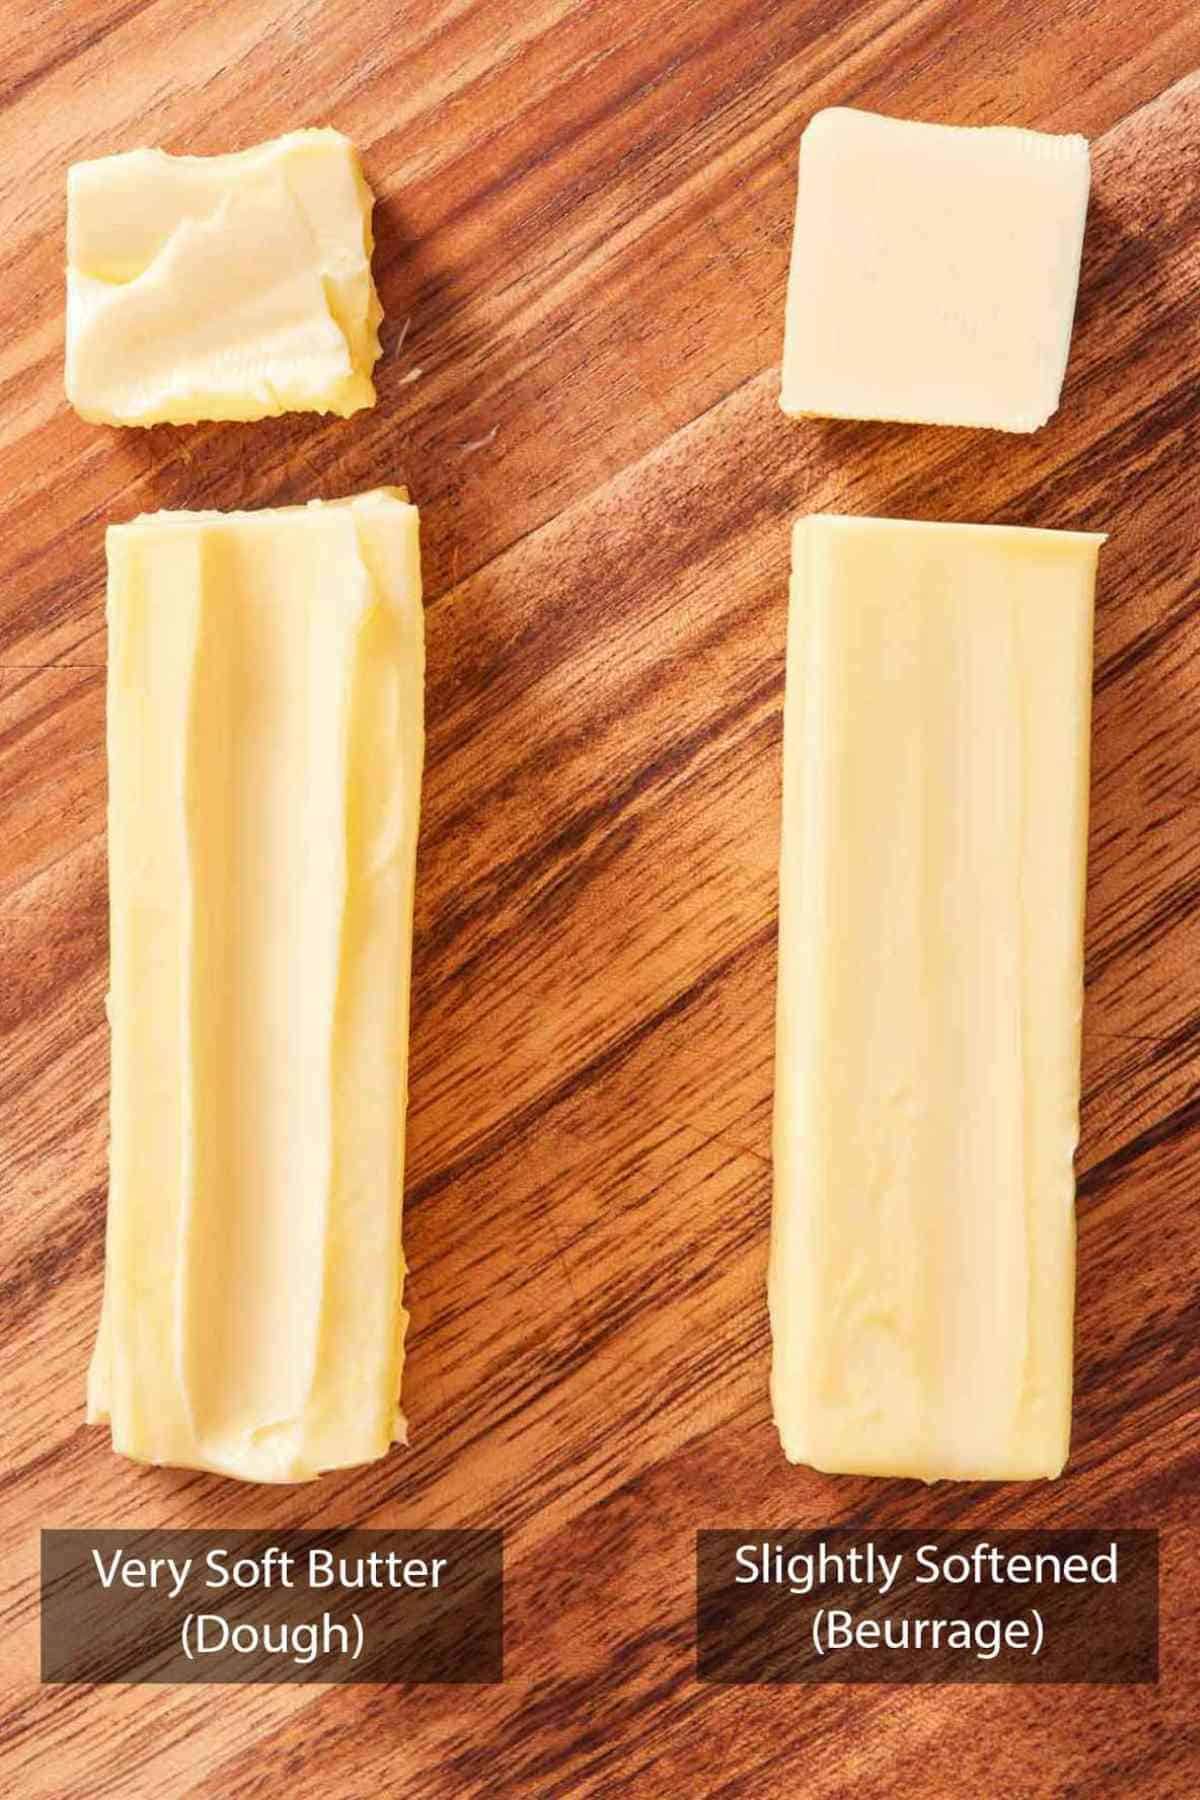
This recipe uses butter in two different states of “softened.” It’s important to have each type at the right texture because they are crucial for incorporating into the dough correctly.
The butter that is kneaded into the dough should be extra soft, to the point that you can drag your finger through it and leave an indentation very easily. You can see this in the image below, shown on the butter stick on the left. The butter will also spread very easily and should be stirrable, similar to the consistency of thick sour cream. If it is not soft enough, microwave it on 20% power in 15-second increments, until it can be stirred, but it is not melted.
The butter for the block (beurrage)— which is what you’ll use to laminate the dough— should be softened and malleable but still feel a bit firm. You should be able to make an indentation in the butter with your finger when pressed with moderate force, but you will still feel some resistance. (In the image below, you can see this shown on the butter stick on the right.) In order to create the beurrage layer, you’ll roll the butter into a thin, pliable block that can be rolled between the dough without melting into the dough. If it’s too soft, the butter will be hard to shape, and it can melt into the dough.
How To Make Croissants
Below, I’ve highlighted important sections of the recipe with images and instructions for making homemade croissants. I have also listed the tools you need for each stage, so you can have everything ready to go from the start. You can find the full set of instructions in the recipe card below.
Keep in mind, making these butter croissants is a 2-day project that you’ll complete in stages. To start, you’ll prepare the yeasted dough by turning and folding it before refrigerating it overnight (or up to 18 hours). The next day, you’ll shape and proof the dough before baking. With these step-by-step images, you’ll be making perfectly laminated and shaped croissants and be on your way to enjoying warm, flaky perfection!
Day 1: Laminating and Folding
Tools needed for this stage: Stand mixer, knife, offset spatula or bench scraper, rolling pin, ruler, plastic wrap, parchment paper, and a sheet tray.
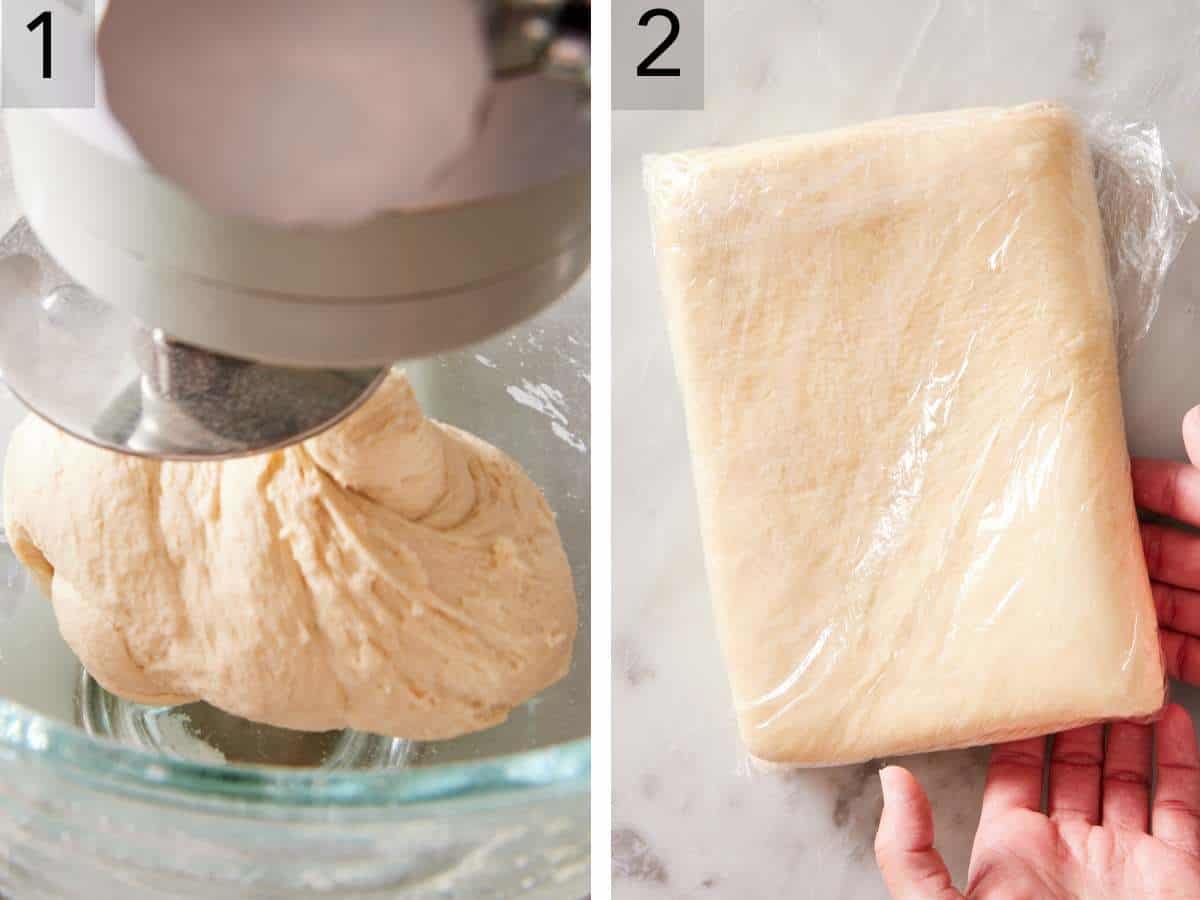
1. Make the Dough: Add the warm milk, yeast, and 1 tablespoon sugar to a measuring cup, mix, and let stand for a few minutes to activate the yeast. Then add the cold water and set aside. To the bowl of a stand mixer fitted with a dough hook attachment, add the flour, remaining sugar, and salt, and whisk to combine before adding the yeast mixture. Mix to eventually form a soft dough.
2. Turn the dough onto a large piece of plastic wrap, pat it into a ½-inch-thick square, and wrap it tightly before refrigerating for 30 minutes.
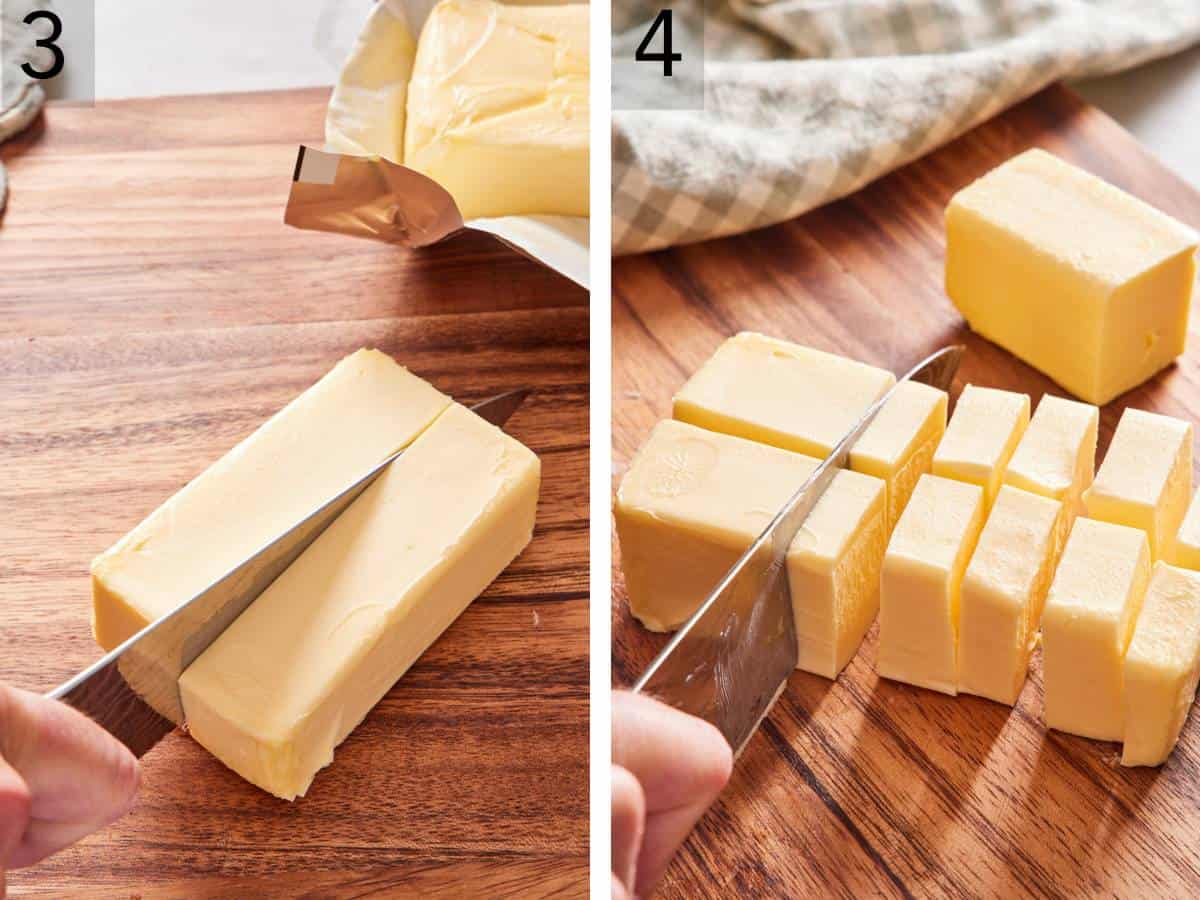
3. How to Make the Butter Block (Beurrage): If using a block of butter instead of sticks, start by slicing it in half lengthwise to create two sticks of butter.
4. Then cut each stick into 10 slices (for a total of 20 slices).
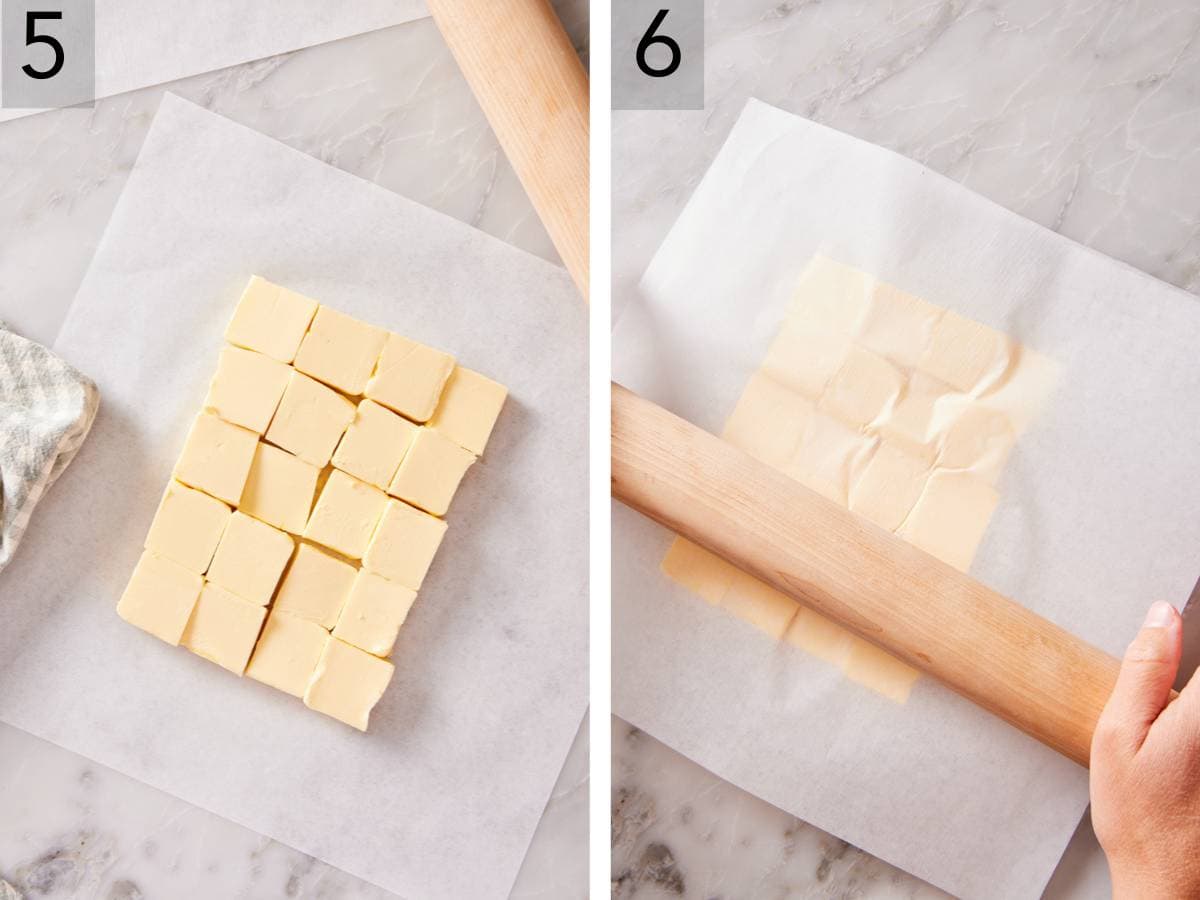
5. Line them up on a piece of parchment paper in four rows of 5 slices, then top with another layer of parchment.
6. With a rolling pin, pound and roll the butter into a 10-inch square that’s about ⅛ inch thick.
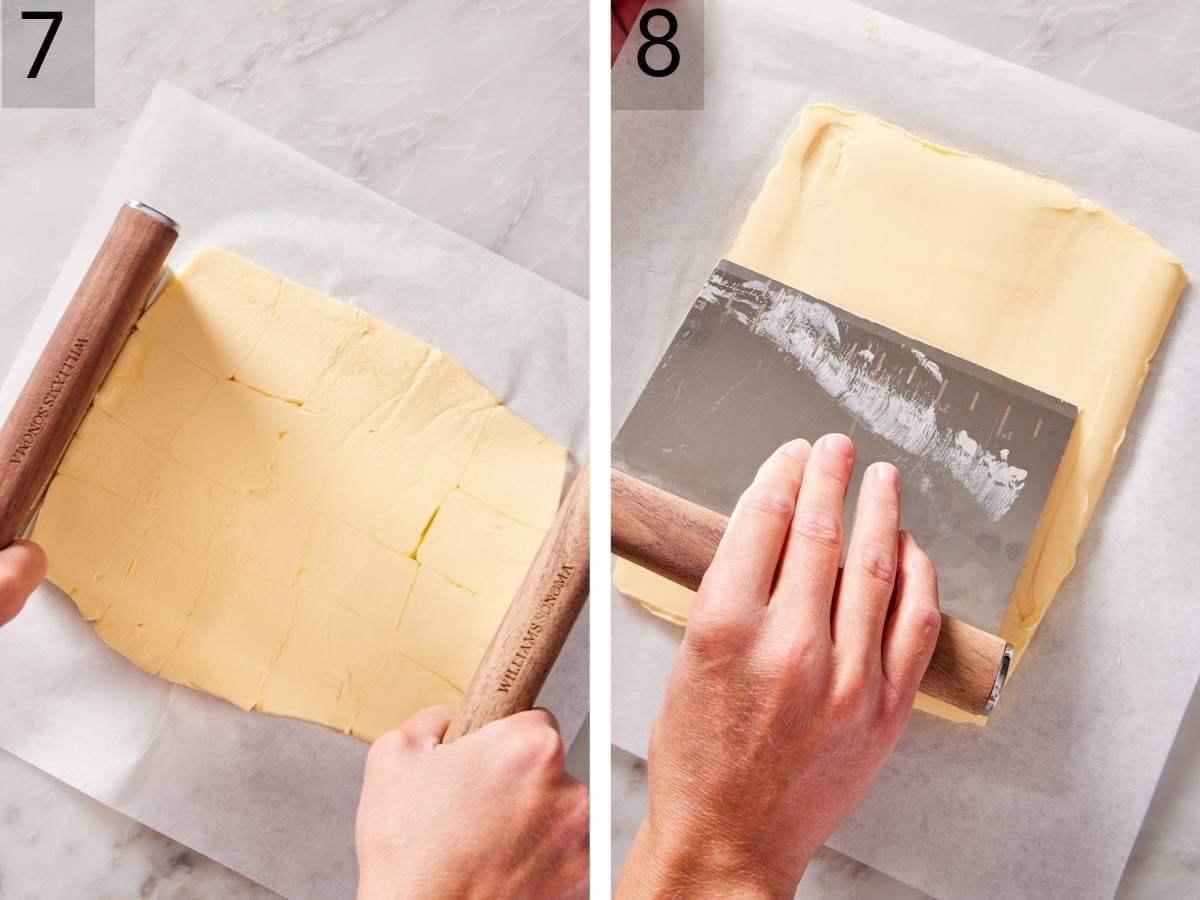
7. To help the butter into the correct shape and thickness, remove the top parchment every now and then, and use a bench scraper or offset spatula to push the butter’s edges straight.
8. These tools can also be used to smooth the top. Once you’ve prepared the beurrage, place the covered sheet of butter on a large sheet pan or flat plate and chill for about 10 minutes to firm the butter slightly.
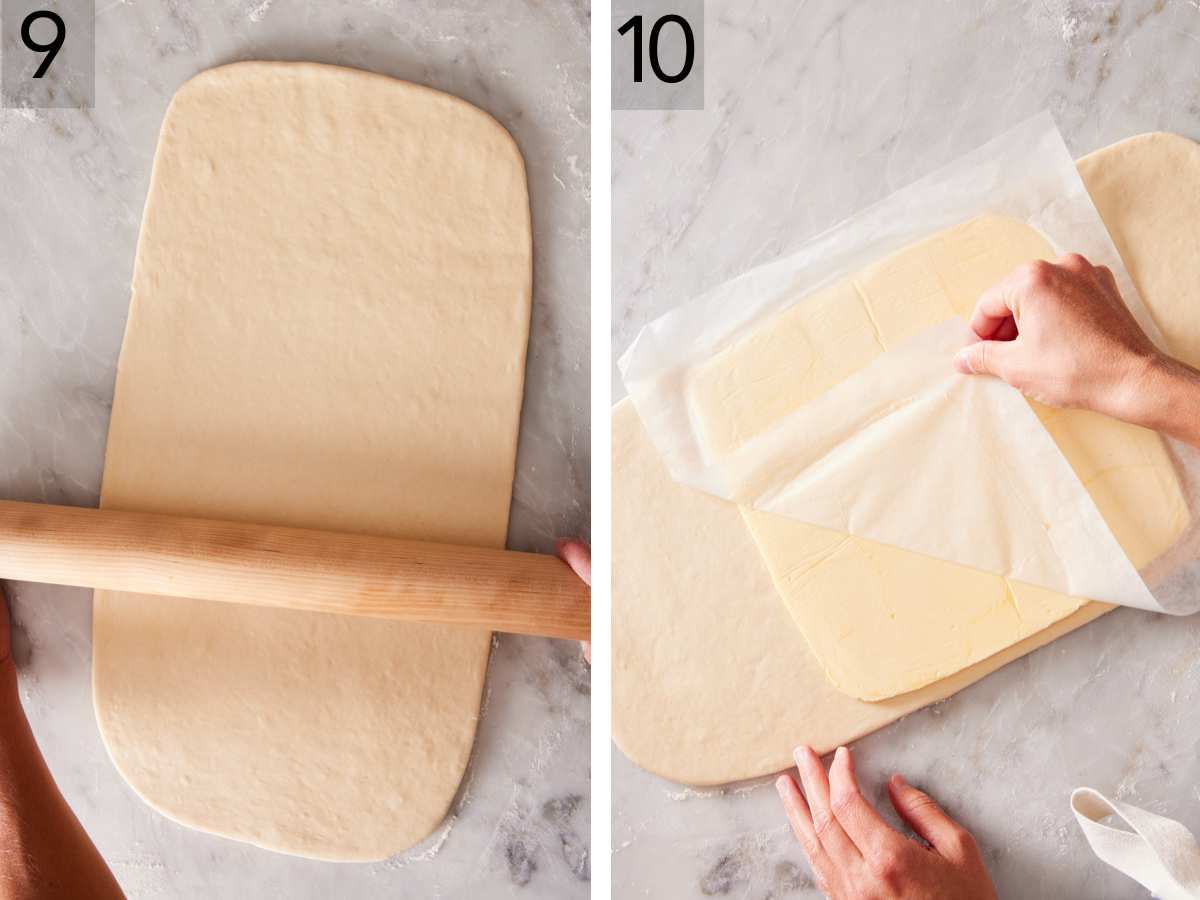
9. Laminate the Dough: After the 30-minute chill time, place the dough on a lightly floured work surface and roll it into a rectangle that’s around 10×20 inches and about ¼-inch thick. Use a pastry brush to brush any excess flour off the top of the dough.
10. Remove the butter block from the refrigerator. It should feel cool but malleable, not rigid and hard. (If it feels like it will break when bent, set it out for 5 to 10 minutes and cover the dough.) Remove the top sheet of parchment paper from the butter block and flip it over, butter-side down, into the center of the dough rectangle. Remove the other sheet of parchment paper.
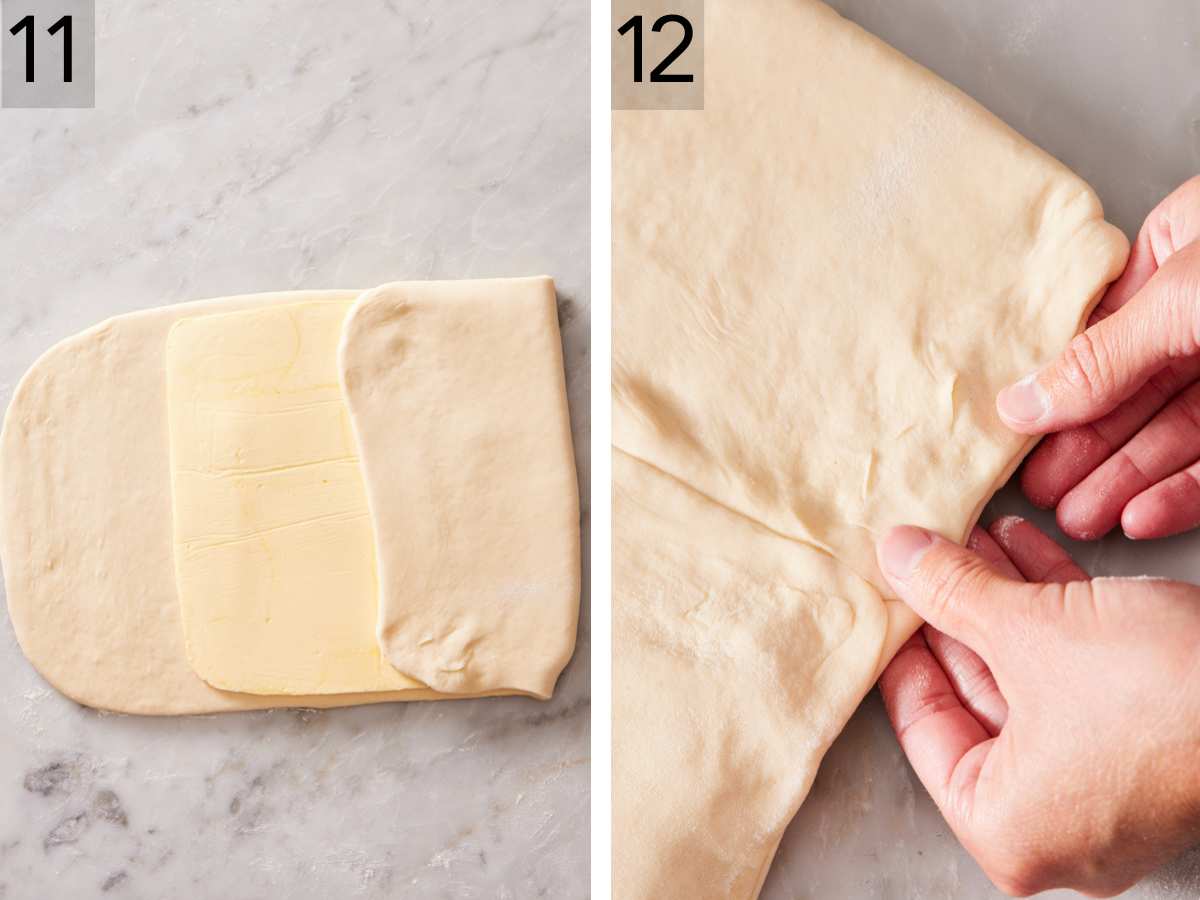
11. Fold the left and right sides (short ends) of the dough over the butter and pinch the center seam together. Gently roll the rolling pin over the top of the dough, just so the dough sticks to the butter.
12. Pinch together the other open edges of the dough so the butter is totally encased by the dough.
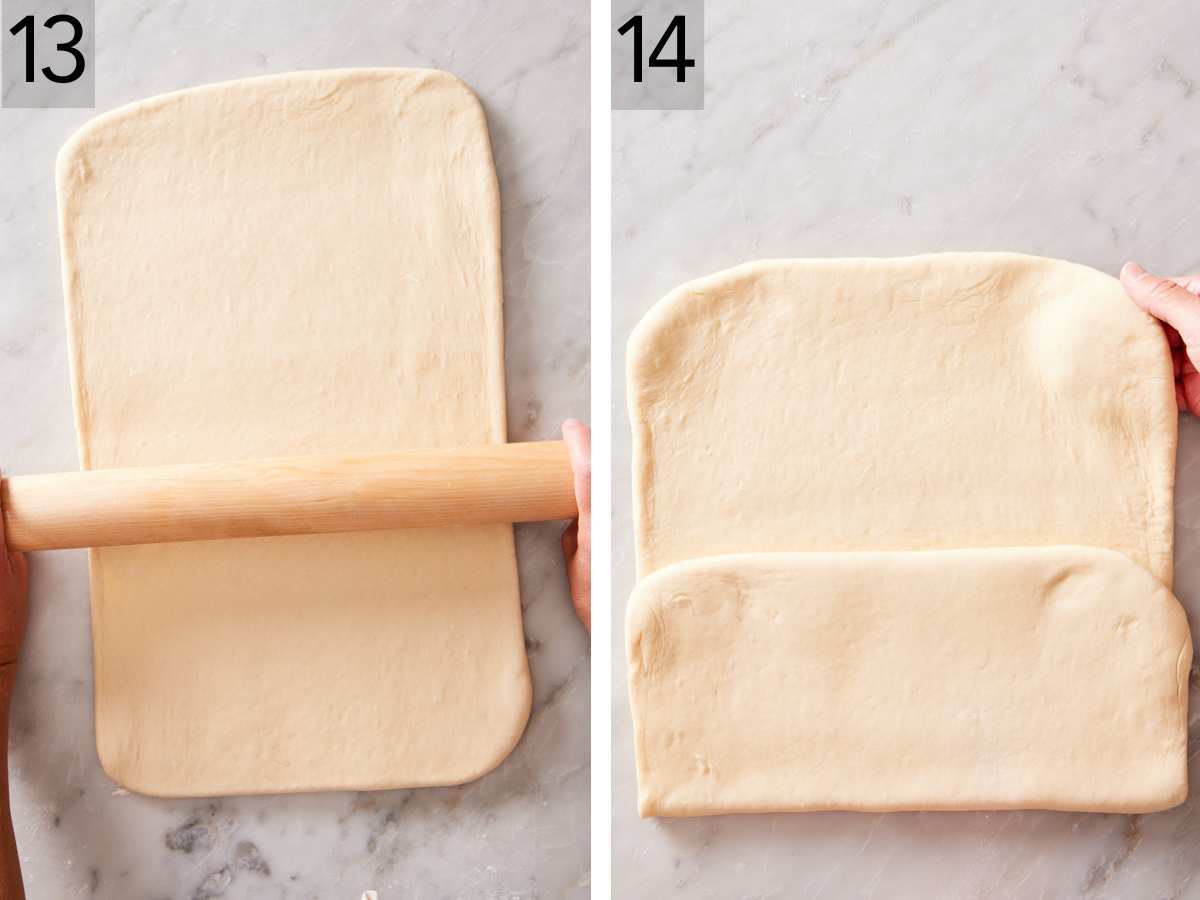
13. Turn and Fold the Dough: Once the butter block is sealed in the dough, roll the dough into a rectangle measuring about 10×18 inches and brush excess flour from the top of the dough.
14. Fold one of the short sides of the dough over the middle third of the dough. Brush off excess flour from the top of the side you just folded, then fold the other short side of the dough on top so the edges line up. This is called a letter fold, which I mentioned a few sections above. Transfer the dough to a lined sheet pan, cover tightly with plastic wrap, and refrigerate for 30 minutes.
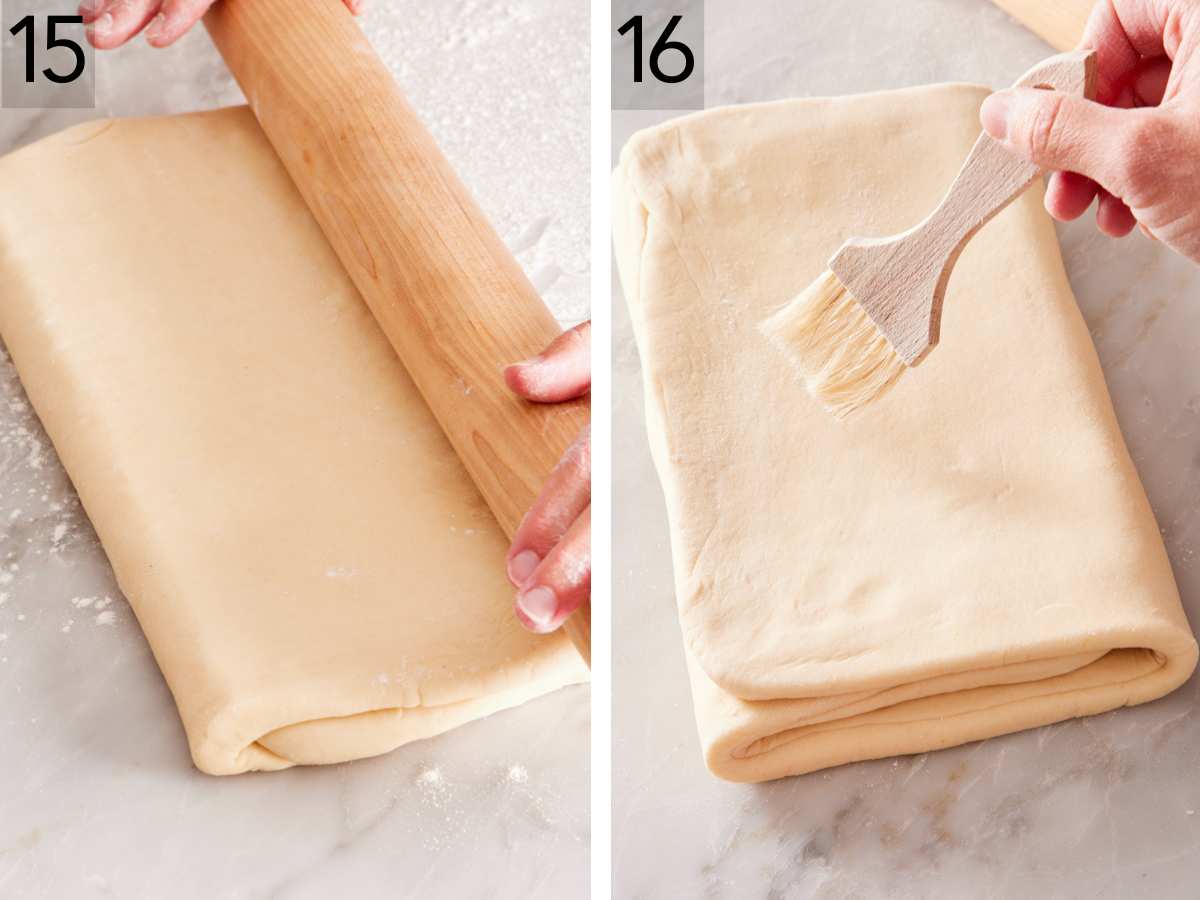
15. Place the chilled dough on a lightly floured surface with a short end facing you. Again, roll it into a rectangle of approximately 10×18 inches.
16. Repeat the letter fold, making sure to brush off excess flour from the first fold. Return the dough to the parchment-lined pan, straighten the sides with a bench scraper, and cover tightly. Refrigerate for another 30 minutes. This marks the end of the second turn. Repeat the sequence of rolling, letter folding, and 30 minutes of refrigeration twice more (for a total of 4 turns). At the end of this, you will have created 81 layers! After the fourth and final fold, wrap the dough tightly in plastic wrap and pop it in the fridge overnight (or up to 18 hours).
Day 2: Shaping, Proofing, and Baking
Tools needed for this stage: Rolling pin, knife, ruler, plastic wrap, parchment paper, and 3 sheet trays.
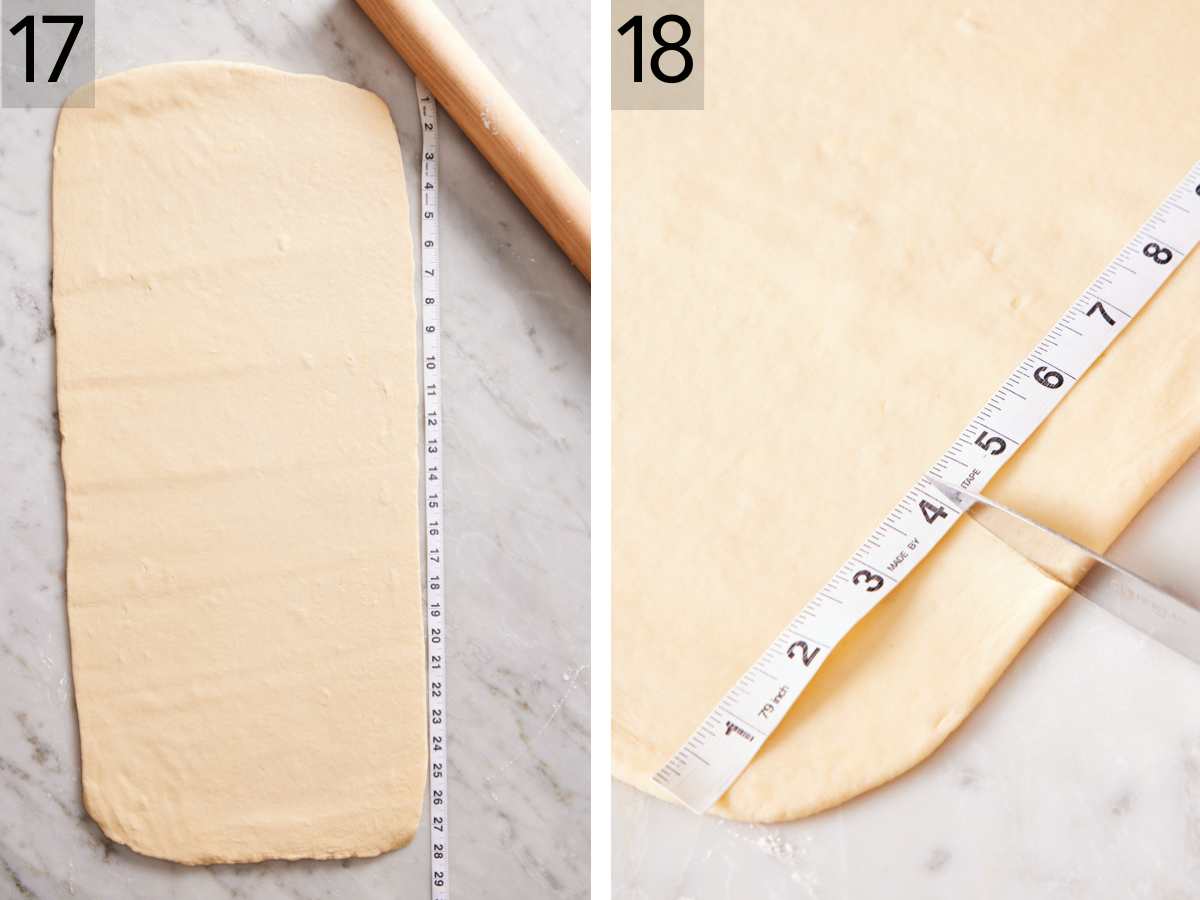
17. Cut the Dough: Remove the croissant dough from the refrigerator and leave it at room temperature for 20 minutes. After unwrapping the dough, lightly flour your work surface and the top of the dough. Roll the dough into a 12×28-inch rectangle with the long sides facing you. (As you roll, pierce any air bubbles that may have formed in the dough with the tip of a knife and press out the air.)
18. Starting from the left corner along the bottom long edge, make light marks down the edge of the dough in 4-inch increments all the way to the other end.
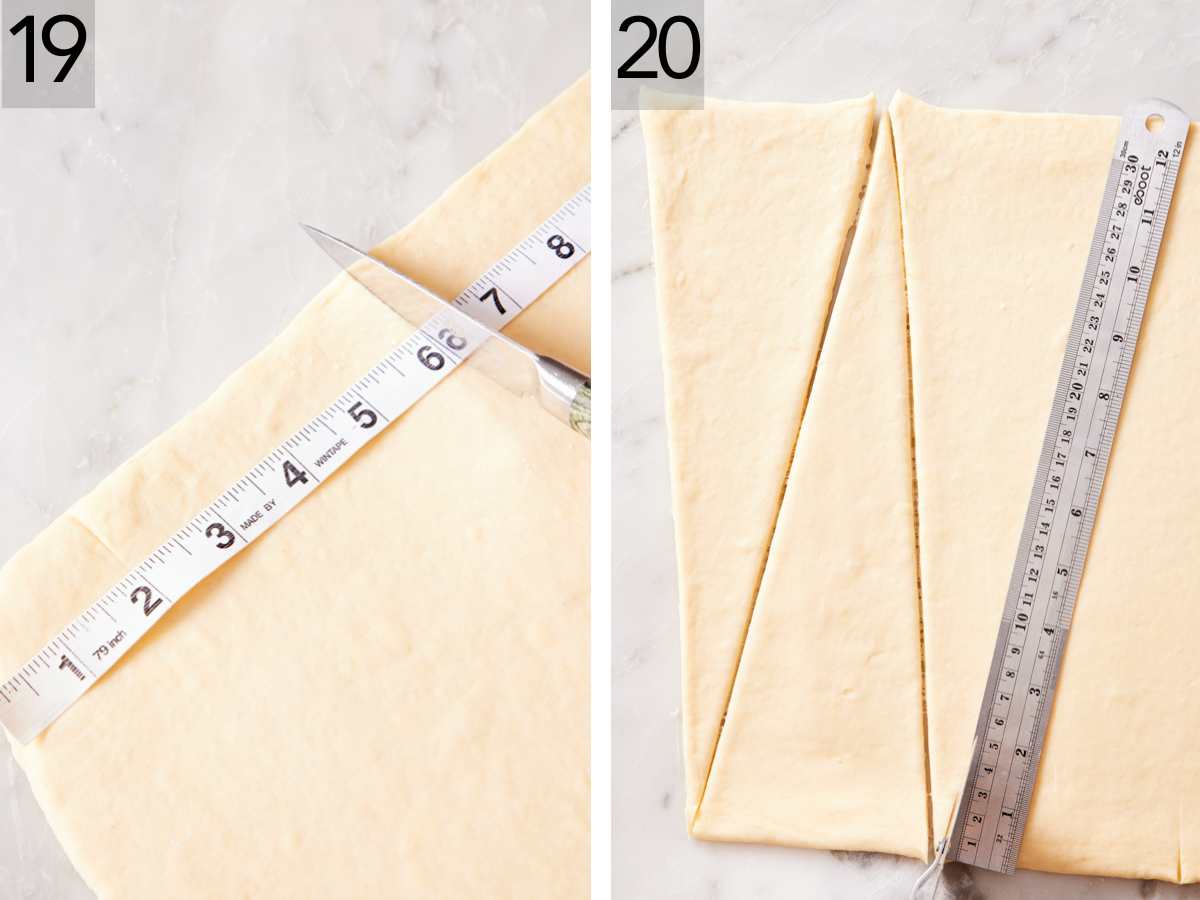
19. On the top long edge, make a mark 2 inches in from the left side. Starting from that 2-inch mark, continue marking in 4-inch increments.
20. Use a ruler or straight edge, and place it running between the bottom and top marks (start with the left corner and the first 2-inch mark at the top). Follow the ruler with a knife or pastry wheel to make a clean cut. Continue moving the ruler diagonally between the marks. By doing this, you will end up with fourteen 12-inch-long triangles, which you can now shape into croissants!

21. How to Shape the Croissants: Set 3 large baking sheets nearby. First, brush any excess flour from the triangles. With the tip of your knife at the center of the wide base of each triangle, cut a slit about ¾-inch deep into the triangle to divide the base in half.
22. Take each side of the cut you just made and fold it up to meet the corresponding edge of the triangle. This will form a V-shape in the center. (If this fold feels confusing or cumbersome, you can skip it! Just pull each bottom corner of the triangle away from each other slightly to open the center slit.)
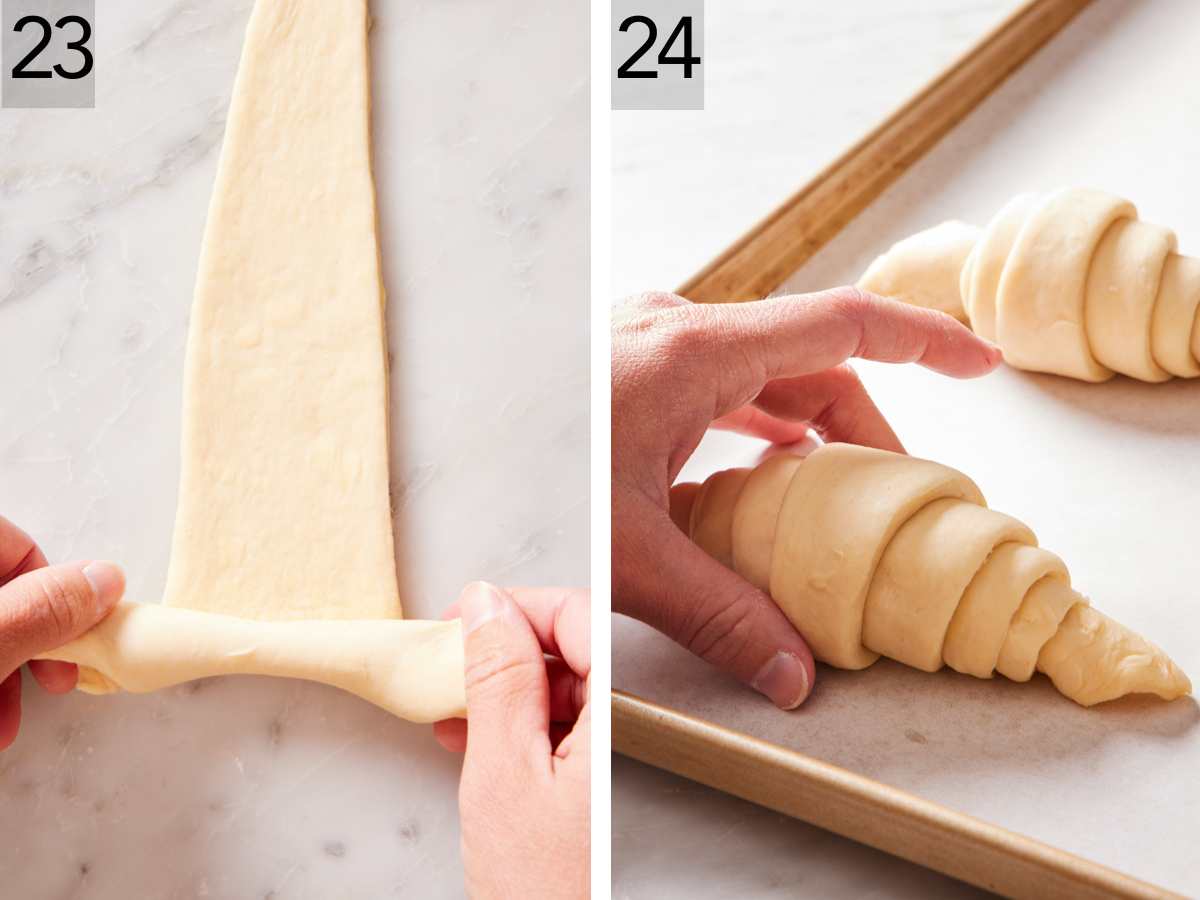
23. Hold each folded corner of the triangle and begin rolling from the base towards the tip of the triangle. Apply light pressure and create tension in the dough to prevent large air pockets from forming.
24. Place the rolled croissants on the baking sheets at least 6 inches apart. You’ll have 4 croissants per pan.
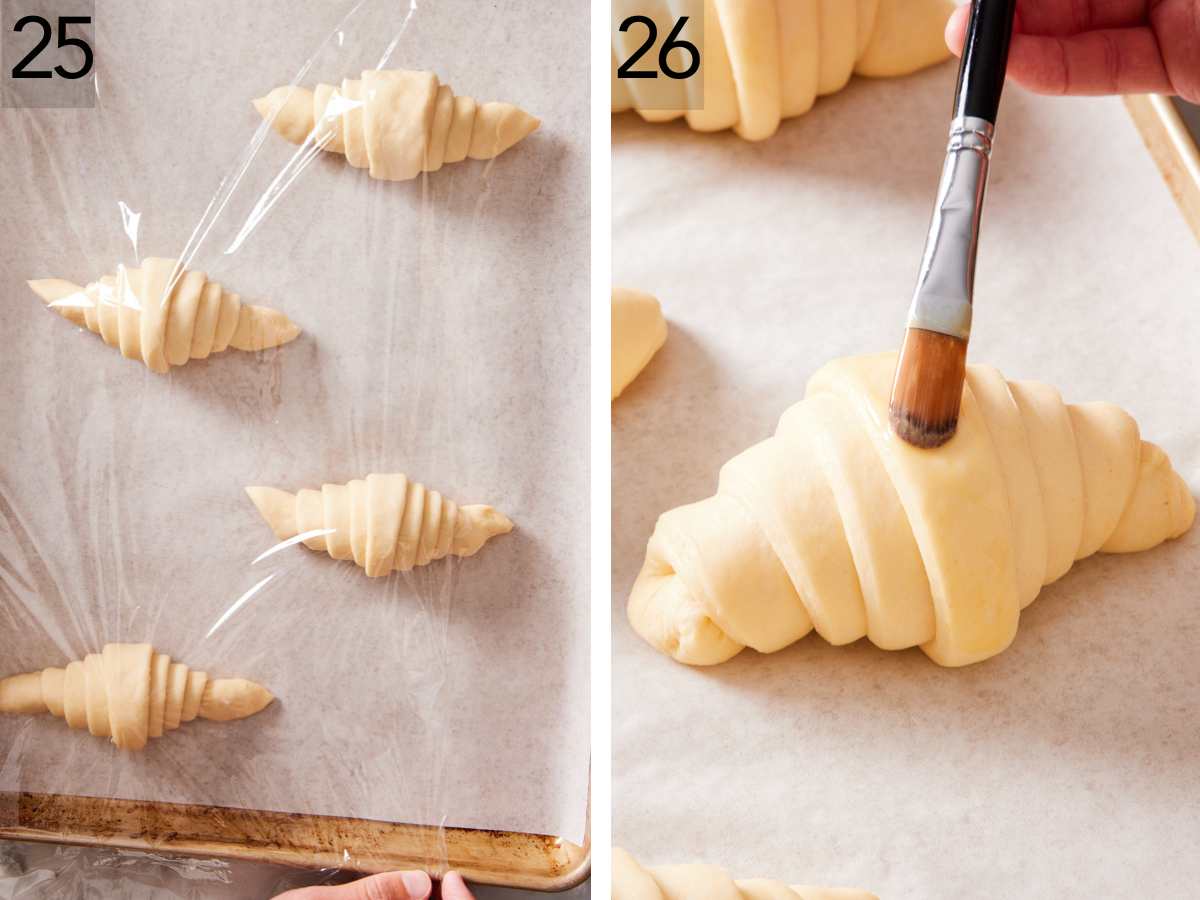
25. Proof: Cover loosely with plastic wrap and allow the croissants to rise at room temperature until they have doubled in size, look very puffy, and jiggle when you shake the pan gently.
26. Bake: Place an oven rack near the center of the oven. After the shaped croissants have proofed for 2 hours, preheat the oven to 425°F. In a small bowl, make the egg wash by whisking together the egg and heavy cream. Start with the baking tray with the puffiest croissants, and brush the tops with the egg wash. (Brush the next tray’s croissants once the first tray is baking.) Place that tray in the oven, reduce the temperature to 375°F, and bake for 15 to 20 minutes until the first batch of homemade croissants reaches an internal temperature of 190°F. Bring the oven back to 425°F before baking the next tray, and repeat the process for the last tray as well. Let the baked croissants cool on the sheet trays for about 10 minutes before digging in.
How Can I Tell When The Croissants Are Ready To Bake?
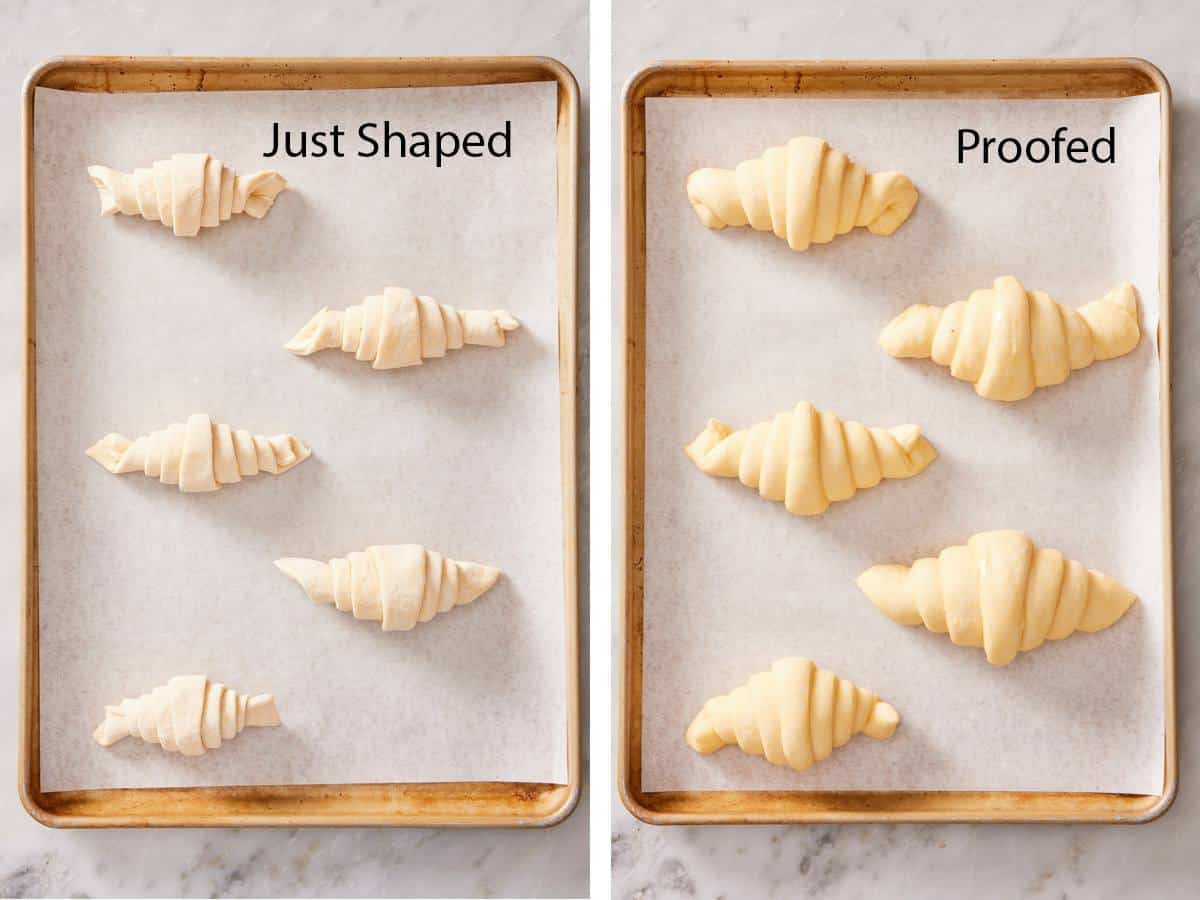
Once you shape and roll the croissant dough, let the croissants rise at room temperature until they have doubled in size. When I tested this recipe, I found that just saying “doubled in size” can actually be a bit hard to determine, given their irregular shape. So look for these other visual clues:
- They’ll appear very puffy at this point! (Almost like they were inflated.) You should also start to see a bit more definition from the layers pushing apart on the cut edges of the dough.
- You can also do a wobble test. Uncover the pan and gently shake the baking sheet back and forth. If the croissants are very wobbly and jiggly when you shake them, they are properly proofed and ready for baking.
The image below shows a tray of croissants just after shaping at the start of their rise, compared to when they are properly proofed and ready to bake. You can see the tray on the right appears very puffy and doubled in size.
What Happens If My Croissants Are Underproofed?
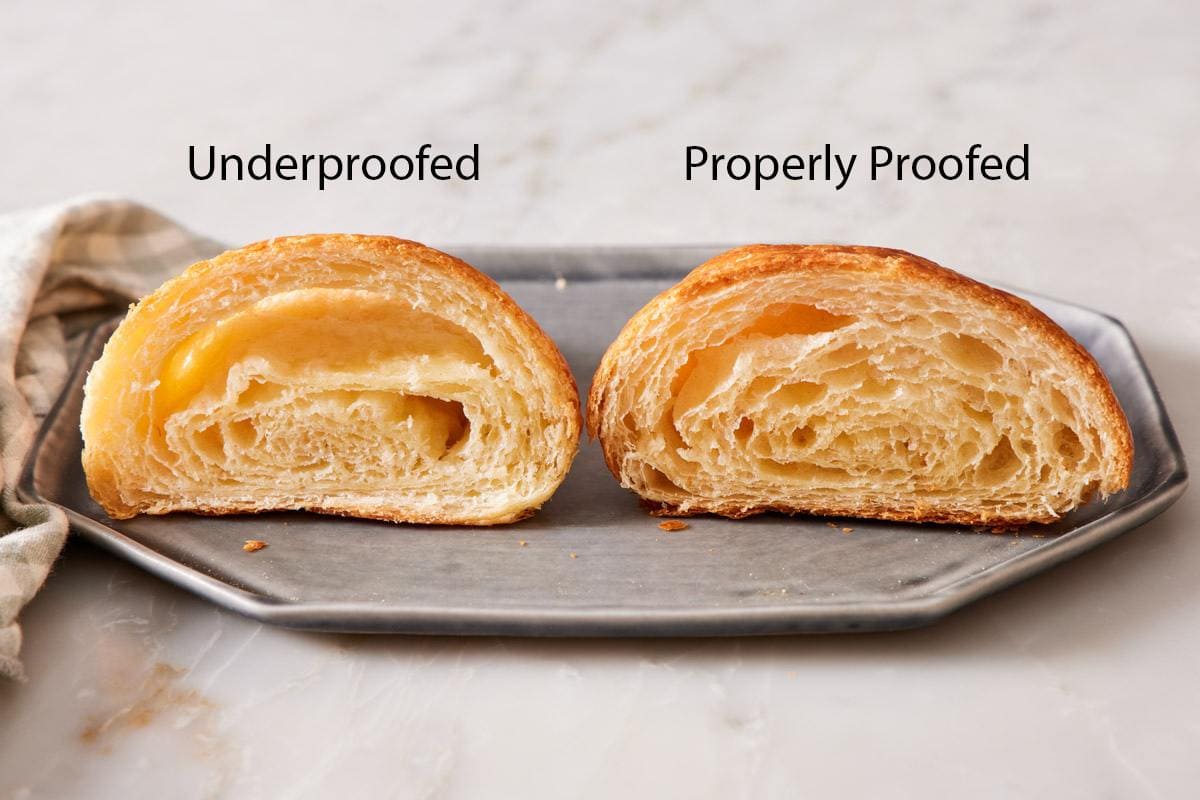
As you can see in the image below, underproofed croissants bake with a tighter crumb structure, large gaps, and ribbons of dense dough where the yeast didn’t produce enough gas to puff up the dough. If your kitchen or proofing environment is 70-75°F, you’ll need at least 2½ hours to proof the croissants.
My team tested proofing a tray of unbaked croissants for 4 hours before baking them, and while they were slightly overproofed (they deflated a little bit when brushed with egg wash), they still baked up great. If you’re uncertain if your croissants are ready, I recommend erring on the side of too much and letting them rise a little bit longer. In this case, a mild overproofing will bake up with a lighter-textured pastry than an underproofed one.
Can I Freeze The Croissants Before Baking?
To make these flaky croissants ahead of time, freeze the shaped croissants before proofing them. Arrange them on a parchment paper-lined baking sheet (they can be close together without touching) and freeze until solid. Store them in an airtight freezer-safe container for up to 3 months.
To bake them, arrange the frozen croissants on a parchment paper-lined baking sheet as directed in the recipe, cover, and let them rise for 4–6 hours at room temperature. If you want to do this right before bed so you can bake them first thing the next morning, they can handle up to 8 hours of proofing if your kitchen is cool. Once they have proofed, brush them with egg wash and bake them as directed.
Variations To Try
Once you’ve made classic butter croissants, you can easily flavor them with other fillings!
- Pain au Chocolat: Instead of cutting the dough into triangles, cut it into 3-inch-wide by 10-inch-long strips. Place one thin stick of chocolate at a short end and roll it up once, just until wrapped in dough. Then, add a second piece of chocolate and continue rolling it all the way. Proof, egg wash, and bake as directed!
- Almond Croissants: Cut leftover croissants in half and spread about 2 tablespoons of frangipane (almond cream) on the bottom half. Set the top back on and spread another teaspoon or two of frangipane on top, then sprinkle with slivered almonds. Bake at 350°F for 25 minutes until deeply golden brown.
- Ham and Cheese Croissants: Before rolling the croissant in Step 23, place a slice of ham and a slice of cheese (Swiss or white cheddar are great options) at the base of the triangle, then roll it up. Proof and bake as directed.

Troubleshooting & Pro Tips For The Best Croissants
These are some common issues I ran into when making homemade croissants, and my tips for how you can avoid them:
- There are butter chunks in my dough: This likely means the butter block layer (beurrage) wasn’t pliable enough, and it broke apart when you were rolling and laminating the dough. To prevent this, use European butter and check the texture of the butter block before you seal it in the dough. It needs some flexibility; it shouldn’t be very rigid. If it cracks when you gently bend it, let it sit at room temperature for 5 to 10 minutes more.
- Butter leaked out while baking: The dough was proofed in an environment that was too warm, so the butter softened too much and melted. The ideal temperature for proofing croissant dough is about 72°F, so a warm place that isn’t too warm. If the butter looks very greasy or is melting on the cut edges once the croissants are proofed, pop them in the freezer for 20 minutes before baking to firm the butter back up.
- The croissants rose unevenly: This happens because the dough wasn’t rolled to an even thickness before shaping the croissants. Check the slab of dough for any thicker or thinner spots before you cut it, and roll it more as needed to even out the thickness. I recommend a straight rolling pin (not a French or tapered pin) to help prevent this issue.
If there are any pockets of air in the dough after it has been chilled overnight, pierce them with the tip of a knife and press out the air. The tiny puncture in the dough will seal back up as you roll out the dough.
When you get to the shaping stage, it’s important to cut and roll the croissants quickly. The butter will continue to soften as it sits at room temperature. If it is cut when it’s too warm/soft, the butter can squeeze out when you roll it up, affecting the layers of the dough.
For a crispier exterior, you can brush the croissants with a second layer of egg wash before baking for a deeply golden brown, crispy finish.
Starting with a hotter oven makes the flakiest croissants. This initial burst of hot air will immediately start to puff the croissants by jumpstarting the yeast to rise and immediately steaming the butter. I direct you to reduce the oven temperature by 50 degrees right after you put the tray in to keep them from burning. It will take the oven a few minutes to drop in temperature, so while that happens, you benefit from the first blast of hotter air and get perfectly golden croissants while avoiding the risk of an overcooked exterior. Be sure to bring the oven back up to 425°F before you bake each tray and drop the temp again.
For best results, bake the proofed croissants one sheet tray at a time. The croissants may proof at different rates, so check each tray to see if one has doubled in size first. Due to the richness of the dough, the croissants rise slowly. Once the croissants are fully proofed, it’s ok to have the trays sit for an extra 30 minutes or so. If you need more time, pop them in the fridge for up to an hour before baking to prevent them from overproofing.

Croissant Recipe
Video
Equipment
- Stand mixer with dough hook
- Bowl and/or bench scraper
- Rolling Pin
- 3 Large baking sheets
- Pastry wheel or pizza cutter
Ingredients
For the Croissant Dough:
- ⅔ cup warm whole milk (85-90°F) (160mL)
- 4 tablespoons granulated sugar divided (50g)
- ½ cup cold water (120ml)
- 1 (.25-ounce/7g) envelope active dry yeast
- 4 cups all-purpose flour (480g)
- 2½ teaspoons salt
- ¼ cup unsalted European-style butter cubed and very soft (¼ block/56g)
For the Butter Layer (Beurrage):
- 1¼ cups unsalted European-style butter (1¼ blocks/282g)
For the Egg Wash
- 1 large egg
- 1 tablespoon heavy cream or whole milk
Instructions
Day 1 – Make the Croissant Dough:
- In a medium liquid measuring cup, combine the warm milk, yeast, and 1 tablespoon of sugar. Let it stand for 5 to 10 minutes, until the yeast creates a little bit of foam on top. Add the cold water.
- In the bowl of a stand mixer fitted with the dough hook, whisk to combine the flour, remaining 3 tablespoons of sugar, and salt. Add the yeast mixture and very soft butter to the flour mixture. Mix on low speed for 1 minute until shaggy but combined. Scrape down the sides of the bowl and hook if needed, then continue to mix on low for 2 more minutes. The dough will ball up around the hook but may still stick to the bottom of the bowl, and the sides of the bowl will be clean. (The dough should feel soft but not sticky, and you may hear it slapping against the sides of the bowl.)
- With a silicone spatula, remove the dough from the bowl and turn it onto a large piece of plastic wrap. Pat it into a square shape about ½ inch thick. Wrap it tightly and refrigerate for 30 minutes.
Make the Butter Layer:
- While the dough chills, set the butter out for 15 minutes on the counter to soften slightly. Meanwhile, cut two sheets of parchment paper to an approximate 12-inch square.
- If using a large (227g) block of butter, cut it in half lengthwise to make two long sticks. Cut the butter sticks into 10 slices (they should be square like butter pats) for a total of 20 pieces. Line the butter up in the center of one sheet of parchment paper in 4 rows of 5 slices. Top with the other sheet of parchment paper. Use a rolling pin to pound and roll the butter into a 10-inch square, about ⅛-inch thick. (To coax the butter into the correct shape and thickness, periodically remove the top layer of parchment paper and use a bench scraper or offset spatula to push the butter’s edges straight, and scrape and smooth the top of the block to redistribute. The butter should soften but stay cool to the touch throughout this process.)
- Once finished, make sure the butter block is covered with both sheets of parchment paper and slide it onto a sheet pan or large, flat plate. Refrigerate the butter for about 10 minutes. (You want it chilled but not hard.)
Laminate the Dough:
- After the dough has chilled, remove the dough from the refrigerator. On a lightly floured surface, roll the dough into a rectangle, around 10×20-inches, and about ¼-inch thick. (Start in the center of the dough and push to roll the pin away from you, then start in the center again and pull to roll the pin towards you.) Periodically stop to press the edges of the dough straight using a bench scraper. Arrange the dough so that the long side is facing you, if needed. (To move the dough, I recommend folding the dough in half and rotating it 90°. Then, straighten the edges once again.) Brush any excess flour off the top of the dough using a pastry brush.
- Remove the butter from the refrigerator. (It should feel cool, yet malleable. If it looks like cracks at all when bent. Let it sit on the countertop for 3 to 5 minutes to become more pliable. Cover the dough with plastic wrap while the butter rests, so that it doesn’t dry out.) Remove the top sheet of parchment paper from the butter block. Flip it over, butter-side down, into the center of the dough, so that it fits just inside the top and bottom edges. Carefully remove the other sheet of parchment paper, coaxing it from the parchment with a bench scraper, if necessary.
- Fold the left and right sides (short ends) of the dough over the butter so the edges meet in the middle. Pinch the center seam together. Gently roll the rolling pin over top of the dough, just to adhere the dough to the butter block. Pinch together the remaining top and bottom open edges of the dough to fully seal in the butter. Press the sides of the dough with a bench scraper to straighten.
- Add a bit more flour to the surface and top of the dough. Roll the dough into an approximate 10×18-inch rectangle. Press the sides of the dough with a bench scraper periodically while rolling to straighten. (I recommend turning the dough or your rolling pin every so often to ensure you roll out the dough evenly.)
Turn and Fold the Dough:
- Trim the uneven edges from the short sides of the dough. Brush off any excess flour from the top of the dough. To make the first folds, visualize the length of the dough divided into thirds. (You can mark it if you need to! They will each be about 6 inches). Grab one short side of the dough and fold it over the middle third. Brush off excess flour from the top of the side you just folded, then fold the other short side of the dough on top, lining up the edges. (This is called a letter fold, because it looks like a business letter!)
- Transfer the dough to a parchment-lined small sheet pan and press the top and sides into a neat rectangle (use a bench scraper if needed). Cover tightly with plastic wrap and refrigerate for 30 minutes for the butter to firm up slightly. (This is the end of the first “turn.”)
- After the dough has chilled, lightly flour your surface and place the folded dough on it with a short end facing you. Roll it once again into an approximate 10×18-inch rectangle, straightening the edges with the bench scraper, as needed. (As you roll, you may notice that you are pushing small pockets of air out of the dough- that is ok! Keep going.) Trim off the uneven edges from the short sides of the dough, if needed. Brush excess flour from the top of the dough. We are going to repeat the same folds again- start with one short side of dough and fold it over the middle third, brush off the flour, then fold the other short side on top just like before. Return the dough to the parchment-lined pan, straighten the sides, and cover tightly. Refrigerate for another 30 minutes. (This is the end of the second turn.)
- Repeat the rolling, letter folding, and 30 minutes of chilling two more times, for a total of four turns. After the fourth turn, wrap the dough tightly with plastic wrap and refrigerate it overnight or up to 18 hours.
Day 2 – Cut the Croissants:
- When you are ready to shape the croissants, remove the chilled dough from the refrigerator. Let it sit at room temperature for 20 minutes to soften slightly. Unwrap the dough and save the plastic wrap.
- Lightly flour the surface and the top of the dough. Gently press on the dough when the rolling pin. If there are any pockets of air in the dough, pierce them with the tip of a knife and press out the air. Roll the dough into a 12×28-inch rectangle with the long side facing you (the dough will be about ⅛ to ¼-inch thick). You can gently stretch the sides and corners to form a more equal rectangle as needed. (If the dough is resistant to rolling or tears at the sides when you start, it may be too cold. Brush the torn parts with a little bit of water and pinch the dough back together to ensure the butter is encased. Cover it with plastic wrap and let it rest for 5 minutes before you try to roll again. Repeat as needed.) As you are rolling, I recommend turning the rolling pin 90° and straightening the sides every so often. If the dough sticks to your surface and doesn’t roll smoothly, add a bit more flour to the surface underneath the dough.
- To cut the croissants into triangles, you will start by making marks on both long edges of the dough so they all turn out the same size. Here’s how to do it: Starting from the left corner along the bottom long edge, mark the dough in 4-inch increments. Then, on the top long edge, make a mark 2 inches in from the left side. Starting from that mark, continue with marks in 4-inch increments down the edge. (This will ensure you have marks on top that land halfway between the marks on the bottom.)
- Arrange a ruler from the bottom left corner to the first mark on the top edge (at 2 inches) so that it runs diagonally between them. Follow the ruler with a pastry wheel or sharp knife to make a clean cut. (The small piece you just cut off will be scrap, and you can bake it or discard it, if you wish.) Move the ruler and line it up from the top edge at the same 2 inch mark where you just cut, running diagonally down to the first bottom mark at 4 inches. Follow the ruler again to make a clean cut. You should now have a 12” long triangle!
- Continue, positioning the ruler diagonally between the marks on opposite sides to cut all of the triangles from the dough. (Pull the triangles apart as you go so that the cut edges do not stick together.) You should have 14 triangles when you are finished. Loosely cover the cut triangles with plastic wrap to keep them from drying out while you continue with shaping each croissant.
Shape the Croissants:
- Have 3 large baking sheets ready. No need to line them, but you can line them with parchment paper if desired.
- Brush any excess flour from the top and bottom sides of the triangles. Before proceeding, I recommend you take a look at my process images in the section “Shaping The Croissants” to make sure you get the next fold right.
- With the tip of your knife at the wide base of each triangle, make a cut about ¾-inch deep into the dough. This will divide the base in half. Take the right side of the cut you just made and fold it up to meet the right edge of the triangle. Repeat with the left side. This will form a V-shape in the center with the bottom corners of dough folded (resembling a shark tooth!)
- To roll up the croissants, hold each folded corner of the triangle and begin rolling the base of the triangle up towards the tip of the triangle. Apply light pressure and gently pull your hands away from each other to stretch the dough out slightly as you roll. (This ensures there are no large air pockets.) Place the shaped croissants, with the tip on the bottom, on the baking sheets spaced at least 6 inches apart (4 per pan). Curve each croissant into a slight “C” shape by bending the tips downward, if desired. Cover loosely with plastic wrap. Let the croissants rise at room temperature (about 72°F) for 2½ to 3 hours, or until they have doubled in size and are very wobbly when the pan is gently shaken. (The croissant will look very puffy when they are done! Almost like they were inflated.)
Bake the Croissants:
- Arrange an oven rack near the center of the oven. After 2 hours of proofing, preheat the oven to 425°F.
- In a small bowl, whisk together the egg and heavy cream.
- Take a look at your trays of croissants and choose the one that looks like it has puffed the most. (They will likely rise at different rates! You will bake one tray at a time, so starting with the largest ones will give time for the others to rise more.) Uncover that one tray of croissants and gently brush them with the egg wash. (Just the tops of the dough; try not to brush the cut sides).
- Place the tray in the oven. Immediately reduce the oven temperature to 375°F and bake for 15 to 20 minutes until deeply golden brown and they reach an internal temperature of 190°F. Return the oven to 425°F before baking the next tray.
- While one tray bakes, brush the next tray of croissants with the egg wash. It’s ok to start brushing with egg wash if the trays aren’t fully proofed yet. They will continue to rise after you brush and while you wait to bake, but you do want to recover them.
- Let the croissants cool on the sheet trays for about 10 minutes. They are best served within a few hours of baking.
Notes
- It’s important to always brush excess flour from the dough before folding and refrigerating. You don’t want the dough (especially the edges) to absorb the excess flour and dry out. This can cause cracks where butter can seep out.
- During the folding stage on Day 1, I give guidance to roll the dough to a 10×18-inch rectangle, but this is approximate. If you are ½ to 1 inch off in either dimension, you will be ok! The most important part is that the dough is rolled to an even thickness, and the edges stay straight. You are just developing layers of butter and dough throughout this process. The exact size of the dough is not essential until rolling the dough out to cut the croissants.
Nutrition

How To Serve Homemade Croissants
A warm croissant, split and spread generously with butter or honey butter, is simple and perfect. Here are some other ideas for how to serve them:
- Serve with jam. Spread your favorite fruit jam liberally in a halved croissant. I gravitate towards strawberry jam and raspberry jam! A drizzle of honey also tastes wonderful.
- Chocolate spread: Who doesn’t love a croissant with lots of Nutella?
- Make a sandwich! Halve a croissant and add ham and cheese, chicken salad, scrambled eggs, and avocado slices, or any of your favorite sandwich fillings for a satisfying meal.
How To Store and Reheat
Once the croissants have cooled completely, store them in an airtight container at room temperature for up to 2 days, or in the freezer for up to 3 months. Croissants will soften on the outside as they are stored, but you can recrisp them by reheating them in the oven or air fryer.
To reheat them, place them in a 350°F oven for 12 to 15 minutes or a 325°F air fryer for 3 to 5 minutes or until warmed through in the center and crispy on the outside. For frozen croissants, thaw them first, or add a few minutes to the reheating time.

More French Pastry Recipes To Try
Feeling inspired? Try these French pastry recipes next!
Macarons are dainty, delicate almond cookies that you can fill with buttercream, whipped ganache, or even ice cream!
Homemade chocolate eclairs are an indulgent treat made of choux pastry filled with vanilla pastry cream, then covered in a rich chocolate glaze.
Mille feuille (meaning “a thousand sheets” in English) is a classic French dessert of baked puff pastry layered with pastry cream and glazed on top. You can make the custard filling up to 24 hours in advance to save a little time.
Two-ingredient palmiers are sweet and crunchy and will melt in your mouth! Just sprinkle puff pastry with sugar, roll it into the classic palmier shape, slice, and bake!
Canelés require a little time and patience, but are so worth it for a caramelized exterior with a soft, custardy interior. You can use classic copper molds or muffin pans— I share all of my tricks in the recipe!
If you’ve tried this croissant recipe, then don’t forget to rate it and let me know how you got on in the comments below. I love hearing from you!
Juliene Conway says
First time making croissants and followed your recipe. They came out great. The family loved them. I made plain, almond and chocolate. Very flaky and flavorful. Thank you preppy kitchen for your wonderful recipe and extremely informative video.
Sarah Ward (Executive Editor, Preppy Kitchen) says
So happy to hear you tried this recipe, and the croissants were a hit!
Jack Leighton says
Amazing! One question: you say to cut a large block (1 cup) into half and then each half into 10 pieces, which makes 20. However, the recipe calles for 1.25 cups which would be 22.5 pieces. Do the pieces matter that much or is it mostly the amount of butter and the dimensions of the block? Thank you!
Sarah Ward (Executive Editor, Preppy Kitchen) says
Hi Jack! You need 20 tablespoons and 20 square pats of butter. I adjusted that wording to be more clear. However you cut it, as long as you have 1 1/4 cups of butter shaped into a 10″ square at the end, you’re golden!
Marissa says
I used this recipe for my first time making croissants and they turned out great!!
cheryl furr says
These were amazing!!! I learned a lot and have a long way to go but these were truly one of the best things I’ve ever made in my tiny little kitchen!!! and you’re right… a tapered rolling pin will not work nor will and especially heavy one work. I have ordered a new rolling pin just so I can make delicious croissants!! ty!!
Tricia says
John! These are amazing. I watched your video multiple times fully intending to make this our Thanksgiving holiday baking project. (I love watching your videos in general because I learn so much, but this one I was watching for the details.) We made them and they turned out spectacular! Every small instruction you provided made the process clear and so much fun. We amazed ourselves, but you deserve the credit. THANK YOU for entertaining and educating me every time I binge watch your YouTube channel. :0-)
Brandon Romero says
Very well done,articulated and I love that the dough gets that extra time to really develop flavor