


Elevate pizza night with this easy sourdough pizza crust recipe! When I tested this recipe, I was honestly amazed at how much of a difference sourdough made in the pizza crust. I found the crust baked up with an irresistibly crisp outside and chewy inside– both of which are guaranteed to win you over. While I love making classic yeasted pizza dough for quick pizza nights, I now turn to my active sourdough starter instead of yeast packets when I have a bit of time to plan ahead. With a few other ingredients (all of which are pantry staples) and some time, you can have a perfect sourdough crust to wow your family. You can top it just like a regular pizza crust, too– add homemade pizza sauce, pesto, or any sauce you like on pizza, your favorite toppings like pepperoni and veggies, and you have a perfect meal!
While uncomplicated, this recipe does need time. Luckily, most of it is hands-off time while the dough rises and ferments! But keep that prep time in mind if you’re in the mood for a sourdough pizza. I have a simple breakdown of the steps and timing so you can choose to make the dough all in one day, or let it ferment overnight! Trust me, it’s worth the wait.
Table of contents
- Why Use Sourdough For Pizza Crust?
- Key Ingredients
- Can I Make The Crust With Whole Wheat Flour?
- Recommended Equipment
- A Step-By-Step Breakdown
- Troubleshooting Issues With Your Dough
- Topping Ideas
- Pro Tips For Making Sourdough Pizza
- How To Make Sourdough Pizza Crust
- Can I Bake This In A Pizza Oven?
- Frequently Asked Questions
Why Use Sourdough For Pizza Crust?
Sourdough starter isn’t just for making loaves of sourdough bread. There’s a whole world of sourdough recipes out there, from sourdough pancakes to sourdough biscuits to pizza! And like those recipes, I love making sourdough pizza crust because of the incredible, unbeatable depth of flavor that comes with using sourdough starter as the yeast.
Just like I discuss in my ciabatta and focaccia recipes, a dough that rises slowly for several hours before being baked will have better flavor. This longer fermentation (or rising time) allows the yeast to break down more proteins and sugars in the dough, producing gas (those lovely air bubbles you see in bread!) and acids that enhance the flavor. The same is true for this wild-yeast-based sourdough pizza crust. Its flavor is so complex, thanks to that longer fermentation process. Lengthening this process also enhances the texture of the pizza crust. The outside is always so crispy, while the inside remains moist and unbelievably chewy.
Key Ingredients
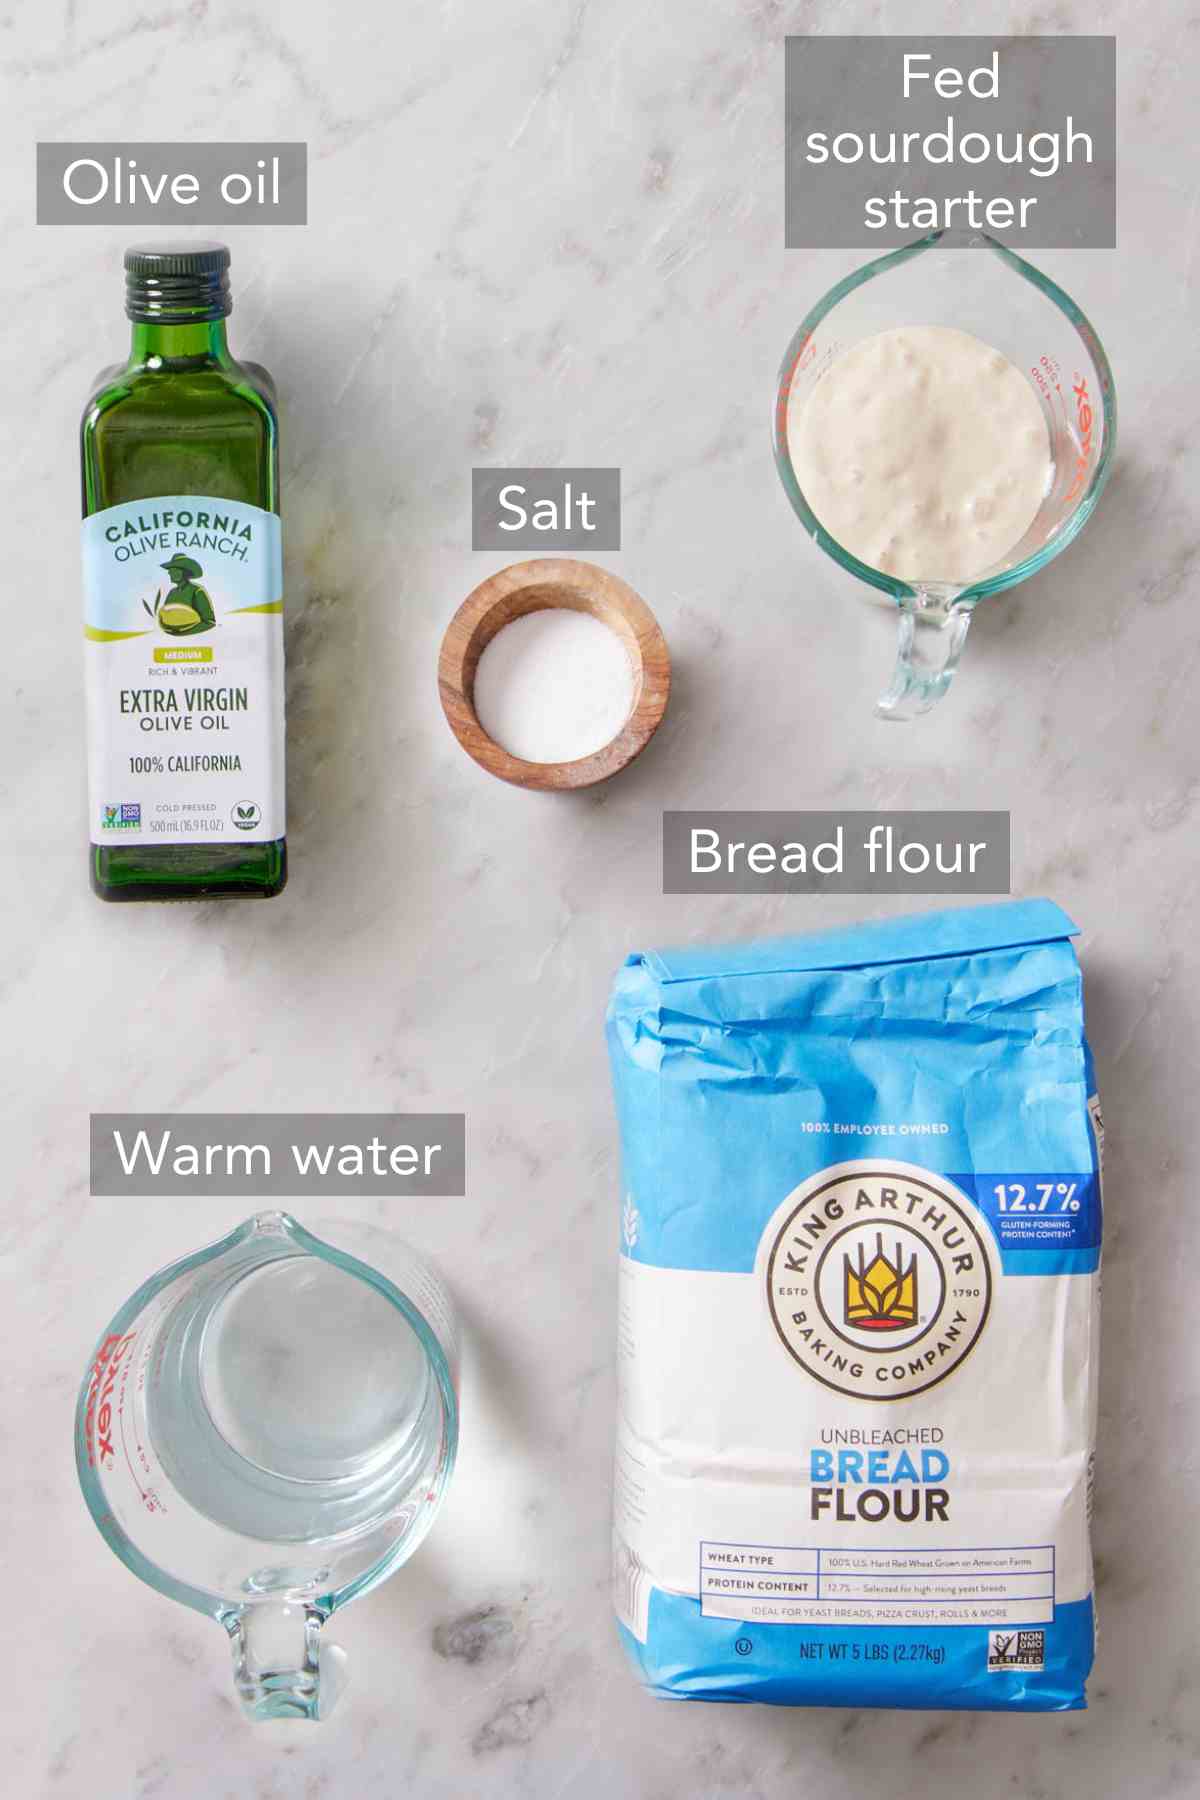
You only need a handful of simple ingredients to make a sourdough pizza crust! You can find the measurements for each ingredient in the recipe card below.
Water — use filtered water if possible, as additives in tap water can affect the bacteria in sourdough starter. It should be warm, between 80°F and 85°F, when mixing the dough.
Sourdough starter — a fed, bubbly, active sourdough starter is a must for the best sourdough pizza crust. If your sourdough starter is not bubbly yet, hold off on making this recipe until it has risen. Check out my post for all of the info you need to activate and maintain a healthy starter!
Oil — oil adds richness and flavor to this sourdough pizza dough recipe. It also makes it a bit easier to handle when shaping the dough balls.
Flour — I lean towards bread flour, as it’s higher protein content yields an addictively chewy crust. If you don’t have any, all-purpose flour will still make a delicious crust.
Salt — salt adds flavor, but also strengthens the pizza dough so it’s able to hold onto the air bubbles produced during fermentation.
Can I Make The Crust With Whole Wheat Flour?
You can replace up to 1 cup of bread flour with whole wheat flour. For the perfect recipe, don’t use more than that, as it will cause the sourdough pizza crust to turn out heavy and dense instead of pillowy and chewy.
Recommended Equipment

These tools are basic kitchen essentials that will help make mixing and shaping your sourdough pizza dough easy.
Kitchen scale — an essential piece of equipment! A scale will stop you from accidentally using too much flour, which will affect the texture of the dough. Sourdough pizza crusts start with a high-hydration dough (meaning it is loose and somewhat sticky), so using the correct amount of flour is a must. A scale is also useful for Step 7 of this recipe, so you can weigh the dough before dividing it into four equal pieces.
Mixing bowl with a lid — the bowl that you’ll use to make the dough either needs a lid, a baking tray, or a plate large enough to cover the bowl while it rises. You can also cover the bowl with plastic wrap if you don’t have any of those items on hand. If your bowl has volume or other measurement markings on the side, that’s great too! It can be helpful to know just how much your dough has risen and when it’s ready to shape.
Silicone spatula — you need this early on to stir together the ingredients so a shaggy dough forms. Silicone is best for a lower chance of sticking.
Bench scraper or flexible dough scraper — very helpful for handling the dough, which, due to its moisture content, can be a bit sticky and soft.
Baking sheet or pizza stone — to bake the sourdough pizza crust. A pizza stone or steel yields the crispiest bottom, but a baking sheet works just fine if you don’t have those tools!
A Step-By-Step Breakdown
Making sourdough pizza dough isn’t hard, but it does take a little bit of forethought. Sourdough recipes tend to take longer to rise since they are made with a live culture versus commercially dried yeast. However, I developed this dough recipe using enough sourdough starter so that you can make it all in one day. Here’s a breakdown to guide you through each step so you can plan for your perfect pizza night.
- Feed the starter (night before): If you feed your starter just before bed, then you’ll be ready to make the dough first thing in the morning. If you’ve used it recently and refrigerated it, make sure your starter has been fed and was active within the last 72 hours prior to making the dough. If so, you don’t need to feed it again before using it, just let it sit at room temp for an hour.
- Mix the dough (8 am): All you need to do is mix together the dough ingredients and let it rest for 1 hour! The flour will hydrate during this time, and the starter will start its fermentation process.
- Fold and turn (9 am): This is where gluten development begins! Because this is a very soft dough, traditional kneading is replaced by a series of folds and turns. You will need a total of 2 hours for this step, but it only takes about 5 minutes of hands-on time in total.
- Bulk fermentation (11 am – first rise): Once the folds are done, the dough is left alone to ferment and rise. This is where the texture starts to develop and big air bubbles grow! You can do this at room temperature in 3-5 hours.
- Shape (2-4 pm – second rise): Now we’re close to pizza-making time! The dough is divided into four pieces and shaped into round balls. This will ultimately become the pizza crust! Once shaped, the dough needs about 2 hours to rise again and let the gluten relax so your stretched crust holds its shape.
- Bake! (6-8 pm) All of your waiting pays off now with the most delicious pizza! Shape and bake in a high-heat oven for a crisp crust full of sourdough flavor.
If you want to cold ferment overnight, make the dough in time to do the bulk fermentation in the fridge for at least 12 hours and up to 24 hours. The next day, you’ll need to let the dough warm up at room temperature for 1 to 2 hours before shaping it, so keep that in mind depending on when you plan to bake your pizzas.

Troubleshooting Issues With Your Dough
When my executive editor, Sarah, cross-tested this recipe, she discovered some issues that you might encounter when making sourdough pizza dough, especially if it’s your first time. Here are my helpful tips for troubleshooting these potential problems:
Dough is too sticky: Flour the surface well during shaping. This will keep the dough balls from sticking to the counter and your hands while shaping the balls and help soak up some of the extra moisture.
Dough balls are hard to stretch: Let them rest for longer. When shaping the dough balls, you are activating the gluten again, and it needs some time to relax. If the dough springs back when you go to shape the pizza crust, this can also be a sign that your dough hasn’t risen enough and needs more time to ferment.
Dough balls are too soft: It might be overproofed, which means it’ll bake up a bit denser. I typically bake it anyway! For easier handling, you can gently roll out the dough instead of stretching it, making a thin-crust pizza. Or, place the covered dough balls in the fridge for 30 minutes before stretching and topping.
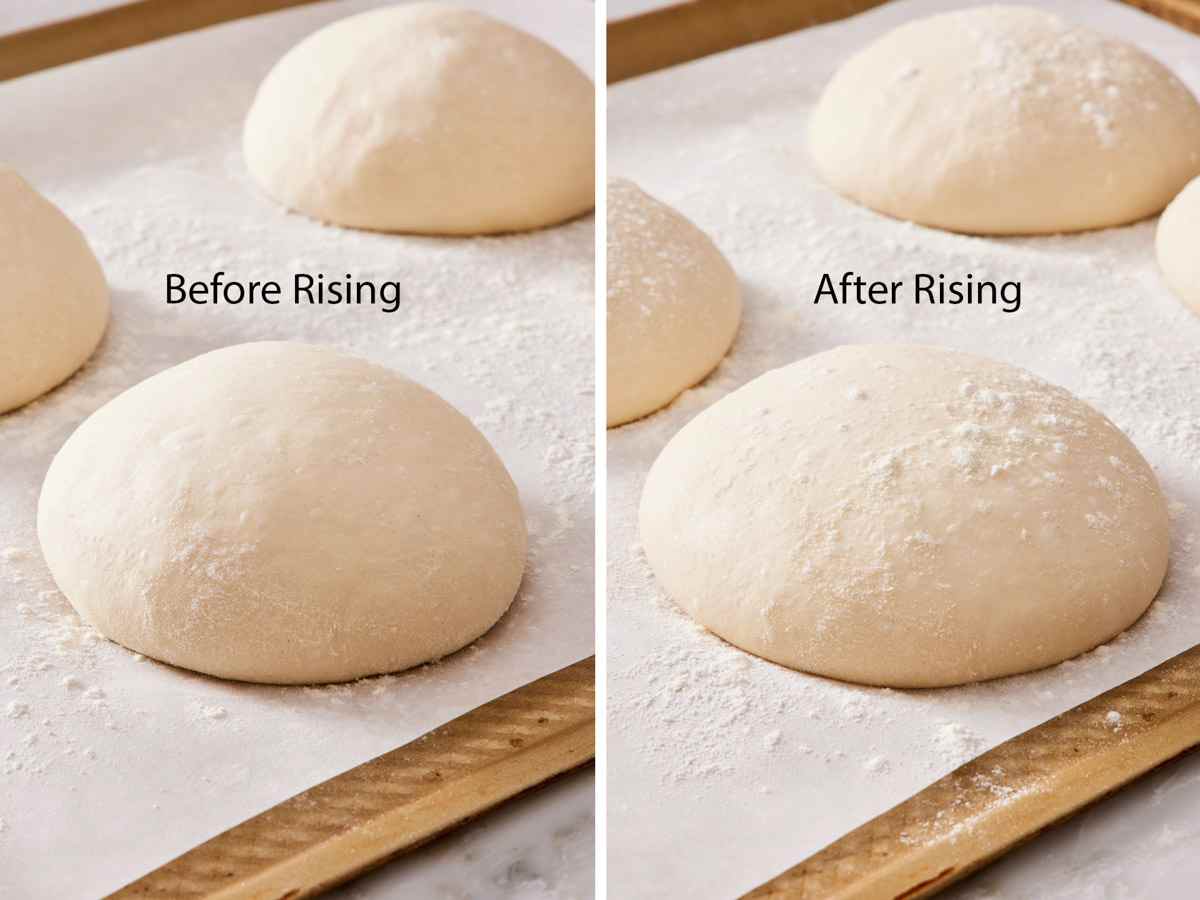
You can see in the image below what properly shaped sourdough pizza dough balls look like before and after rising.
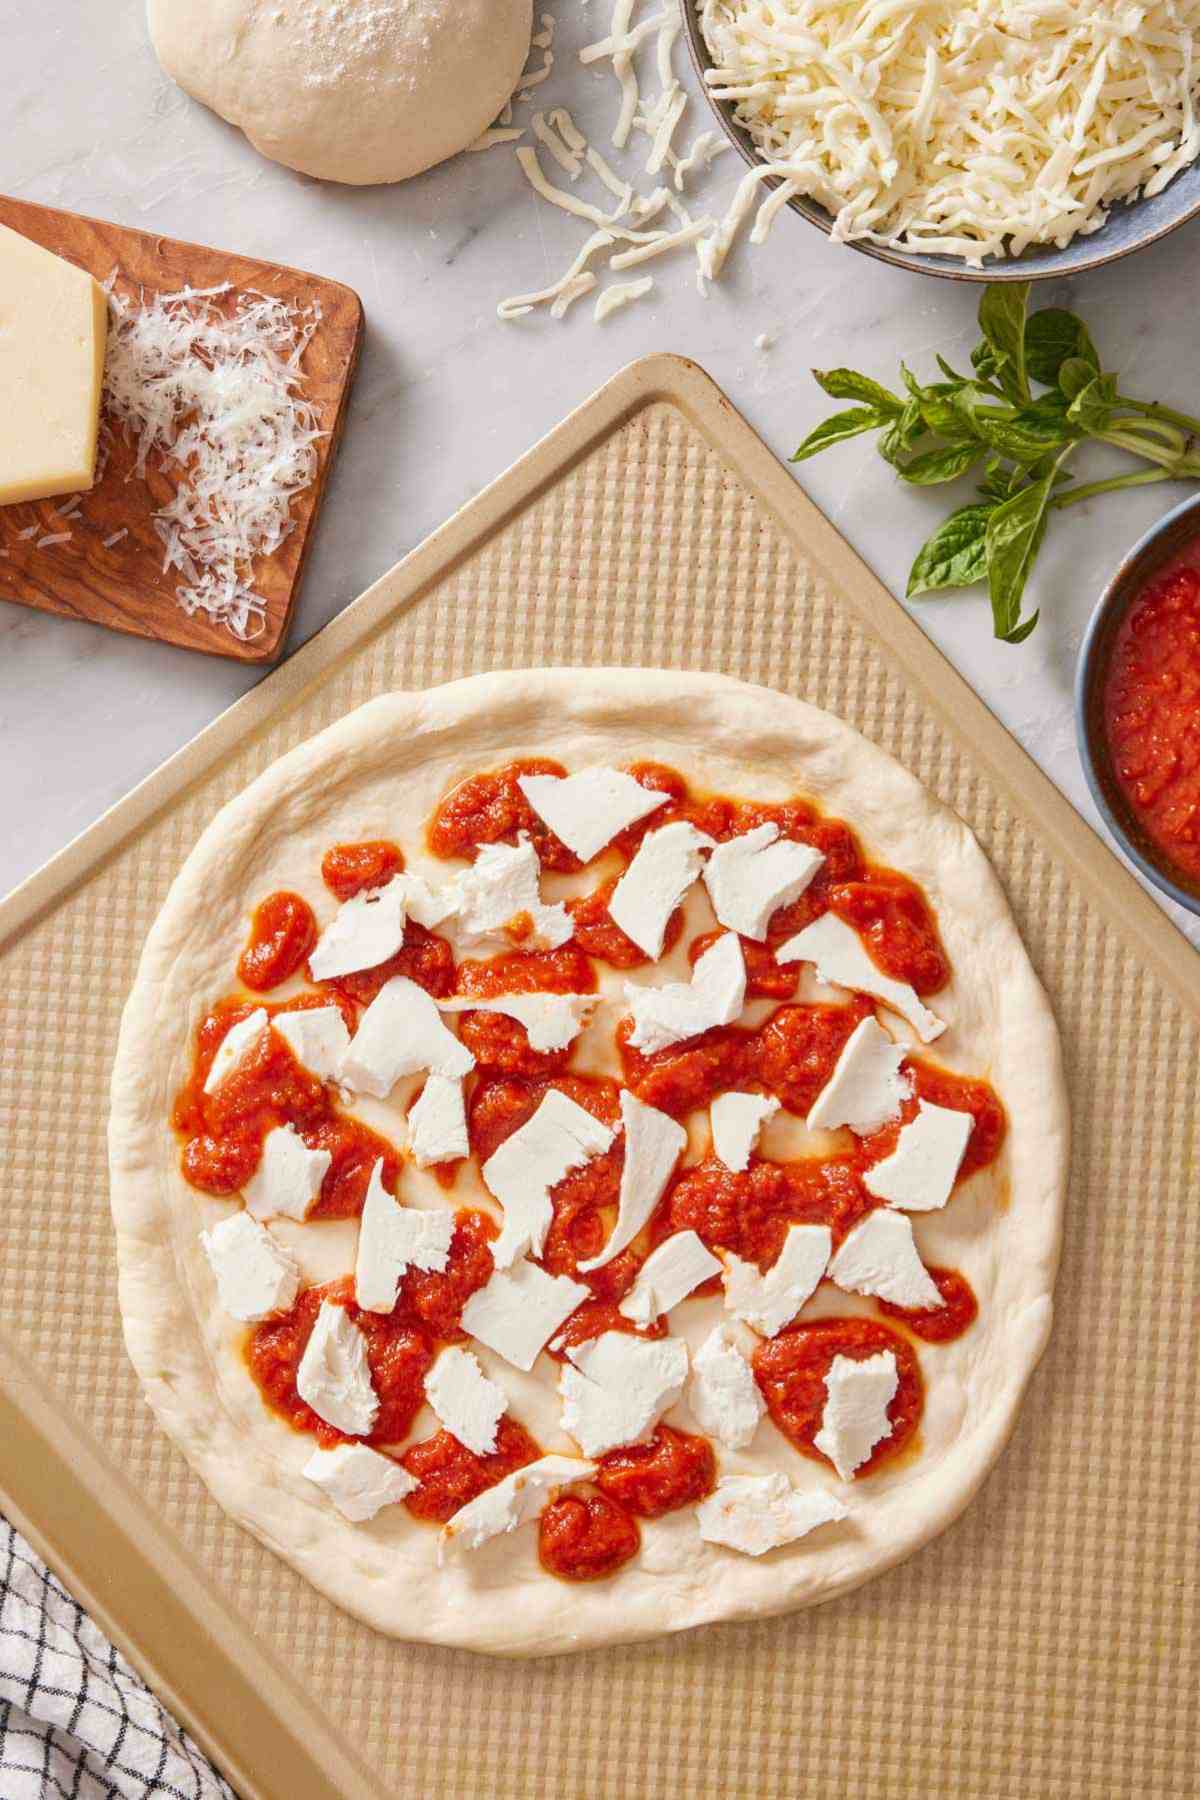
Topping Ideas
The limit is your imagination! Make a sourdough variation of my classic cheese pizza recipe with mozzarella cheese and parmesan cheese, opt for a margherita pizza with tomatoes and basil, or go all out with a buffalo chicken pizza, made with a mixture of buffalo sauce and ranch dressing, shredded chicken, cheese, and onions.
Instead of pizza sauce, try my vodka sauce or homemade BBQ sauce. You can also add any of your favorite pizza toppings like bell peppers, cured meats, onions, sausage, mushrooms, olives, and spinach (or even pineapple, like Lachlan and George do!). Just be sure not to overload the sourdough pizza crust with toppings because, as mentioned earlier, it can cause the crust to not cook properly.
Pro Tips For Making Sourdough Pizza
Make sure your starter is active and ready to go! If it was refrigerated, I recommend bringing it to room temperature for an hour first, before mixing the dough.
Use a stand mixer. In step 2, you can also use a stand mixer with a dough hook to mix the dough. Mix for 1 to 2 minutes on medium-low speed, just until the dough comes together.
While tempting, don’t overload the dough with toppings! Sourdough pizza dough is a bit softer and has more moisture than standard pizza dough. So overloading it with toppings can cause it to underbake in the center. Extra moisture from too many toppings can also prevent it from crisping properly.
Bake with high heat. For the ultimate crispy pizza crust, bake at 500°F. A short bake time at a high heat gives you lovely charred bits, a crispy crust, and the perfect chewy middles.
For the crispiest crust, use a pizza stone or steel if you have one! Place the stone on the lower oven rack and preheat the oven for 45 minutes to 1 hour with the stone inside to ensure it’s heated through. Instead of placing the stretched dough on a baking sheet brushed with olive oil, place it on a piece of parchment paper sprinkled with semolina flour. Slide the whole piece of parchment onto the baking stone and bake for 7 to 10 minutes.
Yield: This recipe yields 4 (275g) pizza dough balls, making about 10- to 11-inch pizzas each. This makes them the perfect size for two people to share, or let each person have a personal make-your-own-pizza that they can customize with toppings to their taste!
How To Make Sourdough Pizza Crust
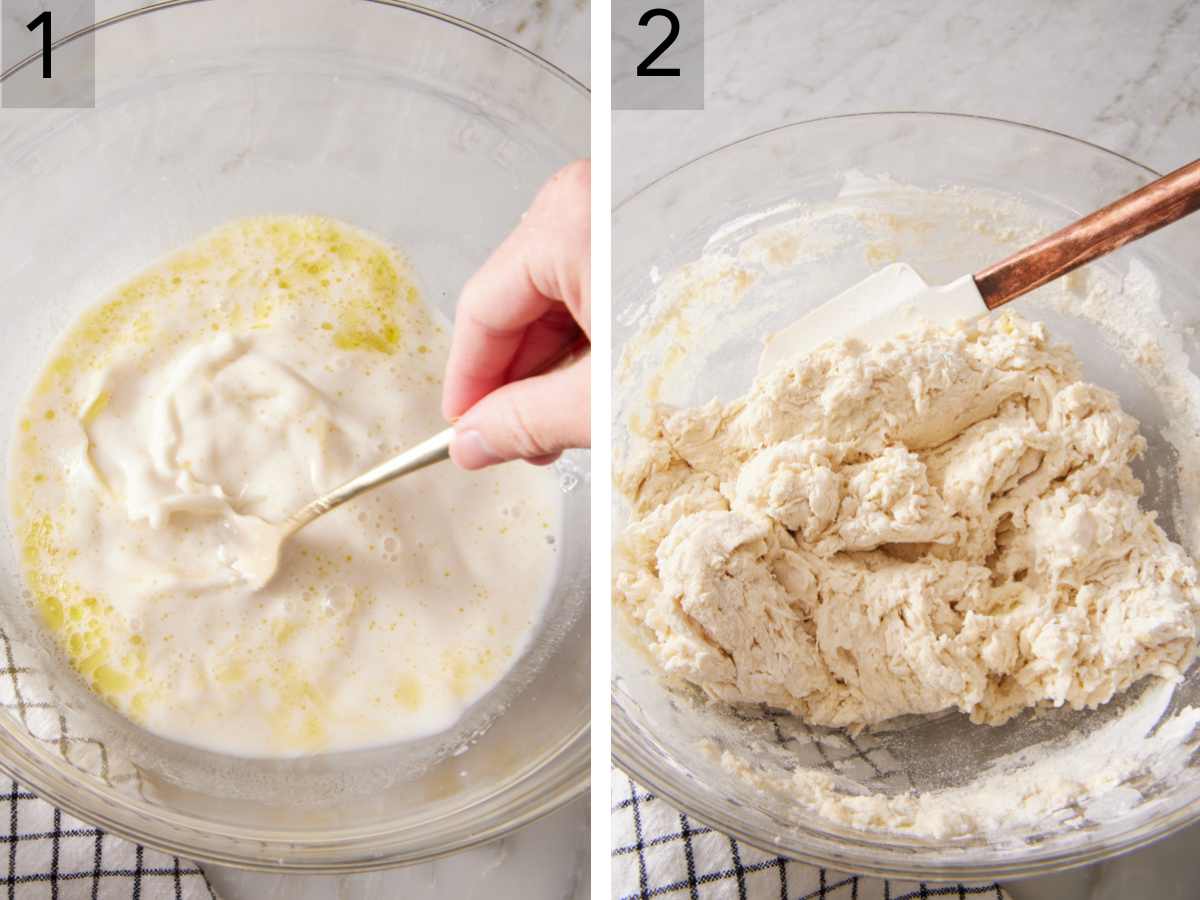
1. In a large bowl, using a fork, stir together the water, sourdough starter, and olive oil.
2. Add the flour and salt and stir together with a spatula until a shaggy dough forms.
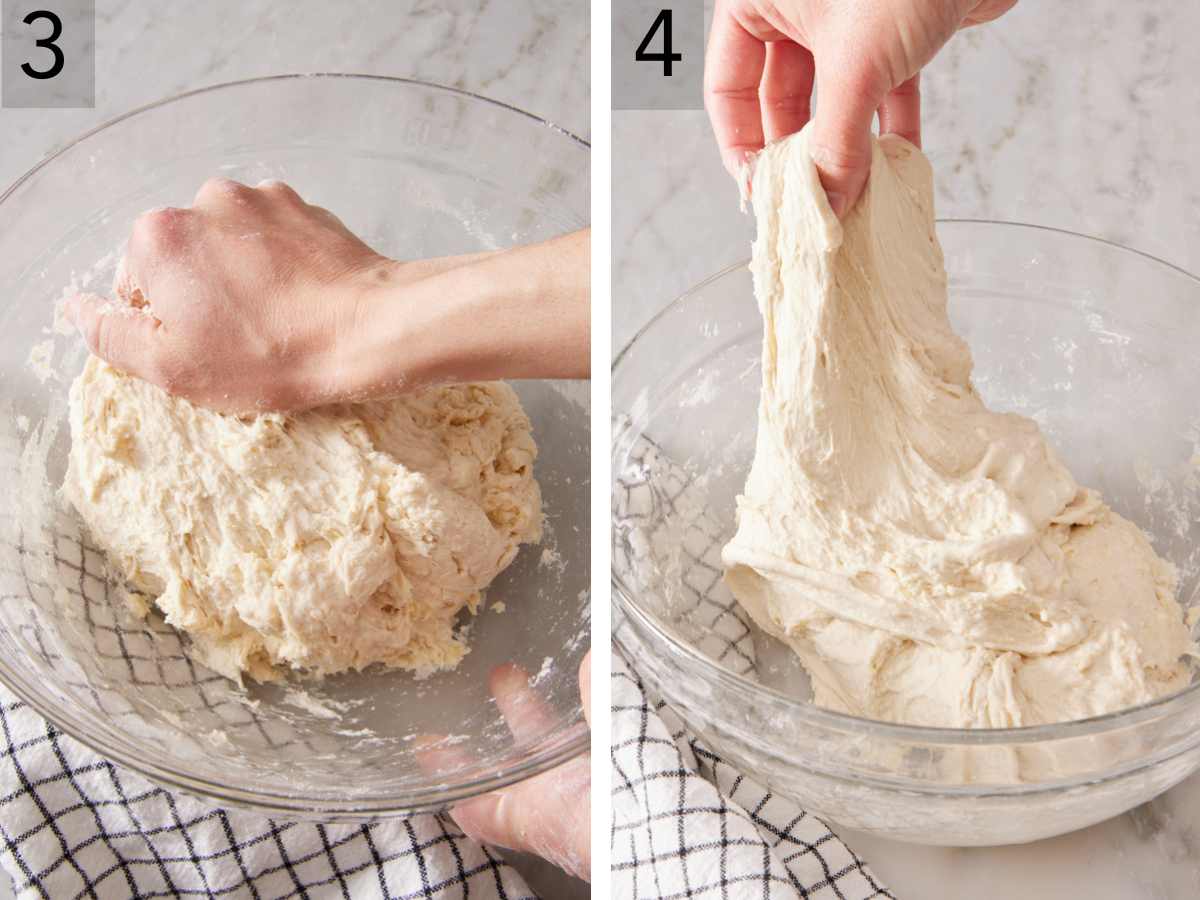
3. Scrape the sides of the bowl and, with lightly floured hands, knead the dough. Cover the bowl and let the dough rest for 1 hour in a warm place.
4. Wet your hands with warm water and perform a series of 4 to 6 stretches and folds 3 to 5 times to help strengthen the dough. Then form the dough into a ball and place it back in the bowl to rest for another 30 minutes. Repeat the series of stretches and folds, resting for 30 minutes between each. Brush the inside of a large bowl with olive oil. Add the dough to the bowl and cover, then let it rise in a warm place until it has increased by 50% to 75% in size, which will take about 3 to 5 hours.
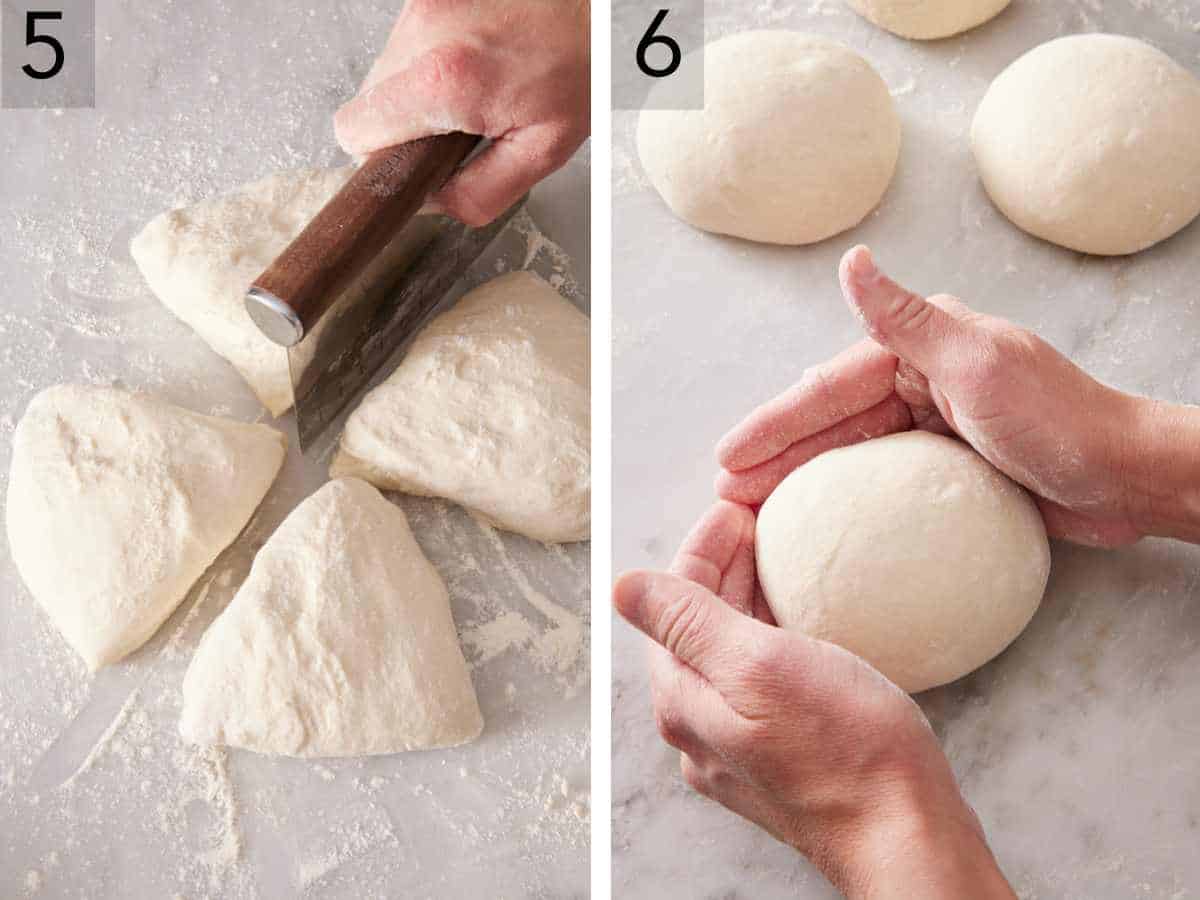
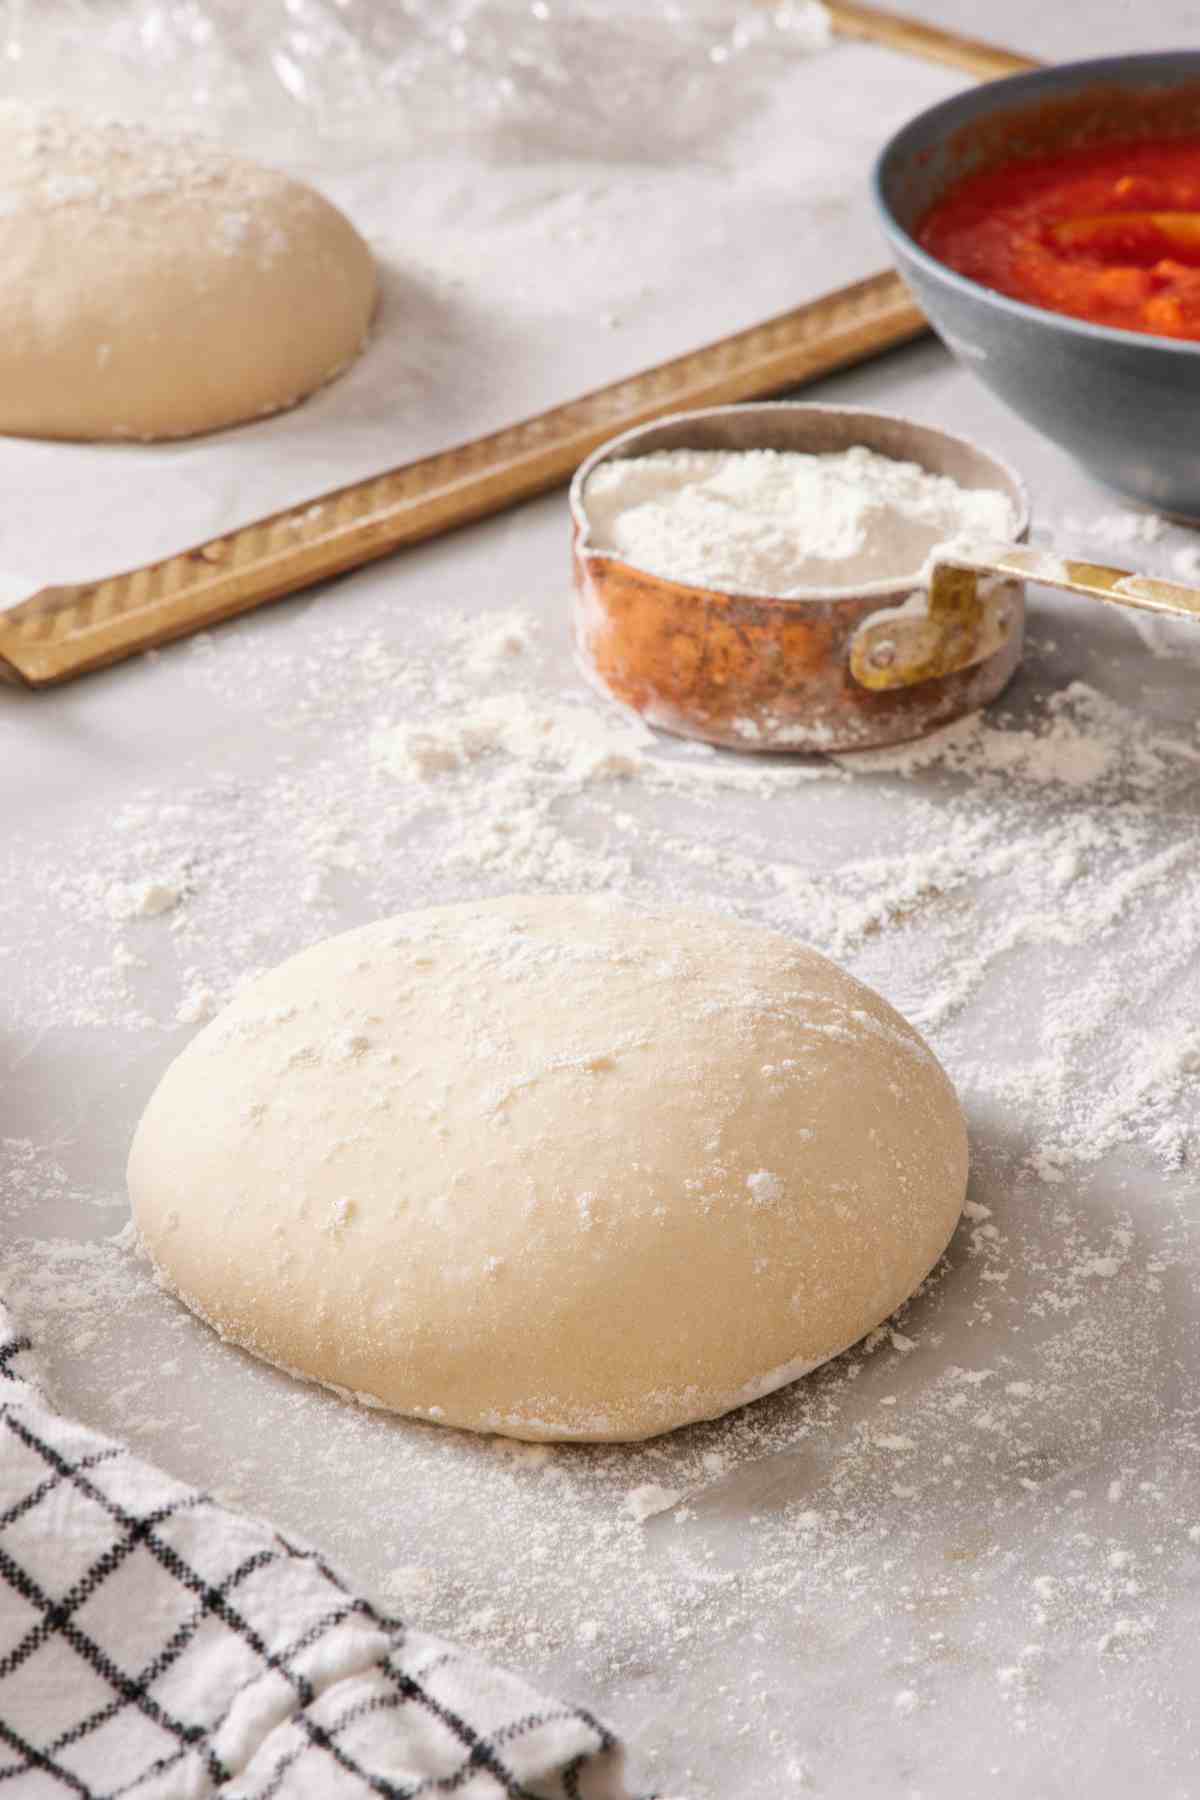
5. Turn the dough onto a lightly floured surface. Divide it into 4 equal-sized pieces, about 275g each. A bench scraper makes it easy to divide the dough.
6. Pinch the edges of each piece of dough together to shape it into 4 balls, then flip them over and shape them into tight balls with a lot of tension. Place the sourdough pizza crust balls on a small tray, lightly sprinkle with flour, and cover with plastic wrap. Let rise for 2 more hours until puffed. In the meantime, place an oven rack in the bottom third of the oven, then preheat the oven to 500°F. Brush a large baking sheet with olive oil.
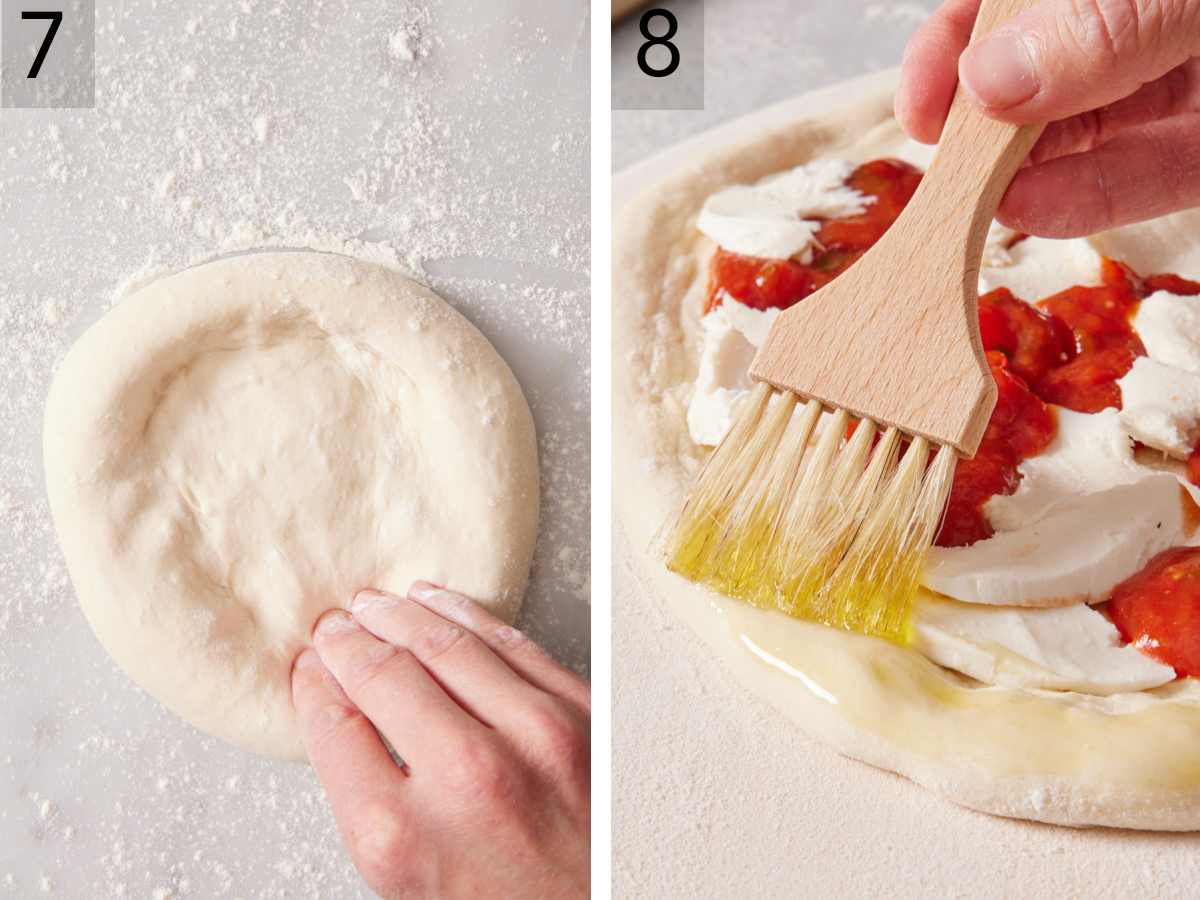
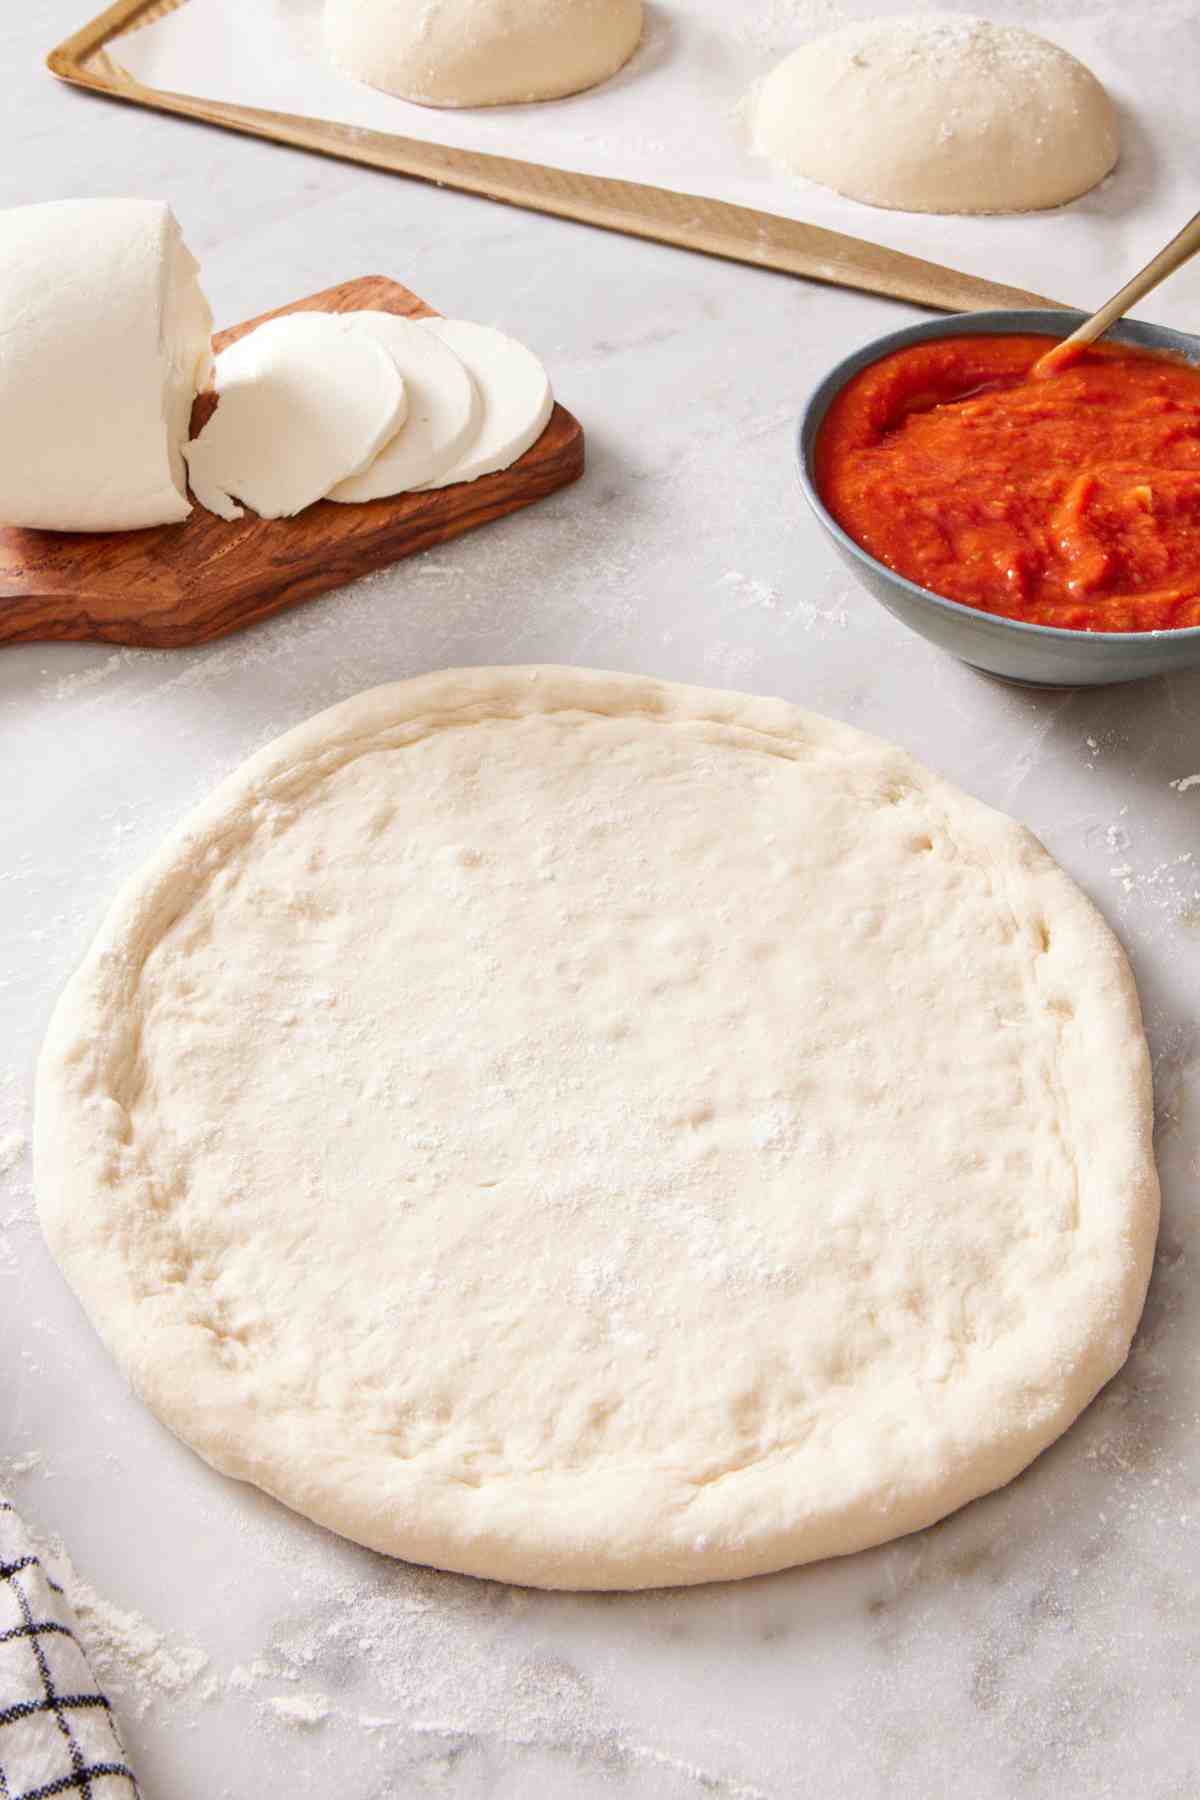
7. Transfer the dough to a well-floured surface. Flip over to coat the top in the flour, then flip once again to place each dough ball seam-side down. Dimple the center of the dough to create a circle inside with a puffy rim, then stretch the dough into a 10- to 11-inch circle.
8. Place the dough on the prepared baking sheet and reshape it into a circle. Top with tomato sauce, cheese, and toppings. Brush the crust with a little olive oil before baking for 8 to 10 minutes. Repeat with the other pizza crusts.

Sourdough Pizza Crust Recipe
Video
Equipment
- Large bowl
- Silicone spatula
- Large sheet pan
- Bench scraper
Ingredients
For the Crust:
- 1½ cups warm water (80 to 85°F) (360mL)
- ⅔ cup fed sourdough starter (150g)
- 1 tablespoon olive oil plus more for brushing
- 4¾ cups bread flour or all-purpose flour (570g)
- 2½ teaspoons salt (15g)
Pizza Toppings:
- 1 to 1½ cups pizza sauce (240 to 360g)
- 8 to 12 ounces mozzarella cheese (226 to 340g)
- Fresh vegetables, cured meats, or other pizza toppings
Instructions
- In a large mixing bowl, stir together the water, sourdough starter, and olive oil with a fork.
- Add the flour, then the salt. Stir together with a silicone spatula until all of the flour is moistened and a shaggy dough forms. Scrape the sides of the bowl and knead the dough together a few times with lightly floured hands, until it is combined. (It’s ok if it’s lumpy. The dough will smooth out as it rests.)
- Cover the bowl and let rest for 1 hour in a warm place (about 72°F).
- Wet your hands with warm water. With the dough bowl directly in front of you, slide your fingers or a bench scraper under one edge of the dough down to the bottom of the bowl. (I like to pull at the top or 12 o’clock.) Pull that section of dough up, stretch it over the center, and press it down into the dough to help hold it in place. Turn the bowl 90°, or a quarter turn, and repeat 3 to 5 more times until you’ve made 4 to 6 folds and turns. (The dough will feel sticky. Continue to moisten your hands in order to work with it easily.) Form the dough into a ball and return it to the bowl. Cover the bowl tightly with plastic wrap or a plate.
- Let the dough rest for 30 more minutes, then repeat the 4 to 6 stretches, folds, and turns three more times. Cover the bowl and rest for 30 minutes between each set of stretches and folds, for a total of 4 sets.
- Brush the inside of a large bowl lightly with olive oil. Add the dough to the bowl and cover with a lid or plastic wrap. Let rise in a warm place (about 72°F) until increased by 50% to 75% in size, about 3 to 5 hours. (At this point you can refrigerate the dough for up to 24 hours.)
- Turn the dough onto a lightly floured surface. Divide it into 4 equally-sized pieces 4 pieces, about 275g each. Shape each piece into a ball by pinching all of the edges into the center, like you are bundling up a sack, to make a tight ball shape.
- Flip the dough balls over and place seam-side down on a clean surface. Working with one piece of dough at a time, with your hands cupped around the top of the dough, gently pull the ball towards you, tightening the circular shape. Return the dough to where you started, rotate it 90° and repeat three more times until it is in a tight, circular shape. Place each shaped ball on a small, quarter-sheet tray, lightly sprinkle with flour on top, and cover with plastic wrap. Let rise for 2 more hours until puffed.
- Meanwhile, arrange an oven rack in the bottom third of the oven. Preheat the oven to 500°F. Brush a large baking sheet generously with more olive oil.
- Using a bench scraper, transfer the dough to a well-floured surface. Flip over to coat the top in the flour, then flip once again to place the seam-side down. Dimple the center of the dough with four fingertips all over, to create a circle inside of the dough and a puffy rim around the edge, ¾ to 1 inch wide. Stretch the dough into a 10 to 11-inch circle, maintaining the rim. Brush or shake off any excess flour.
- Place the dough on the prepared baking sheet and re-shape into a circle. Top with sauce, cheese, and toppings of your choice. Brush the crust with a little olive oil. Bake for 8 to 10 minutes, or until the crust is golden. Repeat with the remaining crusts.
Notes
- Try not to open the oven while the pizza is baking until you think it’s ready. You want a lot of heat to help the crust puff up and crisp on the outside! If you open the oven door in the middle of baking, you’ll release that heat, and your pizza won’t bake up as nicely.
- Storage: Leftover sourdough pizza will keep in an airtight container in the refrigerator for up to 4 days. Reheat slices in the air fryer at 375°F for about 3 minutes, or the unsliced pizza in the oven, also at 375°F, for about 10 minutes.
Nutrition
Can I Bake This In A Pizza Oven?
Absolutely! This sourdough pizza dough works very well in a high-heat outdoor pizza oven. Follow the guidelines given by your manufacturer for cooking the pizza. Be sure to use a pizza peel and don’t shape the pizza on parchment paper. It will likely cook several minutes faster than a regular home oven, and it would be a good idea to rotate the pizzas once or twice while they cook.

Frequently Asked Questions
Yes, you can use discard, as long as it’s not too old! The newer, the better for the best pizza crust rise. Opt for refrigerated discard taken from an active starter no more than 72 hours prior.
Technically, yes, but it won’t produce the best results once thawed. The live yeast in the dough starts to die the longer the dough is frozen, so it loses air bubbles and it doesn’t puff up as much when baking after being frozen.
I actually recommend freezing baked pizza and then simply reheating it! This is also a great way to meal prep. Once the pizza has cooled completely, freeze the whole pizza or slices by wrapping them tightly in plastic wrap and aluminum foil. Place in a freezer bag or freezer-safe container and freeze for up to 3 months. Reheat in the air fryer at 350°F for 5 minutes or in the oven at 400°F for 5 to 10 minutes.
If you’ve tried this sourdough pizza crust recipe, then don’t forget to rate it and let me know how you got on in the comments below. I love hearing from you!
Hannah says
Love this! The crust comes out so crunchy on the bottom but has a nice soft texture on the inside. I actually pre baked a few crusts then froze them. Baking them again for 5 minutes the texture was still fluffy. Although the fresh crust was best.
Matilda says
Excellent. I have made twice. The first time, I neglected the recipes advice and put too much sauce and topping. Just as said, the center was underdone. The second time, because we are a very sauce and topping heavy family, I precooked the crusts just a few minutes. Wonderful! All the nice chewy, crispy, fluffy crust one could ever want. The taste of sourdough is subtle and very tasty.