
This post may contain affiliate links. Please read our disclosure policy.
Knowing your oven is essential to baking and roasting with great results. This guide covers the fundamentals to ensure success every time: what each oven setting actually does, how to find your oven’s hot spots with a simple bread test, where to place the rack for what you’re cooking, and why preheating takes longer than the beep suggests.
If your cookies always burn on one side, your cakes dome unevenly, or one batch of cupcakes is golden while another in the same oven is pale, your oven is likely to blame, not your recipe. Your oven probably has hot spots, runs hot or cold, or both. Almost every home oven has temperature inconsistencies, varying by 25° or more, and the better you understand yours, the better every recipe you make will turn out.
In this lesson, I’ll cover what the major oven settings actually do (Bake, Convection, Broil, and the specialty features), how to know your oven’s true temperature, the 9-slice bread test that maps your oven’s hot spots in five minutes, where to place your rack for baking vs. roasting vs. broiling, why preheating matters more than people think, and the small adjustments that turn an inconsistent oven into a reliable cooking partner. By the end, you’ll know your oven the way a good cook does—well enough to predict and adjust.
“This guide changed my baking! My cookies would regularly burn on the bottom and edges and I blamed the recipe and eventually switched out my baking pans. Still no luck. Once I got an oven thermometer, I realized it was running 30 degrees hotter than I set it for. Now I drop the temp and my cookies are perfect!”
Georgina
Understanding Your Oven Settings
Before we get into technique, let’s cover the basics. Most home ovens have three primary modes plus a few specialty features. They apply across cooking methods from roasting to slow braising to baking. Once you know what each one does, you can pick the right one without thinking.
Bake. The default setting on almost every oven. The heating element at the bottom of the oven turns on, heat rises through the cavity, and the oven holds the set temperature. Used for cakes, cookies, casseroles, breads, custards—basically anything that requires steady, even heat from below. This is the setting most recipes assume. When a recipe says “preheat the oven to 350°F” without specifying a mode, it means the standard Bake setting.
Convection (Bake or Roast). A fan circulates hot air around the food, which speeds up cooking and produces more even browning. Convection comes in two styles: Convection Bake (designed for baking, uses a moderate fan speed) and Convection Roast (designed for roasting meat, uses a higher fan speed and often a dedicated heating element).
The general rule when using convection and the recipe doesn’t specify to: Reduce the temperature by 25°F and check for doneness 5-10 minutes earlier than the recipe calls for. Some recipes specify convection. If yours doesn’t, regular Bake is the safer default.
Broil. The top heating element turns on at maximum intensity. Used to brown the top of casseroles, melt cheese, finish steaks, or crisp leftovers. Broiling happens fast—1-3 minutes is often enough to brown the surface—and it requires constant attention because food goes from “perfect” to “burned” in seconds. Always broil with the oven door slightly ajar if your oven manual recommends it (some do; some don’t, so check yours), and keep an eye on the food.
Specialty features. Modern ovens often include extras that aren’t always relevant, but can be helpful for specific tasks:
- Warming drawer — keeps cooked food at serving temperature without continuing to cook it. Great for holiday dinners with multiple dishes.
- Proof — maintains a low temperature (around 100°F) for proofing yeast doughs. See the How To Proof Bread Academy lesson for proper use.
- Dehydrate — sustains very low heat (140-170°F) for drying fruits, herbs, or jerky.
- Slow Cook — turns the oven into a slow cooker, holding 200-225°F for hours. Useful but rarely needed if you have a dedicated slow cooker.
- Delayed starts and timers — allows you to program your oven to preheat or turn off at certain times so you don’t have to be right next to it.
For most home cooking, you’ll use Bake 80% of the time, Convection 15%, and Broil 5%. Specialty features come up occasionally, and they are useful when you need them.
Knowing Your Oven Temperature
Here’s the uncomfortable truth: Almost every home oven is wrong about its own temperature. Most are off by 25 to 50 degrees at some point during a bake, and the variation isn’t always the same—your oven might be 25°F hot when you set 350°F, but only 5°F hot at 425°F. Manufacturers calibrate ovens at the factory, but ovens drift over time, the temperature sensor isn’t always perfectly placed, and the door losing heat each time it’s opened changes the actual cavity temperature.
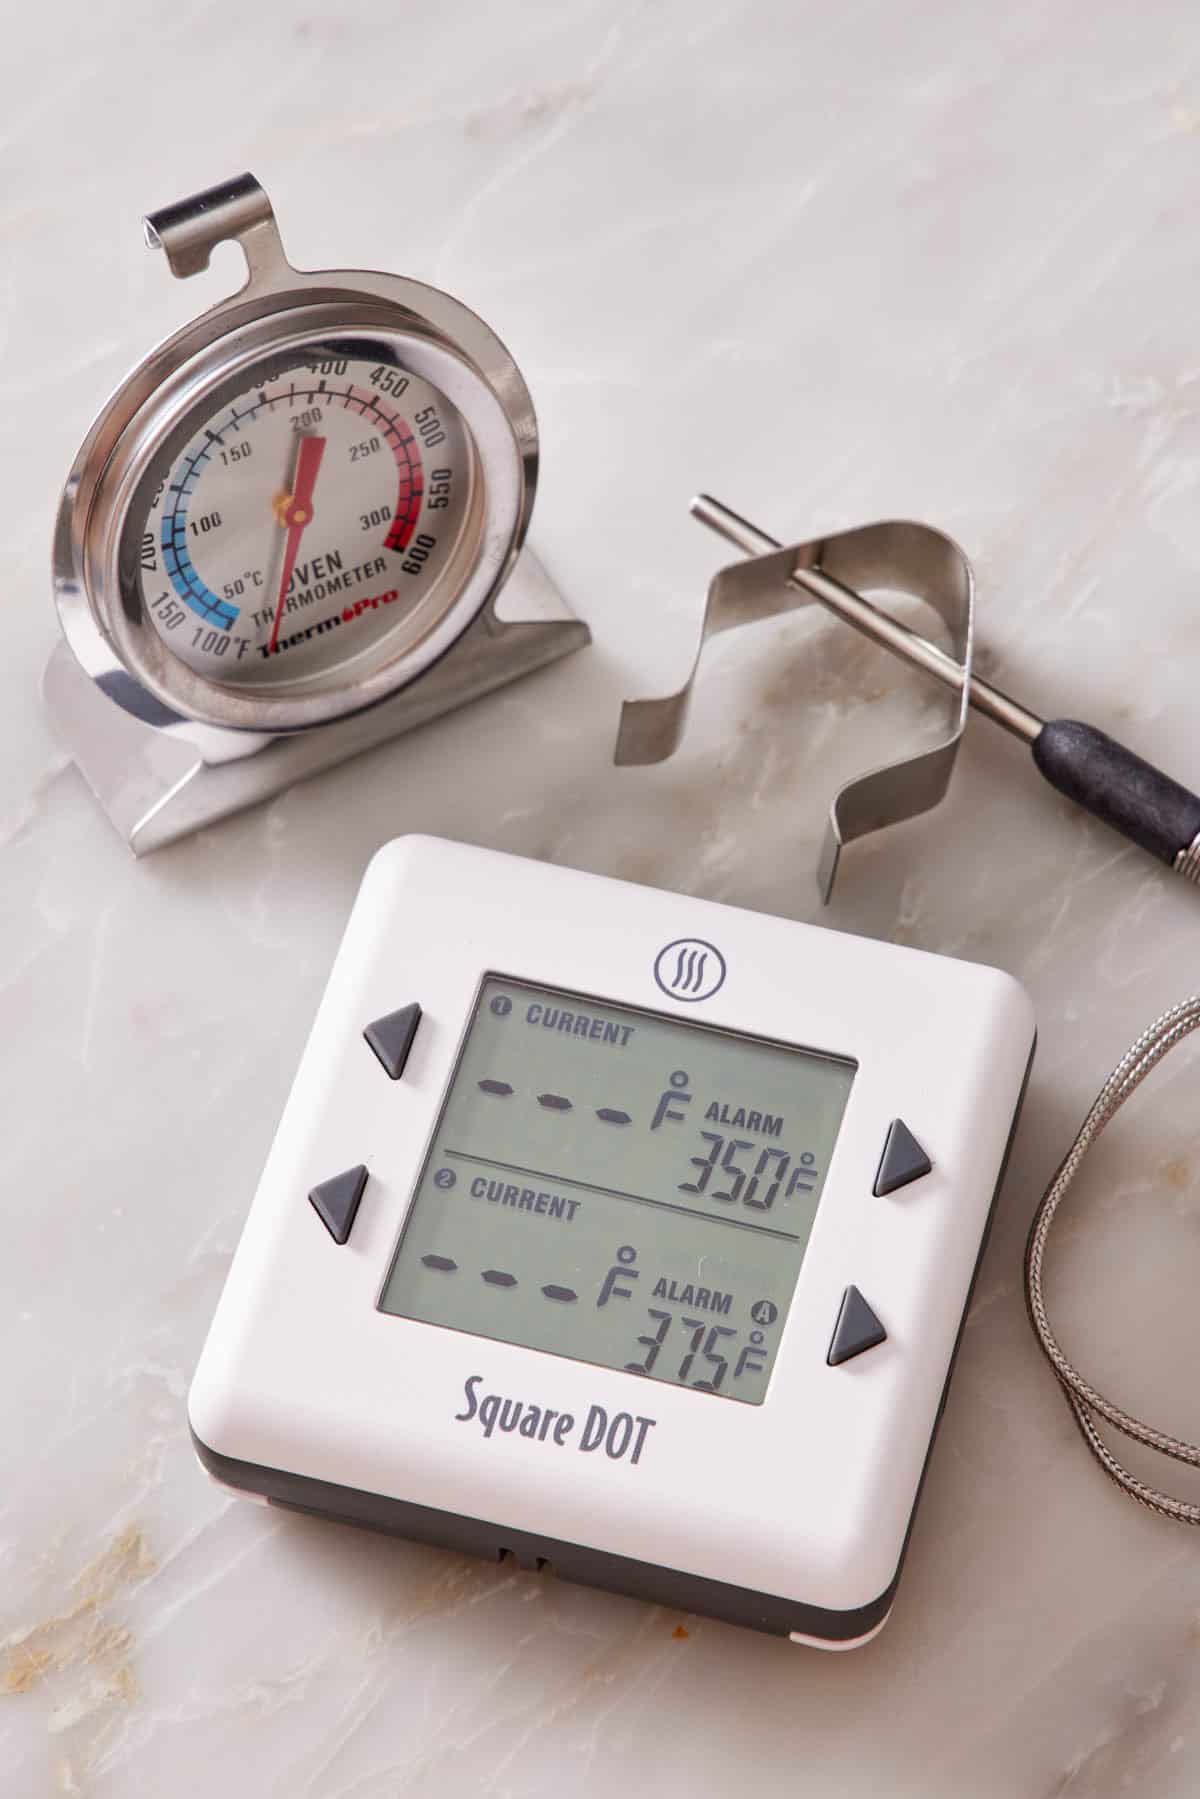
The best fix? Use an oven thermometer. This is the single most useful kitchen tool you can buy for under $10. An independent oven thermometer hangs inside your oven and tells you the actual temperature, not what your control panel says. Place it in the center of the oven on the rack you’ll be cooking on. Preheat to 350°F. Once the oven beeps “preheated,” wait another 10 minutes (more on this below), then check the thermometer. If it reads 325°F or 375°F, your oven is off by 25°F. That’s normal, but it means you should adjust your temperature accordingly: bump it up if your oven runs cold, or lower it if it runs hot.
You can also use a digital thermometer with an air probe. These are very accurate and so easy to use! You can even set alarms to alert you if the oven drops or lowers below a certain temperature. This helps you know if your oven is cycling heavily as well.
Calibrate your oven. If your oven is off by more than 35°F or behaves erratically, check the manual for calibration instructions. (Many modern digital ovens have a calibration feature in the settings menu.) Older mechanical-dial ovens usually require a service call to calibrate, and the cost ($75-150) is rarely worth it unless your oven is dramatically off. For most home cooks, an oven thermometer + adjusting the oven temperature is faster, cheaper, and more reliable than calibration.
A note on gas vs. electric ovens. Gas ovens generally have more temperature swing during a bake—the burner cycles on and off to maintain temperature, so the actual cavity temp can swing 20-30°F up and down even when the display reads steady. Electric ovens are more even. Convection (with the fan running) reduces this swing significantly in either type. If you have a gas oven, an oven thermometer is even more useful because it shows you the swing range, not just the average.
How to Find Hotspots In Your Oven
Even an accurately calibrated oven has hot spots, or areas where heat concentrates and food browns faster. The cause is usually placement of the heating element, the fan (if convection), or air flow patterns specific to your oven’s interior geometry. Finding your hot spots takes about five minutes and uses one ingredient: white sandwich bread.
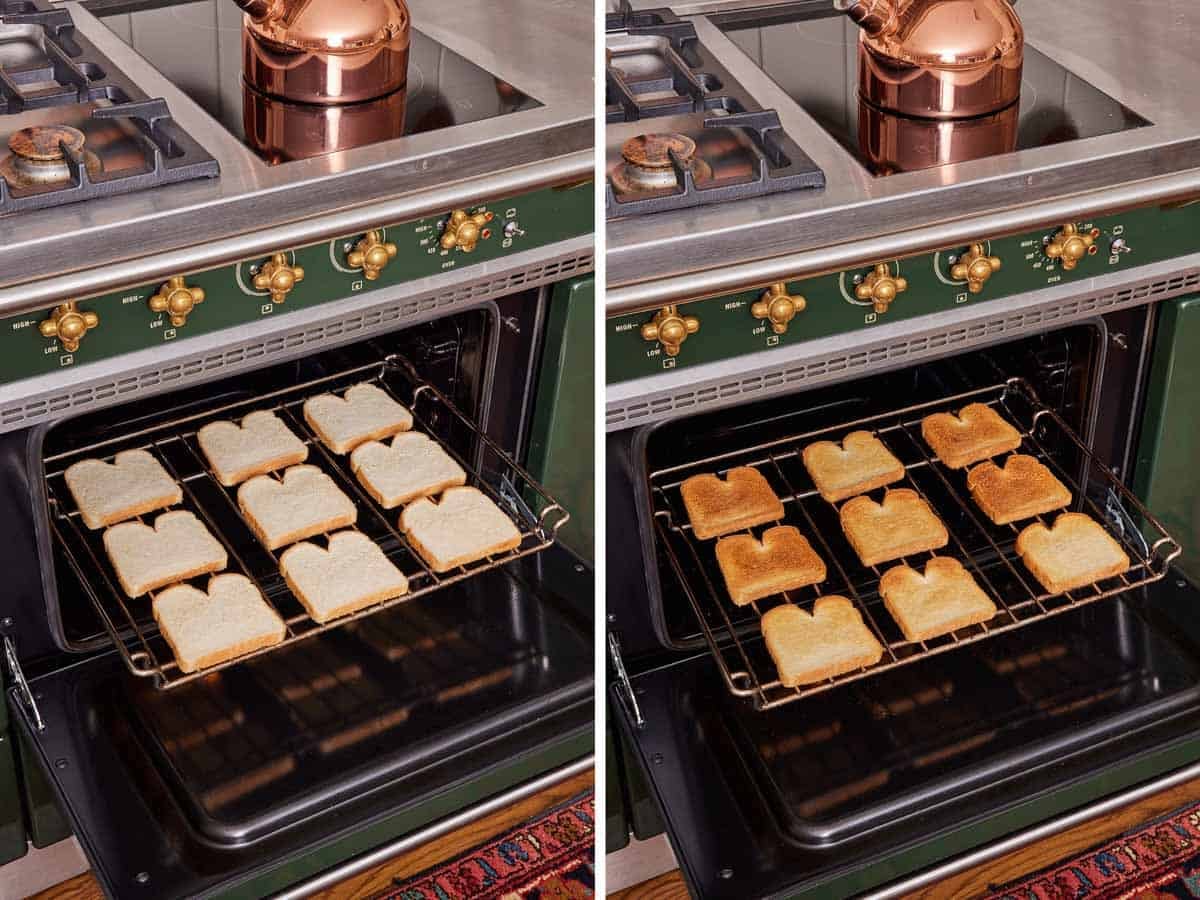
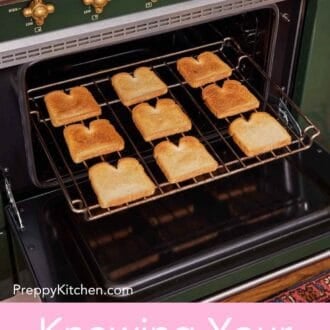
The 9-slice bread test:
1. Position one oven rack in the center of the oven.
2. Preheat the oven to 350°F (Bake setting, no convection). Wait at least 10 minutes after the preheat beep before continuing to ensure your oven is fully up to temp.
3. Arrange 9 slices of plain white sandwich bread on the oven rack in an even 3×3 grid: back row (back-left corner, back-center, back-right corner), middle row (left, dead-center, right), and front row (front-left corner, front-center, front-right corner). The slices shouldn’t touch each other.
4. Bake for 4-5 minutes or until the center slice turns light golden brown. Don’t open the oven during this test until you are ready to check your bread slices. (Look through the door’s window for the best gauge.) Opening the door changes the test results because you will lose oven heat, and cause the air within the oven to circulate differently than it does when closed and actively cooking.
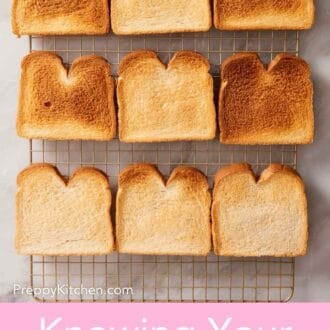
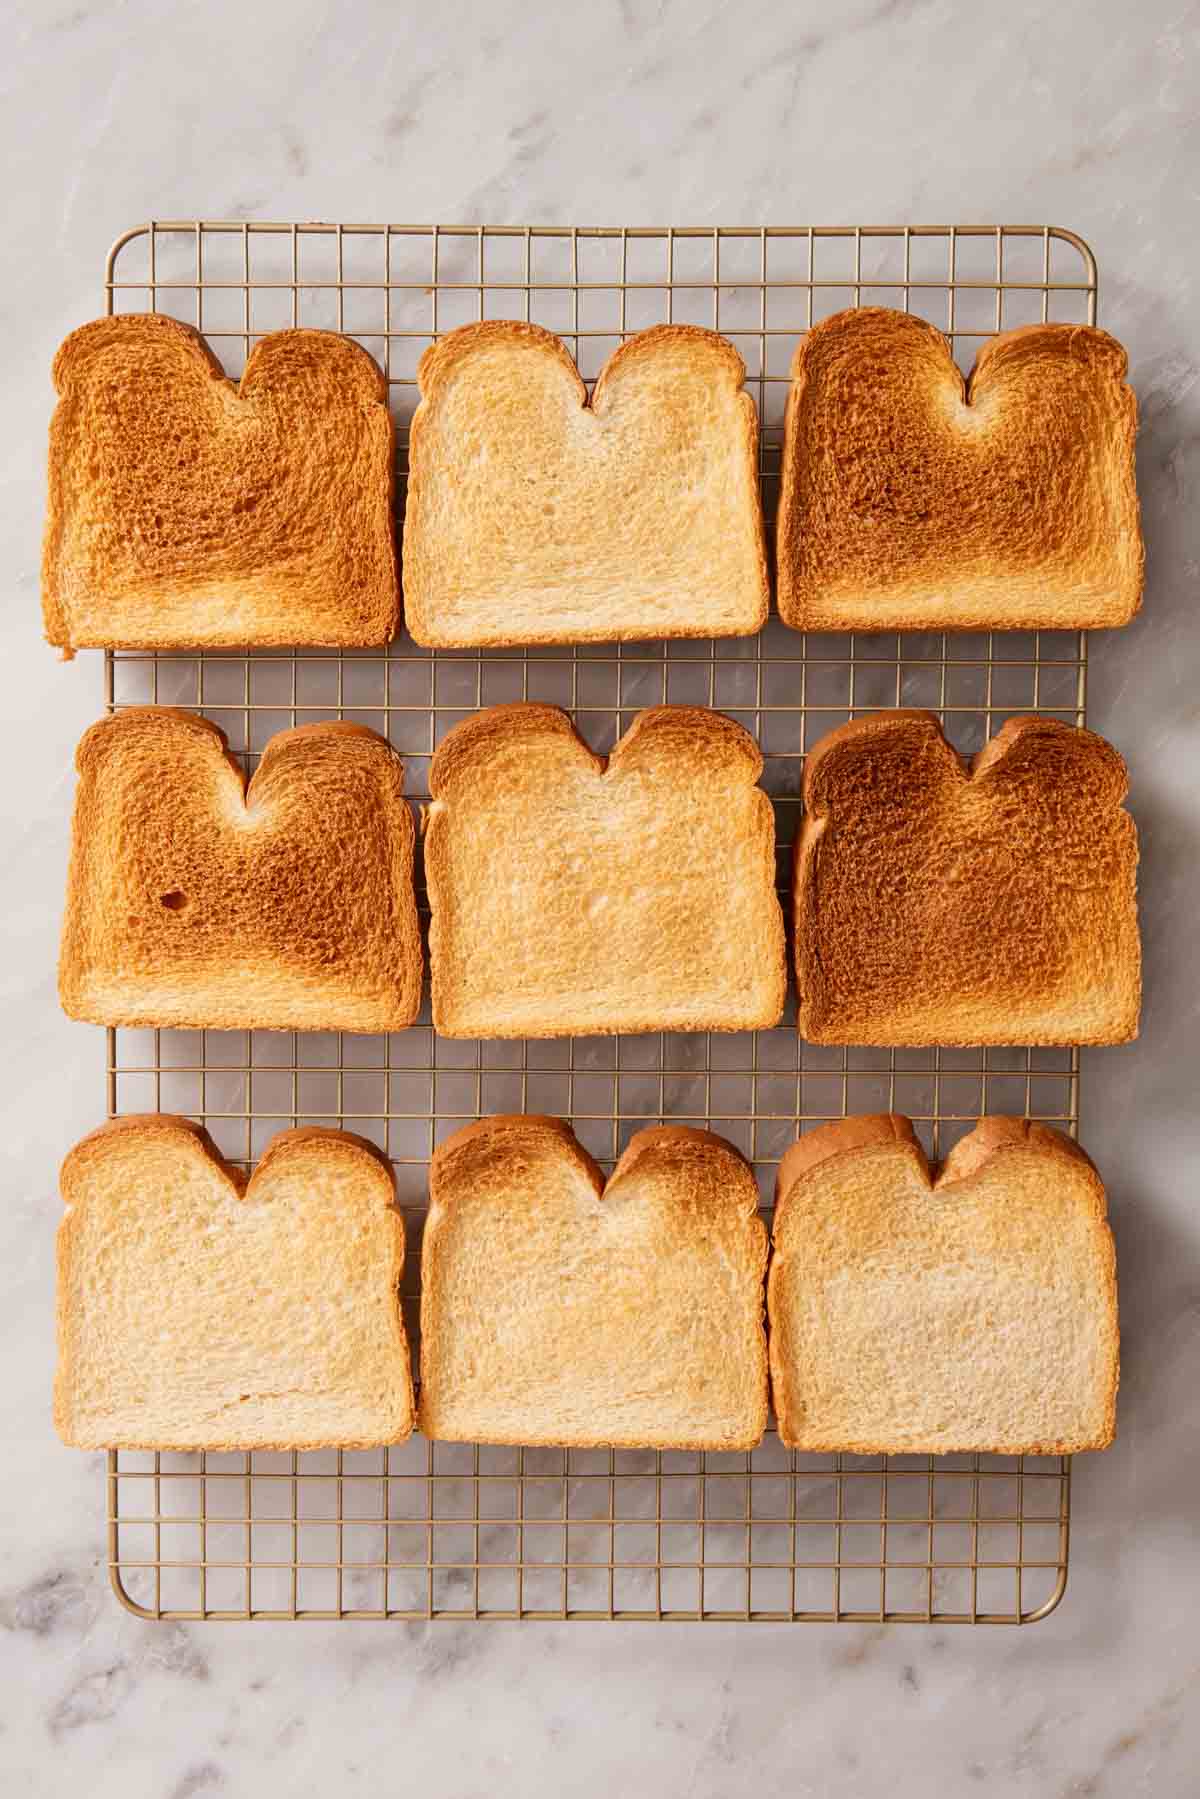
5. Remove the rack and observe. The slices that are darker than the center are your hot spots. (The bread turns darker because heat concentrates there and browns the slices faster.) The lighter slices are your cooler areas.
Repeat for the upper third and lower third of your oven to map all your hot spots. Most home ovens have at least one, often the back of the oven (where heat from the burner concentrates) or one corner (where airflow is restricted). The test takes about 15 minutes total for all three rack positions, and once you know your oven’s pattern, you’re all set from there on.
What to do with this information:
- Rotate pans halfway through baking to even out the difference between hot and cool spots. This is the most useful fix for inconsistent ovens.
- Position pans away from your hottest spot when you can. If your hot spot is the back-right, place baking sheets toward the front-left.
- Use lower temperatures for delicate items (cakes, custards) where the hot spot would burn before the center is set. A drop of 15-20 degrees can help offset burning without ruining the bake.
- Use convection when you have it, and it’s safe for the recipe—the fan circulates air enough to even out most hot spots.
One of my readers, Jane, commented on my apple pie post, reporting “The crust went brown quickly, under 20 minutes.” This is a classic issue of an oven running too hot and having hot spots. She was able to save the pie by reducing the oven temperature slightly and lowering the oven rack. Using a thermometer and doing this bread test will help determine any issues before you start.
Oven Geography: Rack Placement Matters
The rack you cook on changes everything. The same item baked at the same temperature on a different rack can come out dramatically different—golden vs. burnt, evenly cooked vs. raw underneath, perfectly spread vs runny or too thick. Standard home ovens have 5 or 6 rack positions. Most recipes assume baking on the center rack unless they specify otherwise.
Here are the three primary positions:
| Rack Position | What It Does | Best For |
| Top Rack (Position 5-6) | Closest to the top heating element. Maximum direct heat from above. | Broiling, melting cheese on casseroles, browning the tops of finished dishes, crisping leftovers, and quickly browning meats |
| Center Rack (Position 3-4) | Equidistant between top and bottom elements. Most even heat. | Cookies, cakes, cupcakes, brownies, casseroles, and most everyday baking. The default for almost any recipe that doesn’t specify. |
| Bottom Rack (Position 1-2) | Closest to the bottom heating element. Maximum direct heat from below. | Pies (where you want a crispy bottom crust), pizza, some breads, anything that needs strong bottom heat to brown the underside |
The bottom-third position is where many PK pie recipes live. Pumpkin pie, pecan pie, and sweet potato pie all use the bottom third specifically because heat concentrates there, which crisps the bottom crust. Without that placement, you’d get the dreaded soggy-bottom pie. Rack placement isn’t a small detail—it’s often the difference between a beautiful pie and a sad one.
Some other terms you’ll hear:
- Upper third — anywhere in the top half of the oven, closer to the top element. Used for broiling and finishing.
- Center — the middle position, the safe default.
- Lower third/bottom third — anywhere in the bottom half, closer to the bottom element. Used for pies and pizza.
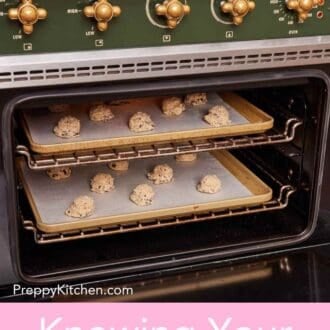
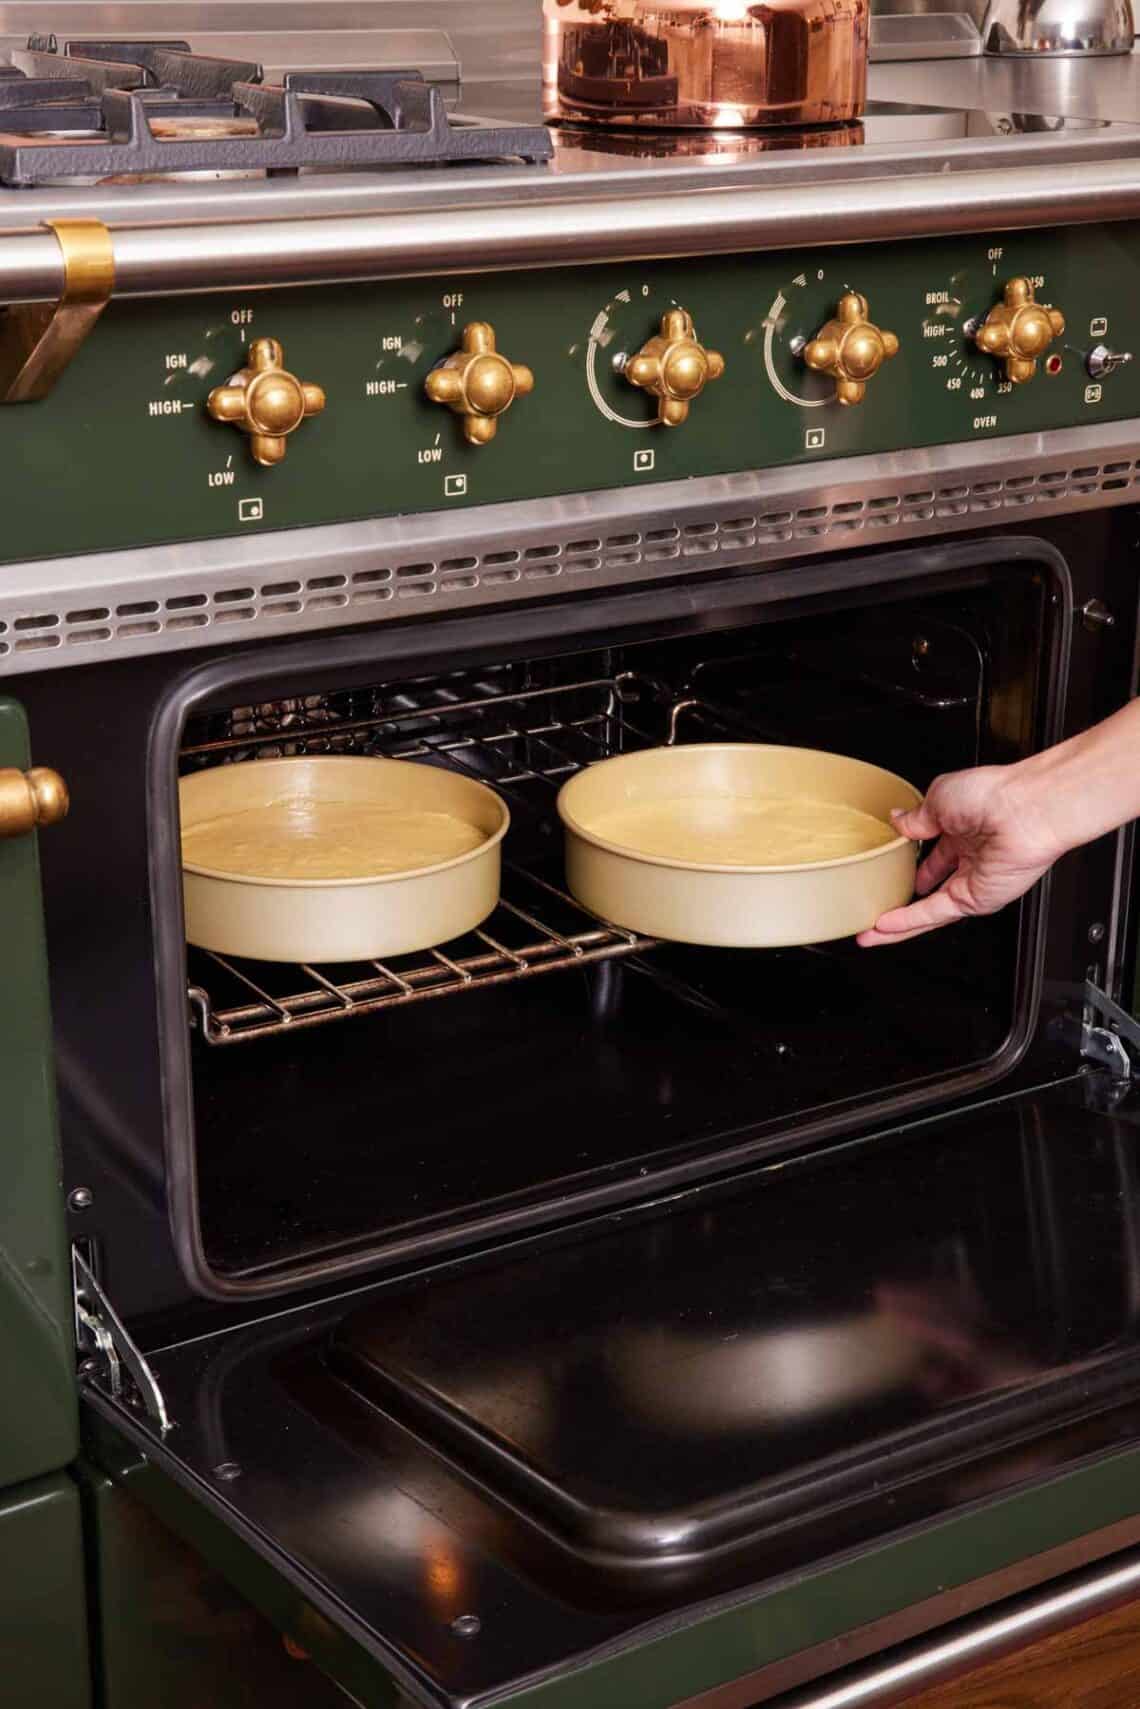
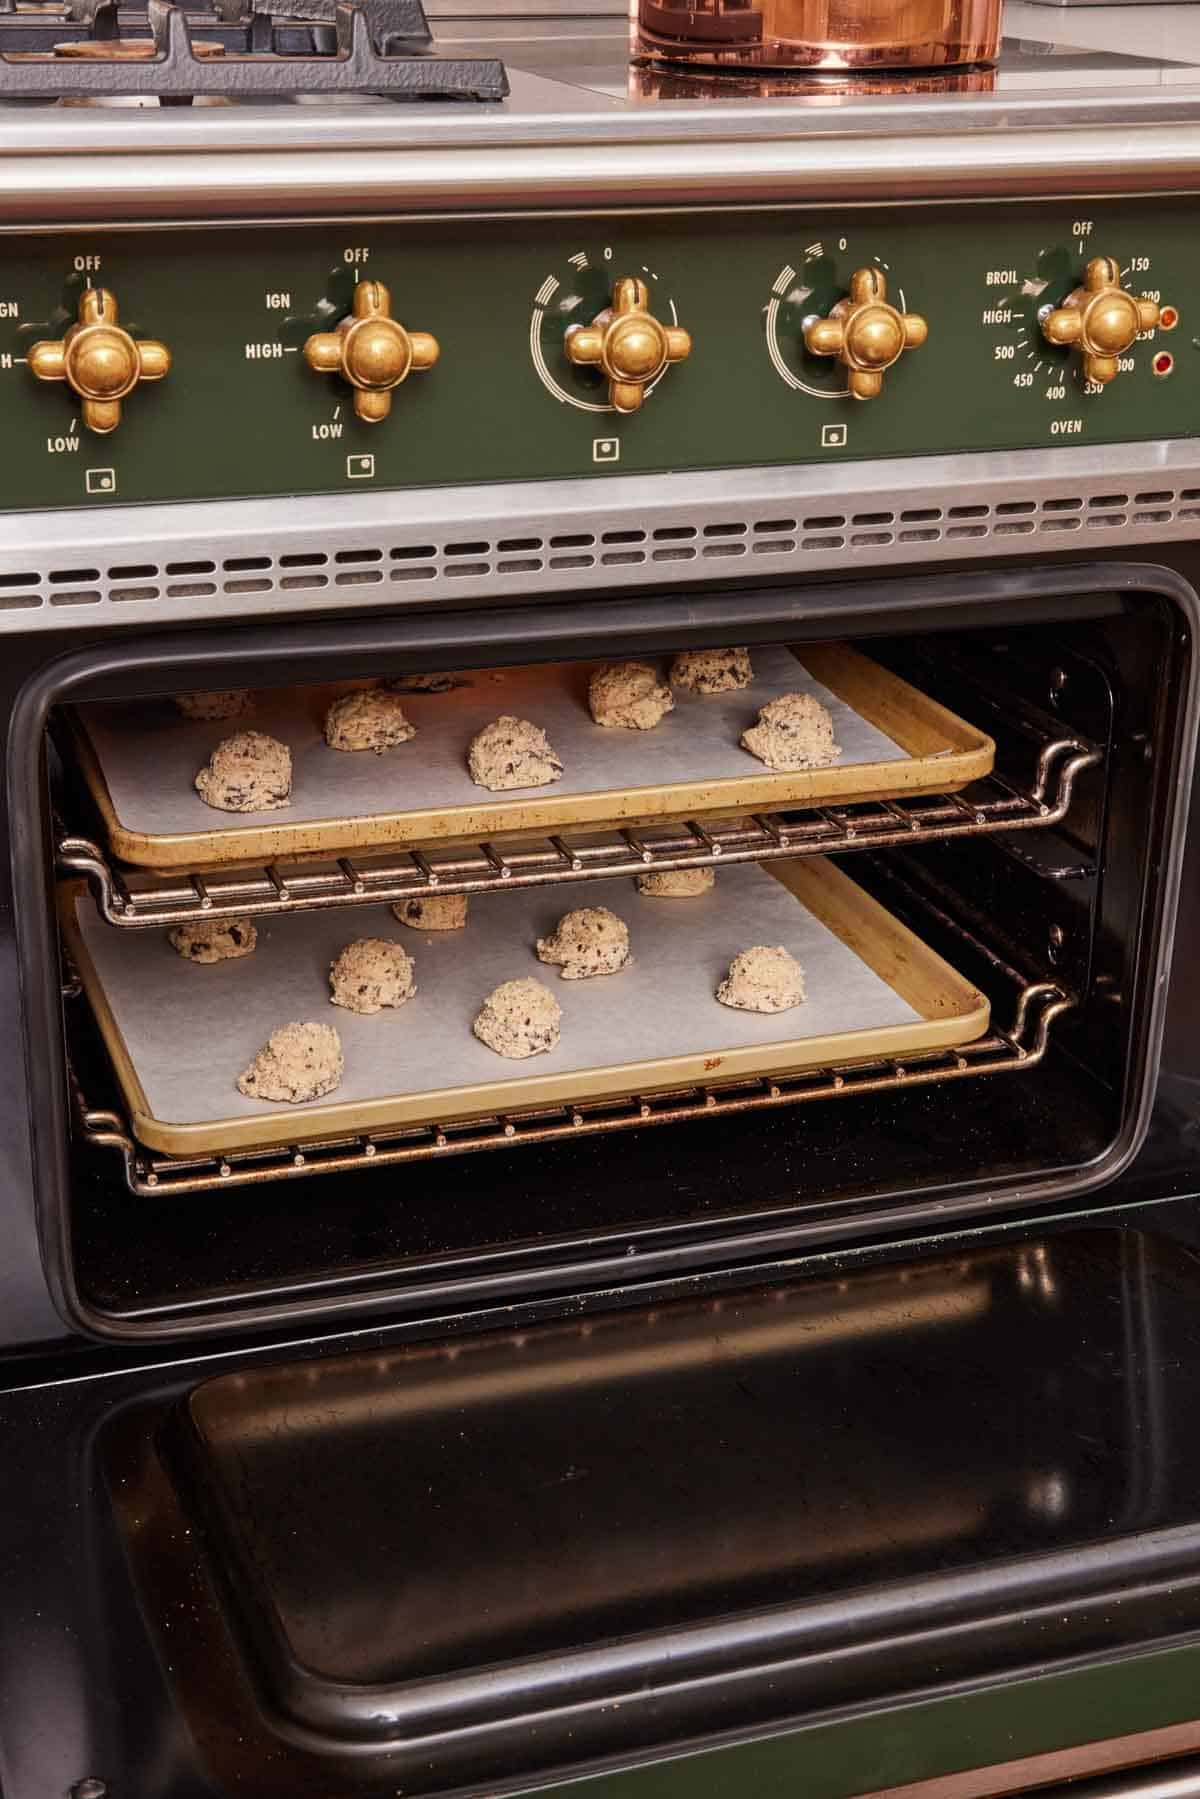
When a recipe calls for baking on two oven racks at the same time, it will often say to “position racks towards the center.” This means putting one rack in the upper third and one rack in the lower third (shown below). You will often rotate the pans between racks during the bake to ensure even cooking between each one.
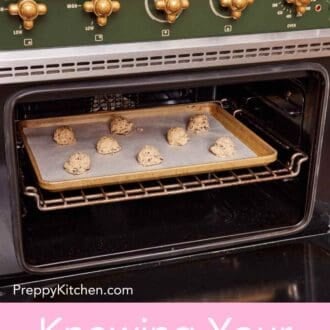
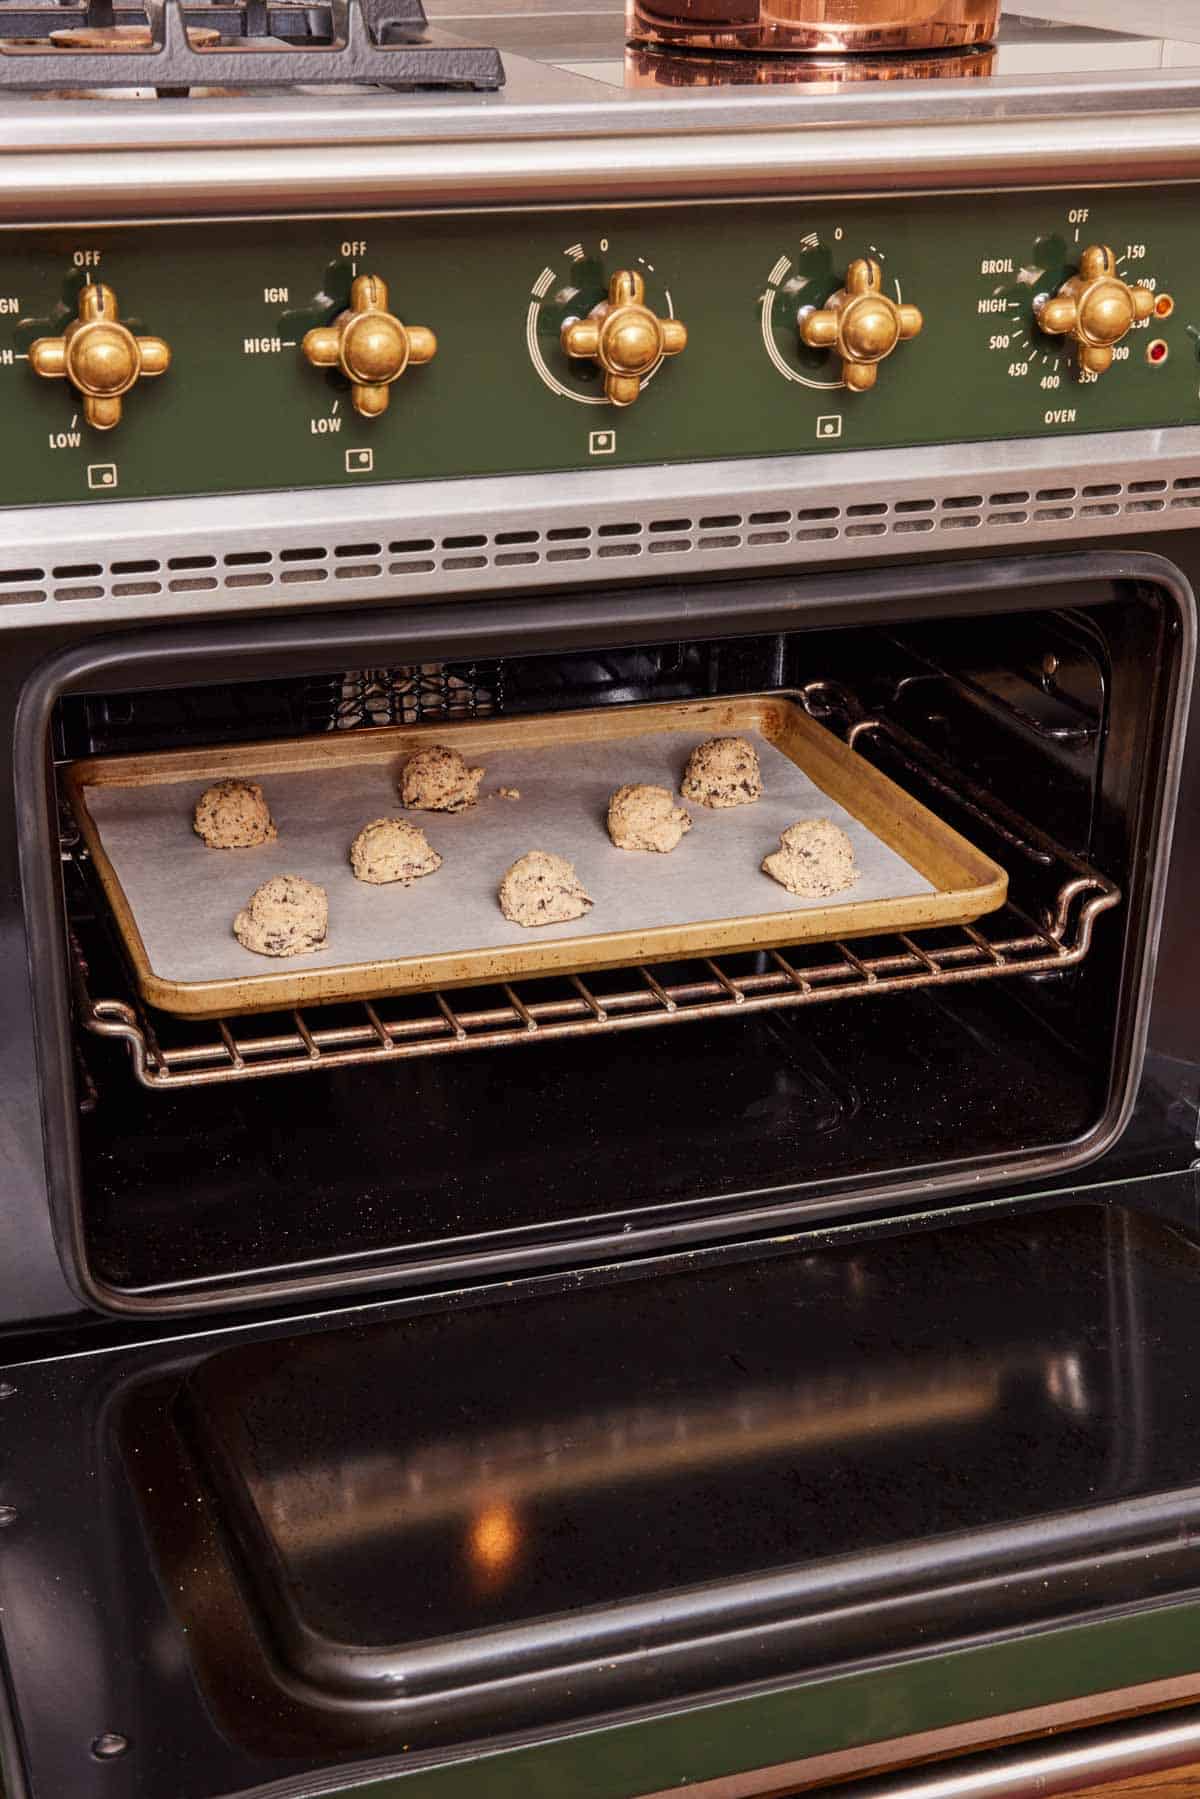
Rack Placement Cookie Test
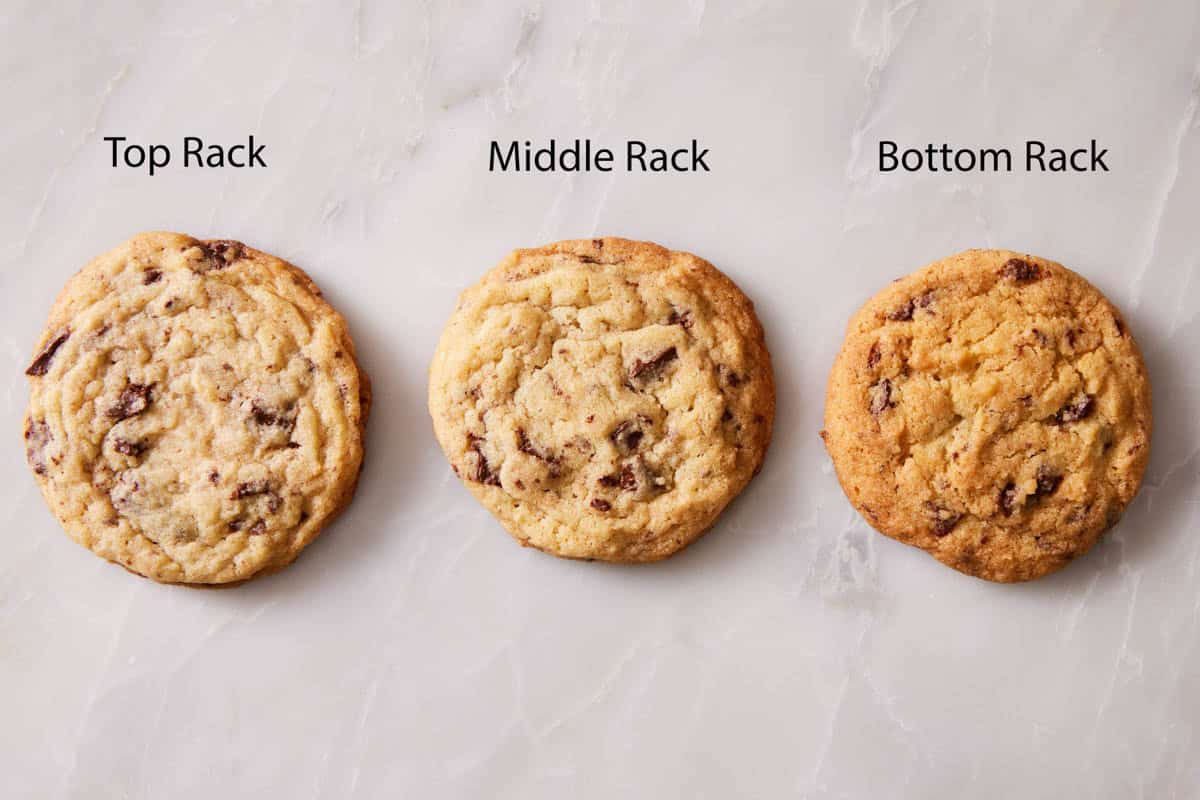
To test the importance of rack placement, I baked my chocolate chip cookies in each position. I baked one sheet at a time using the same batch of dough at the same temperature (350°F) for the same amount of time (12 minutes). Here are the results:
| Rack Position | Spread | Color and Texture |
| Bottom (Position 1) | Less spread | Very dark edges and bottom; much crispier despite spreading less |
| Center (Position 3) | Normal | Crisp edges, chewy centers; rich, golden edges and bottom |
| Top (Position 5) | Spread much more than normal | Pale on the edges and bottom, very soft from lack of browning |
Always Preheat The Oven
This sounds obvious, but the nuance is important: Most ovens lie about being preheated. The “preheated” beep typically sounds when the temperature sensor reads the target temperature of the air in the oven—but the sensor is in one specific spot, and the rest of the oven cavity hasn’t fully equilibrated yet.
The actual rule: Wait at least 5-10 minutes after the preheat beep before putting baked goods in. By that point, the oven walls, the rack, and all of the air have all reached the target temperature, and your bake will be even from the first minute.
How long preheating actually takes:
- Standard 350°F (most baking): 10-15 minutes total from cold (5-7 minutes to the beep + 5-10 minutes after).
- Higher temperatures (425-450°F for pizza, bread, roasting): 15-25 minutes total.
- Very high (475-500°F for pizza stones): 30-60 minutes. The stone alone needs 30-45 minutes to fully heat through, even after the oven beeps.
Why this matters:
- Cookies put in too early will spread more before the oven reaches the right temperature, producing thinner, crispier results.
- Cakes put in too early can fall, dome unevenly, or end up underbaked in the center because the leavening hasn’t activated properly in the cooler oven.
- Bread put in too early produces poor oven spring (the dramatic rise in the first 5-10 minutes of baking).
The preheat temperature drop: Every time you open the oven door, the temperature drops 25-50°F. If you put a cold dish into a preheated oven, you’ve also just dropped the oven temperature significantly. Open the door for as little time as possible, slide the dish in quickly, and close the door. For very temperature-sensitive bakes (soufflés, custards), some bakers preheat their oven 25°F higher than the target, then drop it as soon as the dish goes in to compensate.
FAQs
The fastest way: Buy an oven thermometer for under $10, place it in the center of your oven, preheat to 350°F, wait 10 minutes after the beep, then check the reading. If it shows 325°F, your oven runs 25°F cold; if it shows 375°F, it runs 25°F hot. Adjust your recipes by that amount.
The longer way (without a thermometer): If your bakes consistently come out underdone in the time the recipe specifies, your oven runs cold. If they come out overdone or burned, it runs hot.
Yes, especially for baking. Cooking with a savory recipe (a roast chicken, a lasagna) is more forgiving. Temperatures within 25°F of the target produce acceptable results. Baking is much less forgiving. A cake at 25°F off can dome unevenly, fall, or come out raw in the center while burned at the edges. An oven thermometer is the cheapest insurance policy in your kitchen. For a few dollars (and a permanent place on your oven rack), you eliminate one of the biggest variables in home baking.
The center rack (Position 3-4) is the default for most baking—cookies, cakes, brownies, cupcakes, casseroles. Use the bottom rack for pies, pizza, and bread (where you want crispy bottom heat). Use the top rack only for broiling, melting cheese on casseroles, or briefly browning the top of finished dishes. When in doubt, the center rack is right.
Longer than the beep suggests. The preheat beep typically sounds when the temperature sensor in one specific spot reads the target temperature, but the rest of the cavity is still 10-25°F cooler. Wait at least 5-10 additional minutes after the beep before putting baked goods in. Most ovens take 10-15 minutes total to fully equilibrate at 350°F, 15-25 minutes at 425-450°F, and 30-60 minutes at 475-500°F (especially with a pizza stone).
More Tutorials To Try
Kitchen Fundamentals lessons:
- Academy: How To Measure Ingredients Correctly — accurate measurement matters as much as accurate temperature. The flour measuring test in this lesson explains why two cooks following the same recipe can get very different doughs.
- Academy: Mise-en-Place — preparation that pairs perfectly with knowing your oven. Get everything ready before the oven heats up.
- Academy: Salt 101 — the key to flavor in everything you are cooking and baking.
If you’ve read this academy lesson on Knowing Your Oven, then don’t forget to rate it and let me know how you got on in the comments below. I love hearing from you!


