This post may contain affiliate links. Please read our disclosure policy.


Homemade Sweet Potato Pie is a classic dessert for the holiday season. The creamy filling is made with roasted sweet potatoes whisked into a simple custard and delicately spiced to complement the potato’s natural sweetness. It’s easy to make ahead or bake and serve warm!

Sweet potato pie is divided into two main styles. One treats it as a rich, buttery filling, stirring butter mashed into the potatoes, adding a good amount of sugar and cream, and light spices or none at all. The other treats it more like a spiced custard, closer in structure to pumpkin pie.
My recipe is in the second group. I found that when testing this recipe, roasted sweet potatoes carry enough natural richness on their own that, once baked into a buttery pie crust, leaving the butter out of the filling lets the potato’s true flavor shine. It’s lightly sweetened (and I give you a trick to adjust as you wish) with just the right amount of spices to bring warm, fall flavor.
“I decided to try this recipe, and my family loved it. It is not too sweet and delicious. I made the first pie and it looked so good that I made a second one. This pie was so easy to make. I used brown sugar and 2% milk and it was delicious.”
A reader
Key Ingredients

These are the main ingredients you need to make this homemade sweet potato pie. You can find the full list of ingredients and measurements in the recipe card below.
Sweet potatoes — use sweet potato varieties with orange flesh, such as red garnet, Beauregard, or jewel sweet potatoes. These varieties are a bit sweeter and moister in comparison to white or purple sweet potatoes, which are more starchy. Their deep orange flesh also makes for an eye-catching pie and a great substitute for those who don’t love pumpkin pie. You may also see sweet potatoes called yams at your local grocery store if you’re in the US. While true yams are actually a completely different root vegetable, in the US, sweet potatoes are often labeled yams, and you’ll find them in the fresh produce section at the store. (See my candied yams recipe for identifying the difference between true yams and sweet potatoes!)
Sugar — I use granulated sugar to enhance the natural flavor of the sweet potatoes, but you can swap it for light brown sugar for subtle molasses notes in the pie filling.
Evaporated milk — this canned milk is more concentrated than fresh milk, so it adds creaminess without thinning the filling. Whole milk works, but the filling will be softer. Use half and half or cream if you want an even richer pie.
Eggs — eggs are essential to help the filling set, as the protein in the eggs gives the sweet potato mixture structure as it bakes. You need the milk to add moisture so the filling doesn’t just feel like mashed potatoes, but the eggs thicken it all back up. This ensures the pie slices beautifully and has a custardy texture.
Spices — a cozy trio of ginger, cinnamon, and nutmeg pairs well with vanilla extract to infuse this pie with autumnal flavor. You can swap this for 1½ to 2 teaspoons of pumpkin pie spice if you like.
Pie crust — if you are using my classic pie crust recipe, you’ll end up making two 9-inch pie crusts’ worth of dough. You can tightly wrap and freeze one disc of dough for up to 3 months (see How To Freeze Pie Crust). You can also use a store-bought pie crust or a gluten-free pie crust. If you use a store-bought pie shell, look for a deep dish label or buy a 10” crust. The regular 9” crusts are shallower than a standard pie pan, so you will have leftover filling or you can divide it to make two pies.

Roast The Potatoes For The Best Flavor
Many recipes call for boiling the potatoes for the filling because it’s faster, so I tested it compared to roasting potatoes.
Boiling drives water into the potatoes. The boiled potatoes, once mashed, were wetter and looser than roasted potatoes because the potatoes are cubed into small pieces and absorb the water. That water ends up in your filling, which is the most common reason a sweet potato pie never sets properly. Boiling also diluted the flavor, because some of the sugar and other flavor compounds leach out into the cooking water.
Roasting does the opposite. In my test, the roasted sweet potatoes were drier than the boiled but still moist. The dry oven heat drives just enough moisture out, concentrating the flavor, and caramelizes the natural sugars, so the flesh comes out deeply flavorful rather than watered down.
The biggest mistake when roasting is doing it too fast. You need at least an hour at 375°F for two pounds of medium to large sweet potatoes. They are done when they are so soft they are collapsing under the skins, and the skins wrinkle when pressed. If they still feel firm anywhere, keep going. Underroasted sweet potatoes taste flat and stay slightly fibrous. Keep the skins on so the flesh turns tender without forming a dry skin. My baked sweet potato recipe has more on getting them properly soft.

Should I Puree or Mash the Sweet Potatoes?
Either option will taste great; it just depends on what look and texture you are going for.
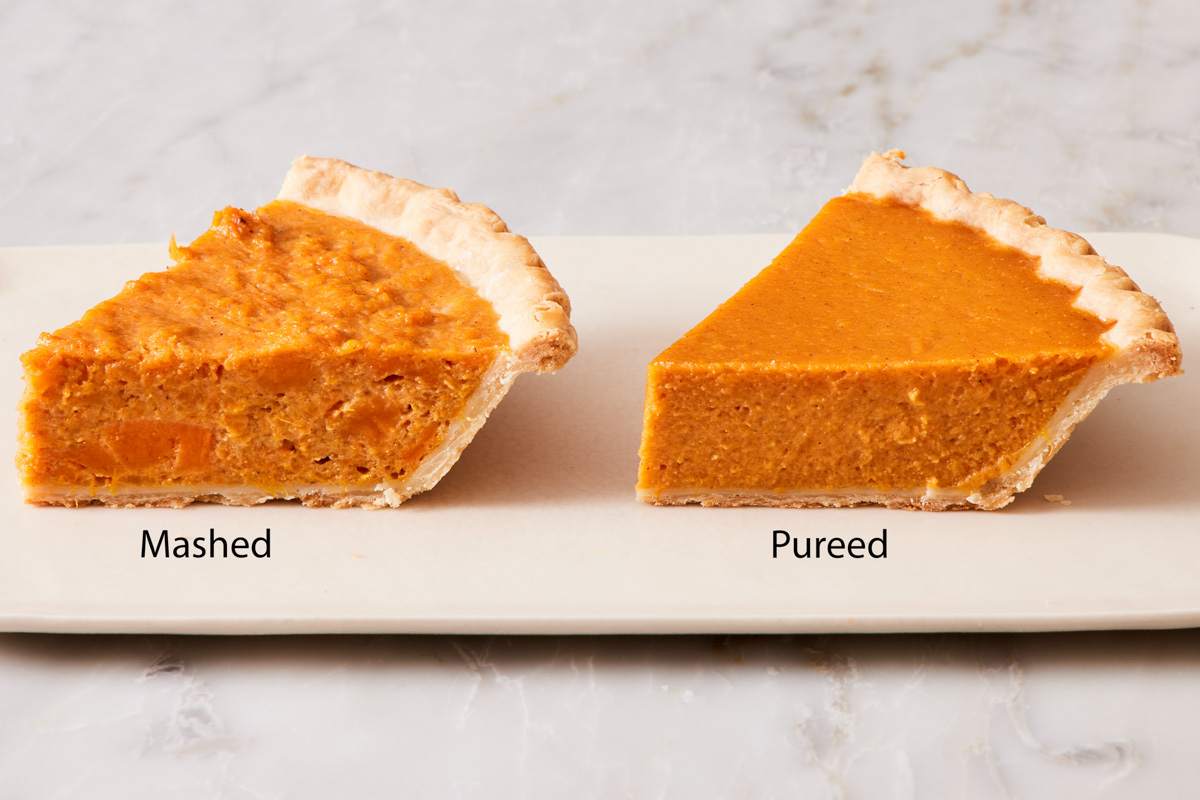
Pureed in a food processor: the filling sets completely smooth and uniform, like pumpkin pie. Mashed with a fork or a masher: the texture stays a little chunky, and you get visible pieces of sweet potato in each slice.
Neither way is wrong, so I included both options in the recipe. I baked both in a side-by-side test so you can see the difference before you choose. If you don’t have a food processor, but don’t want your pie filling to be too chunky, you can beat it with an electric mixer to break up the chunks more. The fibers won’t fully break down, but you will get a more even texture than with a fork or potato masher.
Pro Tips For The Best Sweet Potato Pie
Scrub the potatoes before you roast them. The skins often have dirt or gritty spots on them, which can end up in your filling. Give them a rinse in cold water and scrub them with your hands to make sure they are clean. Dry them with a towel just to remove the excess water, and you’re ready to roast.
Taste the filling before you finish the pie. Sweet potatoes vary enormously in sweetness depending on variety, size, and how long they have been stored. So taste the filling before adding the eggs. If it tastes flat, add sugar a tablespoon at a time (up to 1 cup/200g total). If your potatoes were very sweet already, leave it alone.
If the edges of the crust brown too quickly, cover them to prevent them from burning. You can use a pie shield or wrap strips of foil around the edge. Use my guide for my step-by-step instructions on how to make a pie crust shield out of a sheet of aluminum foil.
How To Make Sweet Potato Pie
Portions of the recipe are highlighted below in step-by-step process images. You can find the full set of instructions in the recipe card.

1. Pierce the sweet potatoes all over with the tip of a knife. Arrange them on a baking sheet lined with aluminum foil. Roast the sweet potatoes at 375°F for 1 hour or until very tender, then allow the baked sweet potatoes to cool for at least 30 minutes before peeling them. Don’t try to peel them immediately; they will be very hot!
2. Meanwhile, increase the oven temperature to 400°F and arrange the oven rack in the bottom third of the oven. Puree the roasted sweet potatoes in the bowl of a food processor, or mash them with a potato masher, electric mixer, or a fork.

3. Add the pureed sweet potato to a large bowl along with the sugar and milk. At this point, you can mix and taste the filling if you’d like to adjust for sweetness.
4. Then add the eggs and all the spices (including vanilla extract).

5. Whisk well to combine. You may need to start whisking slowly to break up the potato puree, so the milk doesn’t slosh out of the bowl.
6. Pour the sweet potato pie filling into the prepared pie shell. Bake at 400°F for 15 minutes before reducing the temperature to 350°F. Bake for another 40 or so minutes, until the filling puffs up and just barely wobbles at the center. Let the pie cool completely on a wire rack before serving to allow the custardy filling to set properly.

Blind Bake If The Crust Is Homemade
Homemade pie dough holds more moisture than a store-bought shell, and this filling is wet enough to soak into it before the base has a chance to cook through. Par-baking first ensures it bakes through to become crisp, not soggy.
If you are making your own crust: crimp the pie crust, freeze it for 20 minutes, line with parchment and fill with weights, and bake for 20 minutes at 425°F. Pull out the parchment and weights, then carry on with adding the filling and baking the pie. Get the full method in my guide on how to blind bake a pie crust (stopping when the crust is par-baked).
A store-bought shell does not need this. They contain less moisture and different fats, and they crisp up fine on their own.
This is the opposite of what I recommend for pecan pie, and that’s because the filling is different. Sweet potato filling is very thick, and it’s hard for moisture to evaporate during baking. In testing, I found that if I didn’t blind bake the homemade crust, the bottom would still have a soft, doughy layer against the filling. Baking in the bottom third of the oven helps brown the bottom of the crust, regardless of blind baking, but in this recipe, you need to par-bake a homemade crust if you want it crisp on the bottom.
Sweet Potato Pie Recipe

Equipment
- Baking Sheet
- Foil
- 9-inch pie pan
- mixing bowl
- Wire cooling rack
Ingredients
- 2 pounds whole sweet potatoes (900g)
- ¾ cup granulated sugar (150g)
- 1 cup 1 cup evaporated milk or whole milk (240mL)
- 2 large eggs
- 2 teaspoons vanilla extract
- 1 teaspoon ground ginger
- ¾ teaspoon ground cinnamon
- ¼ teaspoon ground nutmeg
- 1 (9-inch) unbaked pie crust*
- whipped cream to serve
Instructions
- Preheat the oven to 375°F. Line a baking sheet with foil.
- Pierce the sweet potatoes in several places with the tip of a knife and place them on the baking sheet.
- Bake for 1 hour or until very soft and the skin wrinkles when pressed. Remove from the oven and let cool for at least 30 minutes. Peel, discard the skins, and mash the sweet potatoes in a large bowl or puree in a food processor for a smoother filling. (Should yield about 2½ cups.)
- Increase the oven temperature to 400°F. Position the oven rack in the bottom third. (If using a homemade crust, see notes about blind baking.)
- In a large mixing bowl, combine the roasted sweet potato, sugar, and milk. At this point, you can whisk them together and taste to adjust for sweetness levels, if you’d like, or skip the taste test. Add the vanilla, ginger, cinnamon, and nutmeg. Whisk until well combined. Taste the filling and adjust the sugar if needed, then add the eggs and whisk until smooth. Pour into the pie crust.
- Bake for 15 minutes. Reduce the oven temperature to 350°F and continue baking for 40 minutes or until the filling is puffed and the center barely wobbles when gently shaken. Let cool completely on a wire rack. The pie can be served at room temperature or refrigerated for up to 24 hours before serving. Serve with whipped cream, if desired. Cover and refrigerate leftovers for up to 5 days.
Notes
- Using a homemade crust? Blind bake it first for a crisp bottom. Freeze the crimped crust for 20 minutes, line with parchment, fill with weights, and bake for 20 minutes at 425°F. Store-bought shells do not need this.
- Orange zest. An earlier version of this recipe included the zest of one large orange. Whisk it in with the other filling ingredients if you’d like it.
- If you grew up on the buttery version, you can whisk in two or three tablespoons of melted or browned butter into the custard before filling the pie crust and bake it for the same time. It will be very good, just a slightly different pie.
Nutrition
Have you tried this recipe? Tag me today!
Mention @preppykitchen and tag #preppykitchen!
Storing It
Sweet potato pie is an egg-and-dairy custard, which puts it in the same category as pumpkin and pecan pie. Once it has cooled, refrigerate it. It should not sit out longer than two hours.
Covered in the fridge, it keeps for 5 days. Cover it with foil or store it in a pie container rather than leaving it open, because the filling picks up other smells and the top can dry out.
To freeze, cool completely, wrap in plastic and then foil, and freeze for up to 3 months. Get my exact wrapping technique to avoid freezer burn in my guide on How To Freeze A Pie. Thaw in the fridge overnight before serving.
Frequently Asked Questions
Usually boiled potatoes, which carry too much water. If you roasted them, it’s possible the pie was underbaked. The center should be puffed with only a slight wobble, not sloshing or rippling in the center. And it needs to cool completely; the custard firms as it drops in temperature, so a hot slice will always look looser than a cooled one.
Yes, but drain them well. Avoid anything packed in syrup, which will make the pie too sweet. Skip the roasting steps and start from the puree. The main downside here is that you will lose the caramelization that roasting gives you, and the filling may be softer since they are packed in liquid and will contain more moisture than roasted sweet potatoes.
It’s more of a texture difference than flavor. Sweet potato is starchier and denser, and holds a firmer slice; pumpkin is smoother and looser. Sweet potato is also naturally sweeter, so it needs less added sugar.
More Recipes To Try
Make one of these dessert recipes to go on your holiday table:
- Apple Pie: no-cook fresh apple filling baked in a flaky double crust.
- Chocolate Pie: the chocolate custard filling is rich but easy to make.
- Pumpkin Bars: quick, stir-together batter that gets baked and topped with cream cheese frosting.
- Cranberry Pie: a sweet and tart filling with a buttery pie crust to complement any holiday dessert table.
- Pumpkin Cheesecake: a rich, creamy cheesecake flavored with pumpkin puree and warm spices.
If you’ve tried this sweet potato pie recipe, then don’t forget to rate it and let me know how you got on in the comments below. I love hearing from you!