


When I was first making fried chicken at home, I easily burned the outside of the pieces before the inside was anywhere near done. So, when I was testing this recipe, I took note of the most common issues from my own experience, along with those of other home cooks, and determined they mostly stem from the same mistakes: the oil is too hot, there’s too much chicken in the pot, there’s no thermometer, or the chicken is dredged incorrectly.
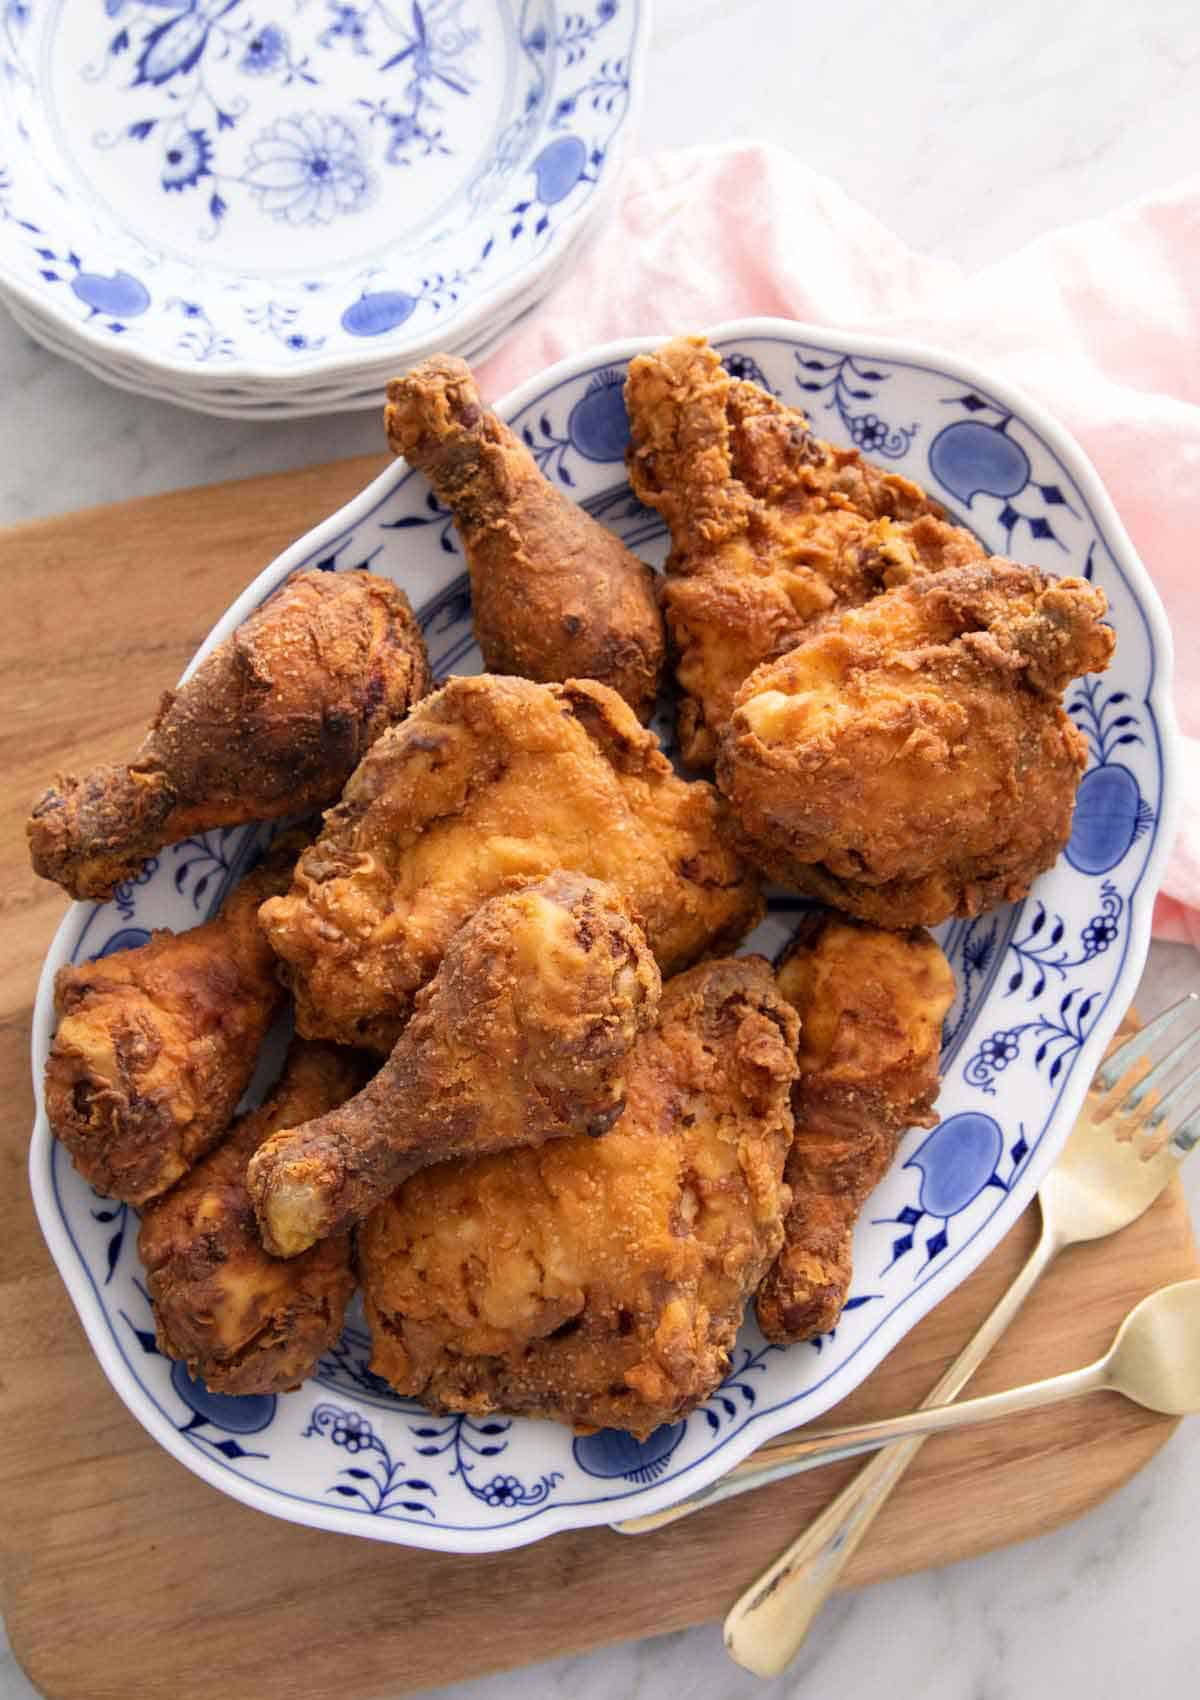
This is the recipe I landed on, and every time I make it now, I get perfect pieces of fried chicken! The key factors: use a whole chicken cut into 10 pieces, do an overnight buttermilk brine, use both a flour and cornstarch dredge(twice!), and keep the oil at 340°F. The resulting fried chicken shatters when you bite it, stays juicy from the outer crust down to the bone, and is seasoned through the meat. It’s fried chicken perfection!
A reader, Donna, says: “So DELICIOUS, great chicken, and just the right amount of spice for us too. Thank you John for another great recipe. I made your Biscuits and your recipe for Mashed Potatoes too to go along with my chicken…What a wonderful delicious dinner this was.” ★★★★★
Table of Contents
Why This Recipe Works
There are three key parts of this recipe that matter most, and help you cook the best fried chicken at home.
- Buttermilk marinating for a minimum of eight hours. Buttermilk’s lactic acid gently breaks down proteins in the meat, then the salt penetrates them and holds onto moisture during the fry. The result is tender and juicy chicken. This takes time—8 hours is the sweet spot for minimal time with maximized flavor. If you can give it 12-24 hours, though, that’s even better.
- Flour with cornstarch, and dredge twice. This combo was a game-changer for the crust! Pure flour gave a heavy, bread-like coating. Pure cornstarch is too brittle and falls off the pieces during cooking and turning. A combination of both gives you flour’s structure with cornstarch’s lighter, crisper finish. The double dredge (dry mix, a quick dip back in buttermilk, then dry mix again) is what builds the craggy, shatteringly crisp peaks.
- Oil at 340°F. This is where most homemade fried chicken recipes get it wrong. Frying at too high a temperature will burn the outside before the thick pieces of chicken cook through. This was the sweet spot that I discovered through many recipe tests (more on the mechanics below).
Ingredient Notes
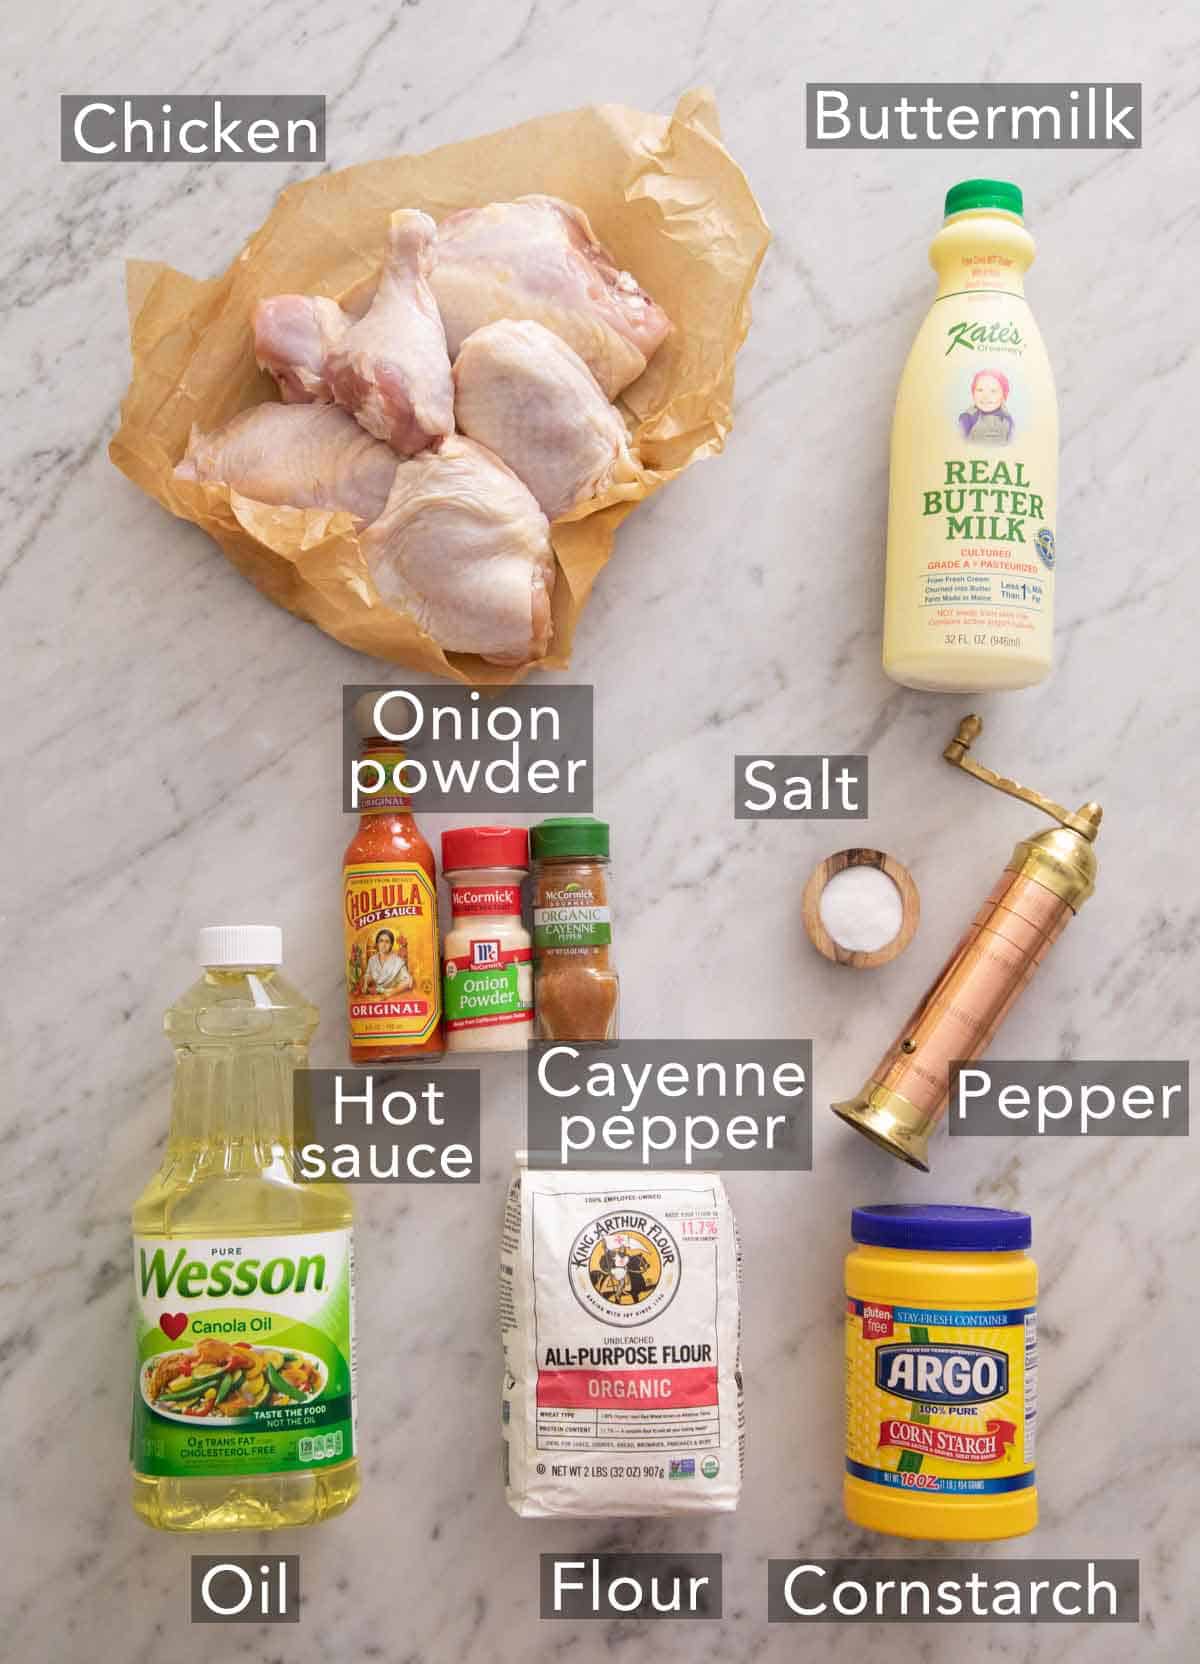
Whole chicken — you will cut up a whole chicken into pieces. A 4- to 5-pound bird gives you 2 wings, 2 drumsticks, 2 thighs, and 2 breast halves that you will cut crosswise into 4 pieces. Cutting up a whole bird is cheaper per pound and gives a mix of dark and white meat. Using a smaller chicken also gives you pieces that are smaller, so they cook more evenly. Pieces that are too large will burn on the outside before the center comes up to 165°F. Be sure to cut the breasts in half, crosswise—a whole breast half takes about 20 minutes to fry through, and the crust gets too dark, while halved pieces fry in about 15 minutes and stay juicy.
Buttermilk — real cultured buttermilk contains lactic acid that tenderizes the chicken by breaking down the proteins. No buttermilk? Use my easy buttermilk substitute by mixing whole milk with lemon juice or vinegar. Even though this is cultured, it still works since the citric acid (lemon) or acetic acid (vinegar) will have a similar result on the chicken proteins as the lactic acid.
Cornstarch — don’t skip this! Cornstarch makes the crust shatter instead of being too hard. It also absorbs less oil, so the crust stays crisp instead of going greasy. This is very important when frying at a lower temperature and for a longer period of time. Since the chicken pieces take a while to fry and drop the oil temperature when they first go in, the cornstarch gives some added insurance for a perfectly crispy, golden crust.
Hot sauce — adds depth and subtle background heat. Most of the capsaicin gets diluted in the buttermilk, but you can skip it if you are very sensitive to hot peppers. Frank’s RedHot, Crystal, or Cholula are great options. If you like spicy fried chicken, double it for more heat!
Salt — the key brining ingredient for flavor and juicy chicken. As the buttermilk breaks down the protein molecules in the chicken, the salt in the liquid will get absorbed into the meat. This deeply flavors the pieces, instead of just adding a seasoned coating on the outside. The salt molecules also retain a lot of moisture, so the chicken turns out juicier. Regular fine table salt or sea salt is ideal for this recipe. You can learn more about salt varieties in my Academy lesson: Salt 101.
Peanut oil — you want a neutral oil with a high smoke point for frying. Peanut oil’s smoke point is around 450°F. Plus, it’s the most common oil for frying Southern fried chicken! Vegetable or canola oil works fine, too. Avoid extra virgin olive oil (smoke point is too low and it doesn’t have a neutral flavor) and “frying oil blends” with hydrogenated fats.
How to Fry Chicken at Home
Here are the step-by-step highlights of the recipe. You can find the full recipe with ingredients in the recipe card below.
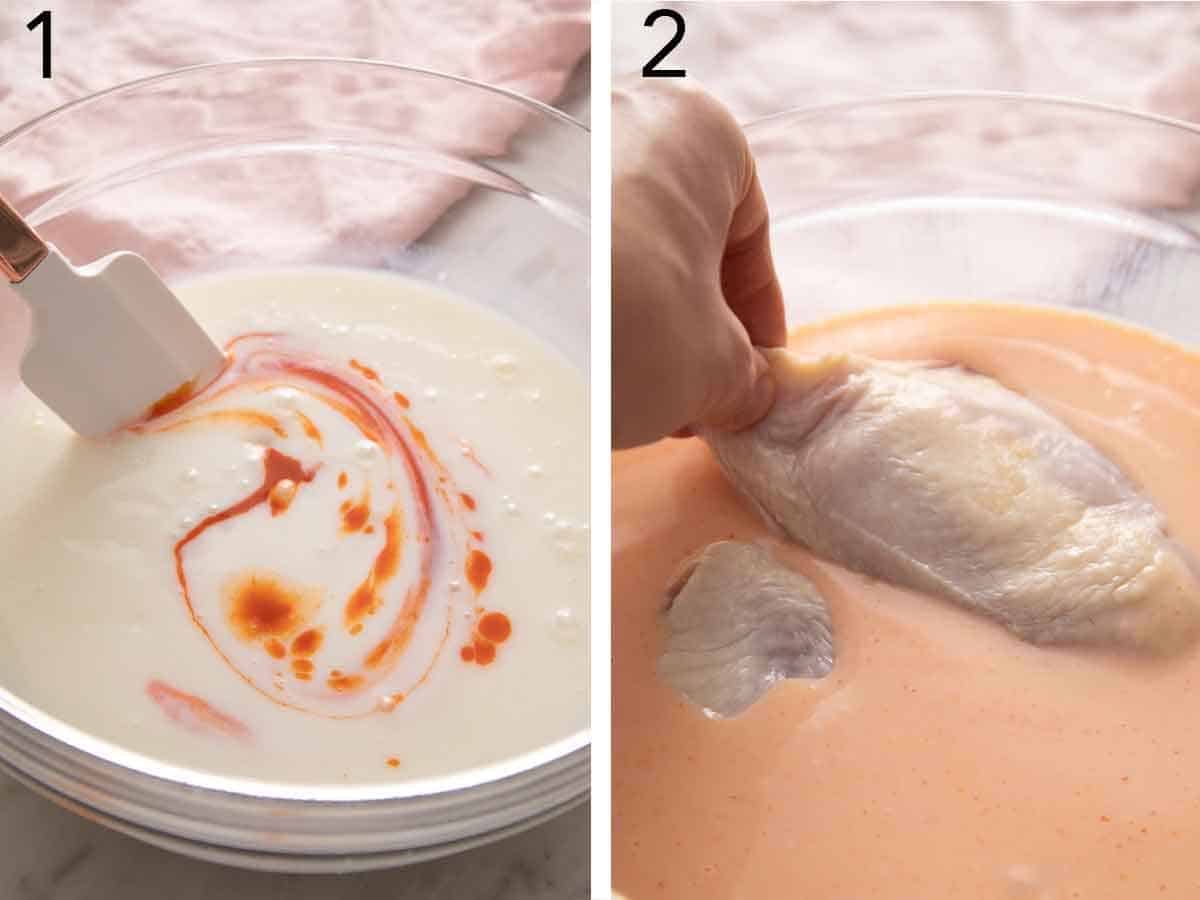
1. Brine the chicken. In a large bowl or zip-top bag, whisk the buttermilk with hot sauce and salt until the salt dissolves.
2. Add the chicken pieces, toss to coat, cover, and refrigerate. Thirty minutes is the bare minimum if you’re in a rush, but 8-24 hours is where this recipe really earns its name. When you are ready to fry, heat the oil. Pour 3 inches of peanut oil into a Dutch oven or other heavy-bottomed pot with high sides. Clip a deep-fry thermometer to the side, set it over medium heat, and bring the oil to 340°F. While the oil heats, set a wire rack over a rimmed baking sheet next to the stove—this will be your draining station.
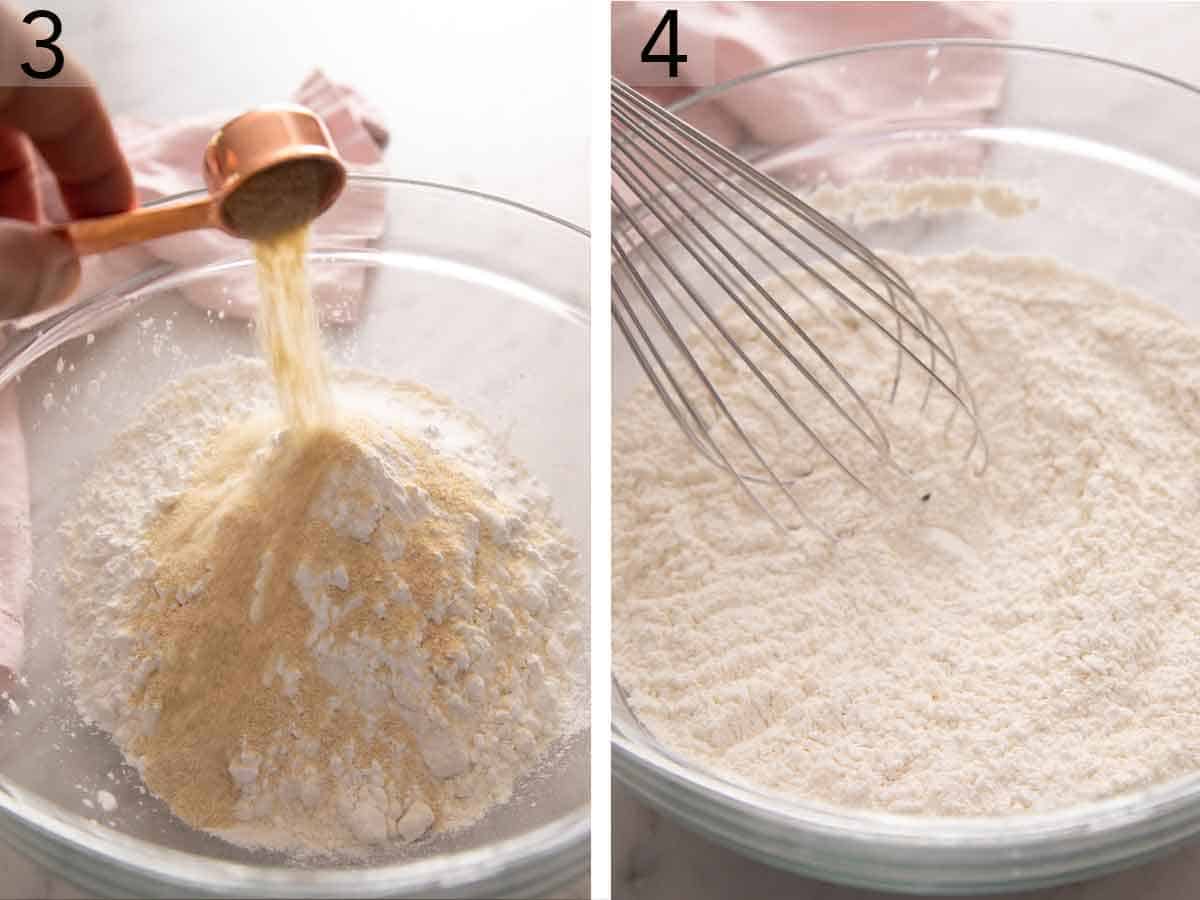
3. Make the dredge. In a wide shallow dish, combine the flour, cornstarch, onion powder, salt, black pepper, and cayenne.
4. Whisk the dry mix together. Make sure the dish is wide enough that you can flip a piece of chicken and press down without spilling the dredge—a pie dish, 9×13 baking dish, or a wide mixing bowl all work well.
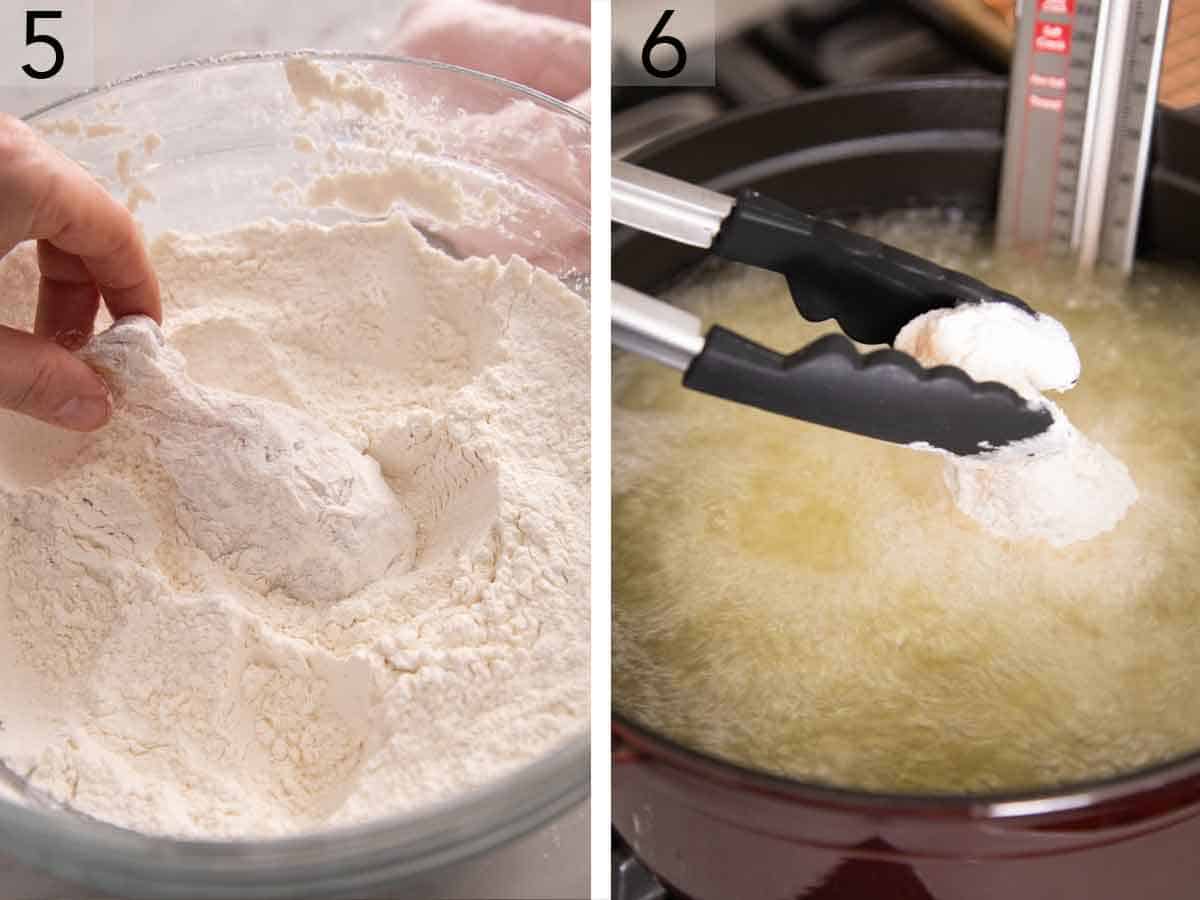
5. Dredge and rest. Lift each piece of chicken out of the buttermilk, let the excess drip off (but don’t wipe it dry—you want the dredge to stick), and coat it in the flour mixture, pressing it firmly to the surface of the chicken. For an extra-craggy crust, dip the dredged piece back into the buttermilk briefly and then into the flour a second time. Set the dredged pieces on a plate or sheet pan and let them rest for a few minutes while the oil finishes coming up to temp. This is when the dredge hydrates and turns into the perfect shell that fries up crisp.
6. Fry in batches. When the oil hits 340°F, and the dredge has rested, lower 2-4 pieces into the oil with tongs, skin side down. Don’t crowd the pot! You can fry 3-4 smaller pieces at one time, but only fry 2 breast pieces together since they are large. Only fry as many pieces as can sit in the oil with at least an inch of clearance between them. The temperature will also drop (that’s expected). Aim to keep it between 290°F and 340°F by adjusting the burner up or down whenever needed.
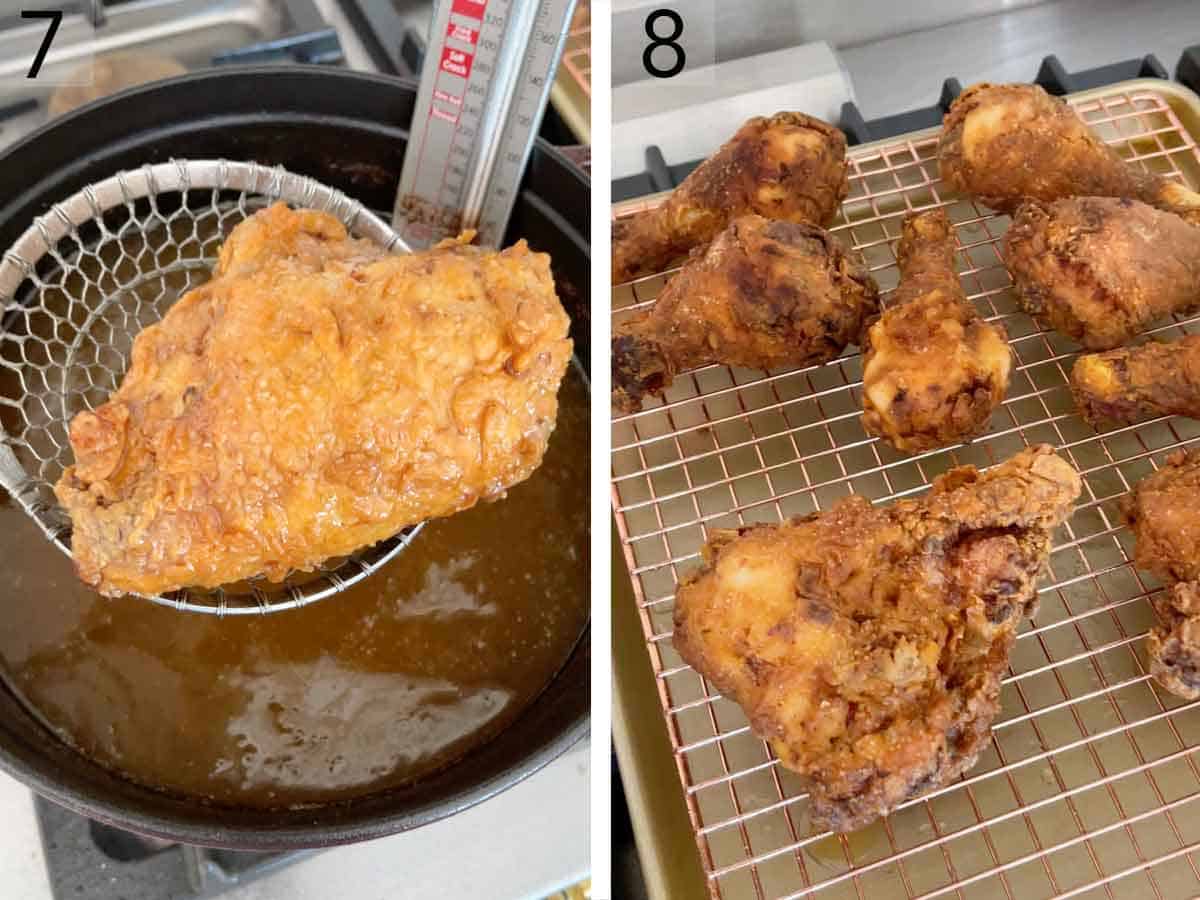
7. Fry undisturbed for the first 5 minutes, then turn and fry until golden brown and the internal temperature reads 165°F at the thickest part. Wings finish in 7-9 minutes, drumsticks and thighs in 12-14, halved breast pieces in 13-15.
8. Drain on a wire rack. Pull the chicken out with tongs or a spider strainer, and set the pieces on the wire rack. The rack lets the oil drain while steam escapes from the underside, so the crust stays crisp. Let the first batch rest while the second batch fries, then serve hot. Or keep the pieces in a 200°F oven to stay warm while you cook all of the chicken.
The Oil Temperature Problem (And the Fix)
When you put cold chicken into 340°F oil, the temperature drops fast, usually 40-60°F in the first minute. With an underpowered burner or a crowded pot, temperature recovery is slow, and the chicken can sit in 250°F oil for two or three minutes. That’s long enough for the crust to soak up oil instead of crisping and sealing, leaving it greasy and pale.
The fix: start at 340°F, only fry 2-4 pieces at a time. Turn the burner up for the first minute to fight the temperature drop. Once the oil temperature stabilizes, dial back to medium or medium-low and try to hold no lower than 320°F for the rest of the fry. I tested this recipe at 350°F and 360°F, as most recipes call for, but I found the crust always burned. 340°F was the perfect sweet spot.
A thermometer is essential here! A candy thermometer clipped to the pot or an instant-read with a high-temp probe both work. Visual cues aren’t reliable indicators of doneness for poultry, and the same goes for oil: eyeballing it is how chicken gets ruined.

Doneness: 165°F Isn’t the Whole Story
USDA’s FSIS recommends a safe minimum internal temperature of 165°F for poultry, measured at the thickest part of the breast and the innermost part of the thigh and wing. Be sure to check each piece with a meat or instant-read thermometer before you call it done. But there’s a quality consideration too.
Cooking chicken breasts at 160°F with a few minutes of carryover to come up to temperature makes them juicy, but pushed to 175°F, they go dry. Since the breasts are halved crosswise, pull them at 160°F and let them rest while the dark meat finishes—they’ll carry over to 168°F-170°F, the sweet spot for white meat. If you’ve got a mixed batch, pull the smaller pieces first.
Thighs and drumsticks have more connective tissue, and that collagen only starts breaking down meaningfully above about 170°F. So, you can actually cook the dark meat to 175°F-180°F without ruining it because it gets more tender, not less, as the collagen turns to gelatin and fat renders into the meat. This can make the crust go darker, though.
Why Isn’t My Fried Chicken Crispy?
When fried chicken comes out soggy, the cause is almost always one of three things, and they’re easy to diagnose if you know what to look for.
Oil too cool. If your oil drops below about 290°F when the chicken goes in, the crust never sets fast enough. Instead of forming a sealed shell that fries from the outside in, the dredge soaks up oil like a sponge. You’ll know this happened because the crust will be paler, softer, and oilier on the bottom. To avoid this, always use a thermometer and fry in smaller batches.
The crust didn’t set before frying. Dredged chicken needs a rest before it hits the oil. During that rest, the buttermilk left on the chicken hydrates the flour-cornstarch mixture and turns the surface pasty. The pasty layer is what fries up into the shatter-crisp shell. If you drop a piece into the oil straight from the dredge bowl, the loose flour just floats off and burns. This rest time is built into the recipe, as pieces will sit while the oil warms up and other pieces cook.
Steam trapped under the chicken after frying. Fried chicken, draining on paper towels, gets soggy on the bottom. The trapped steam between the crust and the paper rehydrates the coating from below within minutes. Use the wire rack set over a sheet pan, so air circulates underneath, allowing the steam to escape, and the crust to stay crisp.
Pro Tips From My Kitchen
A Dutch oven beats every other pot for frying. Cast iron’s mass and ability to hold heat mean the oil temperature recovers faster after you add chicken, and the high sides keep splatter contained. If you don’t have one, any heavy-bottomed pot with sides at least 5 inches tall works—that gap between oil and rim is your splatter buffer, which helps minimize mess.
Cut the breast pieces crosswise. This is key! A bone-in breast piece takes almost 20 minutes to cook through, and the crust will be so burnt by the time the middle is cooked. Halved breasts fry in just about 15 minutes with a perfect crust.
Reuse the oil once or twice. After frying, let the oil cool completely, then strain it through a fine-mesh sieve lined with cheesecloth or a coffee filter into a clean bottle. Stored it in the fridge; it’ll keep for a few weeks and works great for a second batch. Past two reuses, the oil starts to smell tired and taste off, so toss it.
Fried Chicken Recipe
Video
Equipment
- Large Pot
- Candy thermometer
Ingredients
For the Brine:
- 1 whole chicken 4- to 5-pound, cut into pieces (or 8 of your favorite bone-in chicken pieces)
- 1 quart whole buttermilk (960mL)
- 3 tablespoons hot sauce optional
- 1 tablespoon salt
For Dredge and Frying:
- Peanut or vegetable oil for frying
- 3 cups all-purpose flour (360g)
- ½ cup cornstarch (80g)
- 1 tablespoon onion powder
- 1 tablespoon salt
- 2 teaspoons ground black pepper
- 1 teaspoon cayenne pepper optional
Instructions
Brined Chicken:
- In a large bowl or ziptop bag, combine chicken pieces, buttermilk, hot sauce, and salt. Toss to combine. Cover or seal and let stand for 30 minutes, or for juicier chicken refrigerate for several hours or overnight.
Dredge and Frying:
- When ready to fry, fill a Dutch oven with 3 inches of peanut oil. Place a candy or deep-fry thermometer in the oil and place over medium heat until it reaches 340F. Place a wire rack inside a rimmed baking sheet.
- While the oil is heating, in a shallow dish, whisk together flour, cornstarch, onion powder, salt, black pepper, and cayenne.
- Remove chicken pieces from brine, and shake off excess buttermilk. Dredge in the flour mixture, making sure each piece is well coated. Place on plate or baking sheet. Let dredge pieces rest until oil is ready. (For an extra crunchy crust, lightly coat chicken again in the dredge when ready to fry.)
- Working in batches, carefully place chicken in the hot oil. Fry until golden brown and they register 165F on a meat thermometer when inserted into the thickest portion, about 7 minutes for wings, 12 minutes for drumsticks and thighs, and 15 minutes for breast pieces. Remove from the oil and let drain on the wire rack. Serve hot.
Notes
- Salt the chicken right after it comes out of the oil. Hot chicken loves a sprinkle of flaky sea salt! The salt sticks because of the surface oil and seasons the crust at exactly the moment your taste buds are primed for it. Don’t skip this even though there’s already salt in the dredge.
- Keep batches warm in a low oven. A 200°F oven holds finished chicken on a rack for up to 30 minutes without losing crispness. Don’t cover it, though, or you will trap steam.
- Storing leftovers: Keep fried chicken in an airtight container in the fridge for up to 4 days.
Nutrition
What to Serve With Fried Chicken
The classic Sunday supper plate is fried chicken plus three sides. The non-negotiables in my book are biscuits (or buttermilk biscuits), coleslaw, and either mashed potatoes or garlic mashed potatoes—the cool, creamy slaw cuts the richness, and the potatoes are a classic combo with the fried chicken. Cornbread and collard greens make great alternatives. If you want to stretch it out, mac and cheese is a classic Southern picnic addition.
Frequently Asked Questions
You’ve got two good options. The fastest is to stir 1 tablespoon of lemon juice or white vinegar into 1 cup of whole milk and let it sit for 5-10 minutes. It’ll curdle slightly and pick up enough acidity to do most of the brining work. Plain whole-milk yogurt thinned with water to a buttermilk consistency works even better because the cultured yogurt has the same kind of lactic acid as real buttermilk. The full breakdown is in my how to make buttermilk post.
Most commonly, it means your oil temperature was too cool either at the start, or didn’t come back up to temperature fast enough. For exact troubleshooting and ways to prevent soggy fried chicken, see the section “Why Isn’t My Fried Chicken Crispy?” above.
Yes! Simply swap the all-purpose flour 1:1 for a gluten-free 1-to-1 baking flour like King Arthur Measure for Measure or Bob’s Red Mill 1-to-1, and keep the cornstarch as written. The crust comes out close to the wheat-flour version, slightly more tender and a touch less craggy. Skip the double dredge with gluten-free flour, though, because it is all starches, and it tends to fall off the chicken on the second pass.
The air fryer or oven is the best option. Heat a 375°F oven (or air fryer) and put the chicken on a wire rack over a baking sheet if it’s going in the oven. Heat for 12-15 minutes in the oven, or 6-8 minutes in the air fryer. The microwave will warm the chicken, but the crust won’t stay crisp; the moisture has nowhere to go, and the crust goes soggy. Stored in an airtight container, the leftovers keep 3-4 days in the fridge.
More Recipes To Try
Try more main dish recipes for dinner:
- Air Fryer Fried Chicken — a riff on this technique with a different cut that uses the same brine and dredge but cuts the oil entirely.
- Chicken-Fried Steak — borrows the dredging method for a beef cube steak with white gravy.
- Oven-Fried Chicken — a similar brine and dredge technique that uses breadcrumbs for a crispy coating on baked chicken
- Chicken Nuggets — bite-sized pieces of fried chicken using boneless chicken breast
- Chicken Schnitzel — thin chicken cutlets dredged and pan-fried until golden brown
If you’ve tried this fried chicken recipe, then don’t forget to rate it and let me know how you got on in the comments below. I love hearing from you!
Mary Martinez says
EXCELLENT
Donna says
Crispiest, moistest chicken ever. Thanks for this recipe, John.
Catherine M Smith says
Did you know you say 360 degrees in the video (twice), but in print you say 340?
Which should it be? I’m making this now, so it may be too late by the time you answer 🙂
Lula says
Hello, I´m making a lot of your recipies and they are always a huge succes. I’d love to make this chicken but can I make it in an air fryer? Thank you.
Tina Chavez says
My youngest child requests fried chicken for her BD dinner every year so Monday I made your recipe for her 36th BD because I’ve always felt mine was kinda boring and she LOVED IT!!! It’s the BEST fried chicken we have ever eaten John, thank you so much from my family and I for your recipe❤
Thomas A Smith says
In the video you said
heat oil to 360° but in the recipe ingredients directions it days 340° so i don’t know what to do
Joslynn says
It is awesome. The taste and flavour were just perfect.
Joe Krizek says
Can I use gluten free flour
Gary says
Not enough dry seasonings. If you don’t have it on hand, do use Bell’s. Should be available in your neck of the woods. Don’t be afraid to add a bit of ginger, even allspice.
Deborah says
Oh my God thank you so much John will definitely add this to my plans for Sunday lunch