


In our house, Sunday night is pizza night, and this easy pizza dough recipe is what I reach for every time. It’s quick, foolproof, and ready in under 90 minutes, including the rise time! My boys love getting their hands in the dough and piling on their favorite pizza toppings, making it a fun, interactive way to end the week. I developed this recipe with busy nights in mind: you don’t need any fancy equipment or ingredients or hours of waiting— just a few pantry staples and a little patience. The only “tricky” part is waiting for the dough to double in size before you shape it, but don’t worry! I’ll share my best tips (and plenty of photos) so you’ll know exactly what to look for.
A reader, Jenny, says: “I’ve been trying different recipes for pizza crust and this has been the easiest to stretch and is super quick to make! Thanks for a recipe that makes me want to make pizza at home.” ★★★★★
Key Ingredients And Substitutions
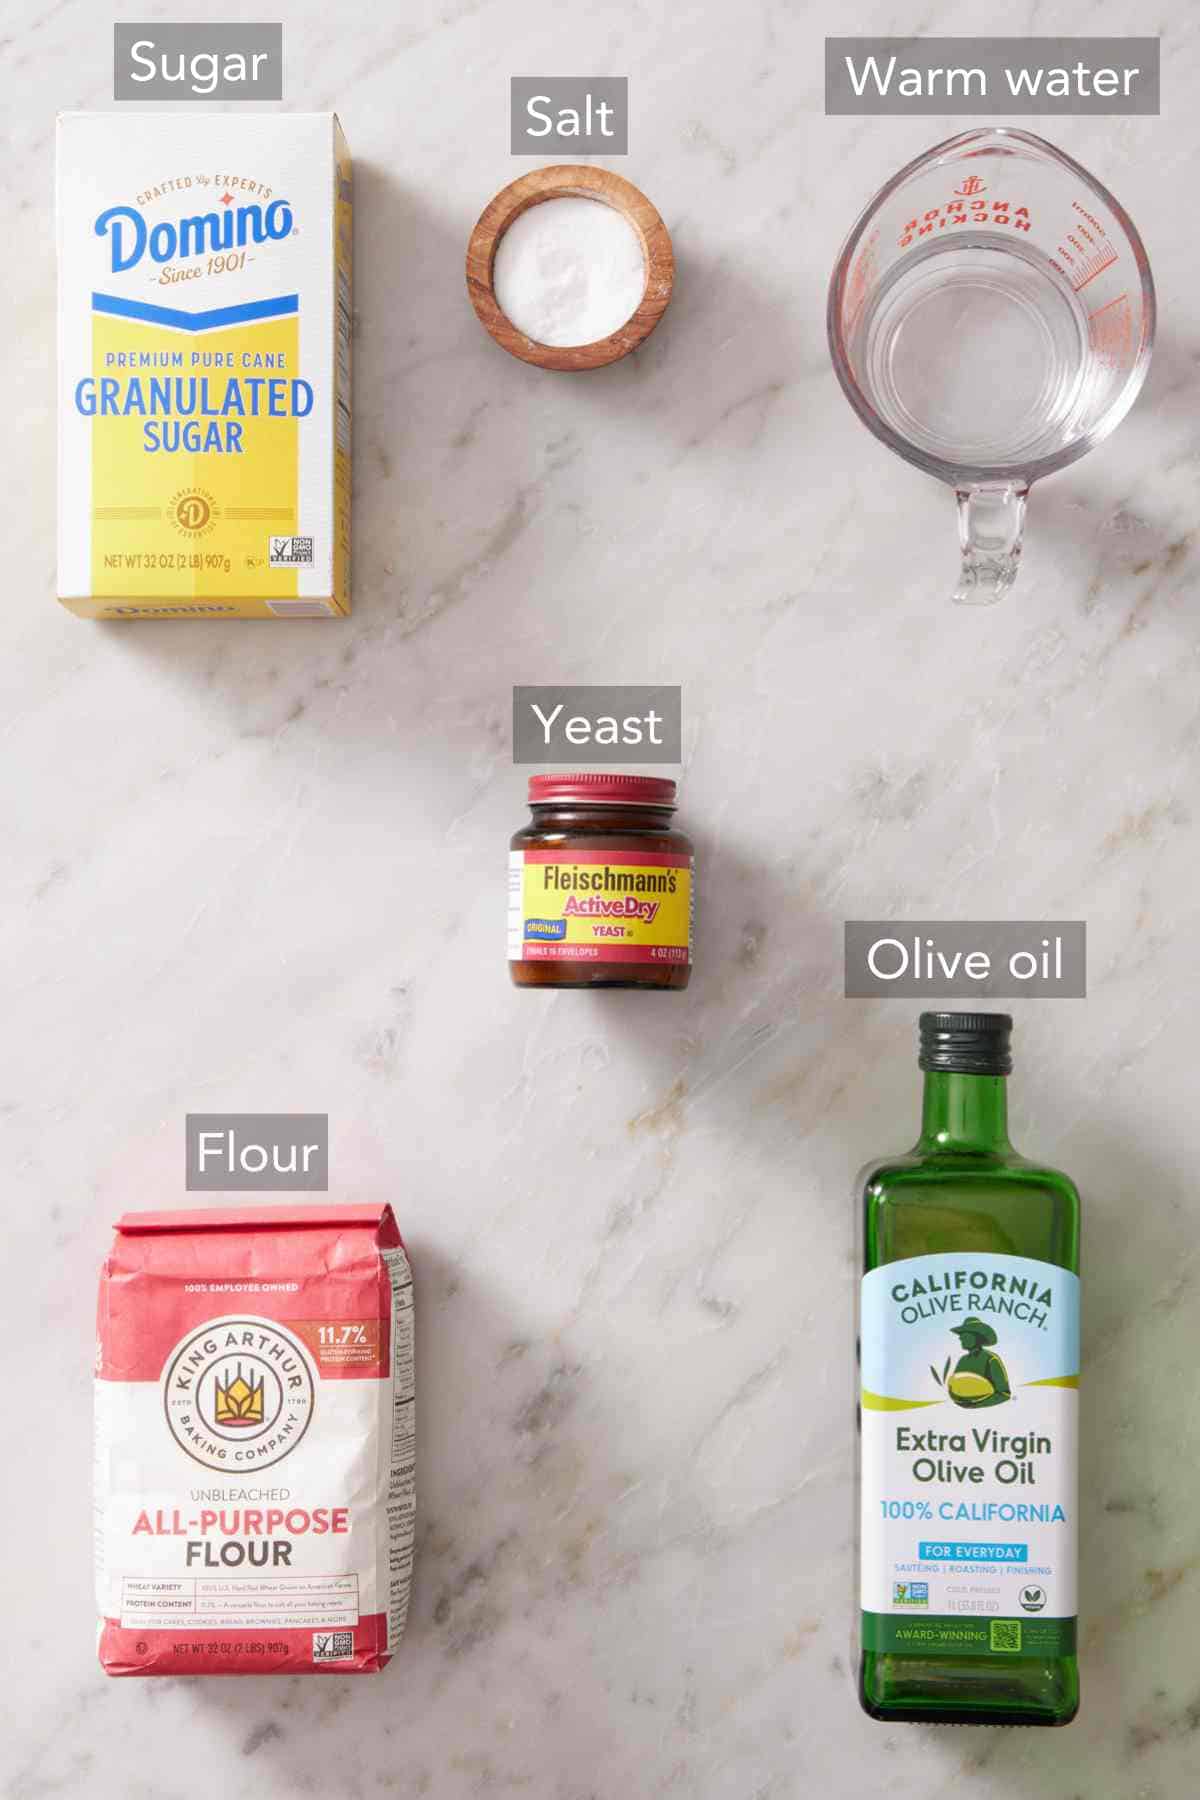
You only need 6 ingredients to make this easy homemade pizza dough. You can find the full list of ingredients and measurements in the recipe card below.
All-purpose flour — plain flour makes a great pizza dough, and it’s honestly what I use almost every time. But if you want a slightly chewier crust, use the same amount of bread flour or 00 pizza flour. Avoid whole wheat flour, which is “thirstier” than white flours thanks to the bran from the wheat grain. (This means it can throw your dry-to-liquid ratio off, leading to a denser texture.)
Warm water — the operative word here is “warm,” so don’t use hot water! Ideally, it should be around 100-110°F (which feels comfortably warm to the touch, in case you don’t have a thermometer) to create a cozy environment for the yeast. Much hotter than that and you risk killing it.
Active dry yeast — this type of yeast has to be bloomed in warm water first to activate. Make sure it turns nice and foamy on top before you mix your dough. And always check the expiration date! I have found that yeast close to or past the date will be slower to activate, or may not ever become active, and needs to be replaced.
Granulated sugar — you add a little bit at the beginning to feed the yeast and make it bubbly, then a bit more to coax out a beautifully golden brown crust.
Olive oil — a touch of oil helps keep pizza dough soft and easy to stretch, adds flavor, and gives the crust a nice golden finish.
Salt — a bit of seasoning prevents the crust from tasting bland. Note that high concentrations of salt can kill yeast, so it is hindered from reaching the bloomed yeast by adding it on top of the flour in the mixing bowl. You can also add dried herbs or other spices to flavor the dough along with the salt. I like adding Italian herb seasoning, dried basil, or garlic powder for some extra flavor.

Can I Use Instant Yeast For A Faster Rise?
Yes, but I prefer active dry yeast because it gives the dough a slightly deeper flavor. Why? A longer rise time. This rise time is still relatively short (1 hour), but during that time, the water, yeast, and flour co-mingle, breaking down flour proteins and producing flavorful compounds that make the dough taste better. You can use instant yeast for a quicker rise, but the dough won’t have as much time to produce a deep flavor. If you use it, just skip the blooming step and whisk the flour, instant yeast, sugar, and salt together, then add the water and olive oil and continue with the recipe as written. Your rise time will be closer to 30 minutes.
How To Tell When The Dough Has Risen Enough
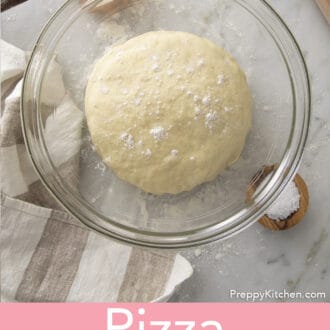
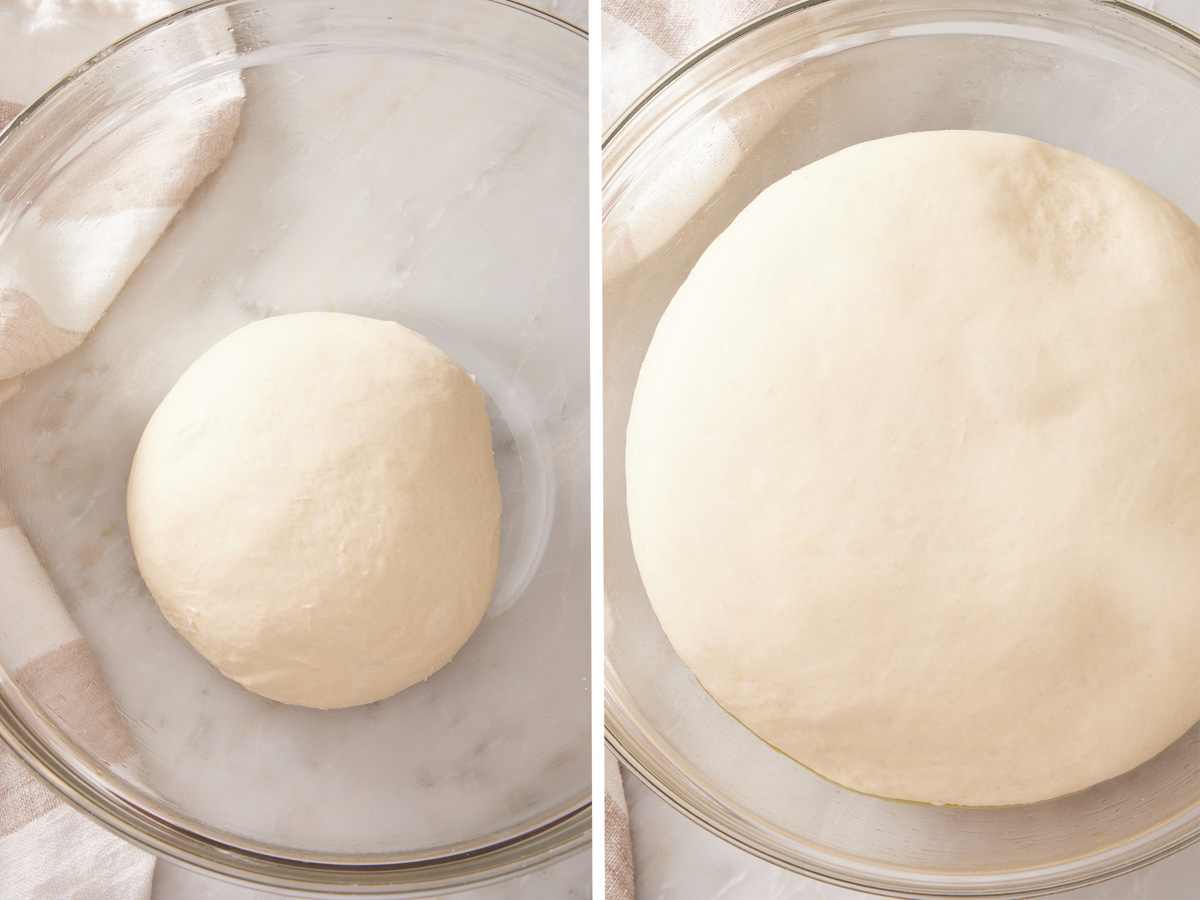
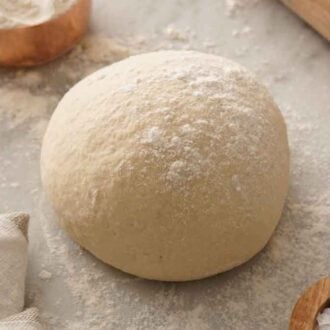
One of the biggest questions with homemade pizza dough is knowing when it’s risen enough. The easiest clue? Look for the dough to puff up and almost double in volume. It should look soft, airy, and noticeably bigger than when you first mixed it.
I personally like to use a clear bowl because you can use the measurement markers on the side, or simply draw a line where the top of the dough ball starts before it rises. After about an hour, you should see that the dough has grown well above that mark.
In the photos below, you’ll see a side-by-side comparison: the left shows the dough right after mixing, and the right shows how it looks after a full hour of rising.
Let The Dough Rise Overnight For More Flavor
If you have a little extra time when you make your own pizza dough, letting it rise overnight in the fridge is a fantastic way to build more flavor and improve the texture. It’s also great for meal prep! Just mix up the dough the day before, and it’s ready to bake the next evening with very little effort.
Here’s why it works: Yeast grows much more slowly in cold temperatures, so the refrigerator slows everything down. That extra time gives the yeast a chance to break down more proteins in the flour, which results in a pizza crust that’s lighter, airier, and more flavorful.
To do an overnight rise, knead the dough and place it in an oiled bowl, then cover and pop it straight into the fridge. Let it chill for up to 18 hours. Before shaping, bring it back to room temperature by letting it rest on the counter for about an hour. (This will make it much easier to stretch.)
No Special Shaping Technique Required
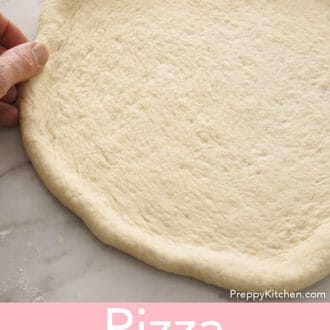
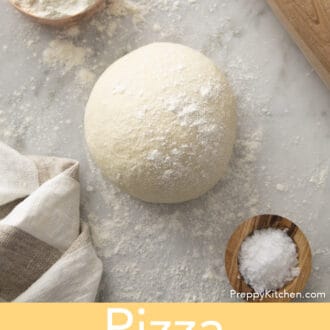
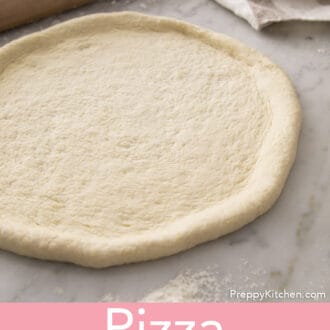
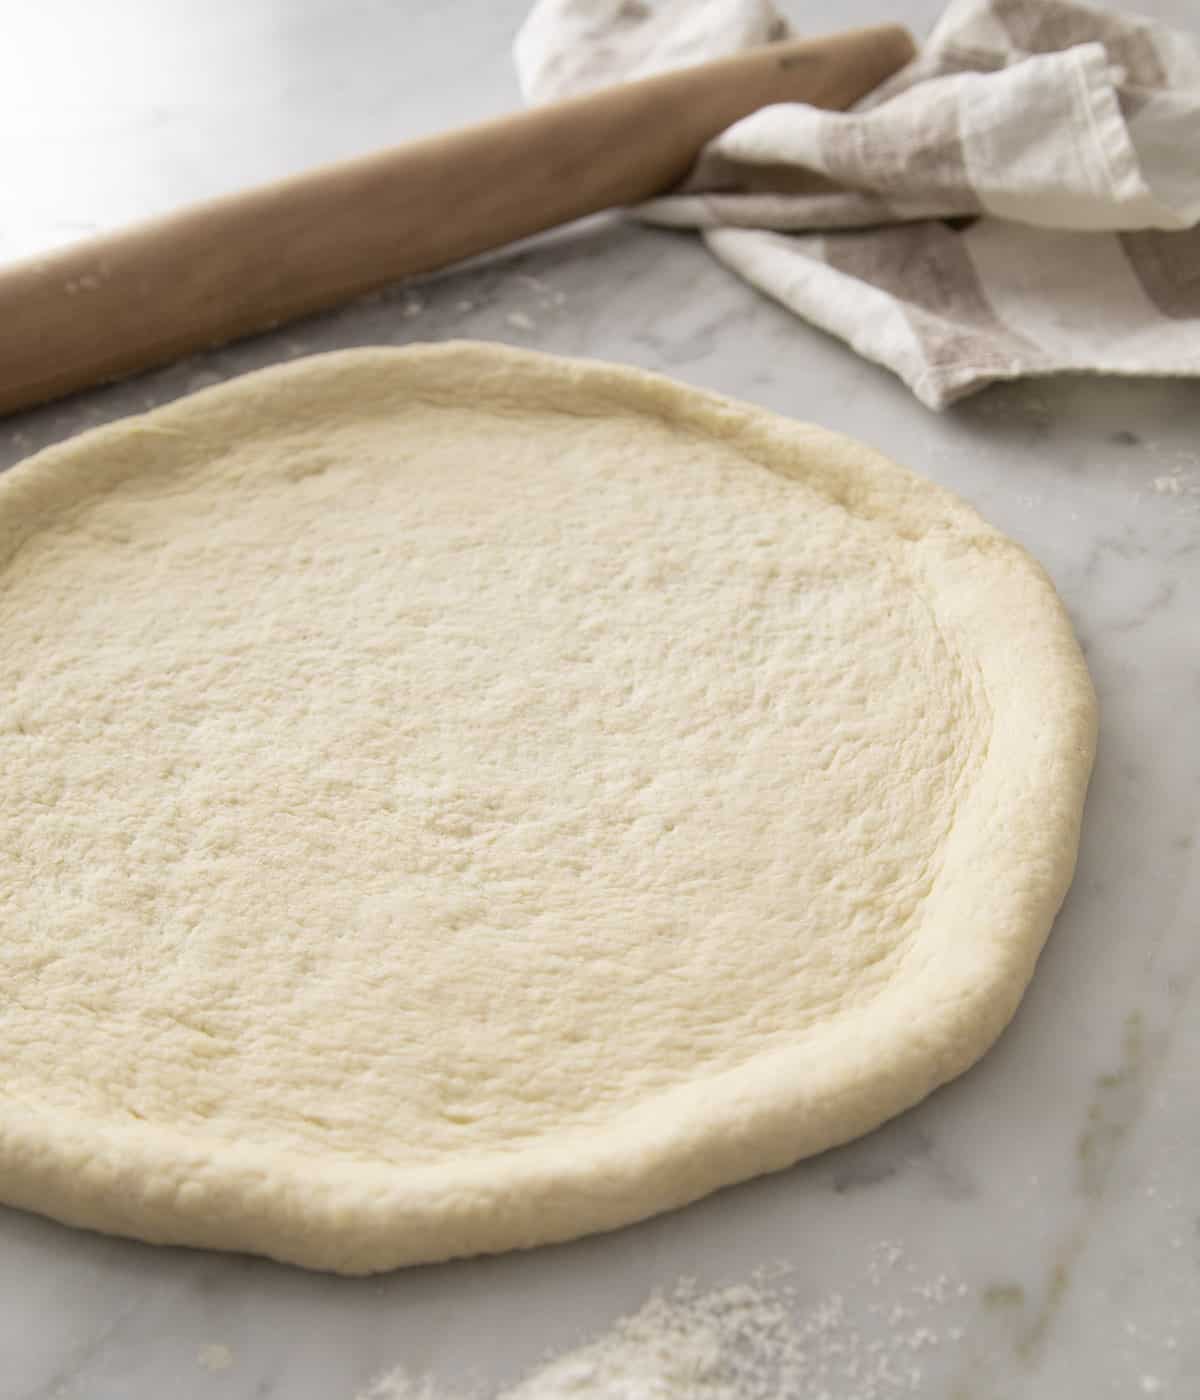
The best thing about my easy pizza dough recipe is how simple it is! There are no special shaping techniques needed. Once the dough has risen, just give it a gentle punch down to release the air, turn it out onto a lightly floured surface, and stretch it into a circle. That’s it. You don’t need to worry about pulling it into a tight ball or letting it rise a second time.
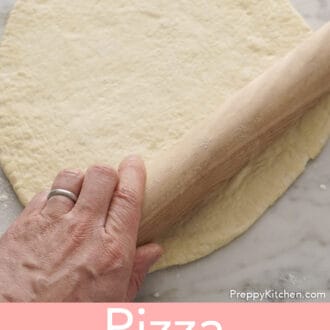
When you stretch the dough, try to relax your fingers or use the backs of your hands or your knuckles and not poke your fingertips into the dough. This keeps the dough from tearing while helping it stretch more evenly. And skip the rolling pin, which can press out all those lovely air bubbles, leaving you with a flatter, denser crust instead of the airy, chewy texture we’re after.
Pro Tips For Making The Best Pizza Dough
Double the recipe to make more pizzas! Simply double all the ingredients except the yeast, then divide the dough into two equal pieces. The dough will need a bit more time to rise at room temperature (about 90 minutes to 2 hours), but the slower rise actually helps build even more flavor. You can also leave it a bit longer in the fridge (up to 24 hours).
Weigh your ingredients. Using a kitchen scale instead of measuring cups gives you the most accurate results and ensures the right dough consistency every time. Using too much flour will make the dough dry and hard to shape. If you don’t have a scale, fluff up the flour, spoon it into your measuring cup, and use the flat back of a knife to level it off. Never scoop directly from the package, or you can pack in the flour, resulting in up to ¼ cup more flour than needed!
Don’t rush the rise. Whether you let it rise for 1 hour at room temperature or overnight in the fridge, give the yeast the time it needs to produce little air bubbles for a fluffy dough.
Lightly flour the surface. Dust your surface and hands with a little flour to prevent sticking, but don’t overdo it. Too much flour can dry out the dough and make it tough.
If the dough springs back when you shape it, cover it and let it sit for 5 to 10 minutes. This typically means it hasn’t risen quite enough, and the gluten still needs more time to relax. The dough should stretch easily and hold its shape well without pulling back towards the center.
How To Make Pizza Dough
Below, I’ve highlighted portions of the recipe in step-by-step process images along with instructions for making the best pizza dough recipe. You can find the full set of instructions in the recipe card below.
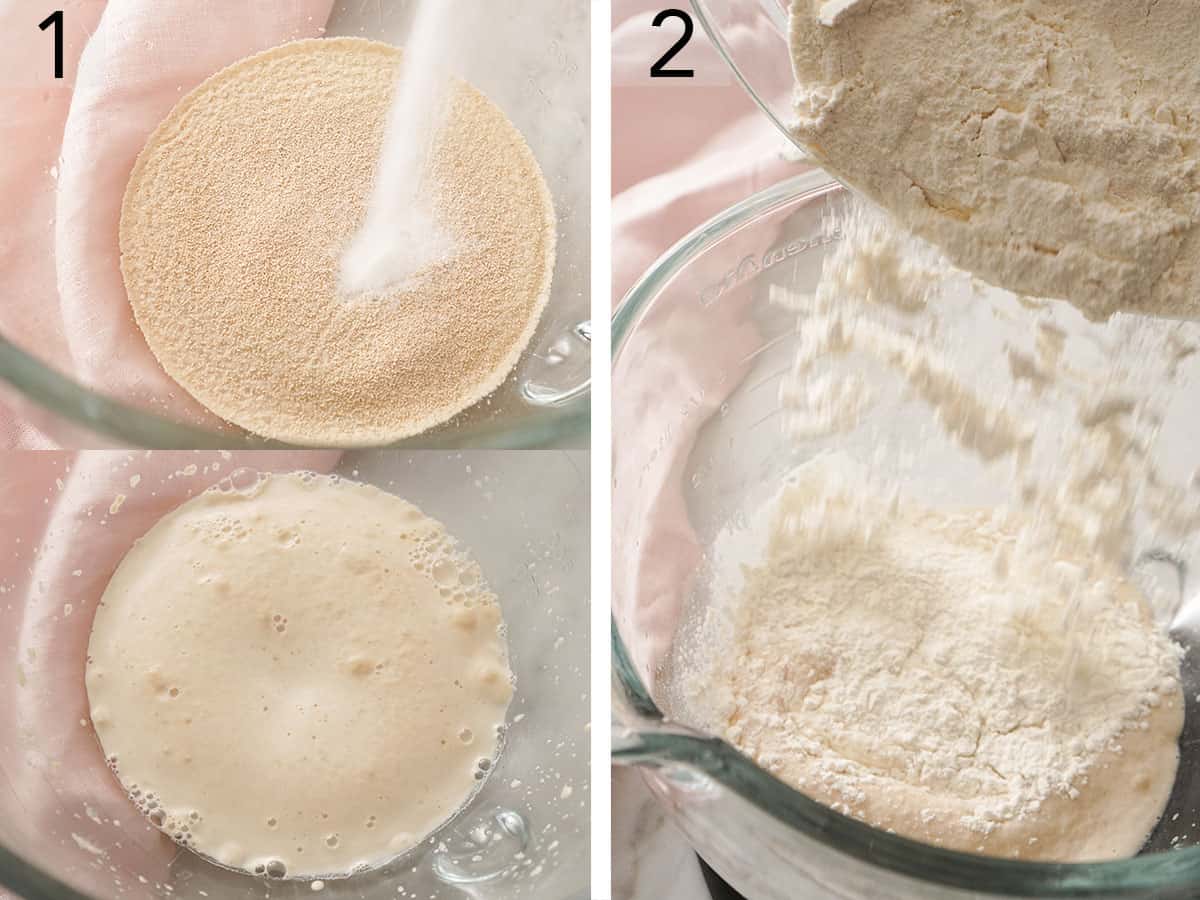
1. Start by mixing the warm water, yeast, and a little sugar in the bowl of your stand mixer. Give it about 5 to 7 minutes to get nice and frothy on top. (That’s how you know the yeast is awake and ready to go.)
2. Once it’s bubbly, add in the flour, olive oil, salt, and the rest of the sugar to the yeast mixture.
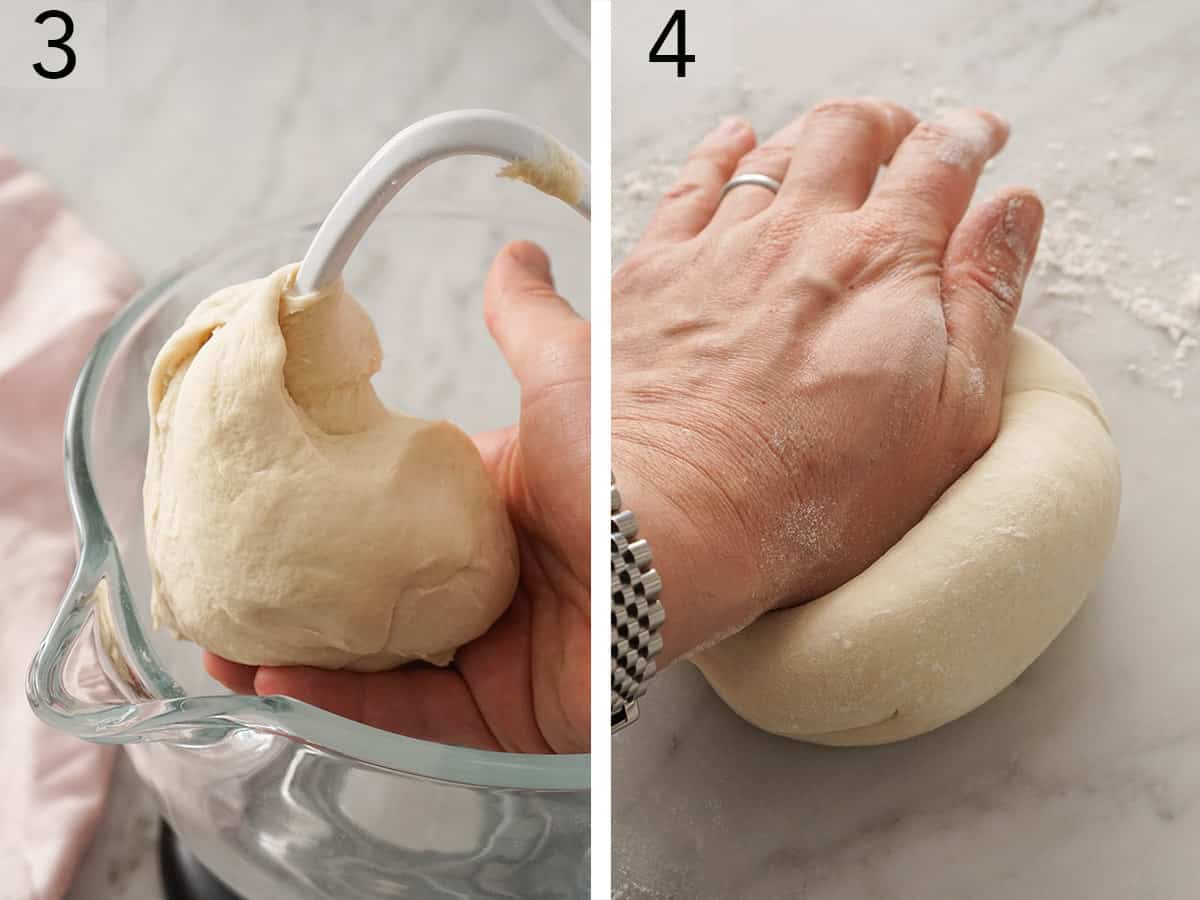
3. With the dough hook on, start mixing on low for a minute or so, then bump it up to medium-low. After about 5 minutes, the dough should pull together into a smooth ball that springs back when you give it a gentle poke.
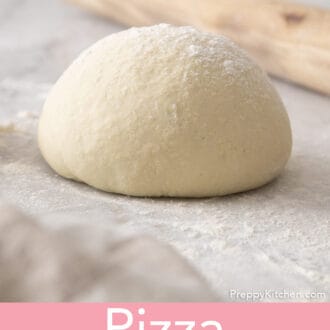
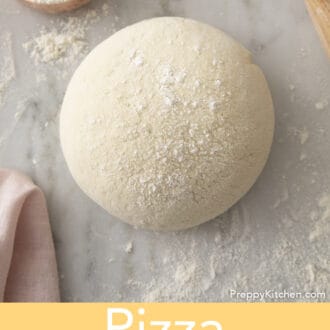
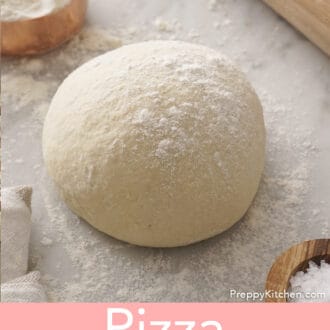
4. Turn the dough out, shape it into a ball, and pop it into a lightly oiled large bowl. Cover it up and let it rise in a warm spot until it doubles in size, which usually takes 45 minutes to an hour, depending on the temperature of your kitchen.
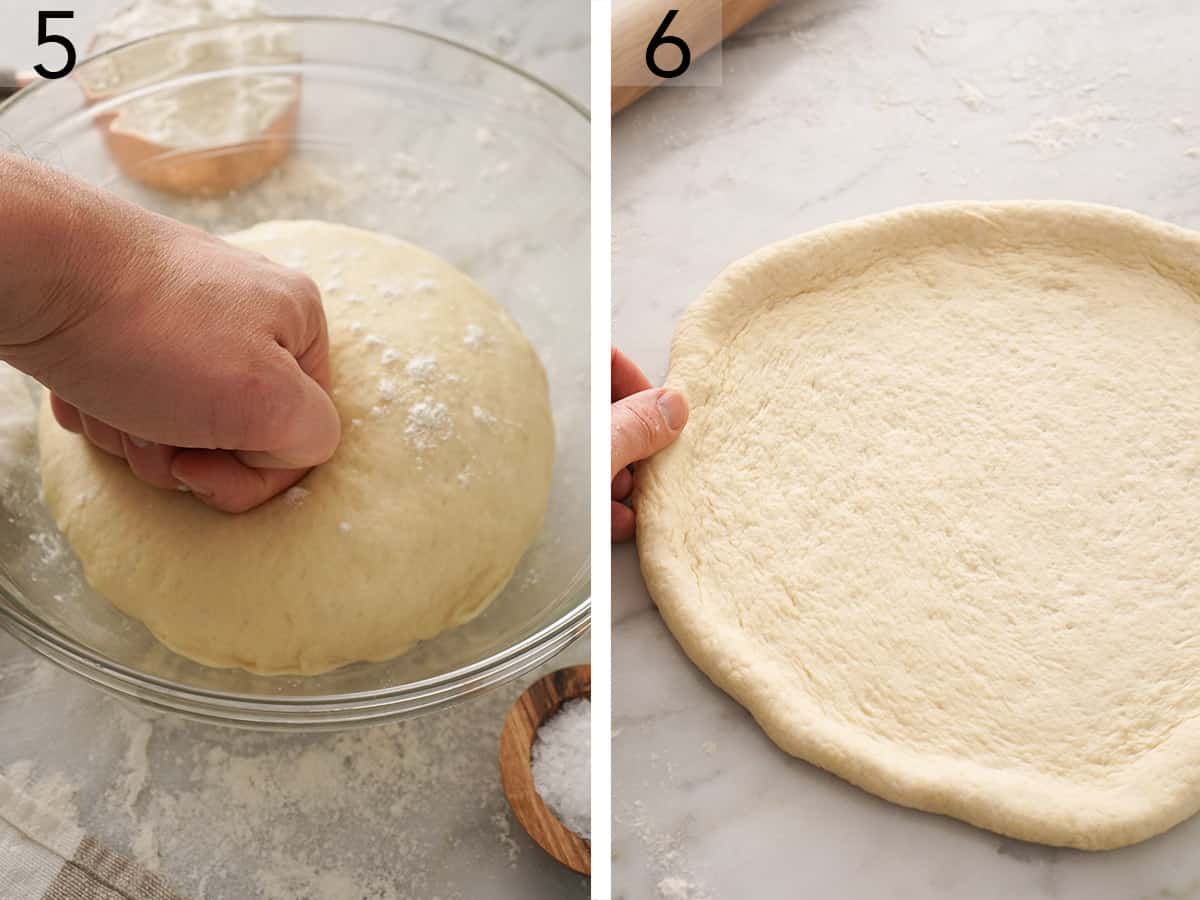
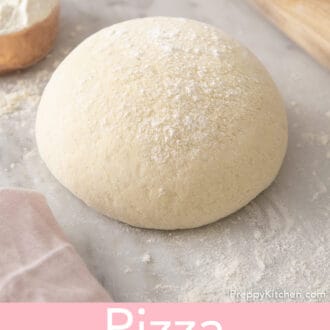
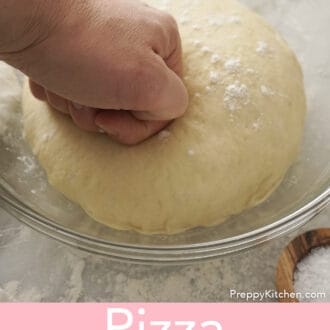
5. When it’s puffed and ready, preheat your oven to 450°F. Punch down the dough in the bowl, then turn it out onto your lightly floured work surface.
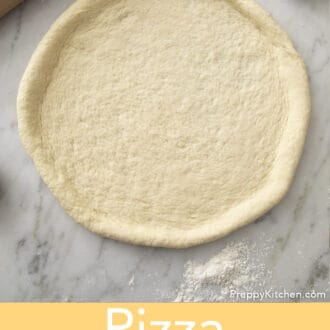
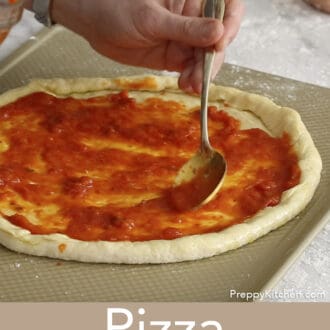
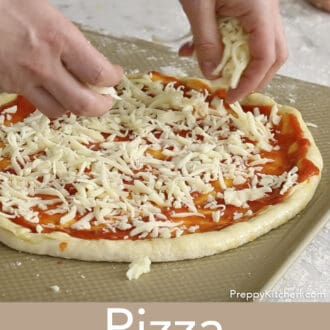
6. Stretch it into a 12-inch circle on a lightly floured surface, leaving a thicker edge around the outside for that classic bubbly pizza crust. Move it to a parchment paper-lined baking sheet or pizza pan, reshape if needed, and brush the rim with a little olive oil for added browning if you’d like. Now the fun part: toppings! Top with pizza sauce, cheese, and whatever else you’re craving. Bake for 12 to 15 minutes, or until the crust is golden and the cheese is perfectly melted and bubbling. Enjoy!
Pizza Dough Recipe
Video
Equipment
- mixing bowl
- Stand mixer
Ingredients
- ¾ cup warm water (100-110°F) (180mL)
- 1 (.25-ounce/7g) packet active dry yeast
- 1 tablespoon granulated sugar divided
- 2 cups all-purpose flour plus more if needed (240g)
- 1 tablespoon olive oil plus more for brushing
- ¾ teaspoon salt
Instructions
- In the bowl of a stand mixer, stir together the warm water, yeast, and 1 teaspoon of sugar. Let the mixture stand until it is very frothy on top, 5 to 7 minutes.
- Add the flour, olive oil, salt and remaining 2 teaspoons of sugar to the bloomed yeast. Attach the dough hook and mix on low for about 1 minute. Increase to medium-low speed until the dough comes together in a ball, is smooth, and springs back when poked, about 5 minutes. If your dough is still very loose and sticky after 5 minutes, mix in more flour a tablespoon at a time, as needed.
- Shape the dough into a tight ball on the counter and place it in a lightly oiled large bowl. Cover with plastic wrap and place in a warm, draft-free place to rise until the dough has doubled in size, 45 to 60 minutes.
- Preheat the oven to 450°F.
- When the dough has doubled, punch it down and shape it into a 12” circle on a lightly floured surface, making a thicker rim around the outside edge. Transfer the dough to a parchment paper-lined baking sheet or pizza pan and reshape into a circle if needed. Brush the rim with olive oil if desired, and top with sauce and your choice of pizza toppings or as directed by your recipe.
- Bake for about 12 to 15 minutes or until the crust is golden brown and the cheese is melted and bubbling.
Notes
- No stand mixer? No problem. You can absolutely make this dough by hand. Stir everything together with a wooden spoon until it comes together, then knead on a lightly floured surface for about 8-10 minutes. The dough is ready when it’s smooth, elastic, and springs back when pressed.
- Use any of your favorite pizza toppings! For one pizza, I recommend using ½ cup of homemade pizza sauce, 1 cup of cheese, and a few handfuls of other toppings like pepperoni, sliced veggies, or pickled peppers or olives. You can also check out my cheese pizza recipe if you want to keep it simple!
- Storing baked pizza: You can refrigerate the leftover pizza slices in an airtight container (or well-wrapped in plastic wrap) for 3 to 5 days, depending on your toppings. Or freeze them in a freezer container for up to 3 months. To reheat, place the slices in the oven at 375°F for 5 to 10 minutes or in the air fryer at 350°F for 3 to 5 minutes.
Nutrition
Tips For Baking Your Pizza
These are a couple of tips I’ve picked up over the years that help my pizza bake up with a crisp bottom and chewy interior.
- Preheat the oven well. A super-hot oven is your best friend for pizza night. You want the heat blasting so the crust puffs up quickly before it has a chance to dry out, giving you that perfect combo of a crisp exterior and fluffy, chewy inside. If you don’t have an oven thermometer, wait a few minutes past when the oven says it has fully preheated to make sure it’s nice and hot.
- Use a pizza stone or baking steel if you have one. If you do, you’ll get the closest thing to restaurant-style pizza at home! Pop it in the oven before you turn it on, then preheat it. Once the oven’s at temp, give the stone another 30 minutes to really soak in the heat. Shape your dough on parchment on a pizza peel, rimless cookie sheet, or the back of a rimmed baking sheet, then slide the whole thing (parchment and all) right onto the stone. The result? A crust that’s crisp on the bottom and bubbly on top.

Ways To Use Homemade Pizza Dough
Homemade pizza dough is incredibly versatile and can be used as the base for just about any pizza you can dream up. Use it in all the classics, like a simple margherita pizza with fresh mozzarella and basil, or get creative with flavors, like a summery pesto peach pizza.
But, don’t stop there— use it for any recipe that calls for regular pizza dough! This dough also works beautifully for other Italian-inspired favorites. Roll it up with fillings for a hearty stromboli, fold it over into a cheesy calzone, or cut and twist it into buttery garlic knots for the ultimate dinner roll upgrade. Trust me: once you’ve mastered the dough, you’ll find endless ways to put it to work in your kitchen!

Frequently Asked Questions
Yes! Just tuck it into a freezer-safe bag and it’ll keep for up to 3 months. When you’re ready to use it, move it to the fridge to thaw overnight, then let it come to room temperature before punching down and shaping.
It usually comes down to proofing. If your dough rose a lot during the rise but baked up flat, it may have been over-proofed. That means the yeast used up all of its energy before hitting the oven, so instead of springing up, the dough collapsed. Next time, keep an eye on it and bake as soon as it has doubled.
On the other hand, if your dough didn’t rise much to begin with, it was likely under-proofed. The yeast didn’t have enough time to produce those little air bubbles that make the crust puff up in the oven. If this happens, simply give the dough more time to rise (sometimes it takes longer if your kitchen is cool).
The fix? Watch the dough, not just the clock. Look for dough that’s doubled in size and feels light and airy to the touch.
Yes! Parbaking is a great make-ahead option, and it saves you from relying on store-bought prebaked crusts. Just know the crust won’t be quite as fluffy, but it’s still delicious and super convenient.
To parbake, shape the dough, poke the center all over with a fork (this keeps it from puffing up too much), and bake for 8 to 10 minutes until it’s lightly golden. You can then cool it, wrap it up, and store it to top later.
Or, for a fun twist, bake the crust all the way through (about 10 to 12 minutes) with no toppings, then turn it into dessert pizza! Spread it with Nutella and finish with fresh fruit for a sweet treat.
More Pizza Recipes To Try
Once you have this easy dough recipe down, turn it into one of these delicious pizzas!
My potato pizza has a pesto base, and it’s topped with thin slices of baby potatoes and mozzarella cheese. This is a great twist on the classic and perfect for potato-lovers!
A buffalo chicken pizza is the perfect game day recipe! Save some prep time by shredding rotisserie chicken for the topping. And plan on serving it with plenty of extra ranch for dipping.
If you’re ready to try a more skillful recipe, my sourdough pizza dough is the perfect place to start. It takes longer to make, but the result is a crispy crust with a chewy interior that is super flavorful.
Skip the homemade dough and make my super-easy flatbread pizza in under 30 minutes. Simply spread a store-bought flat bread with your favorite sauce and toppings, and bake!
If you’ve tried this Homemade Pizza Dough recipe, then don’t forget to rate it and let me know how you got on in the comments below. I love hearing from you!
Addie Kitch says
Supper good! The crust is amazing!