
This post may contain affiliate links. Please read our disclosure policy.
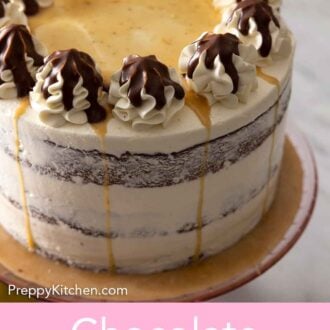
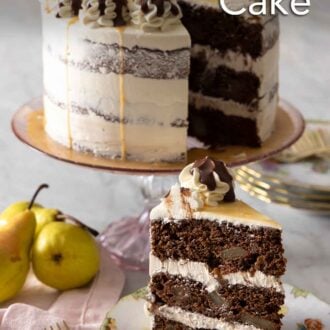
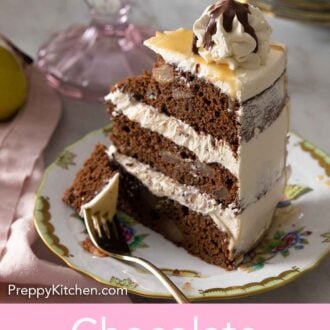
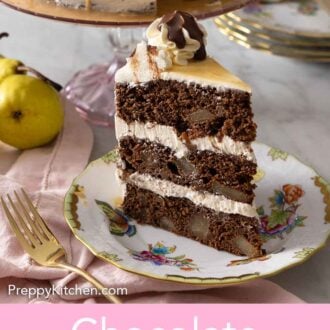
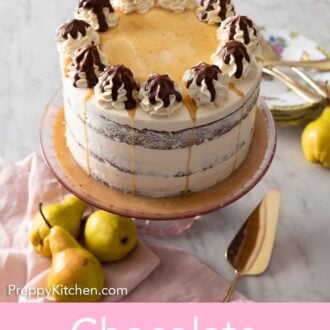
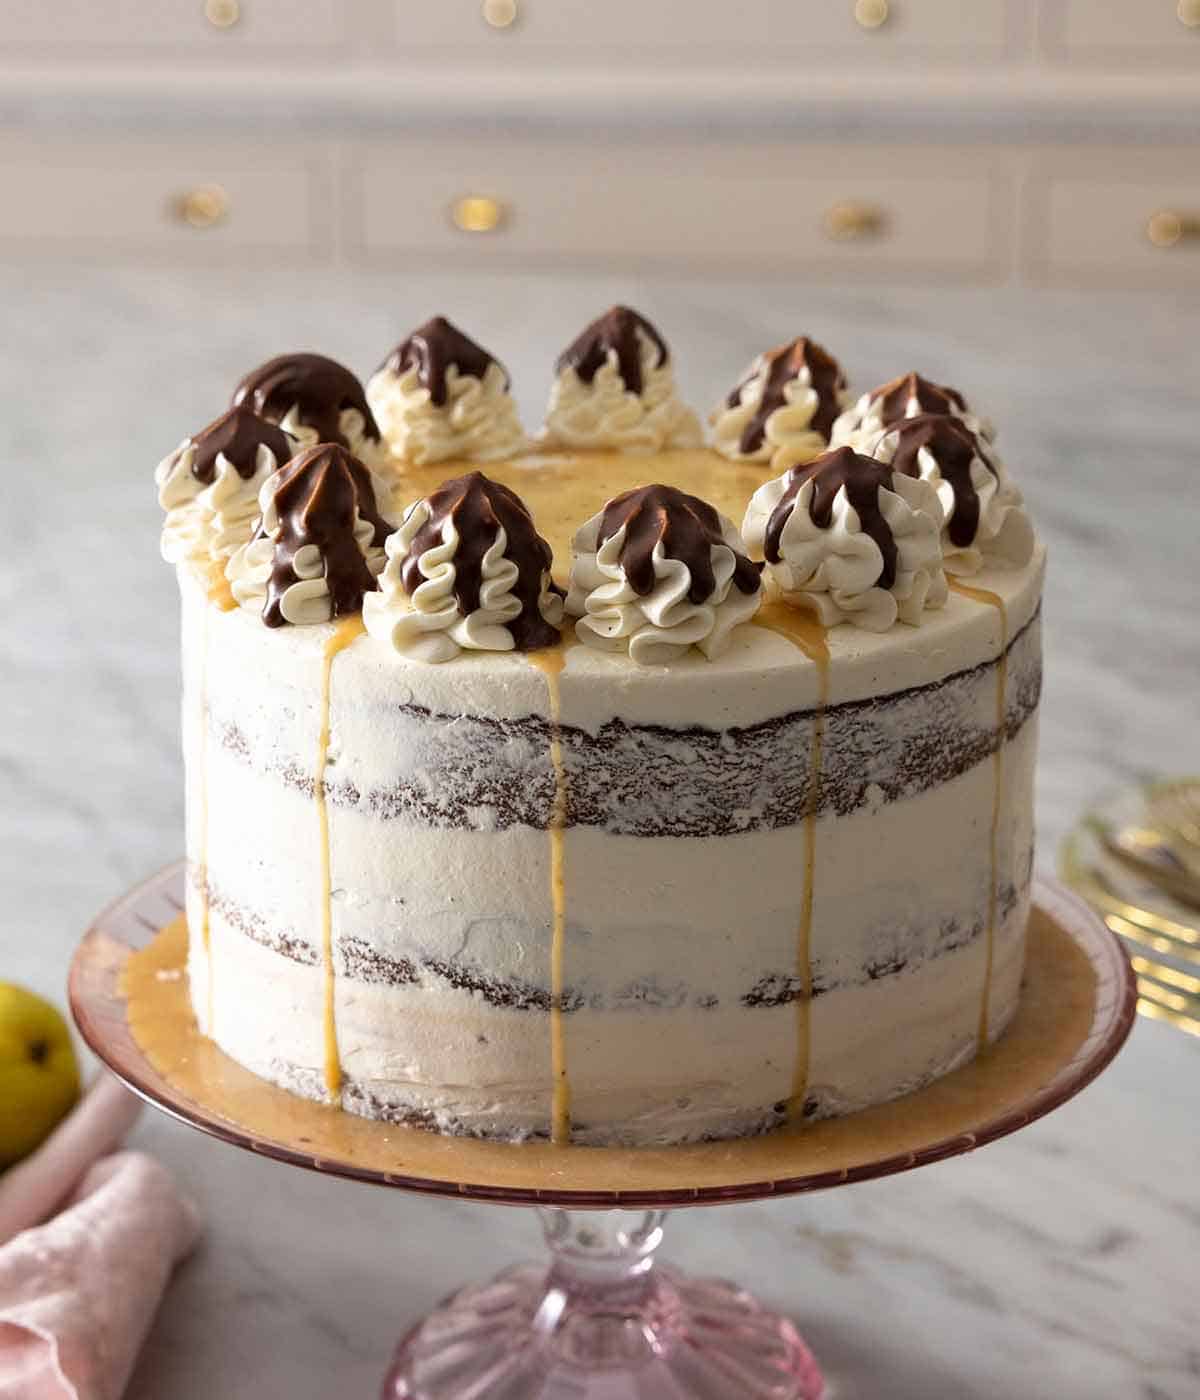
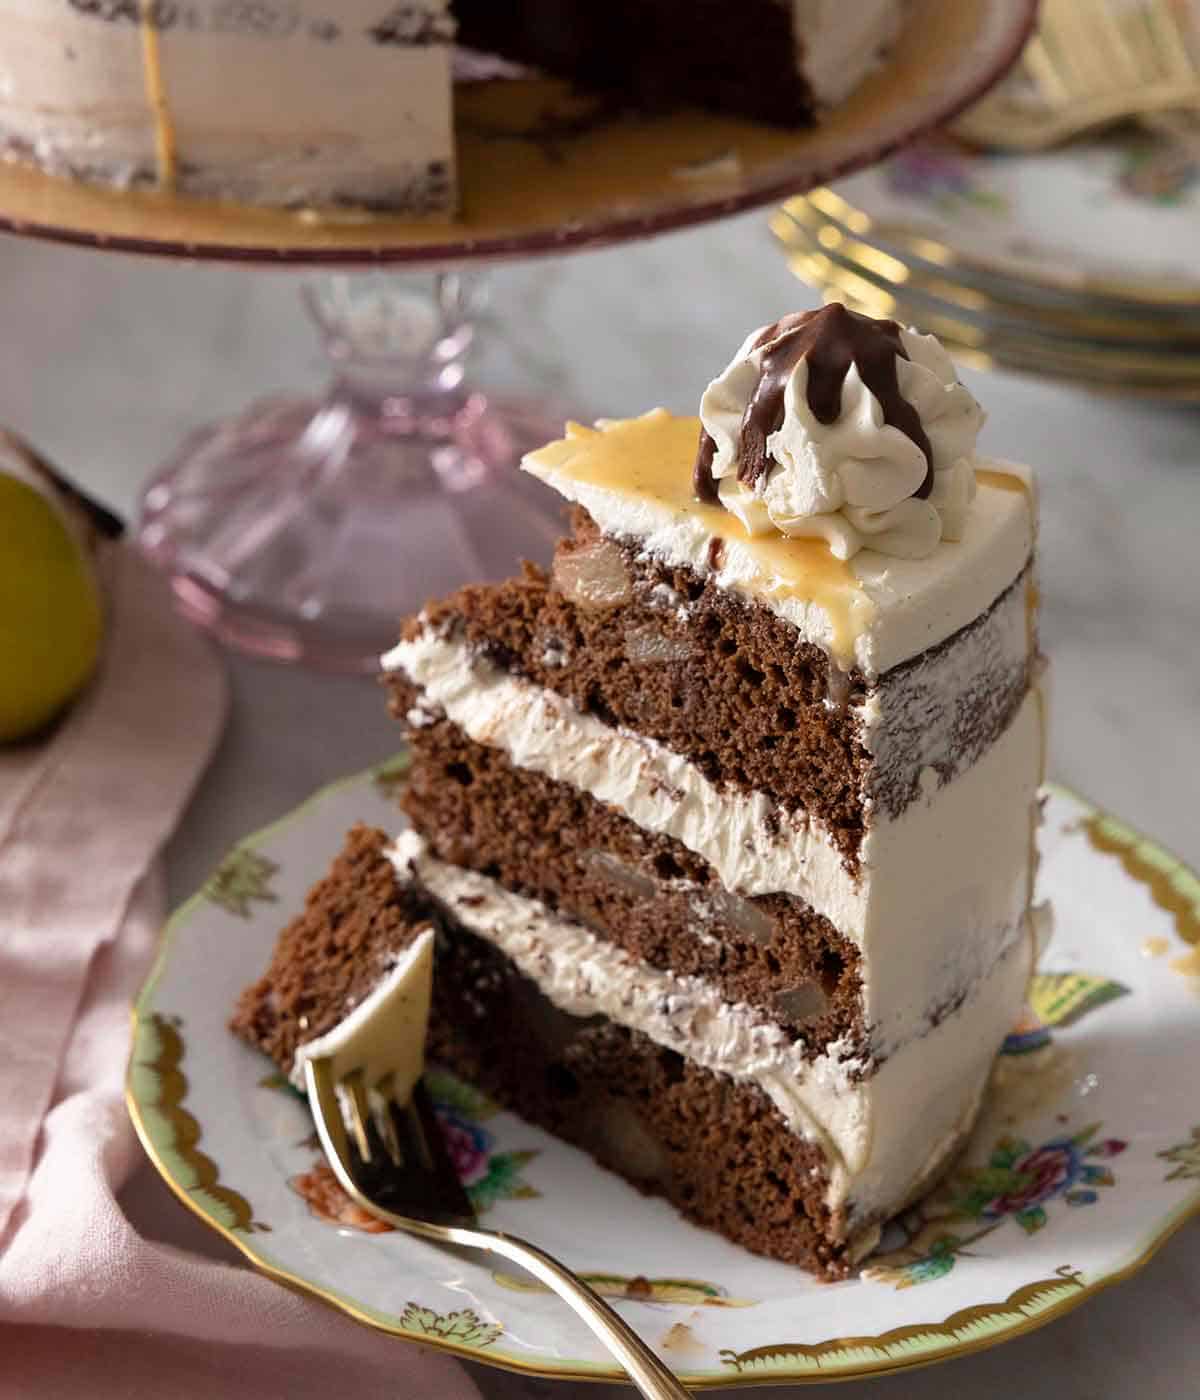
Loaded with pears, this Chocolate Pear Cake is moist, flavorful, and makes for the perfect dessert. The sweetness of the pears pairs deliciously with the chocolate cake, making it perfect for both kids and adults. The beautiful layers will leave guests impressed once you pull out a slice!
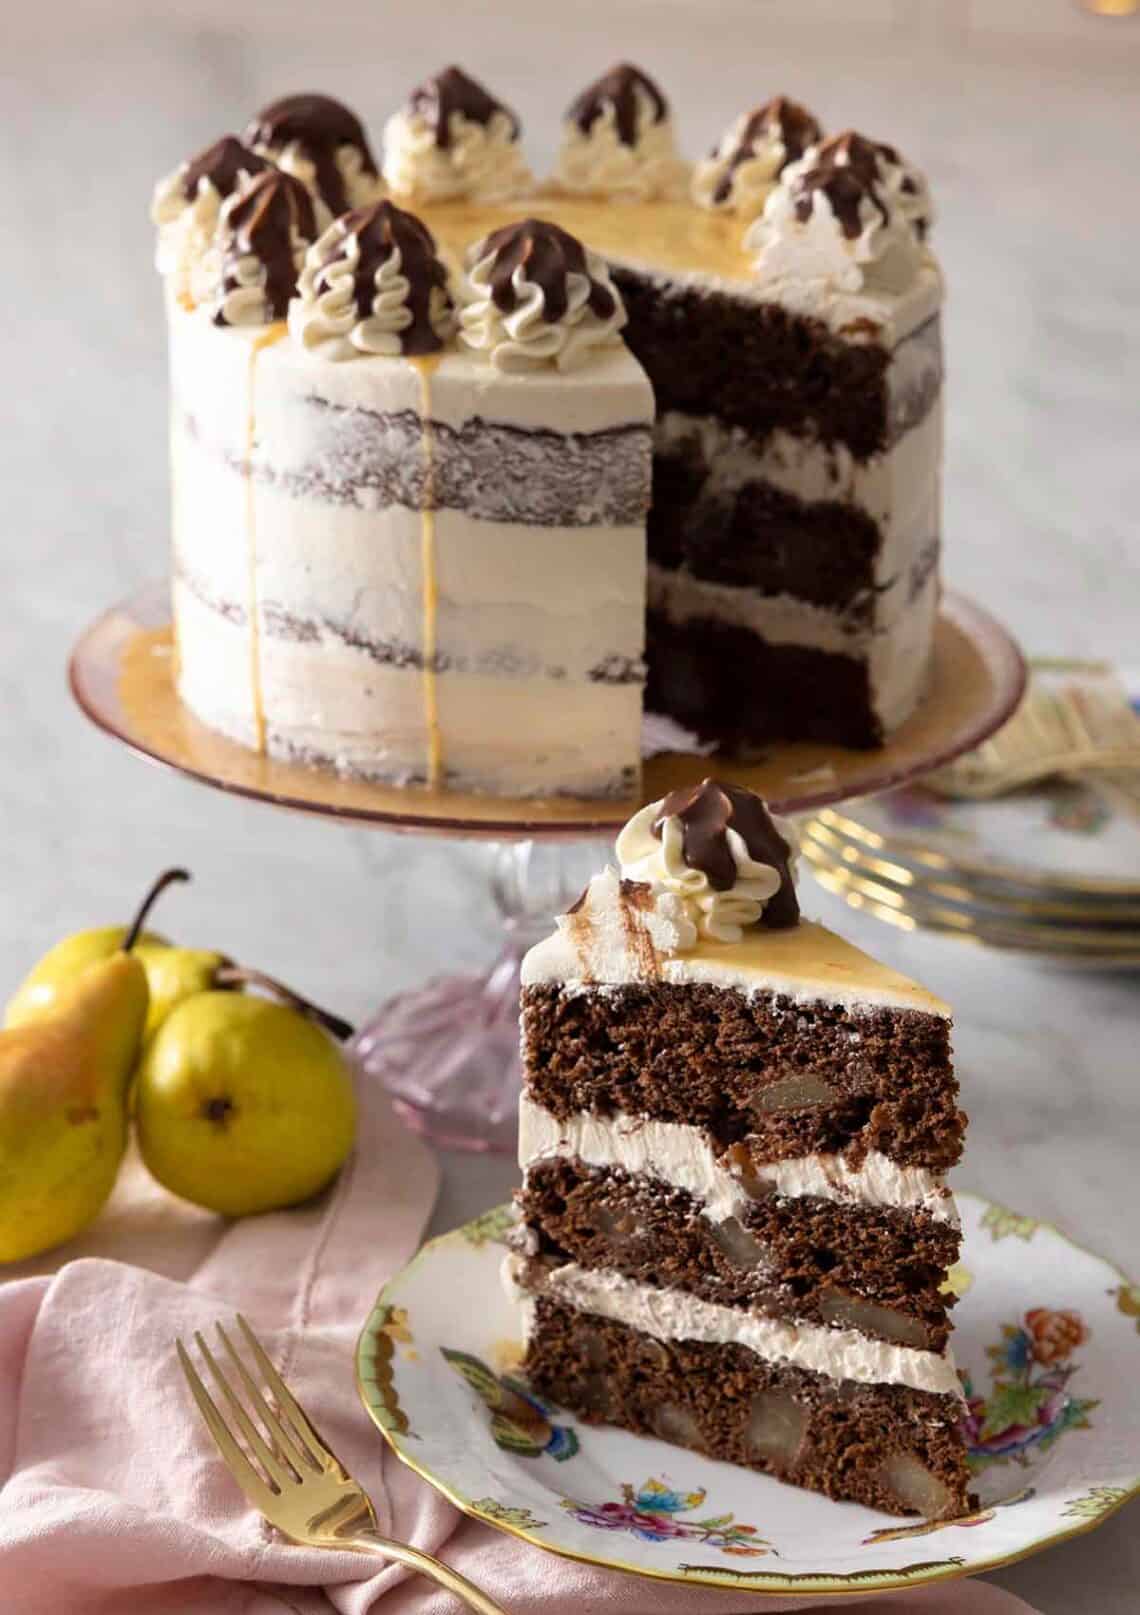
Rich, buttery, and incredibly moist, this pear and chocolate cake is a delicious and beautiful cake. The soft and tender pieces of pear will just melt in your mouth. Perfect for any occasion, this cake is ideal for when you’ve got a ton of pears on your hands and you don’t know what to do with them. For another fruity dessert, try my Classic Tarte Tatin or Berry Chantilly Cake.
WHAT YOU NEED TO MAKE THIS RECIPE

D’Anjou pear — this is my go-to pear as they are dense, so they hold up well when poached and baked. A softer pear will become soggy, affecting the cake’s texture after baking. As these green pears do not change color to indicate ripeness, check for ripeness by pressing your thumb near the stem end of the pear. If the pear gives in to pressure, the pear is ripe.
Brandy — use a good quality brandy as the alcohol improves the pears’ flavor and boosts its aroma. If it’s not drinking quality, I don’t recommend cooking with it.
Brown sugar — brown sugar keeps the cake moist and soft on the inside. The sugar also adds a delicious molasses flavor both to the cake and the poached pears. If you don’t have brown sugar, you can follow this post to Make Your Own Brown Sugar.
Semisweet chocolate — I recommend using chocolate bars made for baking as they melt better, with a consistent texture.
Yogurt — while it’s only a cup, the whole milk yogurt keeps the chocolate pear cake moist and provides a hint of tangy flavor that compliments the sweetness from the pears.
HOW TO MAKE CHOCOLATE PEAR CAKE
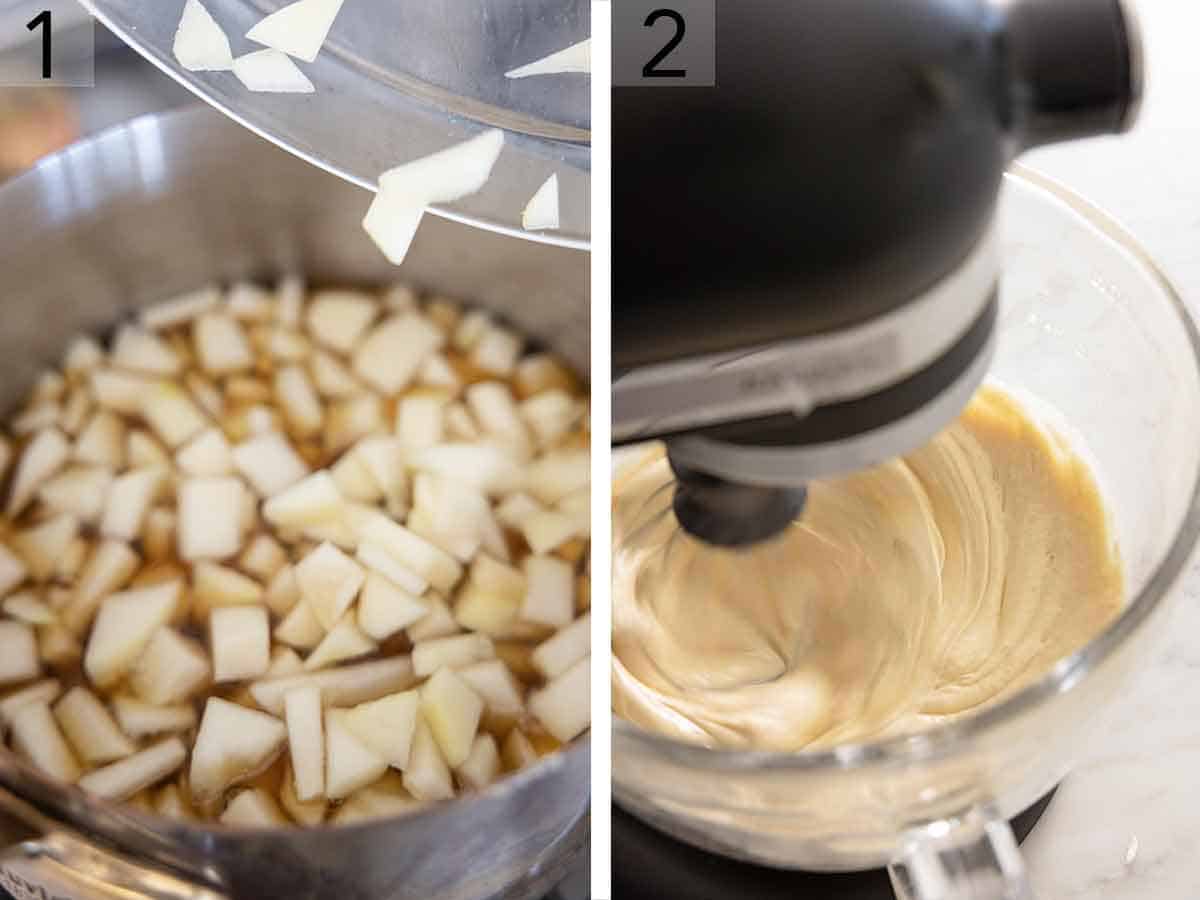
1. Add the water, brandy, sugar, vanilla, cardamom, and lemon juice to a medium pot and bring to a boil. Add the diced pears and lower the temperature to a simmer. Cook until softened, about 20 minutes, then move the pear pieces to a bowl and allow to cool. Reserve ⅓ of the poaching liquid and cook down the rest. Reserve another ¼ cup of the reduced liquid for the buttercream and then whisk in confectioners’ sugar into the remaining liquid until the desired thickness is reached for a glaze.
2. In a stand mixer fitted with a whisk attachment, add the eggs and sugar and mix on high for several minutes.
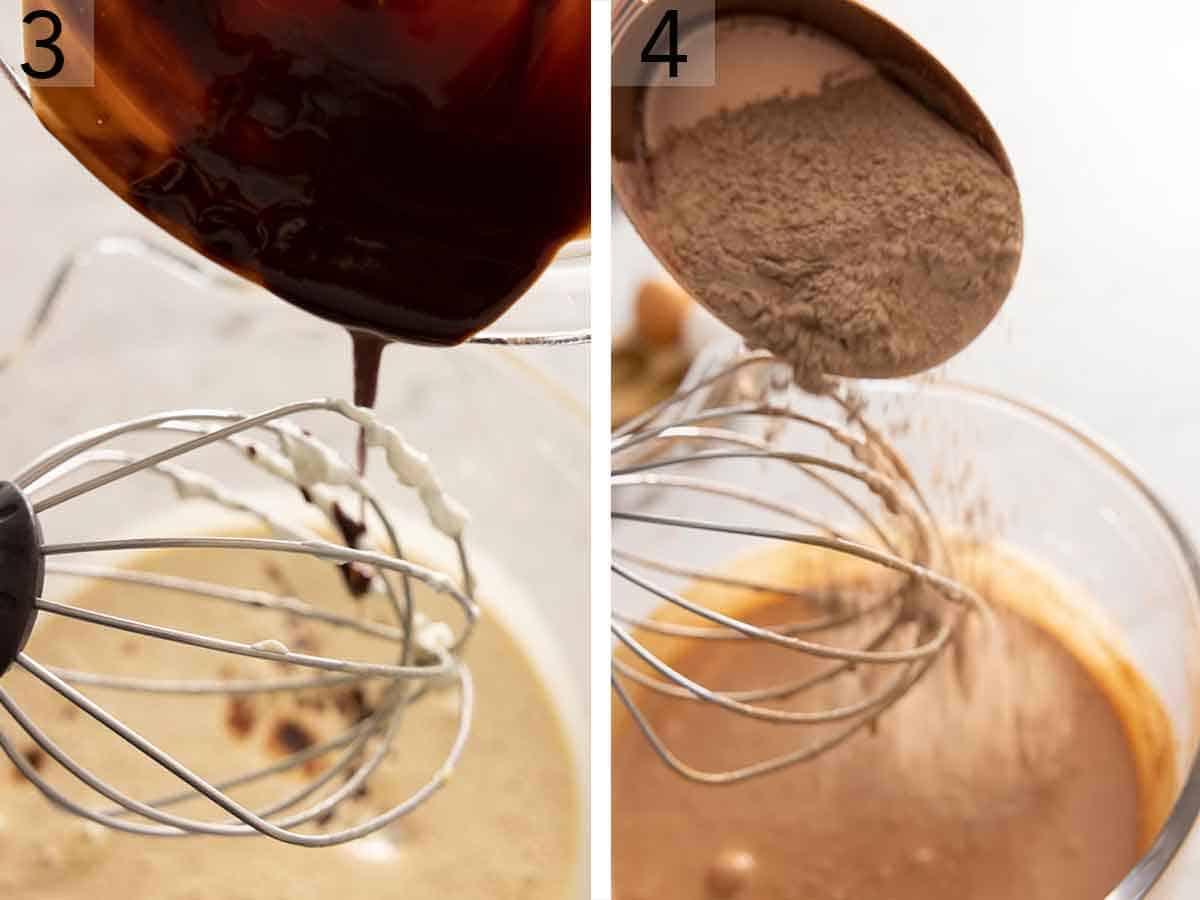
3. Add the yogurt and melted chocolate, brandy, and ⅓ cup of poaching liquid and beat until well incorporated.
4. Add the flour, salt, cocoa powder, baking powder, and baking soda mixture and mix on low until just combined.
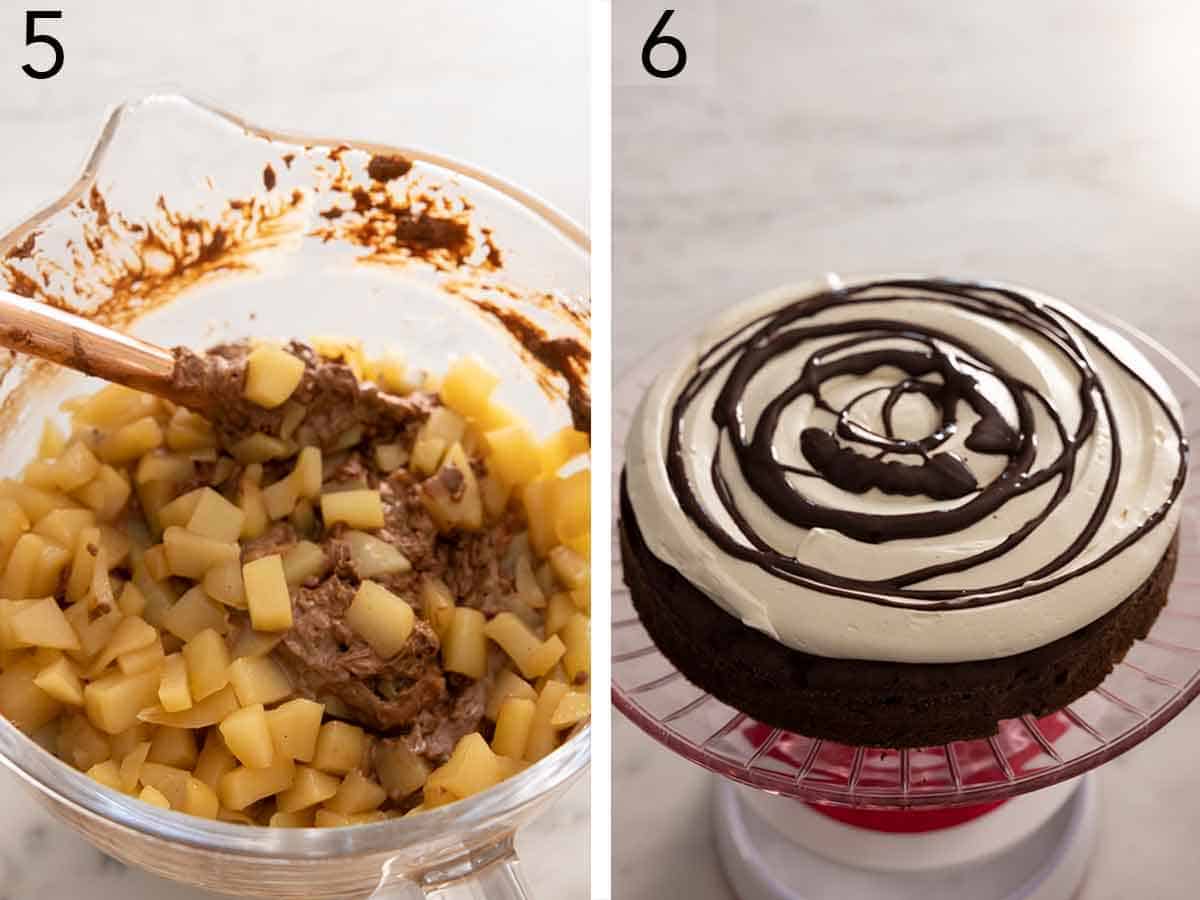
5. Fold in the poached pears carefully using a spatula. Distribute the batter evenly to the three pans and bake for about 25 minutes or until a toothpick inserted in the center comes out clean.
6. Make the buttercream, and then use a spatula to place a generous amount of buttercream on the first layer. Liberally drizzle a chocolate ganache on top and place the second cake layer on top.
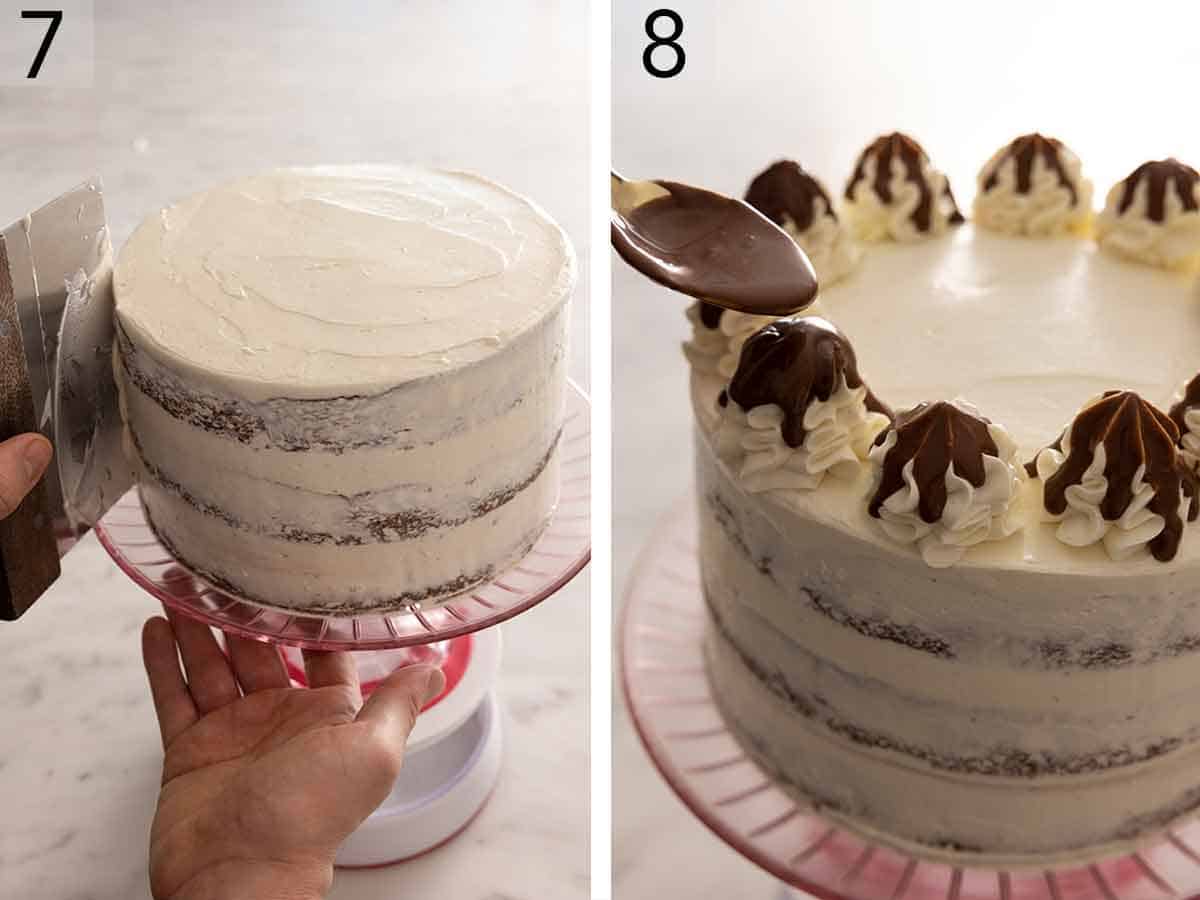
7. Cover the cake with a thin coat of buttercream. Scrape the vertical side down.
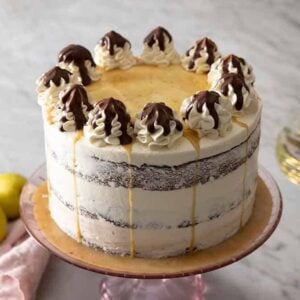
8. Pipe dollops of buttercream on top using a star tip. Drizzle some ganache on top of the dollops, then spoon glaze on the center to form a pool and serve the chocolate pear cake.
PRO TIPS FOR MAKING THIS RECIPE
- When measuring the all-purpose flour, I recommend using a scale for the most accurate measurements. However, if you don’t have one, make sure to fluff the flour first and then spoon it into your measuring cup. Level off the cup with the back of a knife to ensure you don’t overpack the flour.
- The eggs should be at room temperature to ensure they evenly incorporate into your batter without accidentally over-mixing. If you forgot to bring out your eggs, you could quickly bring them to room temperature by placing them in a large bowl and covering them with warm tap water for 5 minutes.
- I recommend tapping the cake pans on your counter to pop any air bubbles.
- Baking soda and baking powder are crucial in the cake rising, so make sure they have not expired before using them.
- The cake strips help your pear cake layers come out evenly. Cake strips work by keeping the outside edge of the pan cooler to ensure that the entire cake rises at the same rate, preventing a dome from forming in the middle of the pan. If you don’t want to purchase a set, check out my post on How to Get Perfect Flat Cake Layers to learn how to make your own strips.
- An offset spatula or bench scraper is perfect for frosting the cake.
- Avoid over-mixing as you risk over-developing the gluten in the batter leading to a tough and dense chocolate pear cake.
- To help the butter melt quicker and easier, cut it into small cubes.
- If you need more detail on it, then see my step by step post on ganache.
FREQUENTLY ASKED QUESTIONS
Should pears be peeled before baking?
I recommend peeling the pears before baking. The pear’s skin becomes tough when heated, leading to an unpleasant texture to the cake.
How do I store this?
Store this cake at room temperature, covered, for up to 2 days or up to a week refrigerated. I prefer eating this pear cake warm, so I recommend reheating it before serving.
Can I freeze this cake?
While the pear cake is freezer-friendly, you might find that the texture, especially of the pears, will be different once thawed. Wrap the cake tightly with plastic wrap then tin foil to avoid freezer-burn as it’ll dry out the cake.
If you’ve tried this Chocolate Pear Cake recipe, then don’t forget to rate the recipe and let me know how you got on in the comments below, I love hearing from you!
Chocolate Pear Cake
Equipment
- 8 inch cake pans
- Mixer
Ingredients
For the Poached Pears:
- 4 cups D'Anjou pears peeled and diced
- 2 cups water
- ½ tbsp vanilla extract
- ¼ cup brandy
- ¾ cup brown sugar
- 2 tbsp lemon juice
- ¼ tsp cardamom
For the Cake:
- 6 ounces semisweet chocolate
- 2¼ cups all-purpose flour 270g
- ½ cup cocoa 50g
- 3 teaspoons baking powder
- ½ teaspoon baking soda
- ½ tsp salt
- 1⅓ cup brown sugar 280g
- ¾ cup unsalted butter softened 170g
- 4 large eggs
- 1 cup whole milk yogurt 240mL
- ⅓ cup poaching liquid 80mL
- 2 tablespoons brandy
For the Ganache:
- ½ cup semisweet chocolate
- ¼ cup cream
- 1 tsp brandy
For the Buttercream:
- 5 egg whites
- 1½ cups granulated sugar
- 2 cups unsalted butter room temperature
- 3 tbsp reduced poaching liquid
- 1 tsp vanilla
- ¼ tsp cardamom
Instructions
To Poach the Pears:
- Add the water, brandy, sugar, vanilla, cardamom, and lemon juice to a medium pot and bring to a boil. Add the diced pears and lower the temperature to a simmer. Cook until softened, about 20 minutes, and move the pear pieces to a bowl and allow to cool.
- Reserve ⅓ cup of the poaching liquid and bring the rest back to a simmer and cook until reduced by about half. Remove from heat and allow to cool. Reserve ¼ cup of the reduced liquid for the buttercream and then whisk in confectioners' sugar into the remaining liquid until the desired thickness is reached for a glaze.
For the Cake:
- Preheat oven to 350F. Butter and flour three 8" pans. I use cake strips to aid in even baking but these are optional.
- Melt the chocolate and butter in a small bowl. You can use a double boiler or microwave at half power in 20 second spurts.
- Sift the flour, salt cocoa powder, baking powder and soda into a large bowl and whisk together.
- In a stand mixer fitted with a whisk attachment add the eggs and sugar and mix on high for several minutes. Add the yogurt and melted chocolate mixture, brandy and ⅓ cup of poaching liquid and beat until well incorporated.
- Add the flour mixture and mix on low until just combined. Fold in the poached pears carefully using a spatula.
- Distribute the batter evenly to the three pans and bake at 350F for about 25 minutes or until a toothpick inserted in the center comes out clean.
For the Buttercream:
- Add egg whites, sugar, cardamom and salt in a bowl. Give the mixture a brief whisk.
- Place the bowl over a pan of simmering water. Make sure the water does not touch the bowl.
- Whisk the egg whites occasionally while it warms up. When the mixture has warmed, whisk it constantly. You will heat the mixture until it reaches an internal temperature of 160F or until it's not grainy between your fingers.
- Transfer the bowl to a stand mixer, mix with a whisk attachment until you get room temperature glossy peaks.
- Switch to a paddle attachment and while the mixture is running on low, add tablespoon sized dollops of room temperature butter making sure to let the butter incorporate before you add the next piece. Mix in the reduced poaching liquid and vanilla.
For the Ganache:
- Melt the chocolate, cream and brandy in a double boiler or microwave. Remove from heat and stir until all the chocolate is melted.
For the Assembly:
- Use a spatula to place a generous amount of buttercream on the first layer. Liberally drizzle the ganache on top and place second layer on top. Repeat steps and cover cake with a thin coat of buttercream. Scrape the vertical side down and pipe dollops on top using a star tip. Drizzle some ganache on top of the dollops then spoon glaze on the center to form a pool and serve.
Notes
- When measuring the all-purpose flour, I recommend using a scale for the most accurate measurements. However, if you don’t have one, make sure to fluff the flour first and then spoon it into your measuring cup. Level off the cup with the back of a knife to ensure you don’t overpack the flour.
- The eggs should be at room temperature to ensure they evenly incorporate into your batter without accidentally overmixing. If you forgot to bring out your eggs, you could quickly bring them to room temperature by placing them in a large bowl and covering them with warm tap water for 5 minutes.
- I recommend tapping the cake pans on your counter to pop any air bubbles.
- Baking soda and baking powder are crucial in the cake rising, so make sure they have not expired before using them.
- The cake strips help your pear cake layers come out evenly. Cake strips work by keeping the outside edge of the pan cooler to ensure that the entire cake rises at the same rate, preventing a dome from forming in the middle of the pan. If you don’t want to purchase a set, check out my post on How to Get Perfect Flat Cake Layers to learn how to make your own strips.An offset spatula or bench scraper is perfect for frosting the cake.
- Avoid overmixing as you risk over-developing the gluten in the batter leading to a tough and dense cake.
- To help the butter melt quicker and easier, cut it into small cubes.
Nutrition
Have you tried this recipe? Tag me today!
Mention @preppykitchen and tag #preppykitchen!


