This post may contain affiliate links. Please read our disclosure policy.


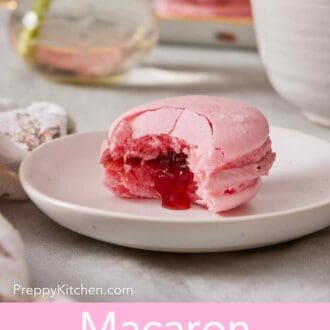

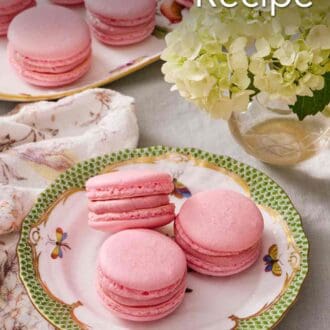
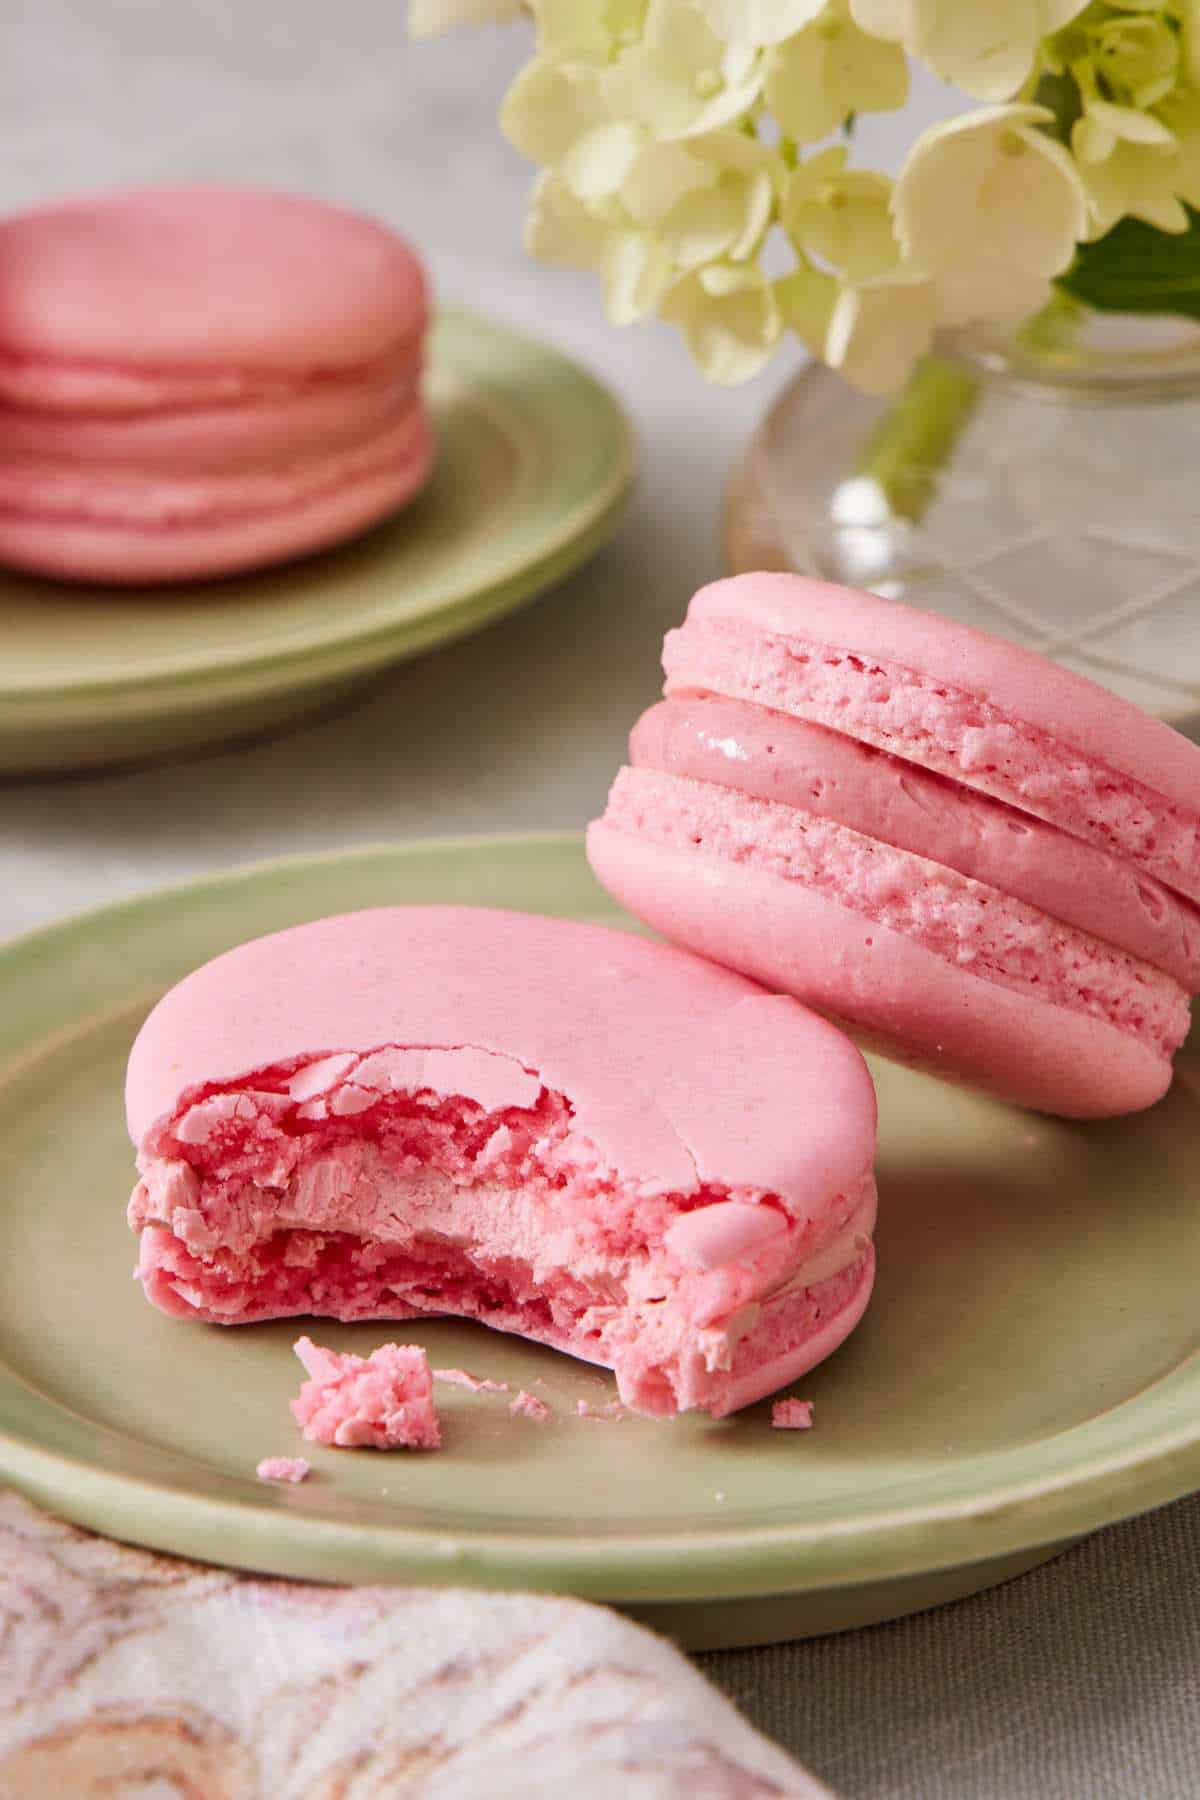
My French Macaron Recipe makes perfect sandwich cookies with crisp almond shells, chewy centers, and a French buttercream filling. I tested this recipe over 16 times to include a fix for every way a batch can fail!
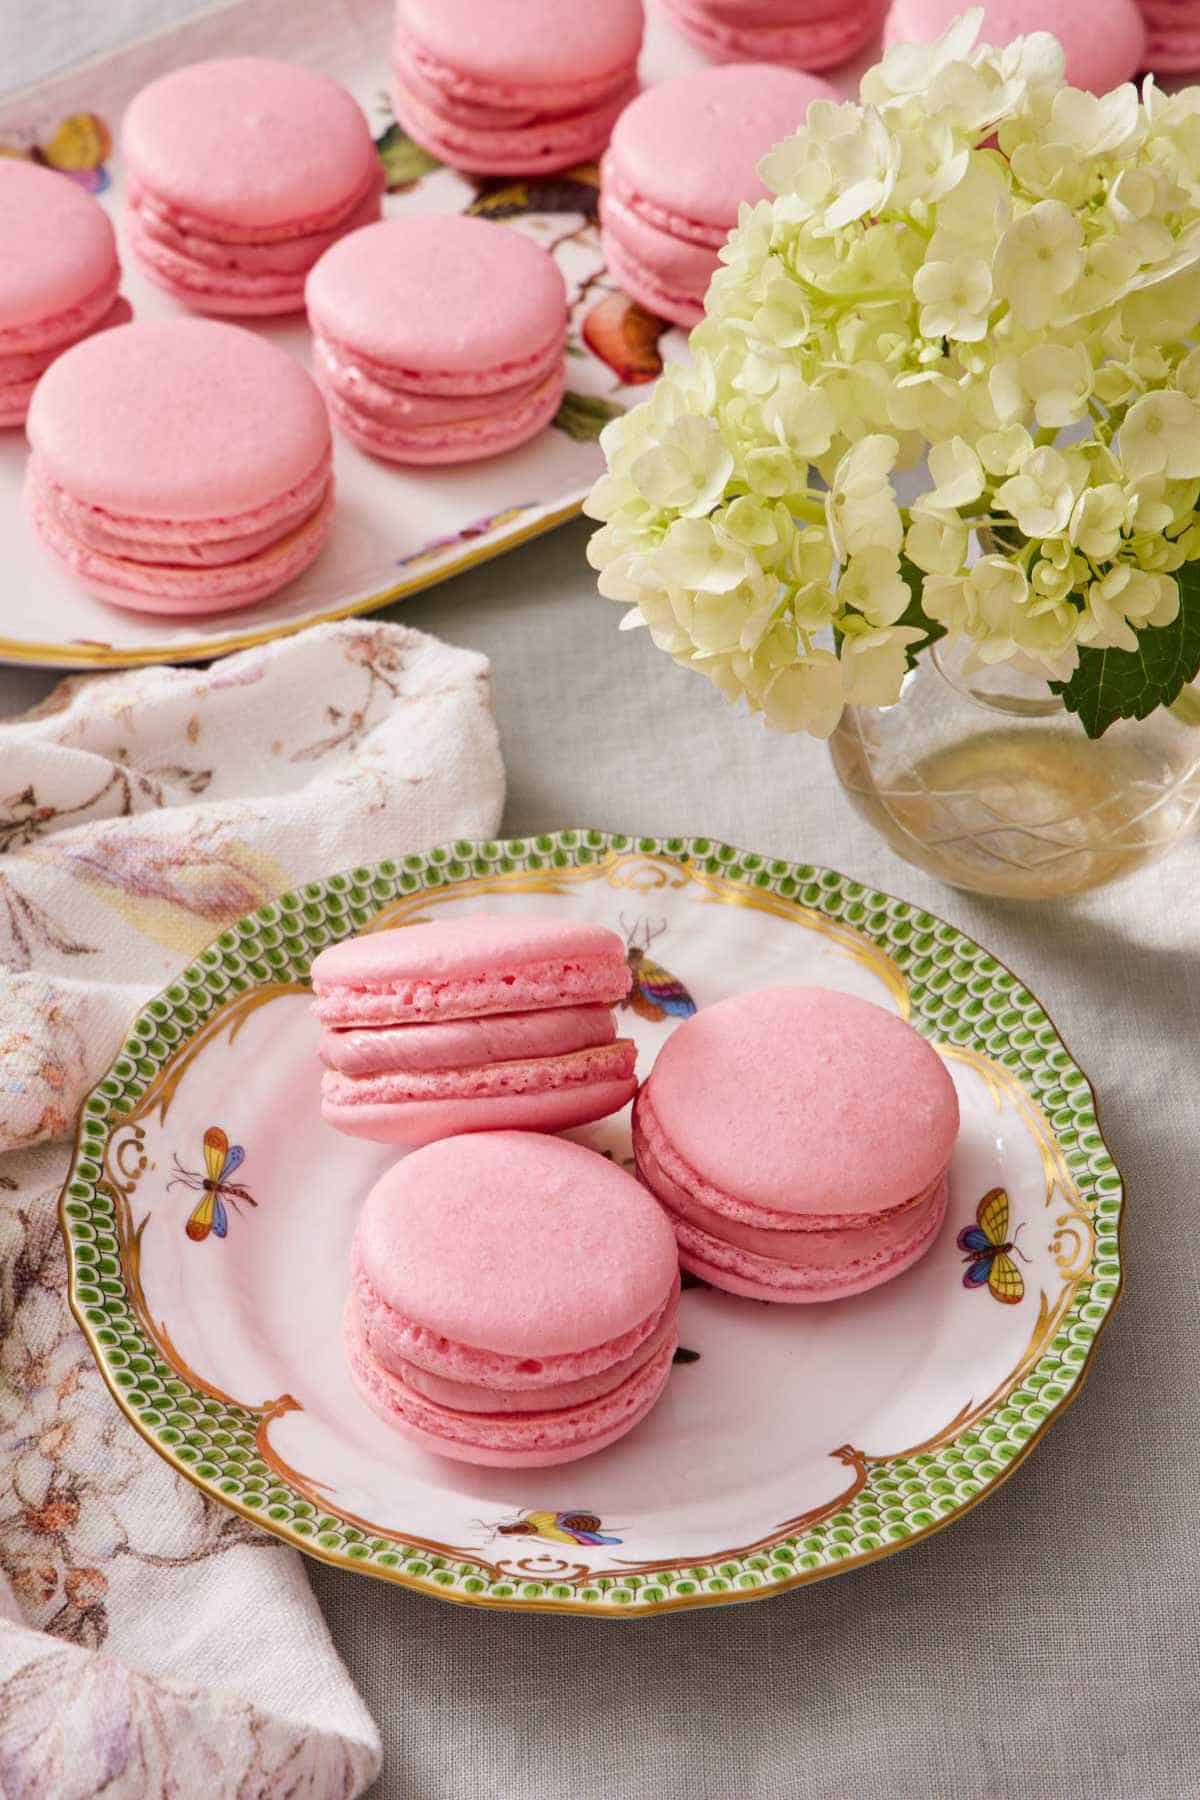
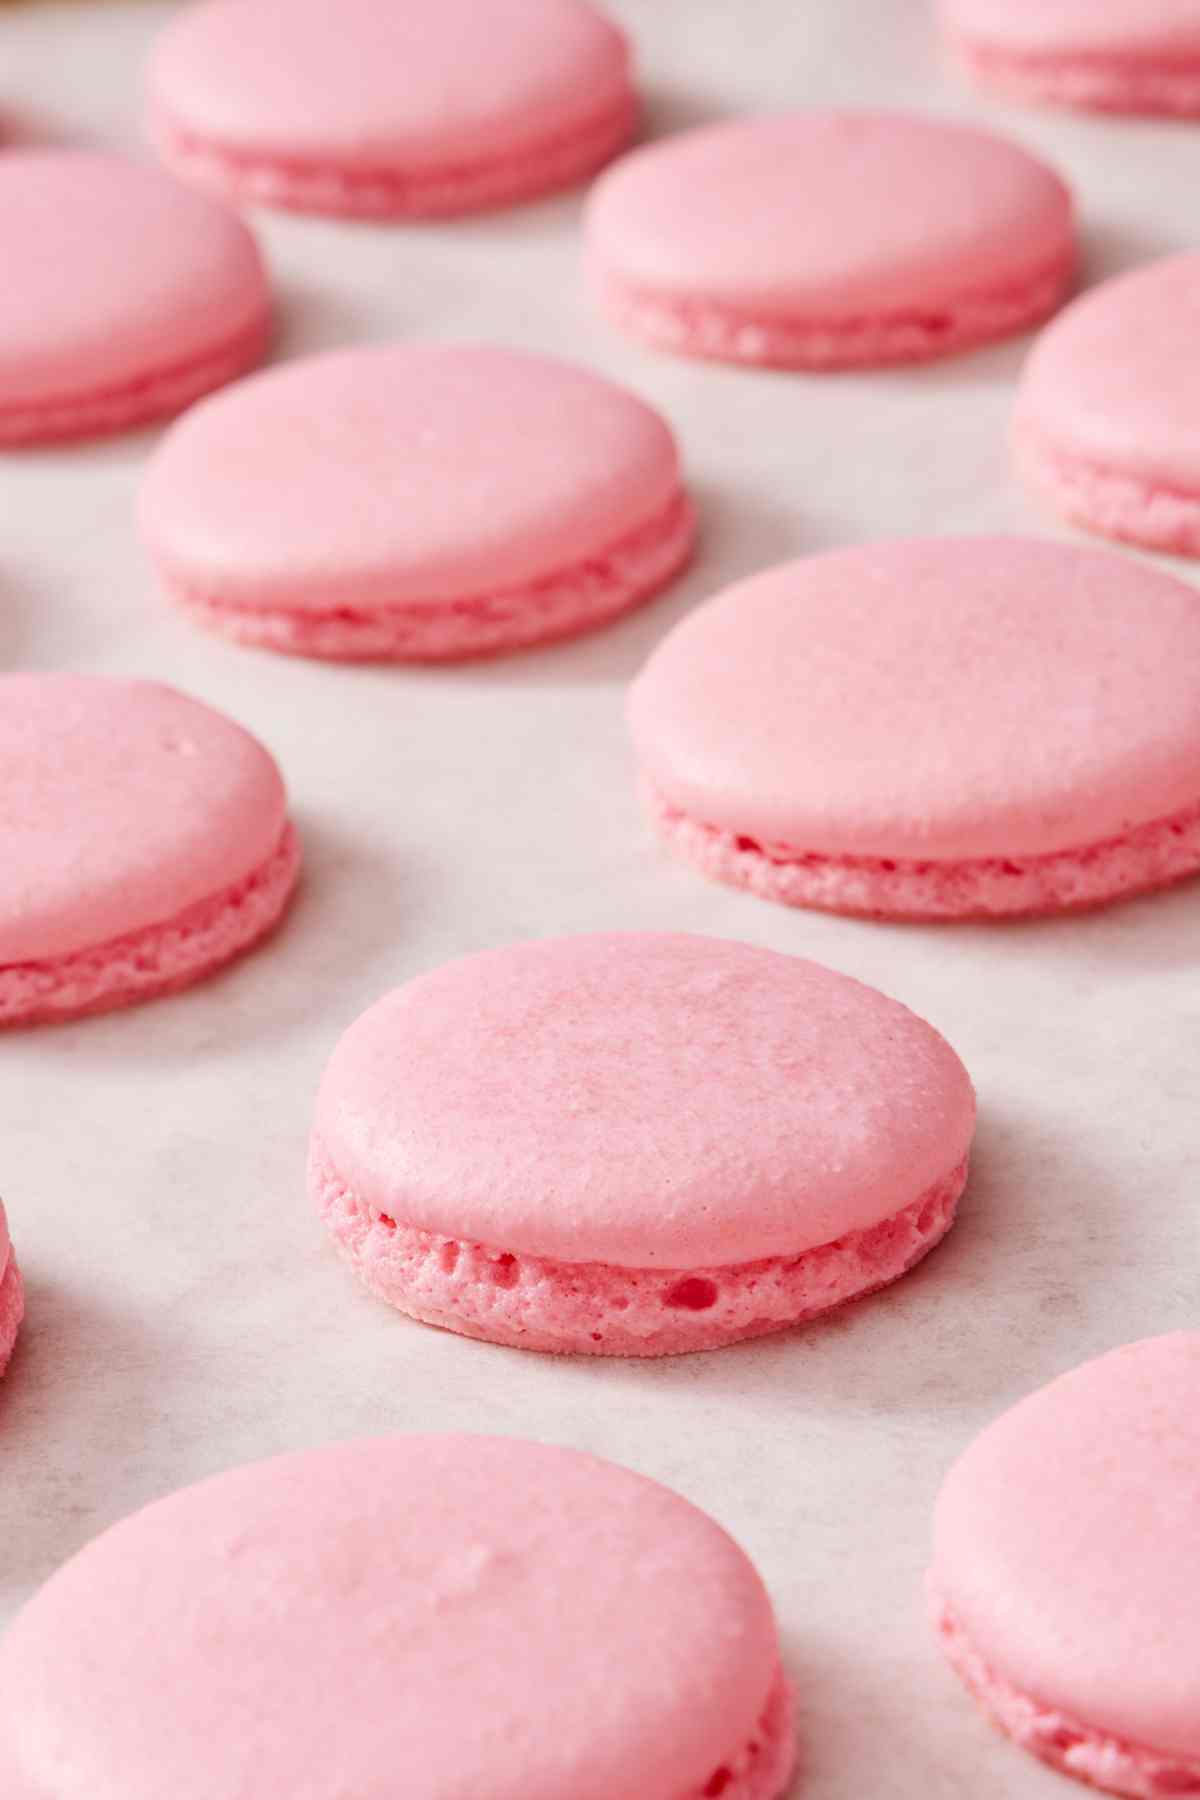
Macarons are one of the most popular recipes on Preppy Kitchen! My recipe makes 36 finished sandwich cookies: that’s 72 smooth almond shells with ruffled feet and chewy centers, filled with a silky French buttercream that uses the yolks left over from making the meringue for the batter.
They also bring a steady stream of questions because macarons are a bit finicky by nature. When my team and I retested this recipe in early 2026, we didn’t just bake it until it worked. We broke it on purpose: we undermixed the batter, cut the rest time short, pulled trays out of the oven early, and left trays in too long. One batch also failed on its own, thanks to an unknowingly oily bag of almond flour. We tested this recipe over 16 times! These tests were based on the most common questions readers ask and when they need help for a step gone wrong.
Know this before you start: My recipe is beginner-friendly, but if you run into an issue, don’t give up! Use the troubleshooting section below to help diagnose and fix the problem for your next batch.
“This was my first time making macarons and they turned out just like the picture in the recipe. The video was so helpful and they are DELICIOUS. I feel like I’m back in Paris!”
Christen
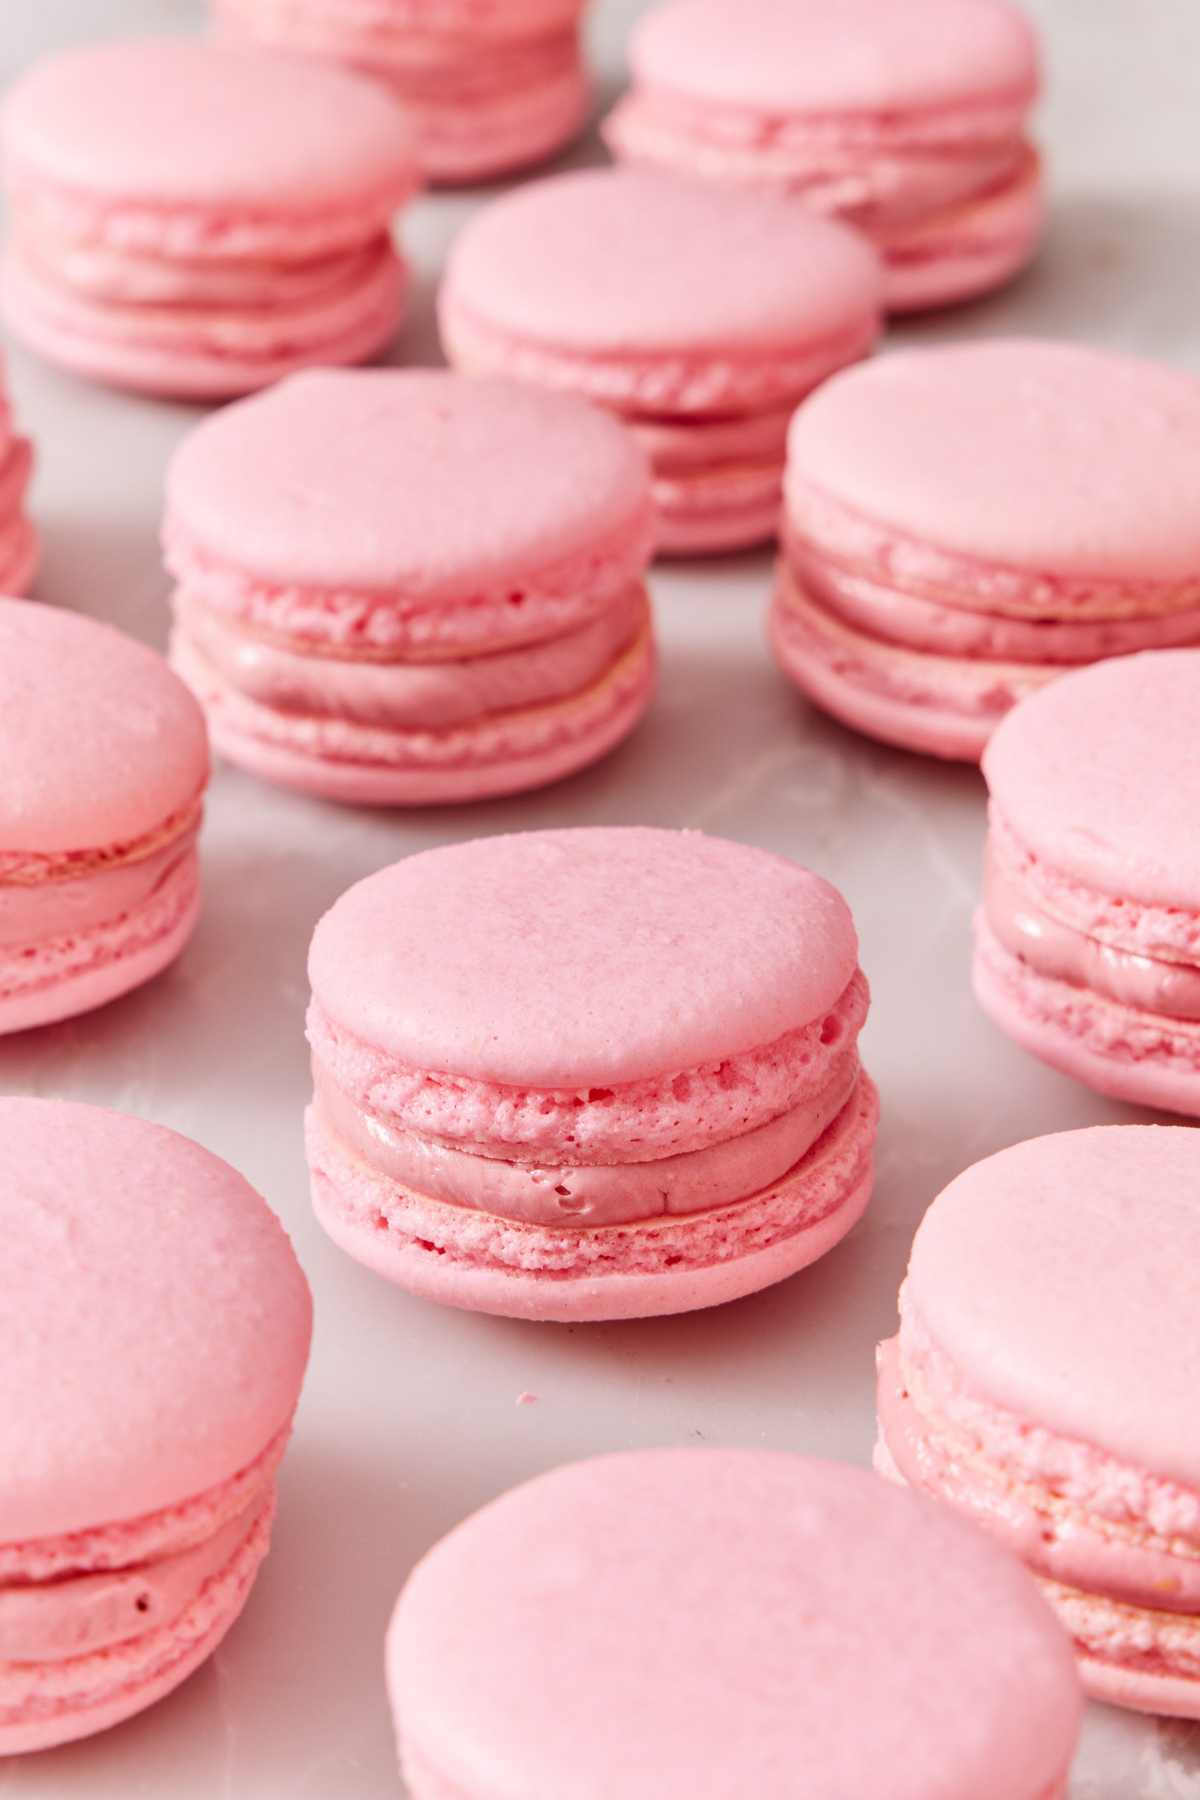
Macarons vs. Macaroons (and How to Say It)
A macaron (mah-kah-ROHN) is a French sandwich cookie: two crisp and chewy shells made from almond flour, powdered sugar, and whipped egg whites, joined by a filling. A macaroon (mack-uh-ROON) is a dense, chewy mound of sweetened shredded coconut. My coconut macaroons are scooped with a cookie scoop, no piping bag required. The names sound alike, but they’re two very different cookies!
The sandwich-style most people picture is the Parisian macaron. Some French towns, Nancy among them, still bake an older style: a single crackled almond cookie with no filling.
Macaron shells are made with a meringue base, but bakers are split on the type of meringue. My recipe uses a French meringue, where granulated sugar is beaten straight into raw egg whites. Others use an Italian meringue, which streams hot sugar syrup into the whites, or a Swiss meringue that warms the whites and sugar together before whipping. I use the French method for these shells because it needs nothing but a mixer; it’s simpler to do, and it takes less time.
Ingredient Notes for Macaron Shells
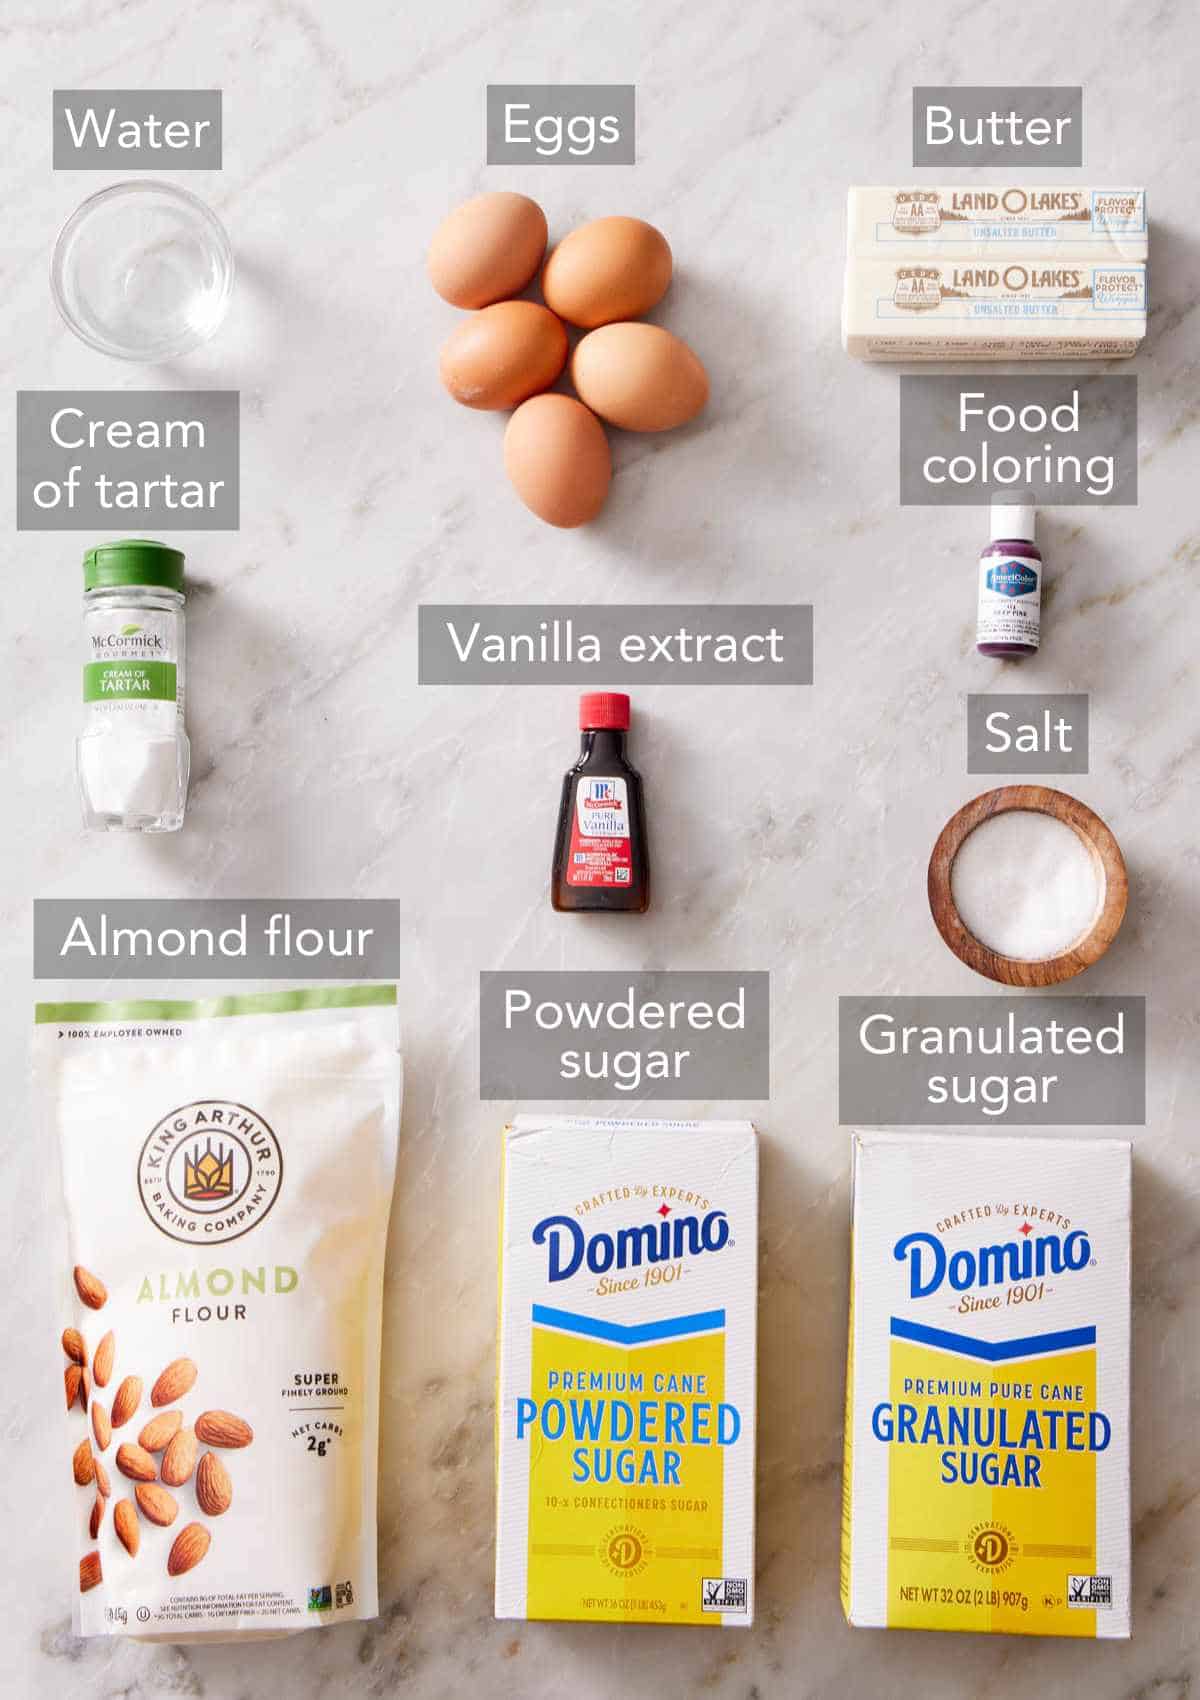
The shells take only a handful of ingredients, so each one matters. You can find the full list of ingredients and measurements in the recipe card below.
Almond flour — use blanched, finely ground almond flour with the skins removed, not natural almond flour or almond meal. Before you start, rub a pinch between your fingers. In our last retest, one bag of the same brand we’d used all along looked and smelled noticeably oily, and that batch baked up wrinkled and cracked. If yours leaves a noticeable film on your fingers, open a fresh bag. You can keep almond flour in the fridge or freezer so it doesn’t turn stale and oily in the pantry if you don’t use it often.
Powdered sugar and granulated sugar — powdered sugar sweetens the shells and dissolves into the batter easily with the almond flour. It also helps the almond flour from clumping together again after it is processed and sifted. Granulated sugar goes into the egg whites a tablespoon at a time and gives the meringue its strength. Both are structural, which is why I don’t cut the sugar (more on that in the FAQs).
Egg whites — you need 100 grams, or about 3 large whites. Weigh them, because egg sizes vary. Many recipes and bakers insist that you need to age the egg whites for the best macarons, and I used to suggest that if you had the time. But over the years, I’ve tested this recipe so many times with fresher and older eggs, and I have never found a noticeable difference in how the meringue stiffened up or the macaron batter baked, so I don’t think aging is worth the added time.
Cream of tartar — just ¼ teaspoon is enough acid to firm up the egg proteins so the meringue keeps its air through folding. It’s the same trick I use for my meringue cookies that don’t have any flour to stabilize the whites—the firmer proteins bond with the sugar better for a more stable structure, so it’s an important ingredient. If you don’t have cream of tartar, use 1 teaspoon of lemon juice or white vinegar.
Gel food coloring — if you want to color the batter, use gel, a drop or two at most for a beautiful pastel color. I prefer gel food coloring over bottles of liquid food coloring because it doesn’t throw off the moisture ratios in delicate recipes like this one. It’s also highly concentrated, so you don’t need to use as much.
Filling ingredients — the extra egg yolks, butter, and sugar combine to make a French buttercream to fill the macarons. You can use another frosting or filling if you’d like!
Tools You’ll Need
These are the essential tools for making macarons. For the rest of my baking kit, see Academy: Essential Kitchen Tools & Utensils.
A kitchen scale — macarons are all about precision! You can still make them with measuring cups, but every ingredient you scoop is a chance for the ratio to shift. And because macarons are notoriously finicky, a shift in the ingredients can throw off the finished texture.
A fine-mesh sieve and a food processor — the sieve catches coarse almond pieces, and a 30-second pulse turns the almond flour and powdered sugar into a powder fine enough for smooth tops.
A stand mixer or hand mixer — you need this to beat the meringue for the batter and the buttercream for the filling.
Piping bags and two round tips — a medium round tip (I use a Wilton 1A) for the shells and a small round one (Ateco #10) for the filling.
Parchment paper or silicone mats — either works with some slight differences. Parchment bakes with the best results, making tall feet and more impressive shells. With parchment, I glue each corner to the tray with a dab of batter so the paper can’t lift up from an oven fan or a slight breeze when you move the trays to the oven. Silicone retains more heat, so they can bake with a smaller foot and an overall flatter top. You can also use silicone macaron mats that have raised circles. I have baked with them, and they aid in developing a foot on your shells, but they will still bake a bit shorter and flatter.
Rimmed baking sheets — I found in testing that a baking sheet with a short lip around the edges protects the macaron shells better in the oven. The shells browned less and developed better feet.
An oven thermometer and a candy thermometer. These shells bake low, at 270°F, and a home oven can run hotter or cooler than the temperature you set it to. An oven thermometer lets you know exactly what temperature the oven is running at so you can adjust it higher or lower to accommodate any difference. The candy thermometer is for the 240°F sugar syrup used in the filling.
Pro Tips For The Best Macarons
The best time to bake macarons is on a dry day. A humid environment can cause your macarons to take a long time to dry out or not dry out properly. While you can bake them in higher humidity, the shells will need longer to rest and dry out, so always tap them to test. (More on this in the Troubleshooting section.)
Weigh everything! The recipe card lists grams for a reason—it’s the most accurate way to ensure your macarons turn out correctly (see How to Measure Ingredients Correctly). Scooping 1½ cups of almond flour straight from the bag packs in more than the 168 grams needed. I tested this and found my ½ cup scoop had 15 grams more almond flour than it needed. In total, that adds 45 grams, almost an additional ½ cup, of flour to the batter, enough to make the batter too stiff. Sifting only removes a few grams of coarse pieces, so you can weigh before you sift.
If your parchment paper won’t stay flat on the edges, or your oven has a fan to circulate air, lightly brush or spray the pan with oil, then place your parchment paper on top. You can also put a small dot of macaron batter on the pan underneath each corner of the parchment paper. This will hold the paper down. If the paper lifts up at all, it can cause the macarons to bake up with a slanted top.
Make sure your hands are dry when you test the macarons after resting. If they are wet, the added moisture will cause the shells to wrinkle during baking.
How To Make Macarons
Here’s the method with my process photos. The exact amounts and every step are in the recipe card. Weigh and set out everything before you start, because once the meringue is whipped, you can’t stop to measure. (See my guide on Mise En Place for setting yourself up for success before you start!)
Grind and Sift the Dry Ingredients
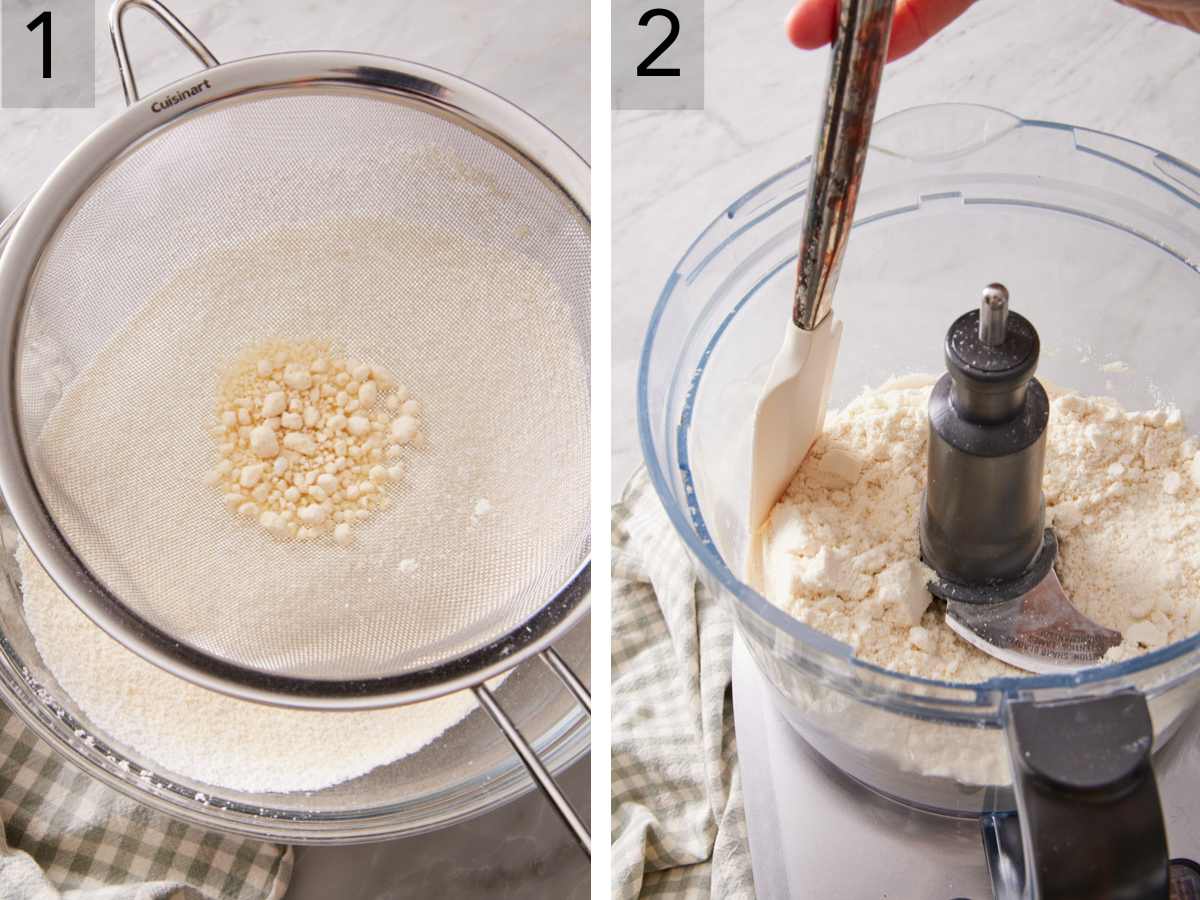
1. Sift the almond flour and powdered sugar into a bowl and let it fall through on its own; don’t press it through the mesh. You can break up any large clumps with your fingers to sift through, but discard the big grains caught by the sieve.
2. Pulse the mixture in a food processor for 20 seconds, scrape the bowl, pulse for 10 seconds more, then sift again and discard the coarse bits left in the sieve. In my kitchen, bumpy tops have come from lumps of almond flour that weren’t fine enough. In the previous version of this recipe, I said this step was optional. But I found that after repeatedly testing it and using different bags of almond flour, it is important for consistent results.
Whip a Stiff French Meringue
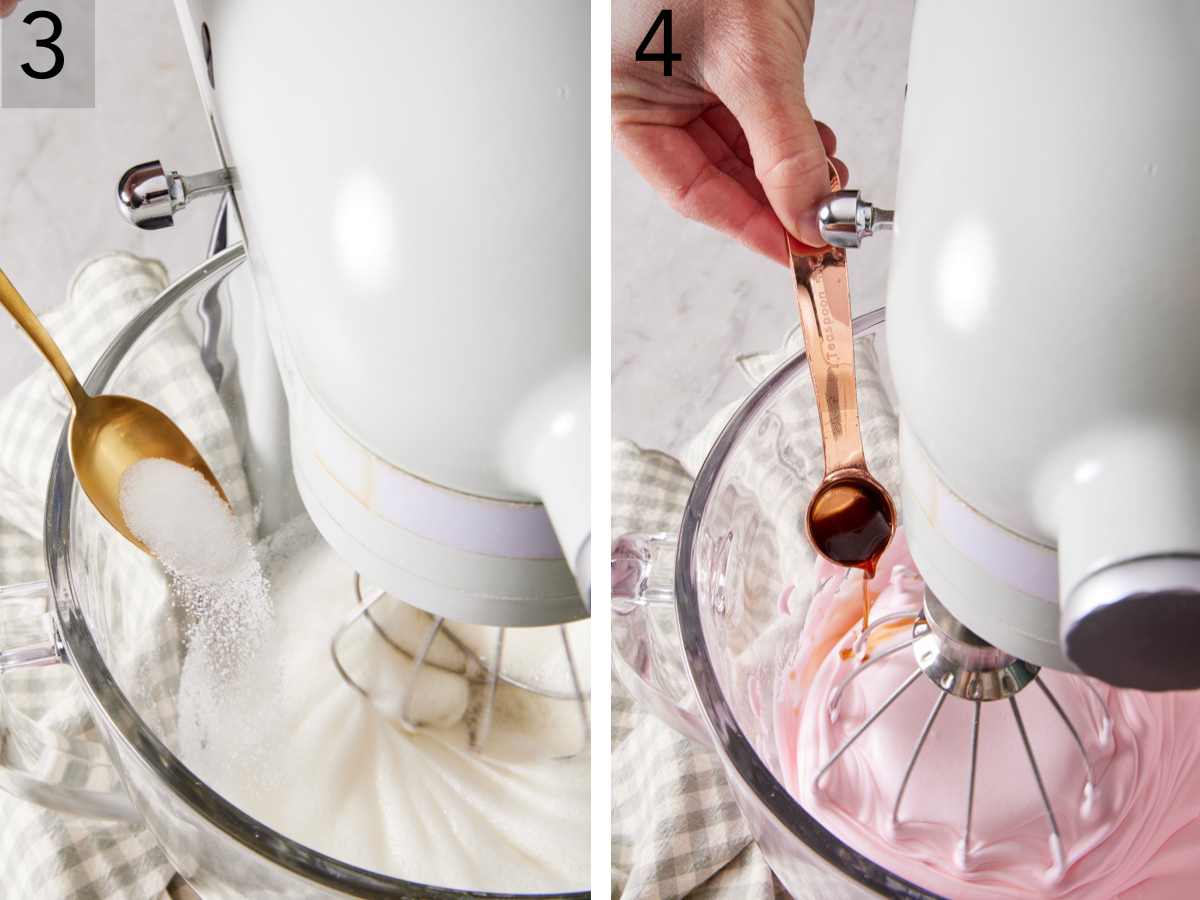
3. Whisk the egg whites on medium speed for about 30 seconds, until foamy, then add the cream of tartar. Start adding the granulated sugar, 1 tablespoon at a time, stopping and scraping the bowl down every now and then. Adding all of the sugar by a spoonful at a time should take a few minutes. This slow process produces a more stable meringue as the sugar dissolves and it forms an organized bond with the egg proteins.
4. Add the vanilla and gel coloring as soon as all of the sugar is mixed in, while the meringue is still soft. This way, it has time to incorporate, and you don’t end up overbeating the egg whites. Then, keep beating on medium speed until the peaks are stiff, about 6 minutes. I keep the mixer on medium the whole time—if you bump it up too high, you can over-whip the meringue before the sugar has had time to dissolve. Going slower gives time for the sugar grains to fully dissolve into the egg whites.
Fold and Macaronage
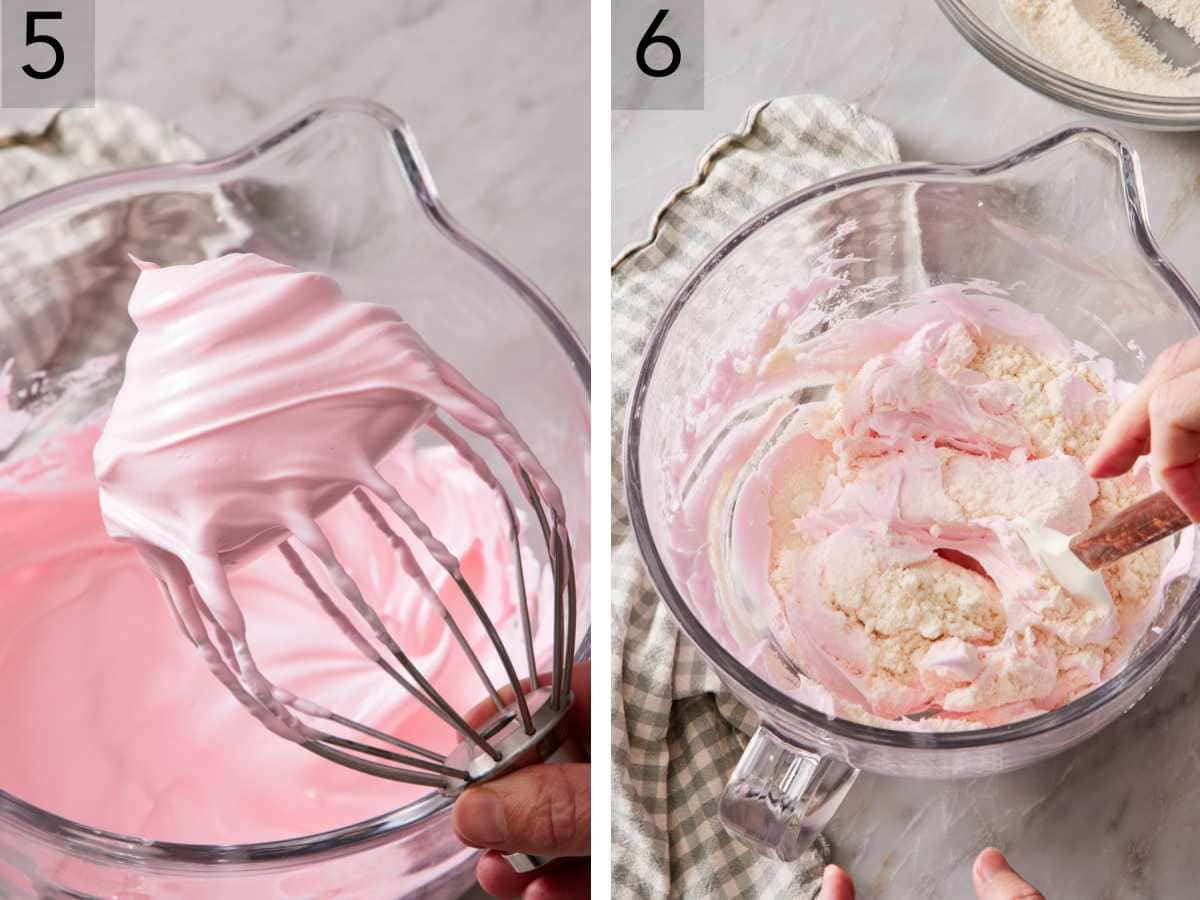
5. Check the egg whites to be certain the egg whites are stiff by removing the beater, dipping it into the egg whites, and pulling it straight out of the bowl. The tip of the peak shouldn’t move when you flip the beater in any direction. If it does, beat for another minute on medium speed and test again.
6. Fold the sifted almond mixture into the meringue in three additions with a rubber spatula, using a J-shaped stroke. This helps the almond flour distribute evenly without prematurely deflating any of the meringue.
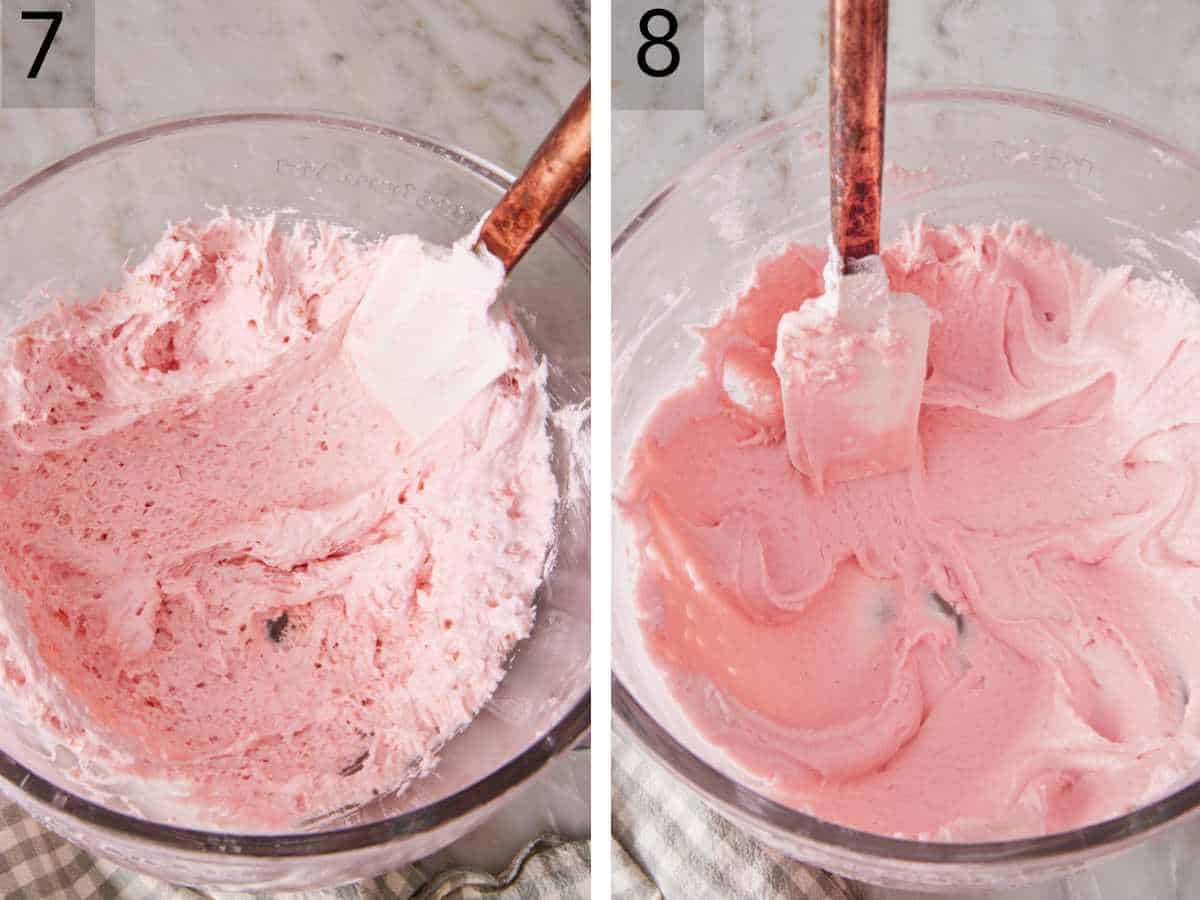
7. Once it’s combined, start the macaronage: Press the batter against the sides of the bowl with a flat side of the spatula, scrape it back to the center, and repeat.
8. You will notice the texture start to change after the first or second round of macronage. During this step, you’re deliberately deflating the meringue until the batter turns shiny and flows slowly but steadily.
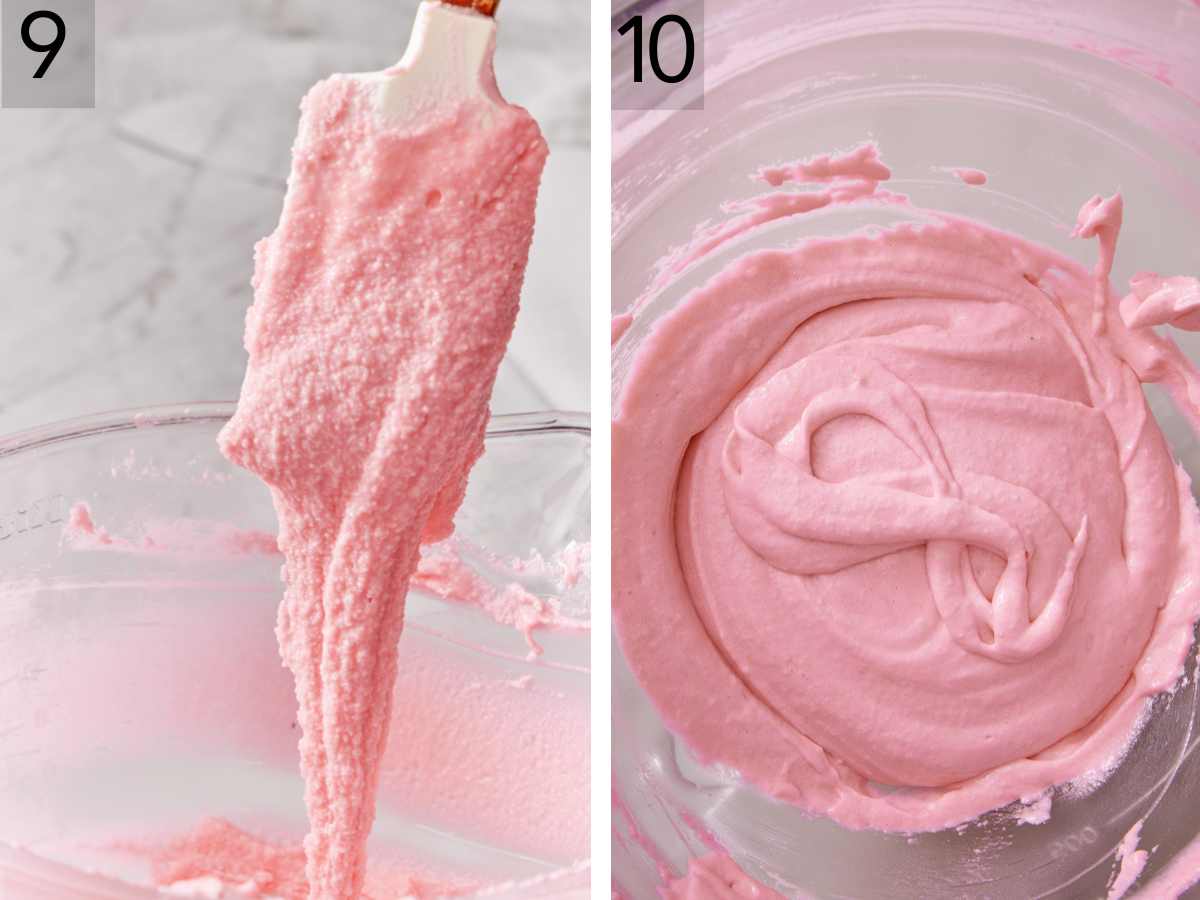
9. Check the Consistency: Scoop some of the batter onto the spatula, then hold the spatula over the bowl with the tip pointing down. The batter should fall off the spatula in a V shape in a slow, even stream. If it breaks off in clumps, continue with another round of macaronage. I like to test for the consistency after each macronage round, so I don’t end up overmixing it.
10. Figure 8 Test: This is the best way to tell when the batter is mixed enough. Allow the cookie batter to fall off the spatula while moving it in a figure-8 pattern. The batter is ready when it’s able to hold this “8” shape for about 10 seconds in the bowl before settling back into itself and disappearing.
Pipe, Rest, and Bake
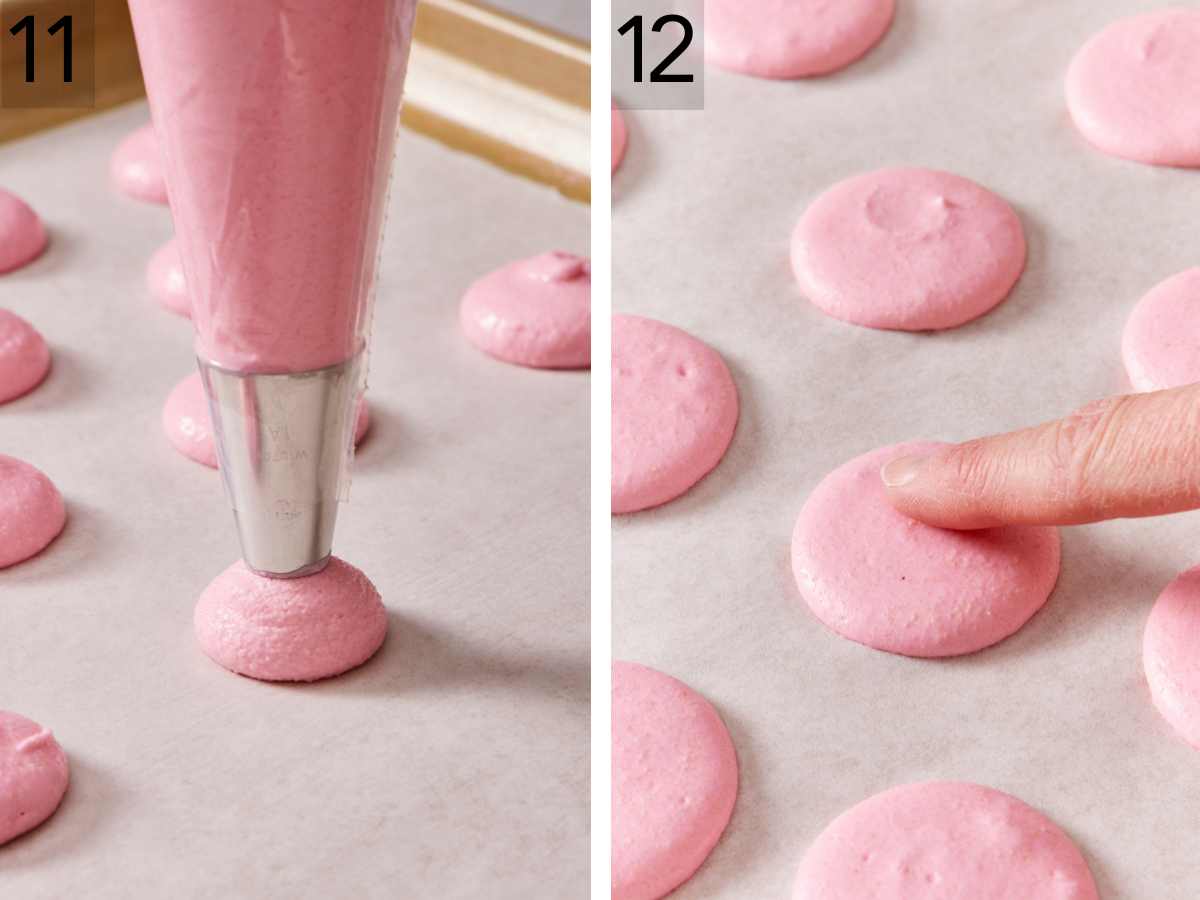
11. Transfer the batter to a piping bag with a medium round tip. Dot a little batter under each corner of the parchment to hold it in place on a rimmed baking sheet, then pipe 1-inch rounds about 2 inches apart. Be sure to hold the bag straight up and down. If you pipe at an angle, the shells can bake up lopsided. Then, tap the tray on the counter a few times and pop any air bubbles that come to the surface with a toothpick.
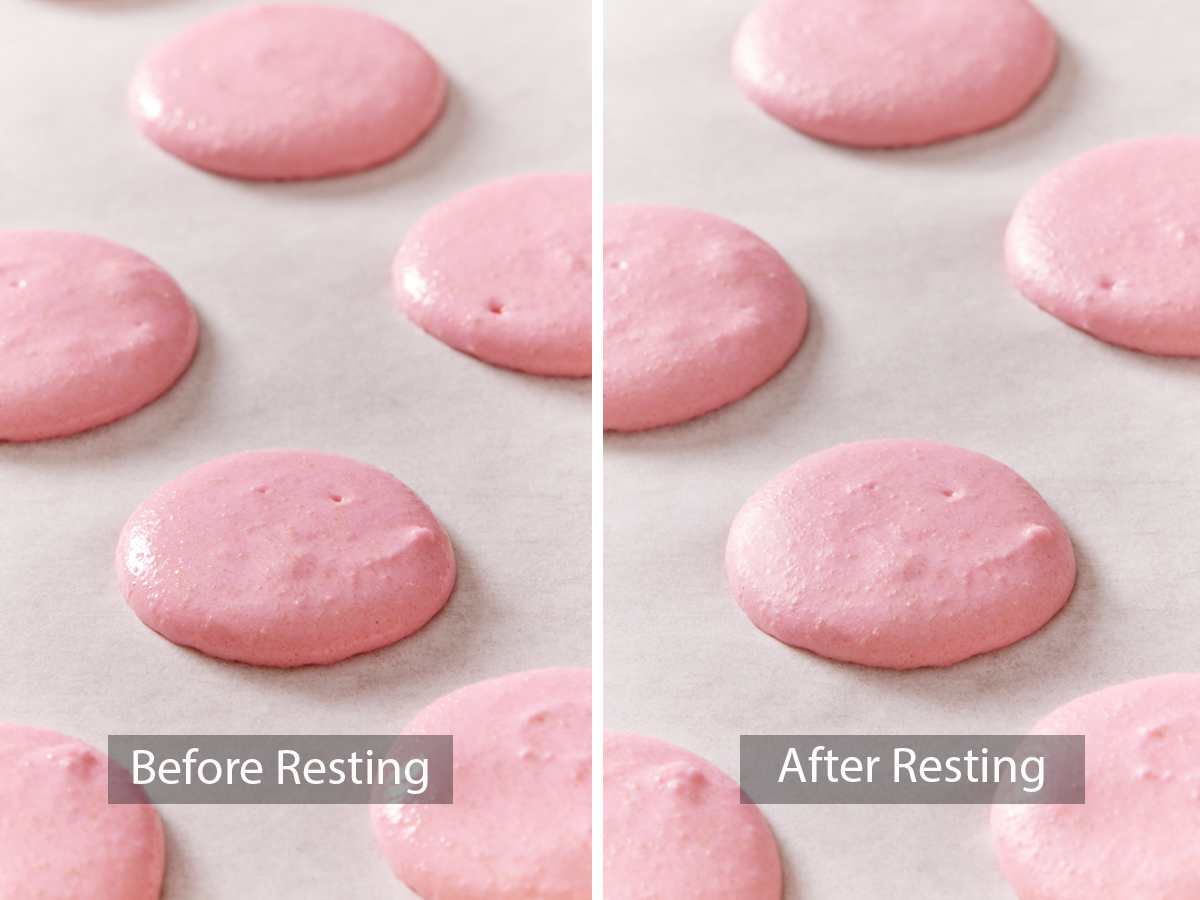
12. Rest the shells at room temperature for about 40 minutes, or until they look matte and feel dry when you touch one lightly with a dry fingertip. On humid days, the rest time takes longer, and I like to set the trays under the vent hood to speed it up. I have made these on days when it was humid in my kitchen, and it took 2 hours for the trays to dry to the touch! When they’re ready, bake at 270°F for 18 to 20 minutes, rotating the tray after 8 minutes. I used to bake the shells at a higher temperature, but I would have mixed results. Some days it worked great at 325°F, and other days they browned and cracked. I also tried 300°F, but my tests were mixed as well, with browning and slight cracking. 270°F was the sweet spot for being hot enough to bake the shells correctly but not too hot to discolor or crack them. Let the shells cool completely on the tray before you lift them.
Make the French Buttercream and Fill
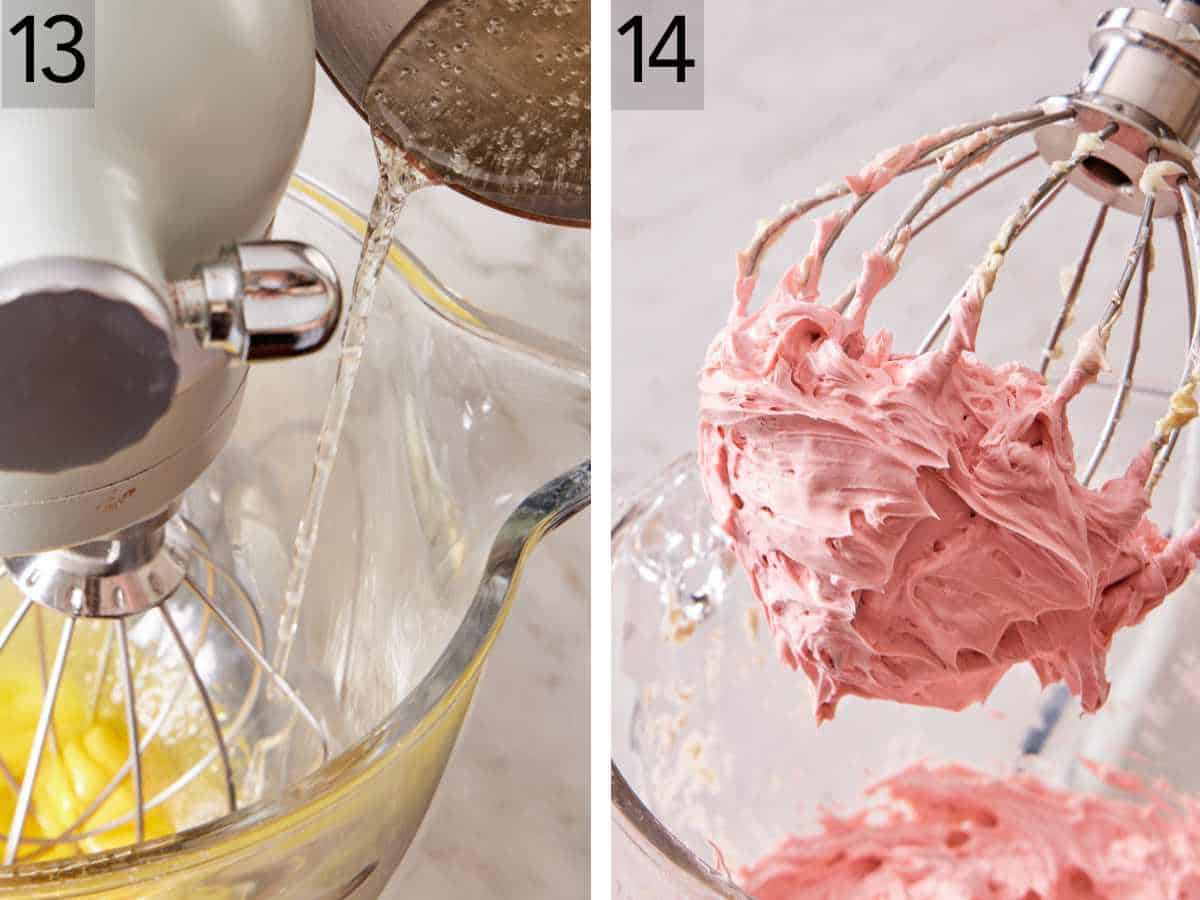
13. Heat the sugar and water on low until the sugar dissolves, then boil to 240°F. Meanwhile, whip the 5 yolks until thick and foamy. With the mixer running, drizzle the hot syrup slowly into the yolks, and keep mixing until the bowl feels cool to the touch, about 5 minutes.
14. Add the softened butter a tablespoon at a time, then the vanilla and salt, and mix for 5 to 6 minutes until smooth. The filling tastes like a cross between pastry cream and buttercream.
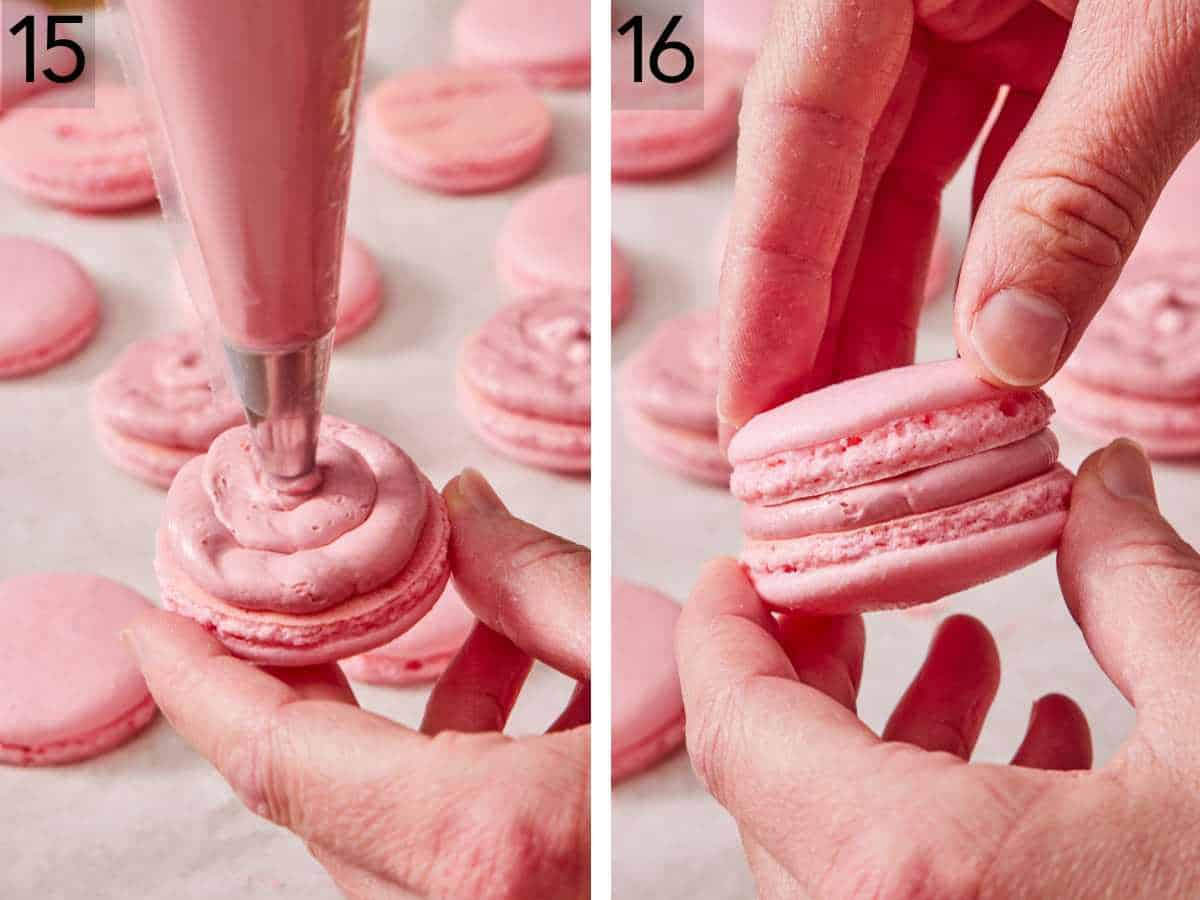
15. Place the buttercream filling into a piping bag fitted with a small round tip (like an Ateco #10). Pipe the frosting onto the flat side of half the macaron cookie shells. Pipe a modest dollop—the filling doesn’t need to be very thick (about ¼” or 10g each).
16. Then place an unfrosted shell on top to make a sandwich cookie. Allow the macarons to mature in the refrigerator for 1 to 3 days before serving. This allows time for the shells to become chewy in the center and the filling to set so it doesn’t squeeze out when you bite into it.
How to Tell When the Batter Is Ready
During the macronage stage, lift the spatula and watch how the batter falls off the tip. Here’s what each stage looks like in my bowl:
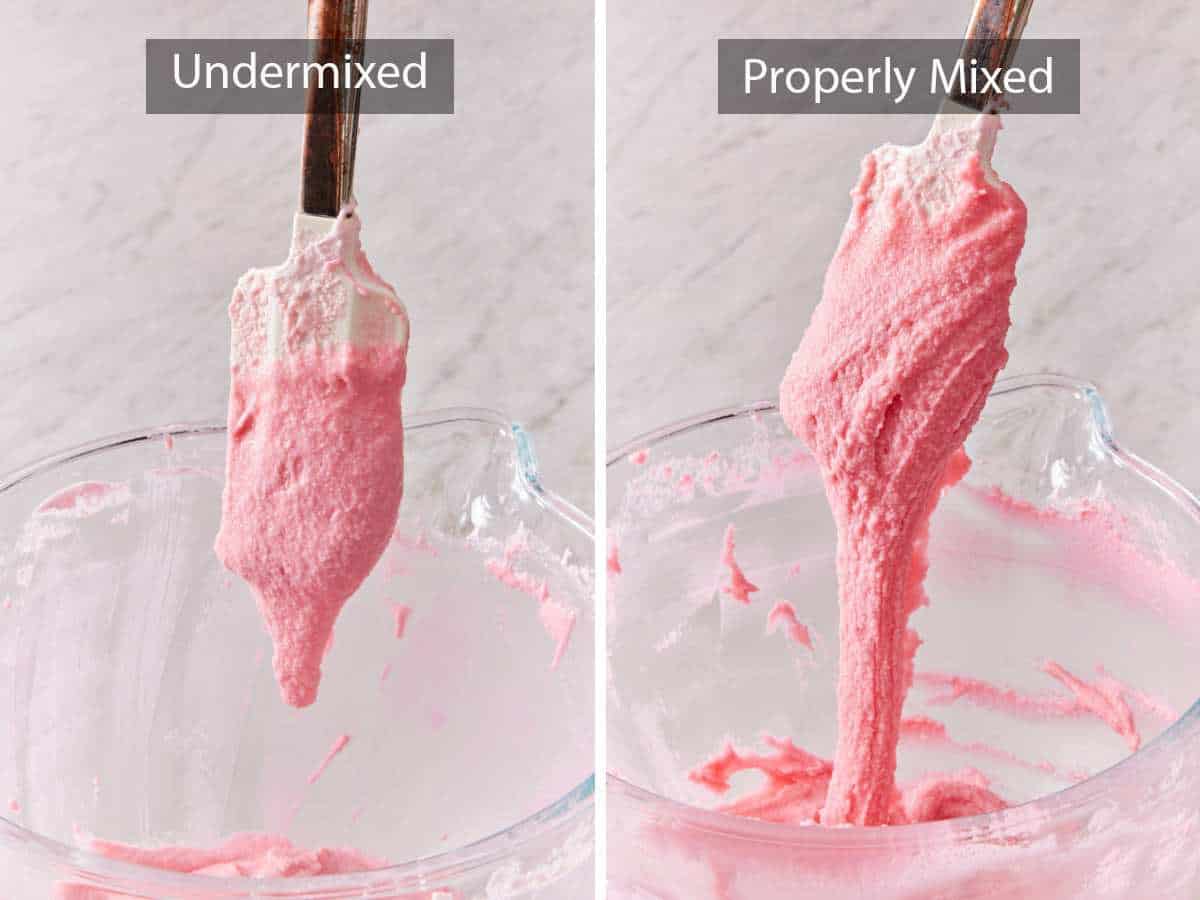
Undermixed: The macaron batter will be thick and break off the spatula, falling in clumps, not a smooth stream.
Properly mixed: The batter will slowly fall from the spatula in a “V” shaped ribbon, and in an even stream. It will be slow and lava-like. You should also be able to move your spatula around the bowl and form a figure 8 on top of the batter. If properly mixed, the figure 8 will hold its shape for about 10 seconds.
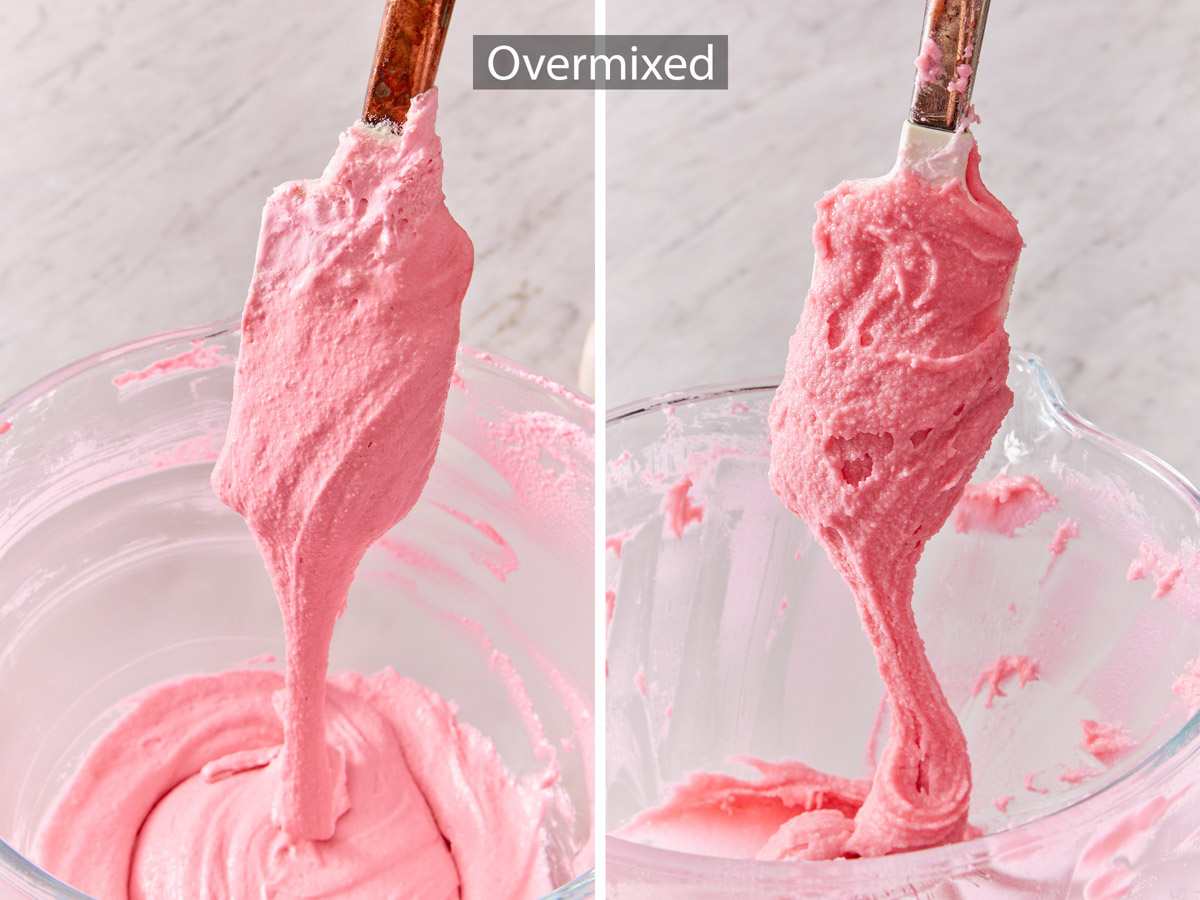
Runny (overmixed): If overmixed, the batter will turn very runny at first—too much air has been knocked out of the meringue, and it loses its structure. At this point, the batter will fall off the spatula quickly. (If piped, it would pour out of the piping bag without squeezing it and make very flat macarons.)
Gummy (well past overmixed): If you keep mixing it beyond this point, the batter will start to thicken back up and turn very gummy. It will be fluid but much thicker. If you bake the macarons with overmixed batter, the cookies will be very thick and rise unevenly, crack, or turn out hollow and gummy inside.
Macaron Troubleshooting
These are the main failures readers experience and ask me about, and some I experienced during our retest. My team and I recreated all of the scenarios to show you exactly how each one shows up in a baked macaron shell and how to avoid it. The video in the recipe card walks through how to troubleshoot them as well!
Batter That Won’t Loosen
If your batter stays thick and clumpy no matter how long you fold or macaronage, the dry-to-wet balance was off from the start. A reader asked me about this recently, and the usual causes are almond flour measured by the cup, an old or oily bag of flour, or egg whites under 100 grams. Weigh both ingredients so you have the correct amount, and start with a fresh bag of almond flour if yours has been open in the pantry for more than a month.
If the next batch is still stiff, drop the almond flour to 140 grams. My previous recipe used 140 grams of almond flour. I chose to change it because in testing, I discovered slightly more almond flour produced a more stable macaron batter.
Bumpy Tops
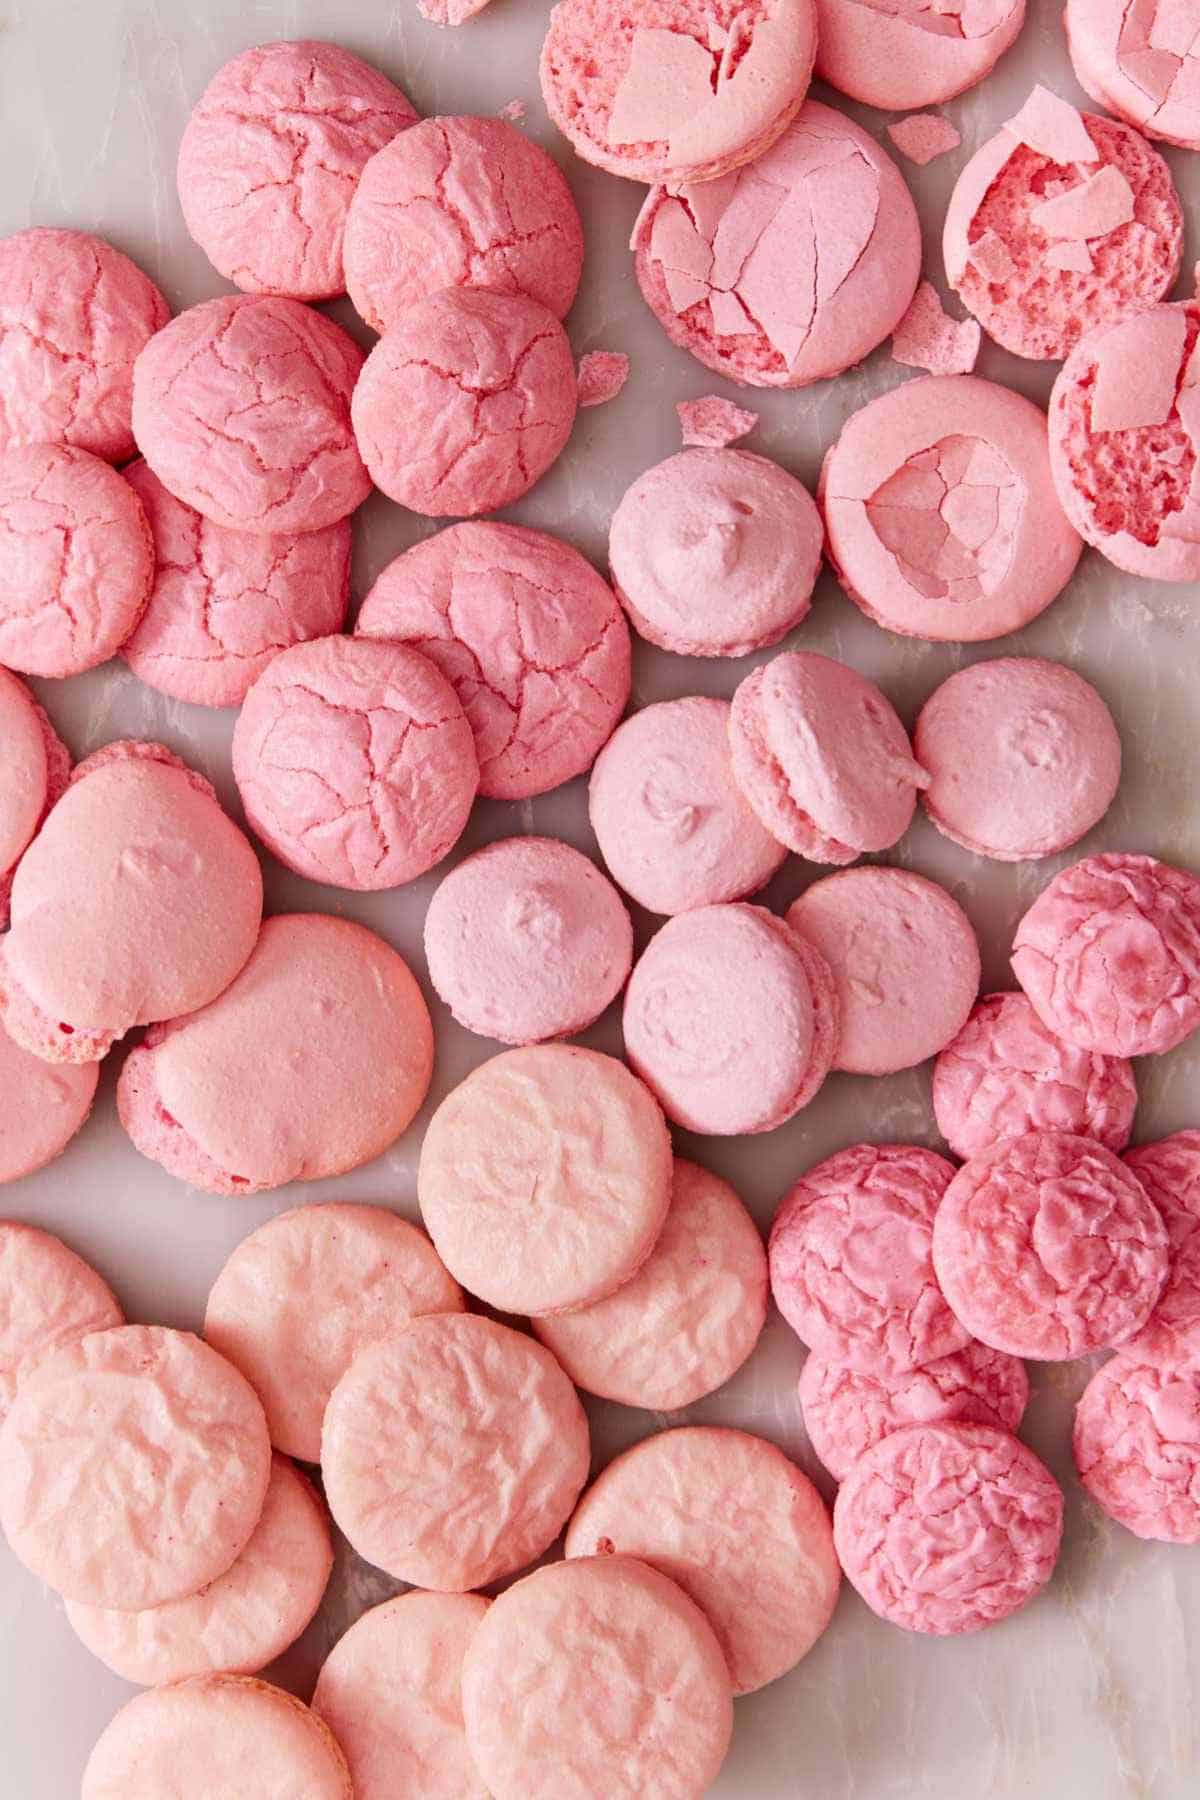
My undermixed test batter baked up with lumpy, uneven tops because the stiff batter trapped big air bubbles and couldn’t settle into a smooth surface before the top dried out. Keep folding until the batter passes the figure 8 test. Also, don’t skip the second sift—lumps of almond flour and powdered sugar don’t mix in smoothly and form bumps in the shells.
No Feet
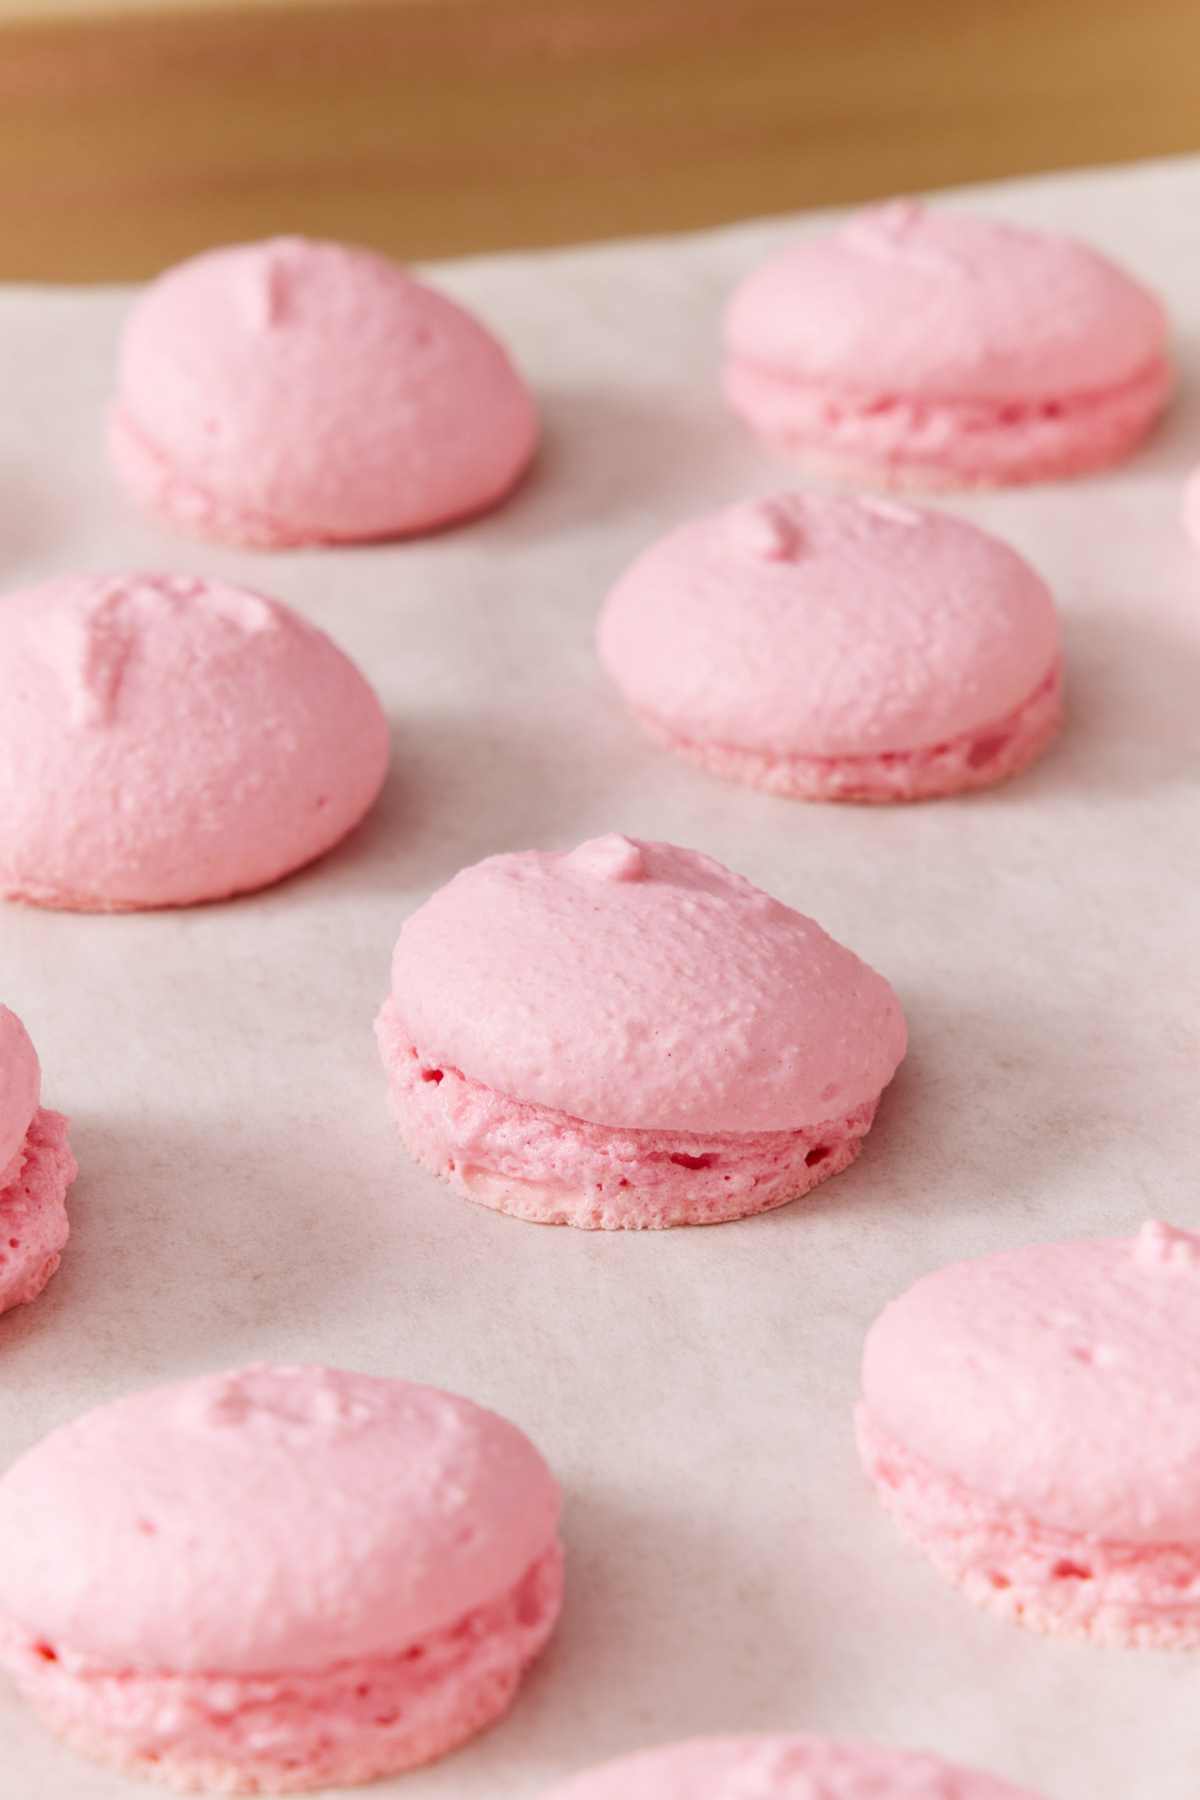
Feet are the ruffled ring at the base of each shell. The firm skin that forms during the rest time forces the batter to rise and spill out underneath, creating the foot. Shells baked before they’ve dried out enough tend to come out flat and footless. Overmixed batter and over- or underbaking can flatten feet too.
In my retest, I baked a tray before it was fully dry, and the shells baked up with feet in small areas, but mostly, the shells were flat and slightly domed from the batter rising up but not being forced out the sides. When rested properly, the shells will turn from shiny to matte on the surface, and you should be able to touch them without marring the surface or any batter sticking to your finger.
Hollow Shells
A gap under the dome means the meringue couldn’t hold the shell’s structure as it baked. Beating the whites too fast, resting the shells far too long, and pulling them out early can all cause it. The meringue collapses beneath the set surface, forming a hollow space between the bottom and top of the shell.
The first time this happened to me was when I was in a hurry, and I beat my meringue at high speed. The proteins in the eggs were weaker as a result and couldn’t hold their shape. The second time was from underbaked shells. They were baked long enough to fully set the outside, so they didn’t collapse or crack on the outside, but the interior wasn’t quite done, so it shrank during cooling. Make sure to beat the meringue properly at medium speed and be patient with the shells in the oven.
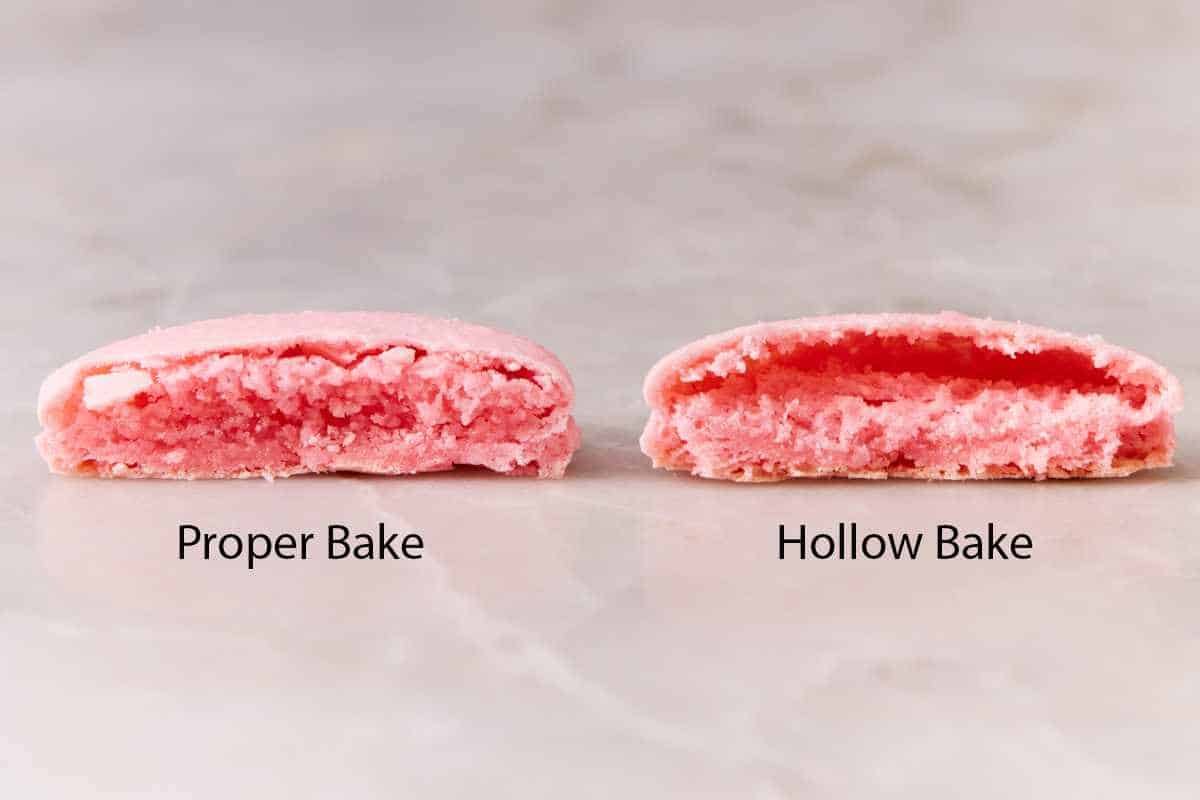
Hollow shells still look fine on the outside and taste great! They just tend to crack easily when you bite into them and don’t have as much of a chewy center.
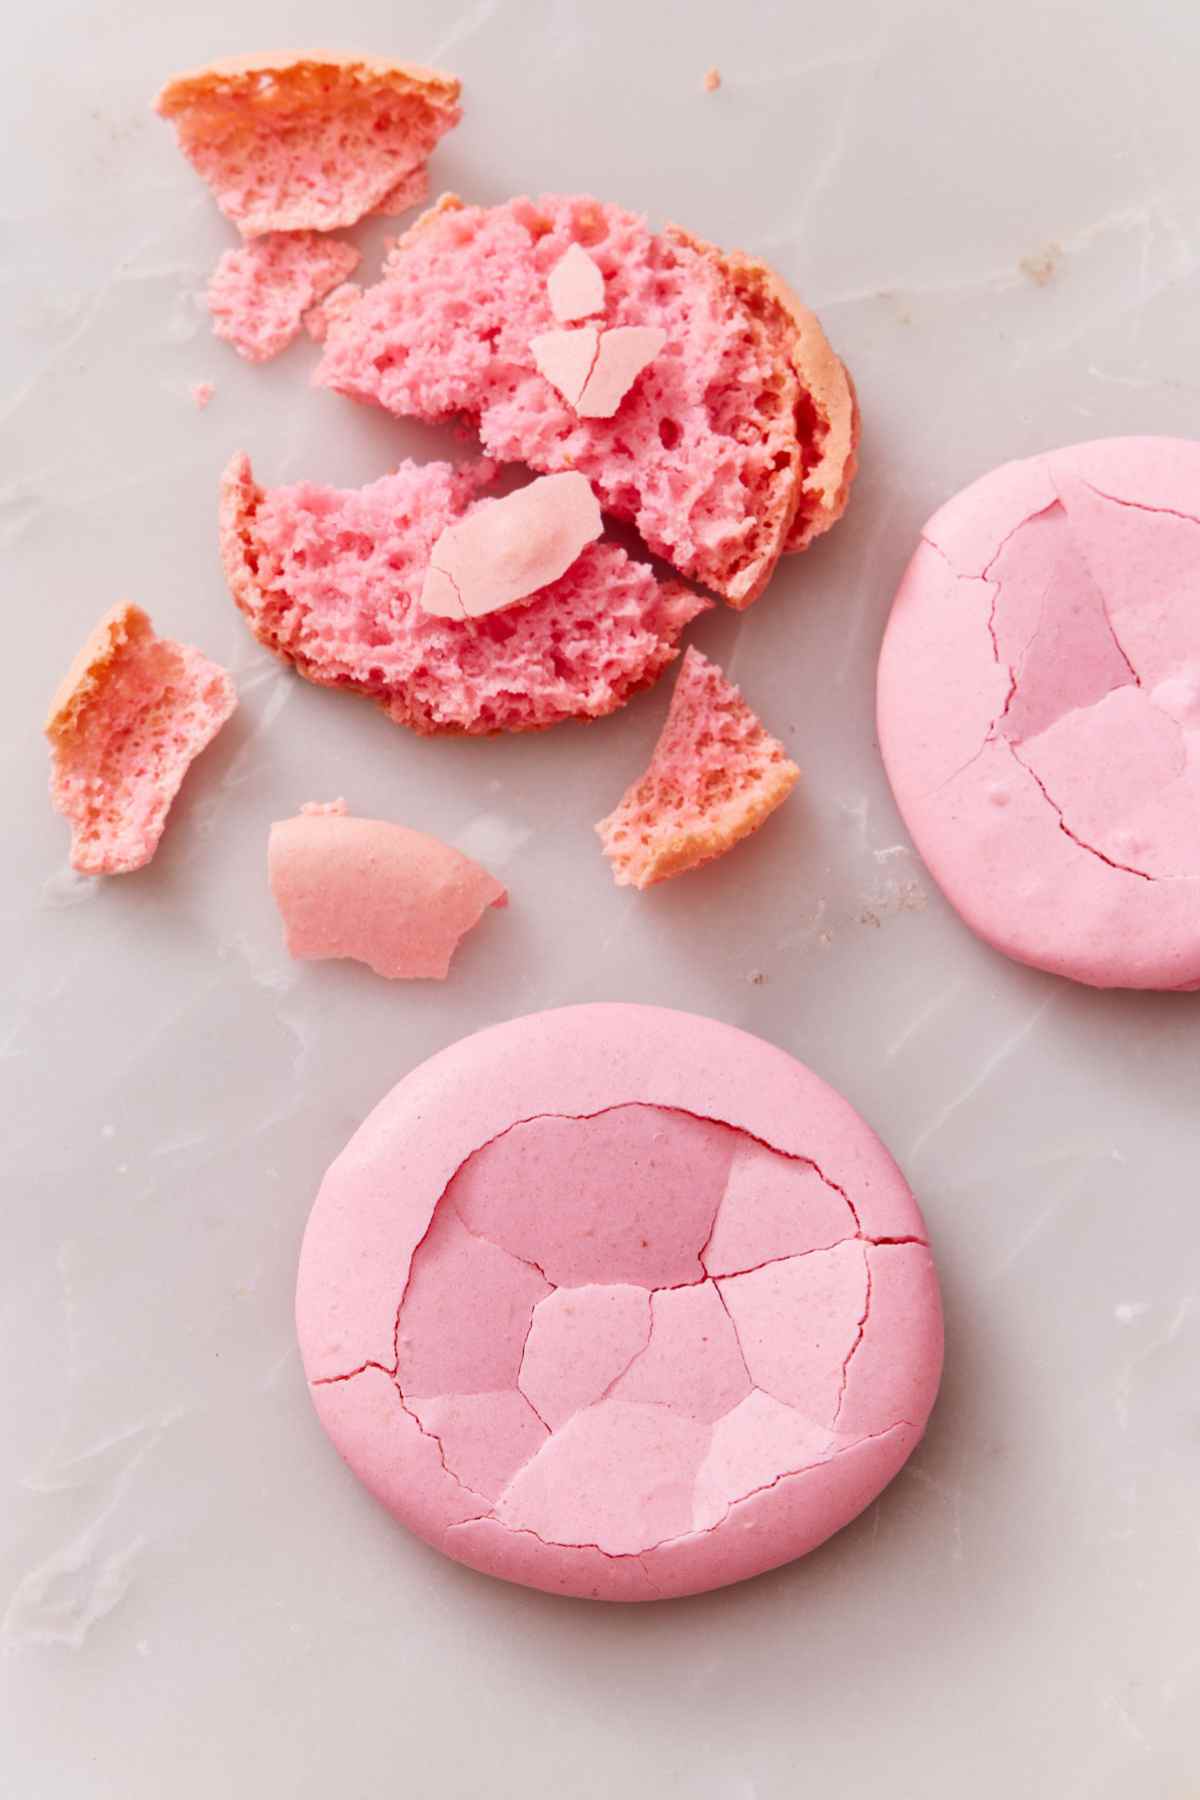
Cracked Tops
Overbaking cracked my macaron shells in testing. They puffed too far, dried out, and some turned golden instead of holding their color. This typically happened when I baked the shells at the higher oven temperatures (300-325°F) previously mentioned. Be sure to check your oven’s actual temperature with an oven thermometer and adjust your heat setting accordingly. Air bubbles you don’t pop can also burst through the top, so be sure to pop them before the shells rest.
The oily bag of almond flour I mentioned earlier cracked a whole batch, too. Fat weakens the structure of the meringue. Almonds naturally contain fat, but it’s typically contained in the nuts and releases a little bit when it heats up in the oven. If your bag of almond flour leaves an oily film on your fingers, this means oil will be dispersed throughout the batter during mixing and can cause the tiny air bubbles trapped in the meringue to pop.
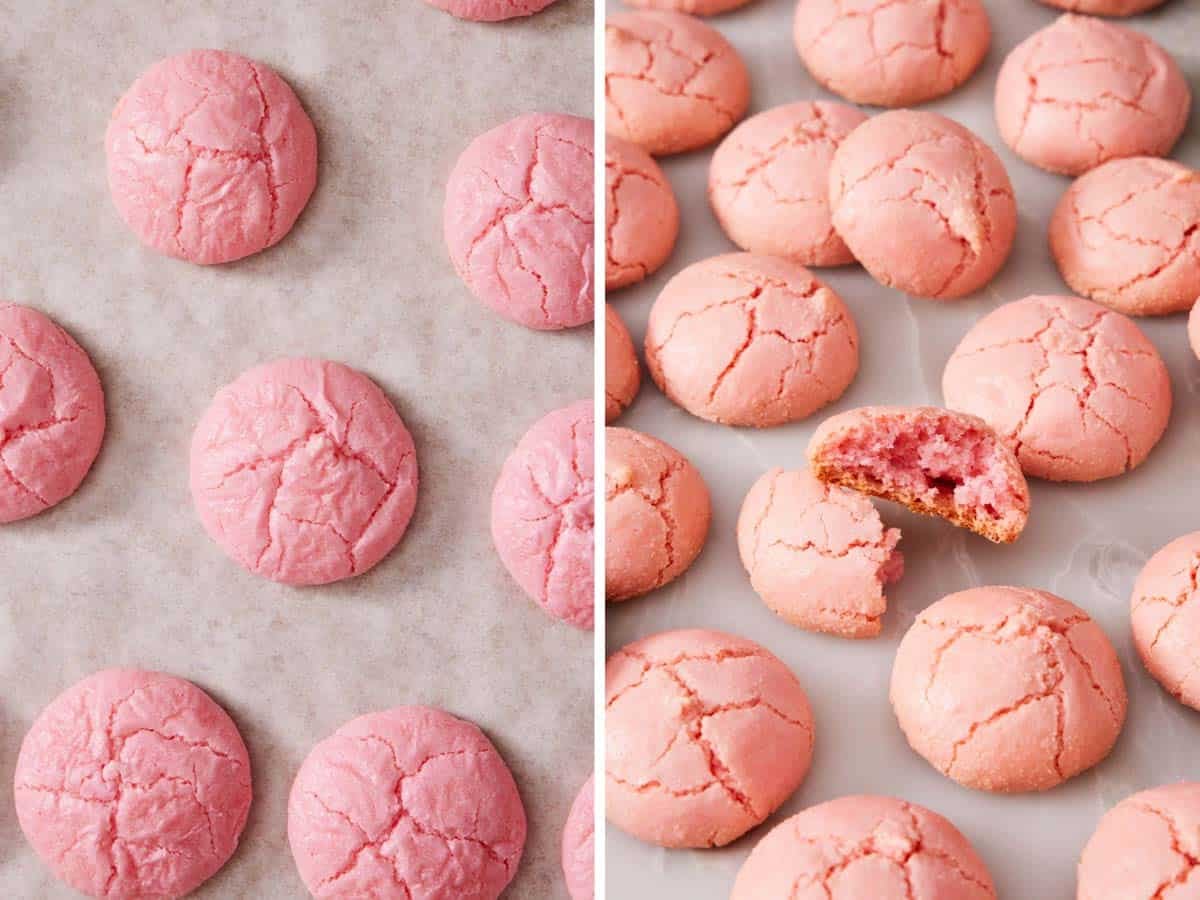
Lopsided or Slanted Shells
Four things can cause a shell to rise unevenly: a rest that’s too short, parchment that lifts up, piping at an angle, and an oven running too hot.
I rest the full 40 minutes and then test for surface dryness. I always tack down my parchment corners with batter so that they don’t lift up when moving the baking trays around or if the oven has a circulating fan.
When you pipe, hold the bag straight with the piping tip down—piping at an angle makes a shell with a thicker and thinner side, so they don’t rise evenly. During one test, I got distracted and realized I was piping at an angle—the shells turned out with taller feet on one side and short or no feet on the other. For another test, the oven was preheated to the wrong temperature (350°F), and my macarons were in there for 10 minutes before I realized it! This set the surface and edges quickly before the center rose, so the batter burst out one side.
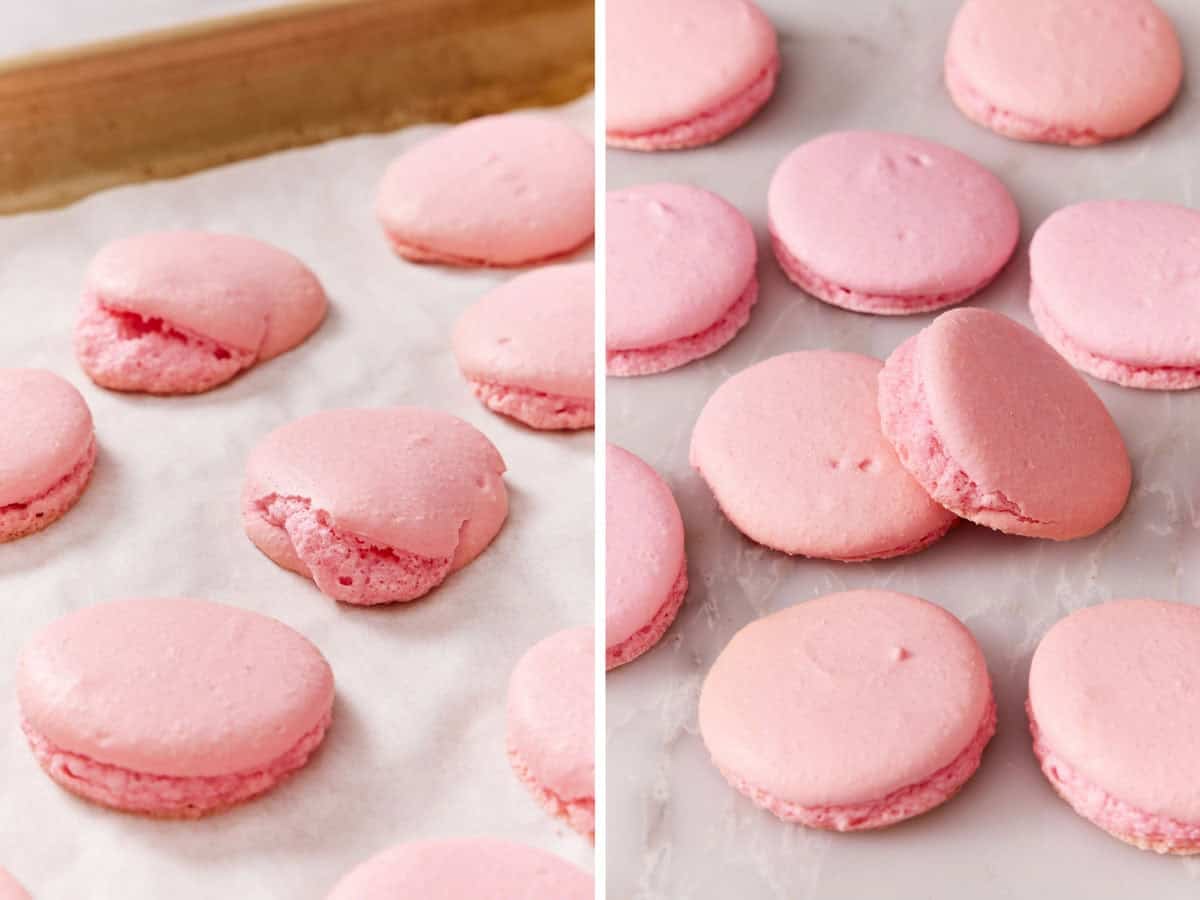
Flat, Spread-Out Shells
If your rounds spread into thin puddles the moment you pipe them, the batter was overmixed, and too much air is gone, so the batter doesn’t hold its shape. Batter goes from ready to runny fast, so once it starts to loosen, I check it after every couple of strokes. I intentionally overmixed the batter during one test, and the shells baked thin with uneven feet.
Wrinkled, Sticky, or Browned Shells
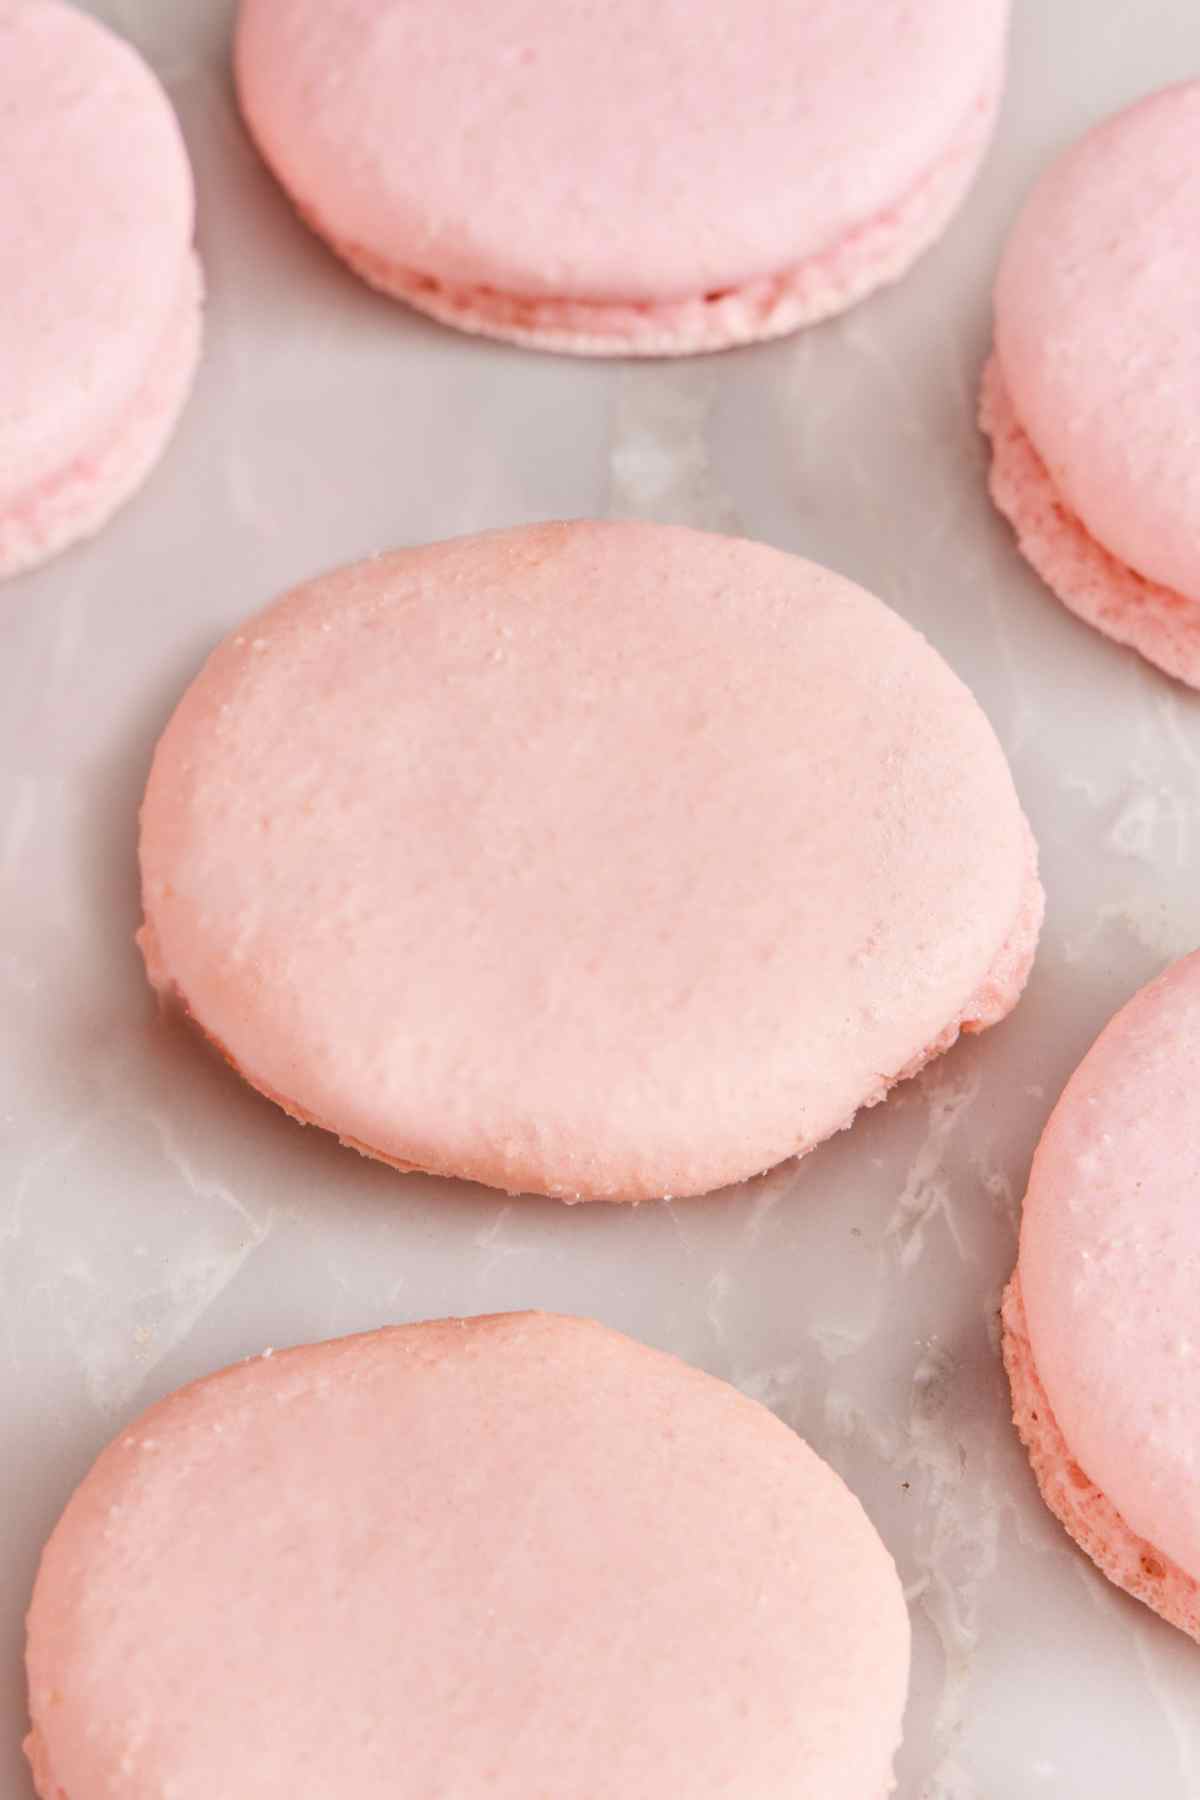
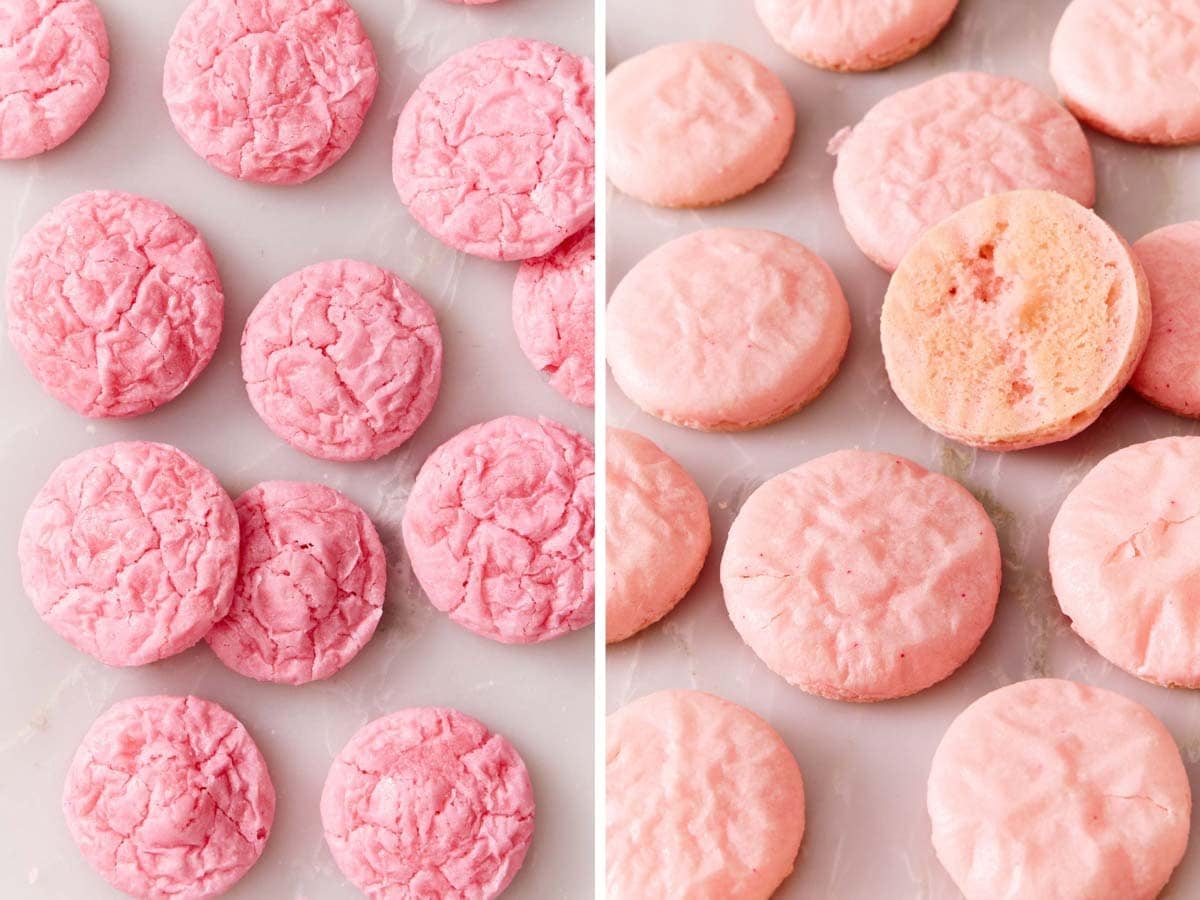
Wrinkled, sticky shells were underbaked in my tests. The structure hadn’t set, so they sank as they cooled and stayed wet inside. Be sure to set a timer so you don’t pull them out too soon unintentionally.
Browned shells are the opposite problem: this means they were in the oven for too long or the oven was too hot. They often crack if overbaked, but not always! If a batch comes out slightly overbaked and just a bit too crisp, I brush the flat sides with a little milk or jam before filling to soften them.
What to Fill Macarons With
I fill these with French buttercream because it uses the yolks from separating the eggs, and it tastes like vanilla custard! It’s pale yellow and rich. For a whiter, lighter filling, my Swiss meringue buttercream and Italian buttercream both work very well. For a quicker, sweeter option, use my vanilla buttercream, or go fruity with strawberry buttercream or raspberry buttercream.
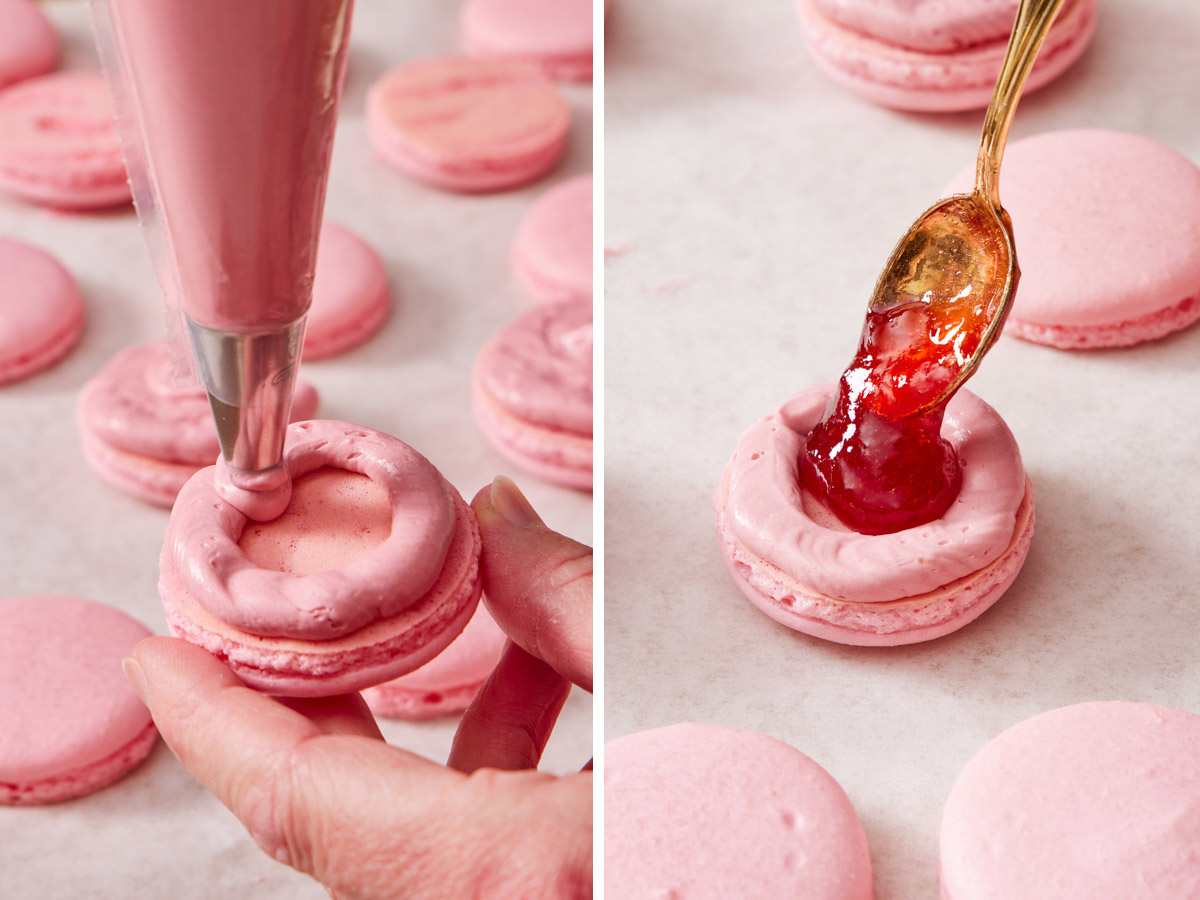
I also like to pipe a ring of French buttercream around the edge of a shell and fill the center. Raspberry jam is the one I love most, but caramel or lemon curd work too. The buttercream wall keeps the soft center from leaking out of the shell. Whipped chocolate ganache is the other filling I reach for. Once it’s whipped, it pipes like buttercream!
Flavoring the Shells
Keep flavorings dry or very concentrated so they don’t thin the batter. Lemon zest or other citrus zest work well and can go in when you fold in the almond flour. Ground spices work the same way. My pumpkin macarons use fall spices and espresso powder in the shells. You can also replace the vanilla extract with other flavorings like almond, orange, or peppermint.
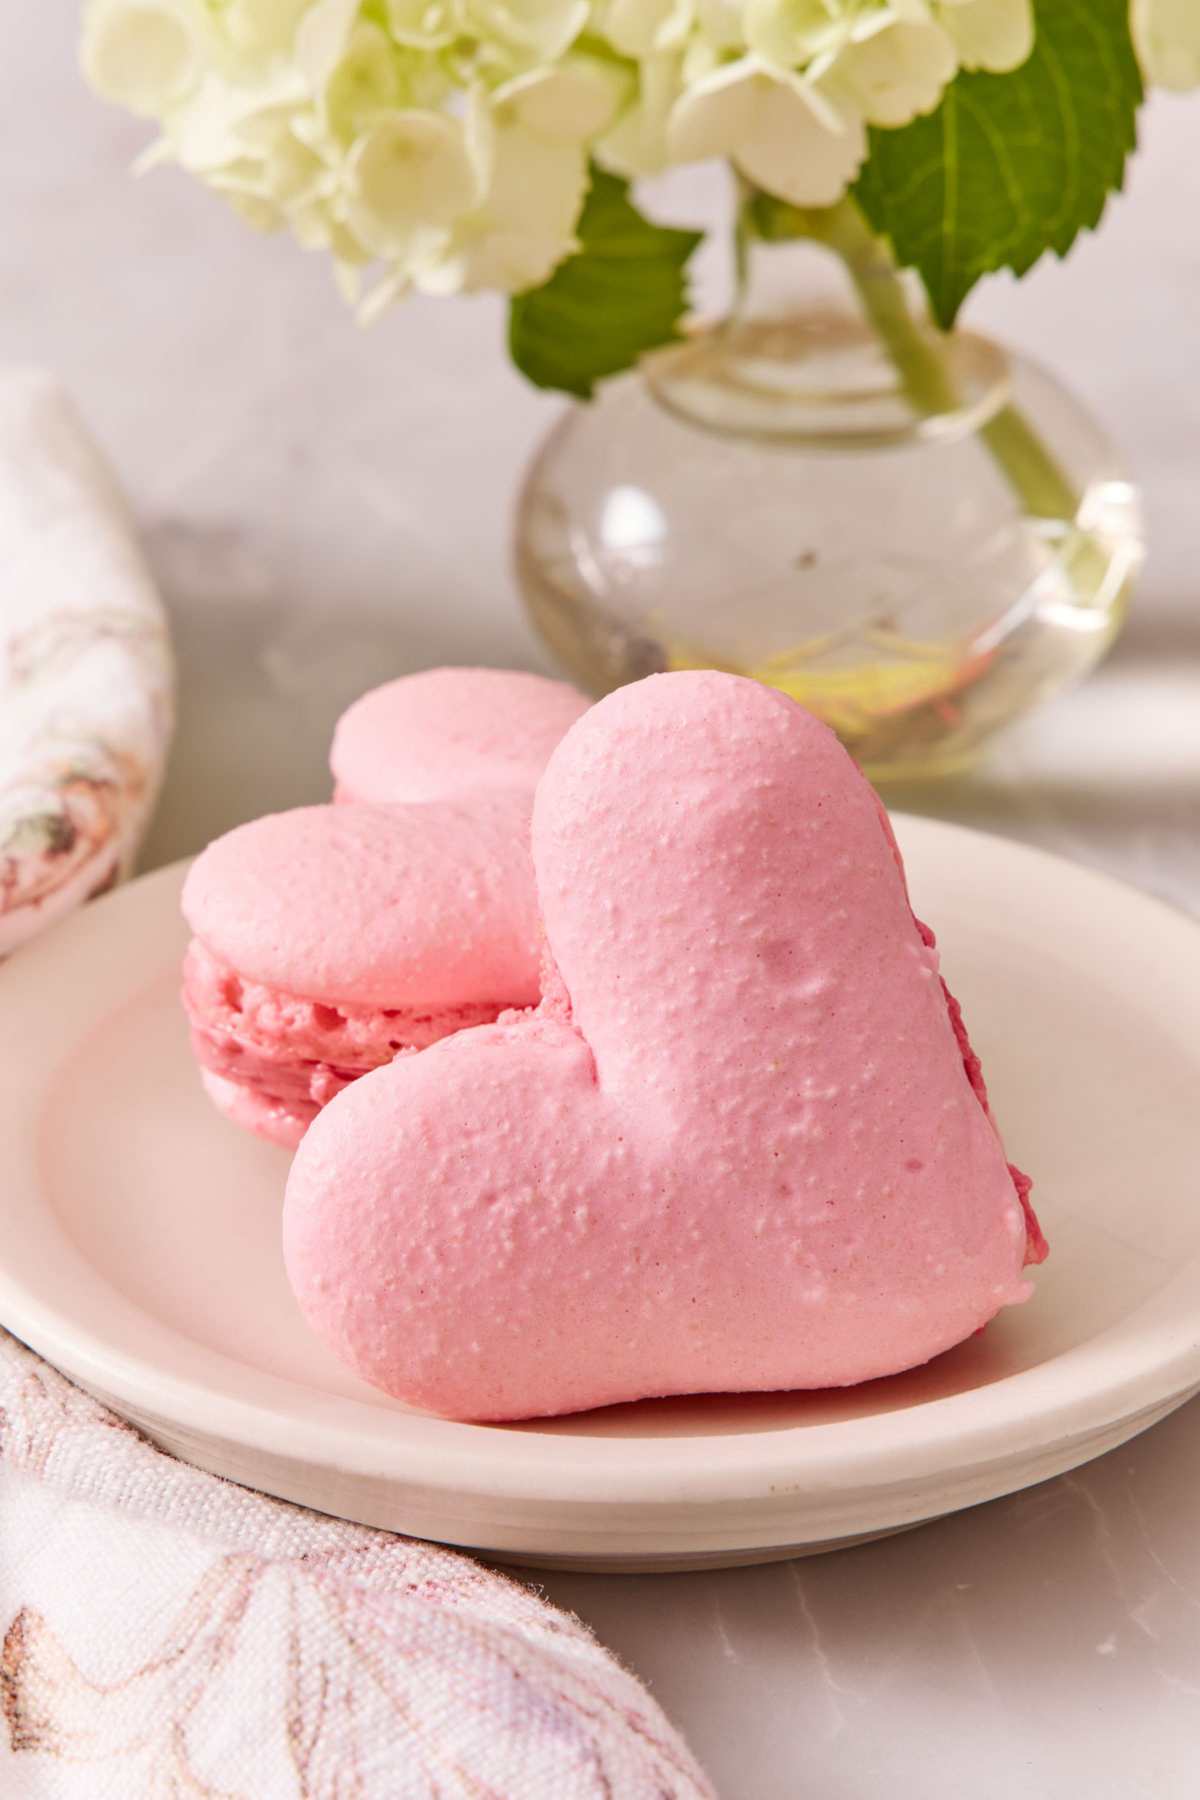
For shapes, I pipe hearts with the same round tip, and it’s easy to do! Snowmen, bunnies, and flowers work with a steady hand and some piping skills. Have fun with it!
Macarons Recipe

Equipment
- Baking Sheet
- Stand mixer
- Piping bag
Ingredients
For the Cookie:
- 168 g blanched almond flour (about 1½ cups)
- 120 g powdered sugar (about 1 cup)
- 100 g egg whites room temperature (from 3 large eggs)
- ¼ teaspoon cream of tartar
- 100 g granulated sugar (½ cup)
- 1 teaspoon vanilla extract
- 1-2 drops food coloring (optional)
For the Filling:
- 1 cup unsalted butter softened (226g)
- 5 large egg yolks room temperature
- ½ cup granulated sugar (100g)
- 1 teaspoon vanilla extract
- 3 tablespoons water
- Pinch of salt
Instructions
For the Cookie:
- Line two baking sheets with parchment paper or silicone baking mats, and set aside.
- In a medium bowl, sift in the powdered sugar and almond flour (be sure not to press the mixture through the sieve just let it fall through). Transfer to the workbowl of a food processor and pulse for 20 seconds. Stop, scrape down the sides, and pulse for another 10 seconds. Sift the almond flour mixture again into the same medium bowl, and set aside.
- To a large clean bowl or the bowl of your stand mixer fitted with a whisk attachment add the egg whites. Mix on medium speed for 30 seconds until they begin to foam. Add in the cream of tartar and continue mixing on medium speed.
- While mixing, gradually add in the granulated sugar 1 tablespoon at a time, occasionally scraping down the sides to remove any sugar build up around the bowl. Add in the vanilla and the food coloring, if desired. Continue to mix until stiff peaks form, about 6 minutes.
- Using a spatula, gently fold in the almond flour mixture in 3 batches. Once fully incorporated, gently press the mixture with your spatula against the side of the bowl to remove any large air bubbles (this stage is called macronage).
- The mixture is ready when it is able to fall off the spatula keeping its shape in a figure eight. Transfer to a piping bag fitted with a medium round tip (I used Wilton 1A).
- To all corners of your baking sheet add a drop of the mixture, this will act as glue to keep your parchment paper down. Pipe one inch dollops onto the baking sheet, spacing them about 2 inches apart.
- Gently tap the pan on the counter to release any air bubbles. (You can also pop any remaining large air bubbles with a toothpick). Allow the pan to rest for 40 minutes before baking. They will be dry to the touch and appear less glossy.
- Towards the end of your rest time preheat the oven to 270ºF. Bake for 18-20 minutes, rotating the pan 180º after 8 minutes. Allow to cool completely on the baking sheet before removing.
For the Filling:
- In a medium saucepan combine the sugar and water. Heat on low while stirring until the sugar is dissolved. Once dissolved, increase the heat to medium high and bring to a boil.
- While the sugar syrup cooks, in the bowl of your stand mixer fitted with a whisk attachment, add the egg yolks, beat until thickened and foamy.
- Continue cooking the sugar syrup until it reaches 240ºF. Immediately remove from heat, with the mixer running slowly drizzle the syrup into the yolks. Continue mixing until the bowl is no longer warm to the touch, about 5 minutes.
- While mixing on medium low speed add the butter in one tablespoon at a time making sure it is completely incorporated before adding the next. Add the vanilla and salt and continue mixing until it is smooth and creamy for about 5-6 minutes. If desired add in a few drops of food coloring and mix until well combined.
- Place your filling into a piping bag fitted with a small round tip (I used Ateco #10). Pipe onto the bottom side of half the cookies. Place an unfrosted cookie on top creating a sandwich. Keep in the refrigerator for 1-3 days to age them. This allows the filling to soften the inside of the shells.
Notes
- The color of the meringue will look lighter than the baked shells. Just keep that in mind when you are adding your food coloring. The baked shells will turn out a few shades darker.
- When drying the piped macarons, place them under your vent hood or in a well-ventilated area if you can. Some air movement will help them dry out more, especially if the humidity is higher.
- Freeze the remaining 2 egg whites from the filling. You can use them for a future batch of macarons or in other recipes.
Nutrition
Have you tried this recipe? Tag me today!
Mention @preppykitchen and tag #preppykitchen!
How to Store, Mature, and Freeze Macarons
Mature them. Refrigerate filled macarons for at least 24 hours, and up to 3 days, before serving. Moisture from the filling softens the inside of the shell so it turns chewy instead of dry. I get impatient and eat a couple the day I make them, but they are always better the next day!
Refrigerate. Keep filled macarons in an airtight container in the fridge for up to 7 days. I let them sit out about 20 minutes before serving so the filling softens and has a more luscious texture.
Freeze. Unfilled shells or filled macarons keep in the freezer for up to 1 month in an airtight container. The French buttercream on its own freezes for up to 3 months. Thaw them in the fridge for several hours before assembling or serving.
Frequently Asked Questions
Not by cutting the sugar. Both the powdered sugar and granulated sugar are essential to holding the meringue’s structure, and with less sugar the shells can lose their shape and texture. Instead, add ¼ teaspoon of fine sea salt to the egg whites along with the cream of tartar, and pair the shells with a tart filling like lemon curd or raspberry jam. The salt and more tart filling will balance the sweetness of the shells.
I haven’t tested this recipe at high altitude yet. The shells contain no baking soda or baking powder, so they may not need changes. If yours puff and crack, start by raising the oven temperature by 15 to 25°F and checking them a few minutes early.
Yes! Thaw the eggs white completely in the fridge, then weigh them out to 100g. Egg whites whip better and are more stable when beaten at room temperature, so I suggest leaving them on the counter for 30 minutes before you start.
More Recipes To Try
If you’re in the mood to make more French desserts, give one of these recipes a try:
- Few desserts are as enjoyable as homemade chocolate eclairs made with from-scratch choux pastry and velvety vanilla pastry cream.
- A classic fruit tart is hard to beat! A crisp pastry envelopes creamy custard, and it’s all topped with colorful fruit.
- French apple cake is moist, buttery, and filled with lots of apple! Use baking apples like Granny Smith or Honeycrisp apples for the best texture.
- Tarte Tatin is a rustic upside-down apple tart with strong caramel notes and a crisp puff pastry crust. It’s a fun twist on apple pie!
- My delicate, buttery, nutty financiers are a wonderful treat for tea time. They’re crisp on the outside and tender on the inside.
If you’ve tried this macaron recipe, then don’t forget to rate it and let me know how you got on in the comments below. I love hearing from you!