

This post may contain affiliate links. Please read our disclosure policy.




This classic apple pie is easy to make with a no-cook fresh apple filling. It has the perfect blend of tart and sweet flavor from a variety of fresh apples. Plus, it’s freezer-friendly so you can make it ahead of time and freeze it before baking!
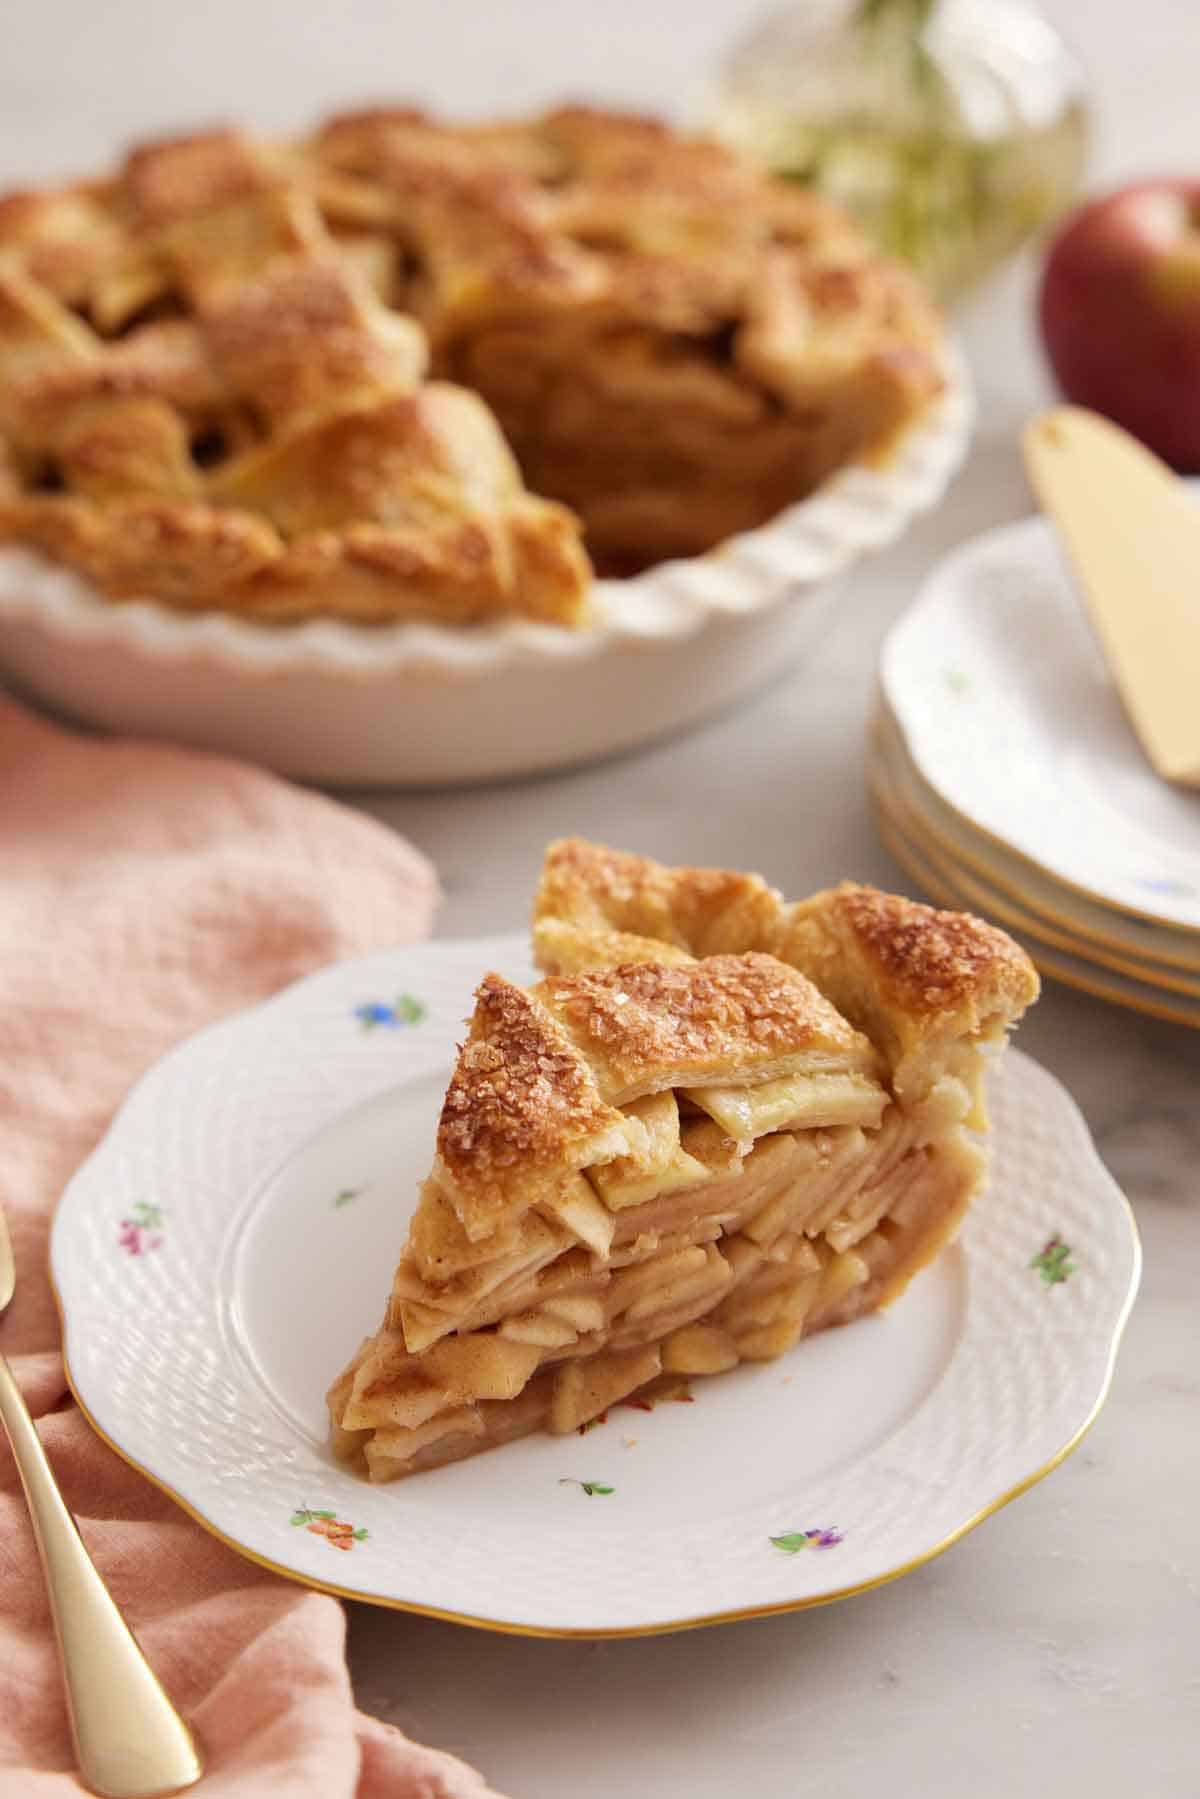
This is the apple pie I make when the holiday table needs a comforting classic. A mix of your favorite apple varieties, two pie crusts, and a gently spiced filling that doesn’t need cooking before the pie is assembled make this recipe so easy to put together. The slices go into the shell raw and turn tender in the oven! I have tested this apple pie many times with both cooked and uncooked fillings. While they both have their place, I found that a fresh apple filling made a delicious, classic apple pie without the added steps and time of cooking and cooling the filling before assembly.
Once your pie is assembled, there are two things worth knowing before you bake it to ensure your pie slices perfectly. The first is where the pie sits in your oven—this avoids a soggy bottom crust! The second is how long you wait before cutting it. If you cut it while it’s hot, all of the flavorful juices will run out, turning your pie soggy. I cover them in detail below, along with tips for freezing the pie unbaked so you can make holiday prep easy!
“This apple pie changed my mind on apple pie. I’ve never been a big fan before but would make it for my husband. However, the amount of flavor from this recipe? Hits you in the face. Amazing! We made it topped with John’s crème anglaise and we will never go back!”
Vaness
Key Ingredients
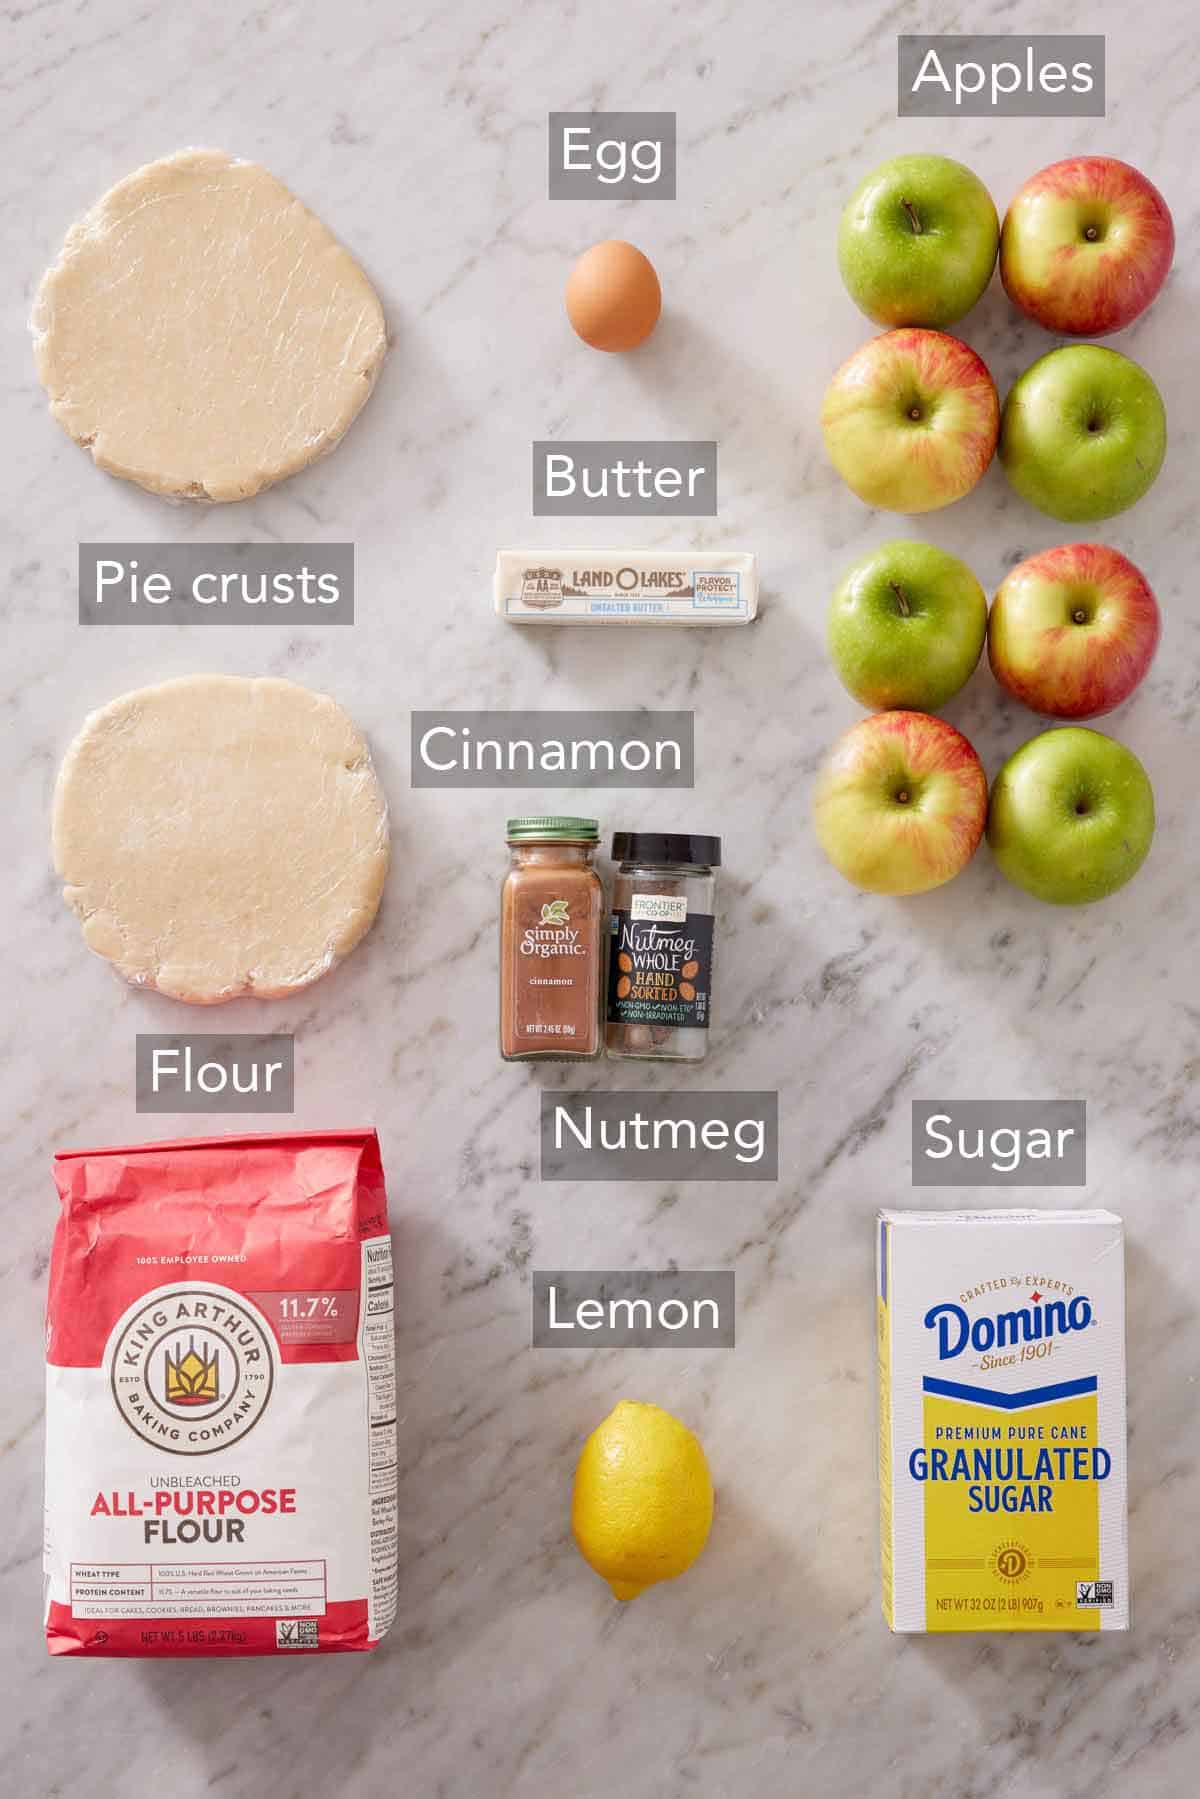
These are the main ingredients needed for a homemade apple pie. Get the full list and measurements in the recipe card below.
Apples — using a mixture of apples, such as Granny Smith apples, Honeycrisp apples, and Fuji apples, will give you the perfect balance of tart and sweet. Those varieties also stay firmer so the filling isn’t mushy. Be sure to peel the apples before you slice them. This might seem like a small thing, but it makes a huge difference in pie filling taste and texture. Some apple skins taste tart or chalky, and they are typically coated in wax, which can have a bitter flavor and turn the skins rubbery.
Flour — I get asked a lot of questions about why there is flour in the filling. It is a thickener. Apples are mostly water, and all of that water comes out in the oven since the filling isn’t cooked first. The amount might also sound like a lot, but for 3 pounds of fruit that goes into the pie crust raw, it’s just right. (Generally, my ratio is 3 tablespoons per pound of fresh apples.) Cornstarch or tapioca starch both work if you prefer them. They are stronger thickeners, so use 6 tablespoons if you swap.
Sugar — I call for all granulated in the recipe because I enjoyed how the neutral sugar made the fresh apple flavor shine during testing. However, I have also tested this with half granulated and half light brown, as well as all brown sugar—each variation is delicious and adds a caramel-like depth.
Lemon juice — this stops the cut apples from browning while the filling rests as you roll the dough. It also sharpens the flavor for a filling that would otherwise read as flat and just sweet.
Pie dough — you need one 9-inch double crust. My homemade pie crust is what I use! Store-bought works fine, too, if you’d prefer.
Choosing The Right Apple Varieties
My two go-to varieties are Granny Smith for tartness and structure, and Honeycrisp or Fuji for sweetness. These varieties not only balance tartness and sweetness, but they are firm varieties that hold up to long bake times better. When I tested a firm variety against a soft one side by side for my apple pie filling, the Honeycrisp slices held their shape with a little bite left while the McIntosh collapsed into mush (same pan, same cooking time). Golden Delicious, Jonagold, Cortland, and Gala all behave like the McIntosh. Pink Lady, Braeburn, and Mutsu behave like the Honeycrisp.
If you prefer a softer filling, choose a soft variety and a firm variety for balance, so the filling isn’t too mushy.
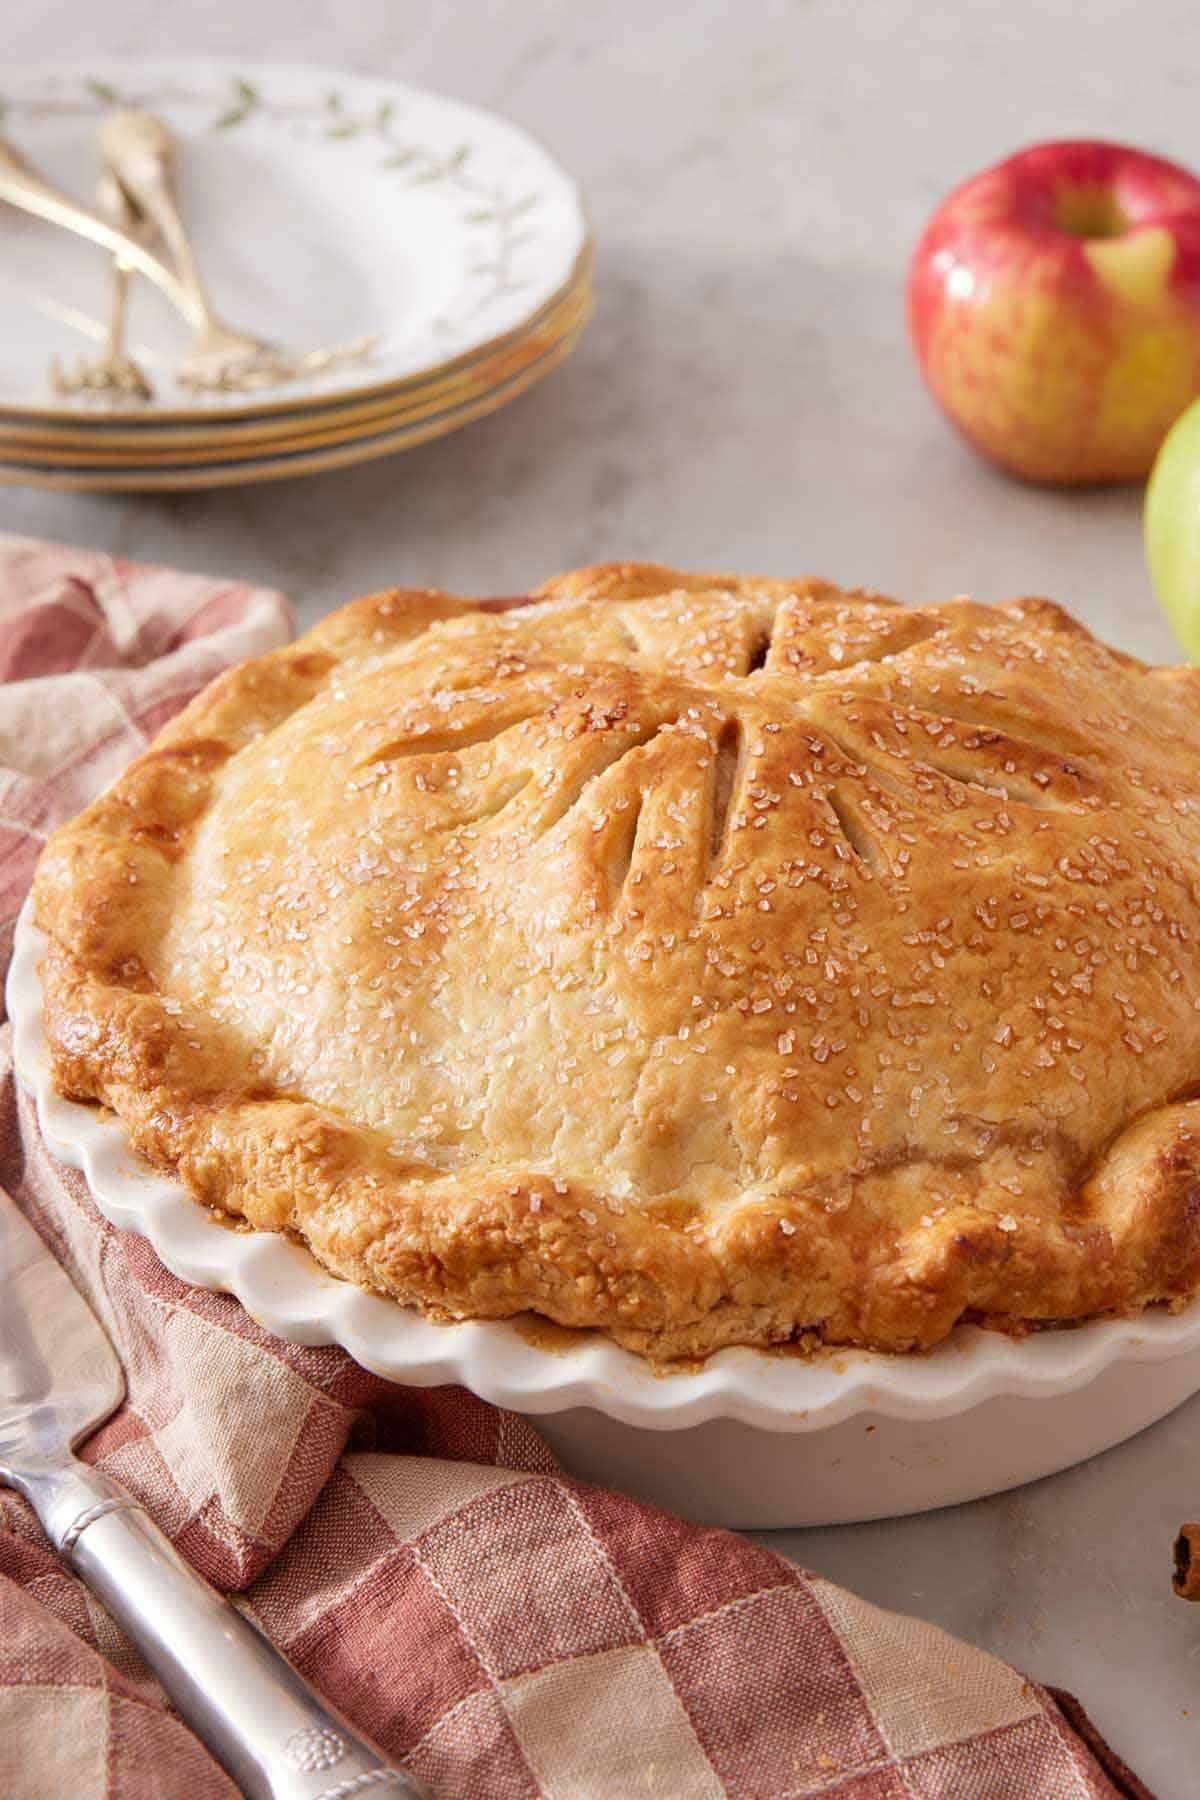
Slice the Apples Evenly
There is a lot of disagreement between apple pie recipes about how thick the apple pieces should be for the filling. Thick slices—a quarter to half an inch—hold their structure very well and don’t collapse as much, so a large gap doesn’t form between the top crust and filling. That is a real advantage, and it’s why other recipes call for it.
The trade-off, though, is texture: the thicker the slice, the firmer the finished filling when you are precooking it, and past a certain point they don’t get tender enough before the crust burns. I prefer a thinner slice, and packing the filling properly so it loses volume less (more on that below). I cut them an eighth of an inch, but you can go thinner still if you want a softer filling. Cut the apple slices thicker than that if you like a crunchier pie filling.
Whatever thickness you choose, cut them evenly. Uneven slices cook unevenly, and you will end up with a pie filling that doesn’t have a consistent texture throughout.
Pack The Filling Into The Crust
Arrange the slices in rough layers and gently press them down as you go, then mound the center slightly higher than the rim. Apples lose a lot of volume in the oven. If you pour them loosely into the crust, they trap air throughout the filling. As they cook down, they will soften and collapse, filling in those gaps and leaving an air gap under the set top crust. That’s how you get a hollow dome where the pastry has nothing right underneath it.
Bake The Pie On A Lower Oven Rack
A pie baked on the middle rack sits closer to the top element, and the top crust can brown hard before the apples have even started to soften. A reader wrote to me having had exactly that happen—her crust was dark after the first twenty minutes, and she had to cover it with foil for the remaining bake time.
Baking it in the lower third of the oven fixes the problem and adds a benefit. It moves the top crust away from the hotter top portion of the oven, and it puts the base nearer the bottom of the oven, where heat also pools. This lower position sets the bottom crust before any juices from the filling can soak into it. The crust browns better too, so you avoid a soggy bottom. Be sure to position the oven rack before you preheat the oven.
I originally tested the recipe baking in the center of my oven. While I didn’t have the top brown too fast (just oven differences), I did find the bottom crust wasn’t fully browned in the very center of the pie. It was cooked through, but soft. When I tested it again, moving the oven rack lower, the baked pie had a perfectly crisp bottom crust and was evenly browned all the way through.
Make Ahead: Freeze Unbaked Apple Pie
This is a great way to get ahead on holiday dessert prep, and I find it makes the pie filling perfectly tender and the crust flakier, so it’s a win-win!
To freeze the pie before baking, assemble the pie, then freeze the whole pie before wrapping it and storing it. I have detailed freezing instructions and storage tips for avoiding freezer burn in my Academy guide on How To Freeze A Pie.
Bake from frozen: Unwrap the frozen pie and place it on a rimmed baking sheet, then bake at 375°F for about 1 hour and 30 minutes, or until the filling is bubbly. The center should reach about 195-200°F if you’re uncertain. Tent the crust with foil if it’s already a dark golden brown after an hour.
Pro Tips For The Best Apple Pie
You can use additional spices in the filling. I love to add a pinch of ground ginger, cardamom, cloves, and/or allspice for warmth and earthiness.
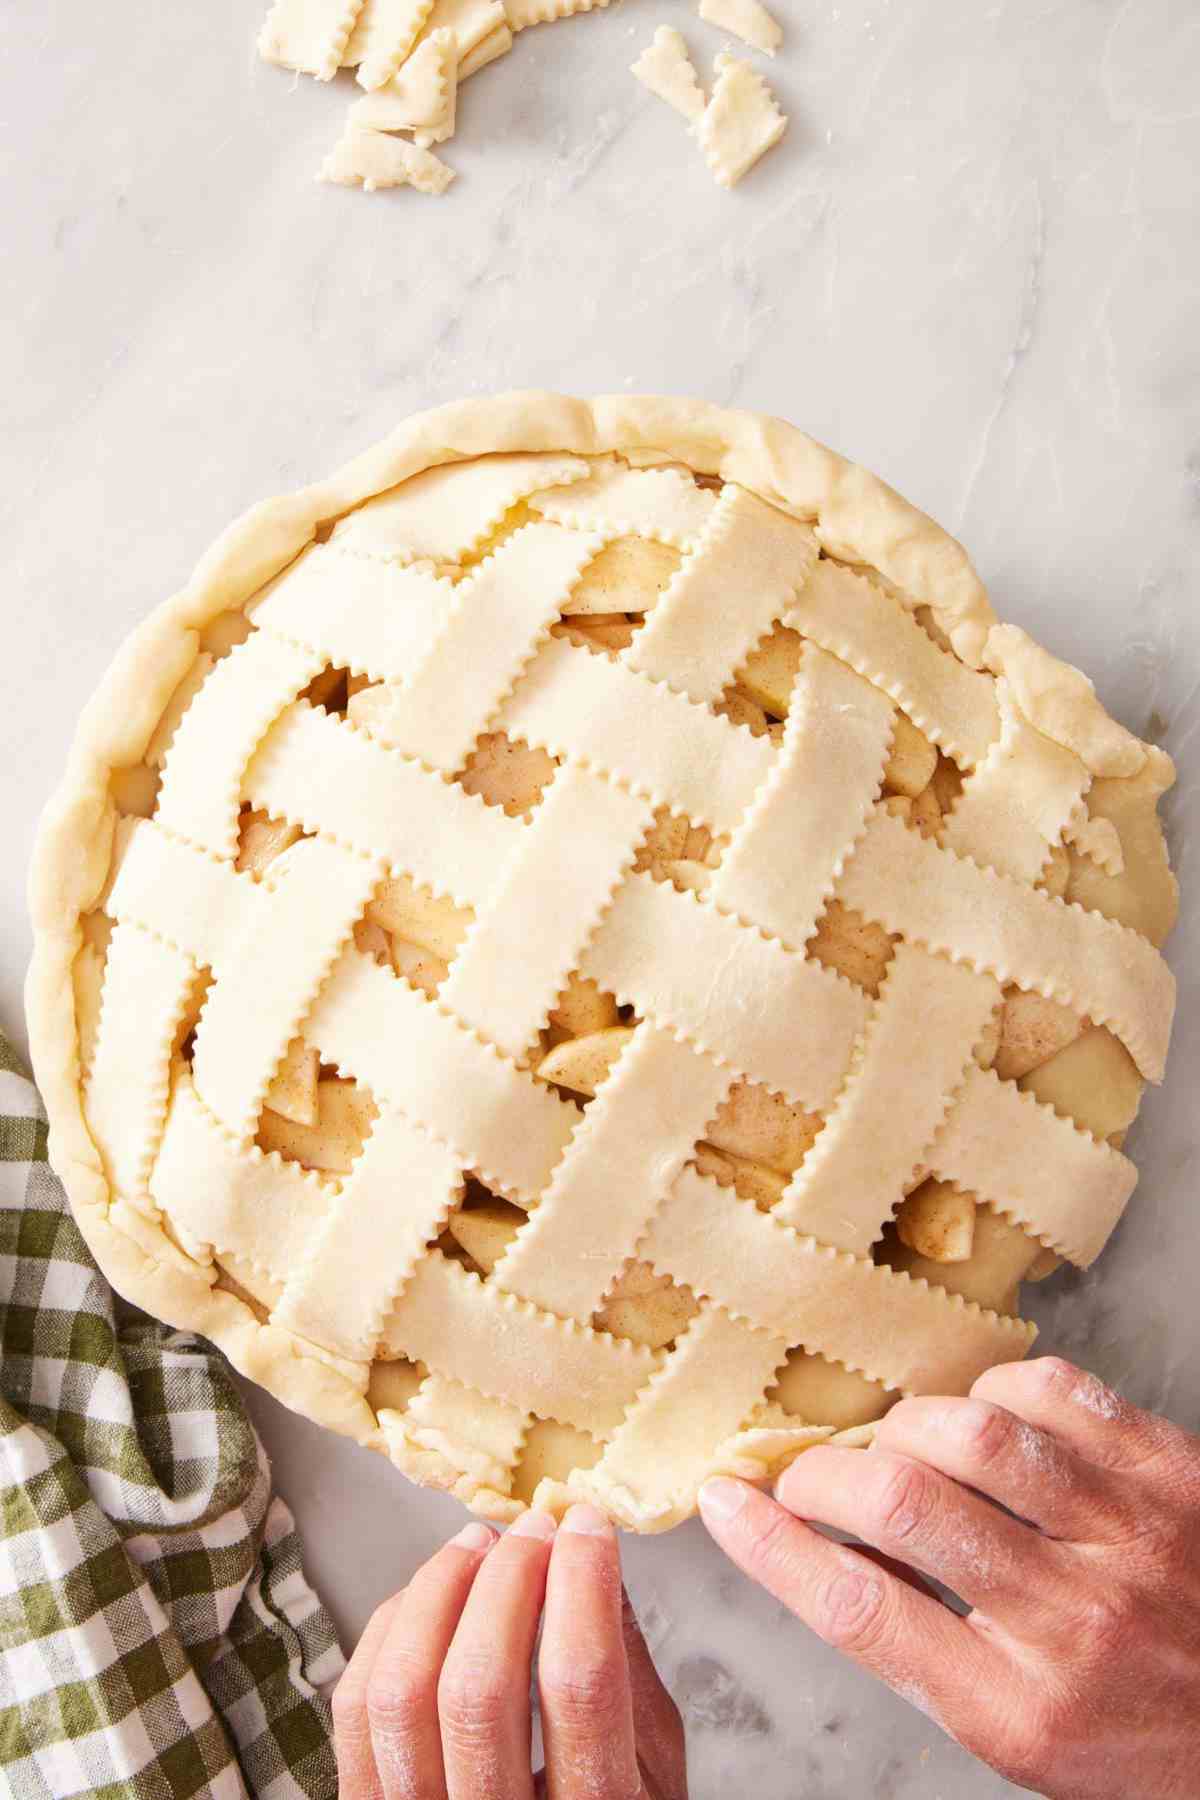
Get creative with the top crust. Sometimes I use a solid top crust with a few slits cut into it to allow steam to escape. Other times, I like to use a lattice crust instead for a more striking presentation. A lattice top helps excess moisture escape effectively as well, if your apples are extra juicy. Follow my Academy guide to learn how to lattice pie crust.
Crimp the edges to seal in the filling. It’s a fun way to add decorative flair to the pie, but it serves an important function beyond just being aesthetic. If you don’t crimp the top and bottom crust together, the juices will seep out the seam, and your pie filling will have less flavor, or the bottom crust can stick to the pan juices that leak down into it. Learn how to crimp pie crust in my Academy guide, along with several decorative designs to try!
Skip the top crust and use streusel instead. The crumb topping turns this recipe into a version of my Dutch apple pie! Bake it without the topping at 425°F for 20 minutes (as directed in the recipe), then sprinkle the streusel over the filling when dropping the oven temp to 375°F. If you decide on this option, you only need a single pie crust, not a double crust.
Shield the pie crust to prevent it from browning too much. If you notice that your crust is gaining too much color too fast, cover the top of the pie loosely with foil to protect it. Or, if it’s only the edges that are browning too quickly, cover just the edges with a pie crust shield. Use my guide on how to make a pie crust shield to make a foil pie shield.
How To Make Apple Pie
Step-by-step process images along with instructions for making this easy apple pie are below. You can find the full set of instructions in the recipe card.
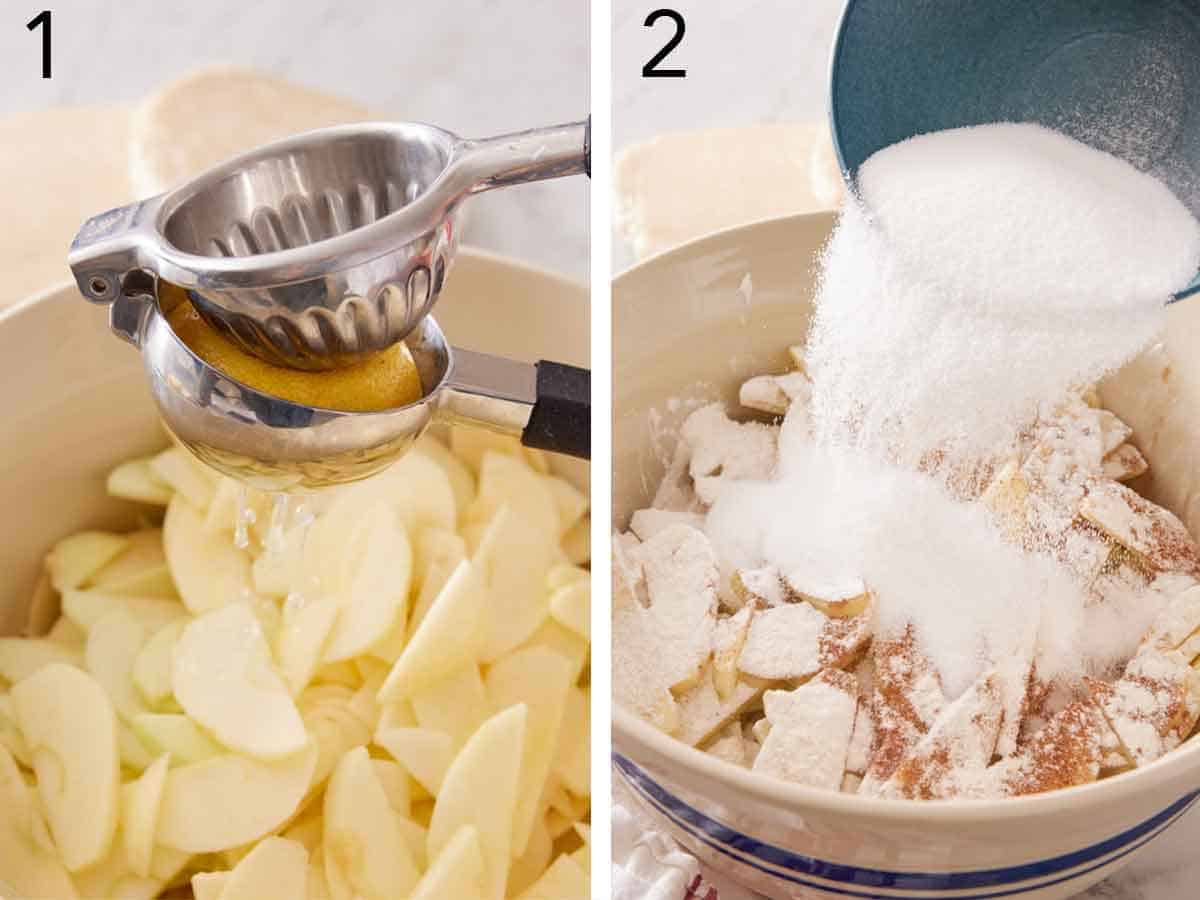
1. Place the sliced apples in a large bowl and pour fresh lemon juice over them. Toss well.
2. Add the sugar, flour, and spices and stir to coat the apples. Set the filling aside while you roll out the bottom crust.
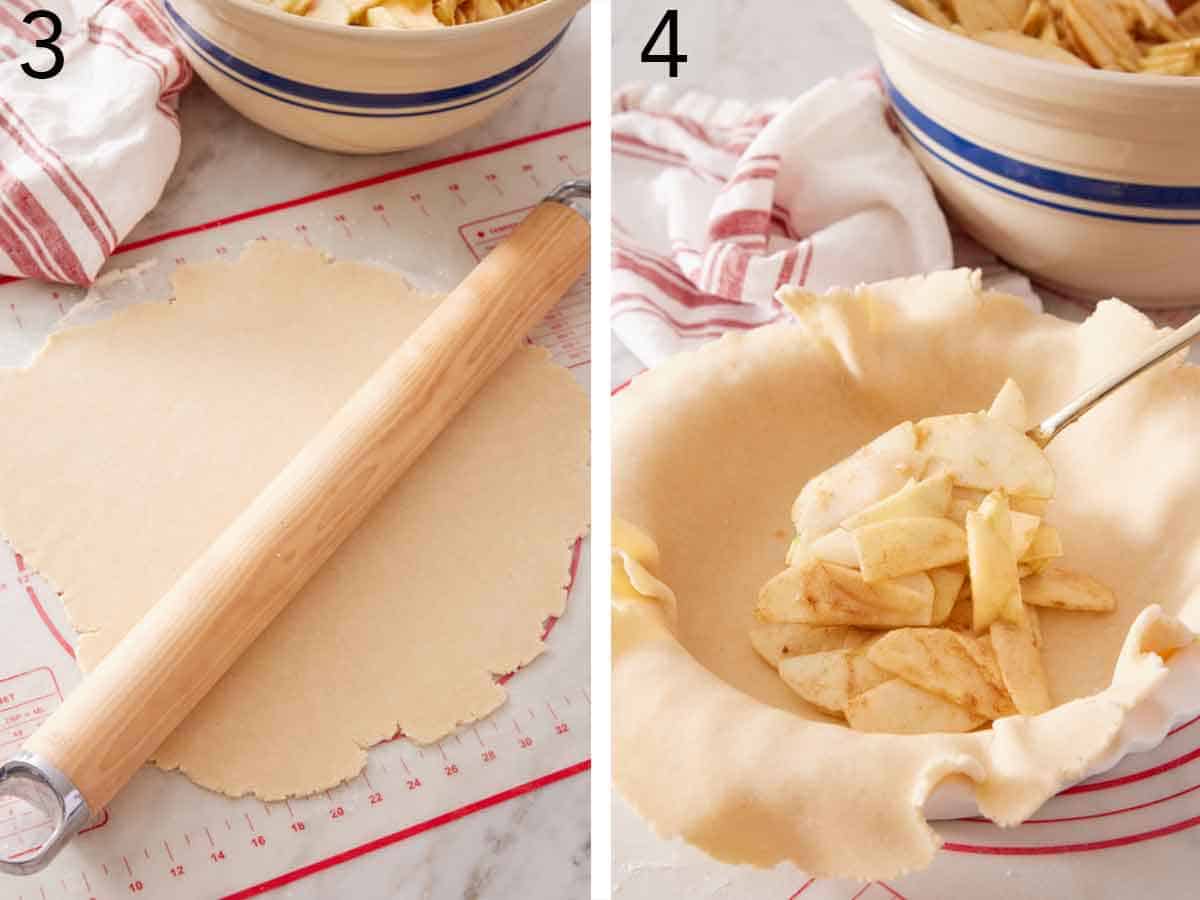
3. On a lightly floured surface, use a rolling pin to roll one disc of dough into a 12- to 14-inch circle. Grab a 9-inch pie dish and line it with the dough, allowing the excess dough to hang over the edge. (See my Ultimate Pie Crust Guide for tips on rolling the dough and lining the pie pan.)
4. Give the apple filling a stir, then pack the apple pie filling into the bottom crust and pat it into an even layer, allowing a slight mound to form in the center.
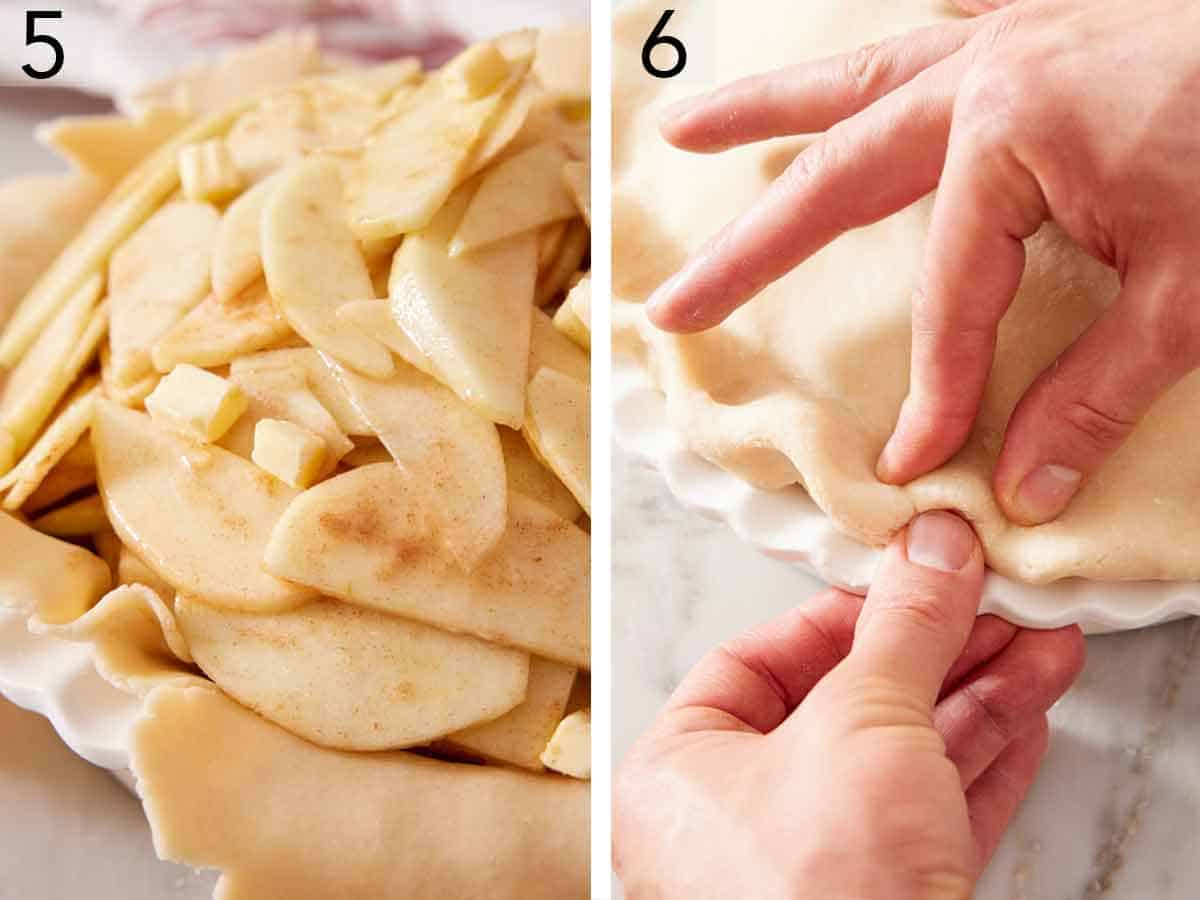
5. Dot the apples with cubed butter. This makes a silkier filling once the apples release their juice and thick syrup forms during baking.
6. Roll the second pie dough into a roughly 11-inch circle (about ⅛-inch thick). Place the dough atop the filling. Trim the excess pie dough (top and bottom crust together) to an inch or so from the edge of the pie pan. Tuck the excess under itself into the pie pan, and crimp the edges.
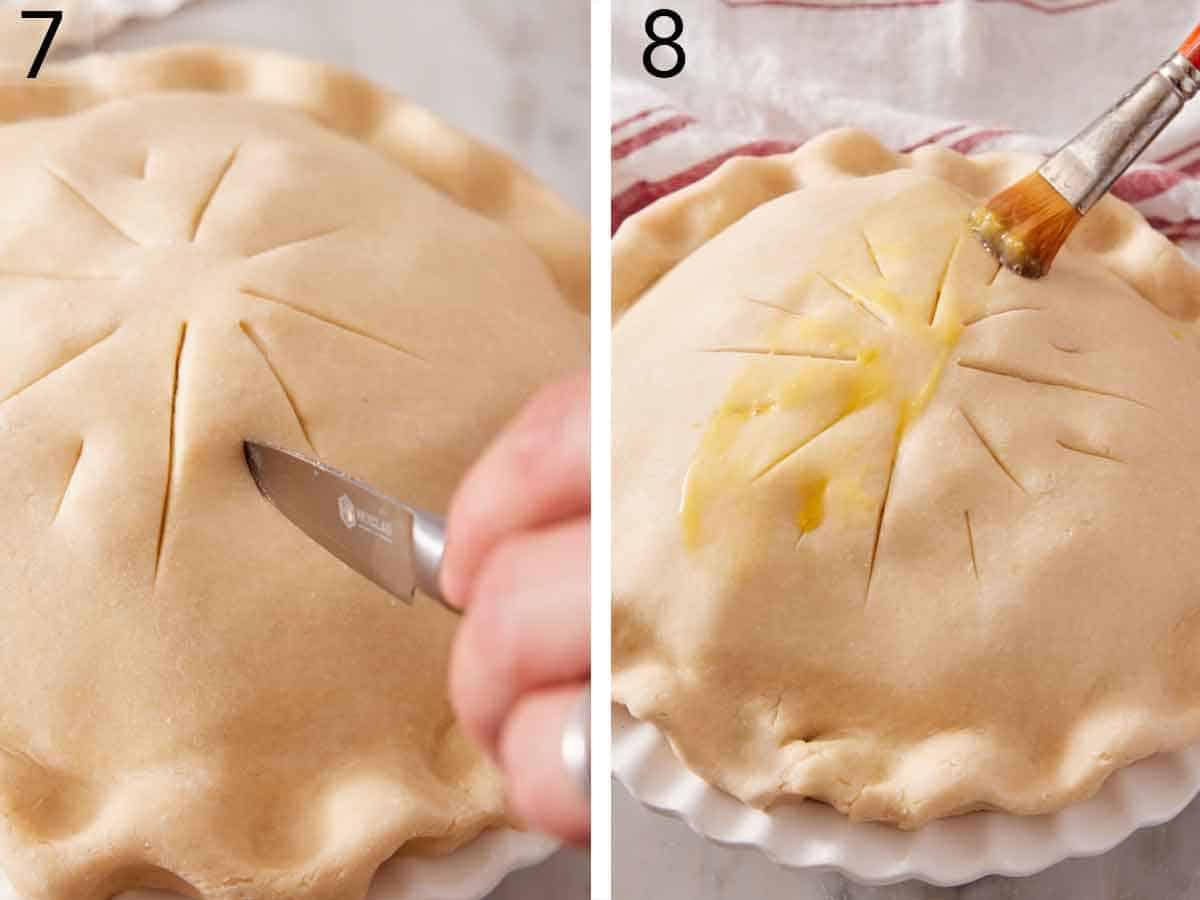
7. Cut slits in the top crust with a sharp knife to allow steam to escape as the pie bakes. Place the pie dish on a rimmed baking sheet lined with either parchment paper or foil to make clean-up easier in case any juices bubble over.
8. Brush the crust with the beaten egg wash. Bake at 425°F for 20 minutes, then reduce the heat to 375°F and continue baking until the crust is a deep golden brown and the filling is bubbly, about 50 minutes to 1 hour. Cool completely on a wire rack, about 4 hours, before slicing.
How To Tell When It Is Done
The pie crust should be a deep golden brown all over (edges to center) and the filling bubbling through the vents or gaps in the lattice. If it’s just barely bubbly at the edge, keep baking until you see it bubble towards the center and the syrup from the filling is nice and thick around the edge. The bubbling indicates boiling, which means the flour is gelatinizing and reaching its full thickening potential. A pie pulled when the crust looks right, but the filling has barely bubbled, is the most common cause of a runny slice.
If the crust darkens faster than the filling cooks, tent the whole pie loosely with foil, or shield just the edges. If you’re uncertain that the filling is done, use an instant-read thermometer! Insert it into the center—the filling should reach about 195°F before you pull the pie from the oven.
Why You Should Let The Pie Cool Before Slicing
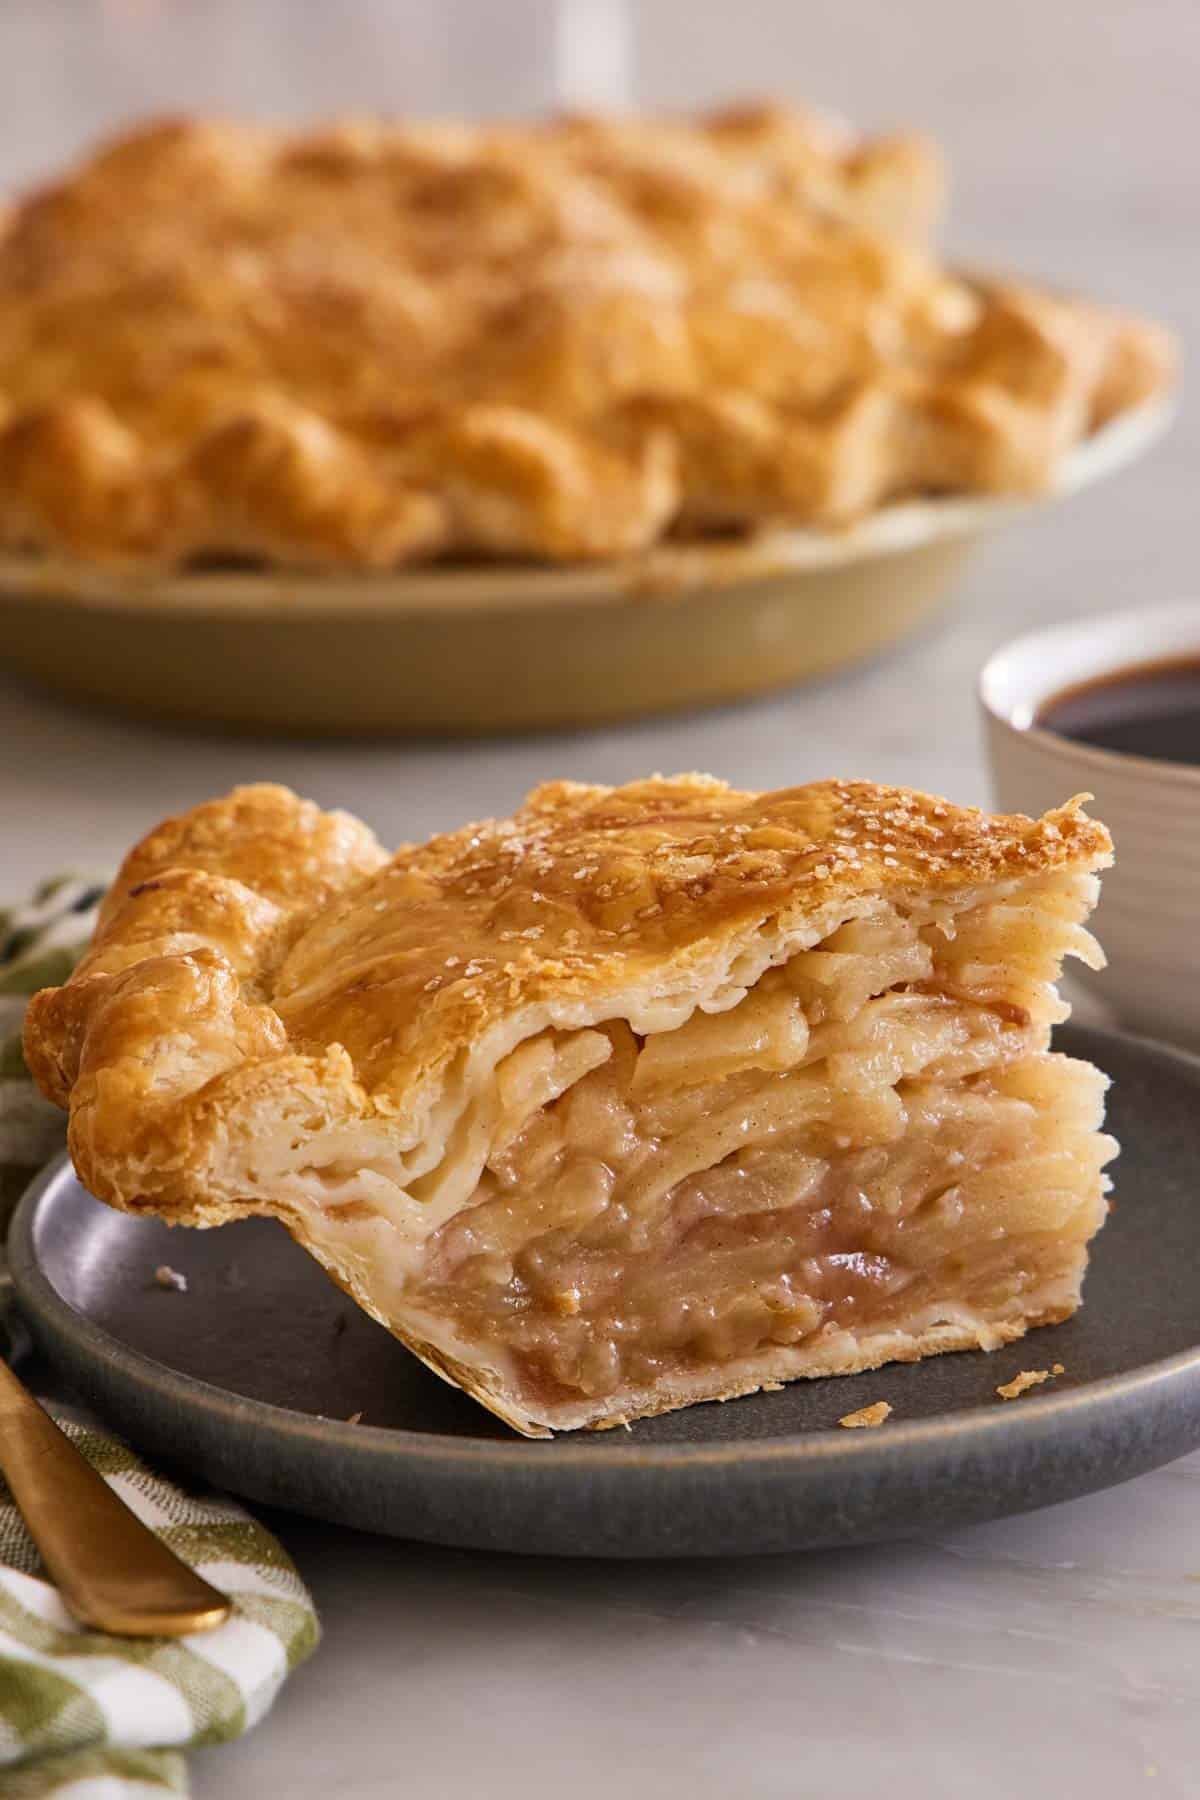
Allowing the apple pie to cool completely gives the filling time to set and thicken up. You can see this in the images below. In the slice on the left, I cut the pie right out of the oven. The juices spilled right out of the slice. In the slice on the right, you can see a cooled filling where the juices set before I sliced it. By allowing the juices time to set, your slice of pie will not only look better, but it will taste better! All of that flavor stays in the slice, for more tastiness in every bite.
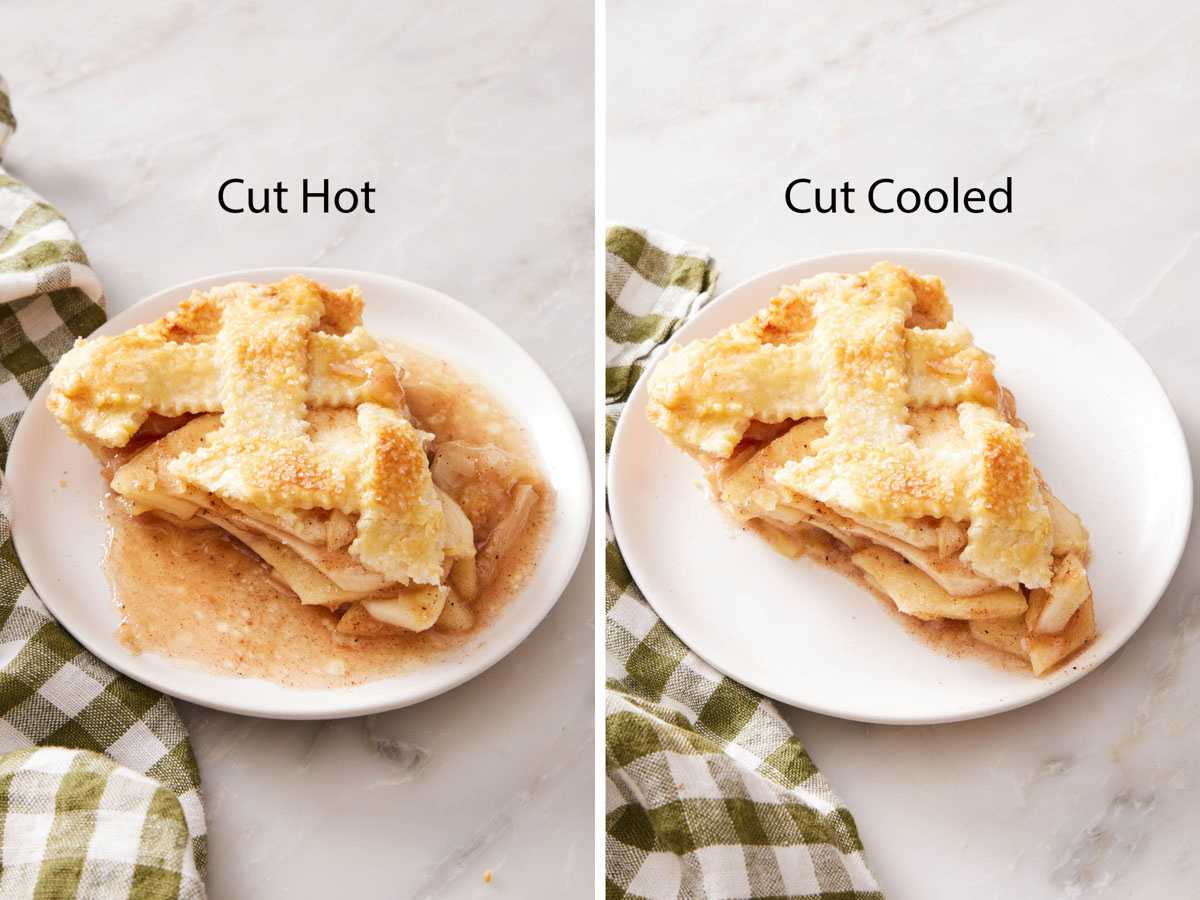
The free-flowing juices will also seep under the bottom crust, turning it soggy. I know it’s tempting to slice it hot, because if you’re anything like me, I prefer warm apple pie. Instead, simply reheat it gently before or after slicing. (Instructions are in the next section!)
Apple Pie Recipe
Equipment
- 9” pie dish
- Large mixing bowl
- Knife or pastry cutter
- Pastry brush
Ingredients
- 3 pounds apples peeled, cored, and thinly sliced (1.35kg)
- 2 tablespoons lemon juice
- 1 cup granulated sugar (200g)
- ½ cup all-purpose flour (60g)
- 1½ teaspoons ground cinnamon
- ¼ teaspoon ground nutmeg
- 1 (9-inch) double-crust pie dough homemade or store-bought
- 2 tablespoons unsalted butter diced
- 1 large egg lightly beaten
Instructions
- Preheat the oven to 425°F.
- In a large mixing bowl, toss the apple slices with the lemon juice. Add the sugar, flour, and spices. Stir until the apples are well coated.
- On a lightly floured surface, roll one disc of pie dough into a 12- to 14-inch circle. Line a 9-inch pie pan with the dough, letting the excess hang over the edge. Pour the apple filling into the crust and pat it into an even layer, mounding it slightly in the center. Dot with the butter.
- Roll the second pie dough into roughly an 11-inch circle (about ⅛-inch thick). Place on top of the filling for a solid top, or cut the dough and arrange in the desired pattern. Trim the excess pie dough to about an inch from the edge of the pie plate, tuck the excess under and crimp the edges as desired. Cut slits in the top of the pie to create steam vents if covered with a solid top crust. Place on a rimmed baking sheet. Brush the crust with the beaten egg and sprinkle with additional sugar, if desired.
- Bake for 20 minutes at 425°F.
- Reduce the heat to 375°F, and continue baking until the crust is a deep golden brown and the filling is bubbly, about 50 minutes to 1 hour. (If the crust browns too quickly at any point, loosely cover the whole pie or the edges with foil.) You can check the temperature in the center of the pie if you don’t see any bubbling with a double crust. It should reach about 195°F before you remove it from the oven. Let the pie cool completely on a wire rack, about 4 hours before slicing.
Notes
- Sprinkle the top of the pie with sugar for a sweet topping. A sprinkle of turbinado sugar or granulated sugar after the crust is brushed with the egg wash will give this pie recipe a slightly crunchy topping and sweet flavor. Or, mix together 2 tablespoons of granulated sugar with 1 teaspoon of ground cinnamon and ½ teaspoon of ground ginger for a spiced sugar finish.
- Serving suggestions: While you’ll never go wrong with a warm slice of apple pie with a big scoop of vanilla ice cream, I like to change it up sometimes! Apples and caramel are a classic combo, so try serving the pie with a drizzle of caramel sauce or even butterscotch. For a simple yet classic option, serve slices of apple pie with a dollop of freshly whipped cream.
- The bake time will change depending on the pie pan material. A ceramic or glass pan insulates more, so the pie will take 10-15 minutes longer to bake than in a metal pan.
Nutrition
Have you tried this recipe? Tag me today!
Mention @preppykitchen and tag #preppykitchen!
Storing And Reheating
Refrigerated and covered, the pie keeps for up to 5 days. Covered at room temperature, eat it within 24 hours, or place it in the fridge after a day.
For very neat slices, cut it cold. A chilled pie cuts more cleanly than a room-temperature one. This is a good way to firm up the filling if you slightly underbaked the pie and it was juicier than expected.
To freeze a baked pie, cool it completely, wrap the whole pie or individual slices in plastic and then foil, and freeze for 2 to 3 months. Thaw overnight in the fridge before serving or reheating.
Reheat in the oven or air fryer to re-crisp the crust. A whole pie takes 15 to 20 minutes at 350°F on a baking sheet. Individual slices take about 10 minutes in the oven, or 5 minutes in the air fryer at 350°F. The microwave is less ideal since it makes the crust soft, but you can reheat a slice in 10-20 seconds, if needed.
Frequently Asked Questions
Usually one of two reasons: The pie baked too high in the oven, so the base never got enough direct heat. Or the filling never bubbled long enough for the thickener to set. Baking in the lower third addresses the first, and waiting for a hard bubble fixes the second cause.
Yes. Assemble the pie completely, cover it, and refrigerate overnight. Bake it straight from the fridge and add a few minutes, since it is going into the oven cold. I have done this several times for holiday baking, and it works well! You can also mix together the filling and chill it overnight before assembling the pie. You will have more juice in the bowl, so just pour it on top of the apple slices before you add the top crust.
Yes. Some people prefer it, and an older version of this recipe worked that way. Make my apple pie filling, cool it completely to room temperature first, then fill a pie crust and bake 10 to 15 minutes less than the times above. Cool the filling properly before you assemble the pie, or it will soften the raw bottom crust before the pie ever reaches the oven, melting the butter and making the bottom soggy or stick to the pan.
Pears work well alongside the apples, as do sliced Fuyu persimmons. Cranberries are the other classic pairing—see my apple cranberry pie!
More Recipes To Try
Try one of these apple dessert recipes next:
- Apple Crisp — no pastry at all, just spiced apples under a crisp oat topping.
- Mini Apple Pies — the same idea scaled down; useful when you want individual servings.
- Air fryer Hand Pies — pie dough stuffed with tender apple filling and baked in the air fryer.
- Apple Cobbler — the flavor of apple pie without the need to roll out a pie crust.
- Apple Tart — fresh apples sliced and arranged in a tart crust; a simpler version of this apple pie!
If you’ve tried this apple pie recipe, then don’t forget to rate it and let me know how you got on in the comments below. I love hearing from you!





