
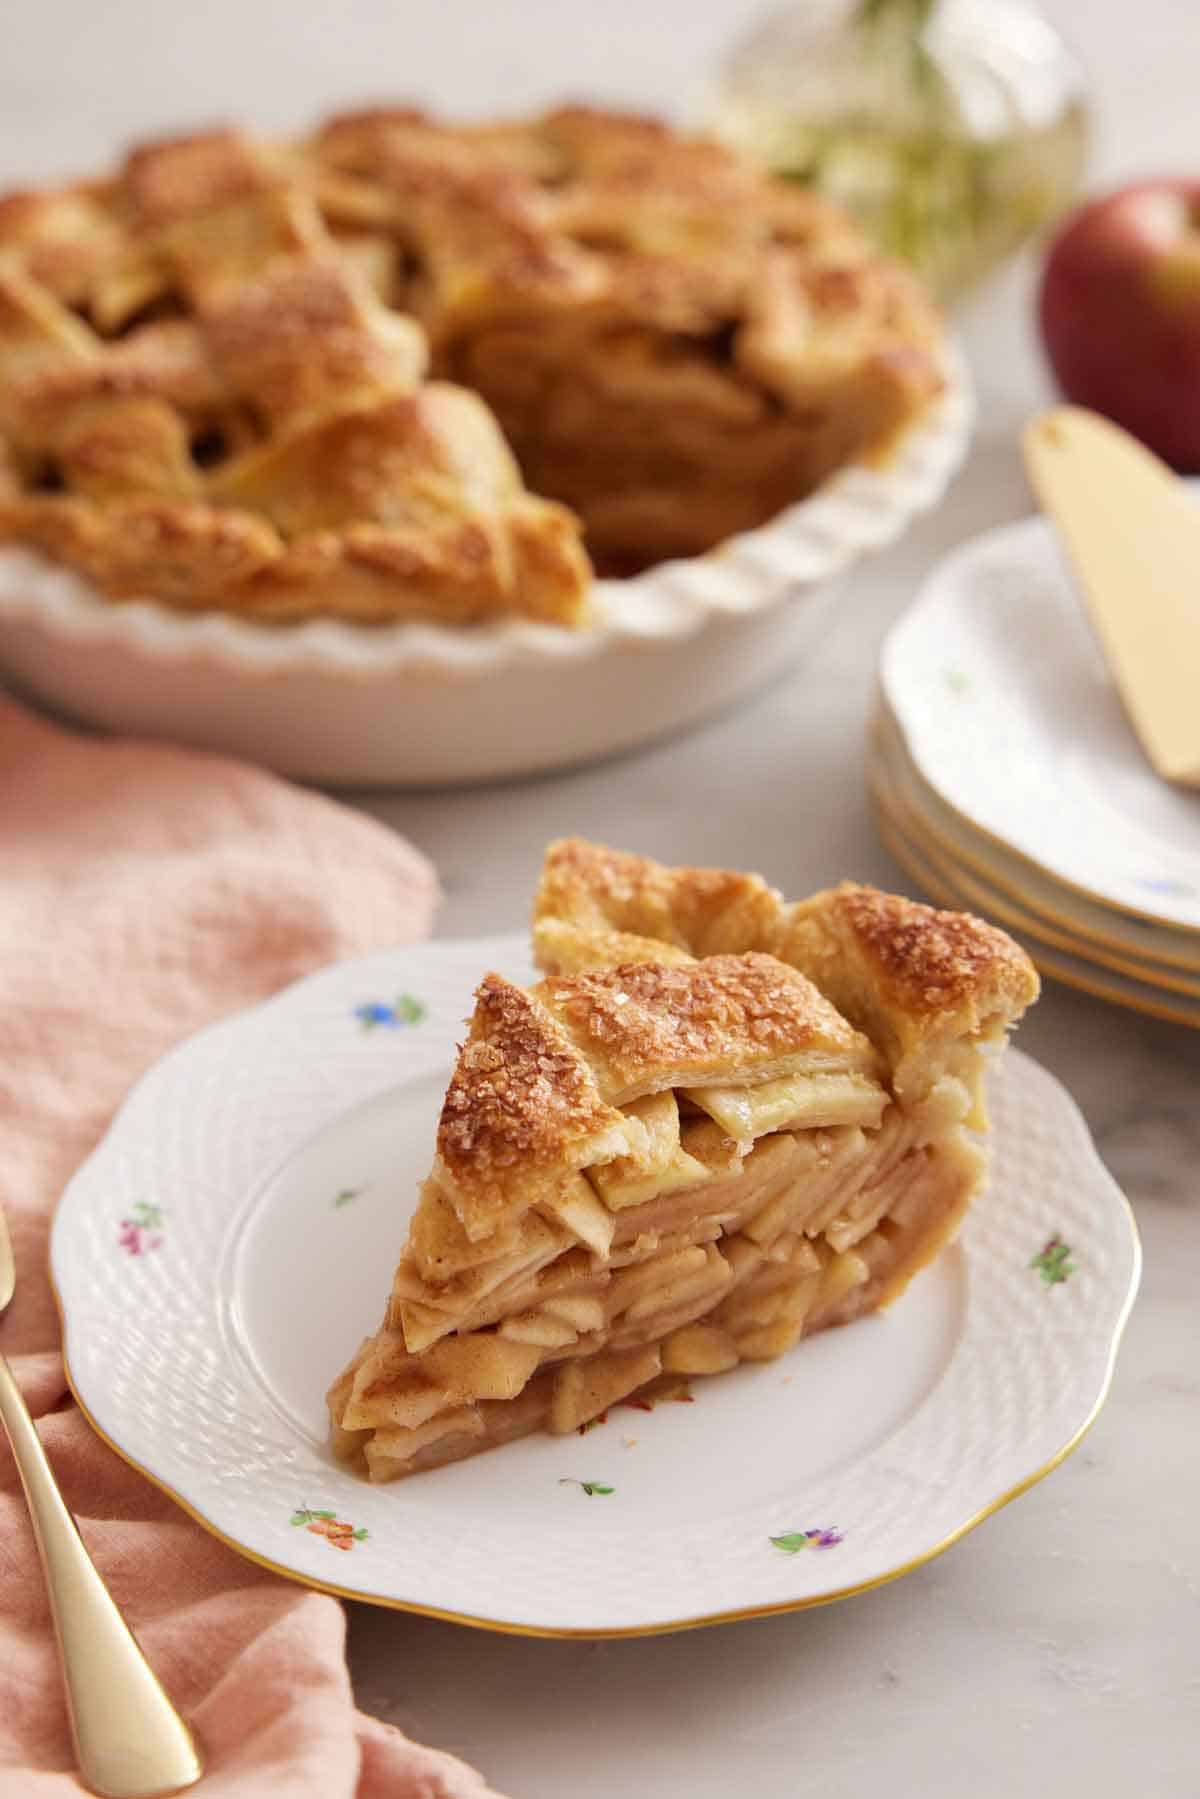


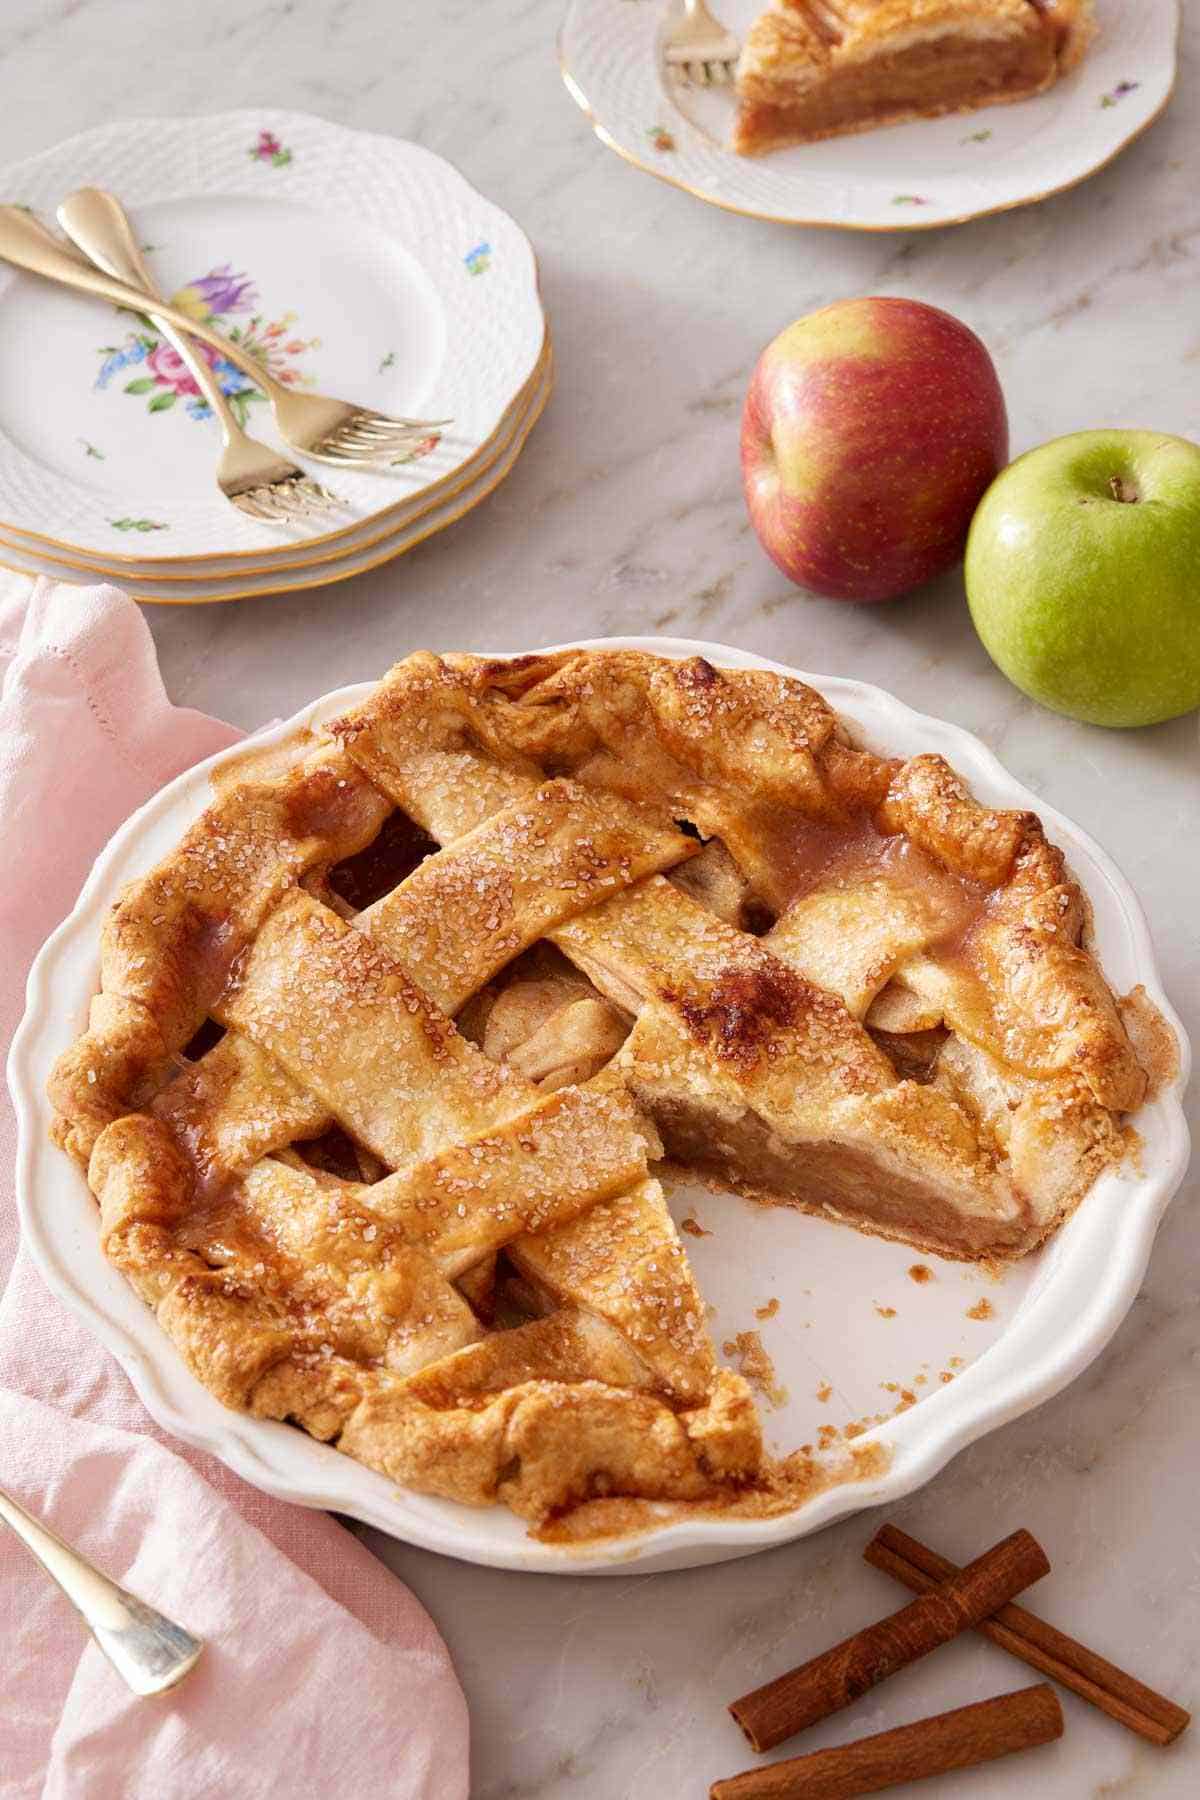
Few desserts scream fall like this American classic, the apple pie. A flaky, buttery pie crust generously filled with gently spiced apples alongside a big scoop of vanilla ice cream- it doesn’t get much more delicious than that. When apple season rolls around, I find any excuse to whip up cozy desserts like mini apple pies, an apple galette, or an apple crisp whenever I can. But when holidays arrive, an apple pie is my go-to! It’s ubiquitous on almost every holiday table because it is simply that popular, so much so that many families have their own take on an apple pie recipe.
My recipe for apple pie is a favorite in our family, and it isn’t difficult to put together (no, you do not need any canned apple pie filling either for this easy holiday dessert). One of the best things about this apple pie recipe is that it is packed with an abundance of crisp, fragrant fresh apples. No need to cook the filling first either, as the thinly sliced apples turn perfectly tender in the oven.
I have tested this apple pie many times with both cooked and uncooked fillings. While they both have their place, I found that a fresh apple filling made a delicious, classic apple pie without the added steps of cooking and cooling the filling before assembly. Your loved ones will adore the crisp, flaky pie crust and tender, fragrant apples. It truly says “fall in every bite”, and you need very simple ingredients to make it!
Table of contents
Key Ingredients
You only need a few ingredients to make a delicious apple pie! The full list of ingredients with measurements can be found in the recipe card below.
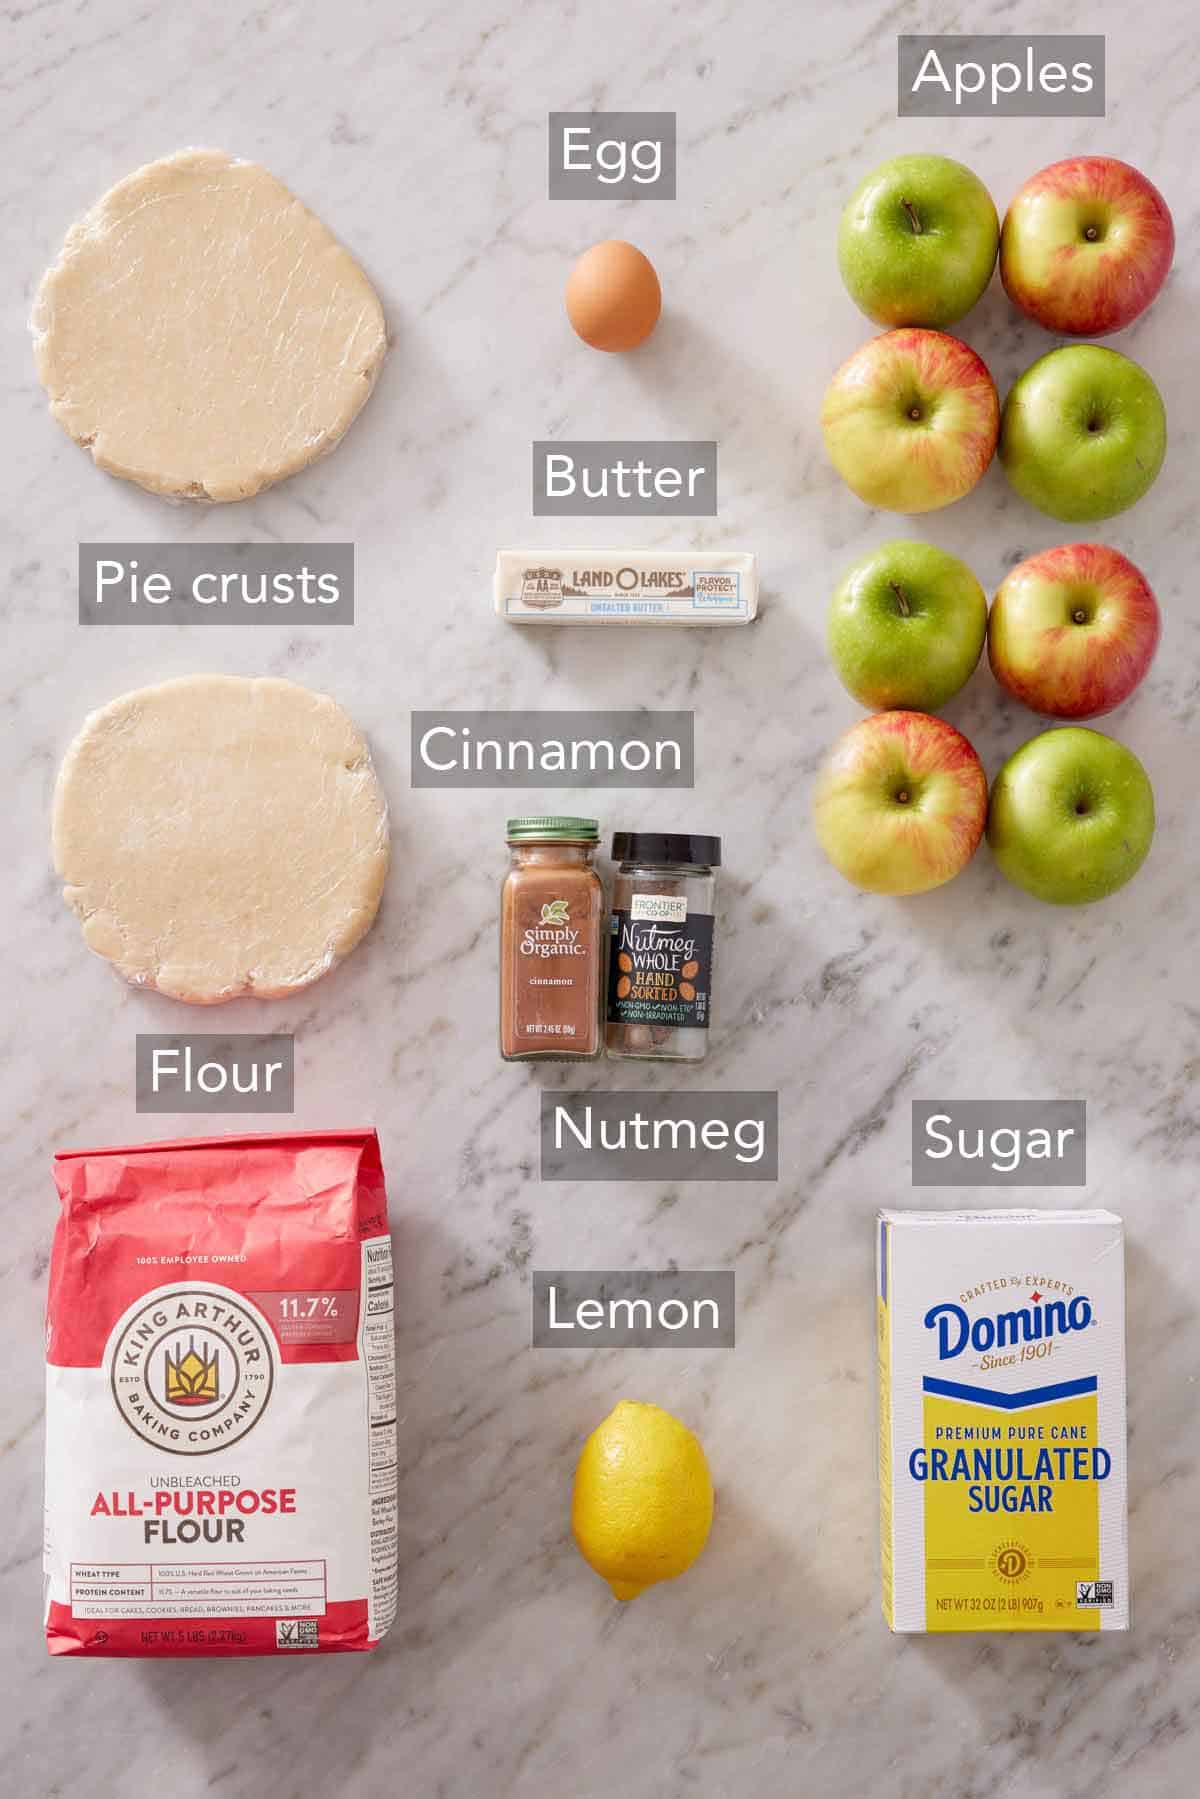
Apples — peel, core, and thinly slice the apples for the best pie filling texture. Using a mixture of apples, such as Granny Smith apples, Honeycrisp apples, and Fuji apples, will give you the perfect balance of tart and sweet.
Sugar — I used the classic granulated sugar since I’m adding spices to the filling. I also like that it let more of the fresh apple flavor shine in the filling. However, light brown sugar is an excellent swap, or you can use half of each!
Lemon juice — lemon juice prevents the apples from oxidizing (turning brown) and adds a complementary tartness to the sweet filling.
Spices — cinnamon and nutmeg give the apples that classic autumnal flavor for a perfect apple pie. Feel free to add or swap these out for any of your favorite baking spices or blends!
Pie dough — you need one 9-inch double-crust pie dough. My foolproof homemade pie crust recipe works very well, but if you want to save time, store-bought pie crusts or pie dough work great, too.
Choose A Mixture Of Tart Apples And Sweet Apples
I’ve baked plenty of pies over the years, and when it comes to making apple pie, my favorite ones are always when I use a mix of apple varieties with different flavors and textures. This contrast will produce a more flavorful apple pie.
For common varieties, Granny Smith apples are arguably one of the best apples for apple pie filling, and with good reason. They are tart, firm, and hold their texture well after being baked. I balance the tartness with sweet apples like Honeycrisp and Fuji apples. You can also use other apple varieties like Golden Delicious apples and Jonagold apples (both of which get soft when baked) or Pink Lady apples, Braeburn apples, and Mutsu apples (all of which stay firmer) for this homemade apple pie recipe.
Just as I recommend in my apple pie filling recipe, use apple varieties you enjoy the flavor of eating fresh, and anything local you can find in season is great too. Choose your favorites, and the pie is guaranteed to be delicious!
Preparing The Apples For The Filling
Start by peeling the apples. This might seem like a small thing, but it makes a huge difference in how your apple pie will taste, as well as how enjoyable the filling texture is! Removing the peels gives you an amazingly silky pie filling. In addition, some apple skins are tart or chalky, and they are typically coated in wax, which can have a bitter flavor, so don’t skip this step.
Once peeled, remove the fibrous core and slice the apples. Be sure to slice equally thick pieces, no more than ⅛ inch-thick. Any thicker, and the apple slices won’t soften enough during baking. For an even softer, more tender filling, make them thinner (about ¹⁄₁₆ inch). Slicing the apples into equal pieces is essential so they all cook evenly.
Once the apples are prepped, they’re ready to be tossed with lemon juice. This will stop them from oxidizing while you roll your pie dough!
Get Creative With The Top Crust
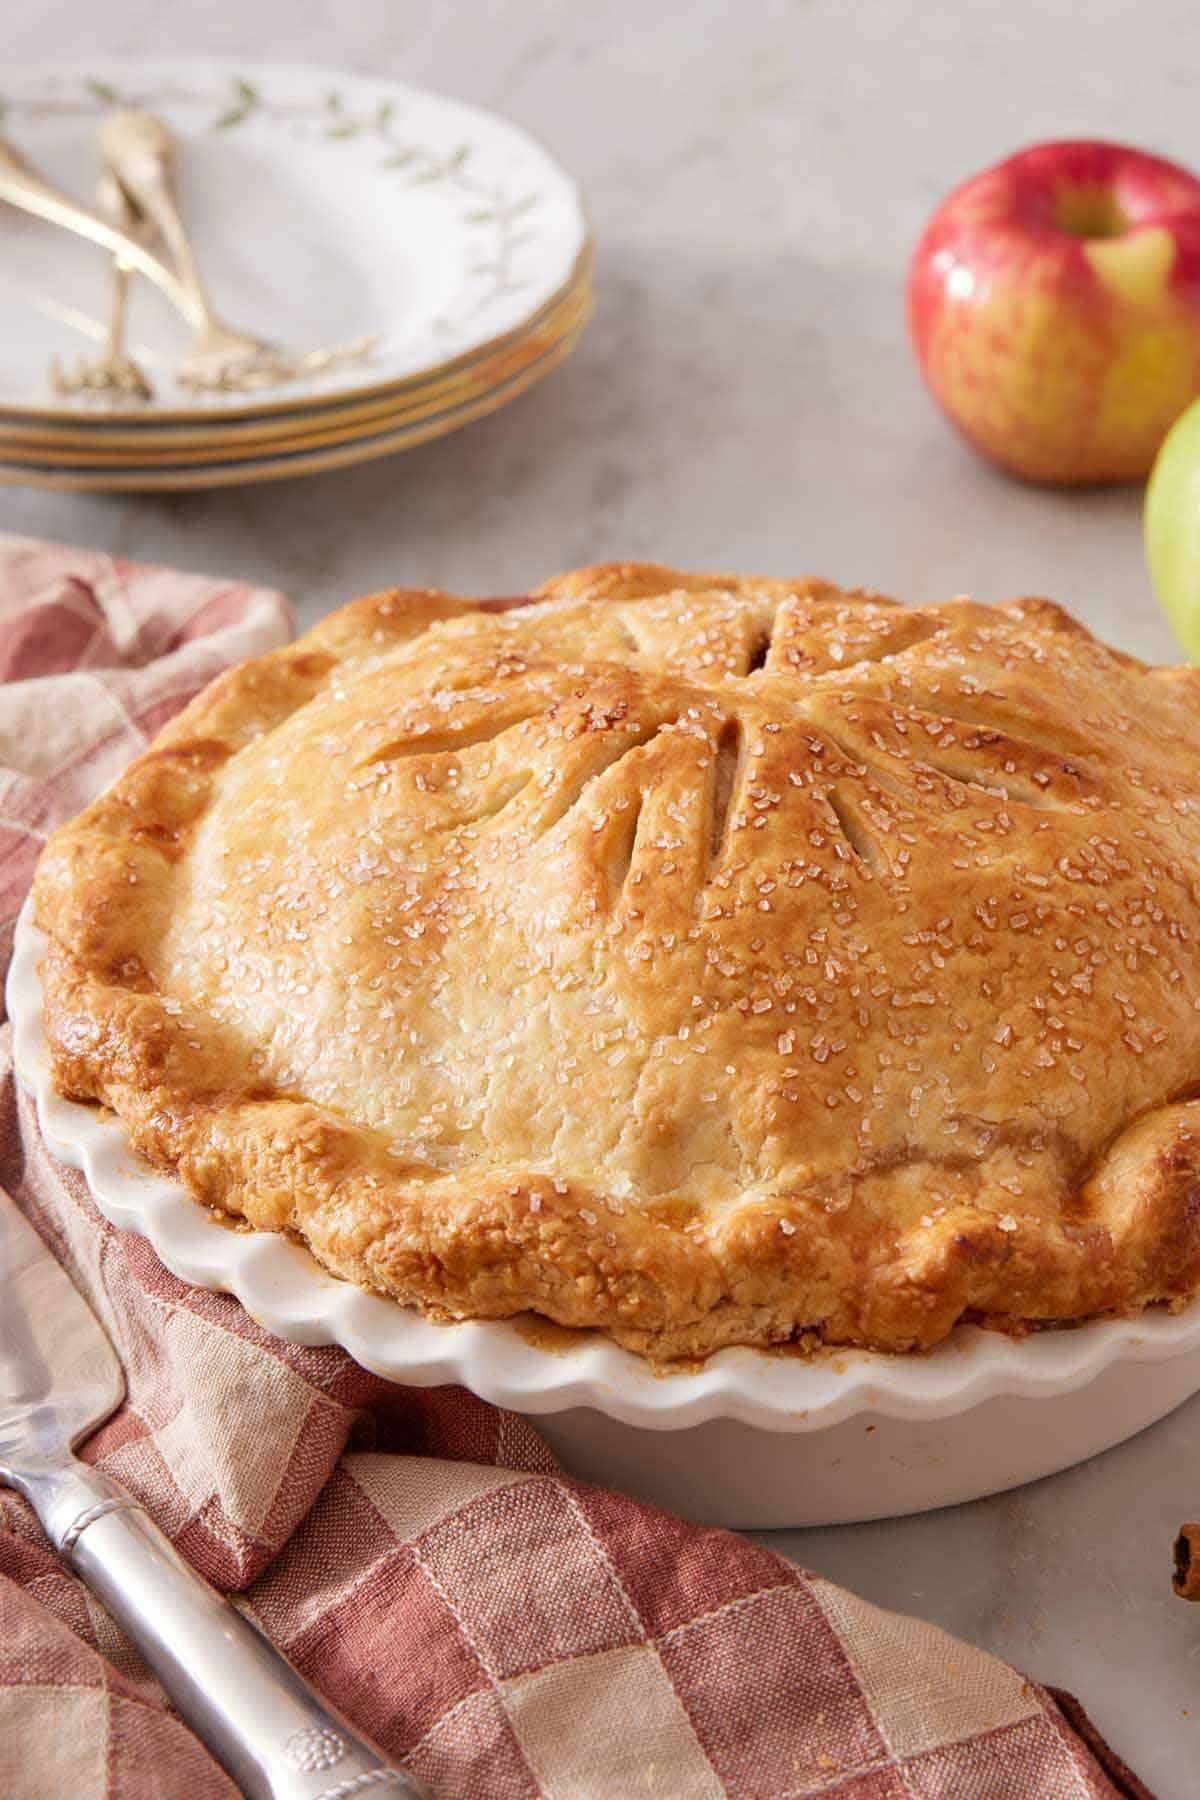
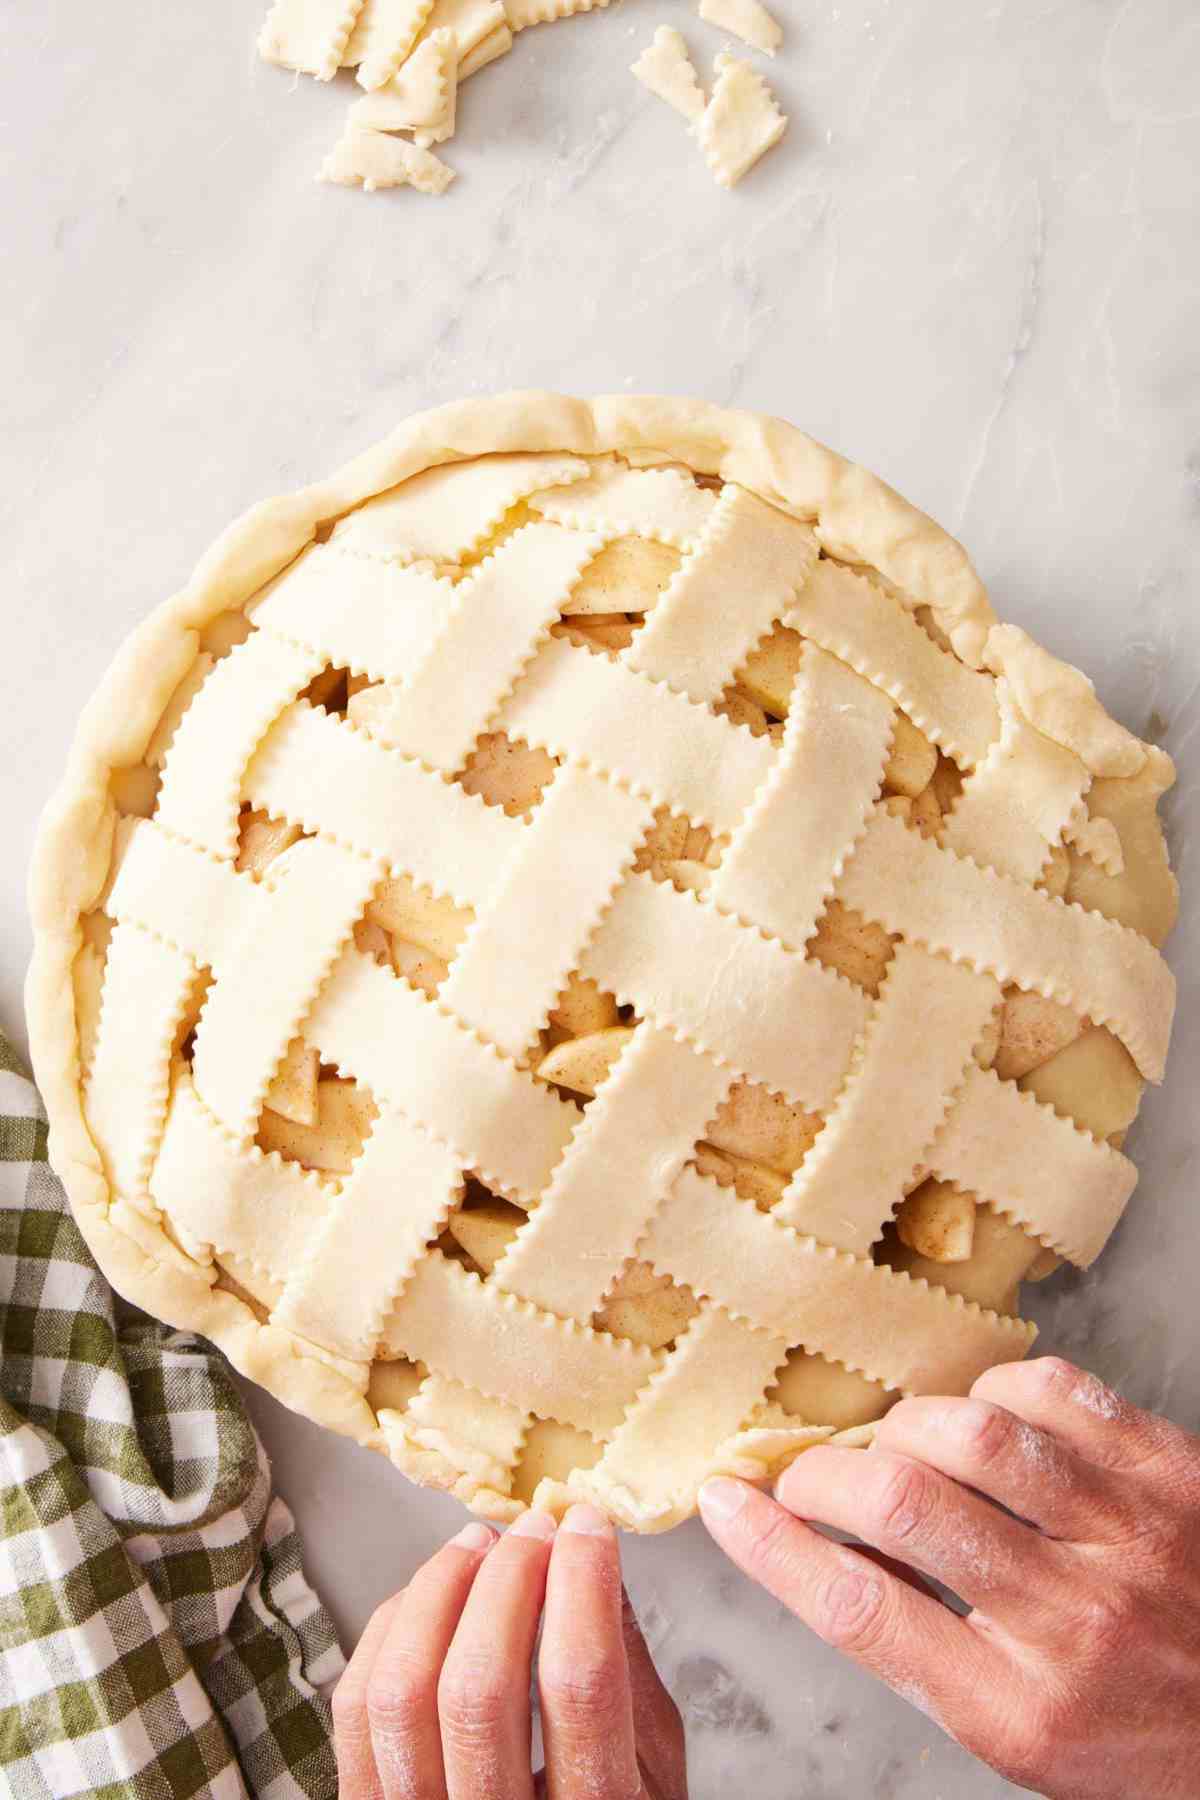
In this apple pie recipe, I sometimes use a solid top crust with a few slits cut into it to allow steam to escape. Other times, I like to use a lattice crust instead for a more striking presentation. A lattice top helps excess moisture escape effectively as well. (Get some tips for how to create a lattice in my blueberry pie recipe!)
Another alternative is to crimp the edge of the bottom crust and then use pie crust cutters or cookie cutters to create beautiful shapes with the top layer of dough. Place those dough cutouts on top to cover the filling.
For a twist, skip the top crust and use streusel instead to turn this recipe into a version of my Dutch apple pie! Bake it without the topping at 425°F for 20 minutes (as directed in the recipe), then sprinkle the streusel over the filling when dropping the oven temp to 375°F. If you decide on this option, you only need a single pie crust, not a double crust.
Pro Tips For Making This Recipe
You can use additional spices in the filling. I love to add a pinch of ground ginger, cardamon, cloves, and/or allspice for warmth and earthiness.
Pack the filling when adding it to the bottom crust. Try to avoid big gaps or uneven areas. As the pie bakes, the filling will cook down, filling in any large gaps left among the apples. This can cause a gap between the filling and the top crust if it isn’t packed somewhat tightly. As you fill the pie crust, arrange the slices in roughly even layers, then mound the filling slightly in the center.
Sprinkle the top of the pie with sugar for a sweet topping. A sprinkle of turbinado sugar or granulated sugar after the crust is brushed with the egg wash will give this pie recipe a slightly crunchy topping and sweet flavor. Or, mix together 2 tablespoons of granulated sugar with 1 teaspoon of ground cinnamon and ½ teaspoon ground ginger for a spiced sugar finish.
Shield the pie crust to prevent it from browning too much. A common problem with baking pies is that the crust browns too fast, especially the edges. If you notice that your crust is gaining too much color too fast, cover the top of the pie loosely with foil to protect it. Or, if it’s only the edges that are browning too quickly, cover just the edges with foil or use a pie crust shield.
How To Make Apple Pie

1. Place the sliced apples in a large bowl and pour fresh lemon juice over them. Toss well.
2. Add the sugar, flour, and spices and stir to coat the apples.
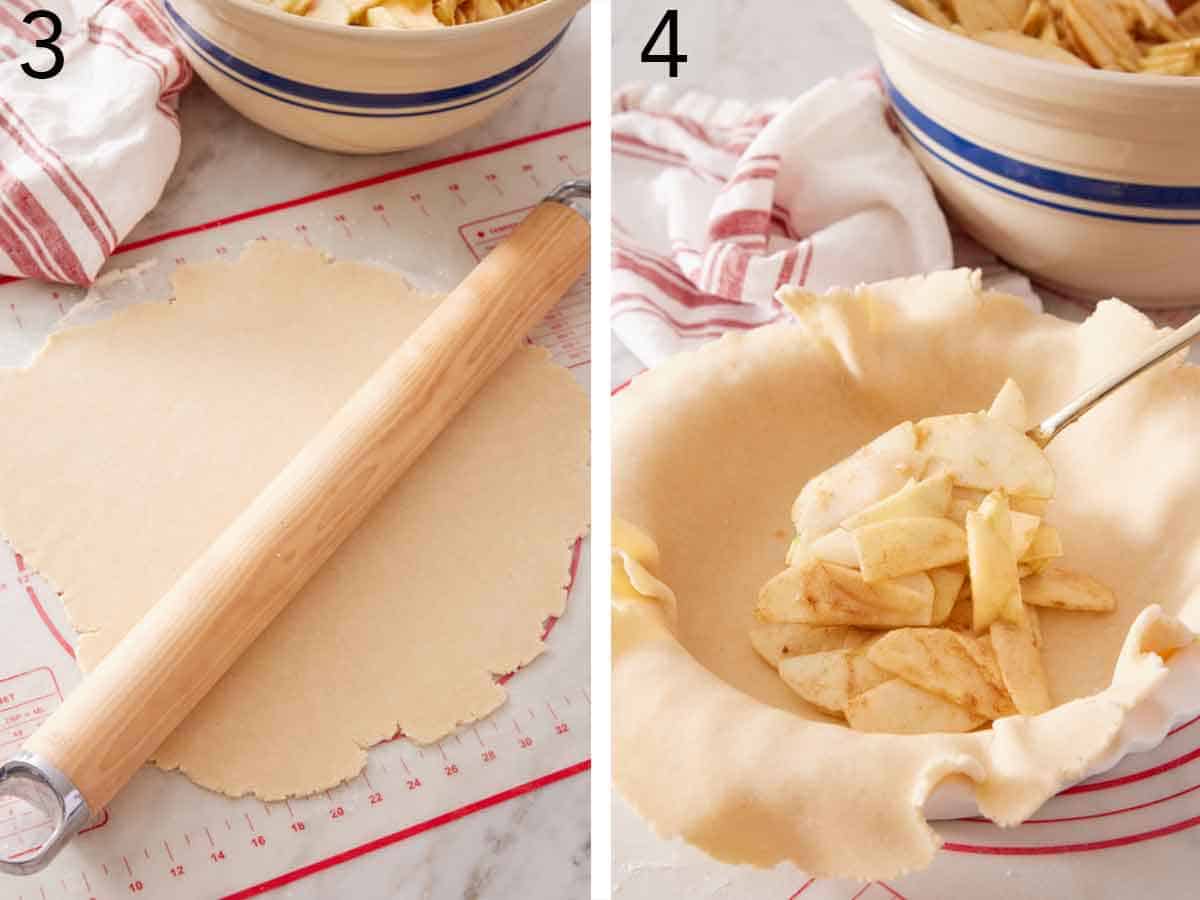
3. On a lightly floured surface, use a rolling pin to roll one disc of store-bought or homemade crust dough into a 12- to 14-inch circle. Grab a 9-inch pie dish and line it with the dough, allowing the excess dough to hang over the edge.
4. Pack the apple pie filling into the bottom crust and pat it into an even layer, allowing a slight mound to form in the center.
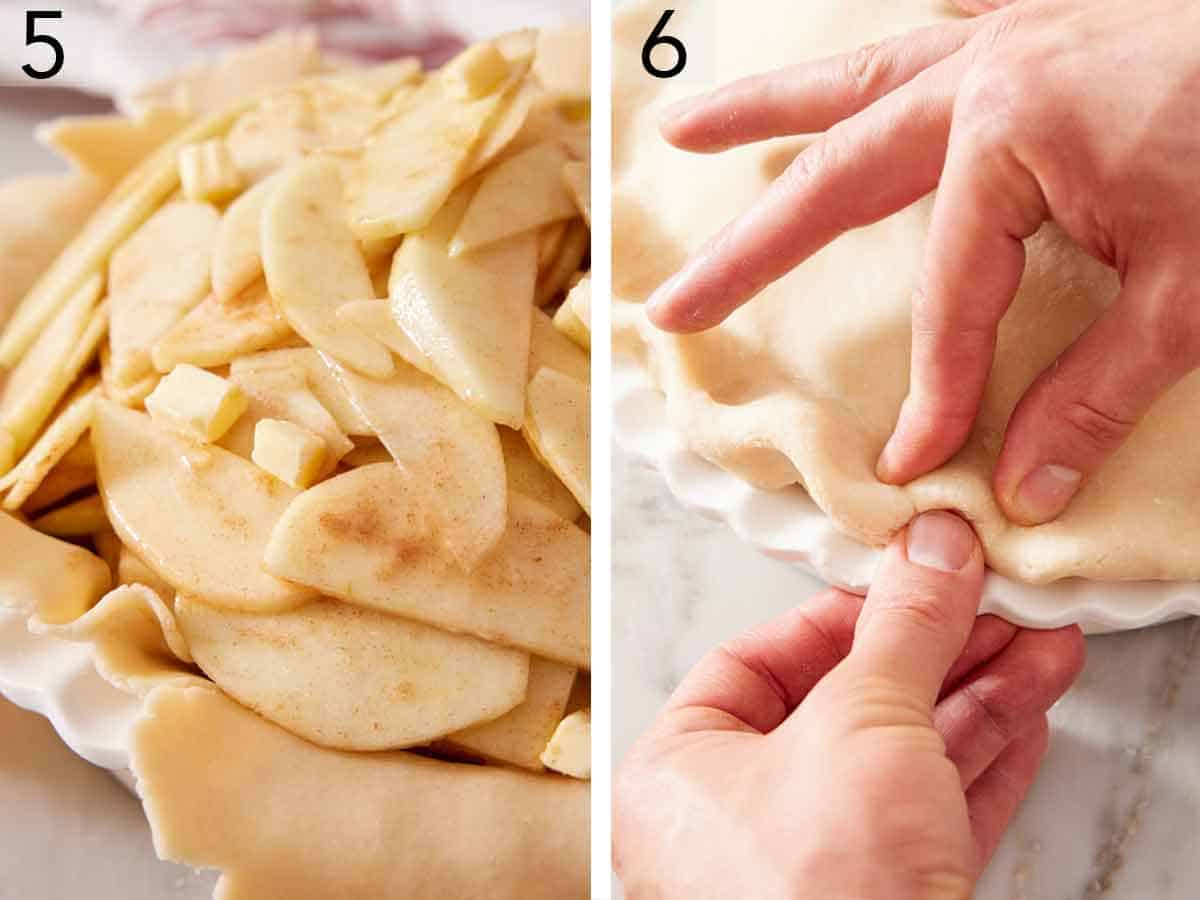
5. Dot with cubed butter.
6. Roll the second pie dough into roughly an 11-inch circle (about ⅛-inch thick). Place the dough atop the filling. Trim the excess pie dough to an inch or so from the edge of the pie pan, tuck the excess under, and crimp the edges.
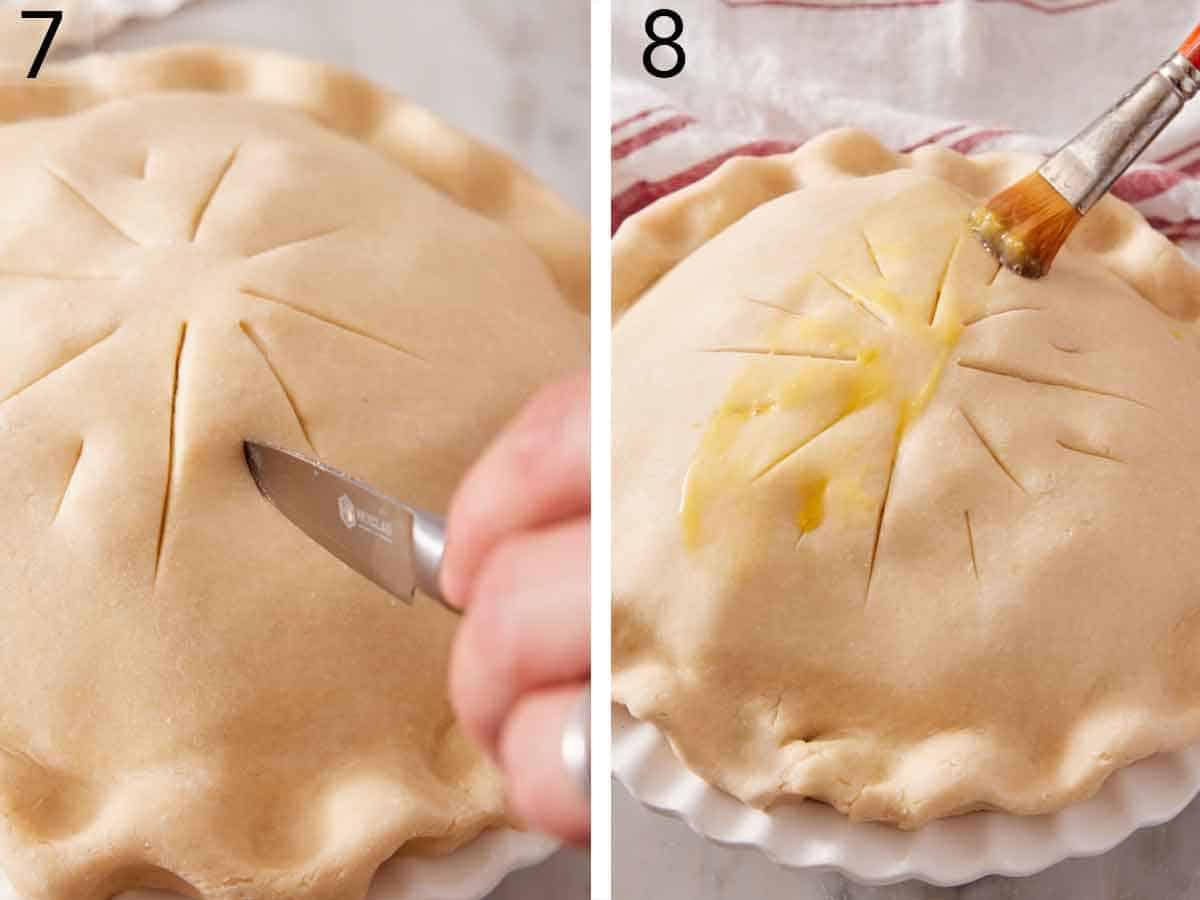
7. Cut slits in the top crust with a sharp knife to allow steam to escape as the pie bakes. Place the pie dish on a rimmed baking sheet lined with either parchment paper or foil to make clean-up easier in case any juices bubble over.
8. Brush the crust with the beaten egg wash. Bake at 425°F for 20 minutes, then reduce the heat to 375°F and continue baking until the crust is a deep golden brown and the filling is bubbly, about 50 minutes to 1 hour. Cool completely on a wire rack, about 4 hours, before slicing.

Apple Pie Recipe
Video
Equipment
- 9” pie dish
- Large mixing bowl
- Knife or pastry cutter
- Pastry brush
Ingredients
- 3 pounds apples peeled, cored, and thinly sliced (1.35kg)
- 2 tablespoons lemon juice
- 1 cup granulated sugar (200g)
- ½ cup all-purpose flour (60g)
- 1½ teaspoons ground cinnamon
- ¼ teaspoon ground nutmeg
- 1 (9-inch) double-crust pie dough store-bought or homemade
- 2 tablespoons unsalted butter diced
- 1 large egg lightly beaten
Instructions
- Preheat the oven to 425°F.
- In a large mixing bowl, toss the apple slices with the lemon juice. Add the sugar, flour, and spices. Stir until the apples are well coated.
- On a lightly floured surface, roll one disc of pie dough into a 12-inch to 14-inch circle. Line a 9-inch pie pan with the dough, letting the excess hang over the edge. Pour the apple filling into the crust and pat it into an even layer, mounding it slightly in the center. Dot with the butter.
- Roll the second pie dough into roughly an 11-inch circle (about ⅛-inch thick). Place on top of the filling for a solid top, or cut the dough and arrange in the desired pattern. Trim the excess pie dough to about an inch from the edge of the pie plate, tuck the excess under and crimp the edges as desired. Cut slits in the top of the pie to create steam vents if covered with a solid top crust. Place on a rimmed baking sheet. Brush the crust with the beaten egg and sprinkle with additional sugar, if desired.
- Bake for 20 minutes. Reduce the heat to 375°F and continue baking until the crust is a deep golden brown and the filling is bubbly, about 50 minutes to 1 hour. (If the crust browns too quickly at any point, loosely cover the whole pie or the edges with foil.) Let cool completely on a wire rack, about 4 hours before slicing.
Notes
- For picture-perfect cuts, slice the apple pie after refrigerating. A cold pie is so much easier to slice neatly! You can always heat up each slice if you want to enjoy it warm.
Nutrition
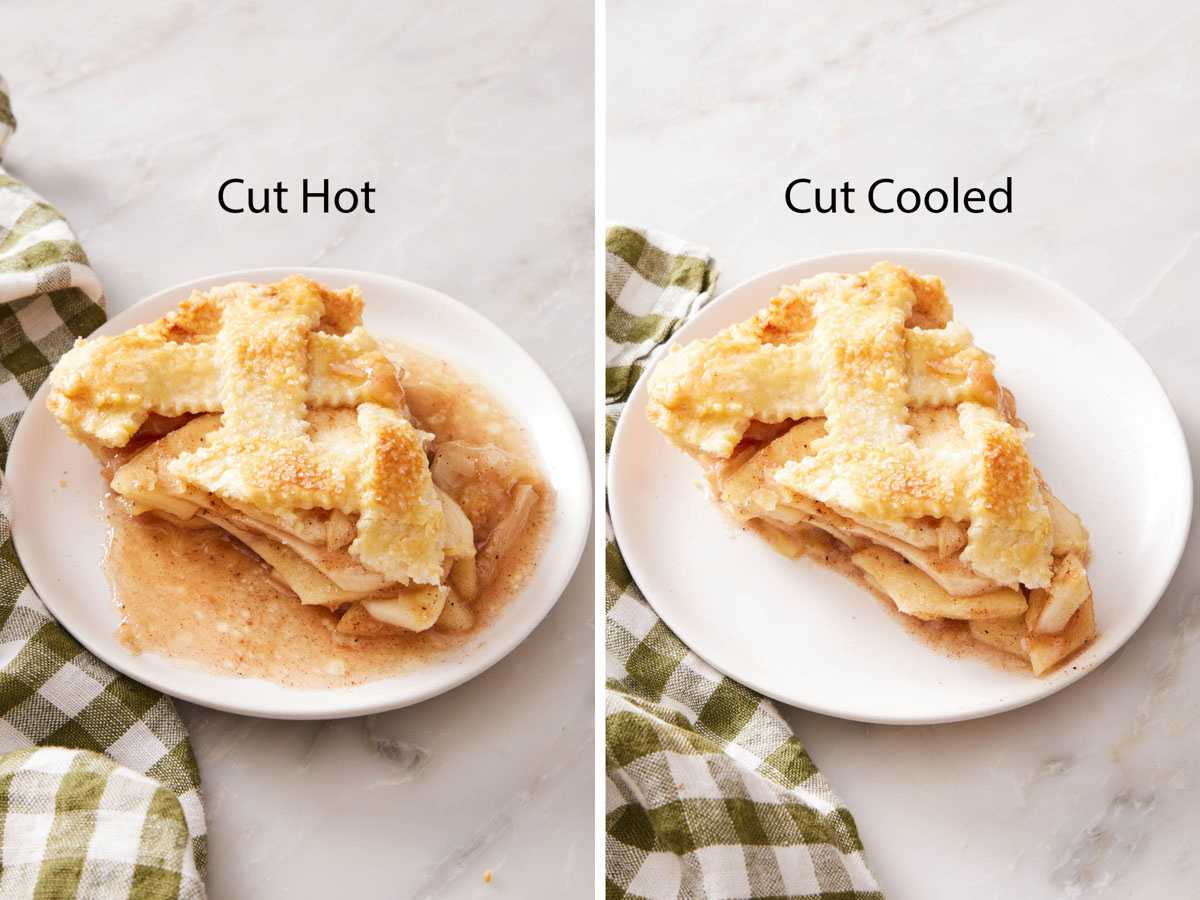
Why You Shouldn’t Cut The Pie While Hot
Allowing the apple pie to cool completely gives the filling time to set and thicken up. You can see this in the images below. In the first image, I cut the pie right out of the oven. The juices spilled right out of the slice.
In the second image, you can see a cooled filling where the juices set before I sliced it. By allowing the juices time to set up, your slice of pie will not only look better, but it will taste better! All of that flavor stays in the slice, for more tastiness in every bite. I know it’s tempting to slice it hot, because if you’re anything like me, I prefer warm apple pie. Instead, simply reheat it gently before or after slicing. (Instructions are in the next section!)
How To Store Apple Pie
Storing: I recommend refrigerating apple pie so it lasts longer (up to 5 days!). If you cover and store it at room temperature, it should be eaten within 24 hours.
Freezing: Once it has cooled completely, wrap the apple pie in a layer or two of plastic wrap, then aluminum foil, and freeze for 2 to 3 months. Thaw overnight in the refrigerator before reheating and serving.
Reheating: Reheat apple pie in the oven or air fryer, not the microwave, to maintain the crisp crust. To warm the whole pie, place it on a baking sheet and reheat at 350°F for about 15 to 20 minutes, or until warm in the center. If reheating slices, they should only take about 10 minutes in the oven, or you can place each slice on foil and air fry at 350°F for 5 minutes.
Serving Suggestions
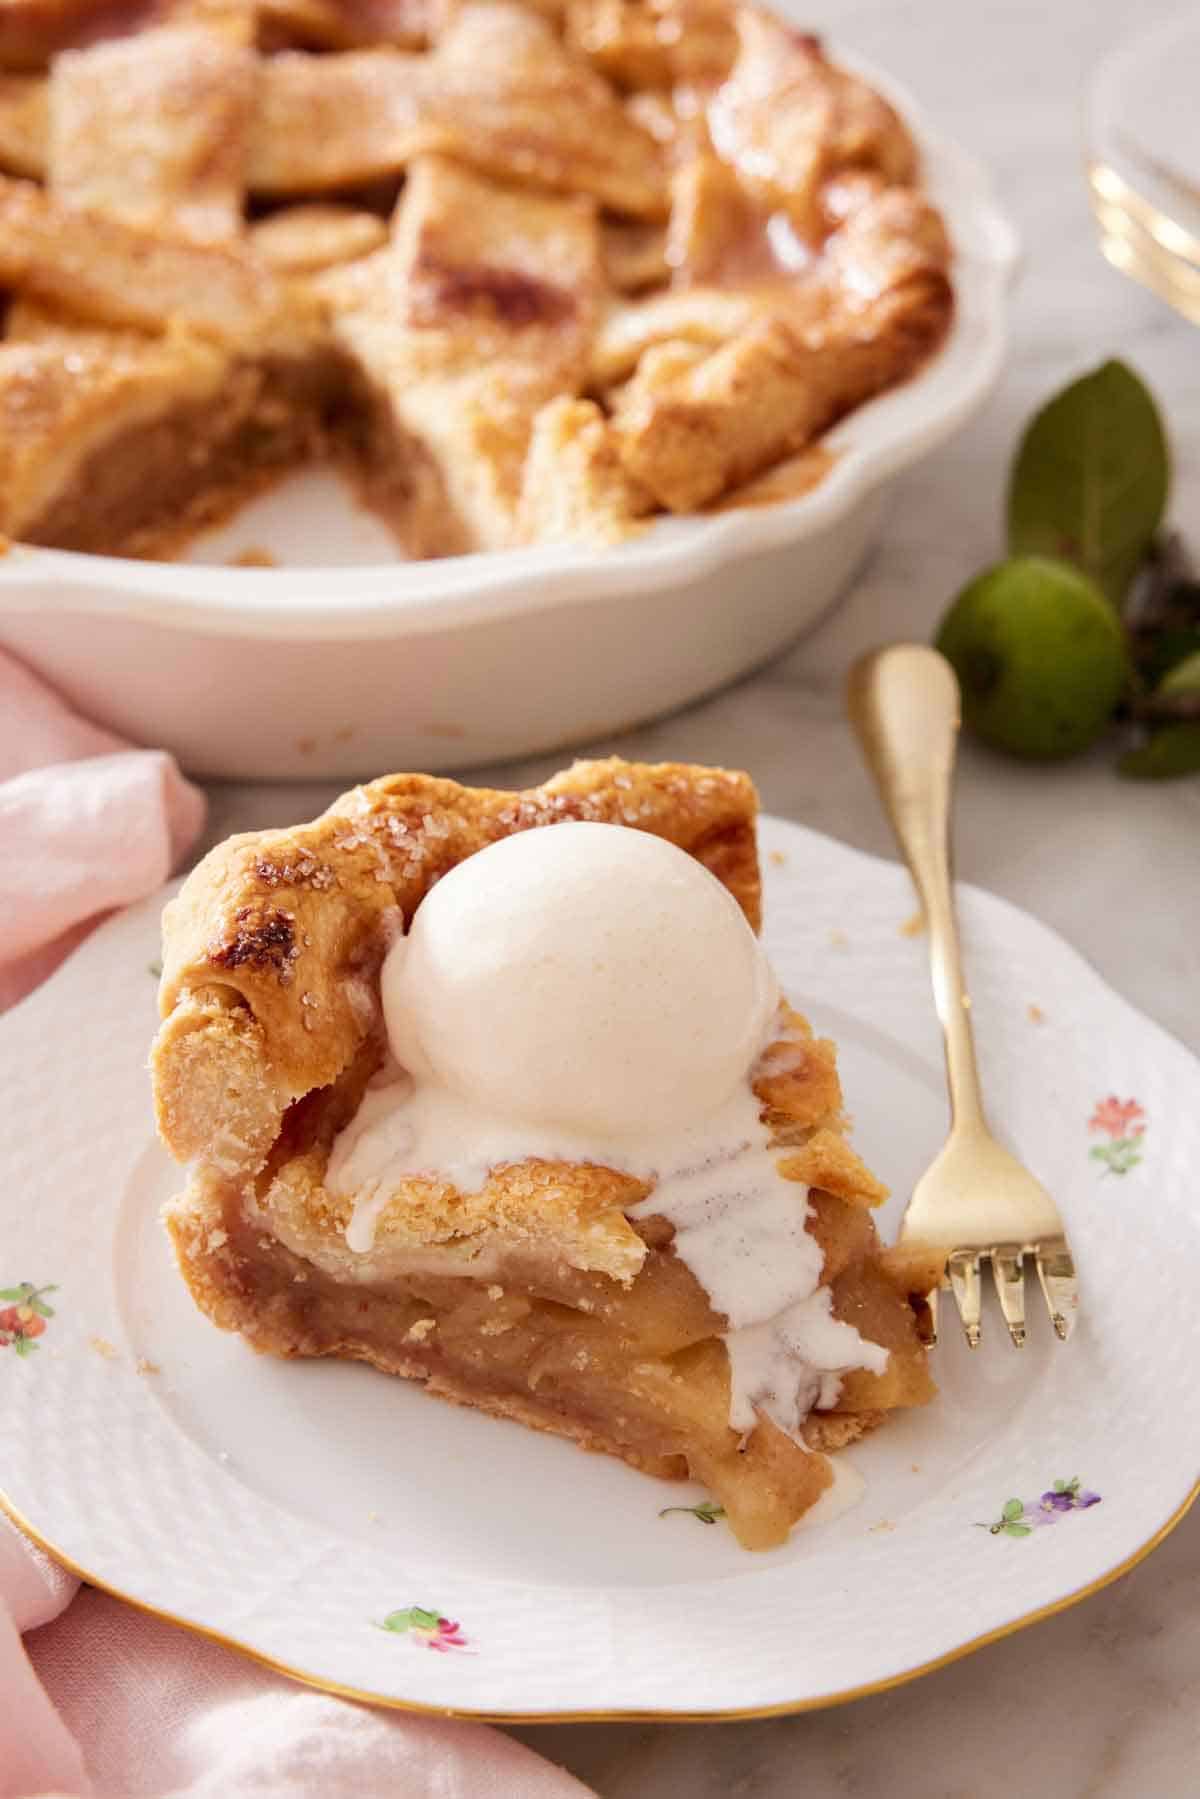
While you’ll never go wrong with a warm slice of apple pie with a big scoop of vanilla ice cream, I like to change it up sometimes! Apples and caramel are a classic combo, so try serving the pie with a drizzle of caramel sauce or even butterscotch! For a simple yet classic option, serve slices of apple pie with a dollop of freshly whipped cream.
Frequently Asked Questions
Yes, you can make apple pie ahead of time. It will keep well alongside a pumpkin pie, sweet potato pie, and pecan pie, making them all super convenient desserts for the hectic holiday season! Simply bake the pie, allow it to cool completely (this will take a few hours), wrap it well with plastic wrap or foil, and refrigerate. Slice it while it’s still cold for ease, before letting it come to room temperature and serving. Apple pie will keep in the fridge for up to 5 days, but I make it a maximum of 2 days in advance, so if there are leftovers, I still have a few days to enjoy them.
Yes. Follow the recipe until the end of Step 4, then wrap the entire pie and pie plate in several layers of plastic wrap. Pop it into a large freezer bag and freeze for up to 2 months. Bake at 375°F from frozen for about 1 hour and 30 minutes, or until the filling is bubbly. The center should reach about 195-200°F if you’re uncertain! Tent the crust with foil if it’s already a dark golden brown after an hour.
Yes! I love using a mixture of apples and pears for a different flavor. Sliced Fuyu persimmons are also delightful paired with apples. Or, try my apple cranberry pie!
If you’ve tried this apple pie recipe, then don’t forget to rate it and let me know how you got on in the comments below. I love hearing from you!
Angela says
How many apples do I need, I don’t have a scale to weigh it. I only have 4 granny Smiths and 2 fuji apples in the fridge. Btw I love your PB Oatmeal chocolate chip cookies it was a hit. Thanks.
Alex says
I made this and it’s great! I just wanted to point out: Your crust instructions above do not show the correct measurements! 🙂 Keep up the great work!
Sumaya says
I had never made a pie before trying John’s recipe. It has been a hit with everyone who has tried it. I now use any excuse to make an apple pie (even during the hot summer)!
Adriana says
This is the first Preppy kitchen’s recipe I maje. It’s the best apple pie… all my family love this. Greetings from Ecuador!
Fareeba Faruq says
Dear Mr. John, thank you for all your recipes. I have been trying my hand at baking for the past few years and the only recipes that have worked for me are yours. Your videos give me so much inspiration and courage to continue baking. I am nowhere near perfect but the process of baking is so fulfilling! I made this apple pie today and everyone loved it. So, I thought I should let you know how happy that made me. Your eclairs recipe is my personal favourite. Love from Bangladesh.
Anonymous says
Another fantastic recipe from Preppy Kitchen. Thank you so much for the recipe. My whole family raved this. I am 16 and this was my first time making, but made me seem like a professional. It was delicious and easy. I added a bit of cloves to the pie. Perfect balance of sweet and tangy. New go to. Thanks!!
Sarbari Bhattacharya says
Dear John, My apple pies have always been, what can I say, uninspired. But what I made today made one want to burst out singing and attempt an enthusiastic Russian squat dance on the table. The whole family was floating around with wide happy smiles and thoughts of the lockdown and Covid situation were completely forgotten. We all owe you this. Thank you, thank you for an absolutely marvellous recipe and a terrific video with whole bunches of very helpful tips. Looking forward to attempting many more recipies from Preppy Kitchen !!!
John Kanell says
That warms my heart. So happy you enjoyed it!
Rachel nithya Karat says
Hi Mr John thank you for such amazing recipes. I have made many of your recipes for my family and they love it . I made the apple pie for the first time but my crust seems to just fall apart. I live in a very warm country called Brunei , could the weather have anything to do with it ?? As it seemed like the pie crust dough was very soft . What can I do to rectify it ?? The pie still turned out great though ..
John Kanell says
it was the weather :/
BX says
Hi Rachel, I live in a hot country too! To stop my dough from falling apart when rolling, I use rice flour. I find it better than using AP flour since the dough doesn’t absorb it. If you can, chill the dough enough and turn the ac on when making pies. I hope that you’ll find this useful 🙂
Danka says
Hi John, thank you for wonderful recipe. I baked apple pie before but it wasn’t this good. I want to ask you how long can you refrigerated the dough? I made double and have still more than half left. I want to try your another recipe but don’t want to bake it right now. Sorry for my grammar english is not my language. ☺️ Hi from Slovakia ?
Sean says
I’ve made this twice now (first attempts at pie ever), but mine is taking much longer to bake – about 55 minutes at 400F – and the bottom crust won’t crisp up. It remains soggy, so my pie pieces fall apart when cutting. It still tastes good, but any ideas on what I’m doing wrong would be super appreciated.
jkanell says
Try cooking the apple juice down more until it’s basically a caramel. That way it will be wayyyy less soggy 🙂