

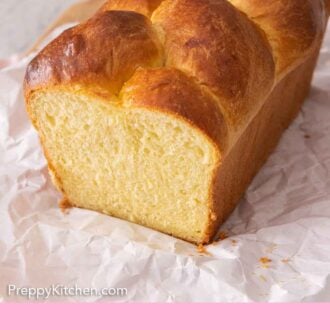


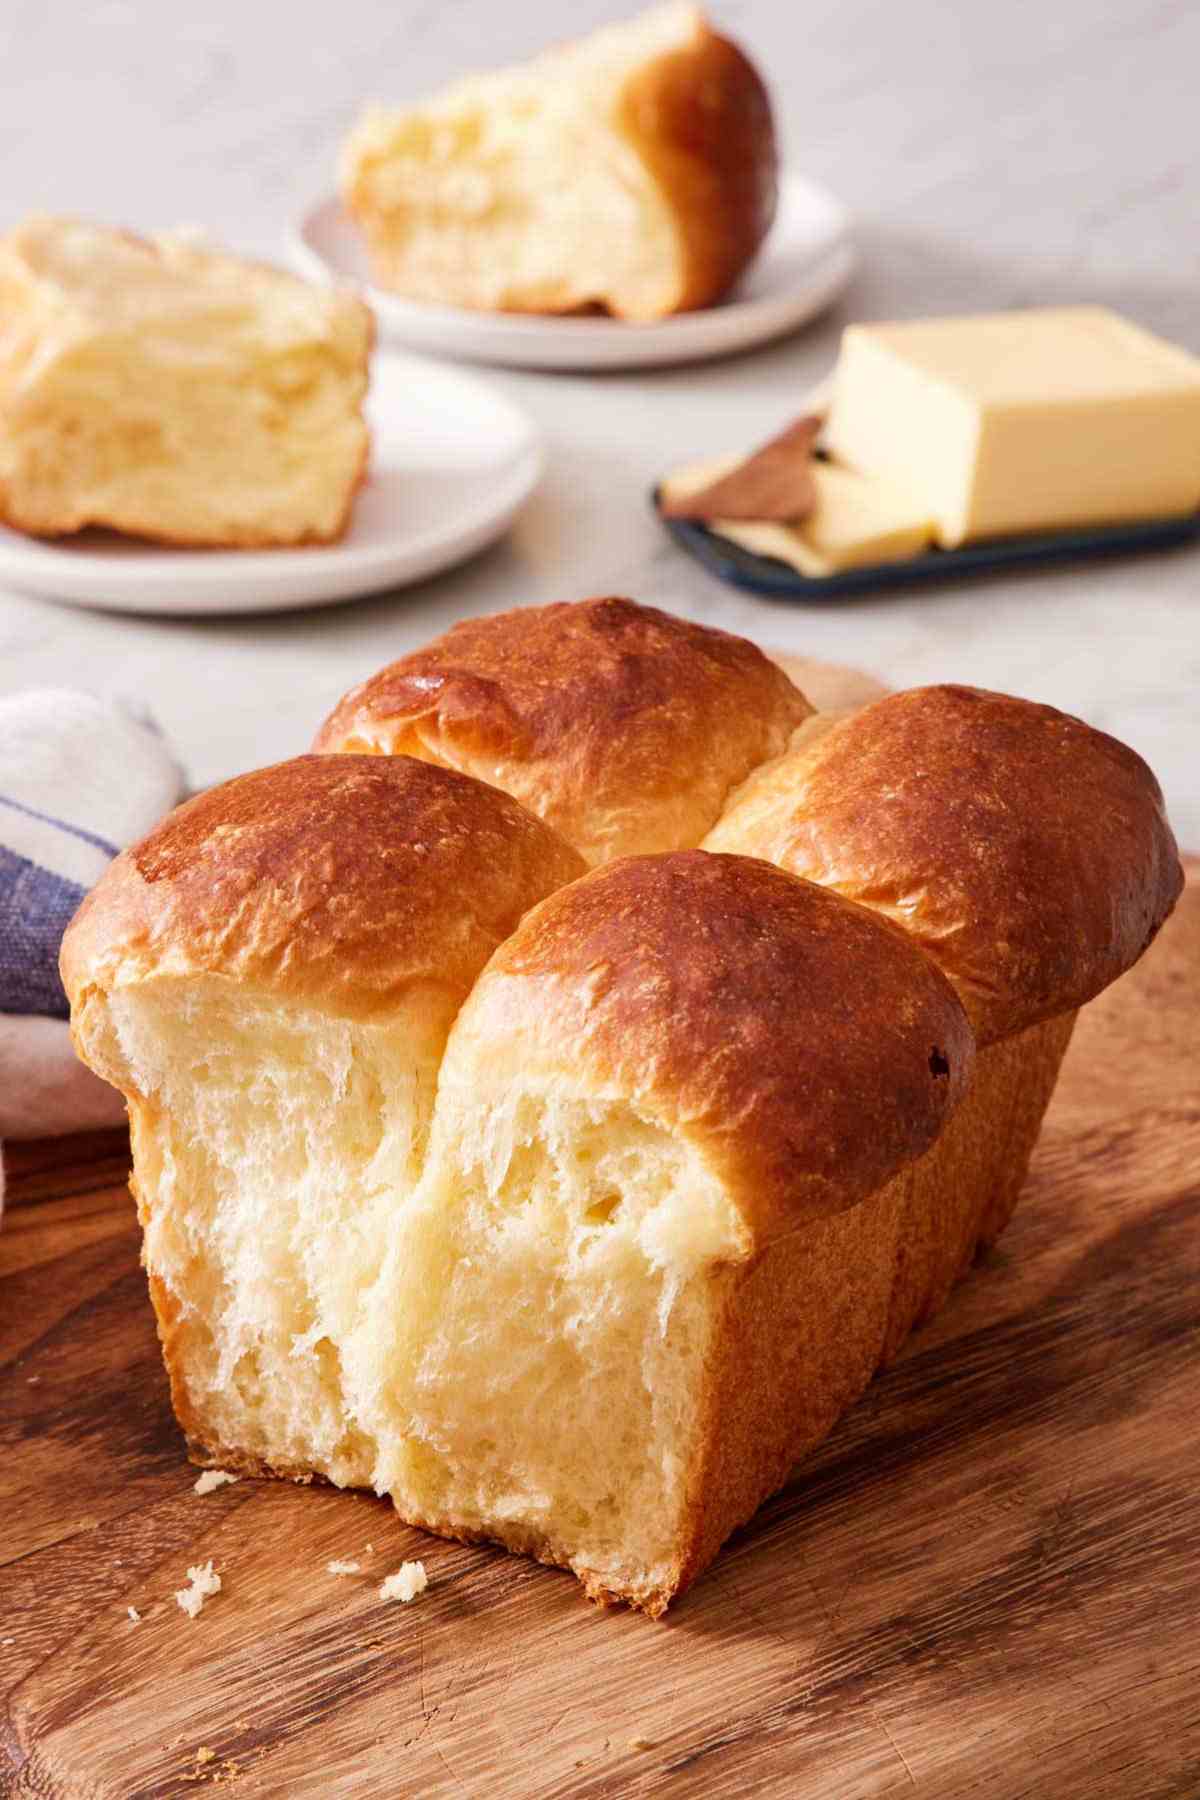
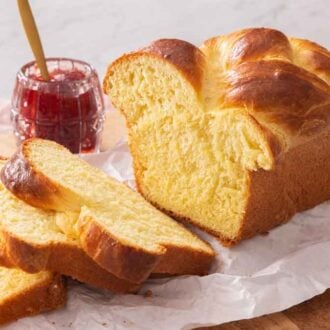
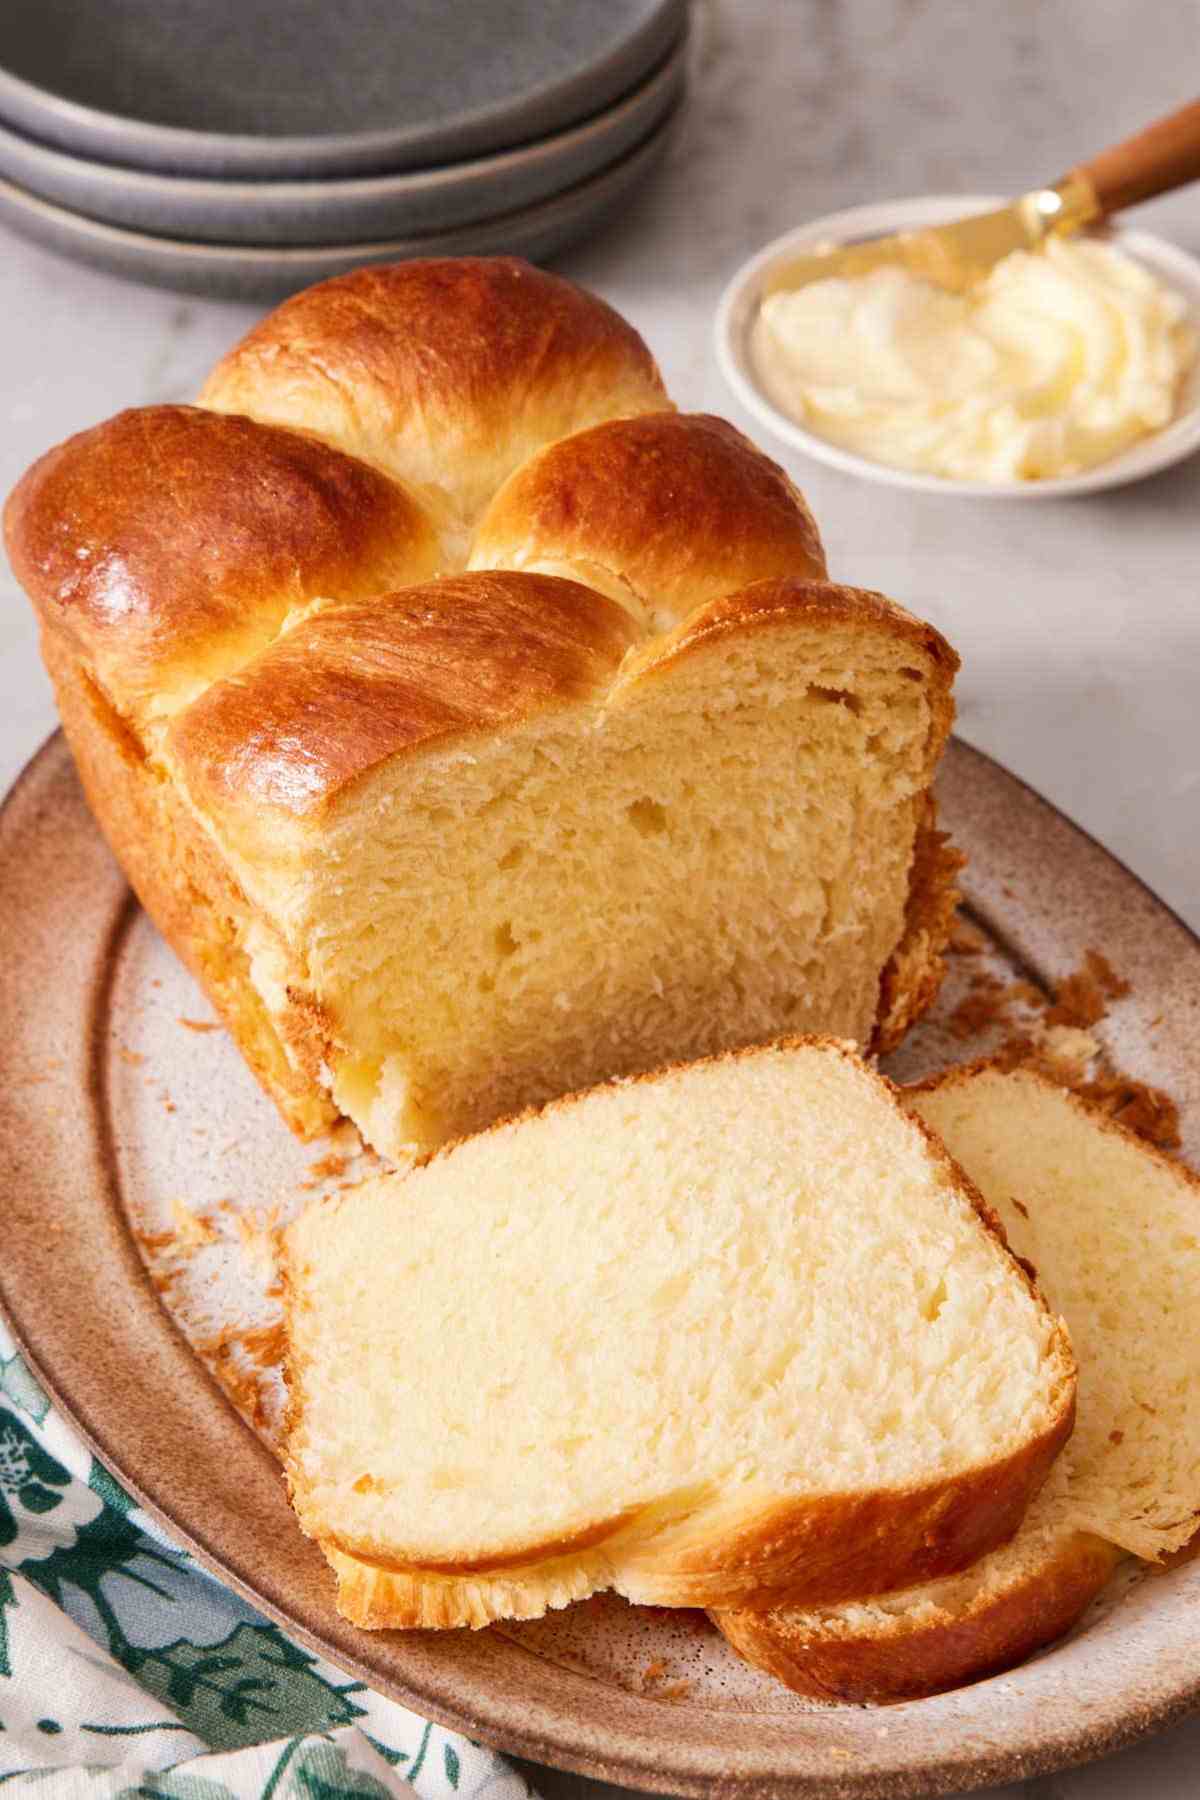
Brioche is a French bread made with an enriched dough containing eggs and lots of butter. Subtly sweet brioche falls into the Viennoiserie category of baking, similar to croissants, falling between bread and pastry in taste and texture. I developed my recipe to have just the right ratio of ingredients for a tender, fluffy interior with a golden brown crust.
I have re-tested my homemade brioche recipe to include two classic shaping methods. Braided brioche is made by rolling 3 pieces of dough into ropes, then braiding them (you use the same technique you’d use to braid hair!). Nantaise involves rolling the dough into smooth balls that you bake in a loaf pan together. However it is shaped, you’re sure to get a fluffy, buttery loaf with my recipe!
A reader, Sarah, says: “This recipe is sooo simple and delicious. I made French toast with one of the loaves and it held up very well. I even made a very nice turkey BLT with this. The battery flavor is just flat out scrumptious.” ★★★★★
Table of Contents
Key Ingredients & Substitutions
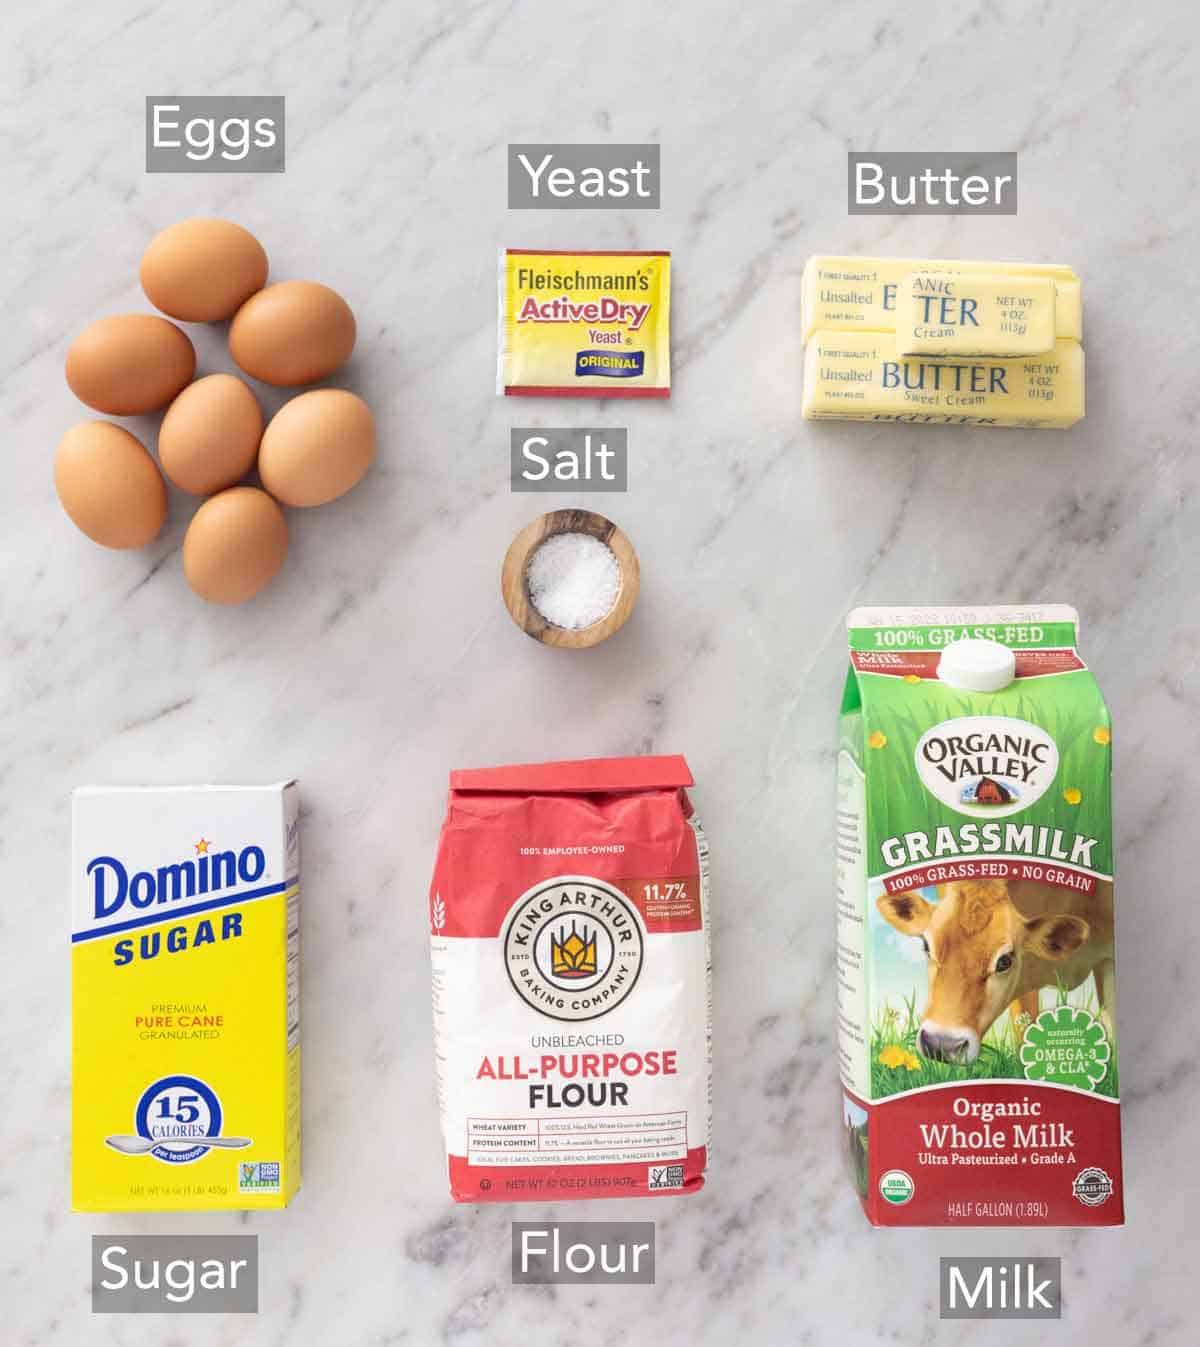
These are the main ingredients you need to make homemade brioche. You can find the full list of ingredients and measurements in the recipe card below.
Yeast — always double-check the expiration date of your active dry yeast. If it is past its “Best Before” date, it’s a good idea to pick up a new packet of yeast at the store. Expired yeast can affect the loaf’s rise, meaning it may rise very slowly or not at all. To start the bread, you’ll make a sponge by combining the yeast with some flour, warm milk, and granulated sugar. This technique results in very flavorful brioche, and also helps you know if your yeast is active or not before you make the main batch of dough.
Flour — all-purpose flour is perfect for making brioche bread, as it’ll give you a soft and fluffy crumb. While you can use bread flour, it will result in a slightly chewier loaf of brioche. Part of brioche’s signature texture is its tender, almost delicate interior, so all-purpose flour is the best choice if you have it.
Eggs — for a rich loaf of bread, eggs are a must. They add lots of flavor to enriched bread like brioche and milk bread. Use room temperature large eggs so they blend more easily with the other ingredients and don’t slow down the yeast.
Butter — be sure to buy unsalted butter and not salted butter for your brioche bread. Salted butter does not have a consistent amount of salt across different brands, so measuring salt separately for the brioche dough ensures it’s not overly salty. Also, make sure the butter is at room temperature, which means it’s soft enough so when you press into it, your finger leaves a dent. This way, it’ll incorporate into the dough seamlessly when you add a tablespoon at a time.
Should I Use European-Style Butter?
You can use American-style butter or European-style butter to make brioche. The main difference between the two is the amount of fat and water they contain. European butter has more fat and less water than American butter, so you’ll end up with richer brioche bread if you use it.
While you can’t always interchange these two butter types, I have tested loaves of brioche with American-style butter as well as European-style, and they both work great and taste fantastic! So I recommend using whichever kind you prefer or is easier to find at your local grocery store.
Can I Add Dried Fruit Or Nuts To The Dough?
Yes, you can add up to 1 cup of finely chopped nuts or dried fruits for textural interest as well as extra flavor in this fluffy bread. Add them after the butter is incorporated and the dough is smooth and elastic (in Step 3, before you let the brioche dough rise). It will only take about 30 seconds of mixing to incorporate the mix-ins well.
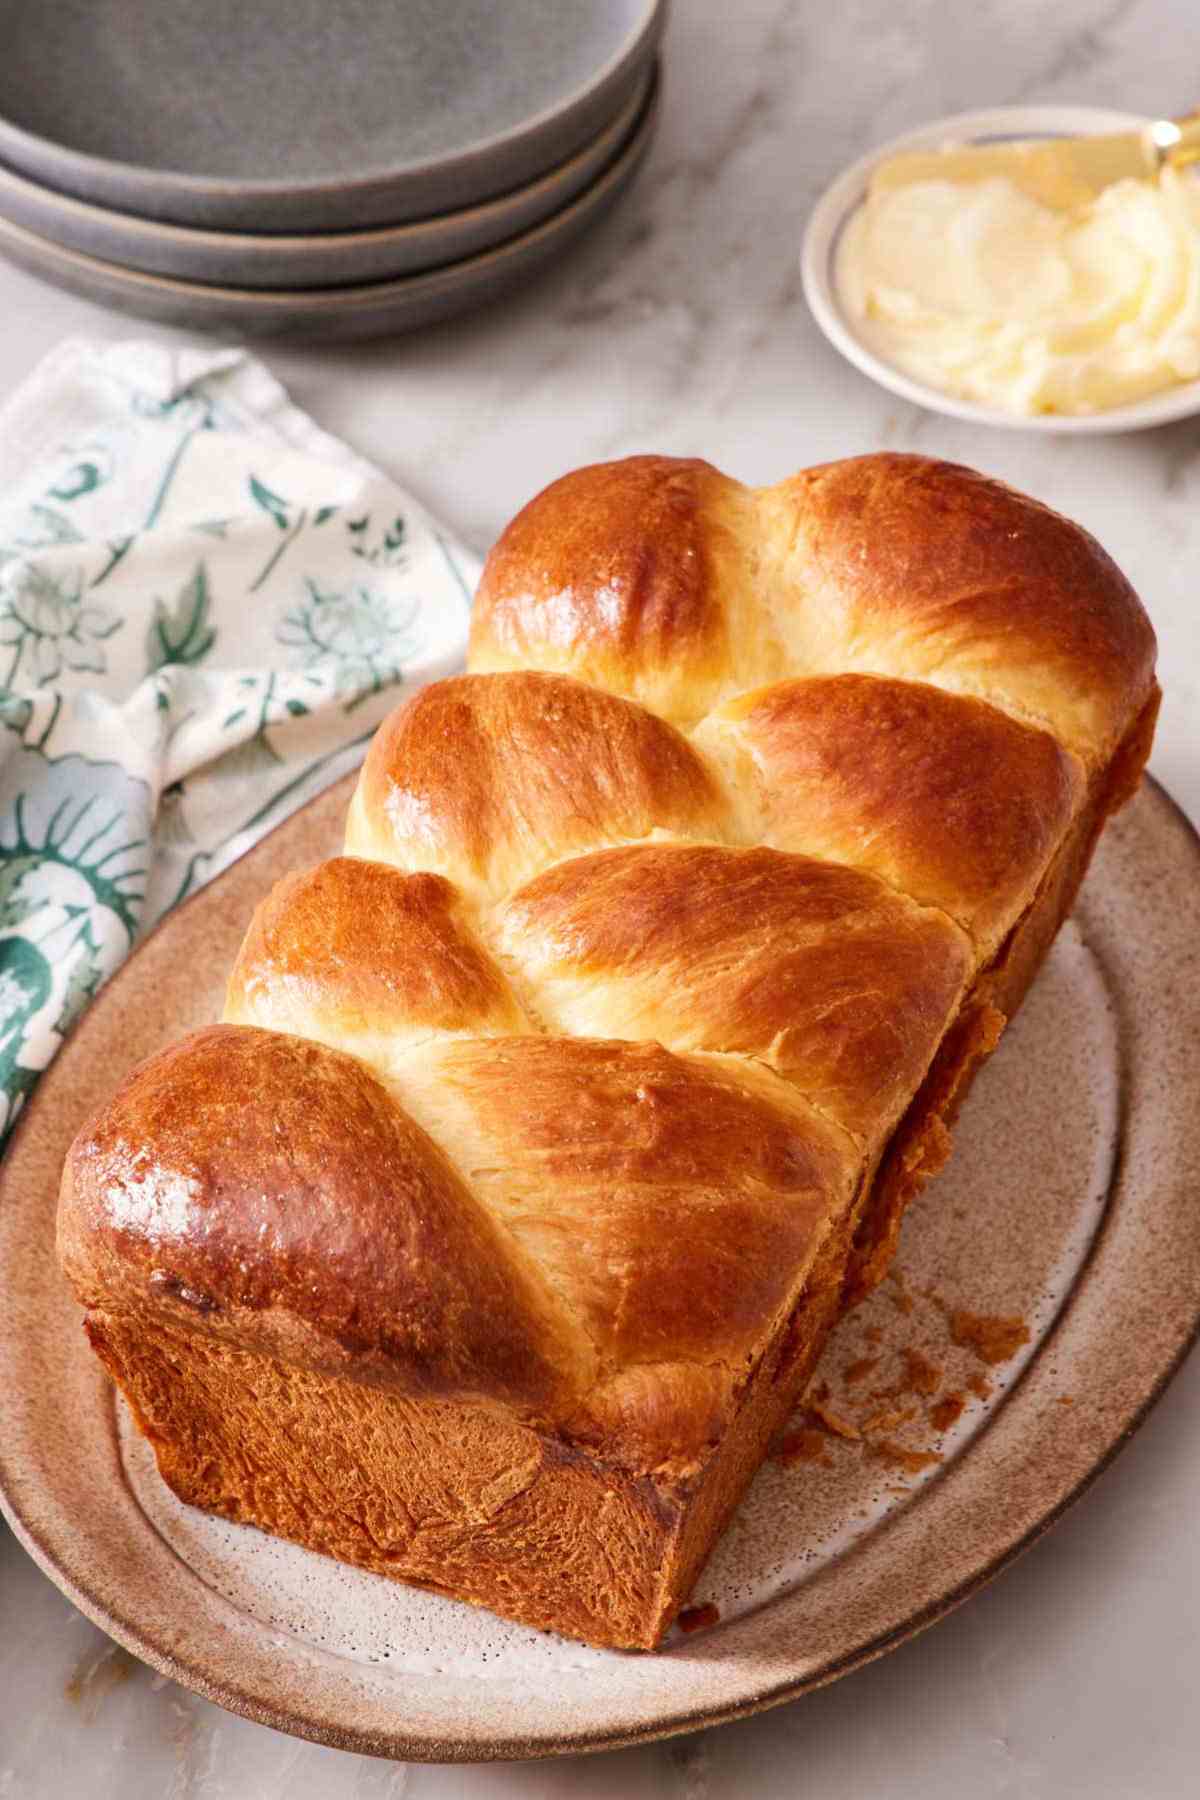
Two Ways To Shape French Brioche
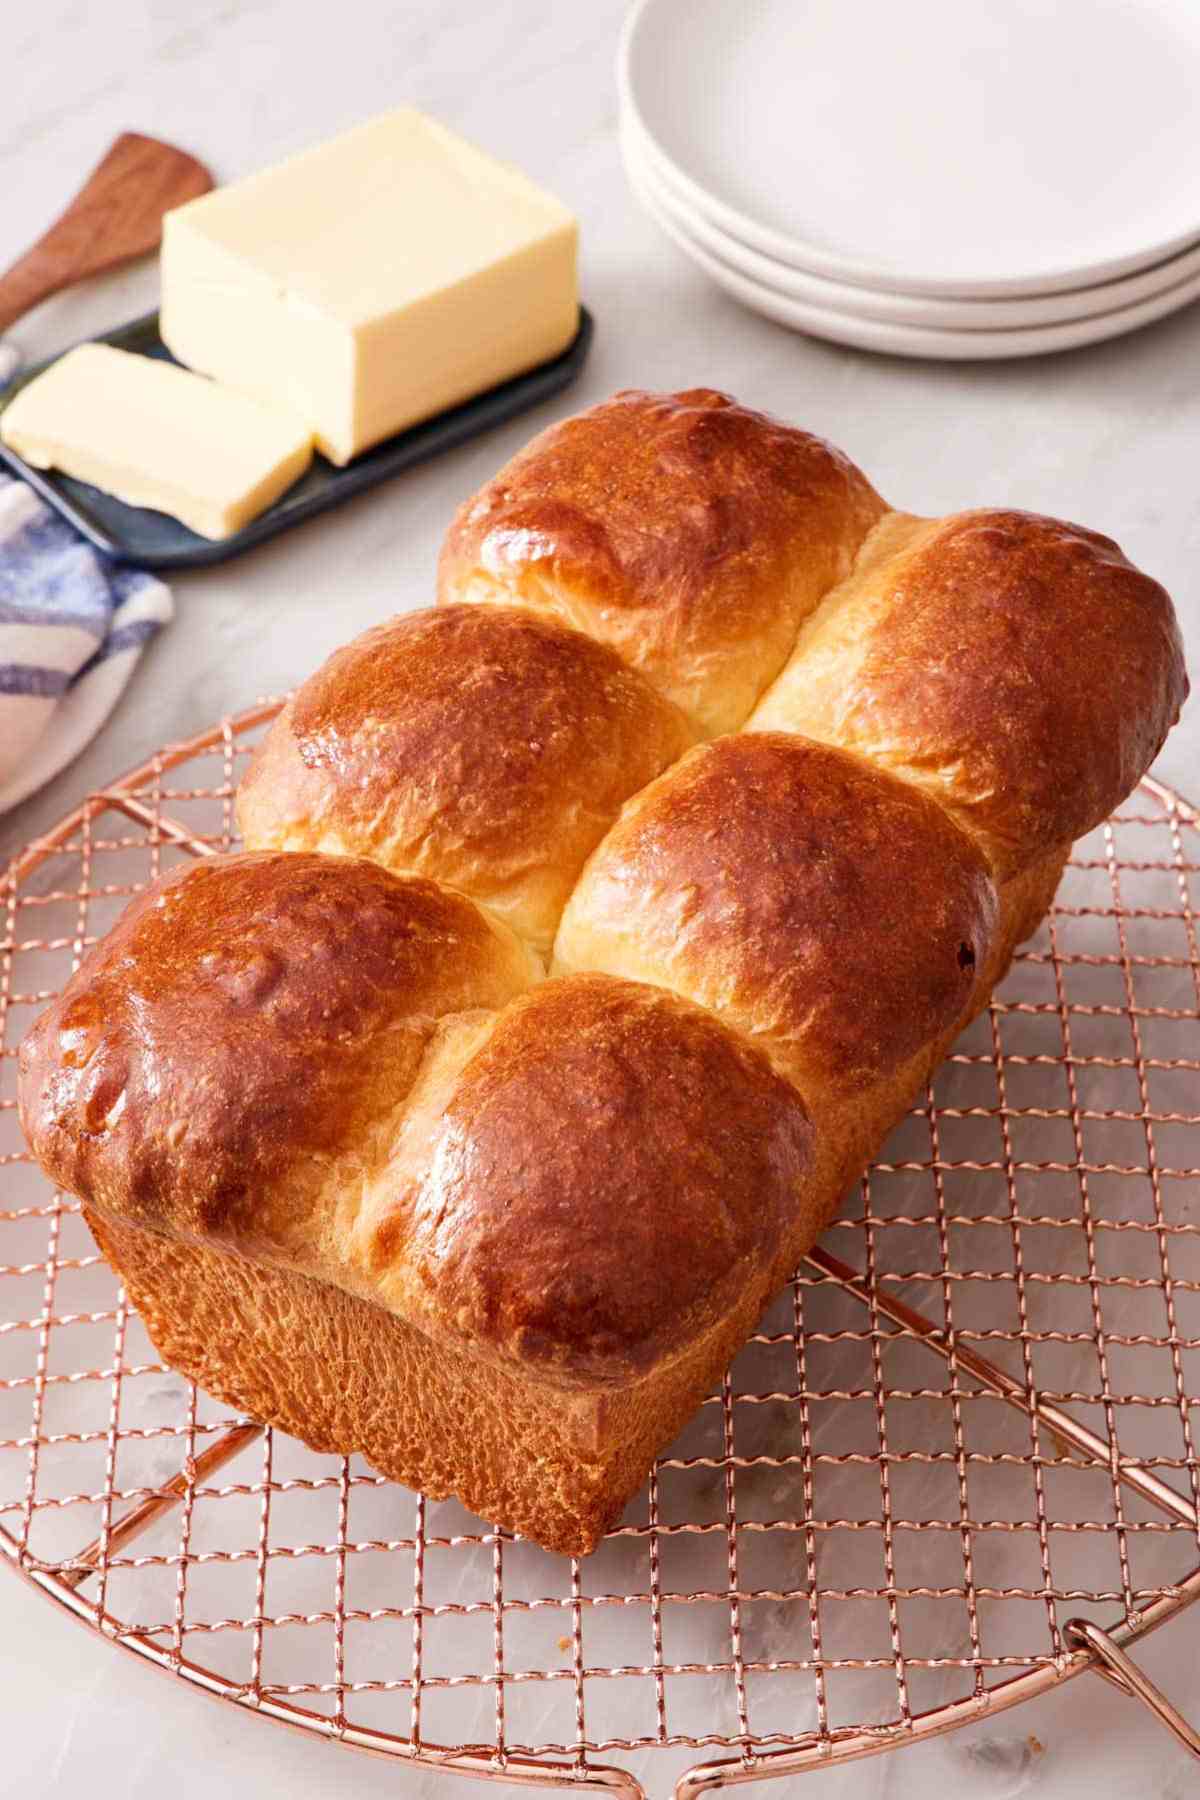
There are two classic ways you can shape brioche bread: You can make a braided loaf or a pull-apart style using smaller balls of brioche dough placed in a loaf pan together. The latter is known as nantaise brioche, which originated in Nantes, France. It’s also referred to as a faux-braided loaf, as it looks similar without actually braiding the dough.
Shaping Braided Brioche
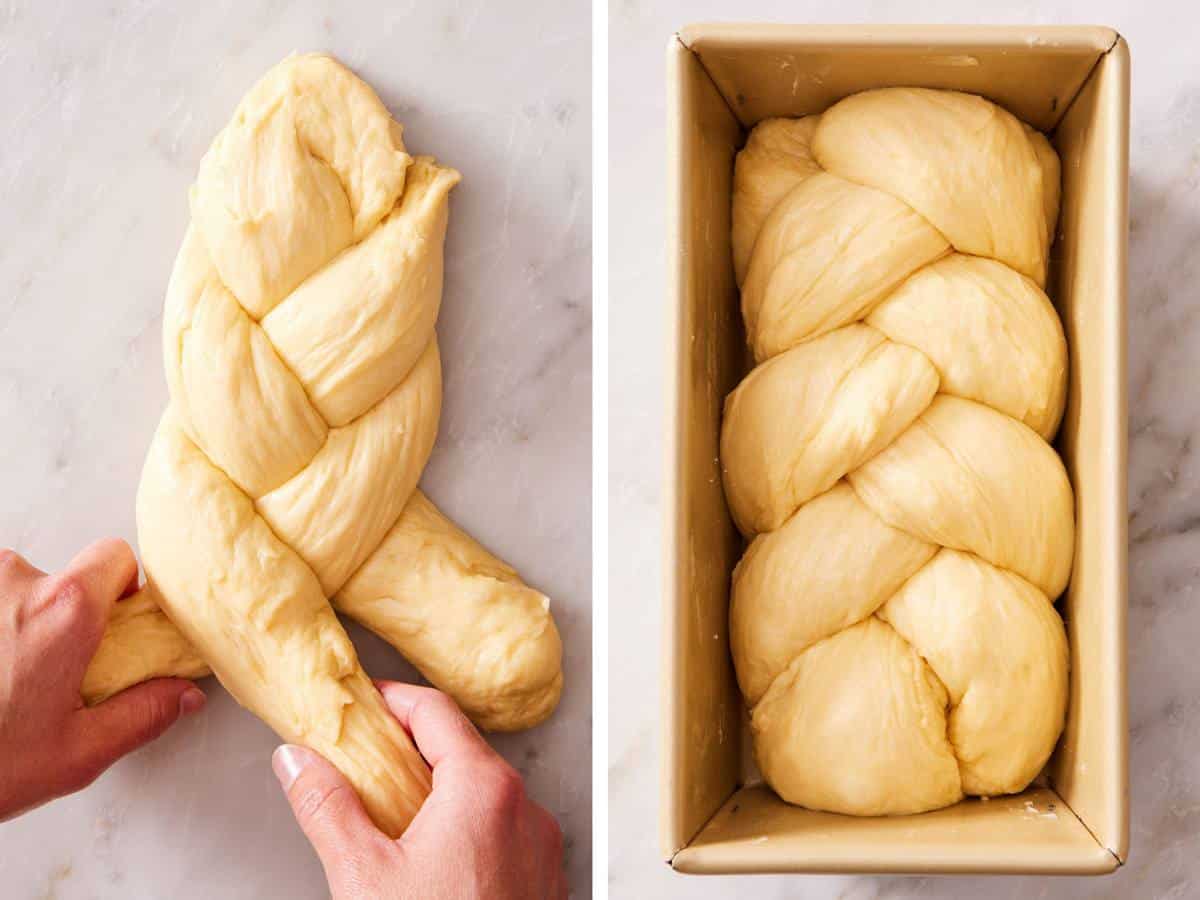
To shape a braided loaf, divide the dough into thirds. Shape each third into a 9-inch-long rope and braid the ropes together by pulling one outer rope over the center rope. Alternate sides as you go. Tuck the ends under themselves and place the braid in the loaf pan.
Shaping Brioche Nantaise
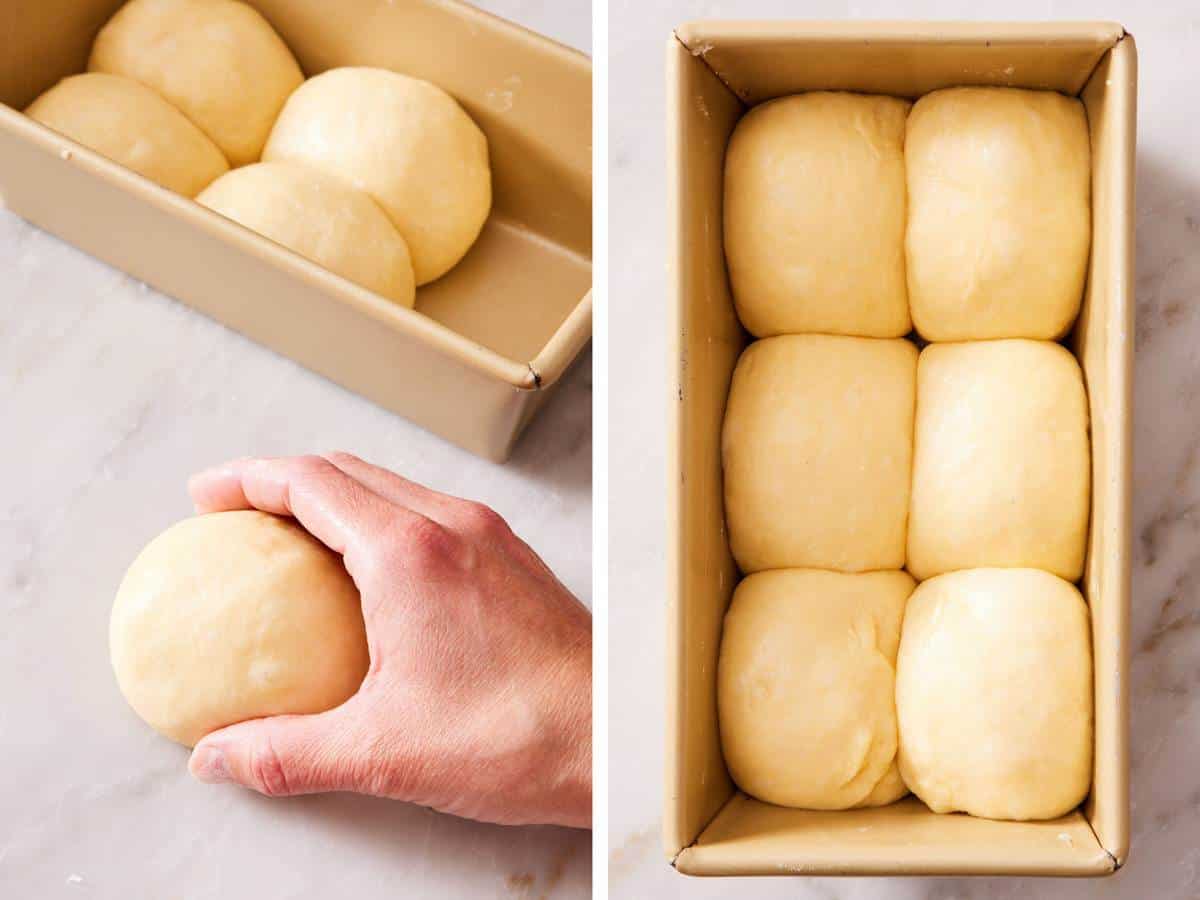
To shape Brioche Nantaise (also called Brioche Nanterre), after halving the dough, divide each half of the dough into 6 or 8 equal pieces. Pinch the ends of one piece together at the center, then flip it over so the seam is on the counter. Cup your hand around the dough and move it in a circular motion 8 or 10 times. This will form a tight ball.
Place the ball in the loaf pan, and repeat with the remaining dough pieces to create two rows. You can line the dough balls up or offset each row to give the faux-braid appearance.
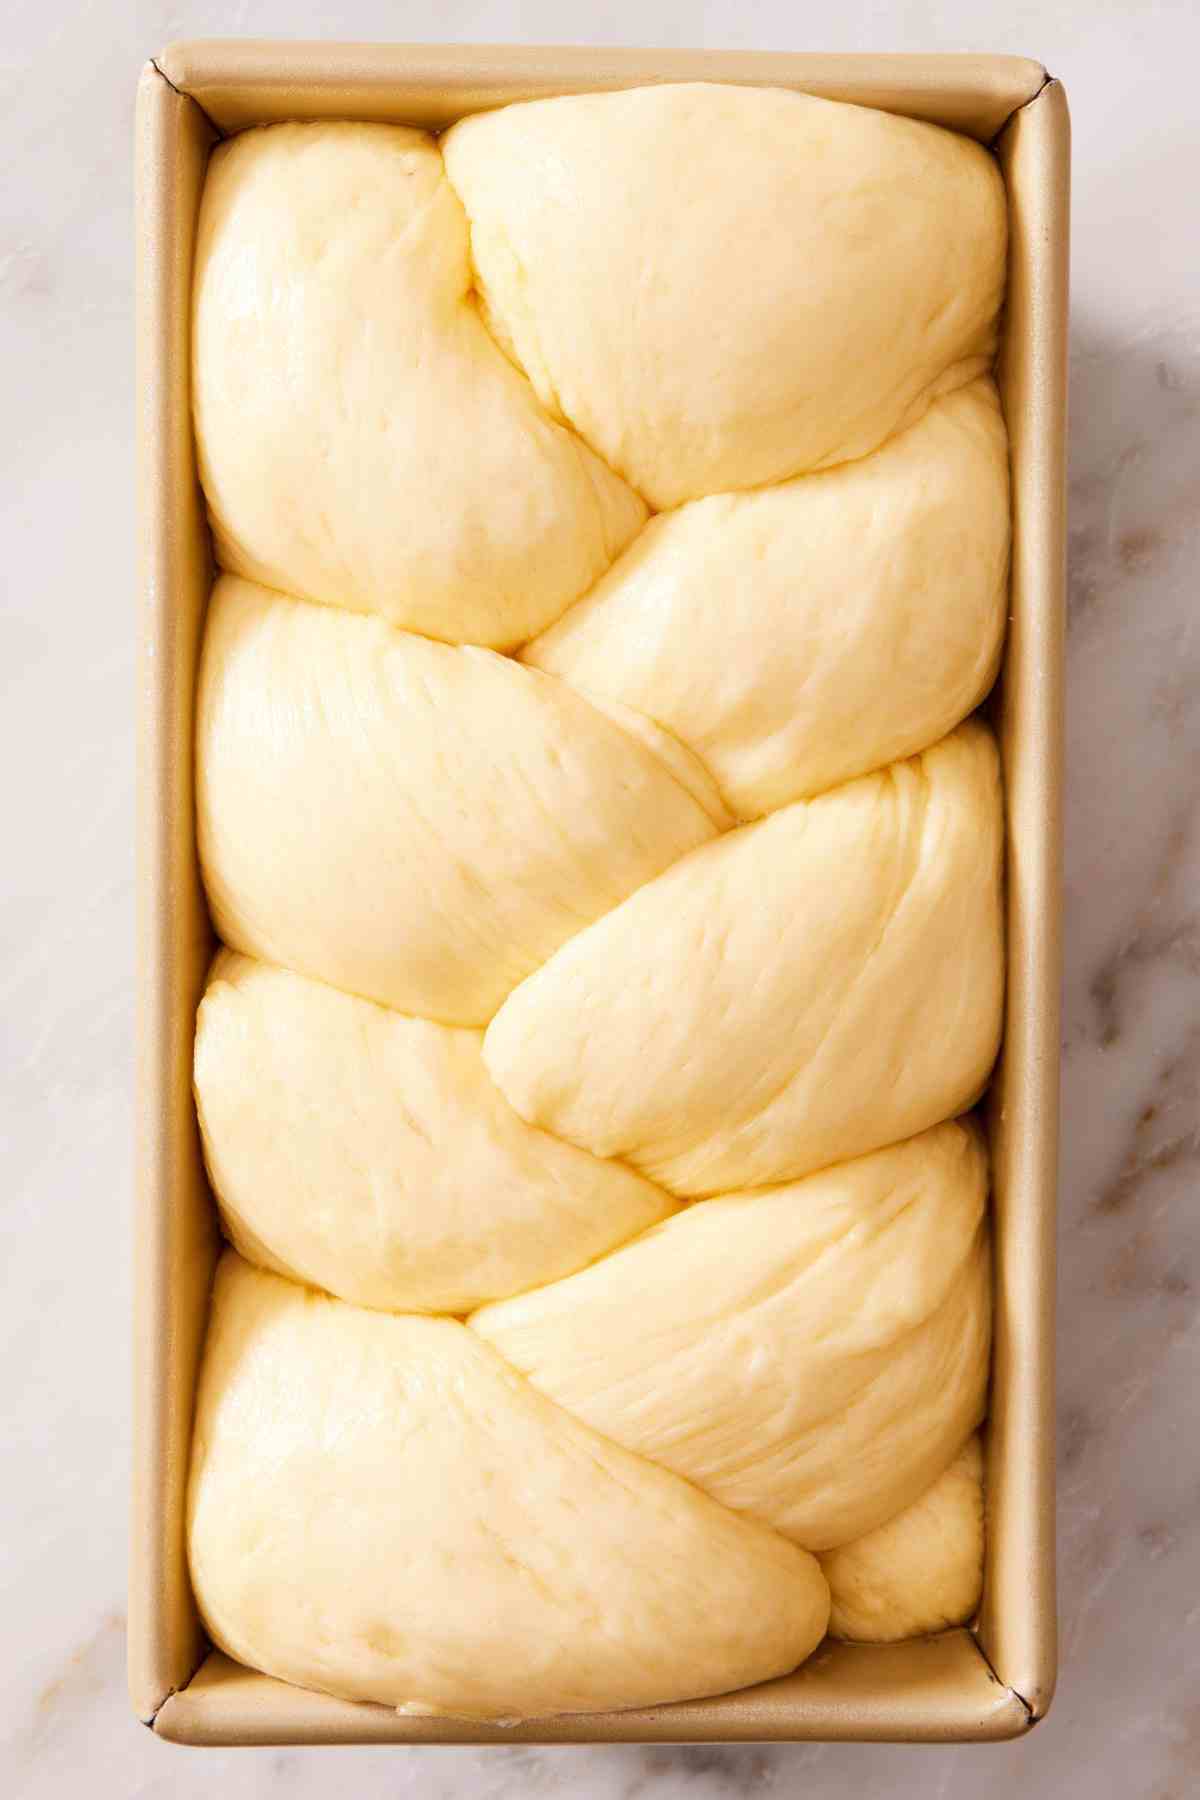
How Do I Tell When The Dough Is Proofed Enough?
After the second rise, the brioche dough should rise just above the rim of the loaf pan. To double-check, you can do the poke test. Gently press the dough. If the indentation stays or springs back slowly, the dough is ready to be baked. If it bounces back fully or quickly, then it needs more time. Ultimately, how much time brioche dough takes to proof depends on the temperature of your kitchen— an environment about 75°F is ideal for rising.
Frequently Asked Questions
Yes. You can use a hand mixer with the dough hook attachments instead. Alternatively, you could knead brioche bread by hand, but it will be labor-intensive as you’ll have to knead it for a very long time. It will take approximately twice as long to knead by hand as with a stand mixer, and you will need to use a wooden spoon to do it by continuously mixing it in the bowl. This is such a soft and sticky dough that it’s hard to knead on the counter like you would other bread doughs. Because of the time it would take to knead by hand, I highly recommend using an electric mixer instead.
The fat in the butter inhibits gluten formation, so in order to get a good structure, the bread has to be kneaded for a bit first, then the butter is worked in. That gives the gluten a head start on forming a network before you add the butter.
Yes. You can put the bulk dough (in other words, dough ready for its first rise) in the fridge overnight (up to 12 hours), then bring it to room temperature before shaping it. It will slowly rise in the fridge, and rise more as it warms up.
Alternatively, shape the dough in the loaf pan and skip the second rise, cover the brioche dough, and chill for up to 12 hours in the fridge. Let it sit at room temperature until the dough has risen to the top of the pan or just above the rim.
Yes! Shape the dough into 12 balls and bake them in a buttered casserole dish. Follow the shaping, rising, and baking instructions in my dinner rolls recipe. To make buns, try my brioche buns recipe instead!
Yes! I originally developed this recipe to make two loaves at one time. However, readers found it more convenient to only make one loaf and double it if needed. It’s an easy modification! To make two loaves, double the recipe and follow the recipe steps through the first rise. Then, divide the dough in half to shape and bake both loaves as instructed.
Please note that with the increased amount of dough, your mixer will work harder. My team and I have tested this recipe numerous times without any issues. But I recommend only doubling the recipe if your stand mixer is healthy and designed to knead sturdy doughs. (I use a standard KitchenAid 5-quart Artisan stand mixer.)
Pro Tips For Making The Best Brioche Bread
Avoid adding too much flour by measuring your flour correctly! Adding too much flour to the recipe is the most common mistake leading to dense bread. The best way to measure flour is by using a scale. If you don’t have one, then fluff your flour with a spoon, sprinkle it into your measuring cup, and use a knife to level it off.
Mind the temperature of your ingredients. Eggs need to be at room temperature and not cold from the fridge. Place the eggs into a bowl of warm water for a couple of minutes to quickly bring them to room temperature if you have forgotten to take them out of your fridge ahead of time. The butter should be soft (learn my tricks to quickly soften butter if needed). Both the butter and eggs will incorporate smoothly when they aren’t cold. Plus, cold temperatures will cause the yeast to rise more slowly.
Making a sponge takes extra time, but it enhances the flavor of the baked brioche. If you want to save some time, skip adding the flour in step 1 and bloom the yeast until the mixture is foamy, about 10 minutes. Then, add all 6 cups of flour in step 2.
Allow the brioche bread to cool. I know it can be difficult to resist tearing into the bread the moment you pull it out of the oven, but the cooling time is not just so you don’t singe your fingers! While the brioche cools, it finishes up the cooking process and the crumb sets. Digging in too soon can lead to a loaf that’s gummy instead of tender. Wait until the loaf is warm or room temperature before enjoying; that’s at least 30 minutes after it’s been removed from the oven.
How To Make Brioche Bread
Below, I’ve highlighted portions of the recipe in step-by-step process images along with instructions for making homemade brioche bread. You can find the full set of instructions in the recipe card below.
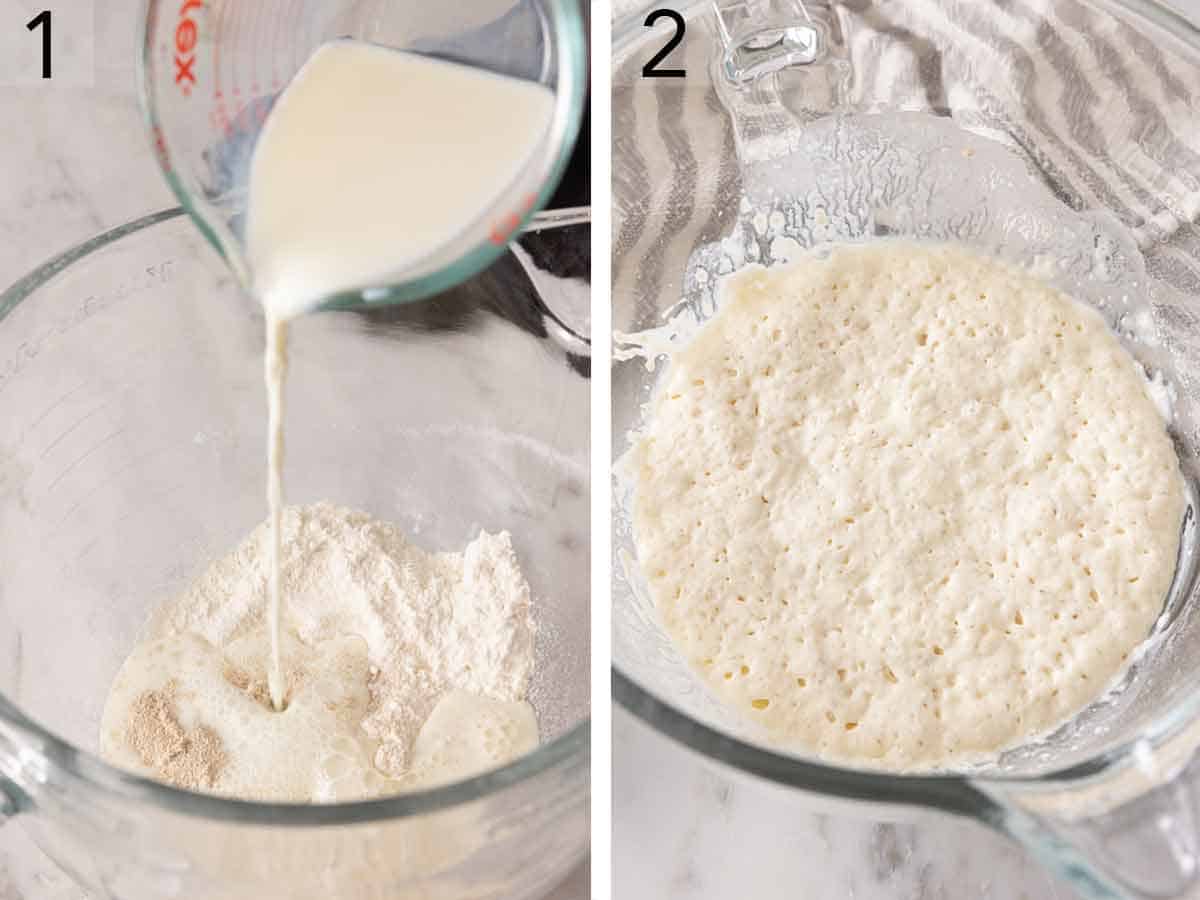
1. Whisk together 1 cup of flour, the warm milk, 1 tablespoon white sugar, and the yeast in the bowl of a stand mixer to make the sponge.
2. Cover loosely and let the mixture stand at room temperature until foamy, which will take about 45 minutes. Your sponge is now ready!
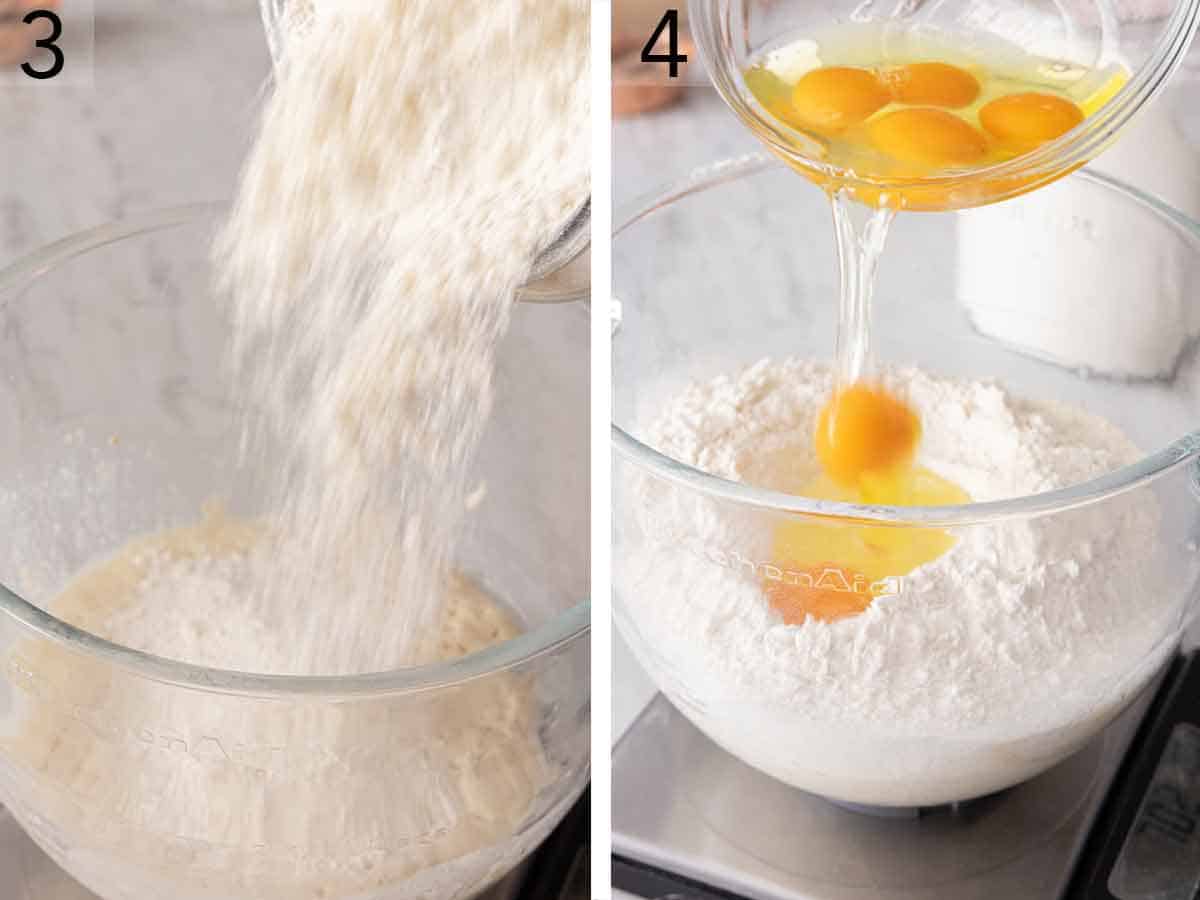
3. Add the dry ingredients (salt, remaining flour, and remaining sugar) to the sponge.
4. Then add the eggs. Beat on low speed with the dough hook attachment until combined, scraping down the sides of the bowl as needed. Then just keep mixing to achieve a shiny, elastic dough. This will take several minutes, anywhere from 10 to 12.
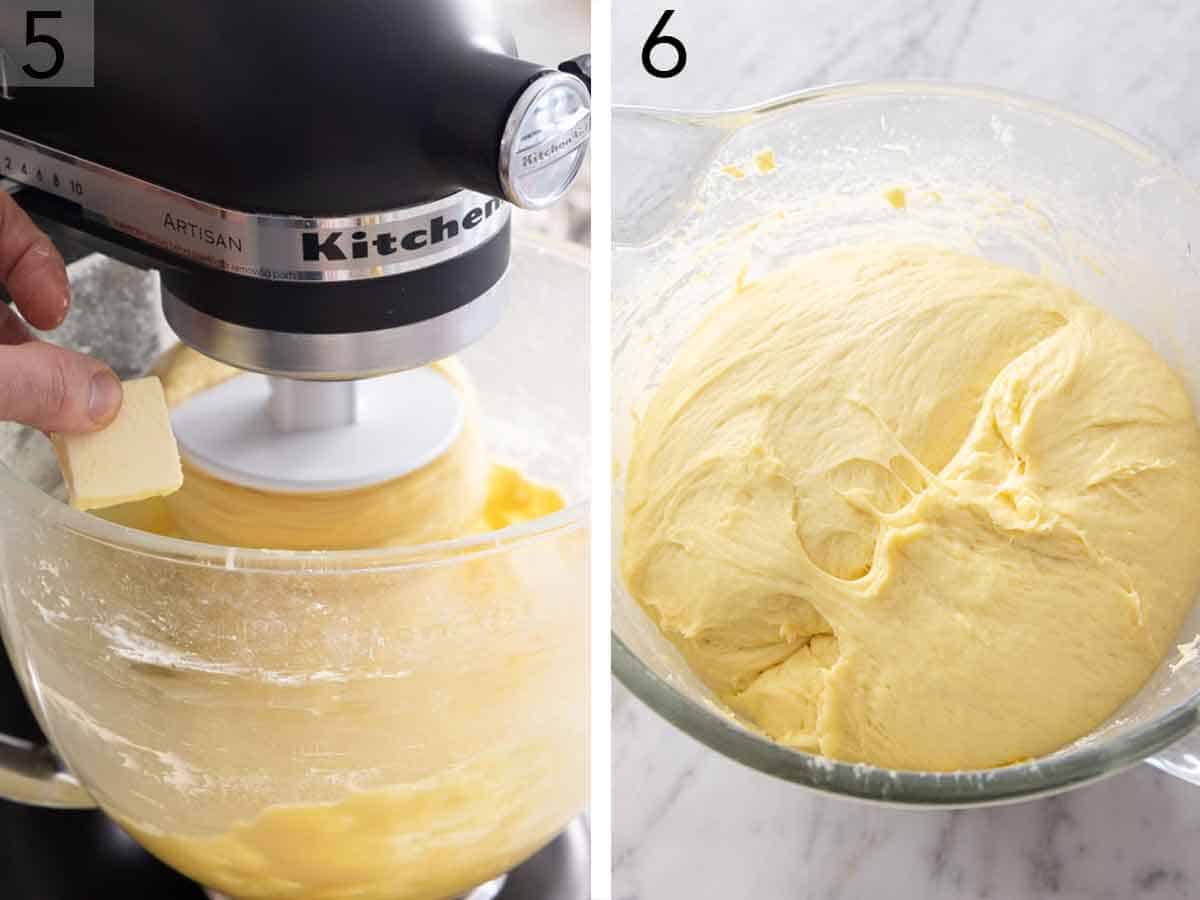
5. Keep the mixer on low speed as you add the softened butter, tablespoon by tablespoon. Let each addition fully blend with the other ingredients before adding the next tablespoon of butter. Next, increase your stand mixer speed to medium-low and keep kneading the dough for about 8 minutes. It should be nice and smooth and elastic once you are done kneading with your stand mixer. Scrape the dough down the bowl.
6. Cover the brioche dough and let it rise in a warm place for about an hour or until it’s doubled in size.
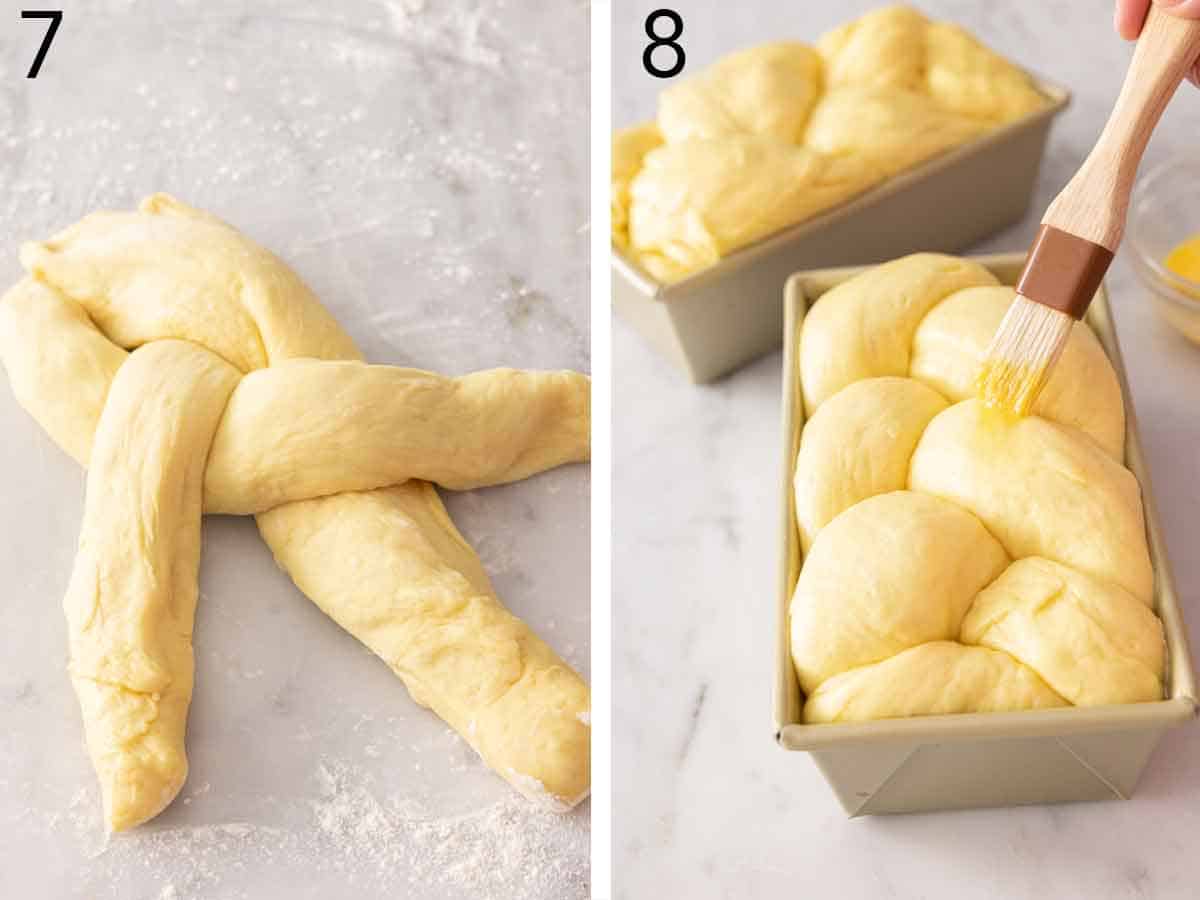
7. Once its first rise is complete, punch down the dough and turn it out onto a lightly floured work surface. Cut it into 3 pieces, then roll each piece into a rope. Braid the ropes together and pinch to seal the edges. Place the braid in a buttered 8¼x4½-inch loaf pan, then cover loosely and let rise in a warm, draft-free spot until doubled in size once more (which will take approximately another hour, depending on the temperature of your kitchen).
8. While the dough is proofing, preheat the oven to 375°F and whisk together the water and remaining egg to make an egg wash. Once the dough is properly proofed, brush it with the egg wash and bake for 35 minutes or until deep golden brown. (If you find the top is browning too fast, cover with aluminum foil after 25 minutes.) Let the brioche bread cool in the loaf pan for 5 minutes, then transfer to a wire rack and allow to cool until warm (30 minutes) or room temperature.
Brioche Bread Recipe
Video
Equipment
- Stand mixer
- Loaf pan
Ingredients
- 3 cups all-purpose flour divided (360g)
- ½ cup warm milk (110-120°F) (120mL)
- 3 tablespoons granulated sugar divided
- 1 (0.25-oz.) packet active dry yeast (2¼ teaspoons)
- 4 large eggs divided
- 1¼ teaspoons salt
- 10 tablespoons unsalted butter softened and cubed (140g)
- 1 tablespoon water
Instructions
- To make the sponge, in the bowl of a stand mixer, whisk together ½ cup flour, the milk, 1 tablespoon sugar, and the yeast until combined. Loosely cover, and let stand at room temperature, until foamy, 30 to 45 minutes.
- Once the sponge is ready, add 3 eggs, the salt, remaining 2½ cups flour, and remaining 2 tablespoons sugar. With dough hook attachment, beat on medium-low speed until well combined, about 1 minute scraping down the bowl as needed. Continue mixing until the dough is shiny and elastic, about 8 minutes.
- With the mixer on low speed, gradually add in the butter 1 tablespoon at a time, waiting until it is fully incorporated before adding the next tablespoon.
- Once all of the butter is incorporated, increase the speed to medium-low and continue kneading until the dough is smooth and elastic, about 8 minutes more. Scrape the dough down into the bowl. Cover, and let rise in a warm place until doubled in size, about 45 minutes.
- Lightly grease a 8¼x4½-inch loaf pan with softened butter.
- Punch down the dough and turn out onto a lightly floured surface. Cut the dough into 3 equal pieces, and roll each piece into a 9-inch long rope. Braid the ropes together, pinching ends together to seal. Tuck the ends under and place in the buttered loaf pan. Loosely cover, and let rise in a warm place until doubled in size, about 40 to 60 minutes. (It should be puffed up above the top rim of the pan.)
- After the loaf has risen for 20 minutes, preheat the oven to 375F.
- In a small bowl, whisk together the water and remaining 1 egg until smooth. Brush the top of the risen loaf with egg wash.
- Bake for 35 to 40 minutes or until deep golden brown, covering with aluminum foil after 25 minutes if the top is browning too quickly. Let the bread cool in the pan for 5 minutes, then remove the loaf, and continue cooling on a wire rack. Serve warm or at room temperature. Store cooled bread in an airtight container for up to 1 week, or slice and freeze in a freezer bag for up to 2 months.
Notes
- Use the windowpane test to tell if the dough is ready. Pinch off a small ball of dough, then stretch it between your fingers into a square. If the dough stretches thin enough to let light pass through and doesn’t break, it’s ready. If it does break, continue kneading it for another minute and repeat the test.
- The time it takes for your dough to rise depends on the temperature of your kitchen. The ideal temperature for dough rising is around 75°F. If your kitchen is cold, you can place your dough in an oven that is OFF with the light on, or use a bread proof setting if it has one.
- For even dough pieces to braid, use a scale. I like to weigh the whole dough ball, then divide that weight by three. Then, when you cut it into thirds, you can weigh each one and trim or add as needed to get each one to an equal weight. This will form the prettiest, most even braid.
- Use a 9×5-inch loaf pan: You can use a slightly larger loaf pan without any issues. Since the loaf will be a touch wider and less tall, check it for doneness after baking for 30 minutes.
- To tell if the bread is baked through, check the internal temperature with an instant-read thermometer. It should read 190-195°F in the center.
Nutrition
How To Store Brioche Bread
Storage: Once cooled, store homemade brioche bread in an airtight container at room temperature for up to 3 days. Do not refrigerate, as that will dry out the bread.
Freezing: This will preserve freshness the best! I like to freeze the loaf or any slices I know I’m not going to eat within a day. If you plan to freeze the whole loaf, slice the bread before freezing so you can thaw out a few slices at a time as needed.
Place slices in a freezer bag and freeze for up to 2 months. Toast from frozen or thaw on the counter for about an hour. If you want to freeze the entire loaf, unsliced, just wrap the whole loaf, pop it into a freezer bag, and freeze! Thaw on the counter for a few hours.
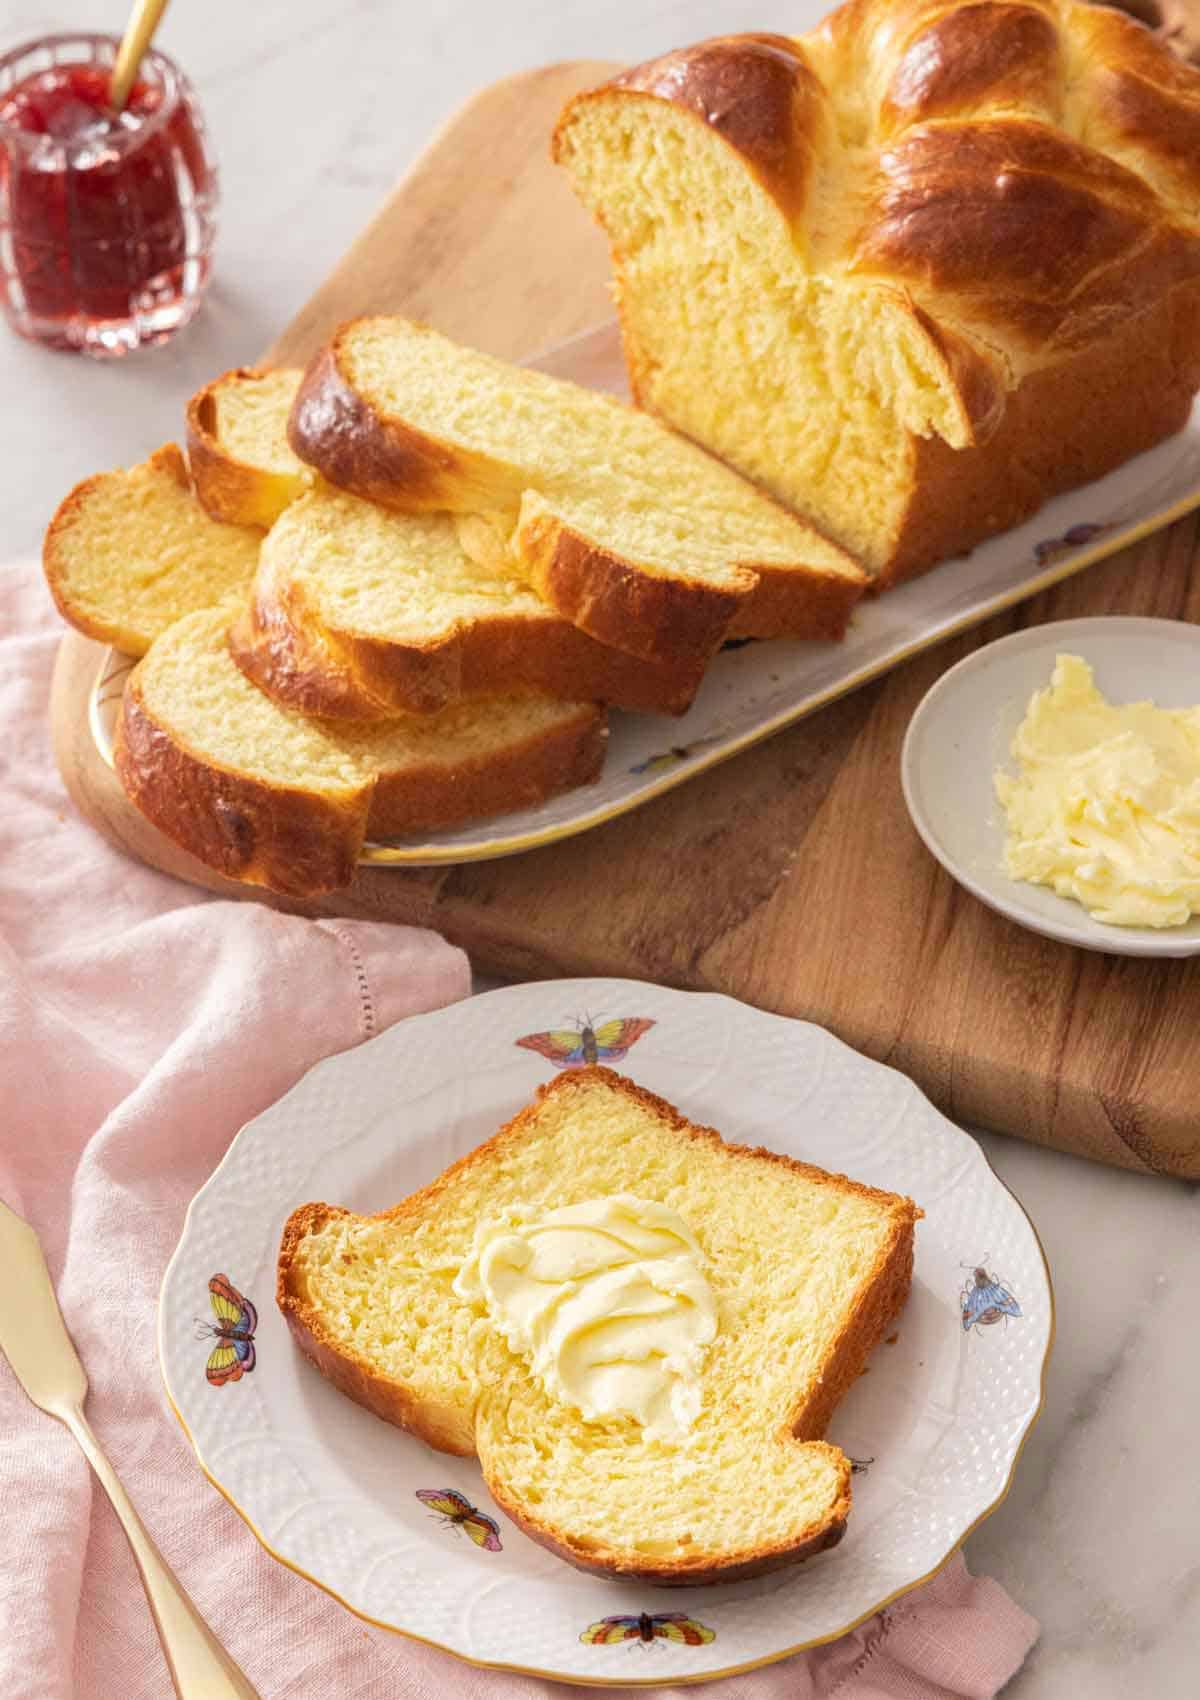
Serving Suggestions
My favorite way to enjoy fluffy homemade brioche bread is with a generous smear of butter or honey butter and fruit jam, like blueberry jam or raspberry jam. It also makes excellent sandwiches!
And, like challah bread, you can also use this buttery bread to make fantastic classic French toast or air fryer French toast, and bread pudding.
More Bread Recipes To Try
Want to make more homemade bread? Give these recipes a try!
My homemade croissants are a labor of love, and I share all the tips and tricks to help you perfect your technique. They turn out flaky and buttery, ideal for enjoying warm with lots of butter.
French bread has a crisp crust and tender crumb, and is so easy to make with a few ingredients.
My artisan bread recipe is a great option for beginner bread makers. It’s a very forgiving recipe and turns out perfect every time.
I love making crescent rolls to enjoy at my breakfast table. I particularly enjoy turning them into breakfast sandwiches stuffed with eggs and cheese. Yum!
No-knead focaccia bread has a simple topping of flaky sea salt and fresh herbs. It’s pillowy, chewy, and simply delicious.
If you’ve tried this brioche bread recipe, then don’t forget to rate it and let me know how you got on in the comments below. I love hearing from you!
Apryl says
I was wondering if this recipe would work with bread flour? I just bought a huge bag thinking that was what I needed before I sat down to find the recipe 🙄 that’s what I get for doing it backwards haha. I would love if Bread flour would work
Thank you
Apryl
Sarah Ward (Executive Editor, Preppy Kitchen) says
You can! The texture will be chewier since bread flour has higher protein (and will develop more gluten).
Rose says
This recipe is my tried and true! Whether you love to make brioche regularly or are just trying it out, this is the recipe to use. Its perfectly buttery and soft with just a hint of sweetness.
Michael Stephens says
Just got my first Kitchenaid mixer. The 5.5 quart bowl lift. Had to use it right away.
I used this recipe to make 8 buns and 1 loaf (not braided…… couldn’t make it work). They came out amazing. I saw the buns recipe, so I used mostly bread flour with some AP flour. . . . Maybe because of the high humidity here in Southwest Georgia, I had to add some extra flour – only 1/3 cup. But when it came together you could stretch it to the point it was almost see through. Thank you for your great recipes.
Wish I could attach a picture.
Penny Behshid yefima says
can I make the dough and keep it in the frig till I am ready to bake it the next day
Sarah Ward (Executive Editor, Preppy Kitchen) says
Yes, you can cover it before the first rise and chill it for up to 12 hours, then bring it back to room temperature before shaping it.
Sarah Schmeckenbecher says
This recipe is sooo simple and delicious. I made French toast with one of the loaves and it held up very well. I even made a very nice turkey BLT with this. The battery flavor is just flat out scrumptious 💖 Thank you for sharing your recipe.
Sakina says
This was great. I put my dough in the fridge overnight to rise and it tripled in size. Made two wonderful loafs one for the week, which probably will be like 3 days.
Andreina Armendariz says
My KitchenAid broke when I was making the dough, so I had to hand-knead it. Still tasted amazing, and my whole family loved it. Will definitely use this recipe again!Thanks John!!!! 🙂
Pamela R. says
I had great success with this recipe, and I’m completely blown away! Never would I have guessed making something so utterly delightful could be attainable! A big thank you for a well written recipe and an excellent video to guide the process! After the dough doubled, it was extremely soft and moist, so instead of attempting braids, I rolled it into 6 balls per loaf. I enjoyed making the sponge as a new technique! I still can’t get over how perfectly light, soft, moist and tender the crumb turned out; as well as the ridiculously thin pull-apart layers throughout- and how beautifully it rose above the pan with a gorgeous, picture perfect deep brown crust–hinting of the heavenly goodness inside! Now I want to go to bread school! LOL, but seriously!
Wesley says
I made it from the YouTube video twice. I ended up ordering the cookbook. I was hoping the brioche recipe was in it. Glad I found this web site as it makes it easier to follow than the video. Thank you
Samuel says
Could I use a 9×5 inch loaf pan instead of two loaf 8×4 pans? Thank you.
Sarah Ward (Executive Editor, Preppy Kitchen) says
Yes, you can use two 9×5″ loaf pans. Check them for doneness after 30 minutes since the loaves will be slightly wider and less thick/tall.