This post may contain affiliate links. Please read our disclosure policy.


This Sugar Cookie Recipe bakes cookies with slightly crisp edges and a tender middle that are sturdy enough to withstand decoration with royal icing, buttercream, and more! This no-spread cookie dough holds a clean shape during baking, so use any cookie cutters you like.

My easy sugar cookie recipe is a must-try! The dough is easy to mix together with 7 simple ingredients, plus it’s firm enough to cut into whatever shapes you like: classic rounds, hearts, Christmas trees, bunnies…the limit is your imagination!
I’ve tested this recipe several times over the years for sugar cookies that hold their shape when cut and baked. And I’ve nailed the ratios! The dough has a balanced sugar-to-fat-to-flour ratio, so it is firm enough to hold a clean edge, but tender enough to be enjoyable to eat (which is always my top priority when developing a recipe). The result is a tender cookie that doesn’t spread, so your special shapes look exactly how you pictured when you pull them out of the oven.
“I made these cookies for Christmas and they were wonderful! They kept their shapes perfectly and tasted great! I’ve never had success with cut-out sugar cookies before. Thank you.”
Mary

A No-Spread Cut-Out Cookie
Sugar cookies come in two families:
- Cut-out sugar cookies: like this recipe. The dough is rolled and cut into shapes, like gingerbread men, to be decorated with icing.
- Drop sugar cookies: the dough is scooped and baked for a chewy style of sugar cookie. They are similar in texture to my brown sugar cookies.
Want a different kind of sugar cookie? Try one of my other recipes. Make my Lofthouse cookies for soft, frosted ones, the snickerdoodles for chewy ones, chocolate sugar cookies when you want a different flavor, or shortbread for something denser and more buttery. Don’t want to shape individual cookies? Bake my sugar cookie bars instead!
Key Ingredients and Easy Swaps

These are the main ingredients you need to make roll out sugar cookies. You can find the full list of ingredients and measurements in the recipe card below.
Butter — I use unsalted butter, softened until a finger leaves a dent without going all the way through (here’s how to soften butter quickly). If you use salted butter, cut the salt to ¼ teaspoon. See my guide on salted vs. unsalted butter for more details on swapping them.
Sugar — use white granulated sugar for firm sugar cookies, perfect for decorating. White sugar adds sweetness, blends smoothly with the butter, and helps the sugar cookies turn lightly golden brown. If you want chewier sugar cookies, swap half of the granulated sugar for brown sugar. The additional moisture in the brown sugar creates a chewier cookie, but it will also increase browning and make the cookies spread slightly. I’ve tested it, and the cutouts still work well, but they have a more rounded edge.
Eggs — use room-temperature eggs so they don’t chill the creamed butter. When I’ve added eggs straight from the fridge, the creamed butter looks curdled and forms lumps of butter in the cookie dough. Soak cold ones in warm water for 5 to 10 minutes if you’re short on time.
Flavor swaps — beyond vanilla (my homemade vanilla extract works well), I like to replace half of the vanilla with almond extract, beat 2 to 3 teaspoons of orange or lemon zest into the butter and sugar, or add about 1 teaspoon of cinnamon, ginger, or pumpkin pie spice to the flour.
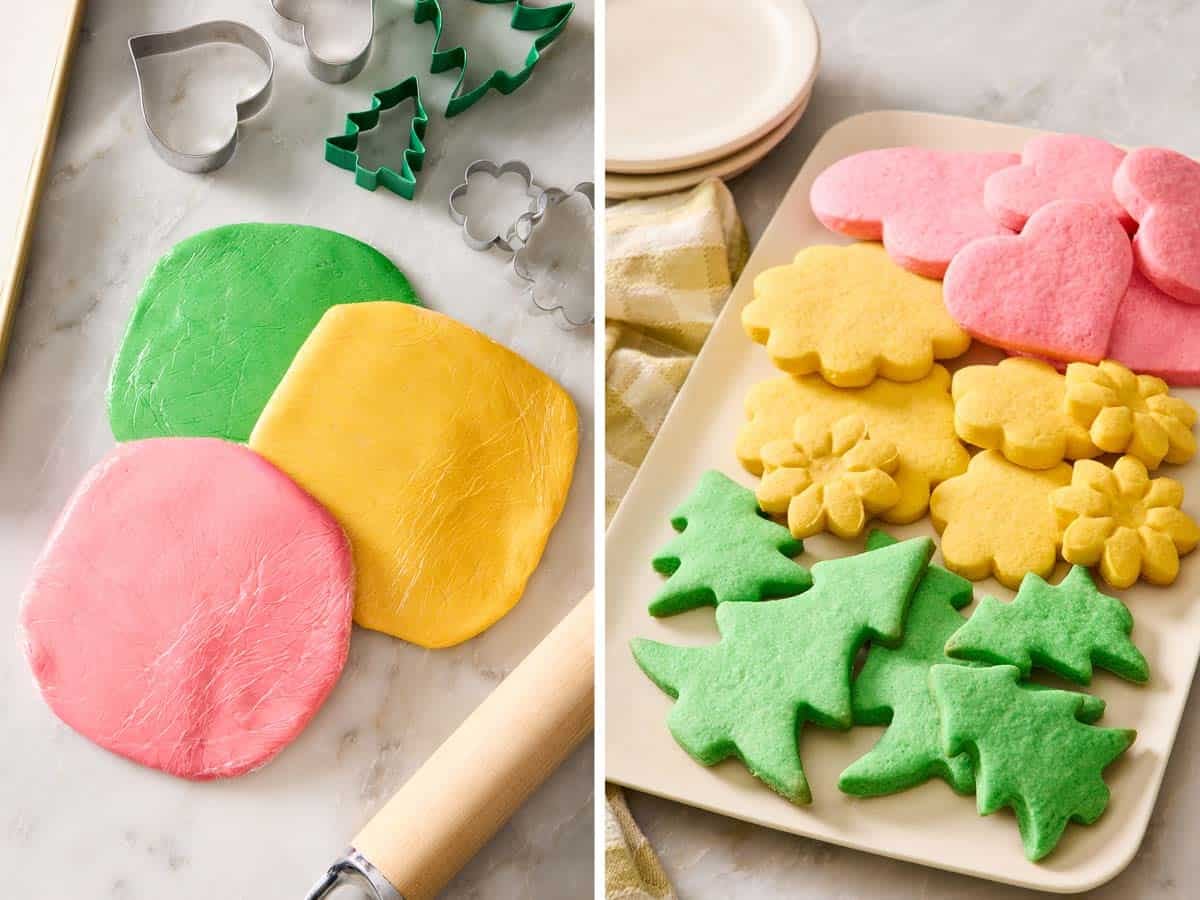
Colored dough — add gel coloring to the creamed butter and sugar, before the flour, to avoid overmixing. When I’ve tinted this dough, 2 to 3 drops gave pastel or light shades, and 4 to 6 gave deeper colors.
Measure The Flour Correctly
Dry, crumbly dough almost always means too much flour was used. When readers tell me these came out dry and crumbly, flour is the first thing I tell them to check. This recipe uses 480g of flour, which is 120g per cup. When I tested measuring methods, a cup scooped directly from the bag, shaken, and leveled, weighed 138g. Across 4 cups, that’s 72g of extra flour (more than ½ cup) soaking up the butter that keeps the cookies tender.
Weigh it, or spoon and level. A scale is the surest way to get the right amount of flour. If you only have measuring cups, fluff the flour, spoon it into the cup, and sweep the top level. See my guide on how to measure ingredients correctly for the step-by-step instructions.
To fix a crumbly dough, I add in milk 1 tablespoon at a time, up to 2 tablespoons, until it holds together.
Pro Tips For The Best Sugar Cookies
Keep the size of your cookie cutter in mind when figuring out the cookie yield. Larger cookie cutters will yield a smaller total number of sugar cookies, while you’ll be able to get more cookies using a smaller cookie cutter. I used 2½” and 3” cutters for this recipe and was able to get about 36 cookies. If you have larger cookie cutters, it might be worth making a double batch of dough based on the number of cookies you need.
For thinner, crispier sugar cookies: Roll the dough to ⅛-inch thickness. Bake until the edges turn a light golden brown, a little bit darker than what is pictured in this post (I rolled to ¼-inch for thicker, softer cookies). This will take 8 to 10 minutes.
Adjust the baking time if needed. For a softer sugar cookie, you want them to bake until they are just slightly brown on the bottom edges without much color on top. Watch the cookies carefully on your first batch. I recommend checking them at the 8-minute mark in case your oven runs hotter, and remove them once you see the tasty golden brown edges form.
How To Make Sugar Cookies
Below, I’ve highlighted portions of the best sugar cookie recipe in step-by-step process images, along with instructions for making these cut out sugar cookies. You can find the full set of instructions in the recipe card below.

1. Sift together the dry ingredients in a medium bowl and set them aside while you work on the wet ingredients.
2. In the bowl of a stand mixer fitted with the paddle attachment (you can also do this in a large bowl and use an electric hand mixer), beat the butter and sugar together until light and fluffy. Keep mixing while you drop in the eggs one at a time, scrape down the sides of the bowl, and add the vanilla extract.

3. With the mixer still running, add the flour mixture into the butter mixture a little at a time until the wet and dry ingredients are properly combined and form a dough.
4. Divide the dough in half, shape it into two disks, and wrap each one tightly in plastic wrap. Refrigerate for 2 hours to give the butter a chance to firm up once more, so the dough is easier to cut into shapes later on.
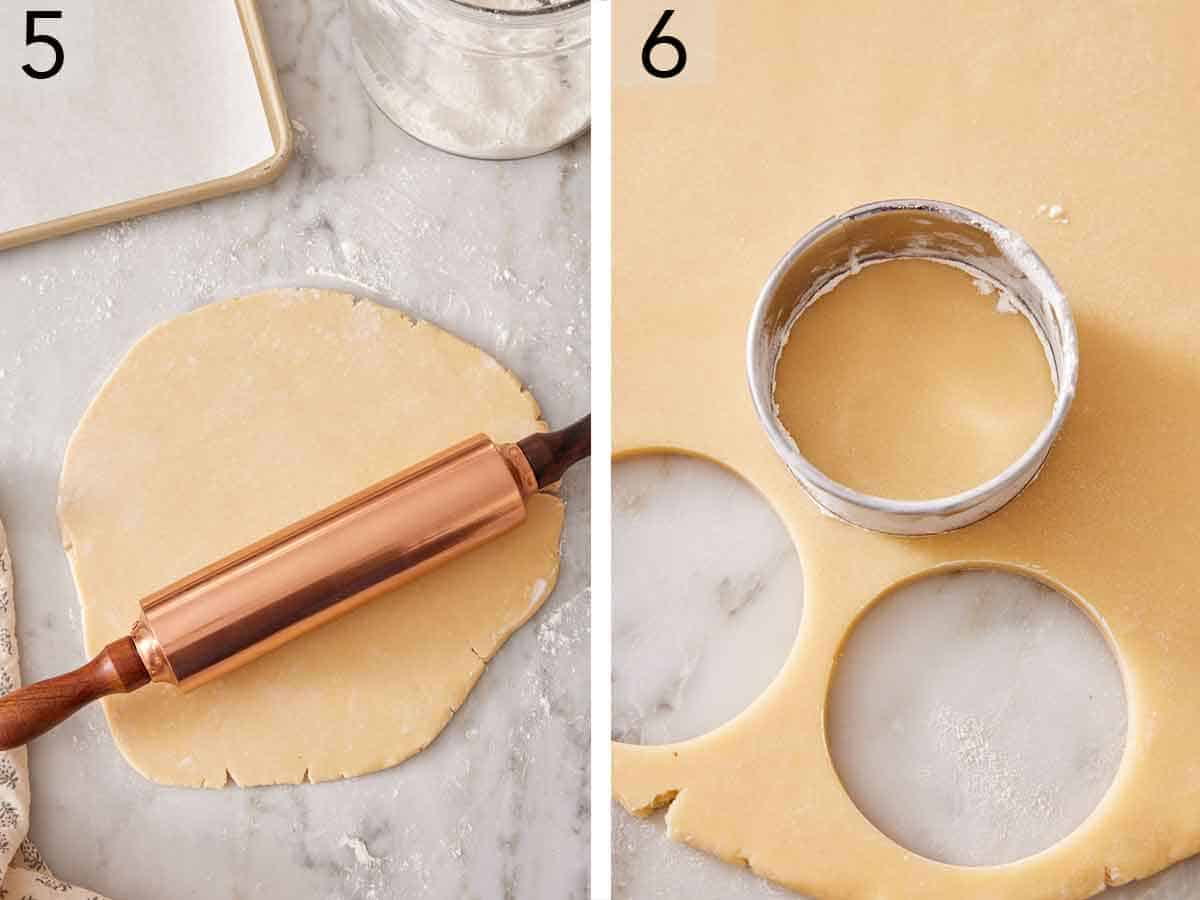
5. Place one disk of dough on a lightly floured surface to prevent sticking and use a rolling pin to roll it to ¼-inch-thickness.
6. Cut out shapes using 2½-inch cookie cutters or whatever size you require. Reroll and cut any scraps of dough to make more cookies. Place the cookies on a lined or nonstick baking sheet with 1 inch of space between them. Bake at 375°F for 10 to 12 minutes, and let cool on the cookie sheet for a few minutes before transferring the sugar cookies to a wire rack to cool completely. Once cool, serve plain or decorate any way you like.
Tips For Cutting Out Shapes
Sugar cookie dough can be cut into any shape or size with fun cookie cutters. If you decide to use a variety of cutters, like I did in the image below for my batch of Christmas sugar cookies, be sure to bake similar-sized cookies together so that they bake at the same rate and smaller cookies don’t burn. Here are some quick tips for the best results when using a cookie cutter to cut out shapes:
- Dip the cookie cutter in flour before cutting the dough. This prevents the cutter from sticking to the dough, making the shape easier to remove after cutting it.
- Cut out the shapes as close together as you can to help maximize the number of cookies you can get from one batch of dough. It will also save you time as you don’t need to reroll scraps too many times.
- Make sure the dough stays cold. The butter fat in the dough firms up when it’s cold, making the dough easier to cut. As it warms up, the fat softens or melts, and the dough becomes soft and sticky. The shapes will also stay intact better if the dough is cold. If the sugar cookie dough seems to be warming up faster than you’re able to cut it, simply pop it into the fridge for 5 to 10 minutes to firm up.

Troubleshooting
These are the three most common issues readers run into when making cut-out sugar cookies. Here’s the cause and how to avoid it:
The Cookies Spread or Puffed
Warm dough is the usual cause: when the butter softens before the cookies reach the oven, the edges slump or round. When my cut shapes have warmed up, I’ve put the whole tray in the freezer for 5 to 10 minutes before baking, and the edges stayed sharp.
Over-creaming and too little flour can do it too. Over-creaming works in more air, which expands in the oven, so the cookies puff. And not enough flour means there’s a higher ratio of fat and sugar to flour, so they spread.
The Dough Is Sticky
Sticky dough means the butter was too warm or there wasn’t enough flour. Flour the counter and pin generously, then brush the extra off the cut shapes, or chill the dough again.
When my dough has been sticky, another 30 minutes in the fridge makes it easy to roll. I have also found it easier to roll sticky dough between two sheets of parchment paper, chilling the rolled sheets for 10 to 20 minutes, and then cutting out the shapes.
The Dough Cracks When You Roll It
Cracking dough is usually a sign that it’s too cold after a long chill; let it sit out about 5 minutes and try again. When I’ve rolled the dough straight from a 2-day chill, the edges split until it had warmed for a few minutes on the counter.
If it still cracks once softened, there’s probably too much flour. You can press the cracks back together or cut around them and reroll the scraps.

How to Decorate Sugar Cookies
Royal icing is what I use for detailed piping and flooding. I let cookies iced with my royal icing dry for at least 6 to 8 hours (up to 24 hours), until hard before I stack or pack them.
Sugar cookie icing whisks together in about 5 minutes and sets softer, taking up to 24 hours to set completely. My sugar cookie icing is less precise than royal icing, but it is super easy to make and use!
Buttercream, sprinkles, or chocolate. Pipe vanilla buttercream, scatter sparkling sugar on the cut shapes before baking, or dip cooled cookies in melted chocolate, like my chocolate-dipped sugar cookies. For tools and icing consistencies, see my Cookie Academy guide on how to decorate cookies.

Sugar Cookie Recipe

Equipment
- Baking Sheet
Ingredients
- 4 cups all-purpose flour (480g)
- ¾ teaspoon salt
- ¾ teaspoon baking powder
- 1 cup unsalted butter softened (227g)
- 1 cup granulated sugar (200g)
- 2 large eggs room temperature
- 2 teaspoons vanilla extract
Instructions
- In a medium bowl, sift together the flour, salt, and baking powder.
- In a large mixing bowl or the bowl of a stand mixer fitted with the paddle attachment, beat the butter and sugar together on medium speed until light and fluffy, about 2 minutes.
- Add the eggs, one at a time, while mixing. Scrape down the sides of the bowl. Beat in the vanilla.
- With the mixer running, gradually add in the flour mixture and mix until everything is well incorporated. Divide the dough in half, shape into two disks, and tightly wrap in plastic wrap. Refrigerate for 2 hours or up to 2 days. (if chilling longer than 2 hours, let the dough sit at room temperature for 15 to 30 minutes or until slightly softened.)
- Once the dough is chilled and you’re ready to bake, preheat the oven to 375F.
- Roll the dough on a lightly floured surface to ¼-inch-thickness. Cut out shapes using 2½-inch cookie cutters. Re-roll as needed for more cookies.
- Place the cut-outs on non-stick or parchment-lined baking sheets 1 inch apart.
- Bake one sheet at a time for 10 to 12 minutes or until the bottom edges start to turn brown. Let cool for a few minutes on the pan then transfer to a wire rack and cool completely. Serve plain or decorate with royal icing.
Notes
- Cool cookies before decorating. Whether you are drizzling with chocolate, frosting with sweet buttercream, dusting with powdered sugar, or using royal icing for intricate designs, allow the cookies to cool to room temperature before decorating. Any icing decorations will melt and run off the cookies if added before they are cooled.
Nutrition
Have you tried this recipe? Tag me today!
Mention @preppykitchen and tag #preppykitchen!
Make Ahead, Storage, and Freezing
Preroll the dough: Divide the dough in half and place each piece on a sheet of parchment paper, pressing it to a square. Add another sheet on top and roll the dough to ¼-inch thick. Stack each sheet on a cookie tray, wrap with plastic wrap, and refrigerate for up to 24 hours or freeze for up to 1 month. When you’re ready, you can just remove the top sheet of parchment and cut the cookies out! (If frozen, thaw the dough in the fridge for about 4 hours before cutting.)
Precut the dough: Cut out the dough into whatever shapes you like and freeze the cutouts on a lined baking sheet, tightly wrapped in plastic wrap. Separate layers with sheets of parchment paper if you want to stack them on the baking sheet. When you’re ready to bake them, simply remove the plastic wrap and bake from frozen, adding 2 minutes to the bake time to account for the frozen cookies. See How To Freeze Cookie Dough for more details.
Store baked cookies: Keep them airtight at room temperature for up to a week. For an event, I bake them within 2 to 3 days. Freeze plain, undecorated cookies for up to 2 months, and bring them back to room temperature before decorating.

Frequently Asked Questions
Yes. Beat the softened butter and sugar with a wooden spoon until pale, mix in the eggs and vanilla, then stir in the flour mixture, finishing with a quick knead by hand to bring the dough together. When I’ve mixed this dough by hand, the creaming took longer, but the dough rolled and baked the same.
Yes. Flour the stamp or embossed cutter before each press so it releases cleanly. When I’ve chilled the stamped cookies on the tray until firm before baking, the pattern stayed crisper than when I baked it without chilling.
Yes. Use 4 cups of a gluten-free baking blend that contains xanthan gum, and add 1 to 2 tablespoons of milk if the dough feels crumbly.
When I tested these with King Arthur gluten-free flour, they held their shape, but the starchy flavor of the flour came through noticeably when they weren’t iced. I recommend decorating them with the icing of your choice to increase the sweetness and add a bit of flavor.
More Cookie Recipes To Try
Try one of these classic cookie recipes next:
- Spritz Cookies: a buttery sugar cookie that can be formed into shapes with a cookie press or piping bag.
- Peanut Butter Cookies: these are quick to make and bake up soft, but give them time to cool so their texture sets up perfectly before you serve them.
- Gingersnaps: perfectly sweet, have just the right amount of warming ginger, cinnamon, and cloves, and have a deep, complex flavor thanks to molasses.
- Cake Mix Cookies: you only need 3 basic ingredients to make these fluffy cookies, and you can add chocolate chips, sprinkles, or nuts to the mix.
- Thumbprint Cookies: crispy, shortbread-style cookies baked with a jam center.
If you’ve tried this sugar cookie recipe, then don’t forget to rate it and let me know how you got on in the comments below. I love hearing from you!