
This post may contain affiliate links. Please read our disclosure policy.
My ice cream cake is easy to make at home! Chocolate cake, a hot fudge and Oreo crunch layer, and ice cream come together for a homemade version that is easy to customize for your favorite ice cream flavor.
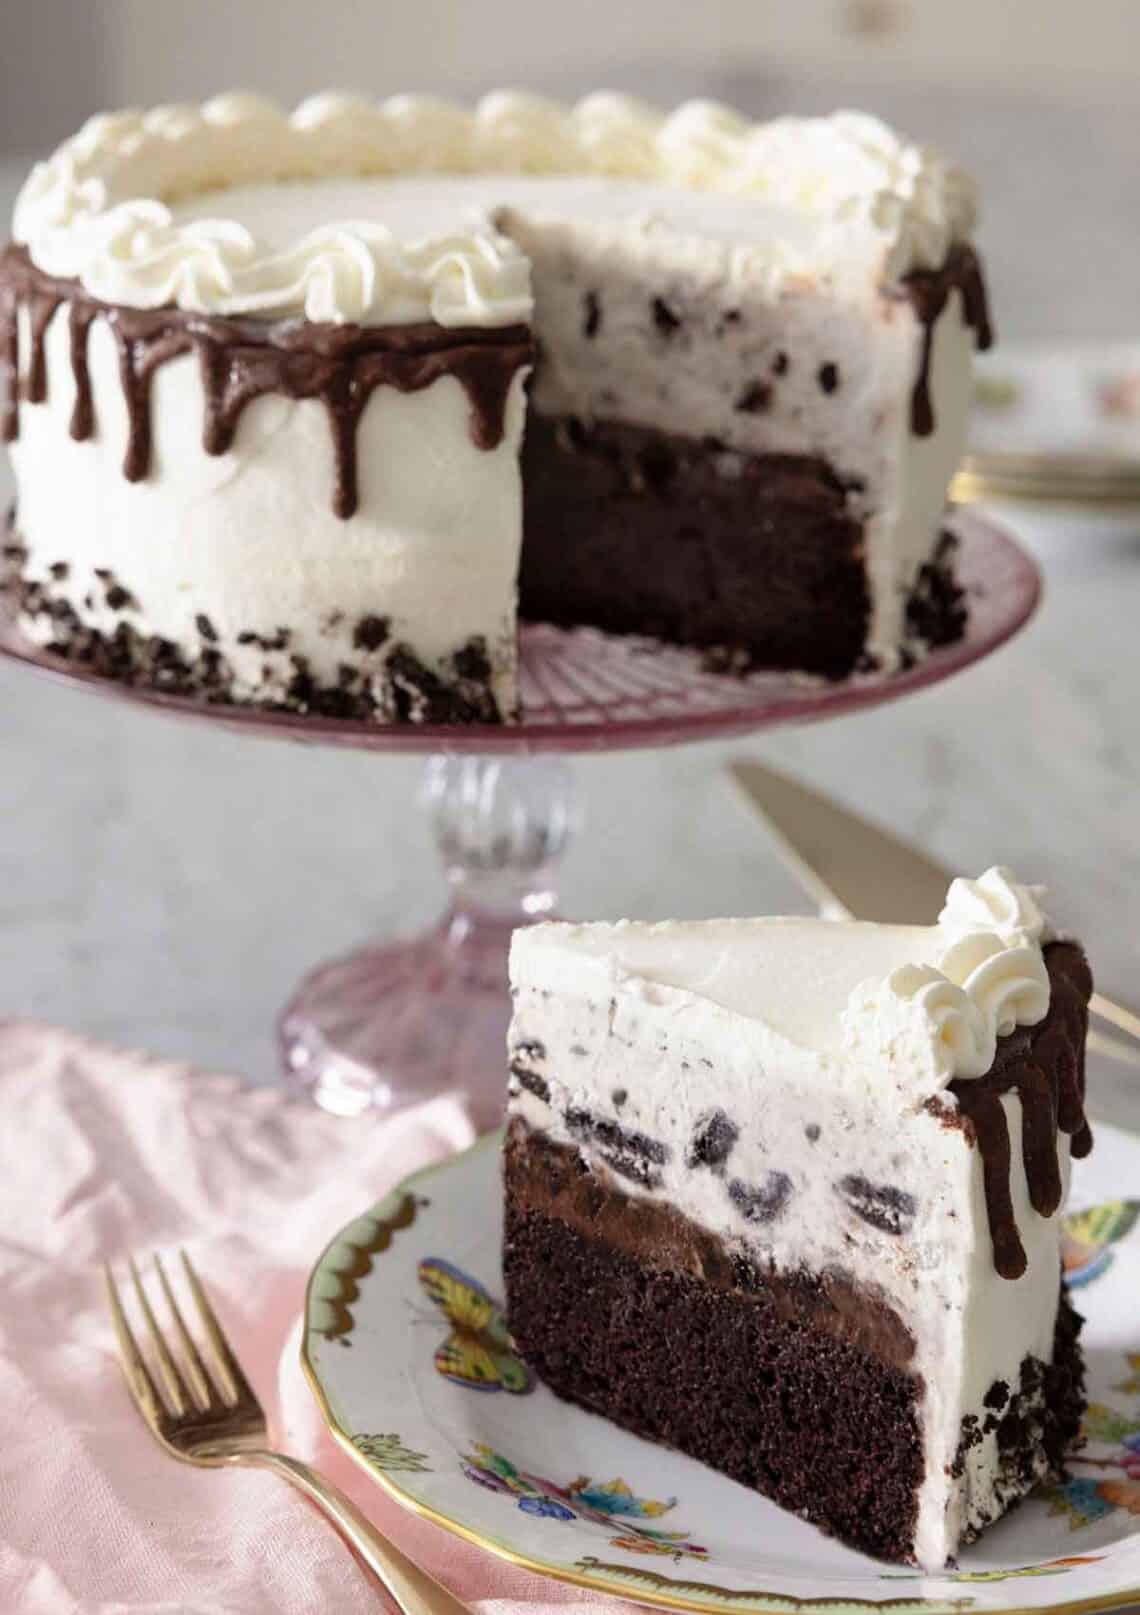
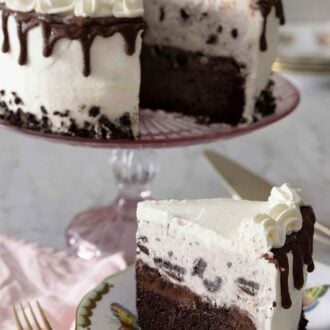
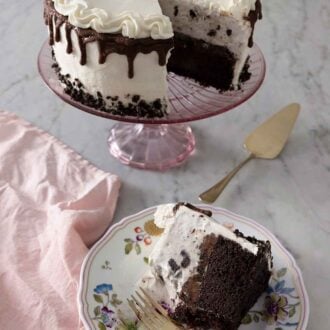
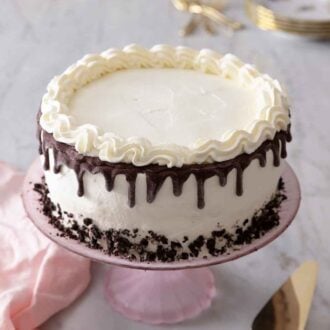
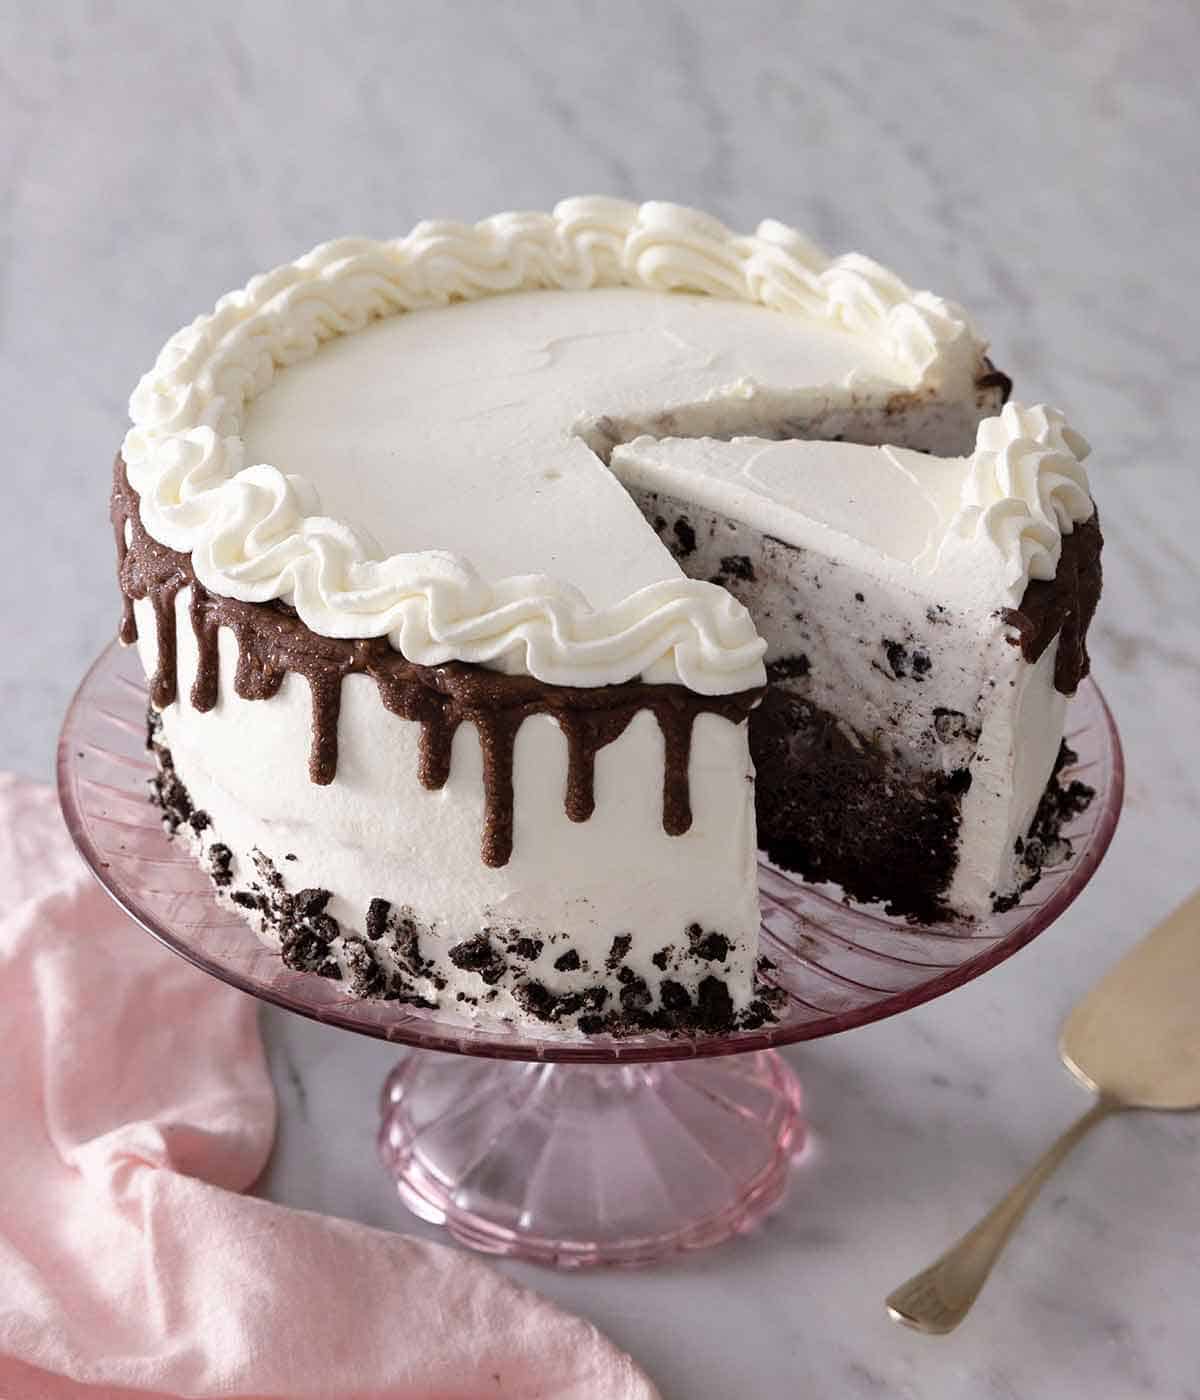
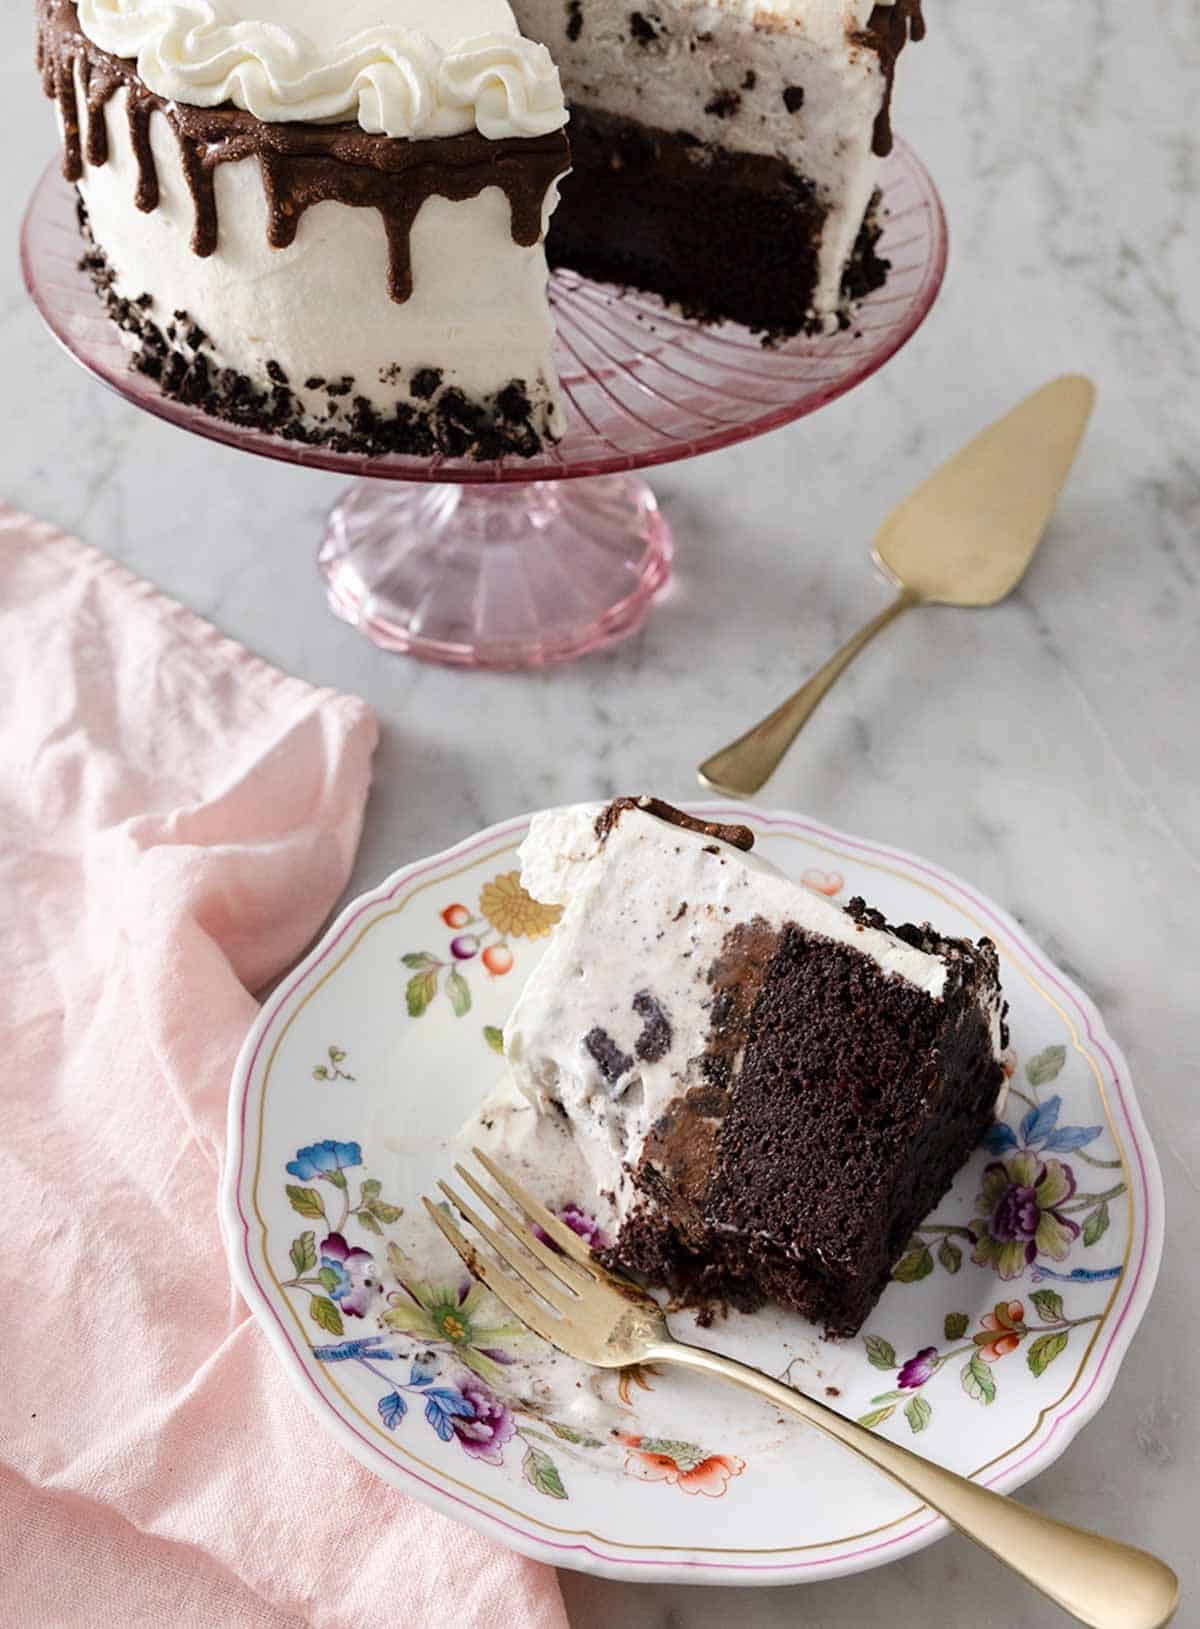
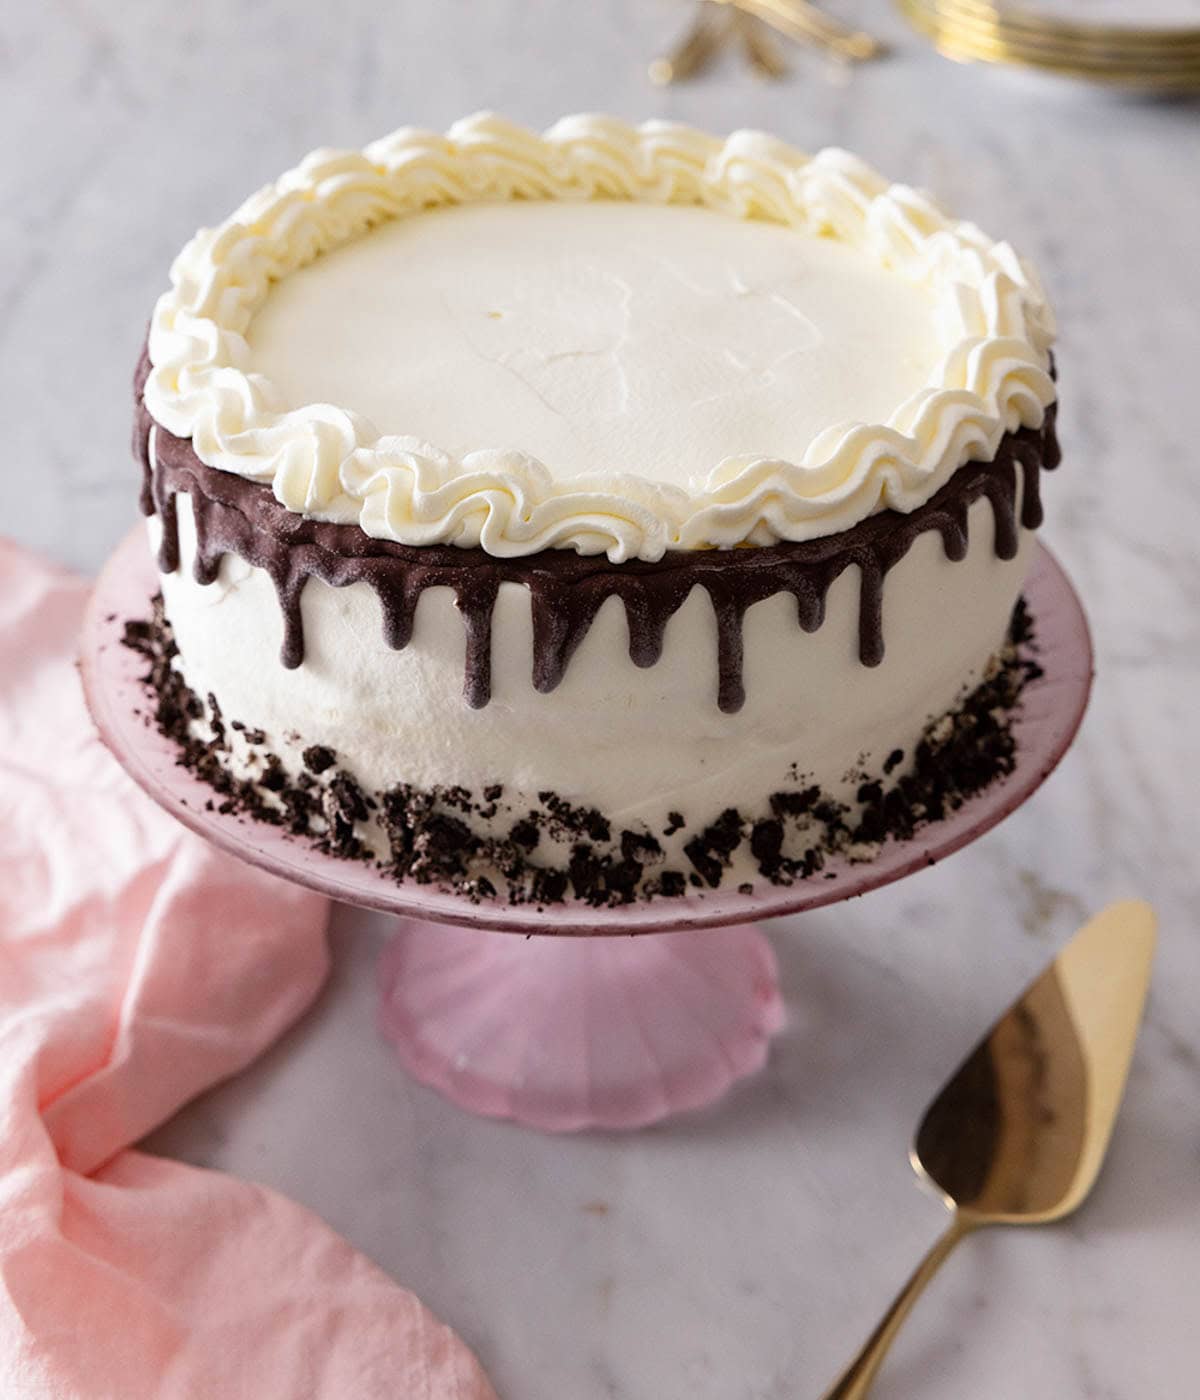
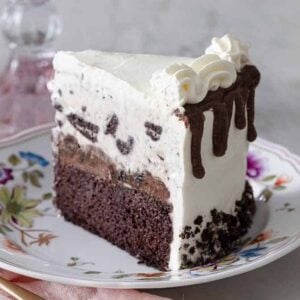
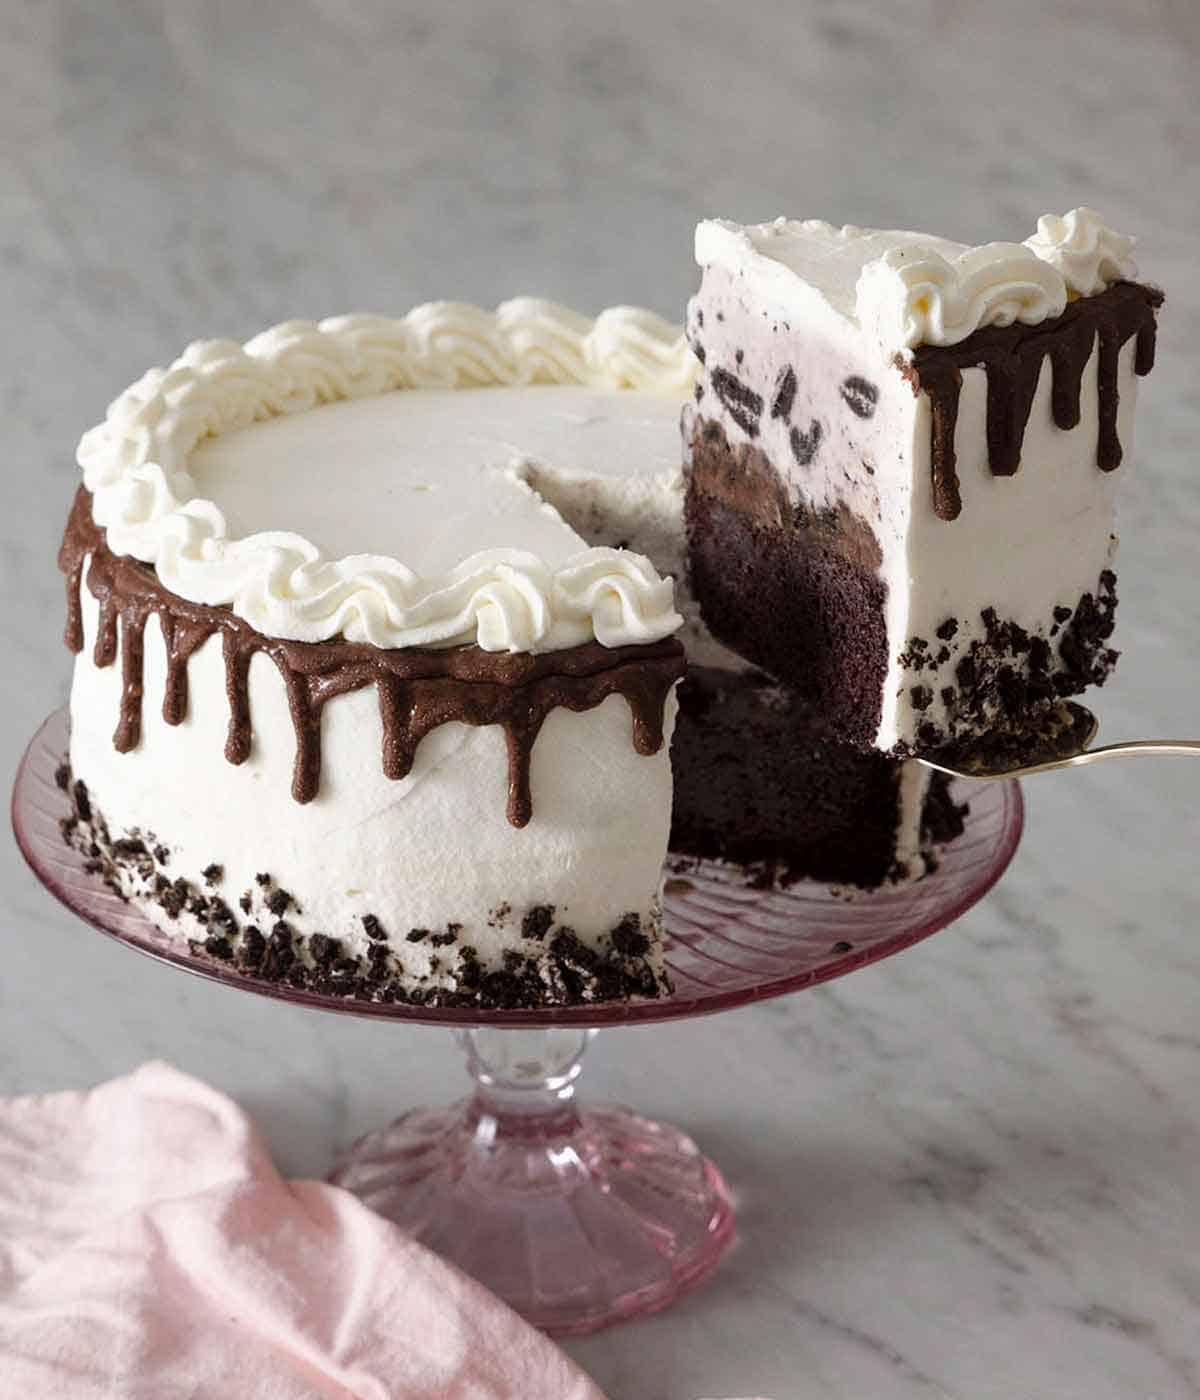
An ice cream cake is the one dessert that makes a whole table go quiet. This is my take on the ice cream cakes everyone grew up fighting over—except mine starts with a homemade layer of chocolate cake on the bottom. That’s topped with an irresistible band of hot fudge studded with crushed Oreos, a thick layer of ice cream, and a coat of real, softly whipped cream over the whole thing.
It looks like a bakery showpiece, but there’s no baking skill involved beyond one easy cake layer (and you can use a box mix if you’d rather). The real work is practicing patience. The cake comes together in stages with freezer time between them, so the only thing that can trip you up is a warm kitchen and not enough freezer space. Clear a shelf before you start—there’s nothing worse than a half-built ice cream cake and nowhere to put it.
“This was a huge hit. I made both the chocolate cake layer and the hot fudge from the linked recipes as well. It looked like a professionally made cake and tasted even better. It also didn’t melt like other ice-cream cakes I’ve done before, so I appreciate the instructions on that as well.”
Stacy
What Makes This Ice Cream Cake Work
Two things separate a homemade ice cream cake that slices into clean, distinct layers from one that slumps into a melted mess: temperature control and the order of operations. Every layer goes onto a fully frozen base, and the whole thing goes back into the freezer between steps. If you rush it by spreading softened ice cream onto a fudge layer that hasn’t set, or frost a cake that’s started to melt, the layers bleed together.
The other key is the crunch layer in the middle. The fudge isn’t just flavor; it’s the glue that anchors the cake and ice cream layers together and gives you that signature band of chocolate-cookie crunch between the two. That layer is actually the part people like the most in this cake!
The components are worth making from scratch if you have time: my chocolate cake for the base, my hot fudge sauce for the crunch layer, and real whipped cream for the frosting. Store-bought works for all three when you’re short on time. Store-bought ice cream is ideal, and honestly, can be better than homemade!
Key Ingredients
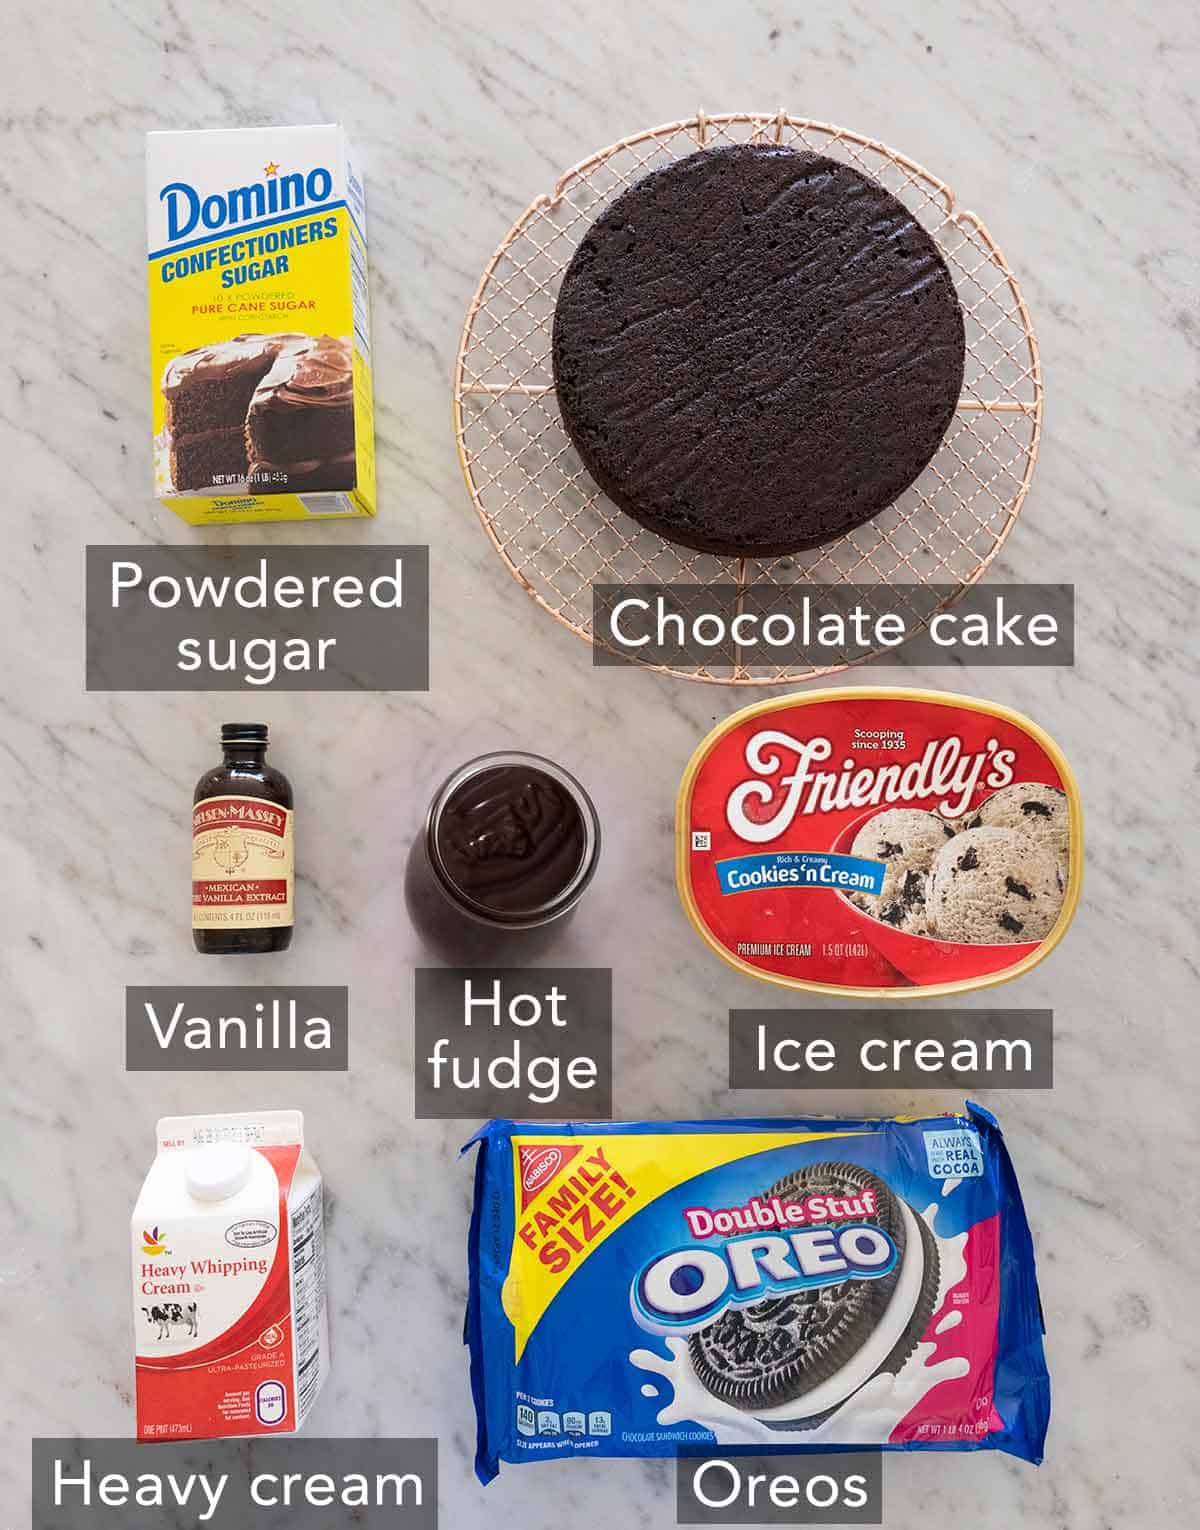
These are the main ingredients you need to make a homemade ice cream cake. You can find the full list of ingredients and measurements in the recipe card below.
Ice cream — use your favorite flavor. I like real dairy ice cream because it softens evenly and refreezes cleanly. You can use a non-dairy alternative, but I would choose something creamy. A sorbet can turn icy and refreeze unevenly. Let the ice cream soften for about 15 minutes so it spreads without melting too much.
Chocolate cake layer — you need one 8-inch layer of my chocolate cake (freeze the extra layers for later) or from a box mix. The cake base is what makes this a true cake-and-ice-cream hybrid rather than a block of layered ice cream. If you choose a different recipe, make sure you use a cake that contains a liquid oil instead of or in addition to butter. Butter turns very hard when frozen, so a butter cake will also be very firm and have a drier texture.
Oreos — roughly chopped for the crunch layer, plus more crushed for decorating the base if you’d like. Chop the cookies into coarse pieces, not fine crumbs (you want texture you can feel). And you do not need to remove the cream filling first!
Hot fudge sauce — make sure it’s at room temperature, not hot. This layer is structural, not just decorative: it sets firm in the freezer and holds the Oreos and ice cream layer in place. If it’s hot, it will melt the ice cream layer when placed on top. Don’t substitute the fudge with chocolate syrup- it’s too thin to set and will bleed into the layers.
Whipped Cream — beat together heavy whipping cream, powdered sugar, and vanilla to make the cake’s frosting. Whipped cream freezes beautifully without cracking, melts at the same rate as the ice cream, and texturally blends into the whole cake, which is why I use it instead of buttercream.
How To Make An Ice Cream Cake
Below, I’ve highlighted portions of the recipe in step-by-step process images along with instructions for how to make your own ice cream cake. You can find the full set of instructions in the recipe card below.
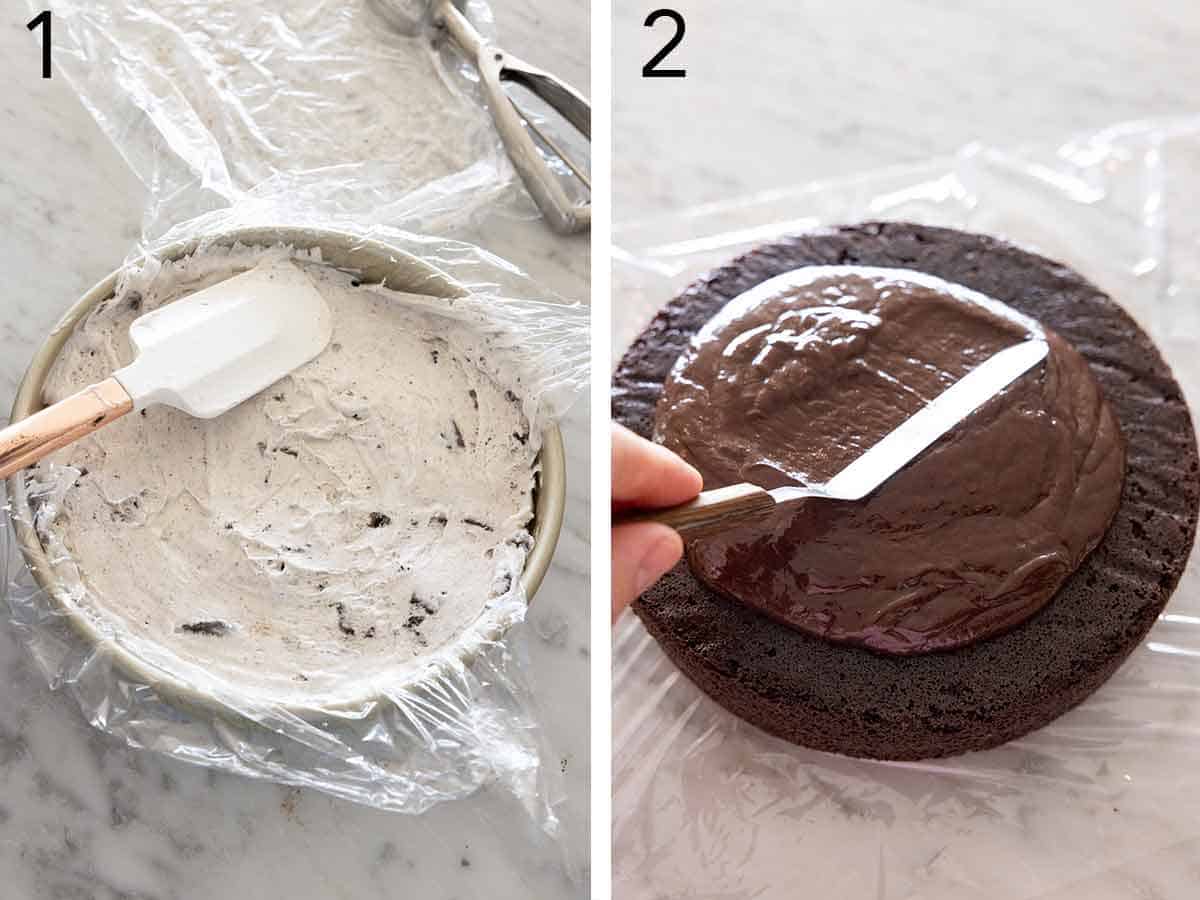
1. Make the ice cream layer. Line an 8-inch pan with plastic wrap and chill it in the freezer for 15 minutes. This will help the ice cream not melt as fast when you go to mold it. Meanwhile, soften the ice cream on the counter for 15 minutes. Scoop the ice cream into the lined pan, cover with more plastic, and press flat. Freeze until very firm, at least 2 hours (this can be done days ahead, too). Now is a good time to bake and cool the cake layer.
2. Add the hot fudge. When you are ready to start assembling, set the cooled chocolate cake layer on a serving plate or cardboard round. Spread the room temperature fudge over the top.
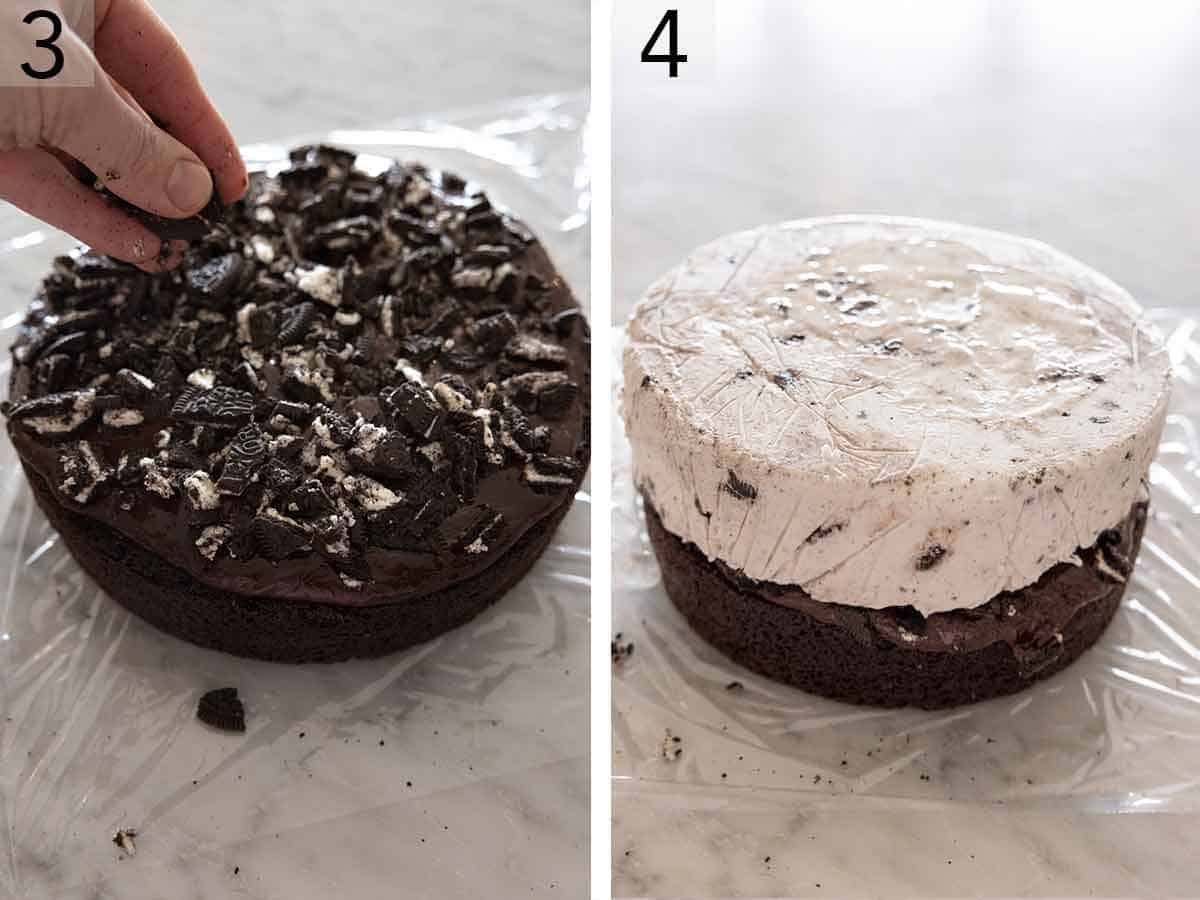
3. Build the crunch layer. Scatter the chopped Oreos across the fudge.
4. Stack the ice cream layer. Unwrap the top plastic from the frozen ice cream, lift it out by the excess wrap, and set it top side down onto the fudge and cookies. Press the layer down gently so it adheres, then press the plastic down around the sides and freeze for at least 1 hour (or wrap well and hold for several days).
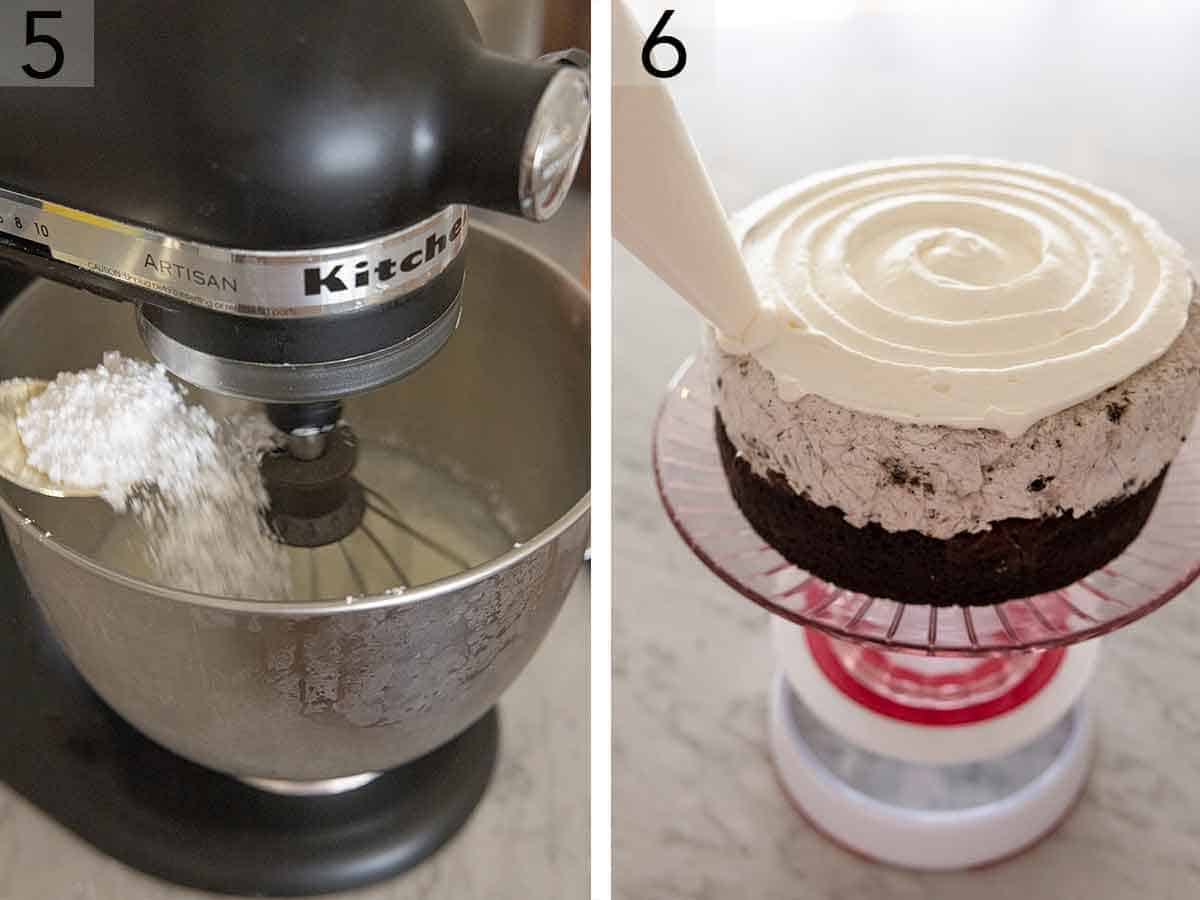
5. Whip the cream. Beat cold cream, powdered sugar, and vanilla on low, rising to high, until very soft peaks form, about 3 minutes, then finish by hand to stiff peaks, stopping before it curdles. I like to finish by hand to prevent accidentally over whipping the cream! Reserve 1 cup in a piping bag fitted with a large closed star tip (Ateco 846) and chill it.
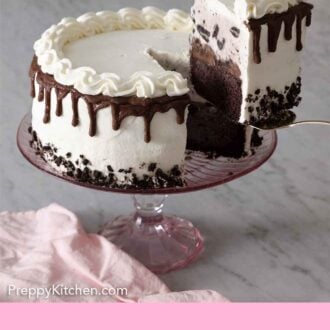
6. Frost. Cover the cake with the remaining whipped cream, smoothing the top and sides, and press crushed cookies around the bottom edge.
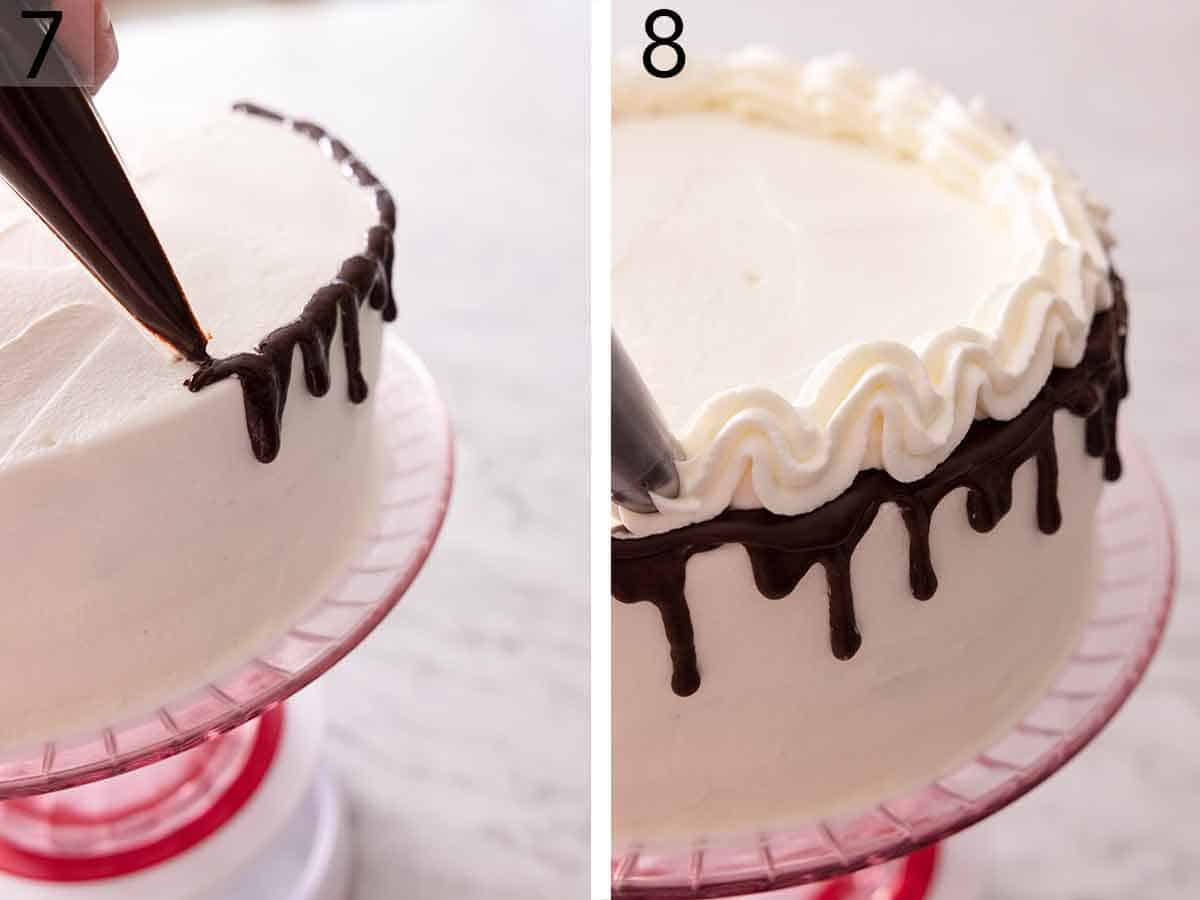
7. For a fudge drip, freeze the cake for 1 hour first so the drip sets cleanly instead of sliding. Warm the fudge enough that it will drizzle, place it in a piping bag with the point snipped off, then pipe it around the edge of the frozen cake.
8. Decorate the cake. Pipe the remaining whipped cream on top in any decorative pattern you like. You can also press crushed cookies or sprinkles to the side of the cake. (If you aren’t adding a fudge drip, you can do these decorations right after frosting it.) Keep the cake frozen until you are ready to serve it.
The Crunch Layer: Why Hot Fudge, Not Syrup
The fudge and Oreo band is the heart of this cake, and it relies on the right ingredient: real hot fudge, not chocolate syrup. Hot fudge is thick enough to set firm in the freezer, which locks the cookies in place, gives you a distinct crunch layer when you slice, and holds the cake and ice cream layers together.
Through recipe testing it both ways, I discovered the chocolate syrup stays loose, bleeds into the cake and ice cream, and never sets. I also found that with syrup, you lose a defined central layer, but the cake and ice cream portions can also slide around. Bring the fudge to room temperature (or warm it just slightly), so it spreads easily, but without melting the ice cream it touches, then freeze before frosting the cake.
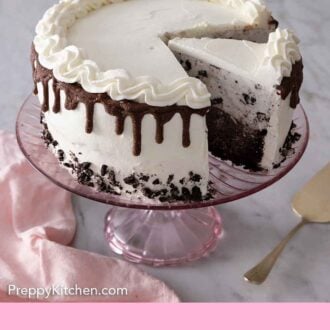
Decorating: Whipped Cream, Drip, and Scallops
Once the cake is frosted and frozen firm, warm a little extra fudge, spoon it into a piping bag, and pipe it around the top edge so it drips down the sides. The cold cake sets the drip almost on contact. Use the reserved whipped cream to pipe a scalloped border around the top, and finish with sprinkles or cherries.
Check out my post about How To Decorate A Cake for more tips on creating a smooth outer frosting and the perfect chocolate drip.
Flavor Combinations to Try
The cake, ice cream, and cookie formula is endlessly swappable, so you can match each component to a theme or preferred flavor profile:
- Vanilla ice cream with funfetti cake and crushed funfetti cookies or Birthday Oreos for a birthday cake.
- Chocolate ice cream with German chocolate cake and chocolate chip cookies for the chocolate lover.
- Rocky road ice cream with chocolate cake and peanut butter cookies. You can replace the hot fudge with a thick caramel sauce or hot caramel topping.
- Mint chocolate chip ice cream with chocolate cake and thin-mint cookies.
- Strawberry ice cream with yellow cake and golden Oreos. The hot fudge can be swapped for fruit jam!
Pro Tips for Making This Recipe
Soften the ice cream just enough. This takes about 15 minutes, not much more. The ice cream should be soft enough to press into an even layer, yet still cold enough not to melt. Press out any air pockets as you go.
Leave extra plastic wrap up the sides of the pan. It’s your handle for lifting the frozen ice cream layer out cleanly. It will also cover the stacked cake when you place it back in the freezer.
Work cold and work in stages. If your kitchen is warm, return the cake to the freezer between every step and as needed. A melting cake will be very hard to decorate or assemble securely. I actually changed this recipe’s method slightly to call for freezing the cake pan before spreading the ice cream in it. After making this cake many times, I found the ice cream melted on the edges where it touched the pan if my kitchen was warm. Freezing the pan first minimizes this because the ice cream hits a very cold surface instead of a room temperature one.
For the crunchiest cookie layer, consider toasting the Oreos first. Tossing the chopped cookies with 2 tablespoons of melted butter and baking them 8-10 minutes at 350°F dries them out so they stay crisp in the freezer instead of softening into the fudge. I don’t mind the softer texture, but this is a good recipe upgrade if you want a crispier cookie layer! Make sure the cookies are fully cooled before assembling.
Ice Cream Cake Recipe
Equipment
- 846 tip
- 1 8 inch cake pan
Ingredients
- 1½ quarts ice cream slightly softened
- 1 8-inch chocolate cake layer
- 14 oreo cookies roughly chopped (160g)
- 1 cup hot fudge sauce room temperature (290g)
- 2 cups heavy whipping cream (480ml)
- 3 tablespoons powdered sugar
- 2 teaspoons vanilla extract
- Optional decorations: ½ cup hot fudge to drip, 1 cup crushed cookies, sprinkles, cherries, etc.
Instructions
Make the Ice Cream Layer:
- Fully line an 8-inch cake pan with plastic wrap. Place the pan in the freezer for 15 minutes. While the pan chills, place your cartons of ice cream on the counter for 15 minutes to slightly soften.
- Use an ice cream scoop to transfer all the ice cream to your lined cake pan. Cover with another layer of plastic then press down into a flat layer. Return the pan to the freeze until the ice cream is very firm again, at least 2 hours. (You can do this stage several days in advance if you’d like! This is also a great time to bake and cool your cake layer.)
Assemble the Layers:
- Once the ice cream layer is very hard, place the cake layer on a serving plate or cardboard round. Cover the top with the fudge sauce then sprinkle the chopped cookies on top.
- Remove the ice cream layer from the freezer. Remove and discard the top layer of plastic wrap. Use the excess from lining the pan to lift the ice cream layer out of the pan. Place it top-side down on top of the cookies and fudge on the chocolate cake. Press the plastic wrap down around the side of the cake, and place in the freezer for at least 1 hour. (You can keep this in the freeze for several days. Tightly wrap it with more plastic wrap or foil, if you do.)
Make the Whipped Cream:
- To a large bowl with an electric mixer or to the bowl of your stand mixer fitted with a whisk attachment, combine cold whipping cream, sugar and vanilla. Start mixing with the mixer on low, gradually increasing the speed to high and mix until very soft peaks form, about 3 minutes. Whisk the rest by hand until the peaks firm up, being sure not to over-whip the cream as it will curdle.
- Reserve 1 cup of the whipped cream and place it in a piping bag fitted with a large closed star tip (Ateco 846). Place it in the fridge.
Decorate the Cake:
- Remove cake from freezer and cover with the remaining whipped cream, smoothing the top and sides. Press crumbled cookies onto the bottom edge. If you want to add a fudge drip, freeze the cake for 1 hour before adding it.
- To pipe a drip of chocolate onto the edge of the cake, warm additional fudge and place it in a piping bag. Pip it around the top edge of the cake, letting some drip down the sides. Using the reserved whipped cream, pipe a scalloped pattern onto the top edge. Add sprinkles or cherries on top if desired.
- You can serve the cake immediately or store the cake in the freezer until ready to slice. If storing for more than a few hours, let it freeze for about an hour to firm up the decorations, then cover it with plastic wrap. Before serving, remove the cake from the freezer and leave it on the counter for about 15 minutes for easier slicing.
Notes
- For the drip, use hot fudge from your jar or homemade, or make a simple ganache by melting 1 cup semisweet chocolate chips with ½ cup heavy cream.
- Temper the cake slightly before cutting. If you let the assembled cake sit out at room temperature for 15 minutes before slicing it, it will make it easier to cut.
- For clean slices, warm the knife. Run hot water over the knife and wipe between slices for clean cuts. The heat helps slice through the hard, frozen ice cream. I use a large chef’s knife or a serrated bread knife for the easiest cut.
- Keep the assembled cake frozen. Whipped cream doesn’t hold up well once thawed after it has been frozen, so return the cake to the freezer after slicing it, if you have leftovers. This will keep all of the components at their ideal texture and prevent the ice cream from melting and pooling out of the cake.
Nutrition
Have you tried this recipe? Tag me today!
Mention @preppykitchen and tag #preppykitchen!
Make-Ahead, Storing, and Slicing
This is a make-ahead dessert by design! The ice cream layer, baked cake layer, or the assembled cake can all live in the freezer for several days to weeks (wrap tightly in plastic and foil once the decorations are set firm, about an hour). Keep the finished cake frozen until serving.
To slice cleanly, pull it out and let it sit on the counter for about 15 minutes or in the fridge for 30 minutes so the ice cream softens just enough to cut through without shattering the layers, and run your knife under hot water and wipe it between cuts. Don’t let it sit out for too long, or it’ll melt; the freezer is its home!
Frequently Asked Questions
Yes! For an all-ice-cream cake (the classic Dairy Queen style), skip the chocolate cake and use two ice cream layers with the fudge and Oreo crunch layer between them. I like the real cake base for structure and contrast, but it’s your call. I recommend freezing whatever plate you plan to assemble your cake on, so that the cotton ice cream layer doesn’t immediately melt and slide off.
Any of your favorite ice cream flavors work, and mixing two is even more fun. Match the ice cream to the cake and cookie. To use two flavors, alternate scoops when adding the ice cream to the pan, or spread two thinner layers on top of each other.
The cake was assembled too warm. Make sure the cake is fully cooled and the hot fudge layer isn’t hot. Otherwise, the ice cream will melt. Work cold and don’t rush the stages!
More Frozen Desserts to Try
Try more freezer-friendly dessert recipes:
- Ice Cream Sandwiches — Soft, chewy cookies sandwiching a slab of ice cream, dressed up for summer.
- Baked Alaska — Cake and ice cream sealed in toasted meringue, the dramatic dinner-party finale.
- Vanilla Ice Cream — vanilla custard base that freezes into a creamy, scoopable ice cream.
- Chocolate Ice Cream — a rich chocolate ice cream that works great as the ice cream layer in this ice cream cake recipe.
- Hot Fudge Sundae — an easy treat using scoops of your favorite ice cream flavor, hot fudge, and whipped cream.
If you’ve tried this ice cream cake recipe, then don’t forget to rate it and let me know how you got on in the comments below. I love hearing from you!


