
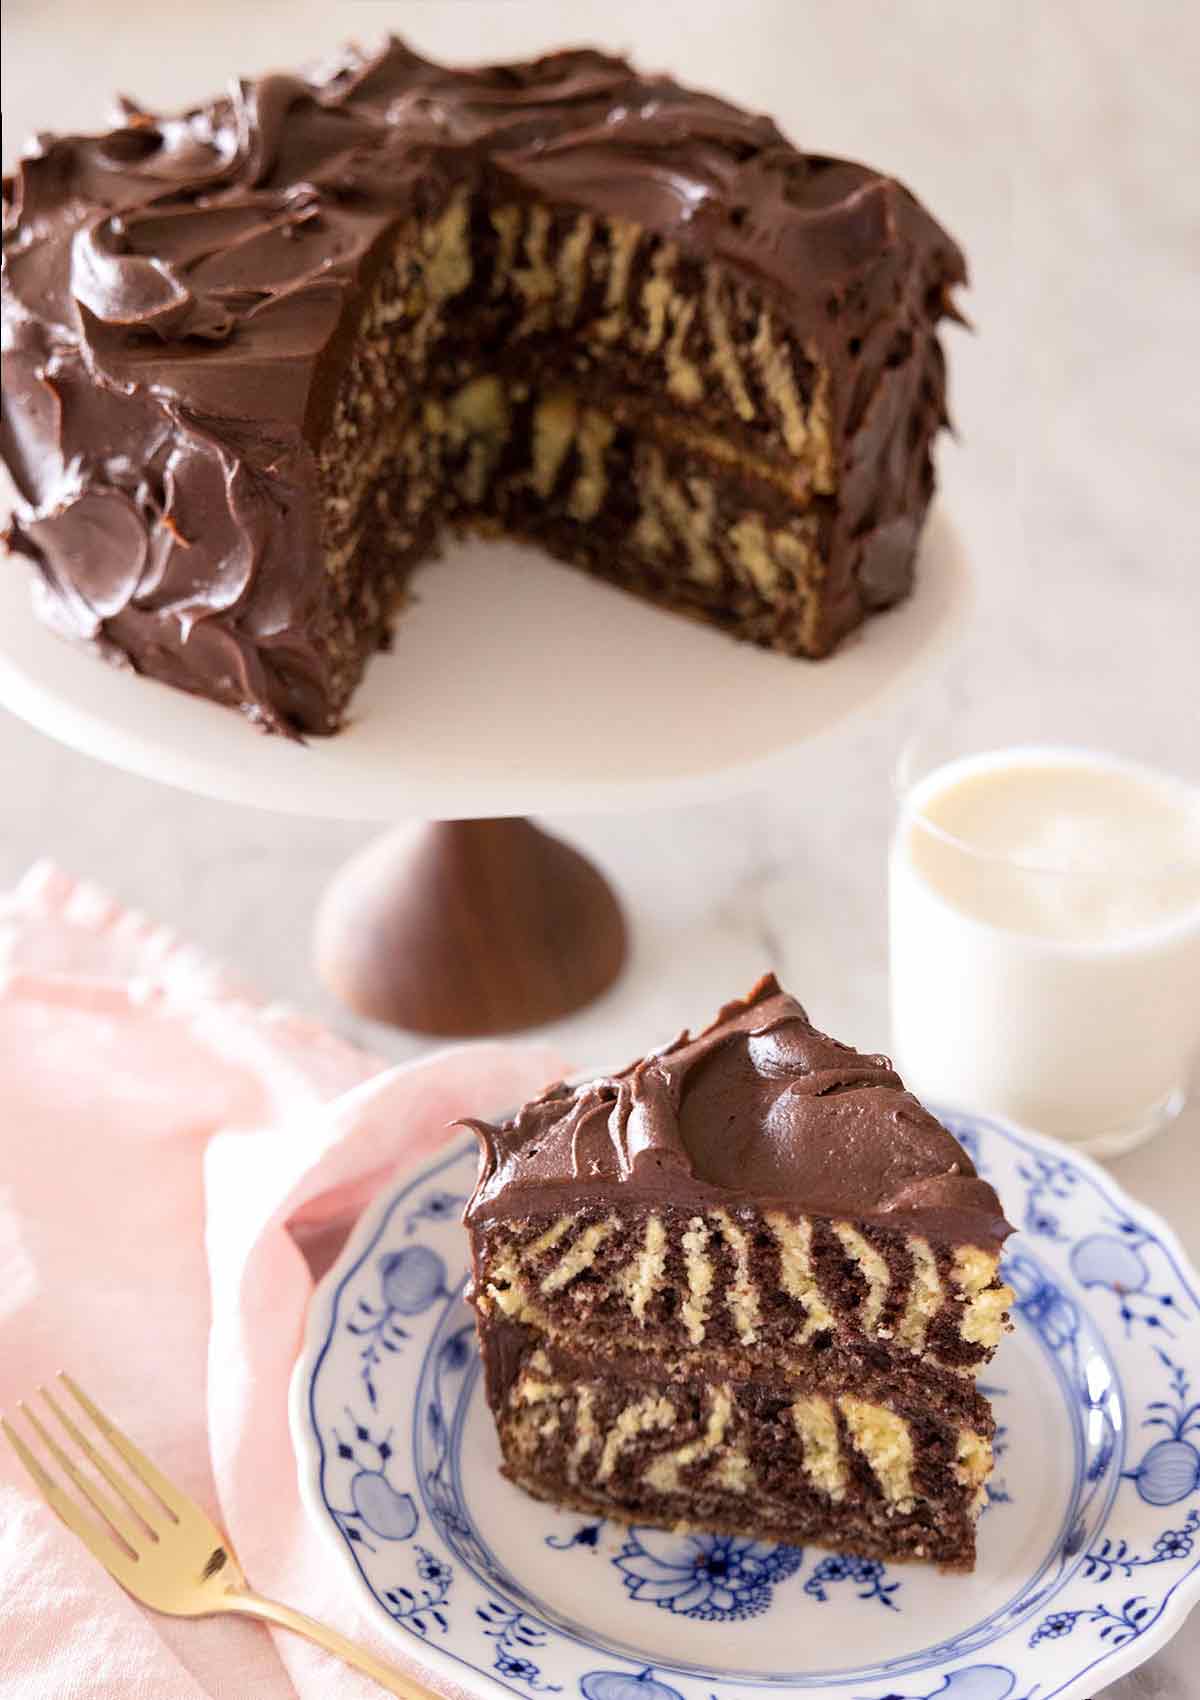
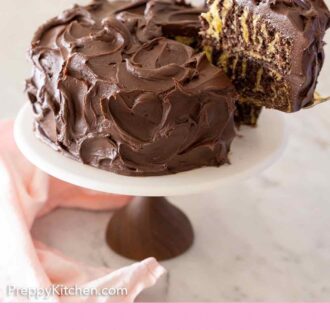
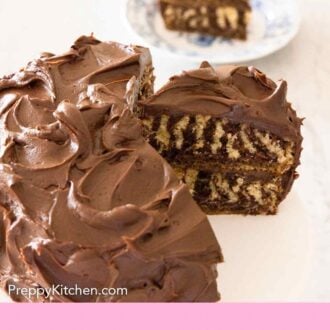
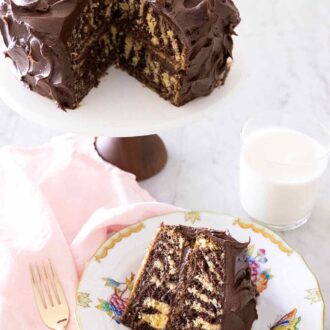
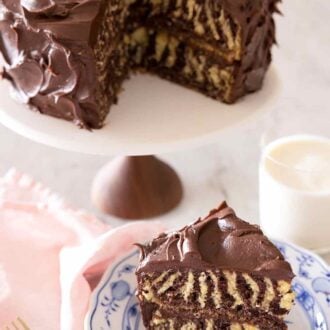
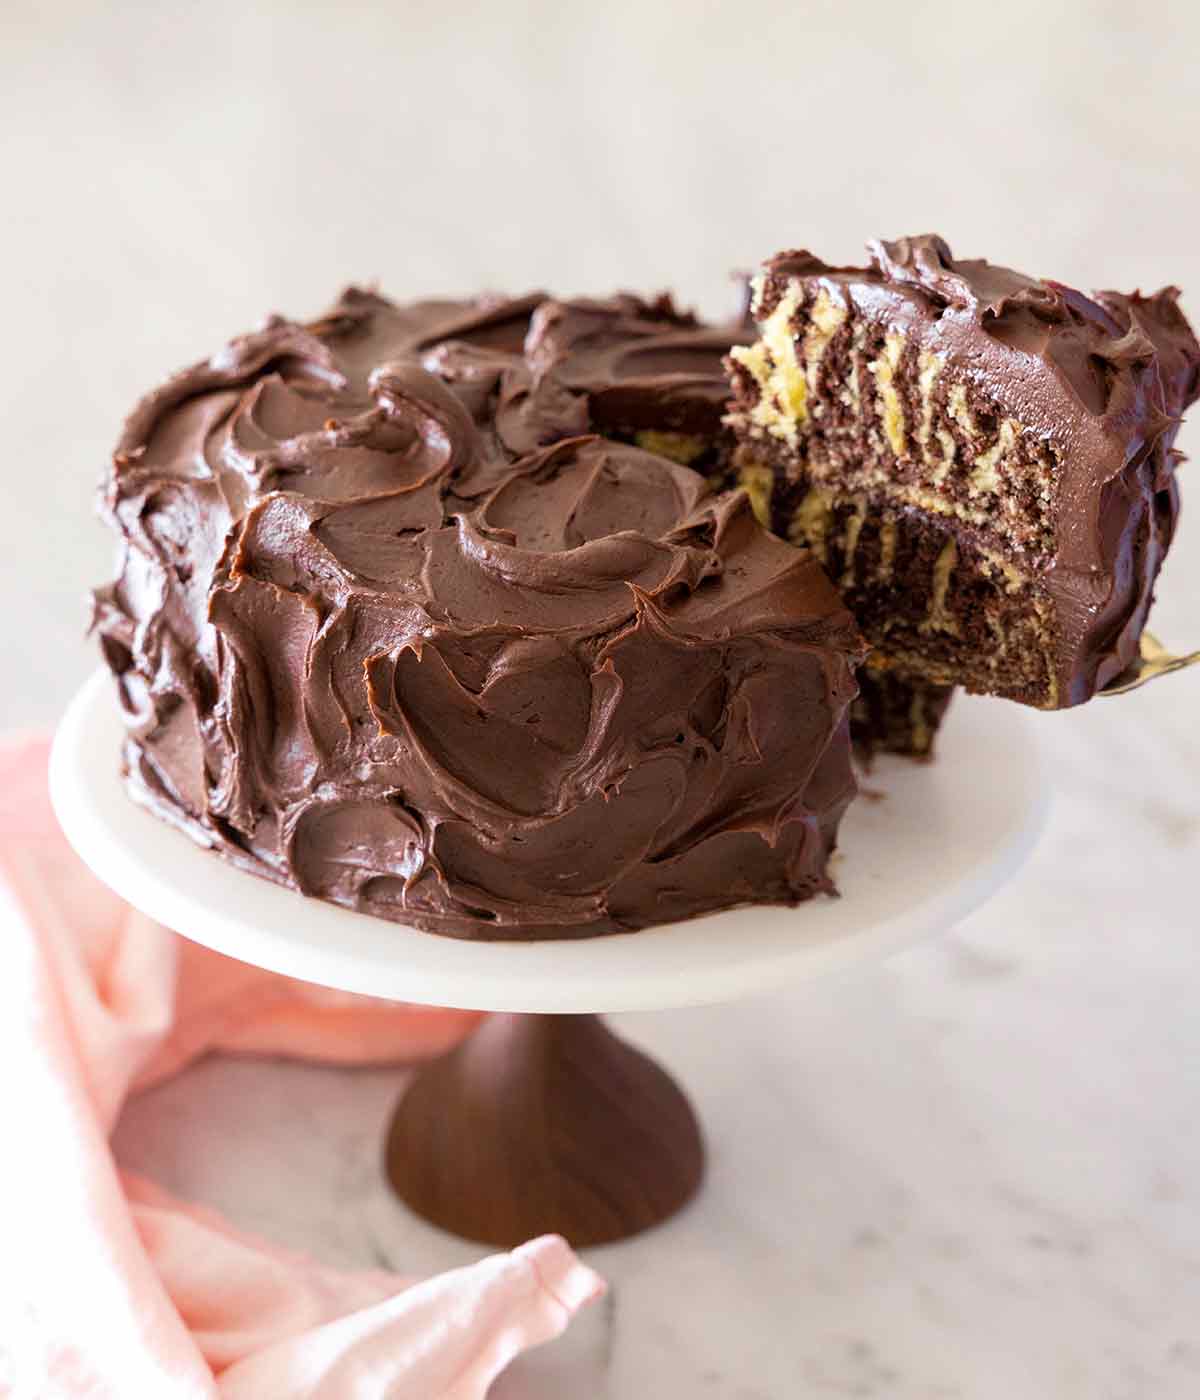
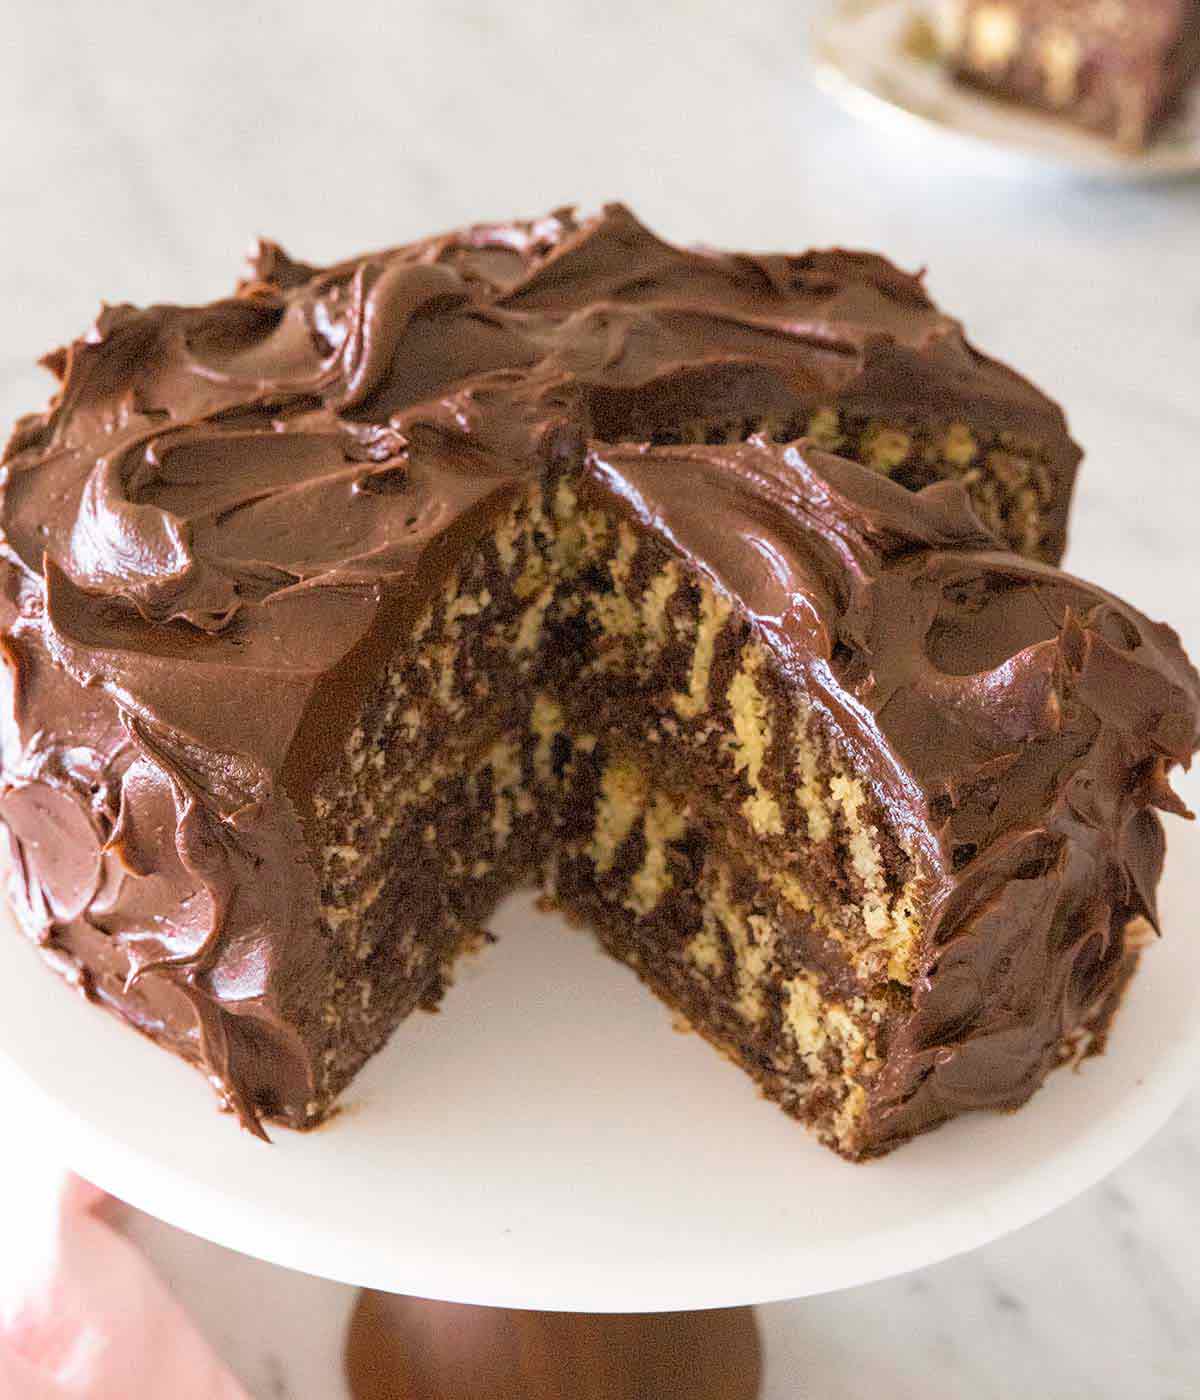
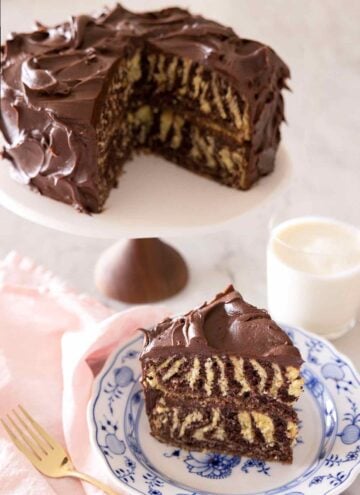
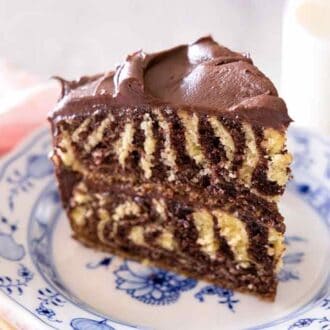
If you want to make an impressive and show-stopping birthday cake for your kids, then you’ve got to try this zebra cake! Despite how complicated it may look, this cake is made from only one batter and is surprisingly easy to make. The zebra stripe effect is made by adding spoonfuls of batter to a cake pan, alternating between the chocolate and vanilla batter.
This zebra cake is similar to my Marble Cake, but there’s no swirling needed. There’s nothing overly technical here, and my step-by-step photos down below will make it super easy. See my full recipe tutorial below with my tips and notes to help you replicate this at home!
WHAT YOU NEED TO MAKE THIS RECIPE
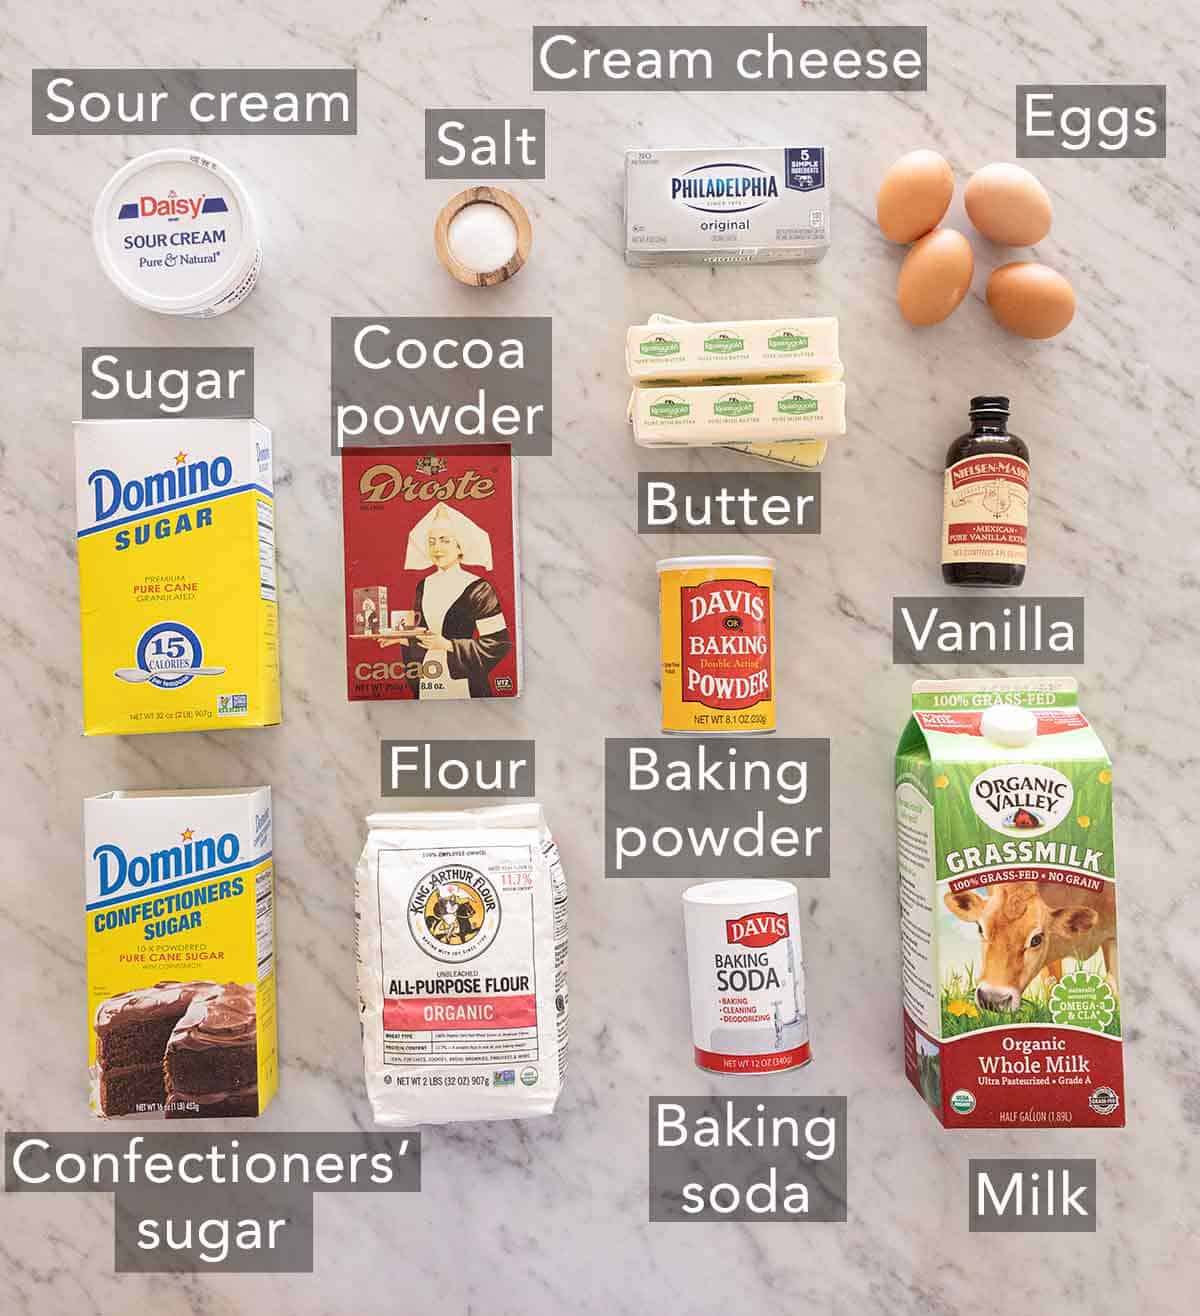
Butter — as the butter is for both the cake and frosting, be sure to use unsalted butter. There isn’t a consistent amount of salt between different butter brands, so it’s best to add salt as needed instead of relying on salted butter. Be sure to set out the butter beforehand, as it needs to be at room temperature so you can cream it easily. To tell that the butter has reached room temperature, you should be able to leave a dent in the butter when you press down with your finger.
Sour cream — the sour cream gives the zebra cake a tender and moist crumb. If you don’t have sour cream, you can make your own by following my post on How to Make Sour Cream.
Cream cheese — to make the chocolate frosting, be sure to purchase a block of cream cheese and not the spreadable cream cheese sold in a tub. I recommend using full-fat cream cheese for the best frosting.
HOW TO MAKE ZEBRA CAKE
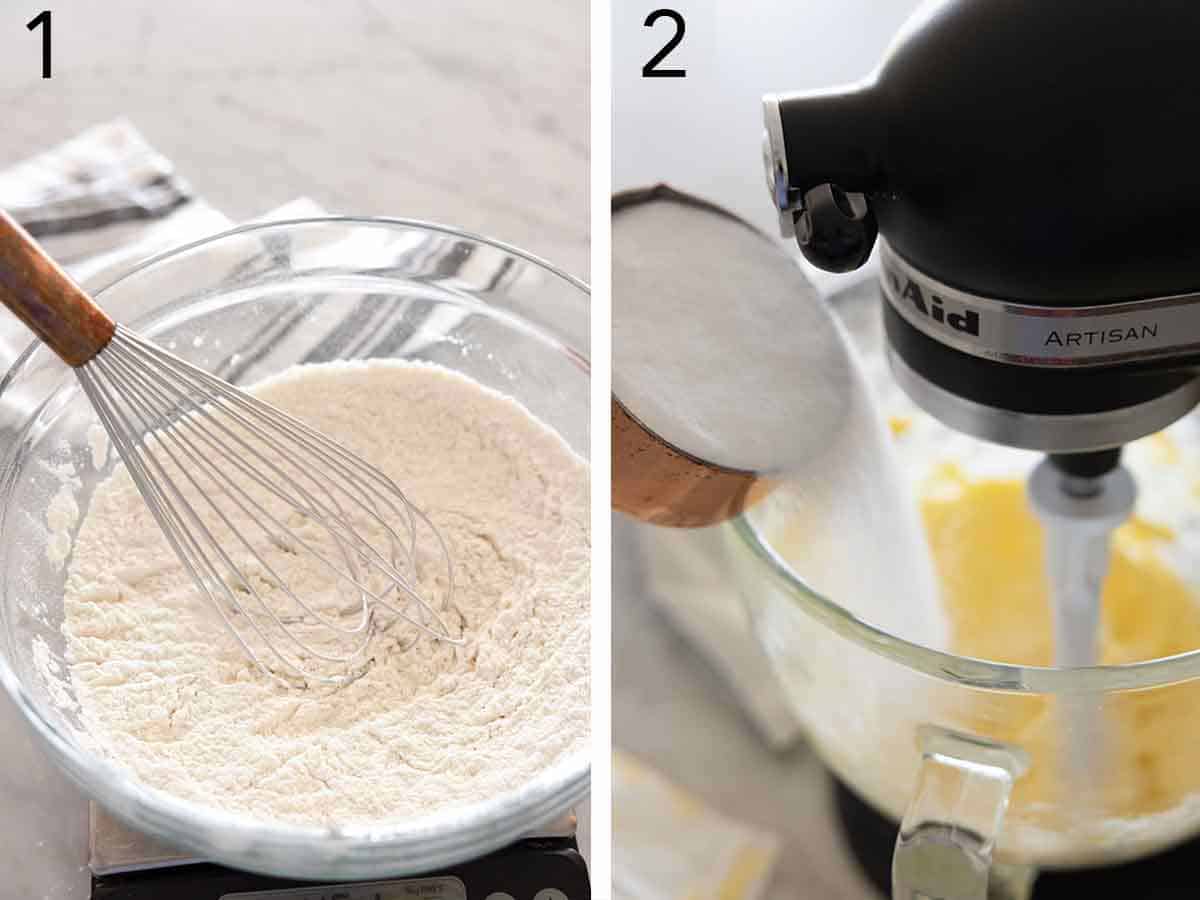
1. In a large bowl, whisk together flour, baking powder, salt, and baking soda.
2. In the bowl of a stand mixer, beat the butter on medium speed until creamy. Add the sugar and beat until light and fluffy.
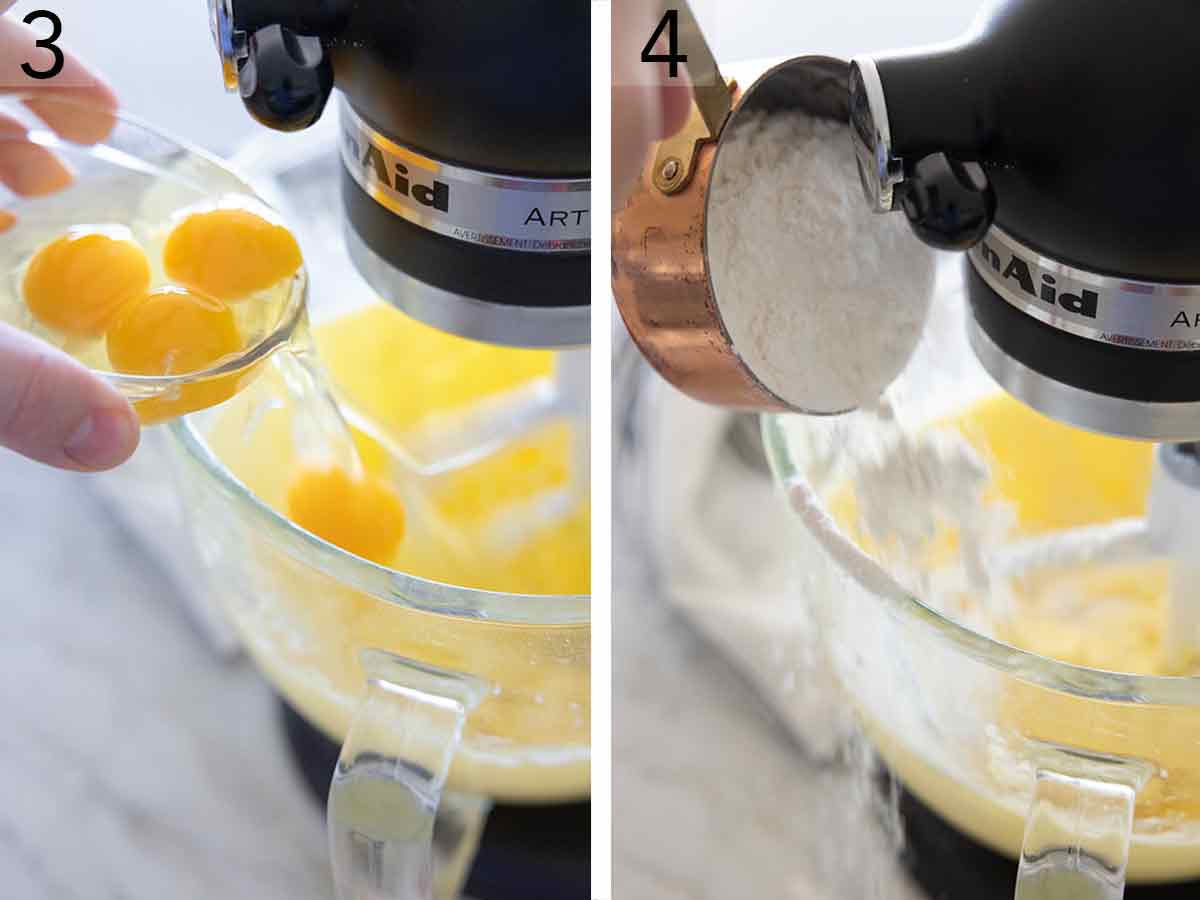
3. Add the eggs, one at a time, beating until well combined before adding the next.
4. With the mixer on low, add one-third of the flour mixture. Alternate with half of the liquid mixture made by combining the milk, sour cream, and vanilla. Continue alternating the wet and dry ingredients.
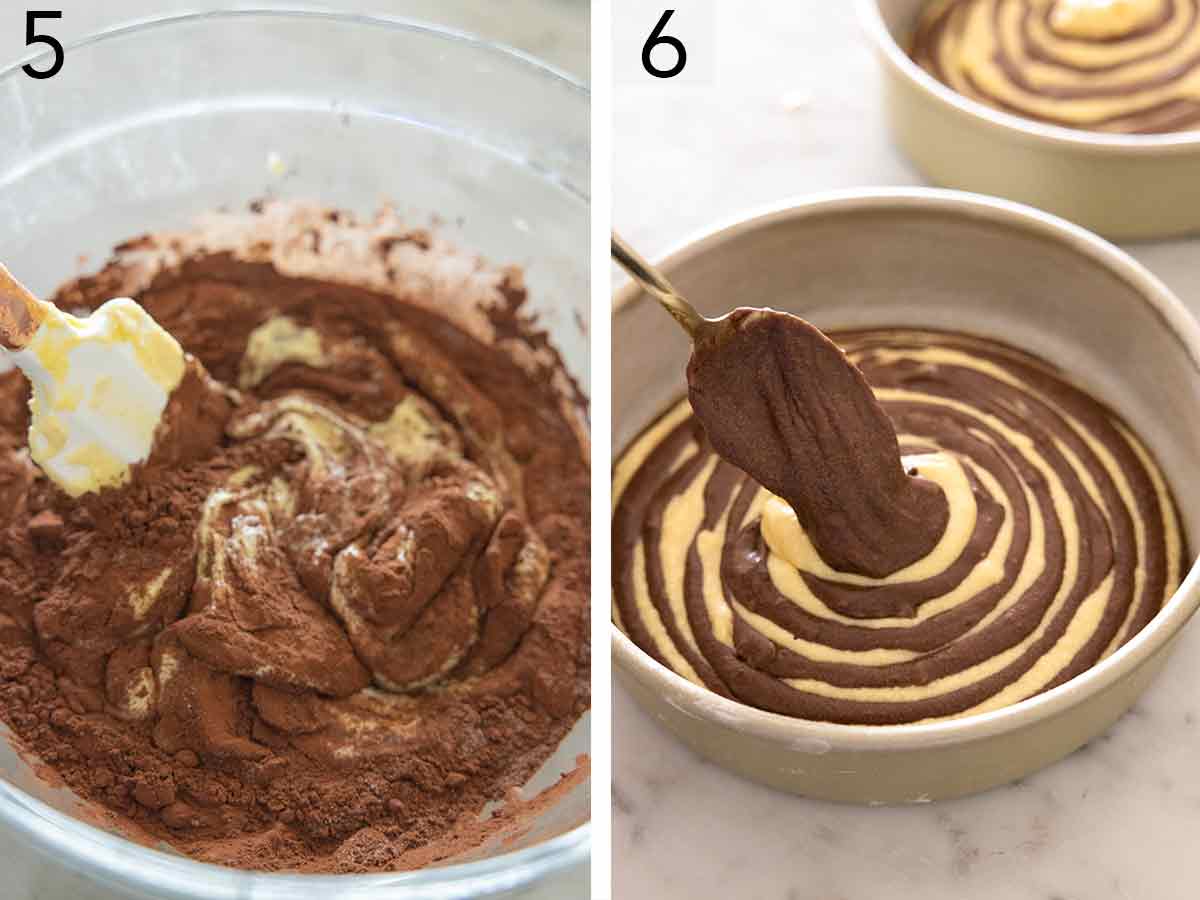
5. Place 2 ½ cups of batter in a large bowl, then add the cocoa powder, milk, and sugar. Mix just until combined to make the chocolate layer.
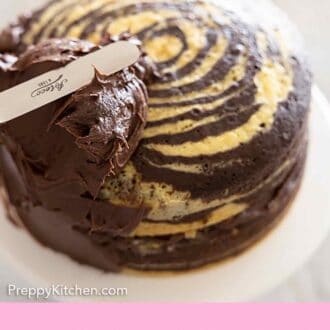
6. To make the zebra cake stripes, alternate between adding large spoonfuls of vanilla batter and chocolate batter to the center of each prepared 8-inch cake pans.
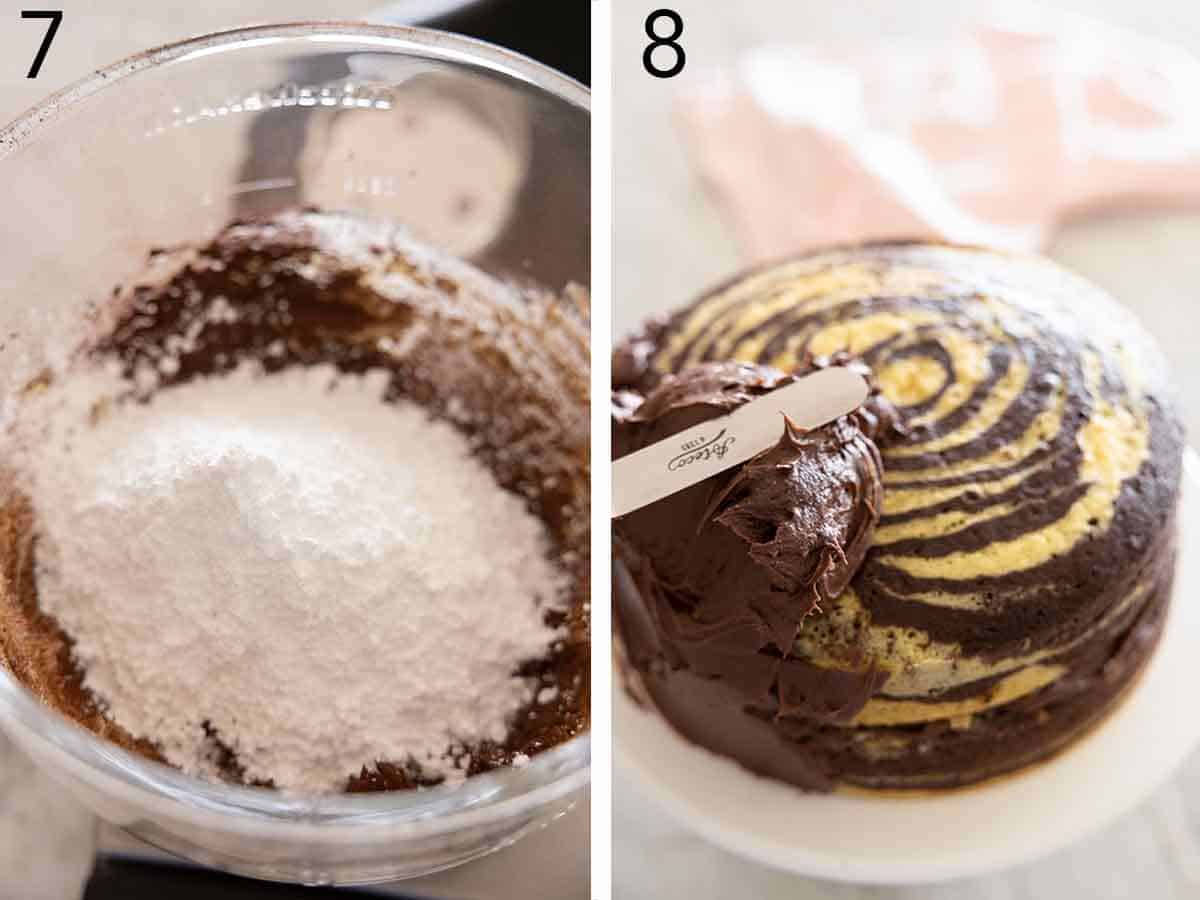
7. Make the chocolate frosting by beating the butter, cream cheese, and salt on medium speed until smooth and creamy. Then sift the powdered sugar and cocoa powder into the bowl, add the vanilla, and beat until light and fluffy.
8. If you didn’t use my method for how to get flat cake layers, then trim the tops of the cakes to create level layers, if needed. Spread about ½ cup frosting over the top before placing the other cake layer on top. Spread the remaining frosting all over the top and sides of the cake. Chill for at least 1 hour or until ready to serve.
PRO TIPS FOR MAKING THIS RECIPE
- Baking soda and baking powder play a crucial role in the cake rising, so make sure they have not expired before using them.
- I prefer using high-quality Dutch-processed cocoa powder. Dutch-processed cocoa powder is darker and less acidic compared to regular cocoa powder.
- When measuring the all-purpose flour, I recommend using a scale for the most accurate measurements. However, if you don’t have one, make sure to fluff the flour first and then spoon it into your measuring cup. Level off the cup with the back of a knife to ensure you don’t overpack the flour.
- The eggs should be at room temperature to ensure they evenly incorporate into your batter without accidentally overmixing. It’s also why we add them one at a time to the batter. If you forgot to bring out your eggs, you could quickly bring them to room temperature by placing the eggs in a large bowl and covering them with warm tap water for 5 minutes.
- I usually recommend tapping the cake pans on your counter to pop any air bubbles.
- If you want to add a pop of color to the vanilla layer, you can use gel food coloring. Gel food coloring is more concentrated and doesn’t add additional liquid to the batter.
FREQUENTLY ASKED QUESTIONS
Can I make this ahead of time? How do I store leftovers?
Yes, you can make this zebra cake ahead of time. You can store it, frosted, covered at room temperature for up to two days. If you would like to keep the cake fresh for longer, store it in the fridge. Allow the cake to come back to room temperature before serving.
Can this be frozen?
If you’d like to make this zebra cake ahead of time to freeze, you can leave it unfrosted and freeze the layers for up to three months. I recommend wrapping the cake layers in plastic wrap and then aluminum foil before freezing. When ready to enjoy, thaw the layers overnight in the fridge. Then, bring the cake layers to room temperature before frosting. You can freeze the frosted zebra cake or individual slices for up to 2 months. When ready to enjoy, thaw overnight in the refrigerator and then bring to room temperature before serving.
Can I use a different frosting?
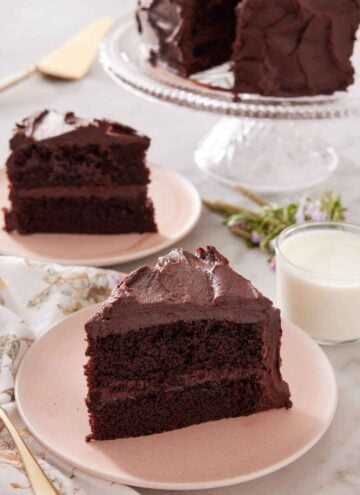
If you’re not a fan of cream cheese frosting, you can change it up by using my Vanilla Buttercream Frosting, Chocolate Buttercream Frosting, Strawberry Buttercream, or Swiss Meringue Buttercream. You can even frost the cake with both chocolate and vanilla frosting similar to my Neapolitan Cake.
If you love this recipe try these out!

If you’ve tried this Zebra Cake recipe, then don’t forget to rate the recipe and let me know how you got on in the comments below, I love hearing from you!
Zebra Cake
Video
Equipment
- 8 inch cake pans
- Mixer
Ingredients
For the Vanilla Cake Batter:
- 2¾ cup all-purpose flour (330g)
- 1¼ tsp baking powder
- ½ tsp kosher salt
- ¼ tsp baking soda
- 1 cup unsalted butter room temperature (227g)
- 1½ cups granulated sugar (300g)
- 4 large eggs room temperature
- 1 cup whole milk room temperature (240mL)
- ⅓ cup sour cream (80g)
- 1 tbsp vanilla extract
For the Chocolate batter:
- ¼ cup unsweetened natural or Dutch-processed cocoa powder (25g)
- 2 tbsp whole milk room temperature
- 1 tbsp granulated sugar
For the Chocolate Frosting:
- ¾ cup unsalted butter room temperature (170g)
- 8 ounces 1 block cream cheese room temperature (225g)
- ⅛ tsp kosher salt
- 2¾ cups confectioners’ sugar (330g)
- ½ cup unsweetened natural or Dutch-processed cocoa powder (50g)
- 1 tsp vanilla extract
Instructions
- Preheat the oven to 350F. Butter and flour 2 (8-inch) cake pans.
For the Vanilla Cake Batter:
- In a large bowl, whisk together flour, baking powder, salt, and baking soda.
- In a large mixing bowl or the bowl of a stand mixer fitted with the paddle attachment, beat butter on medium speed until creamy. Add the sugar and beat until light and fluffy, about 3 minutes. Add the eggs, one at a time, beating until well combined before adding the next.
- In a large liquid measuring cup, whisk together the milk, sour cream, and vanilla.
- With the mixer on low, add one-third of the flour mixture. Alternate with half of the milk mixture, and continue alternating with the remaining flour and milk mixture.
For the Chocolate Batter:
- Place 2 1/2 cups of batter in a large bowl. Add the cocoa powder, milk, and sugar. Mix just until combined.
- To Make the Layers:
- Place a large spoonful of vanilla batter in the center of each cake pan. Place a large spoonful of chocolate batter in the center of the vanilla batter. Continue alternating spoonfuls of batter until all of the batters are used. Gently tap the pans on the counter to spread the batter to the edges of the pans, if needed.
- Bake for 30 to 35 minutes, or until a wooden pick inserted into the center comes out with a few moist crumbs. Let the cakes cool in the pan for 20 minutes. Carefully remove and cool completely on a wire rack.
For the Chocolate Frosting:
- In a large mixing bowl or the bowl of a stand mixer fitted with the paddle attachment, beat butter, cream cheese, and salt on medium speed until smooth and creamy, about 1 minute.
- Sift the powdered sugar and cocoa powder into the bowl. Add the vanilla. Beat on low speed just until combined. Increase speed to medium and beat until light and fluffy, about 2 minutes.
For the Assembly:
- Trim the tops of the cakes to create level layers, if needed. Place one cake layer on a cake stand or plate. Spread about ½ cup frosting over the top. Place the other cake layer on top. Spread the remaining frosting all over the top and sides of the cake. Make swoops with a spoon or offset spatula, or decorate as desired. Chill for at least 1 hour or until ready to serve.
Notes
- Baking soda and baking powder play a crucial role in the cake rising, so make sure they have not expired before using them.
- I prefer using high-quality Dutch-processed cocoa powder. Dutch-processed cocoa powder is darker and less acidic compared to regular cocoa powder.
- When measuring the cake flour, I recommend using a scale for the most accurate measurements. However, if you don’t have one, make sure to fluff the flour first and then spoon it into your measuring cup. Level off the cup with the back of a knife to ensure you don’t overpack the flour.
- The eggs should be at room temperature to ensure they evenly incorporate into your batter without accidentally overmixing. It’s also why we add them one at a time to the batter. If you forgot to bring out your eggs, you could quickly bring them to room temperature by placing the eggs in a large bowl and covering them with warm tap water for 5 minutes.
- I usually recommend tapping the cake pans to pop air bubbles, I suggest doing so very gently as you don’t want to jostle the layers too much.
- If you want to add a pop of color to the vanilla layer, you can use gel food coloring. Gel food coloring is more concentrated and doesn’t add additional liquid to the batter.
Susie says
Can I make a zebra cake out of your white cake recipe but instead of chocolate would it work making it with raspberry cake to alternate with the white cake batter? And if it would work, do you have a raspberry cake recipe that might work? Thanks
Sarah Ward (Executive Editor, Preppy Kitchen) says
You can certainly use this same batter layering technique for other flavors! We don’t have a raspberry cake recipe, but we have a strawberry cake that you could make with raspberries instead. https://preppykitchen.com/strawberry-cake/