
This post may contain affiliate links. Please read our disclosure policy.
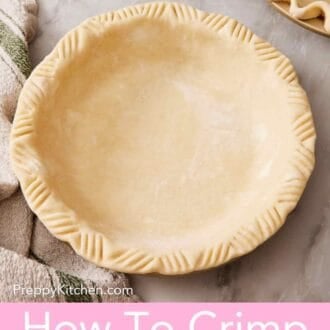
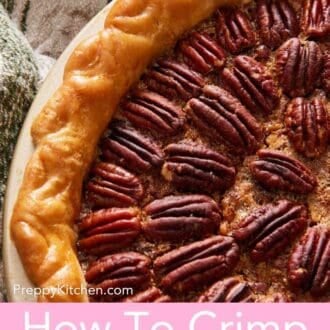
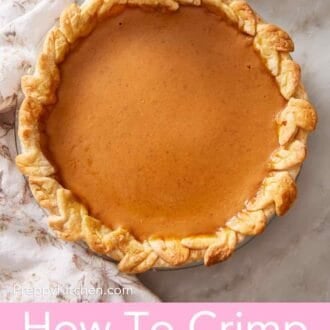
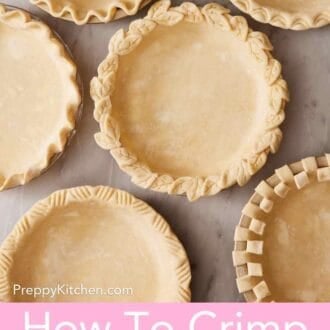
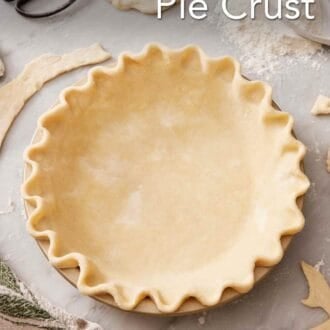
A crimped pie crust edge is the finishing detail that makes a homemade pie look intentional. This guide covers five techniques: fluted, fork, rope, spoon-scalloped, and decorative cutouts. Plus, the cold-dough method that keeps your crimp sharp through baking, and exactly why crimps disappear in the oven (and how to prevent it).
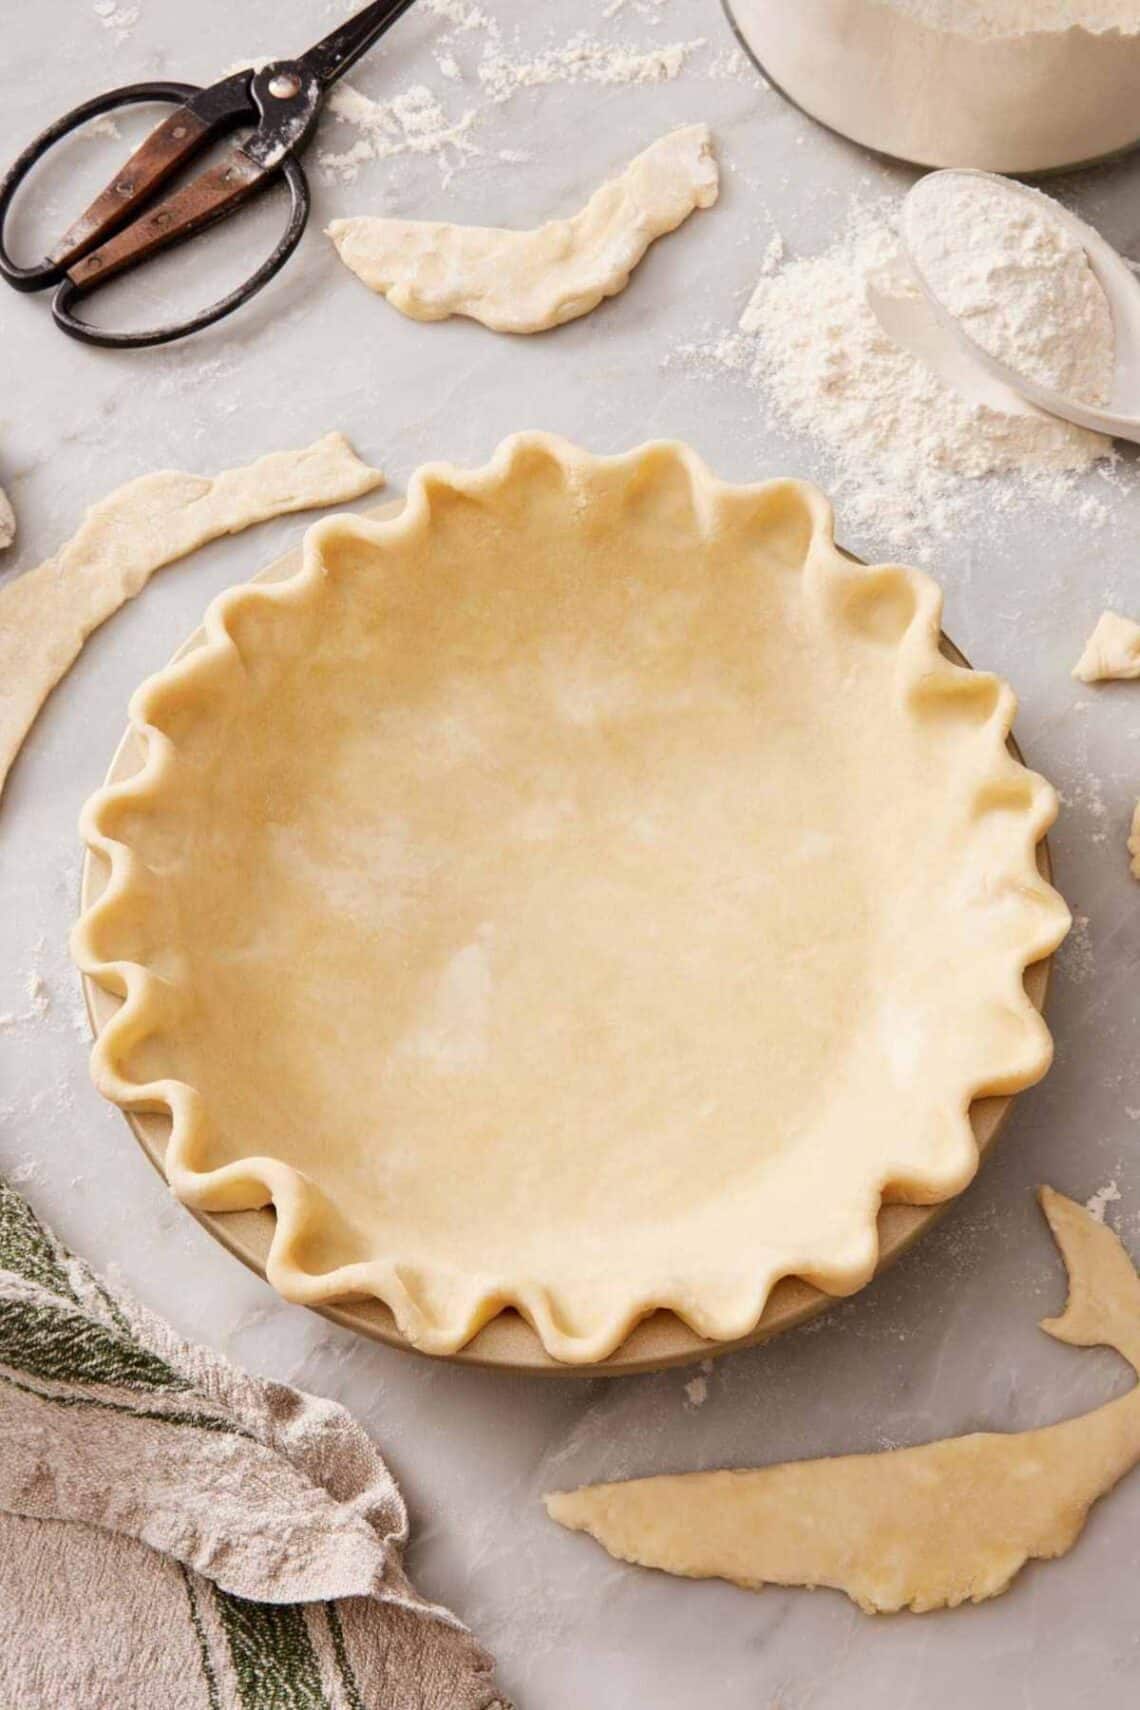
A crimped pie crust does two things at once. It makes the pie look like a pie: that scalloped or rope or pressed edge is what separates a finished pastry from a flat sheet of dough draped over a filling. And it has a real functional purpose. A crimped edge is thicker than the rest of the crust, which protects it from over-browning during baking and creates a tighter seal between top and bottom crusts on double-crust fruit pies. Crimping is one of those small steps that punches well above its weight in finished-pie quality.
In this lesson, I’ll cover five distinct crimping techniques, how to prep your crust before crimping, the cold-dough rule that keeps your crimp sharp, why crimps sometimes disappear during baking, and a six-category framework for which crimp is best for which pie style. By the end, you’ll be able to finish any pie with the edge you want, confidently, in just minutes.
“Reading about the cold dough test changed pie baking for me! I would crimp my crusts, but the design would just disappear in the oven. When I made pecan pie for Thanksgiving, I froze the crust before baking, and my crimp stayed! The pie was gorgeous and made the perfect centerpiece for our table.”
Taylor
Why Do You Crimp Pie Crust?
Crimping pie dough is both decorative and functional, but many home bakers underestimate the functional half.
The decorative reason: A crimped edge is what makes a pie look like a pie. A fluted, scalloped, or decorative pattern transforms a flat circle of dough into something visually finished—even a slightly imperfect crimp reads as “homemade with care.”
The functional reason: A crimped edge is thicker than the rest of the crust. That extra thickness does three things:
- Protects the edge from burning. The rim of a pie is the part of the crust most exposed to the oven heat. A thin edge will burn before the center finishes baking. A thicker, crimped edge bakes more slowly and browns evenly.
- Seals the top and bottom crusts. On double-crust pies (like apple pie and peach pie), the crimp is what holds the two crusts together as the filling bubbles during baking. Without a proper crimp, the seal can open up, and the filling can leak out the side.
- Creates a barrier for fillings. A well-crimped edge gives the filling somewhere to bubble against rather than spilling over the rim. (Yes, some filling can still bubble over on fruit pies, but without the crimped edge serving as a dam, it would be much more.)
The decorative reason is the one most bakers think about. The functional reasons are why you’d crimp even if you don’t care how the pie looks.
Preparing Your Crust For Crimping
If you’re working from my classic homemade pie crust or any reliable flaky pie crust recipe, the prep steps are:
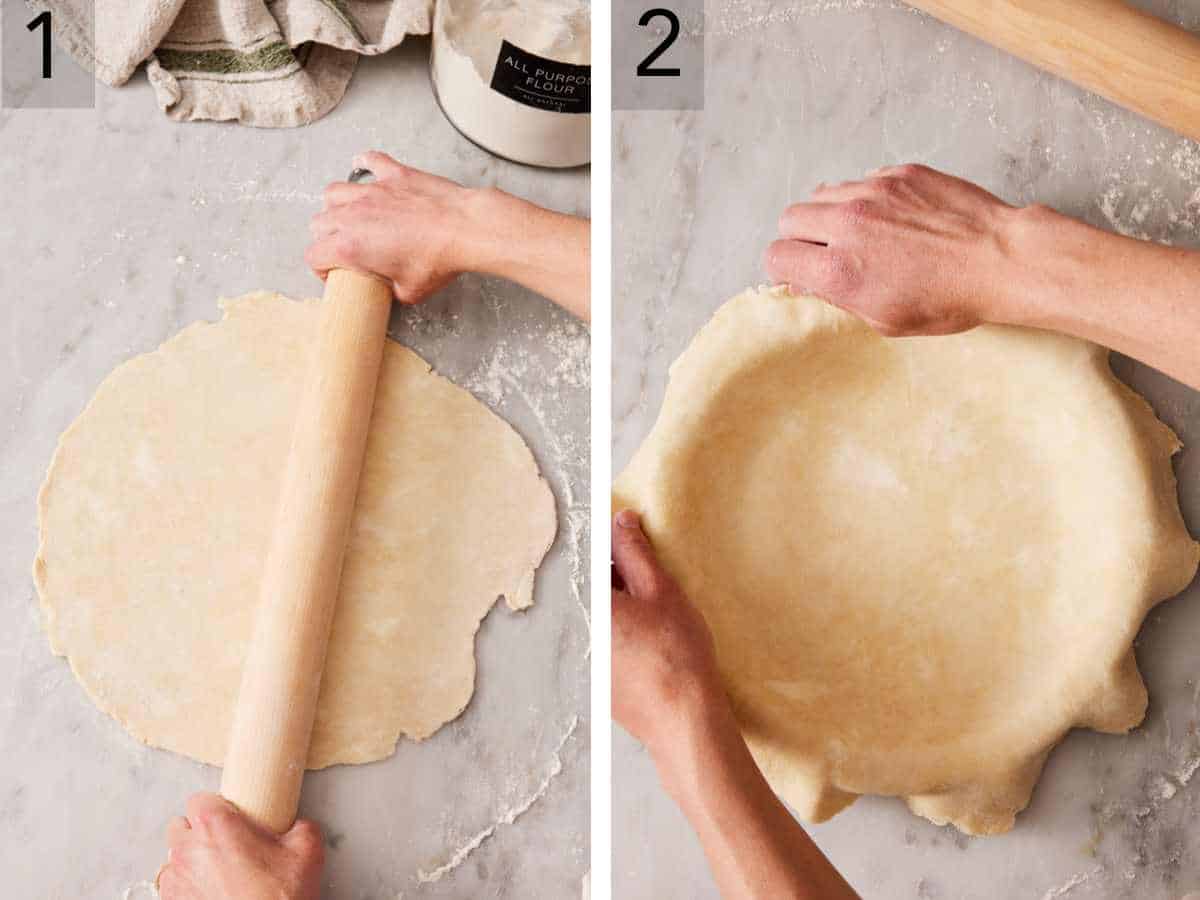
1. Roll the dough into a 12- to 14-inch circle, about ⅛-inch thick. Be sure to flour your counter lightly, and rotate the pie dough frequently to keep it from sticking.
2. Press it into a 9-inch pie pan, with the excess hanging over the edge. Make sure there aren’t any gaps between the crust and the pan, or the crust can shrink while baking.
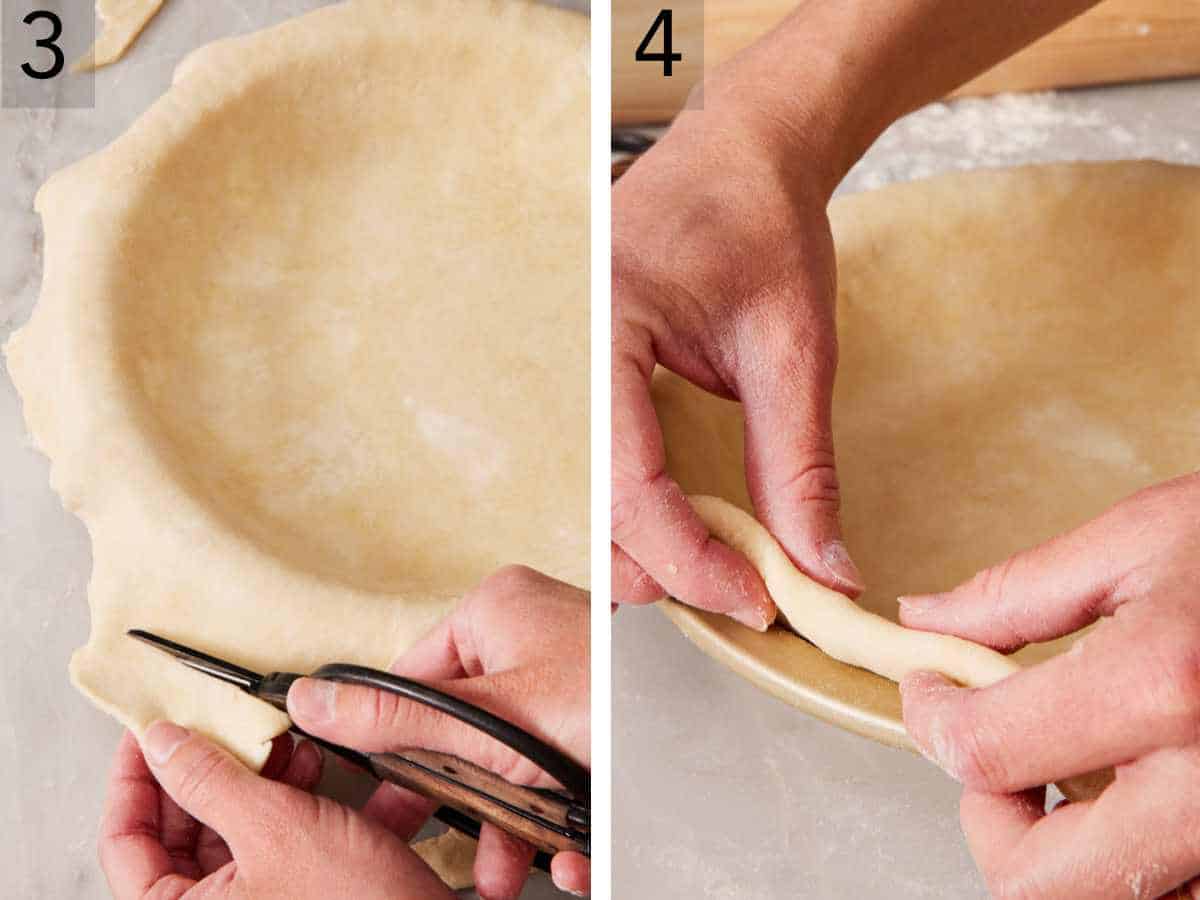
3. Trim the overhang to 1 inch beyond the edge of the pan. This is the dimension that matters for crimping. Too little overhang and you can’t fold and crimp, and your crust can shrink. Too much and the crimp gets bulky and uneven.
4. Tuck the excess under itself. Fold the 1-inch overhang under itself and tuck it into the pie pan, so you have a double-thickness rim resting on the lip of the pie pan. (Do not press it to the outside of the pie pan! This will seal your crust to the pan and make it impossible to slice.) This double rim is what holds your crimp shape during baking and helps prevent burning.
For double-crust pies: Trim and tuck the edges AFTER adding the filling and the top crust. The bottom crust gets fitted into the pan first, the top crust goes on once the filling is in place, then both layers are trimmed and tucked together. The same goes for when you are latticing a pie.
Five Different Ways To Crimp Pie Dough
There are so many creative ways to crimp pie dough! These five simple ways cover most of what home bakers actually use, and they are beautiful options. Plus, you can mix them—a fluted edge with a fork-crimp accent, for example.
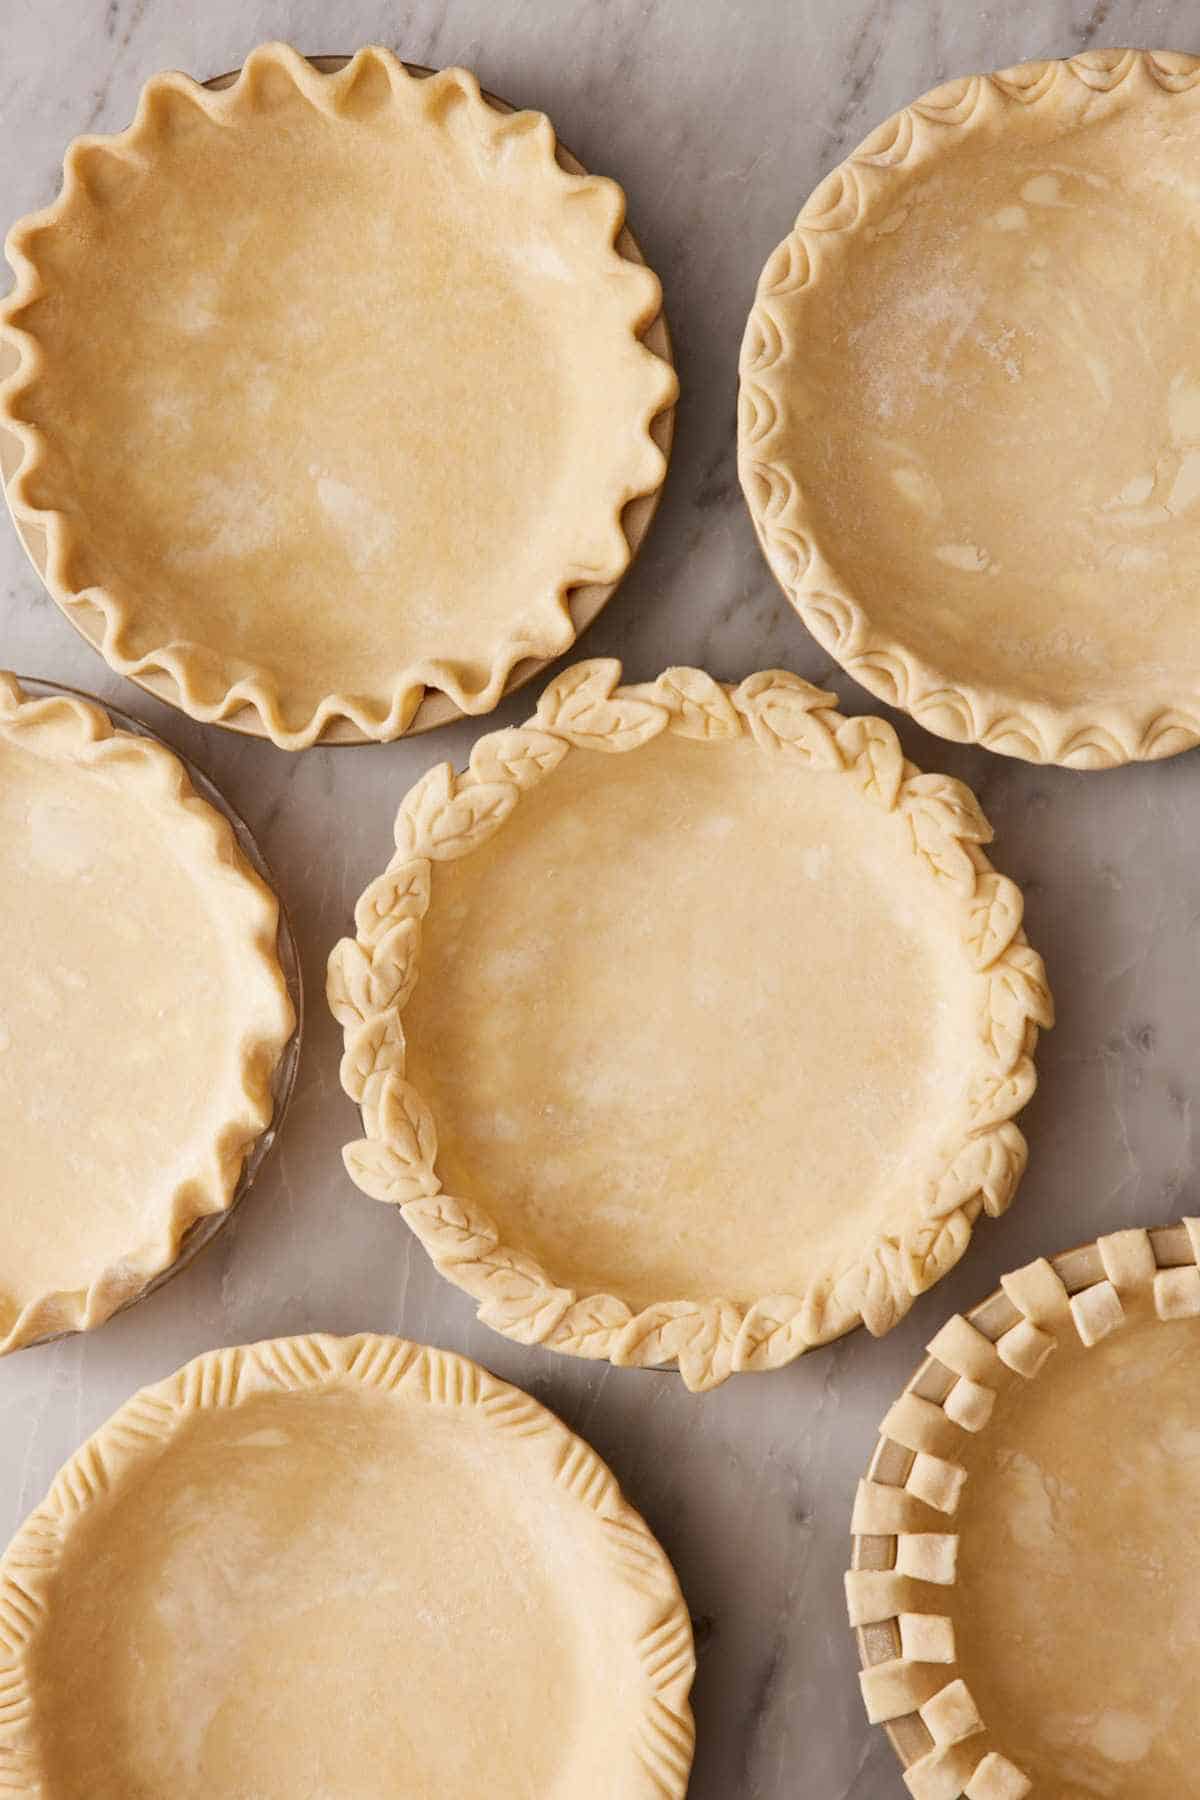
Classic Crimp (Fluted Crust)
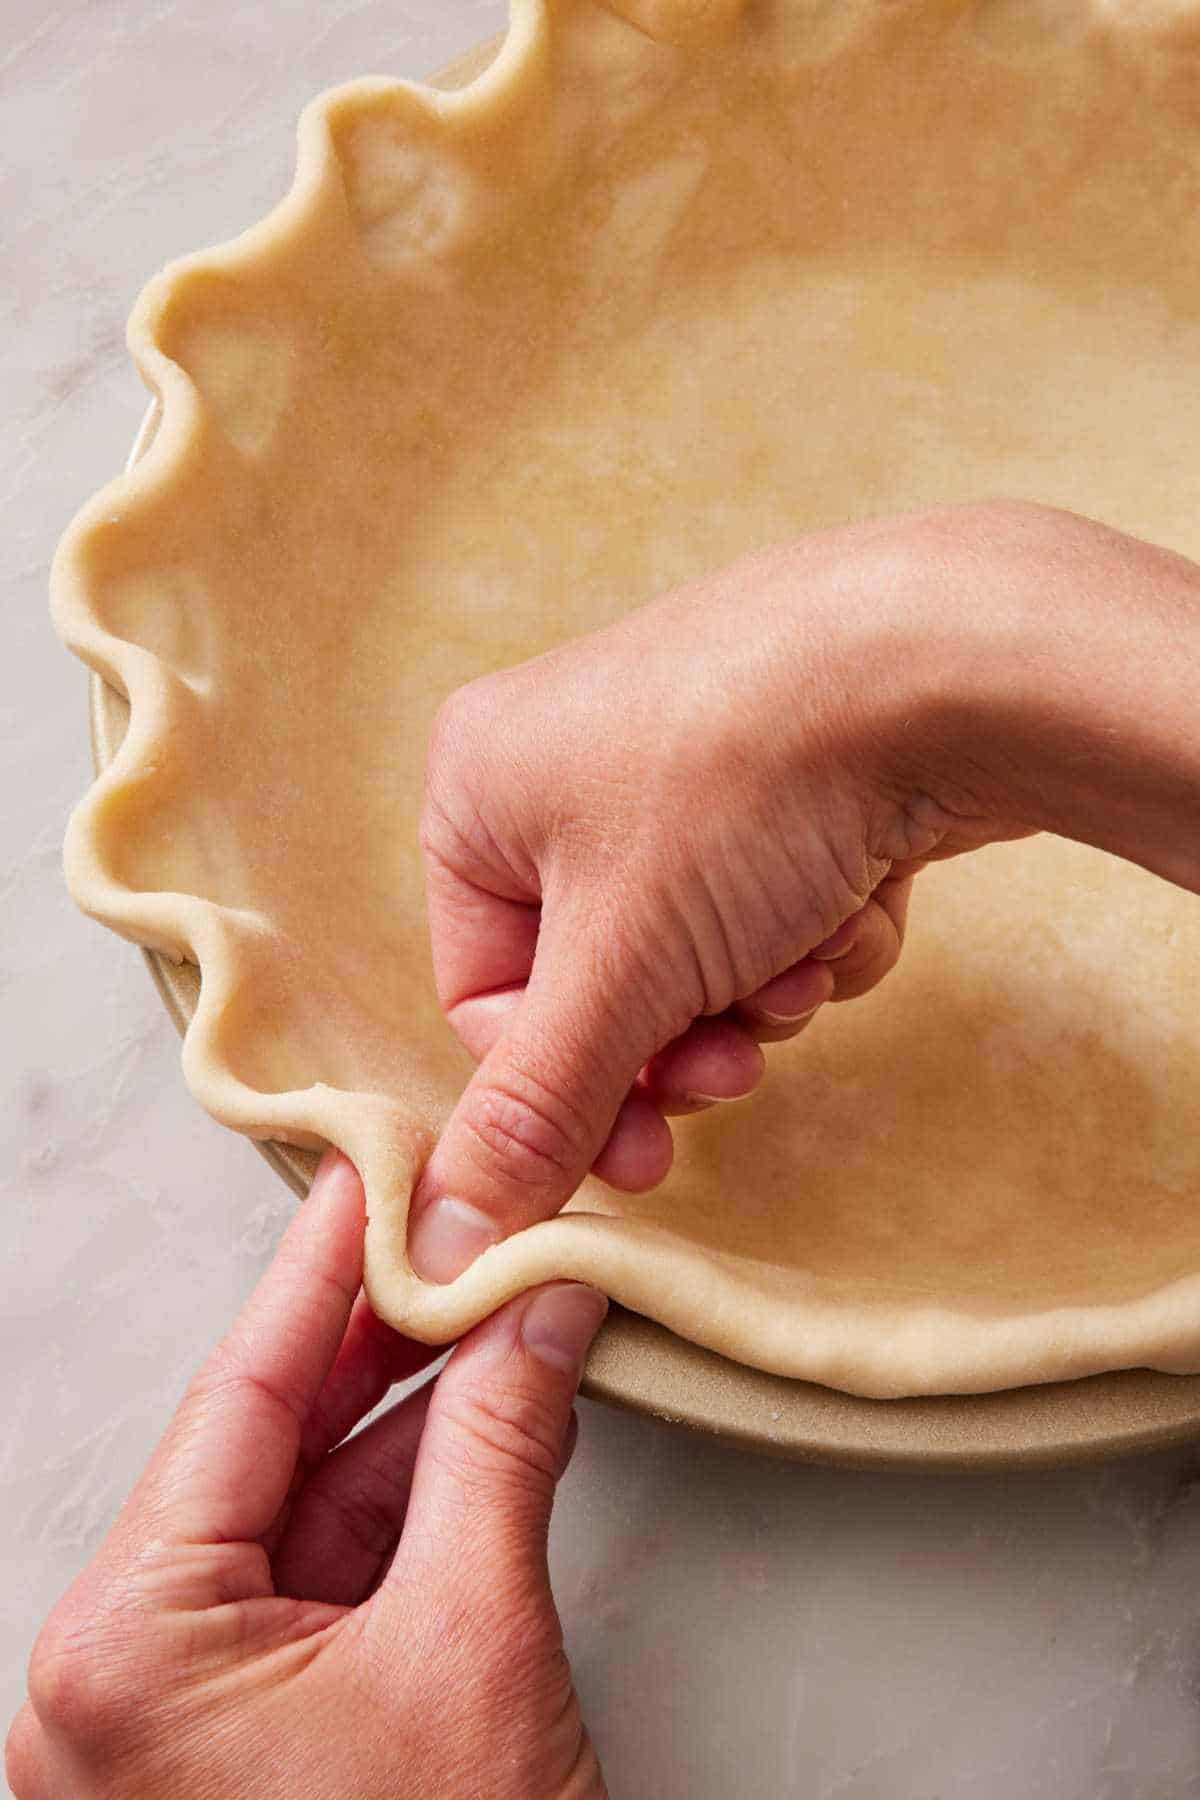
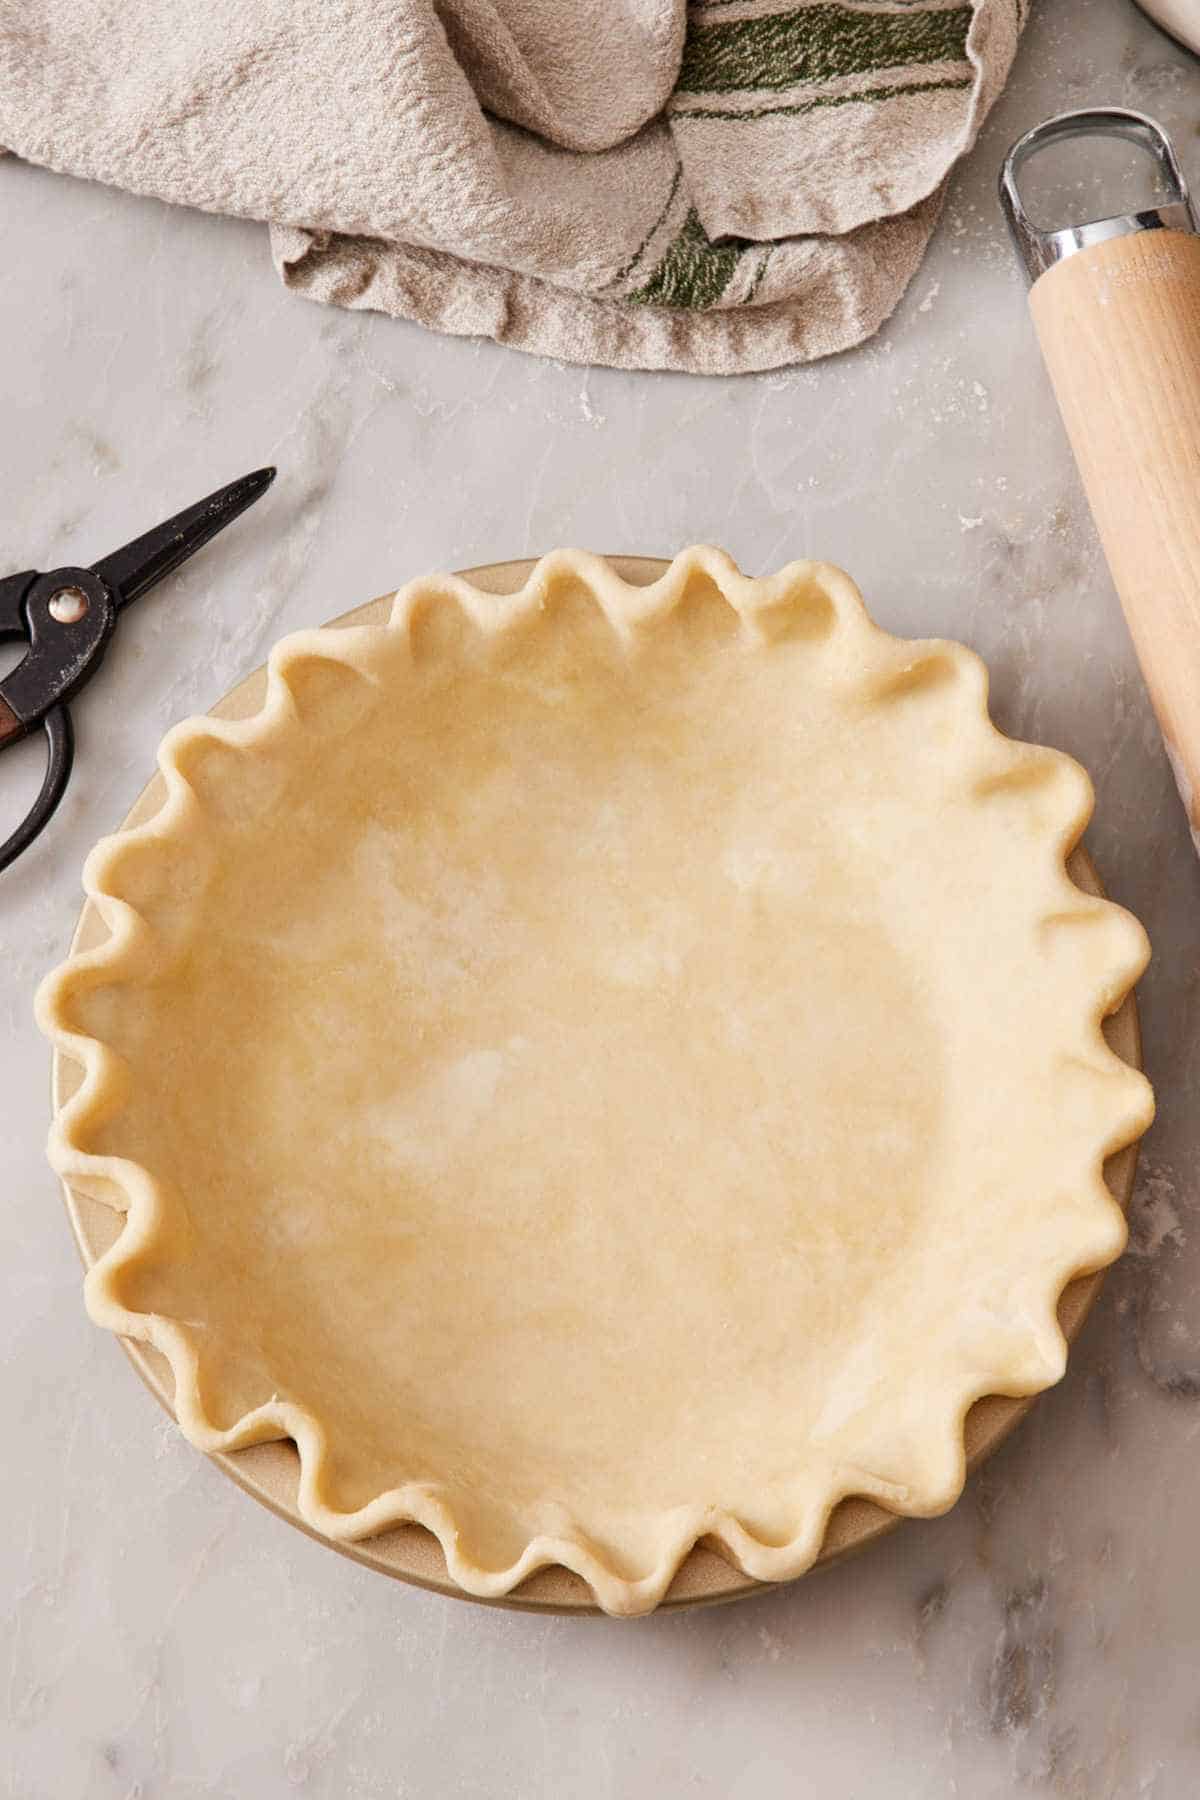
The fluted crust is the icon. It’s the scalloped wave pattern most people picture when they think “crimped pie.” It works on virtually any pie style.
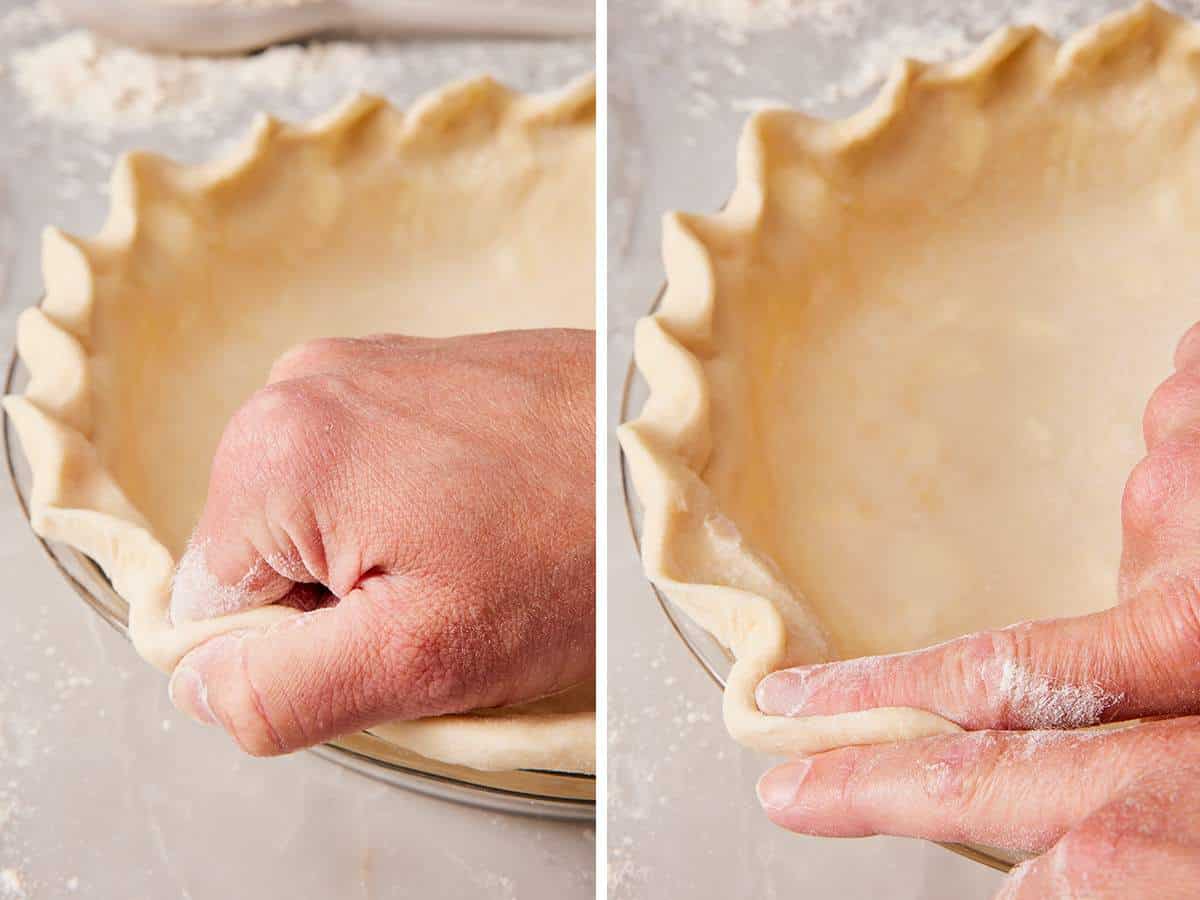
Technique: Hold your thumb and pointer finger of one hand up to the outer edge of the crust, spacing them about 1 inch apart. With your other hand—use your thumb or the tip or knuckle of your pointer finger—push the dough toward the outside of the pan between your other fingers to create a scallop shape. Continue around the edge, spacing each scallop about 1 inch apart.
The scallop can be more rounded, or you can pinch the top to make it pointed. Also, move your fingers closer or farther apart to vary the size of the crimp pattern. You can see this technique used on my coconut cream pie and pumpkin pie recipes.
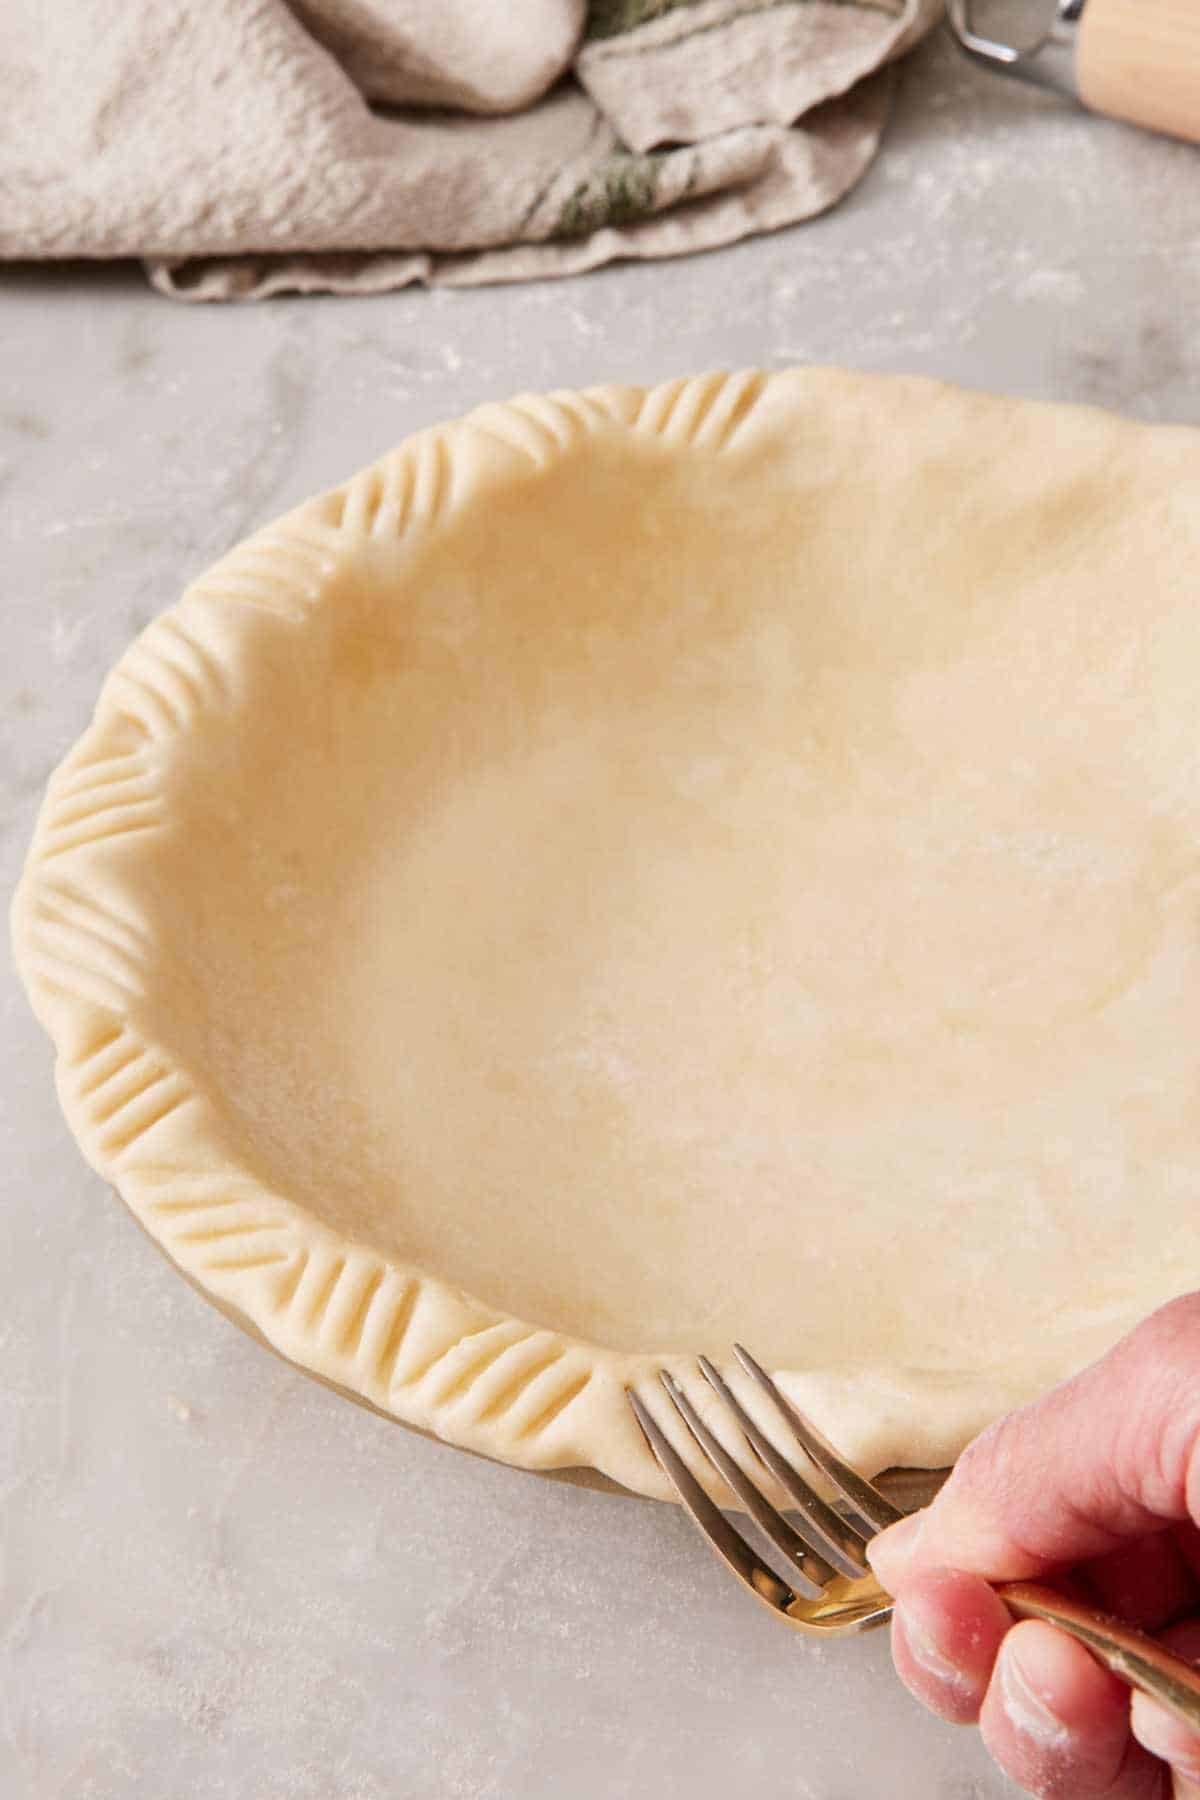
Fork Crimp
This is the fastest and easiest crimp. Even bakers who can’t get a fluted edge to look right can produce a beautiful fork crimp on the first try!
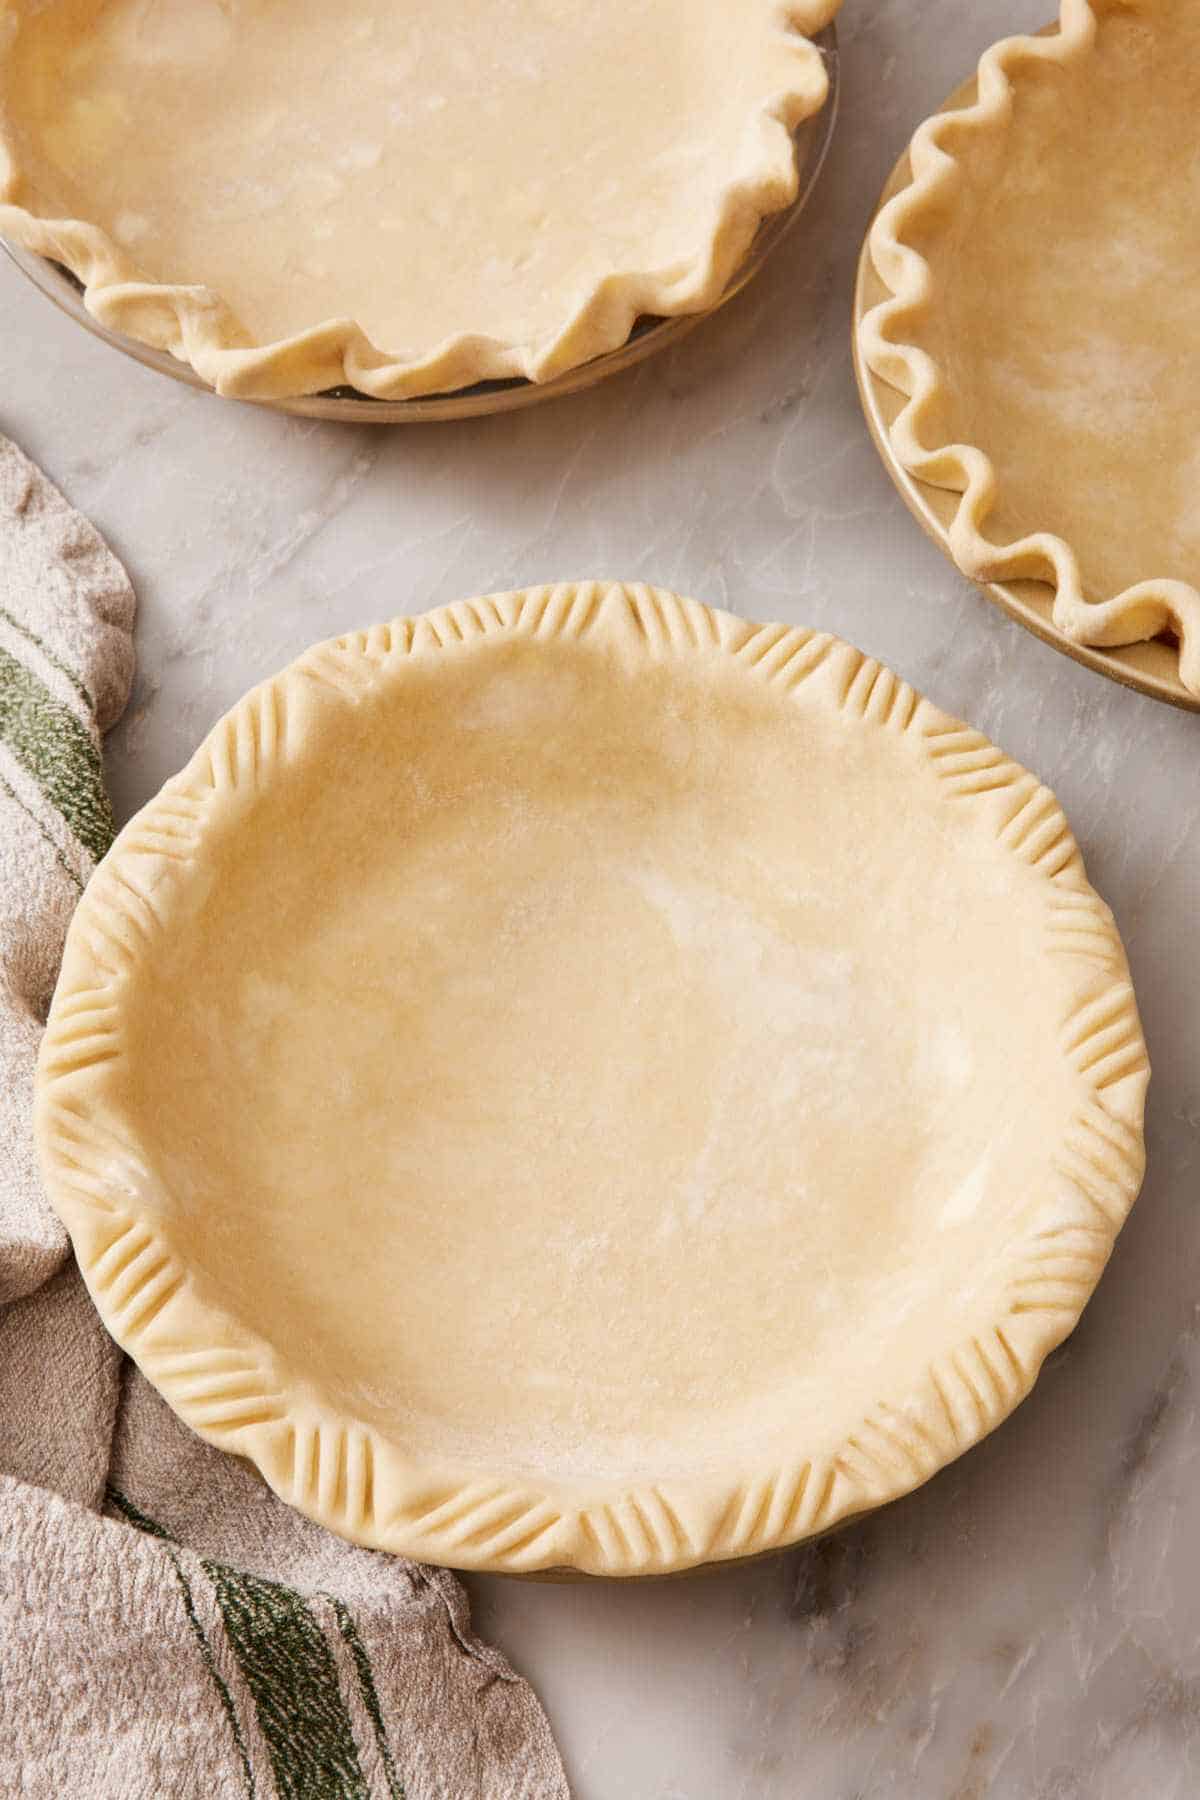
Technique: Press the tines of a fork into the edge of the pie crust, working all the way around the pan. You can press the tines straight or at an angle. I like to alternate the direction of every crimp—diagonal one way for a crimp, then diagonal the other way—for a subtle pattern.
For visual variation, you can also use the fork tines from inside the pan rather than from outside, which creates a different angle. If the fork sticks to the crust at all, dip the tines in flour before pressing into the dough.
Rope Crimp
The rope crimp produces a twisted look that reads as fancier than fluting without being much harder.
Technique: There are two methods to produce a rope crimp. Either method produces the same rope effect, but typically one method will feel more natural to you. Pick that one.
- One-handed: Pinch the dough between your thumb and forefinger at an angle and pinch the dough to make a ridge. Start your next pinch where the first one ends, working around the pan.
- Two-handed: Use both forefingers, placing them parallel to each other at about a 45-degree angle to the edge of the pan and spaced about ¼ inch apart, then press them down and pinch the dough between them.
The key with rope crimping is consistency of angle. If your pinches are at random angles, the rope looks scattered. If they’re all at the same angle, the pattern reads cleanly. Turn the pie pan as you crimp so your hands can stay at roughly the same place and angle.
Spoon Crimp (Scalloped Edge)
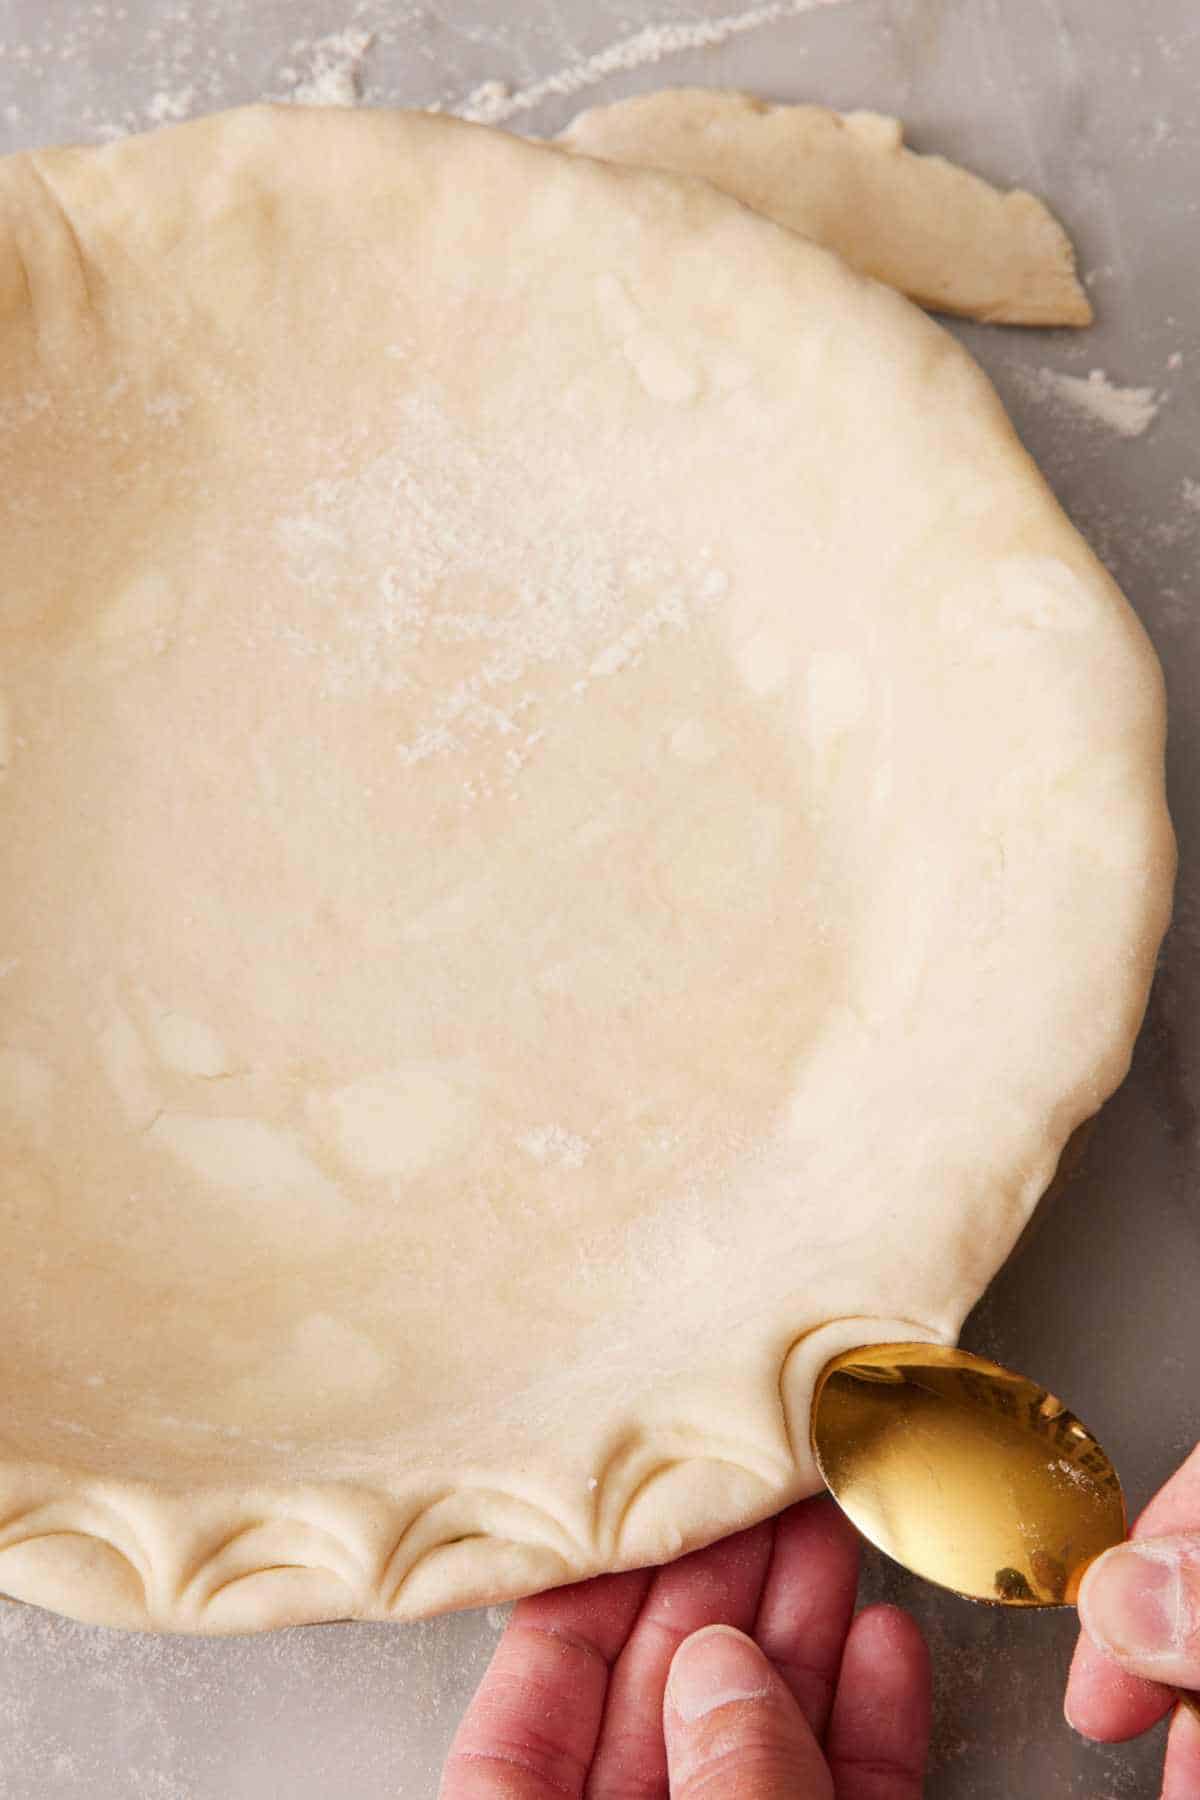
A subtle, elegant crimp that pairs especially well with custard pies and cream pies. It’s easy and looks like a more refined version of fluting. (It works like a fork crimp, but with a different shape!)
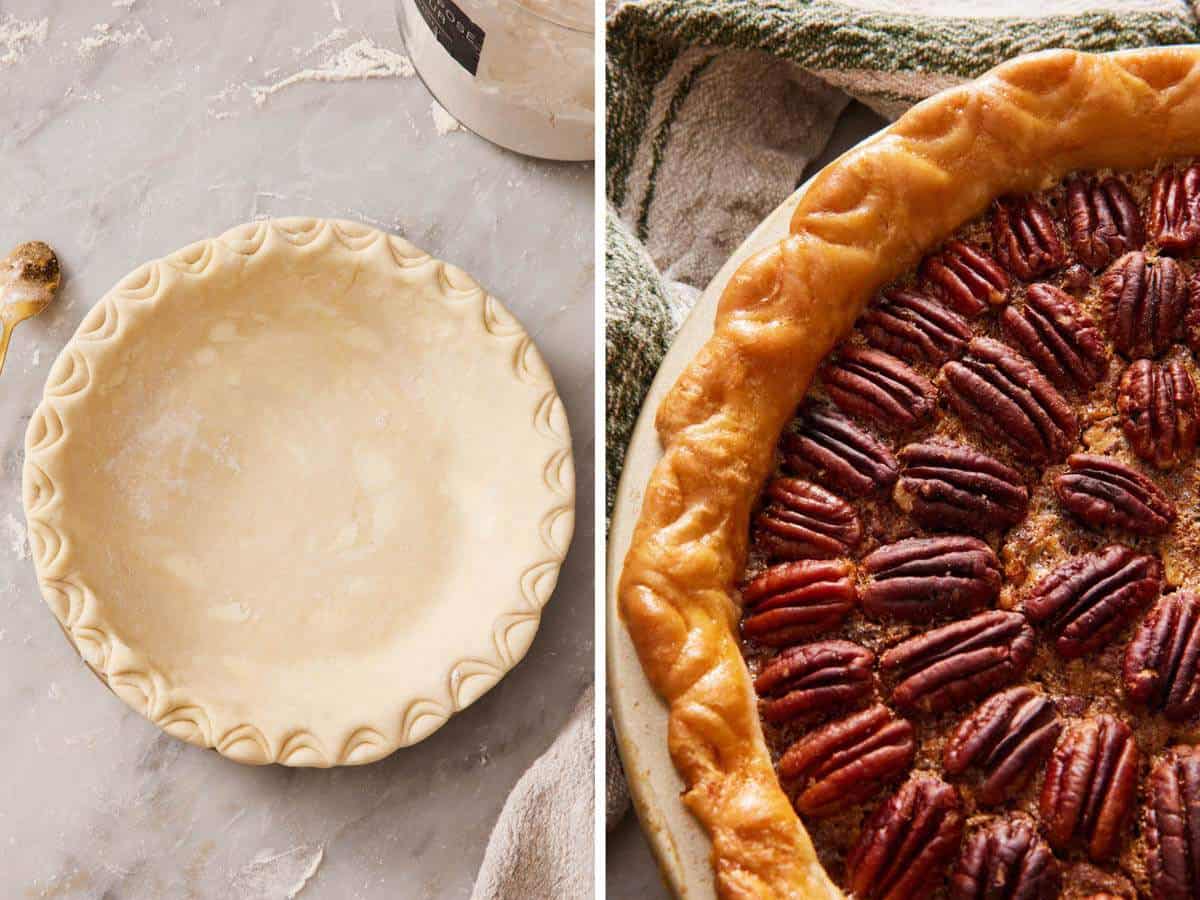
Technique: Hold a small spoon upside down. Point the rounded tip of the spoon towards the center of the pie and press it into the rim of the pie crust. You can do this once or twice per crimp: once close to the filling side of the rim, and once closer to the outside. This creates a delicate scalloped pattern that’s tighter and more controlled than a thumb-pressed flute.
The spoon crimp is the technique I recommend for bakers who want a more professional look without spending time perfecting the fluted finger-press.
Decorative Cuts & Shapes
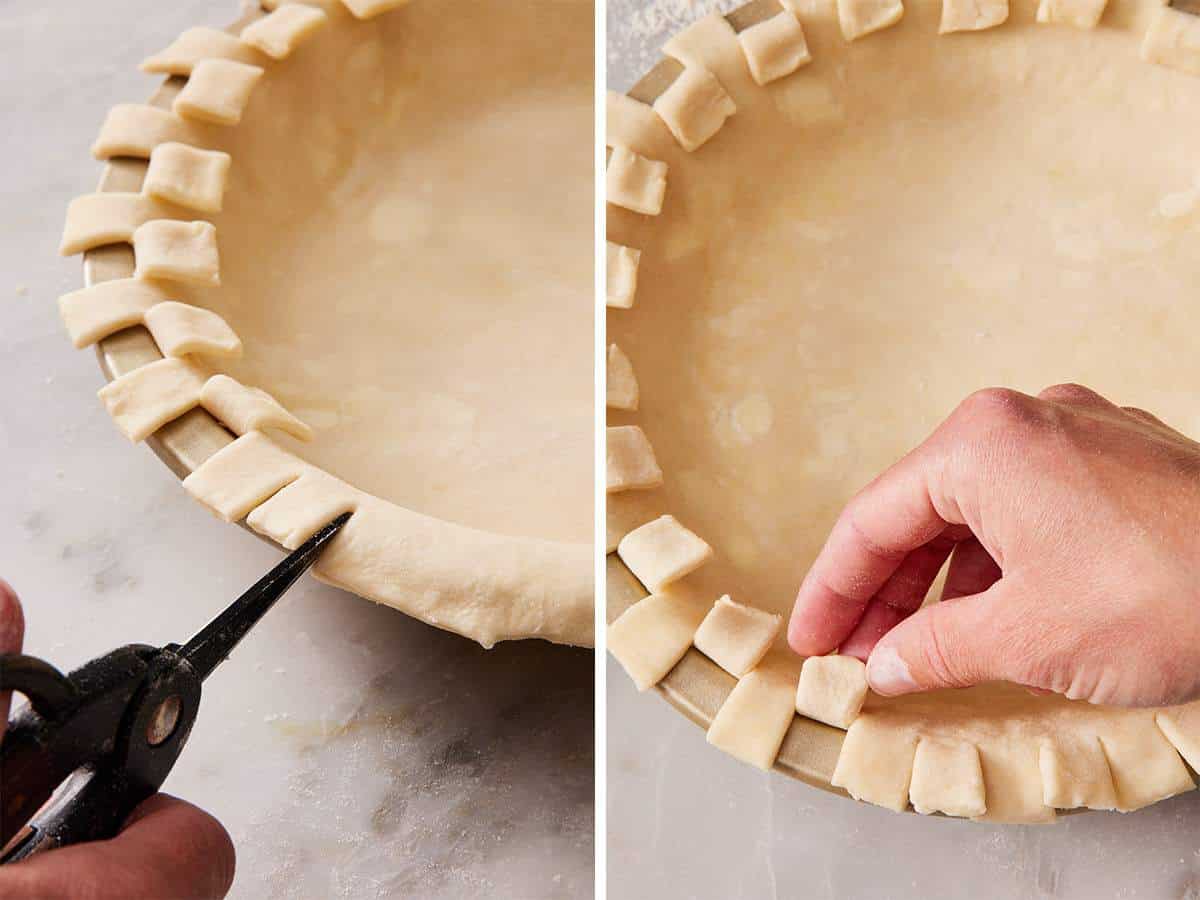
A crimp for when you want the edge to be the showpiece. Here are two variations:
Checkerboard cuts: Use kitchen scissors to make cuts of equal width, about ¼-½ inch into the pie crust edge all around the pie. Then fold down every other strip toward the filling. The contrast creates a zigzag pattern that looks intricate but takes about 90 seconds.
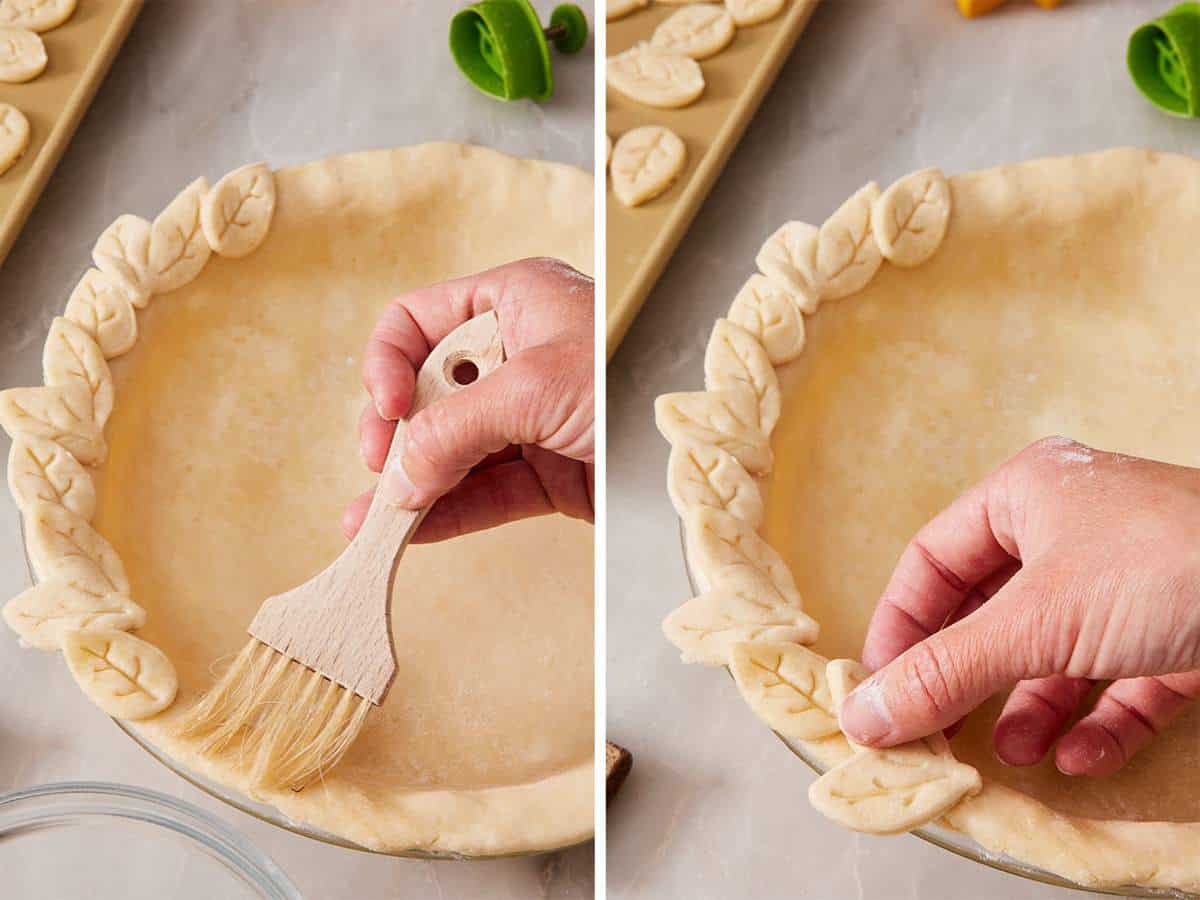
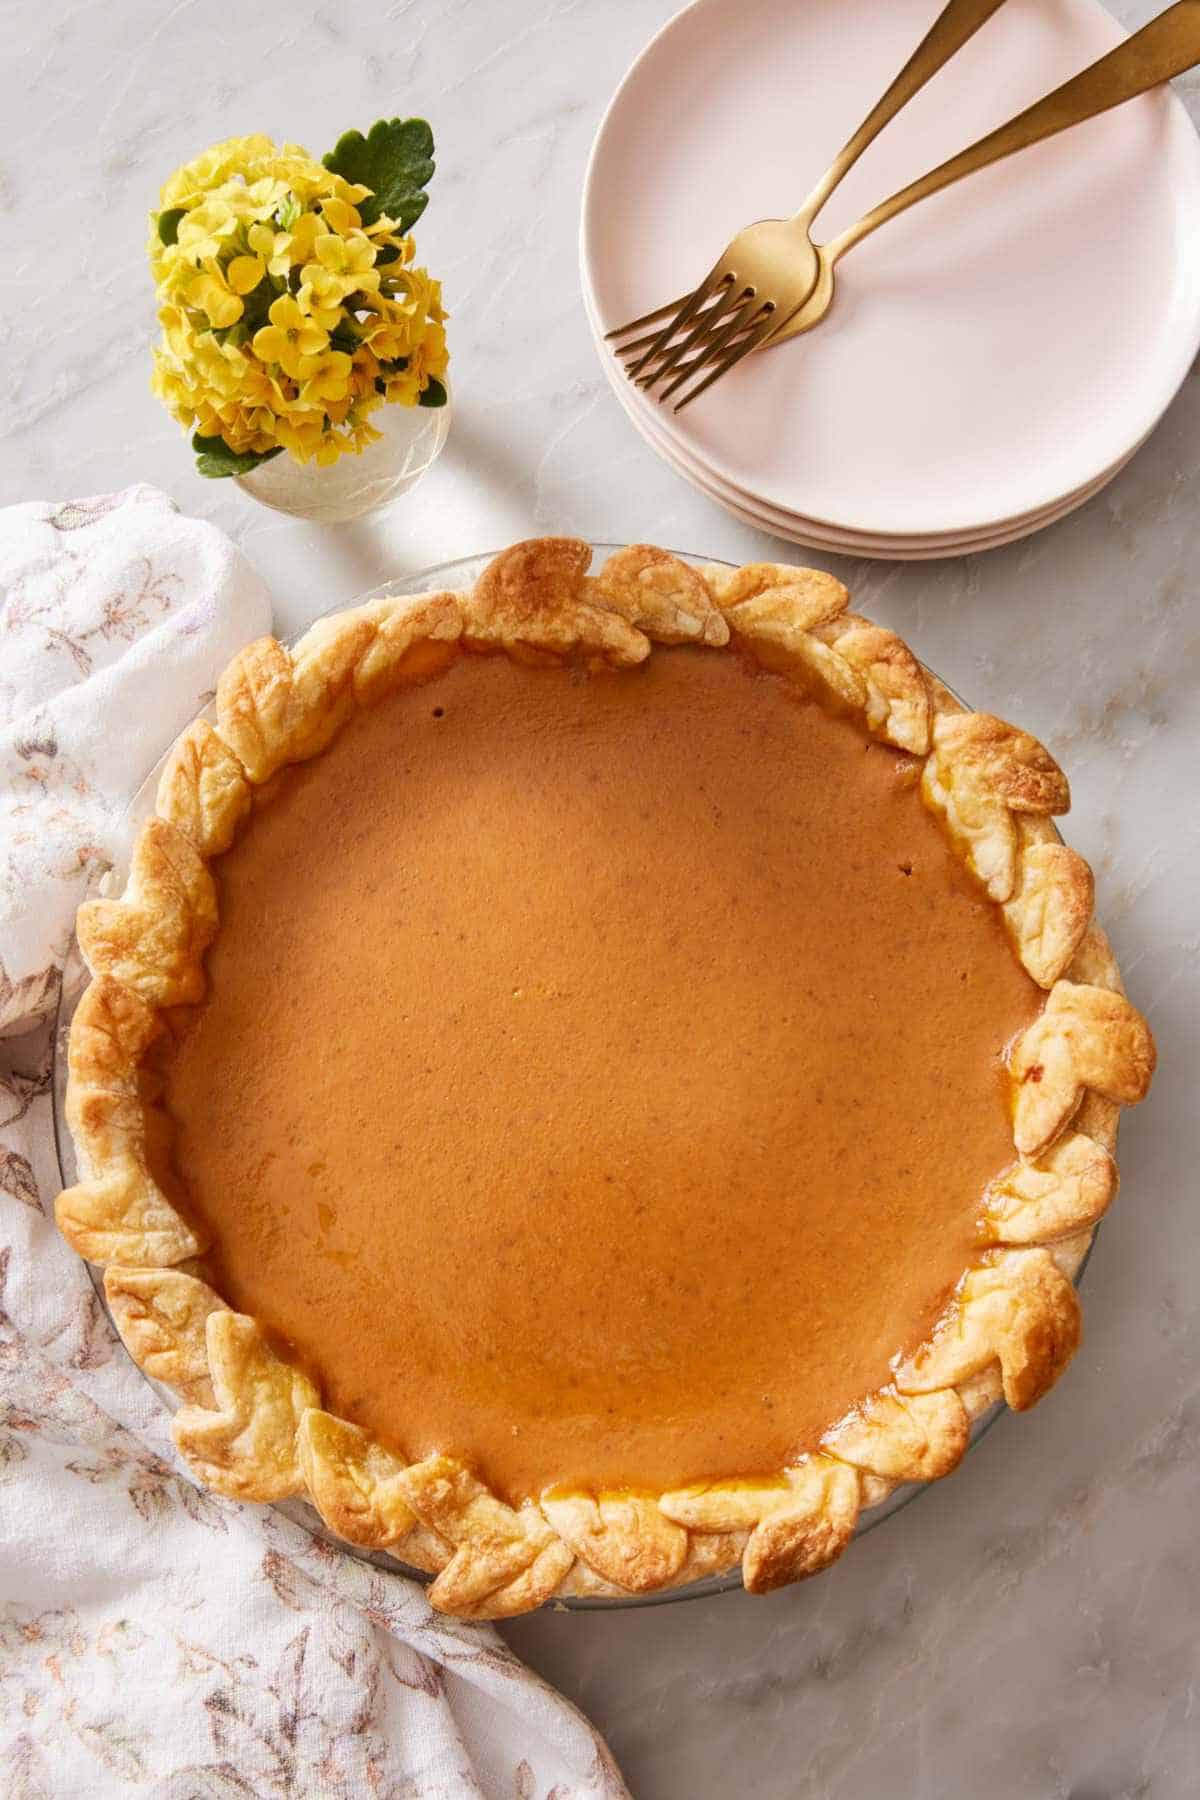
Cookie-cutter cutouts: Roll out a separate piece of pie dough and use small cookie cutters to make decorative shapes (leaves are classic for autumnal pies; stars work for July 4th; flowers work for spring/summer). Brush the edge of the bottom crust with water or egg wash (which acts as glue), then press the cutouts into place around the rim.
For decorative cutouts that won’t over-brown: If you’re using a custard pie that bakes for 50+ minutes (like pumpkin or sweet potato pie), the cutouts on the rim will likely over-brown before the filling sets.
The fix: You can use a pie crust shield at any point during baking once you notice the crust has reached a deep golden brown. Or, pre-bake your cutouts separately on a parchment-lined sheet pan at 350°F for 10-15 minutes, until lightly golden. Let them cool, then place them on the cooled pie before serving. This is an extra technique I use on my pumpkin pie when I want decorative leaves on top so they stay golden, not burnt.
This second variation gives the most visual impact for a very beautifully decorated pie (you’ve likely seen this pie technique on Instagram for this reason!).
Which Crimp For Which Pie?
Some crimp styles suit certain types of pies best. Here’s the framework I use:
| Pie Type | Recommended Crimp | Why |
| Custard pies (pumpkin pie, pecan pie, sweet potato pie) | Fluted, spoon-scalloped, or rope; decorative cutouts for holidays | Elegant, the shaped edge contrasts with the flat custard surface |
| Cream pies (banana cream pie, coconut cream pie) | Fluted or rope | Classic refined look pairs well with toppings like whipped cream or meringue. (Toppings can cover more decorative cutouts.) |
| Double-crust fruit pies (apple pie, peach pie, blueberry pie) | Fluted, fork, or rope | Functional seal; fork is rustic, rope is dressier, and fluted is classic |
| Lattice-topped pies | Fork or fluted | Doesn’t compete with the lattice by keeping the edge subtle |
| Show-stopper holiday pies | Decorative cutouts | Go big when the pie IS the centerpiece |
| Hand pies and mini pies | Fork crimp | Other techniques don’t scale to a small surface area or work without a pie pan; the fork is reliable |
The rule of thumb: Match the crimp’s complexity to the pie’s complexity. Plain custard pie? Decorative cutout edge for visual interest. Already-impressive lattice pie? Keep the edge simple. The goal is balance, not maximum decoration everywhere.
The Cold-Dough Test
For the best results, the dough has to be cold for the crimp to hold. Most of my recipes recommend freezing or chilling the crimped crust before baking—here’s why. I tested the same fluted crimp at three different dough temperatures, then baked all three pies to see the results:
| Dough Temperature | What Happens When Baked |
| Frozen | Each scallop held its shape cleanly. Crimp stays sharp through 30 minutes of baking. |
| Cold from the fridge | Crimp shapes soften slightly within the first 10 minutes of baking. Final result: visible but rounded. |
| Room temperature (~70°F) | Crimp mostly melted back into the rim within 10 minutes of being in the oven. Final result: barely visible scalloped edge. |
The conclusion: Chill the assembled pie before baking. Crimping the crust will warm it up simply from the heat of your hands. Chilling it after crimping gets it cold again. Place the crimped pie in the freezer for 15-20 minutes (or in the fridge for 30 minutes, as a good secondary option). The cold dough enters the oven firm, and the structural set happens before the butter has a chance to melt out of the crimp.
This single step is the difference between a crimp you’re proud of and a crimp that disappears.
Why Did My Crimp Disappear?
This is the most common pie-crimping question from my readers and on baking forums. There are four distinct causes:
1. The dough was too warm. If your crimp visibly melted away during the first 10 minutes of baking, this is almost certainly the cause. (Covered above in The Cold-Dough Test.)
2. The dough was overworked, leading to gluten development, or had too much water added. When pie dough is mixed too long, rolled too many times, or has too much water added during mixing, the gluten over-develops and the dough becomes tight. Tight dough shrinks during baking, which pulls the crimp inward and can make the design disappear. Fix: Mix the dough gently, using just enough cold water to bring the dough together (it should be slightly shaggy, not smooth), and don’t reroll scraps more than once.
3. The edge was too thin. A thin rim doesn’t have enough dough to hold the crimp shape. The crimp gets pressed into too little dough, and the shape can’t survive baking. Fix: Always leave a full 1-inch overhang before tucking under, so you have a double-thickness rim.
4. The crimp design was too fine. Flaky pie dough puffs slightly during baking, which softens very fine details. A delicate, tight crimp pattern can disappear into the puff. Fix: Make crimps with bold, deliberate shapes.
Remember, a cold dough + a generous edge are the two non-negotiable fundamentals.
Pro Tips For Crimping A Pie Crust
Keep a thick edge. Don’t trim the bottom crust too much. The 1-inch overhang folded under creates a double-thickness rim that resists burning AND holds your crimp shape. Readers consistently report crusts going too dark within the first 20 minutes, and this is typically the cause.
Work quickly. Your hands are warm, and the dough is cold. The longer you handle it, the warmer it gets. If you find the dough is becoming too warm and soft as you work, pop it in the freezer for 5 minutes to firm up the fat again.
Flour your fingers and tools. Pie dough can be slightly sticky as you work it. If your fingers, fork tines, or spoon are sticking to the dough, lightly dust them with flour. You just need a small amount. Too much will dry out the surface of the dough and cause it to crack.
Egg wash for color. Brushing a beaten egg over the crimp before baking deepens the color and creates a glossy, golden finish. For a more dramatic shine, use an egg + 1 teaspoon water; for a richer mahogany color, use an egg + 1 tablespoon cream. I have used these egg washes hundreds of times in all of my pie recipes over the years. Egg + water produced the brightest gloss. Egg + milk produced the deepest brown.
Don’t crimp twice. Once you’ve crimped, leave it alone. Going back to endlessly fix or re-press the design just makes the dough warmer and pushes it out of shape. Pick one technique, do it once around the pan, and stop.
Use a pie crust shield. Even with a thick crimped edge, the rim can over-brown faster than the rest of the crust. Add a foil shield about 25-30 minutes into baking, or once the edges start to deepen in color. (More on shields in my How To Make A Pie Crust Shield Academy lesson.)
FAQs
The “best” crimp depends on the pie. For most beginners, the fork crimp is the easiest. It looks rustic and clean, and it’s nearly impossible to mess up. For a more decorative look, the fluted crimp is the classic. See the Which Crimp For Which Pie table above for matching crimps to pie types.
Three possible causes: warm dough (the most common; chill the assembled pie for 15-20 minutes in the freezer before baking), overworked dough or too much water during mixing (the dough is “tight” and shrinks as it bakes), or a too-thin rim that doesn’t have enough mass to hold shape. See the Why Did My Crimp Disappear section above for the full diagnostic.
No. Once the pie crust goes into the oven, it sets its shape and texture. You need to crimp the pie crust before it is baked, whether blind-baking or filling it.
There’s some confusion in the terminology here, and it depends on who’s defining it. Some bakers reserve crimping specifically for the fork-pressed technique, and fluting specifically for the finger-pressed scalloped pattern, treating them as two distinct techniques. In this guide and in most general baking jargon, I treat “crimping” as the umbrella term that covers all decorative-edge techniques: fluting, fork crimps, rope crimps, spoon crimps, and decorative cutouts. Either way, the technique you choose matters more than what you call it.
Yes! This helps the crimp hold its shape the best in the oven and is one of the best holiday baking tricks. Roll the dough, fit it in the pan, crimp the edge, then freeze the pre-shaped crust. Bake from frozen (no thawing needed). For the full method, see Academy: How To Freeze Pie Crust.
More Baking Tutorials To Try
For more pie academy lessons:
- Academy: How To Lattice Pie Crust — the woven-top pattern, including how cold dough makes the lattice come out cleanly.
- Academy: How To Freeze Pie Crust — three methods for freezing pie dough ahead of time, including freezing pre-shaped crimped shells.
- Academy: How To Blind Bake A Pie Crust — the technique for pre-baking a crust before adding wet or no-bake fillings.
- Academy: How To Make A Pie Crust Shield — essential for protecting crimped edges from over-browning during long bake times.
If you’ve tried this “how to crimp pie dough” tutorial, then don’t forget to rate it and let me know how you got on in the comments below. I love hearing from you!






