This post may contain affiliate links. Please read our disclosure policy.
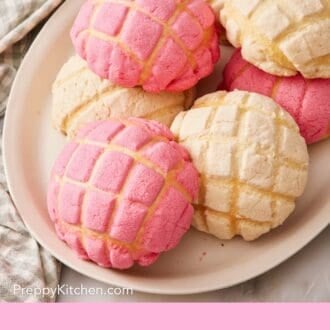
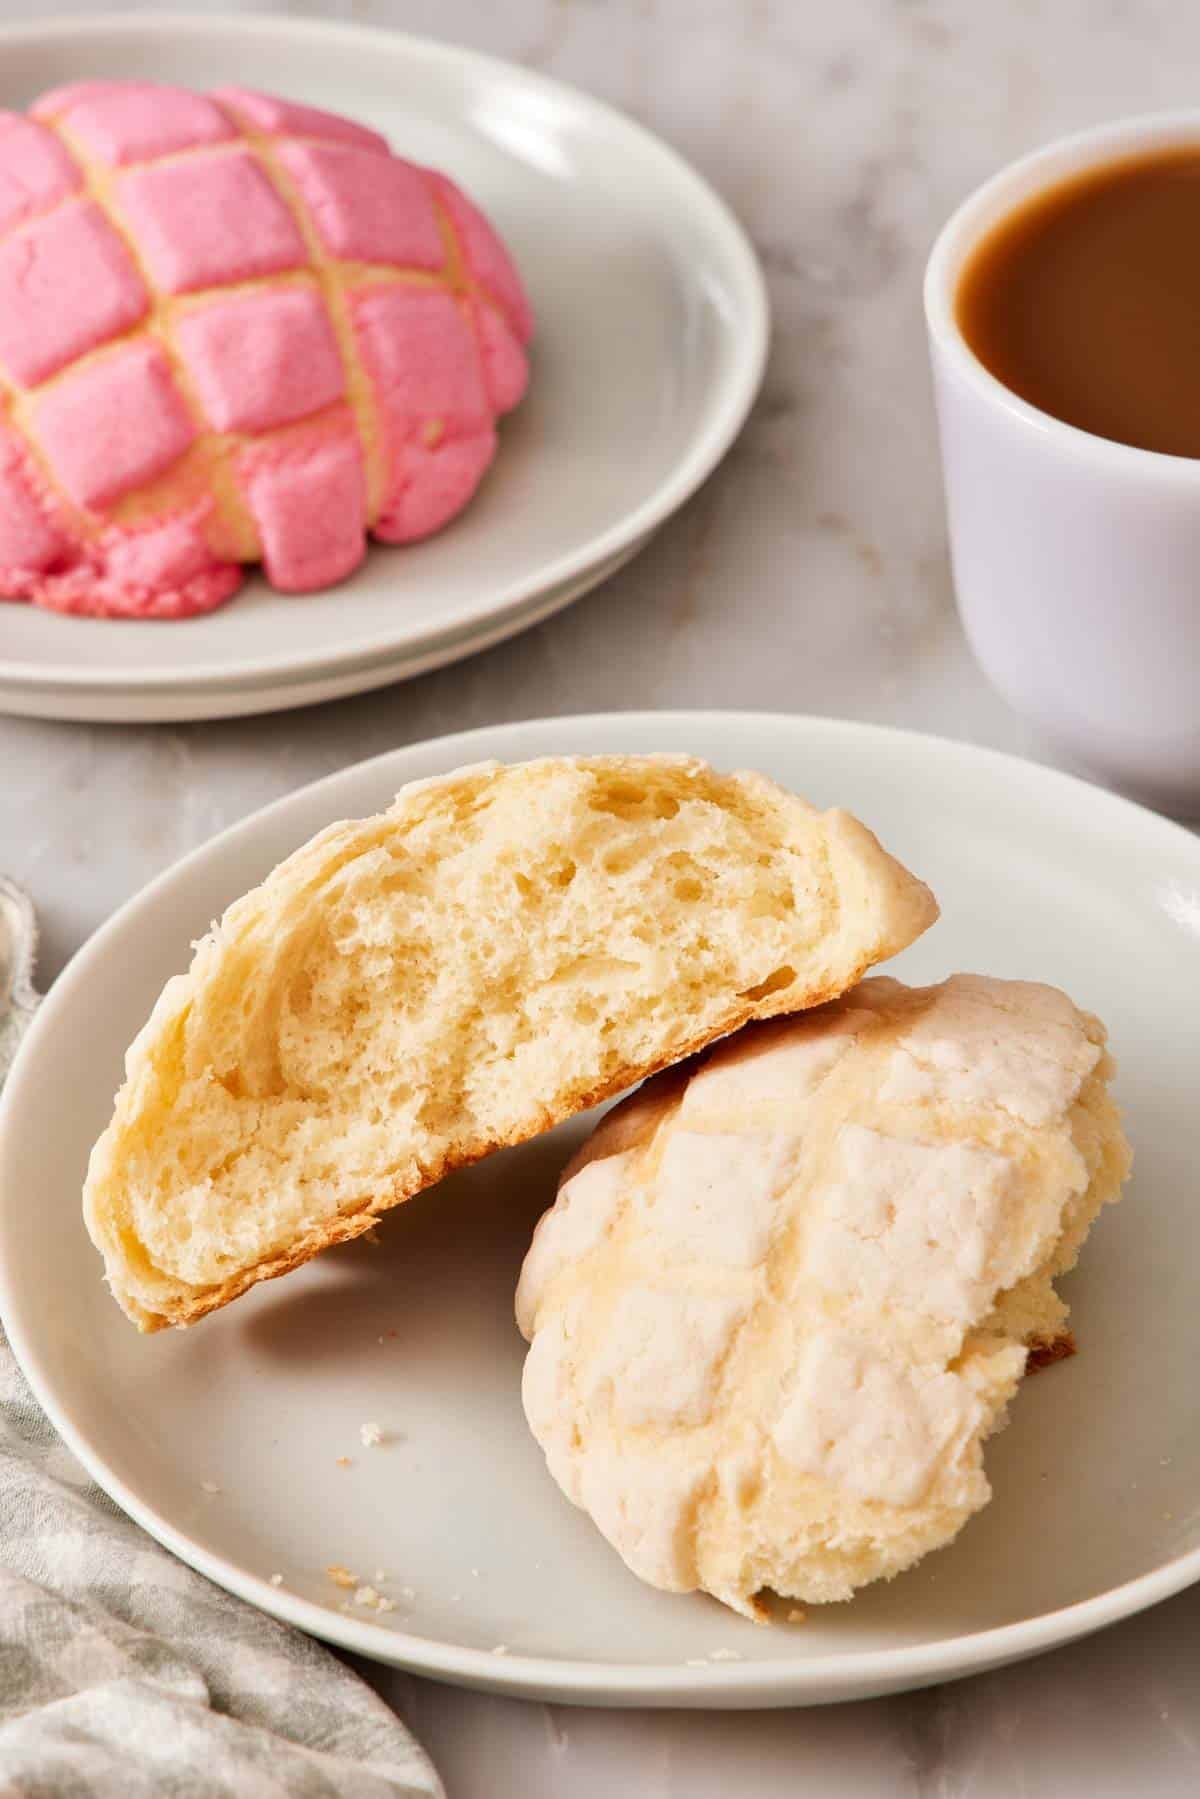
Make the perfect conchas with soft, buttery sweet bread under a crisp sugar topping! My recipe walks you through each step with pictures, from kneading the dough to shaping and scoring the design on top.
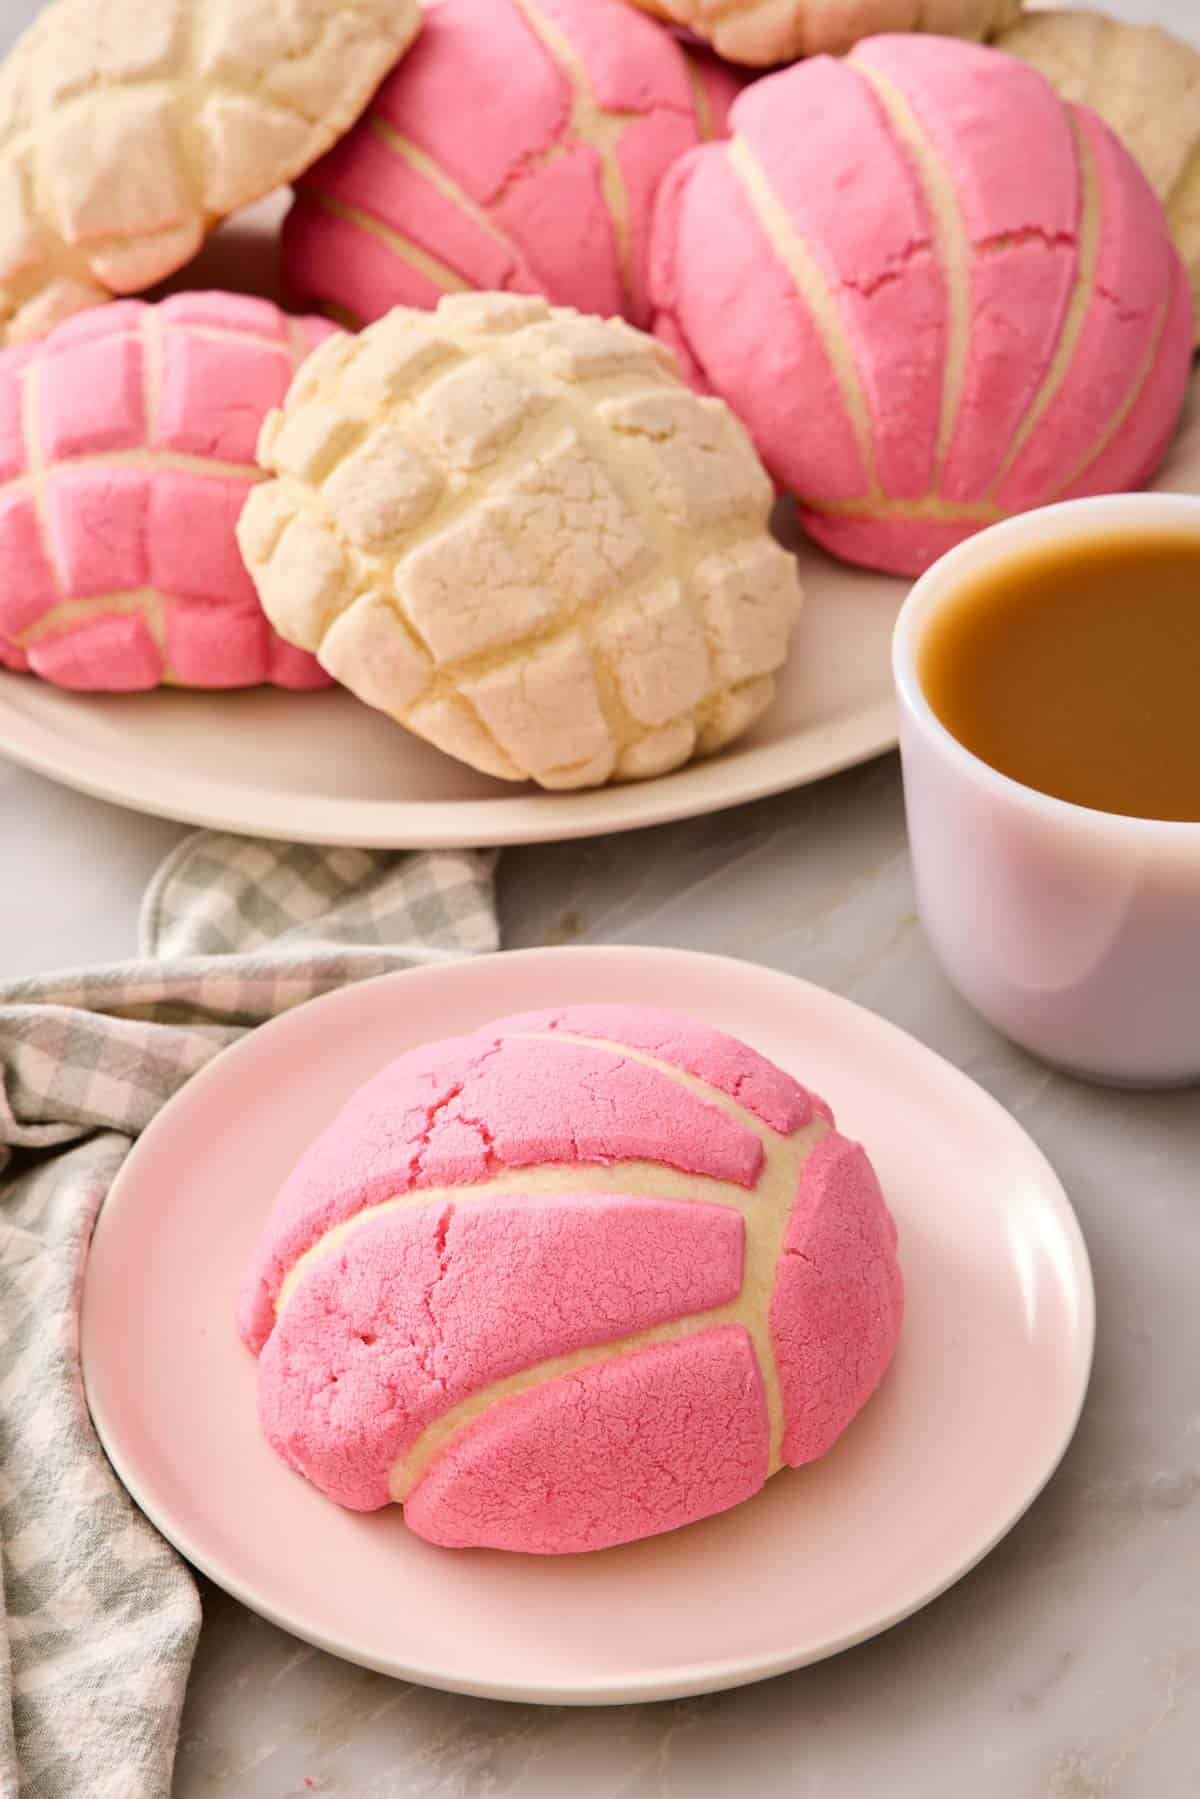
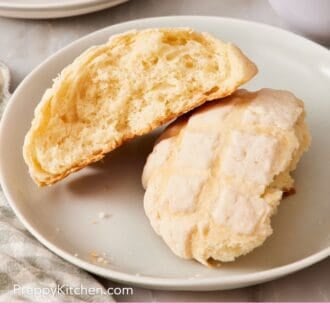
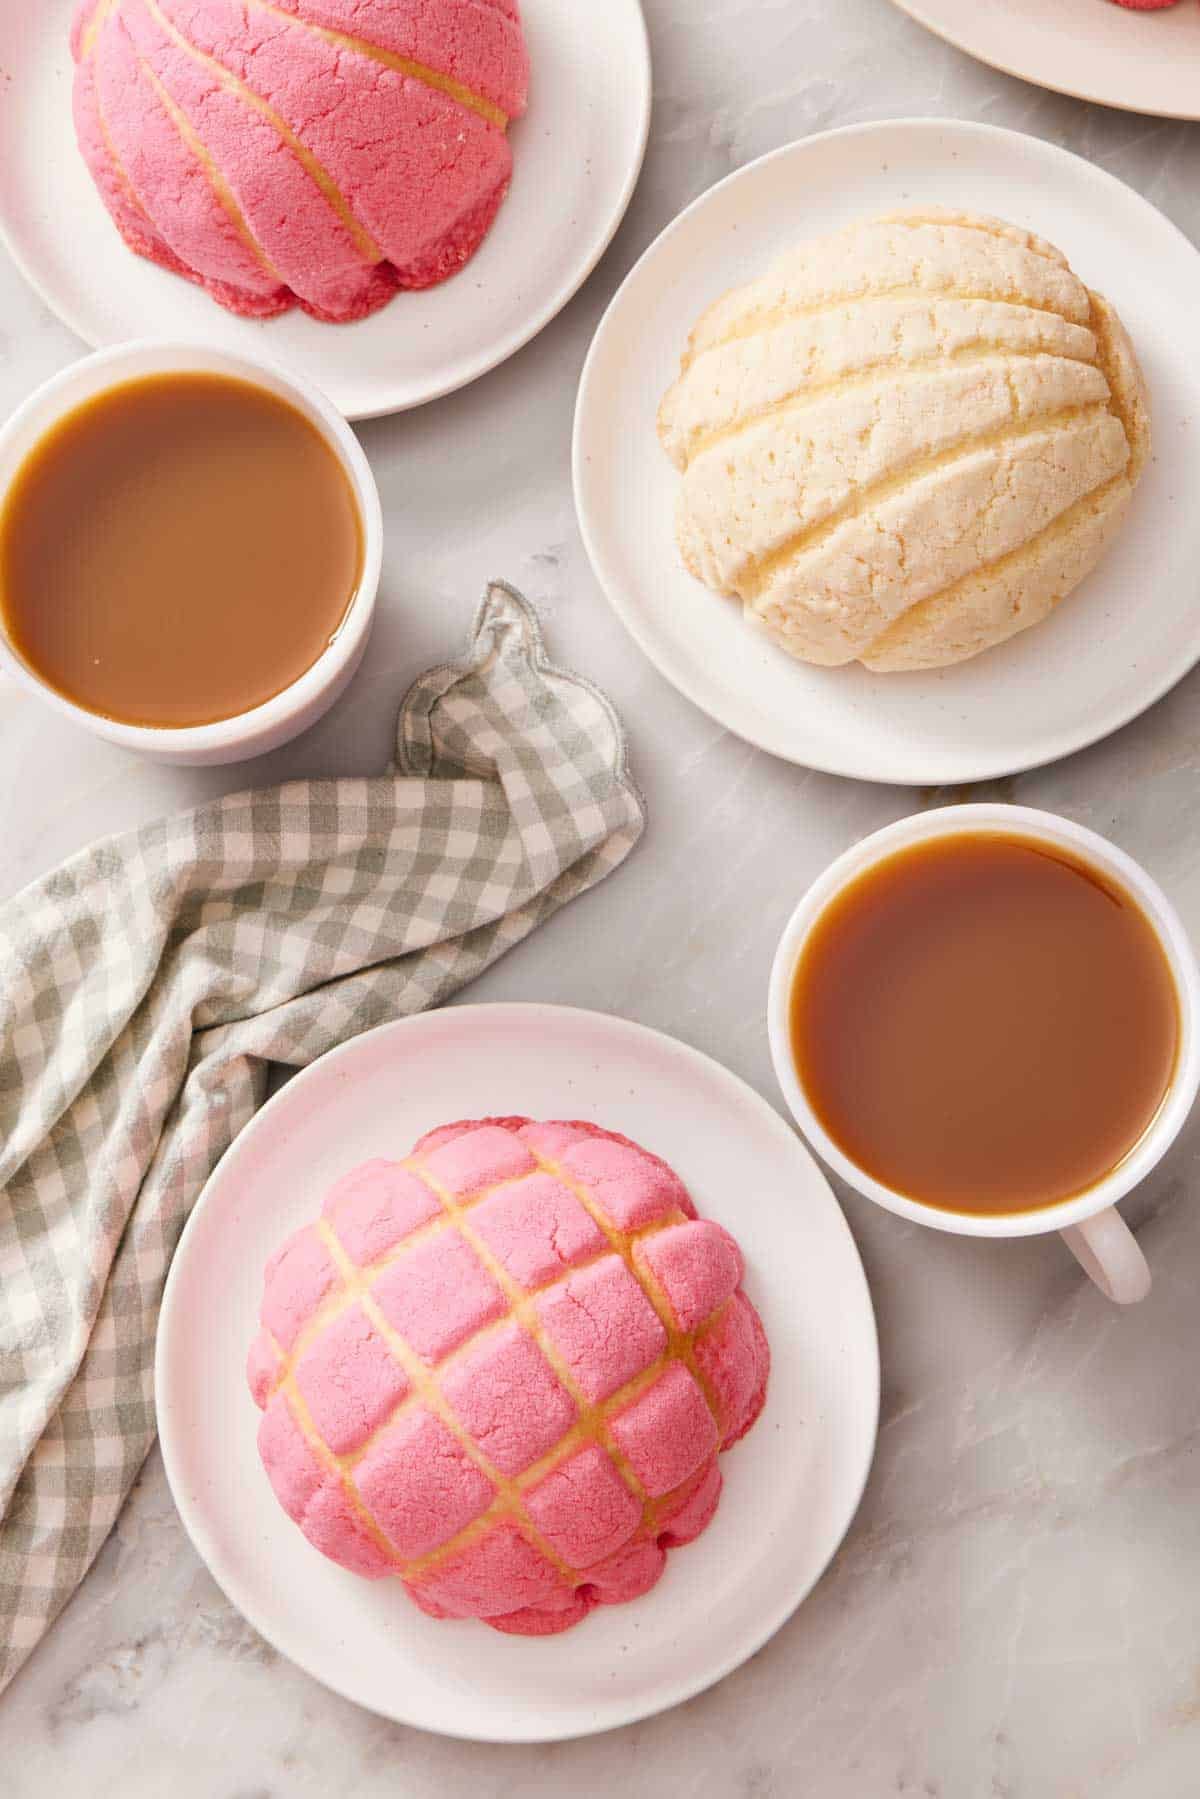
Conchas are the most recognizable pan dulce in any Mexican bakery. Concha means “shell” in Spanish, and they get their name from a sugar top scored with a pattern that opens as the bread bakes, giving each one a seashell look. Underneath the crisp shell is an enriched yeasted dough made with eggs, butter, milk, and sugar. The crumb is so soft, it’s almost brioche-like.
I first had conchas when I was a kid from Mexican bakeries in LA. They were always dried out from being baked days before or not enriched enough. When developing this recipe, my goal was to make a concha that was soft, buttery, and far from dry. I’ve been making them for years now, and I’ve only changed one thing in the recipe: the concha topping now has a little extra flour. In my tests, it melted less in the oven and kept a sharper shell pattern. The dough is the same fluffy, perfectly sweet bun you have loved for years!
“Wonderful recipe, my Mexican husband and mother-in-law approve. I used bread flour and made chocolate, vanilla, and lemon flavors. They turned out soft and flavorful. These are better than any I have ever tasted here in Texas or even in Mexico.”
Ariadne
Are Conchas and Pan Dulce the Same Thing?
Conchas are one kind of pan dulce. Pan dulce means “sweet bread,” and it’s the name for the whole family of sweet breads and pastries sold in Mexican panaderías (bakeries).
Conchas are the most famous pan dulce, but a panadería case usually includes many others:
- Orejas: flaky, caramelized “ears” made from puff pastry.
- Cuernos: crescent-shaped rolls, like a Mexican take on the croissant.
- Marranitos or puerquitos: soft, pig-shaped gingerbread cookies sweetened with piloncillo.
- Polvorones: crumbly shortbread cookies. Their powdered-sugar cousins are known in the US as Mexican wedding cookies.
- Pan de muerto: a sugared, orange-scented bread baked for Día de los Muertos.
My conchas recipe makes a dough that is very similar to brioche bread, so they taste sweet and buttery with a fluffy interior.
Key Ingredients and Substitutions
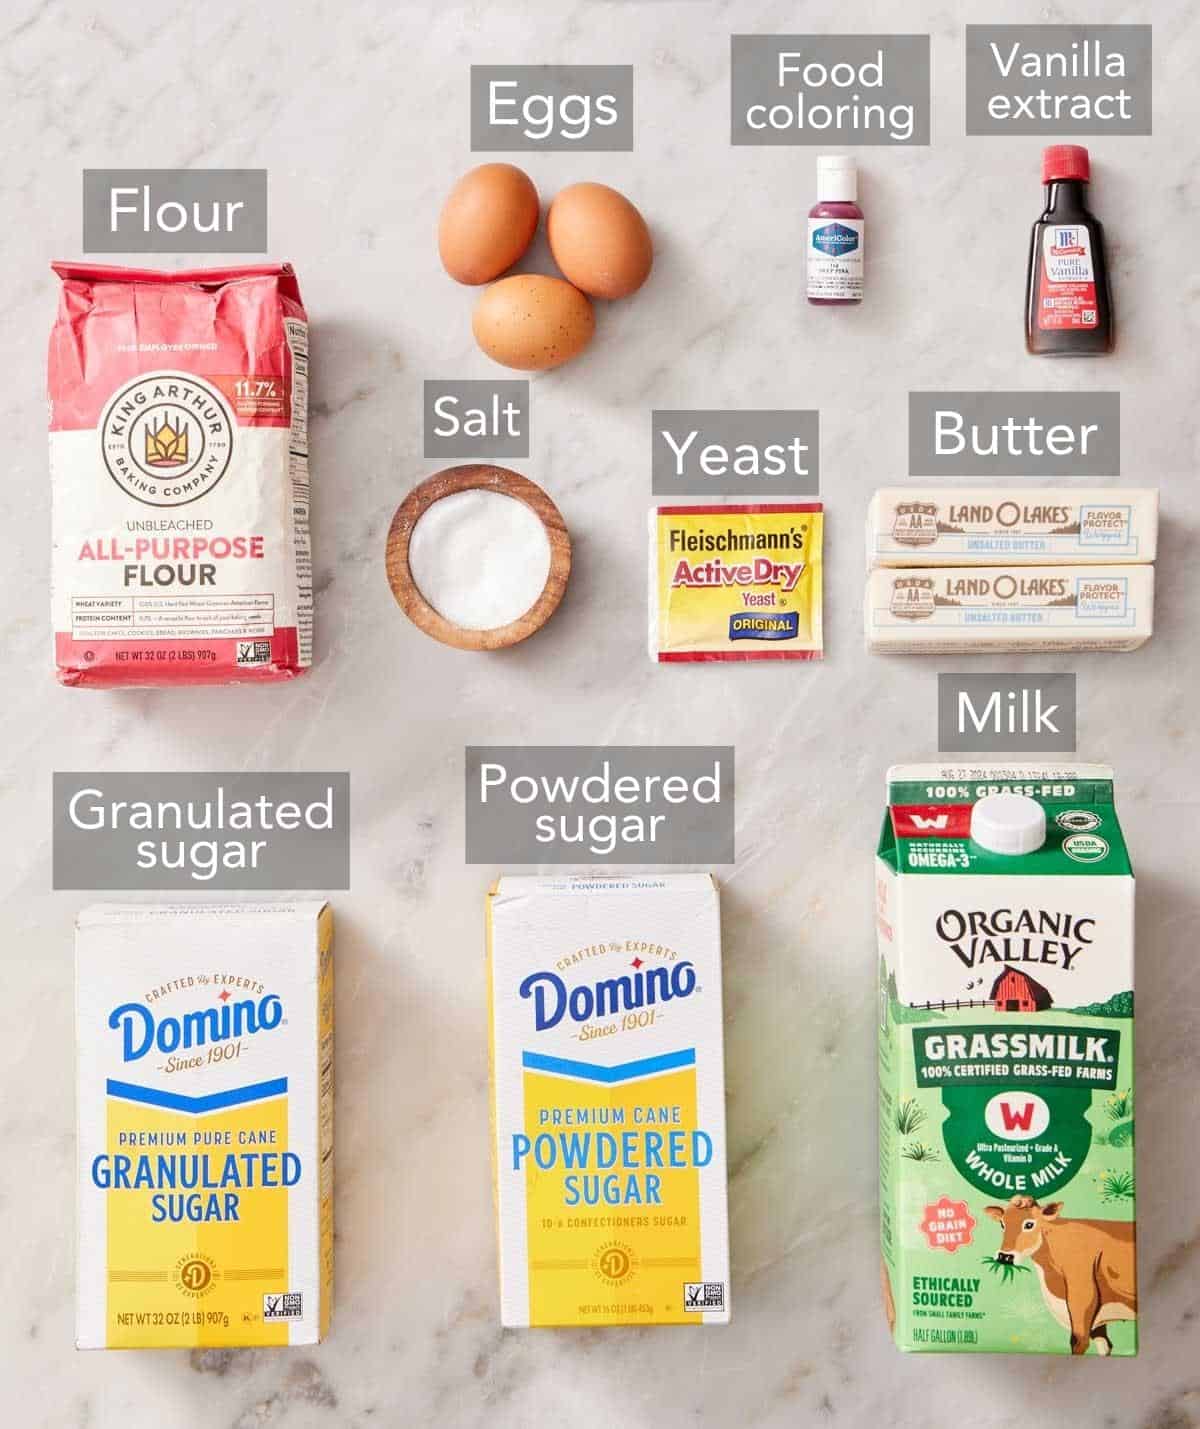
These are the main ingredients you need to make conchas. You can find the full list of ingredients and measurements in the recipe card below.
Active dry yeast — one ¼-ounce packet (2¼ teaspoons) is enough to make a fluffy bun. You will need to bloom it in milk warmed to 105-110°F with some of the sugar before you mix the dough. Check the temperature of the milk before you add the yeast since hotter milk can kill it. You can learn more about how to activate yeast in my guide.
Eggs and melted butter — these high-fat ingredients enrich the dough, giving conchas their tender, rich crumb and golden color. Use room-temperature eggs so they don’t chill the yeast, slowing down its rise. Soak the eggs in a bowl of hot tap water for 5-10 minutes if you don’t have time to set them out to warm at room temp. You can use my tricks for how to soften butter quickly, too.
Flour — I typically use all-purpose flour. Its medium-range protein content adds enough gluten structure for the conchas to have texture, but they stay soft and fluffy inside. I have also tested this with bread flour for the dough. Bread flour resulted in conchas that were a little chewier, and they tend to rise a bit taller than wide since the gluten structure is stronger. Keep all-purpose flour in the topping, though, so it stays light and crispy.
Sugar — granulated sugar is used to sweeten the bread, soften the crumb texture, and provide a source of food for the yeast so the dough rises well. Use powdered sugar for the topping. Granulated sugar is too coarse and doesn’t dissolve into the small amount of butter, so the topping turns gritty and crumbly instead of forming a smooth paste.
Can I Use Instant Yeast?
Yes. You can swap instant yeast 1:1 for active dry, but you will skip the blooming step, as explained in Active Dry Vs. Instant Yeast.
When I retested this recipe recently, I made it twice, with instant yeast and active dry yeast. The instant yeast test rose in about half the time as the active dry test for the first rise and about 10 minutes faster for the second rise.
Pro Tips For The Best Conchas
Weigh your ingredients. Overpacking dry measuring cups with flour is the main reason conchas turn out dry. If you don’t have a scale, learn the scoop and level method in my guide on how to measure ingredients correctly.
You can press the sugar dough balls between your palms if you don’t have a rolling pin. It turns out less even in thickness, but it still works well.
When you score the pattern on top, cut through the topping but not to the dough beneath it. You want the topping to spread apart at the score marks. If the dough is cut, it will also open up, and you can bake misshapen conchas. A sharp pairing knife with light pressure works great.
Make mini conchas. Use the same dough and topping, portioned into smaller sizes. To make them, divide the dough and the topping into the number of mini conchas you want. They will rise and bake faster, so check them sooner.
How To Make Conchas
I’ve highlighted portions of the recipe in step-by-step process images below. You can find the full set of instructions in the recipe card.
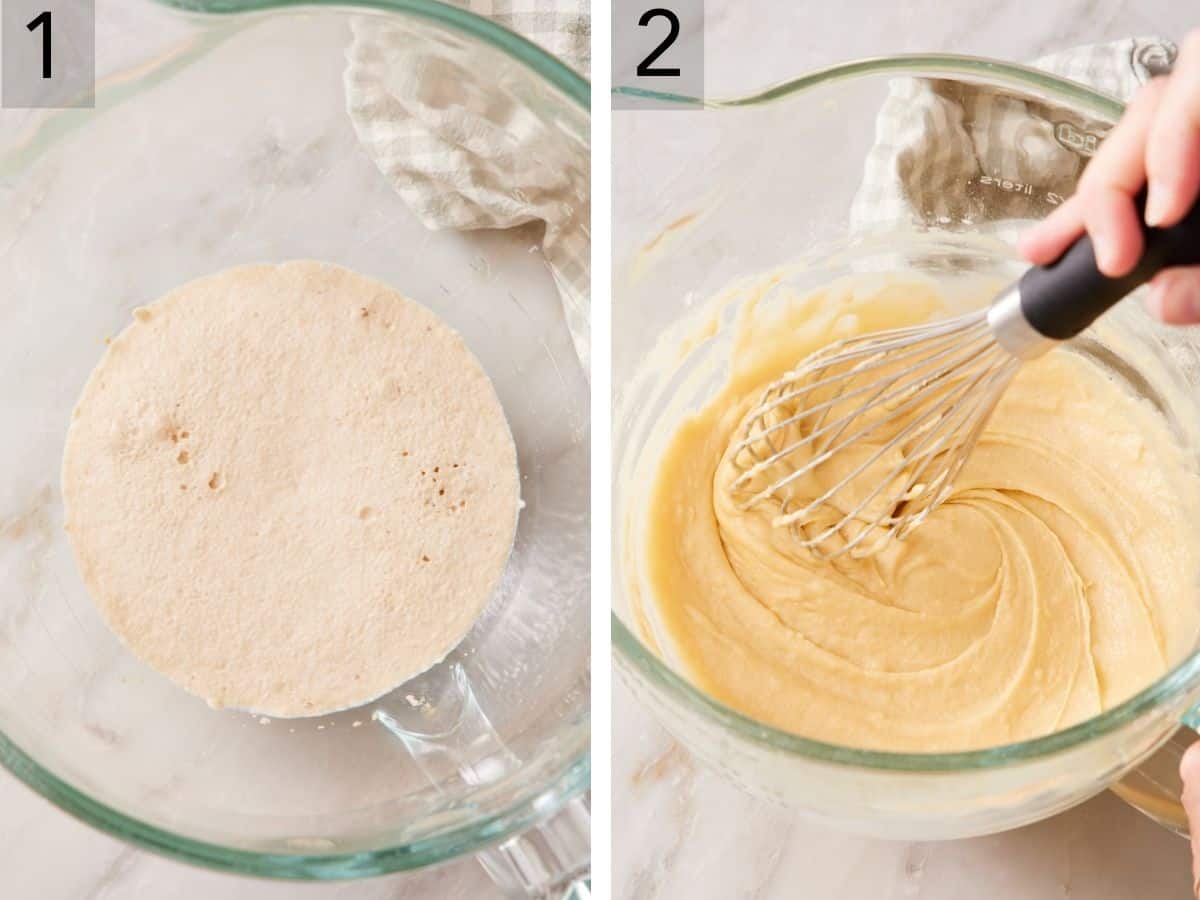
1. Bloom the yeast. Mix the yeast with the warm milk and some of the sugar, then let it sit until it develops a thick layer of foam on top. If it doesn’t turn foamy after 10 minutes, try again. The yeast may have been expired, or the milk wasn’t the right temperature.
2. Mix the dough. Add the eggs, vanilla, salt, and the rest of the sugar to the foamy yeast and whisk to combine. Then add half of the flour and whisk to make a smooth paste. Mix in the butter. Adding these ingredients before adding all the flour ensures the eggs mix thoroughly without chunks in the dough. It also gives the gluten development a jump start.
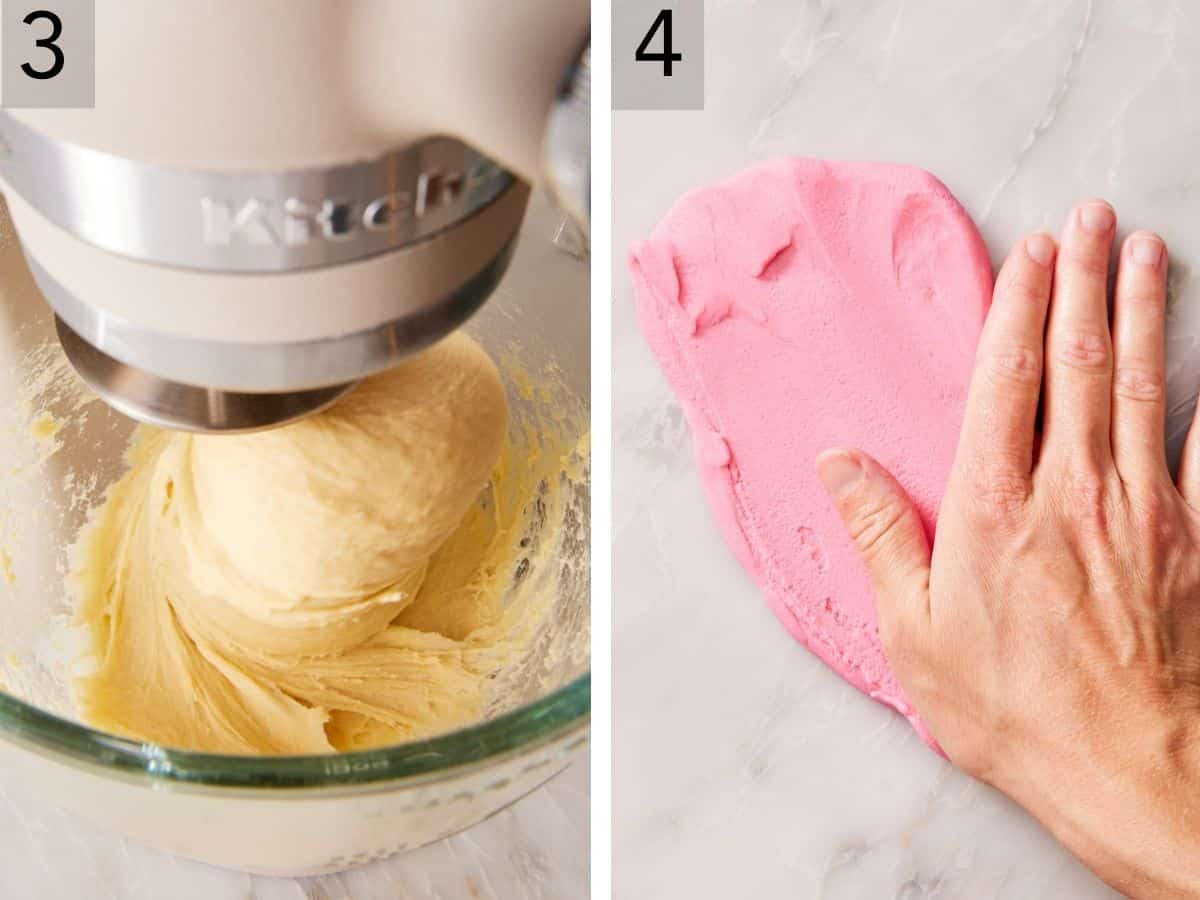
3. Add more flour and knead on medium-low for 5 to 7 minutes, until the dough is smooth, mostly balled around the hook and doesn’t stick when you tap it with a finger. If it’s still sticky, add a tablespoon of flour at a time from the remaining ¼ cup, sprinkling it around the edge of the bowl. Stop adding more as soon as it stops sticking, because extra flour makes conchas dense and dry. For more tips on what well-kneaded dough looks like, see How to Knead Dough. Cover the dough and let it rise for the first time somewhere warm, about 75°F, until doubled in size, 1½ to 2 hours.
4. Make the topping by mixing very soft butter, powdered sugar, flour, and vanilla into a simple paste. Mash the butter into the flour and sugar with a fork, or use a hand mixer on medium-low, until it forms a smooth paste. Cover tightly and keep it in a cool spot (not refrigerated, though) while you shape the dough balls, because warm topping is sticky and hard to roll.
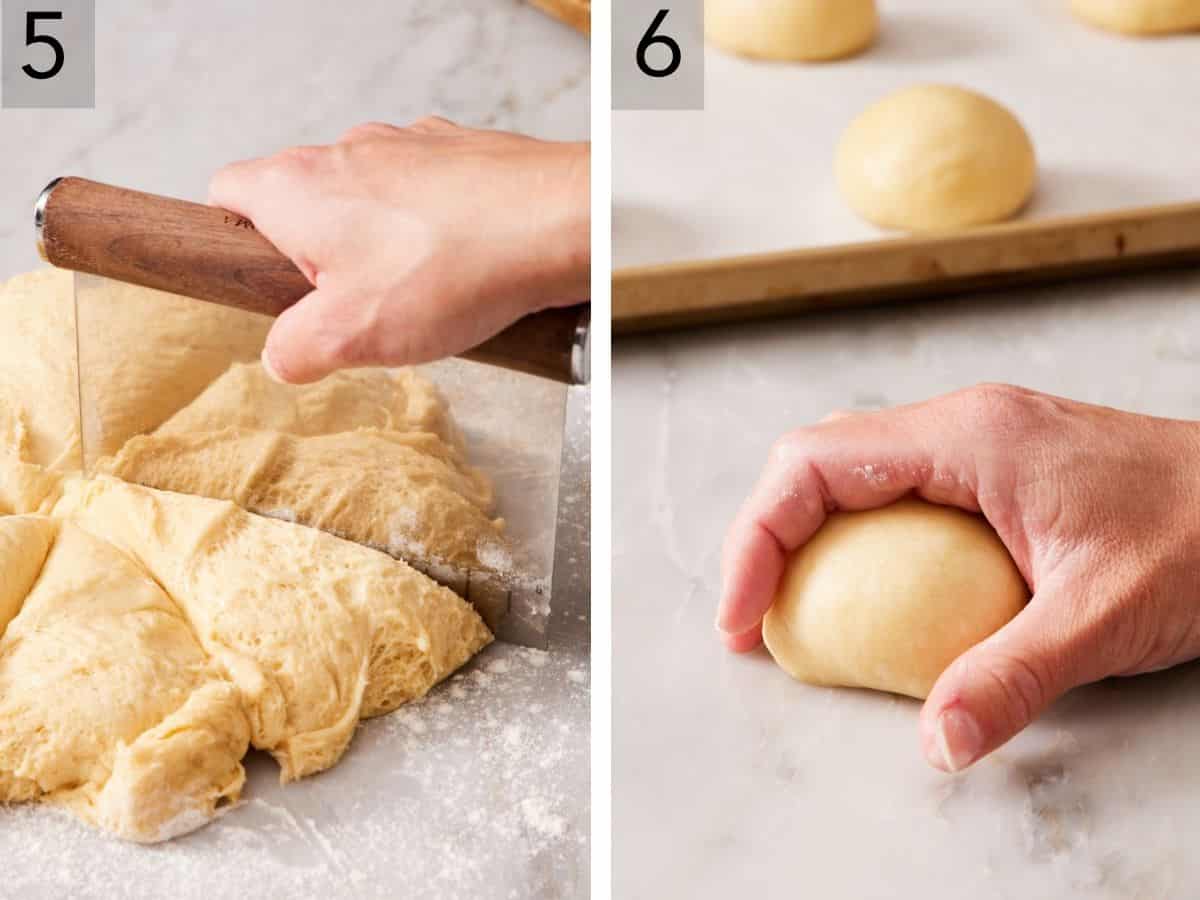
5. Divide the risen dough by turning it out on a lightly floured surface and cutting it into 12 pieces. You can eyeball it or weigh the whole mass of dough, then divide the gram weight by 12 to get the weight for each dough ball. (Mine were about 90g each.)
6. Shape the dough balls. Pinch the edges of each piece towards the center, then flip it over. On an unfloured surface, cup your hand over each piece and move it in small circles until it tightens into a smooth ball. (If you’ve made dinner rolls before, this is the same technique!) Place the dough balls on lined baking sheets, leaving at least 3 inches between each one.
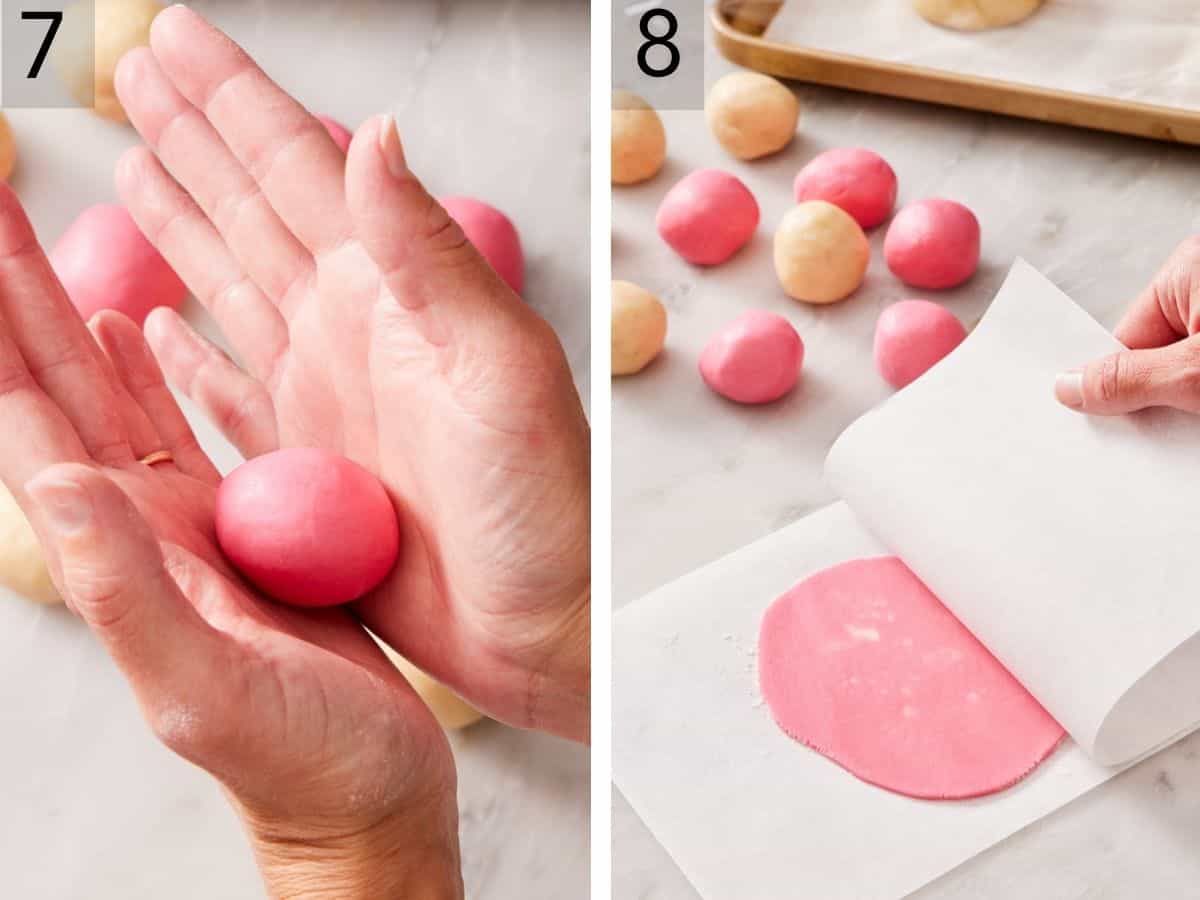
7. Portion the topping into twelve pieces and roll them into smooth balls between your palms.
8. Roll each ball of topping between two lightly floured squares of parchment into roughly a 4-inch circle about 1/16 inch thick. Clean up the edge with a 4-inch round cookie cutter or a knife.
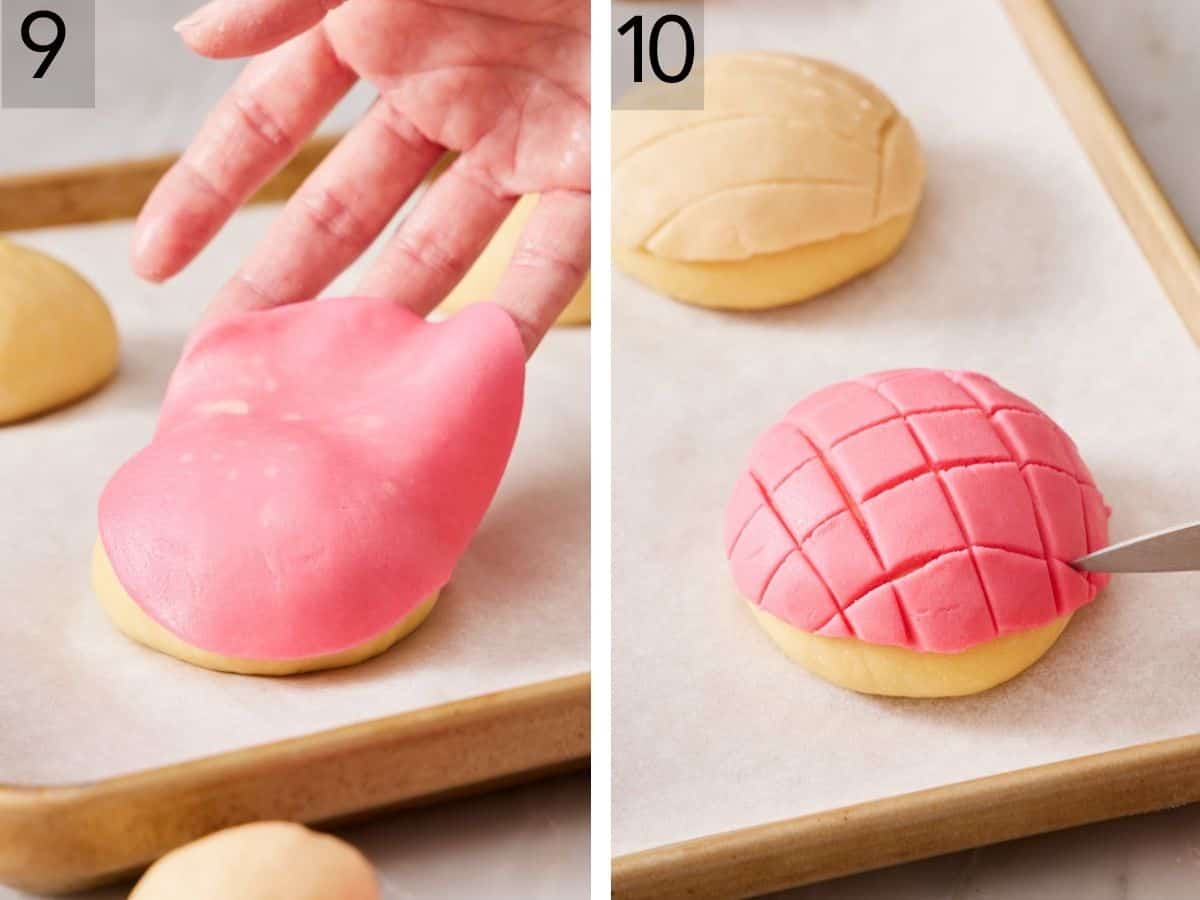
9. Top each risen dough ball. Drape a disc of topping over each ball so it nearly covers the dough without touching the tray, and trim any that does. If it touches the tray, it will stick and can tear away from the dough as it bakes.
10. Score the pattern on top with a sharp knife. For a shell shape, score a small semicircle on one side, then make curved lines about ½ inch apart that form rays out from the semicircle. Make sure you only cut through the topping, not the dough. A grid or any other pattern works too. Second rise: after shaping, topping, and scoring, loosely cover the pans and let the conchas rise for about 30 minutes, until they’re puffed and you can see dough peeking through the cuts. Bake one pan at a time at 350°F for 18 to 20 minutes, until the bottoms are golden. The topping should look dry and feel hard on top. Let them cool on a wire rack for at least 15 minutes before serving (they are delicious, warm and freshly baked).
Tips for the Topping
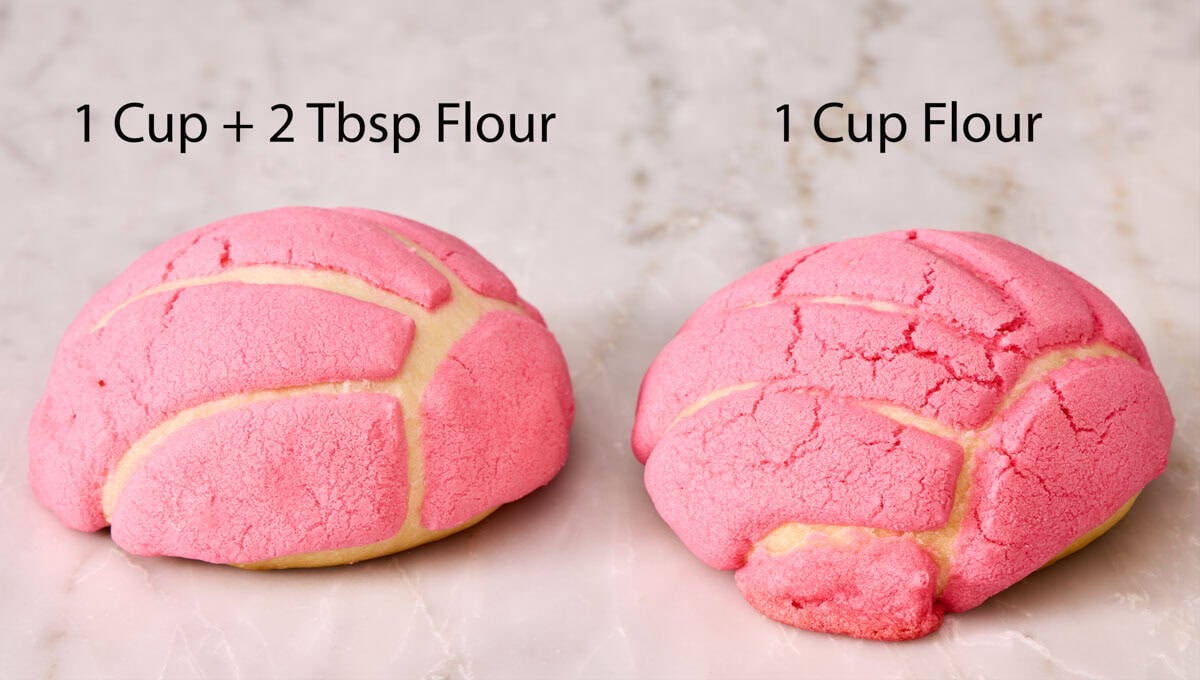
When I retested my original conchas recipe, I found that the topping with less flour would sometimes slide off the top of the dough during baking. It didn’t happen every time, but if the kitchen was warmer and the butter in the topping was softer, it would slide. I retested it again, adding 2 tablespoons of more flour to the topping, and found that the higher-flour topping kept a sharper, cleaner shell regardless of temperature fluctuations. The extra flour gives the paste more structure, so the butter doesn’t let it spread as much as it melts in the oven.
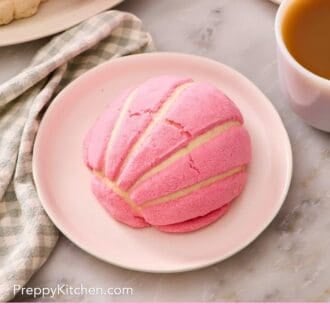
Classic Shell Pattern
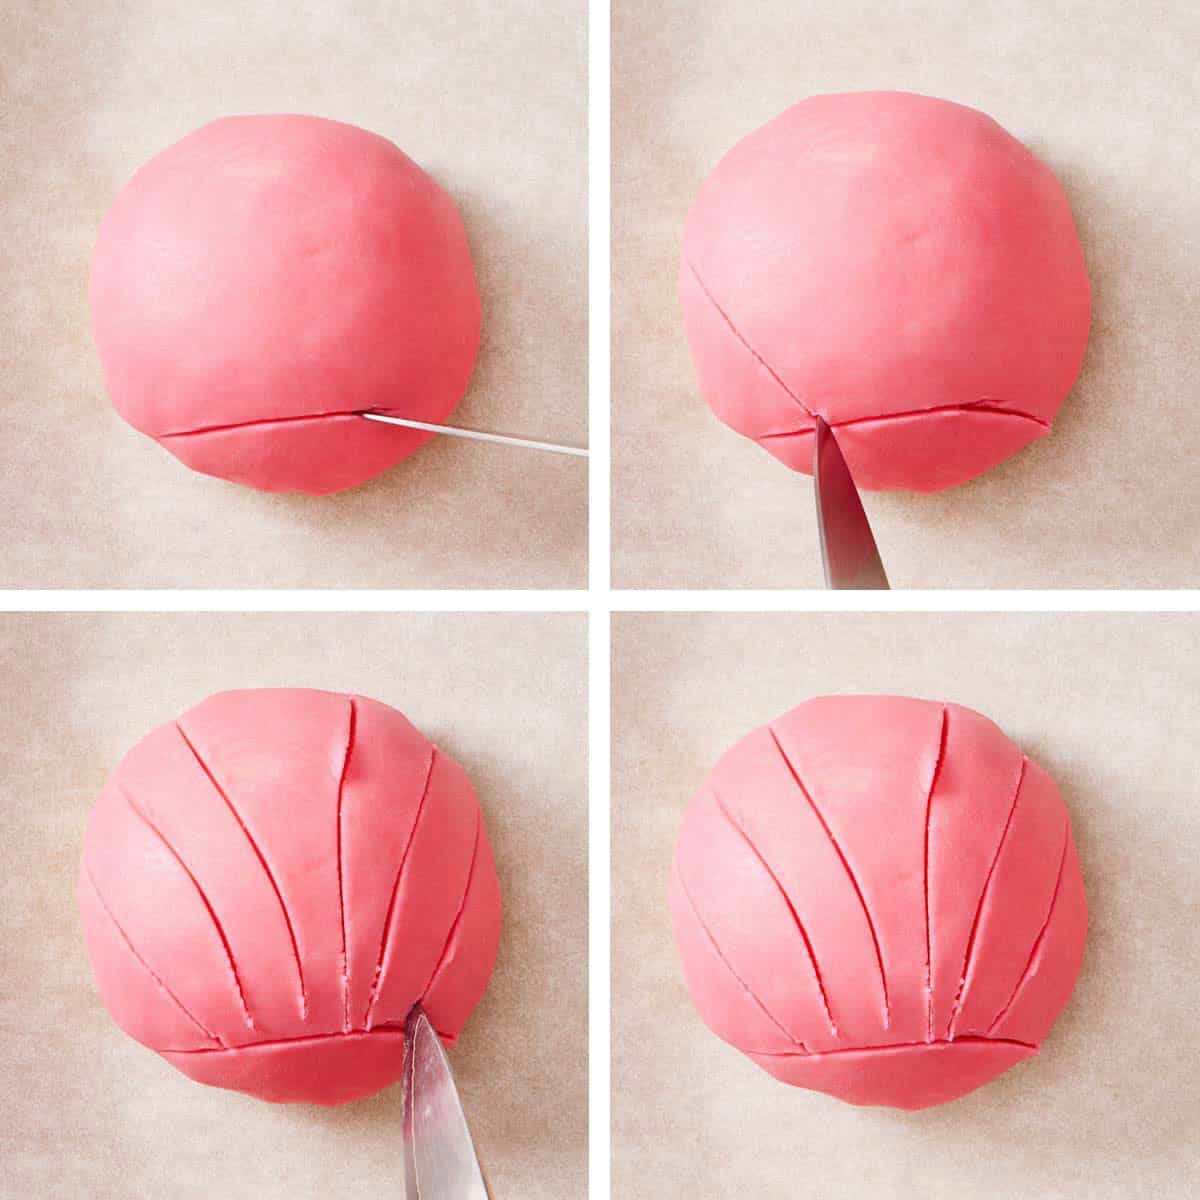
Start by scoring a small semicircle, roughly ½ inch from one edge. This will form the base of the shell. Then, make 6-8 score lines perpendicular to the first line, running at a slight angle to one side as you move across the concha. (They should look similar to sun rays!)
Tip: Note where the center is when you start the second set of lines—any lines to the left of center should go out towards the left side. Any lines to the right of center should go out towards the right side. They will be closer together at the base and fan out at the opposite end.
Grid Pattern
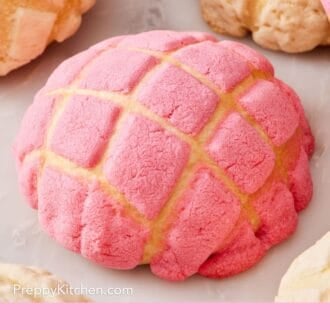
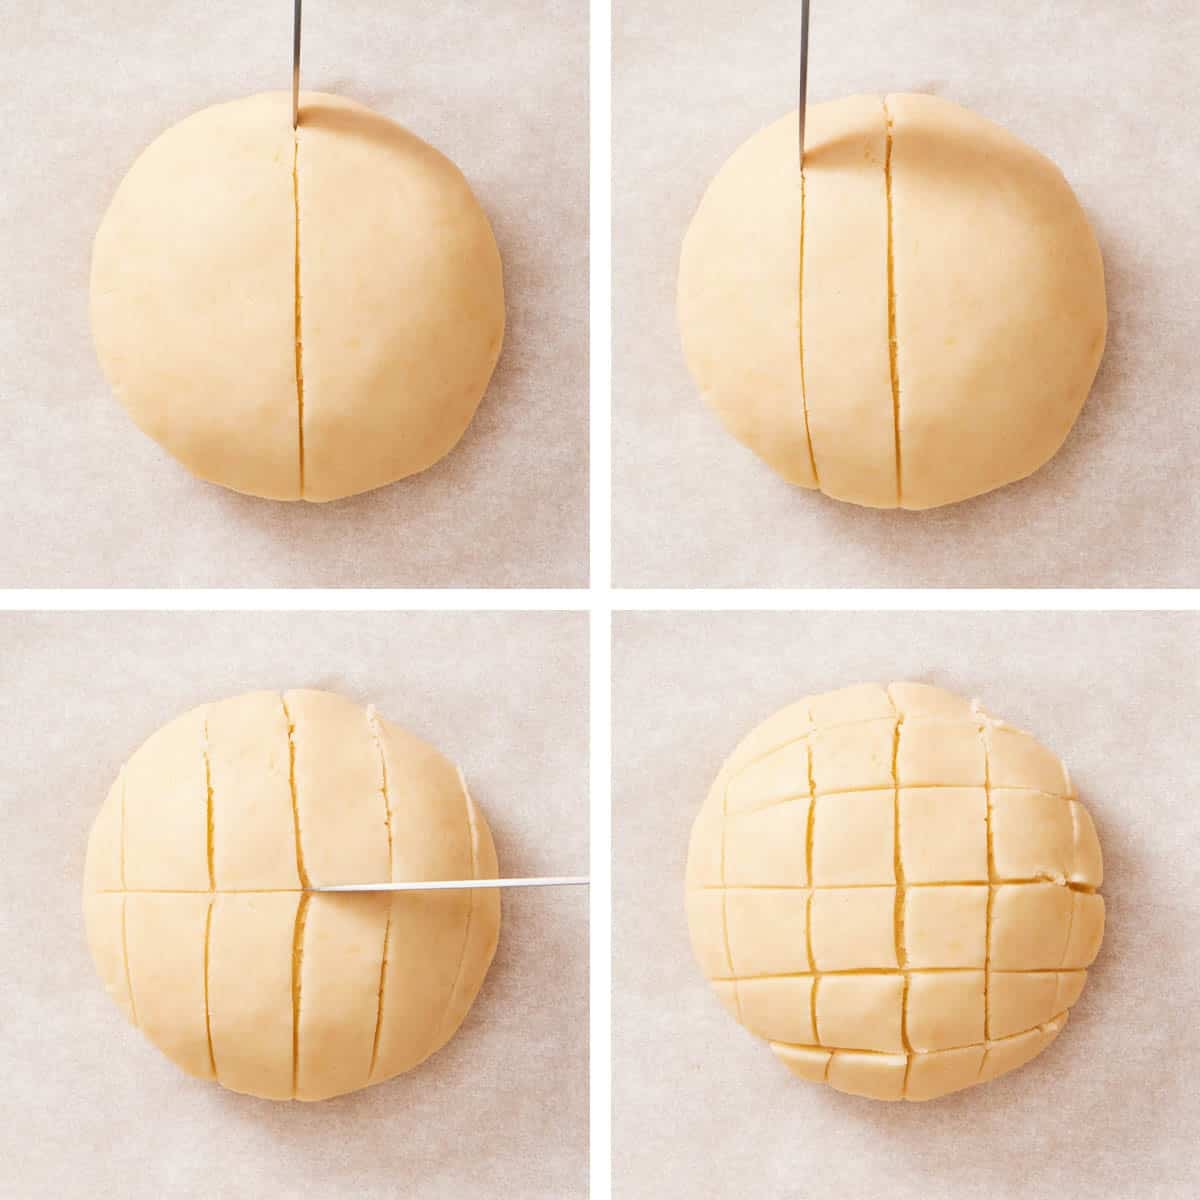
Score straight down the center in one direction. Cutting parallel to the center line, score more lines about ½ inch apart across the topping. Working in the opposite direction from the first set of cuts, score down the center, cutting a perpendicular line across each one. Continue making parallel cuts about ½ inch apart across the top, until the top is covered in a grid. You will have 6-8 scored lines in each direction.
Flavor And Color Variations
Divide the topping into batches and flavor each one. For pink conchas, add 3 drops of pink gel food coloring to one portion. You can use other colors, too! For cinnamon conchas, add ½ teaspoon ground cinnamon or any of your favorite baking spices.
I also tested a chocolate version and found it best to replace the added flour in the topping with cocoa powder! The dry cocoa will keep the topping from slipping off the top in the same way the added flour does. If you don’t remove that extra flour, the topping is too dry and cracks. To make chocolate conchas, use 1 cup of flour (120g) and 2 tablespoons (12g) of cocoa powder. You can also make fruit flavors using this same ratio but replacing the cocoa powder with powdered freeze-dried fruit.
How to Tell When They Are Ready to Bake
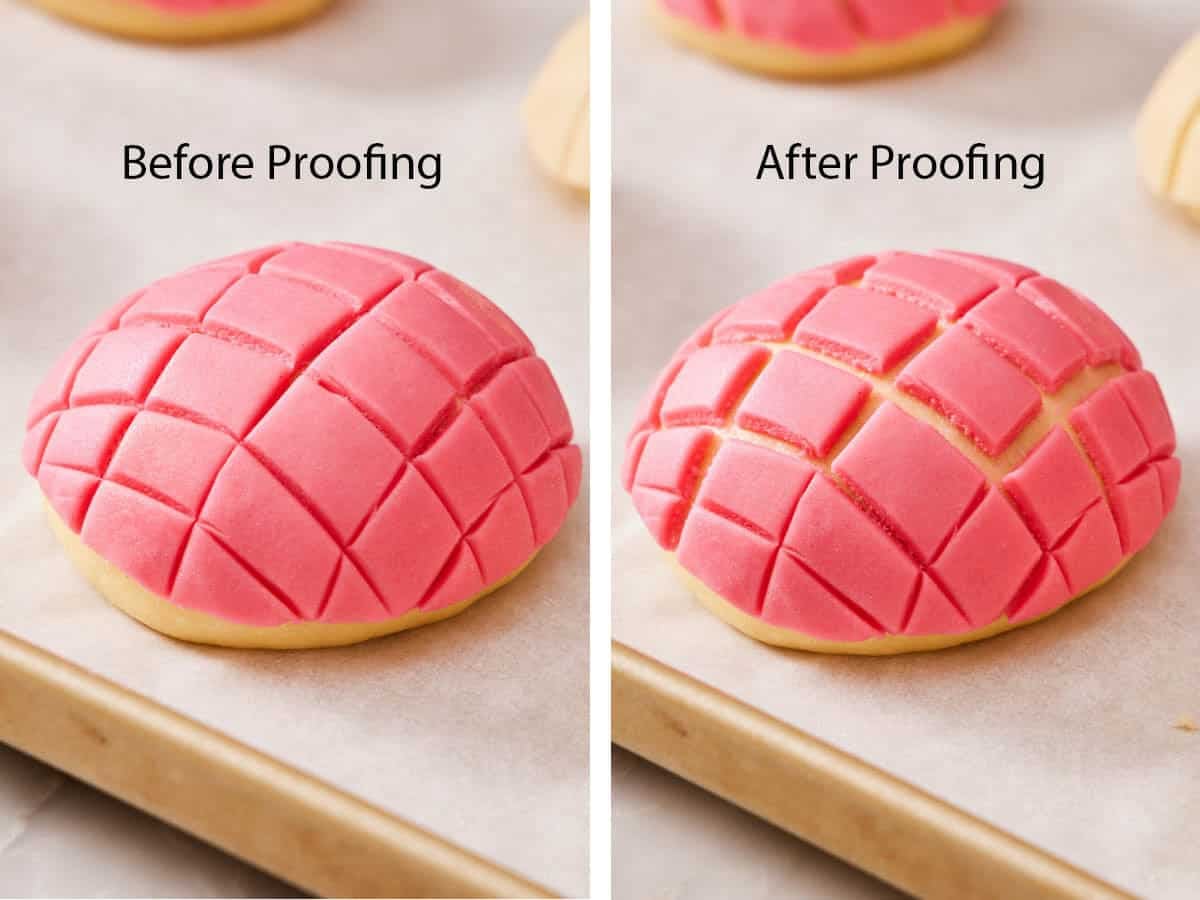
Once the conchas are shaped, the topping will start to pull apart during the second rise. That gap is your signal! You should see visible gaps with dough peeking through between the score lines in the topping. The overall size of the conchas will be bigger as well, but they may not fully double in size. The gap is the best visual indicator!
Underproofed conchas bake up tight, or they can burst or tear in random places, and the topping doesn’t crack open into a shell pattern like it should. For more details on when dough is risen, see my guide on how to proof bread.
Conchas Recipe
Ingredients
For the Dough:
- ¾ cup warm milk (180ml) (105-110ºF)
- 1 (.25-ounce/7g) packet active dry yeast (2¼ teaspoons)
- ½ cup granulated sugar divided (100g)
- 3 large eggs room temperature
- 1 teaspoon salt
- 1 teaspoon vanilla extract
- 4½ to 4¾ cups all purpose flour divided (540g)
- ½ cup unsalted butter melted (113g)
For the Topping:
- ½ cup unsalted butter very soft (113g)
- 1 cup powdered sugar (120g)
- 1 cup plus 2 tablespoons all-purpose flour (128g)
- 1 tablespoon vanilla extract
- Optional: food coloring
Instructions
For the Dough:
- In the bowl of your stand mixer, stir together the warm milk, yeast, and half of the sugar (¼ cup/50g). Set aside until the yeast is very foamy, about 5-10 minutes.
- Once foamy, add in the eggs, vanilla, salt and remaining sugar (¼ cup/50g) and whisk until well combined. Add in 2 ¼ cups of flour (270g) and whisk together to create a smooth paste. Add the melted butter and mix once more.
- Add another 2¼ cups of flour (270g) and attach a dough hook. Knead on low speed for about 1 minute, until a shaggy dough forms. Scrape down the sides of the bowl. Increase to medium-low speed and knead until the dough is smooth, mostly balled up around the dough hook, and does not stick to your finger when gently tapped, 5 to 7 minutes. (If it feels sticky or is still completely stuck to the sides of the bowl, scrape down the sides of the bowl, sprinkle in additional flour, 1 tablespoon at a time, around the edge of the bowl, and mix again for another minute. You may not use all of the extra ¼ cup)
- Place the dough in a large, lightly oiled bowl, and turn to coat. Cover the bowl with plastic wrap and place it in a warm place (about 75°F) to rise until doubled in size, 1 hour 30 minutes to 2 hours.
For the Topping:
- After the dough has been rising for 1 hour, make the topping by whisking together the flour, and powdered sugar in a medium bowl. Add the soft butter in small pieces to the bowl, then add the vanilla. Work the mixture together by mashing with a fork and/or stirring with a spatula until a smooth paste forms. (You can also use a handheld mixer on medium-low speed to mix this together.)
- If desired you can divide the mixture into batches and flavor or color them. To make them like I did, add 3 drops of pink gel food coloring to one portion for pink conchas, and leave the other portion plain for cream conchas. Continue to mash and stir the mixture until the coloring is evenly mixed into each. Cover with plastic wrap and set aside in a cool place until ready to use.
Shape, Assemble, and Rise:
- Line two large, rimmed baking sheets with parchment paper and set aside.
- Turn out the risen dough onto a lightly floured surface. Divide the dough into 12 equal pieces (about 90g each). To shape each dough ball, place the dough on an unfloured surface. Pinch the edges into the center, then flip the pieces over. Cup your hand around the dough, and pinch your thumb and middle finger towards each other so your hand is surrounding the dough. Move your hand in small circles on the surface to create a roll shape. (This will tighten the dough into a small ball.) Place six rolls onto each lined baking sheet, leaving at least 3” between each. Cover each tray loosely with plastic wrap and set aside.
- Portion out twelve 1½-tablespoon-sized balls (about 30g each) of the topping. Working one at a time, roll each into a neat ball shape with your hands. Flatten the ball, then place it between two, lightly floured parchment paper squares. Press with your hands or use a small rolling pin to roll the disc between the parchment to create a circle about 4” in diameter and 1/16” thick. Remove the top piece of parchment paper. If you have a 4” round cutter, cut the topping using the cutter to make a clean circle. If you don’t, freehand it with a small knife or pastry wheel, just to clean up the edges.
- Drape this piece over the top of one of the dough balls (The topping should nearly or completely cover the balls but without touching the sheet tray. Trim off any parts that are touching the tray.) Repeat with the remaining pieces of topping.
- Use a very sharp knife to cut the Concha pattern into the top (seashell shaped lines, about ½-inch apart). Score just through the topping, being careful not to cut through the bread. You can also cut a grid, or any other pattern you enjoy.
- Cover loosely with plastic wrap and allow your conchas to rise for 30 minutes, or until well puffed and you see some of the dough between the cuts.
Bake:
- While the conchas are rising, preheat the oven to 350°F.
- Bake at 350°F for 18 to 20 minutes or until the bottoms are golden. Transfer to a wire rack to cool completely, or enjoy warm.
Notes
- If my kitchen is cold, I like to warm my mixing bowl before I start the yeast. Fill it with warm water and let it sit for a few minutes before pouring it out. Then add the milk. Ice-cold bowls quickly drop the temperature of the milk and make for sleepy yeast!
- Read the expiration date on the yeast before you start. If you don’t bake often, it may have expired, which means your dough won’t rise. Also make sure it says “active dry yeast,” not “rapid rise” or “instant” on the label. Those types do not need to bloom and work better if they are mixed directly with the other ingredients.
- Get creative with the topping design! You can score any design you like. You can also use a small shaped cookie cutter to score shapes into the topping too. This is a fun way to customize the conchas for holidays or any occasion.
Nutrition
Have you tried this recipe? Tag me today!
Mention @preppykitchen and tag #preppykitchen!
How Long Do Conchas Last?
Room temperature: store cooled conchas in an airtight container for up to 3 days. They’re best on day one, but a few seconds in the microwave softens them again.
Freezer: freeze baked conchas in a zip-top bag for up to 3 months and thaw at room temperature.
Make the dough ahead: after kneading, cover and refrigerate the dough overnight instead of letting it rise in a warm spot for the first rise. The next day, set it out and let it come to room temperature, and finish rising if needed before shaping, 1-2 hours in a warm spot. In my test, the dough doubled in size in the fridge overnight, so it just needed to come to room temperature before shaping.
Frequently Asked Questions
Lightly sweet and buttery, with vanilla in both the bread and the topping. The soft bread and crunchy shell contrast in texture, and the sugar crust on top is where most of the sweetness comes from.
Not quite. Conchas are baked, not fried, and the dough is less sweet. The texture is closer to a soft dinner roll or brioche bun with a sugar-cookie top.
Eat them as they are, or tear them and dunk them in coffee, hot chocolate, Mexican hot chocolate (my fave!), or milk. You can also split them and spread the inside with butter, jam, or dulce de leche.
More Recipes To Try
Try more classic Mexican sweets with one of these dessert recipes:
- Churros — crisp fried dough rolled in cinnamon sugar, a panadería and street-food classic.
- Flan — sliceable baked custard with a caramel syrup baked in.
- Tres Leches Cake — a sponge cake soaked in three milks, one of Mexico’s most-loved desserts.
- Sopapillas — fried squares of dough topped with a sweet drizzle of honey.
- Pastelitos de Guayaba — puff pastry filled with guava paste and cream cheese and baked until golden and crispy.
If you’ve tried this concha recipe, then don’t forget to rate it and let me know how you got on in the comments below. I love hearing from you!