

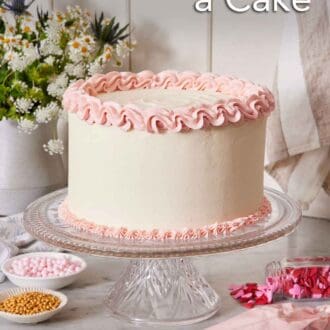
If you’re baking for a special occasion and wondering how to decorate a cake, you’ve come to the right place. I’ve compiled all the tips, tricks, and simple techniques that I use into this post. It not only serves as a guide but also provides plenty of inspiration to help you decide just how to decorate your cake!
So whether you want a more rustic naked cake look or are going all out with intricate buttercream flowers, this cake decorating post has it all! For more baking how-tos, see how to soften butter, how to make powdered sugar, and how to toast coconut.
Equipment For Cake Decorating

Piping bags and tips — these are a baker’s essential for certain cake fillings and piping decorations on cakes. You can use different tips for different effects and styles of decoration. I recommend getting standard 12-inch pastry bags as your all-purpose size, but if you want to stock up, you can also stock a larger size (18 inches) to hold larger amounts of frosting.
Bench scraper — the large, flat blade is very useful for creating a crumb coat on a cake and a smooth finish on the final outer frosting.
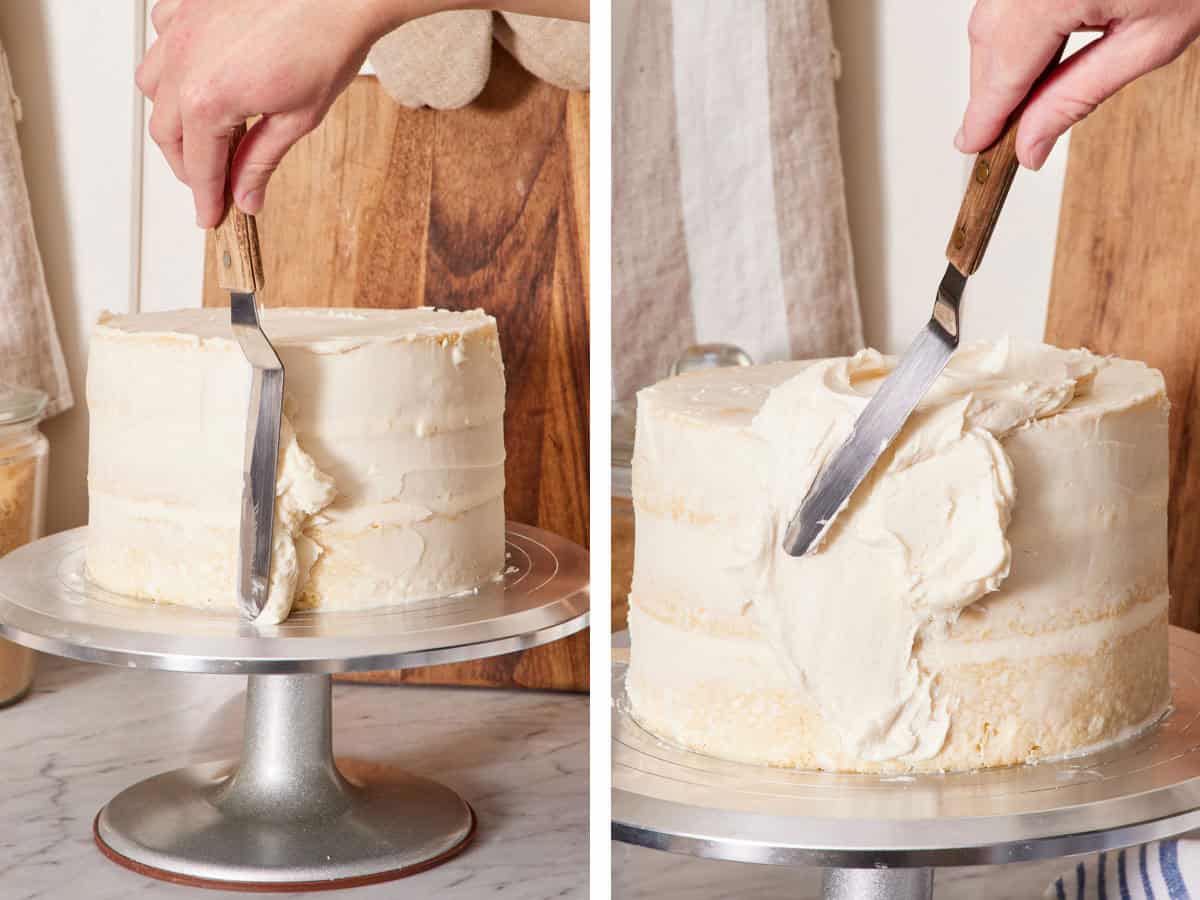
Offset spatula — great for spreading fillings, applying the initial layers of outer frosting, and creating decorative textures like swooping frosting on the outside of cakes.
Cake decorating turntable — provides an easy way to move the cake around seamlessly as you frost and decorate. If you don’t want to commit to buying a cake turntable just yet, you can set your cake stand on a lazy susan!
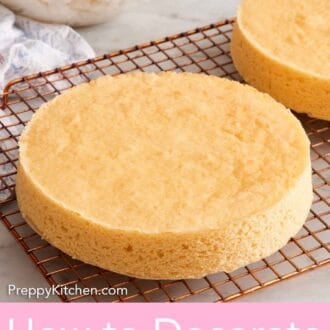
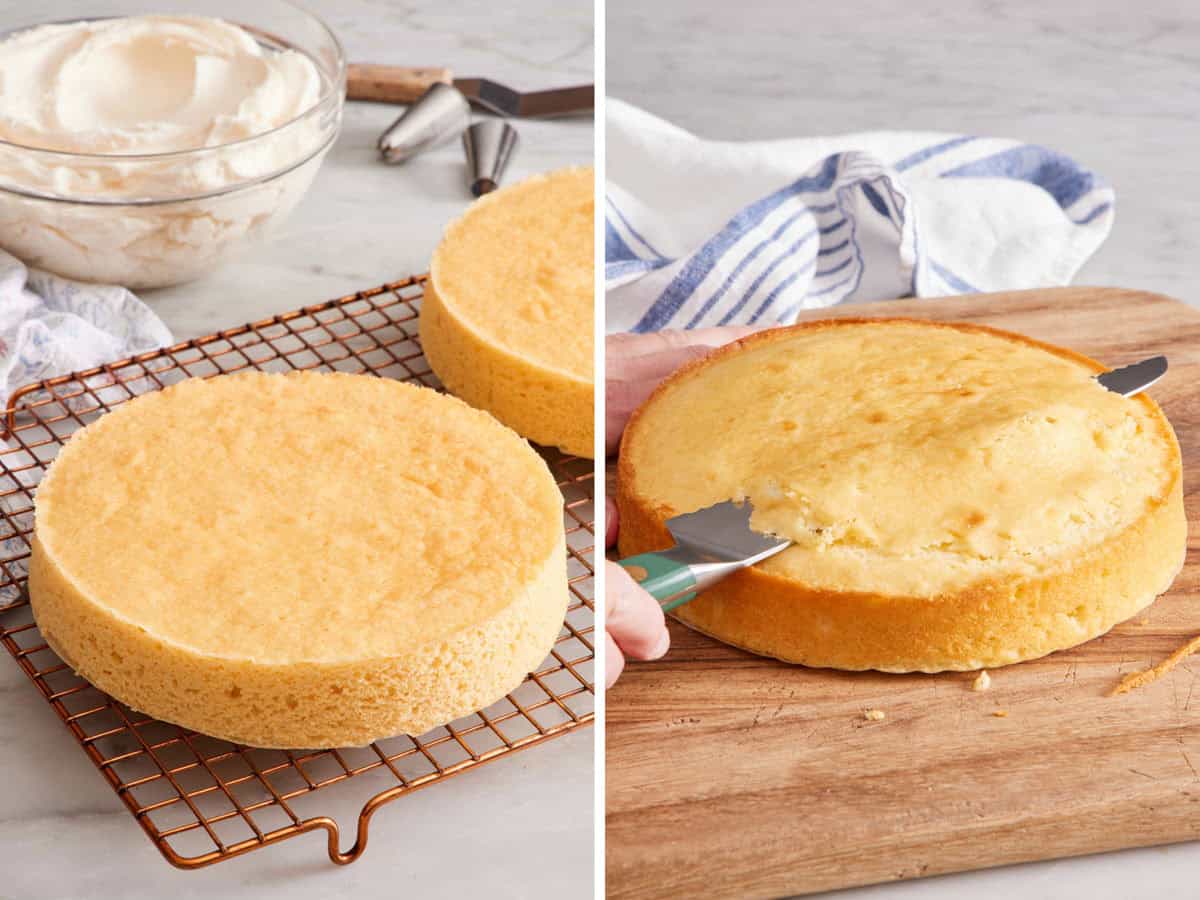
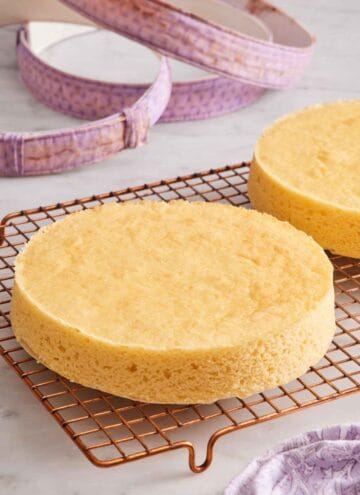
Start With Flat Cake Layers
A perfectly decorated cake starts with the proper foundation– flat cake layers! If your layers are domed or sunken in the middle, your stacked cake will never be straight or level.
The easiest way to bake flat cake layers is to use cake strips! If you have seen any of my cake recipe videos, you know I always bake with these and think they are an essential piece of equipment in a baker’s pantry. You can either buy them (I’ve had my set for years!) or make your own. See my post on how to get perfectly flat cake layers for more info.
If your cakes do end up forming a dome, level them off by carefully trimming off the dome with a bread knife.
Let’s Talk About Buttercream
Choosing the right frosting for how you want to decorate your cake is the second key to a successful cake. These are the main frostings I like to use for cake decorating:
American Buttercream: This is your classic, all-purpose cake frosting. It’s excellent for piping decorative patterns and making buttercream roses. Plus, the flavor is very well-liked, so it’s a great choice if you are serving a cake and aren’t sure of your guests’ tastes. There are so many different flavors of American buttercream to choose from, like classic vanilla buttercream, raspberry buttercream, chocolate buttercream, and strawberry buttercream.
Meringue Buttercreams: Swiss meringue buttercream and Italian meringue buttercream are the silkiest types of frosting and are great for super smooth sides and beautiful decorative piping (most often used for wedding cake!). These frosting recipes are a bit more advanced but are still very achievable for a beginner baker. They will be the easiest to spread on the outside of a layer cake if you want a super smooth, bakery-style finish.
Cream Cheese Frosting: Cream cheese frosting is fluffy, soft, and great for swooping. It can pipe well if made stiff enough, though this frosting needs to be refrigerated to remain stable because it contains dairy (it does not do well in warm temperatures). It also has a slightly tangy flavor, so keep that in mind when deciding whether to use it.
I also have lots of other frosting recipes that you can try, too!
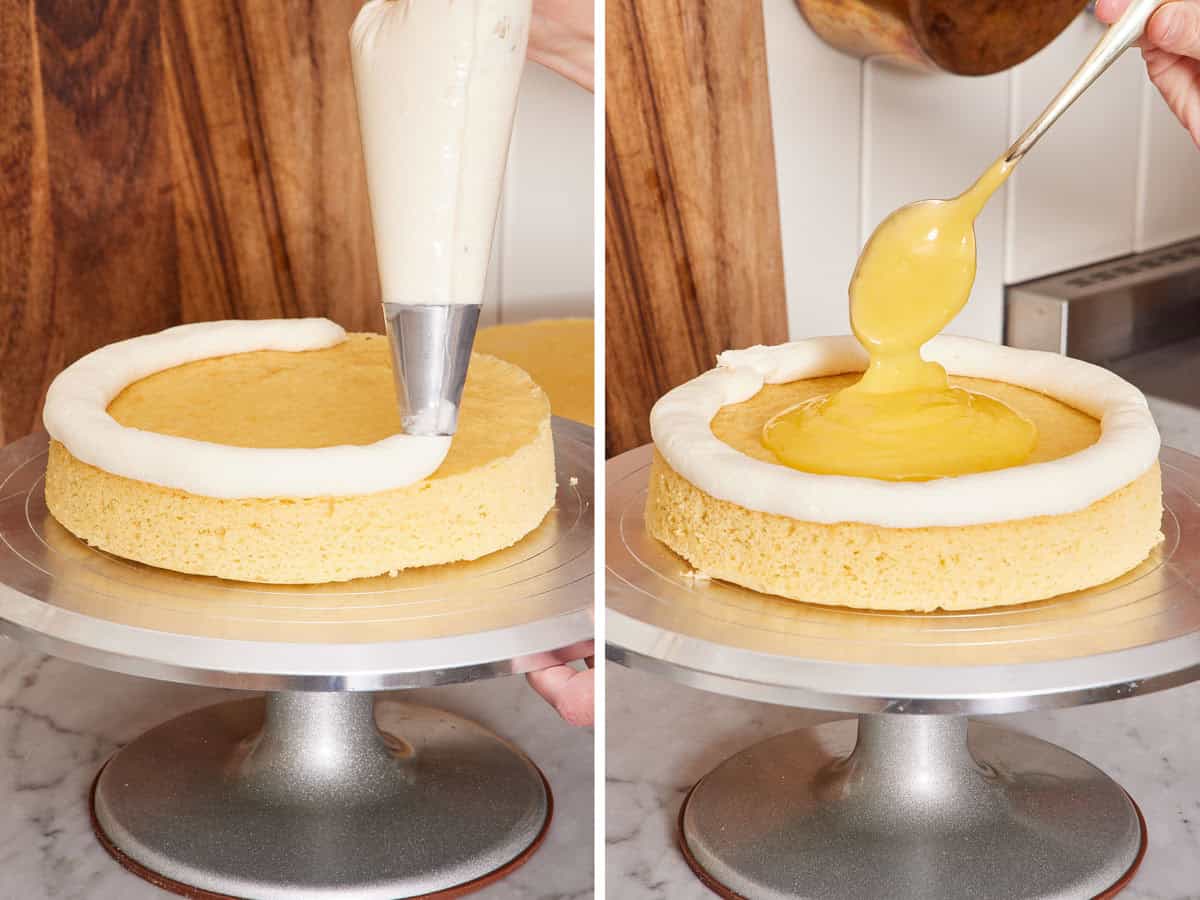
Choose Your Filling
I often fill my cake layers with the same frosting I’m using on the outside of the cake. But other types of fillings are a fun surprise to include in a cake! There are a few things to keep in mind when choosing your filling.
Make sure the filling is sturdy enough to hold up between the cake layers and withstand slicing. If the filling is too soft or runny, the cake layers will slide around and make the cake itself unstable, or the filling will ooze right out when you try to cut the cake.
If you use a filling like lemon curd, strawberry jam, or caramel, use a large round tip to pipe a border of frosting right on the edge of the cake layer before adding the filling. This “frosting dam” will help contain the filling.
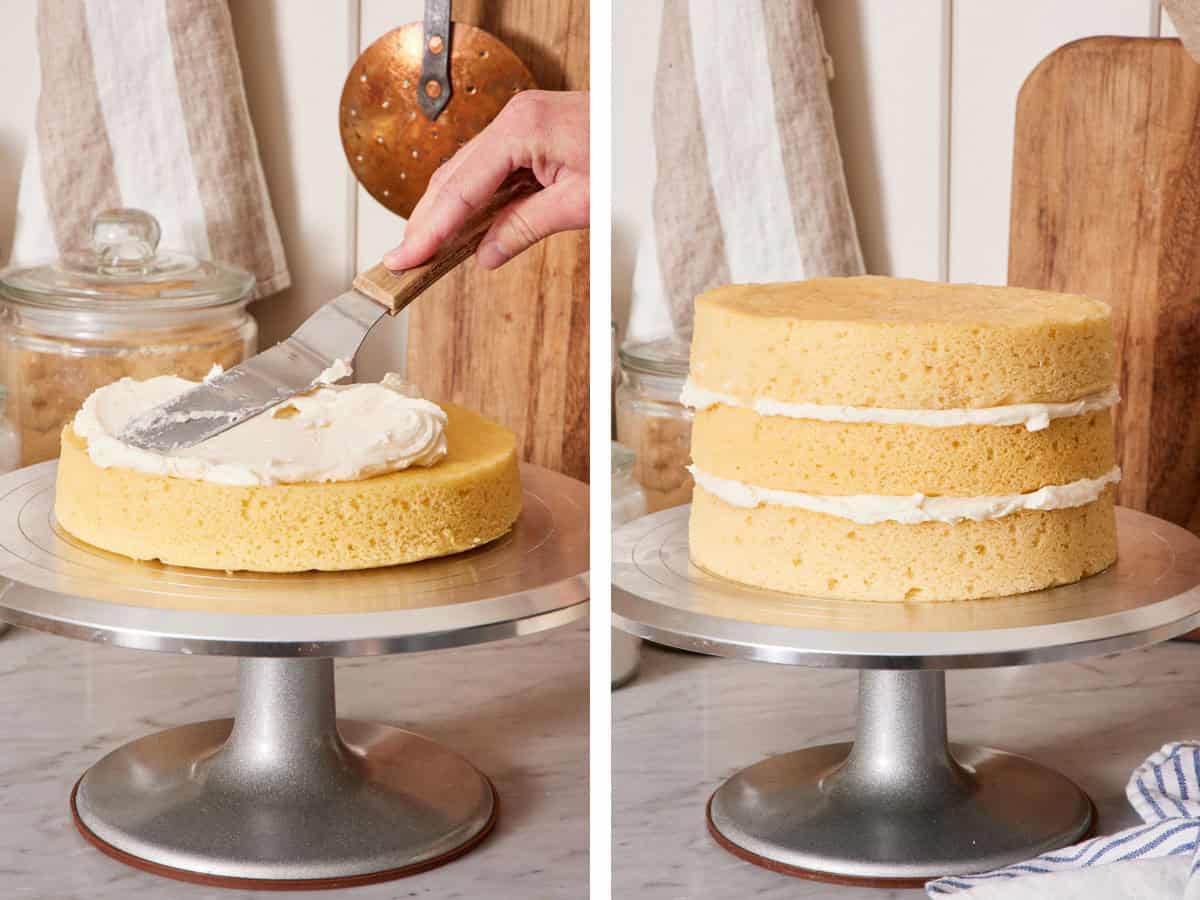
Evenly Stack The Cake Layers
For a tall, stable layer cake, be sure to stack the layers evenly on top of the base layer. All the edges should line up perfectly. For the perfect presentation, spread frosting or filling all the way to the edges of the cake so a gap doesn’t form when you frost the outside.
What’s The Deal With Crumb Coats?
A crumb coat is really just a very thin layer of buttercream that you add to the exterior of the cake first. This stabilizes the cake and keeps any potential crumbs from getting into the final frosting layer and ruining your decoration. Smooth it out using a bench scraper or offset spatula — it doesn’t have to be perfect — and scrape off as much excess as you can without damaging the cake layers. Then, chill the coated cake in the fridge for 20 minutes or so until it’s firmed up.
Once the crumb-coated cake is chilled, you can apply your final layer of buttercream and smooth it out. The world is your oyster at this point! Crumb-coating a cake is not always necessary, but it makes cake decorating much easier!
Make Sure Your Frosting Is Smooth
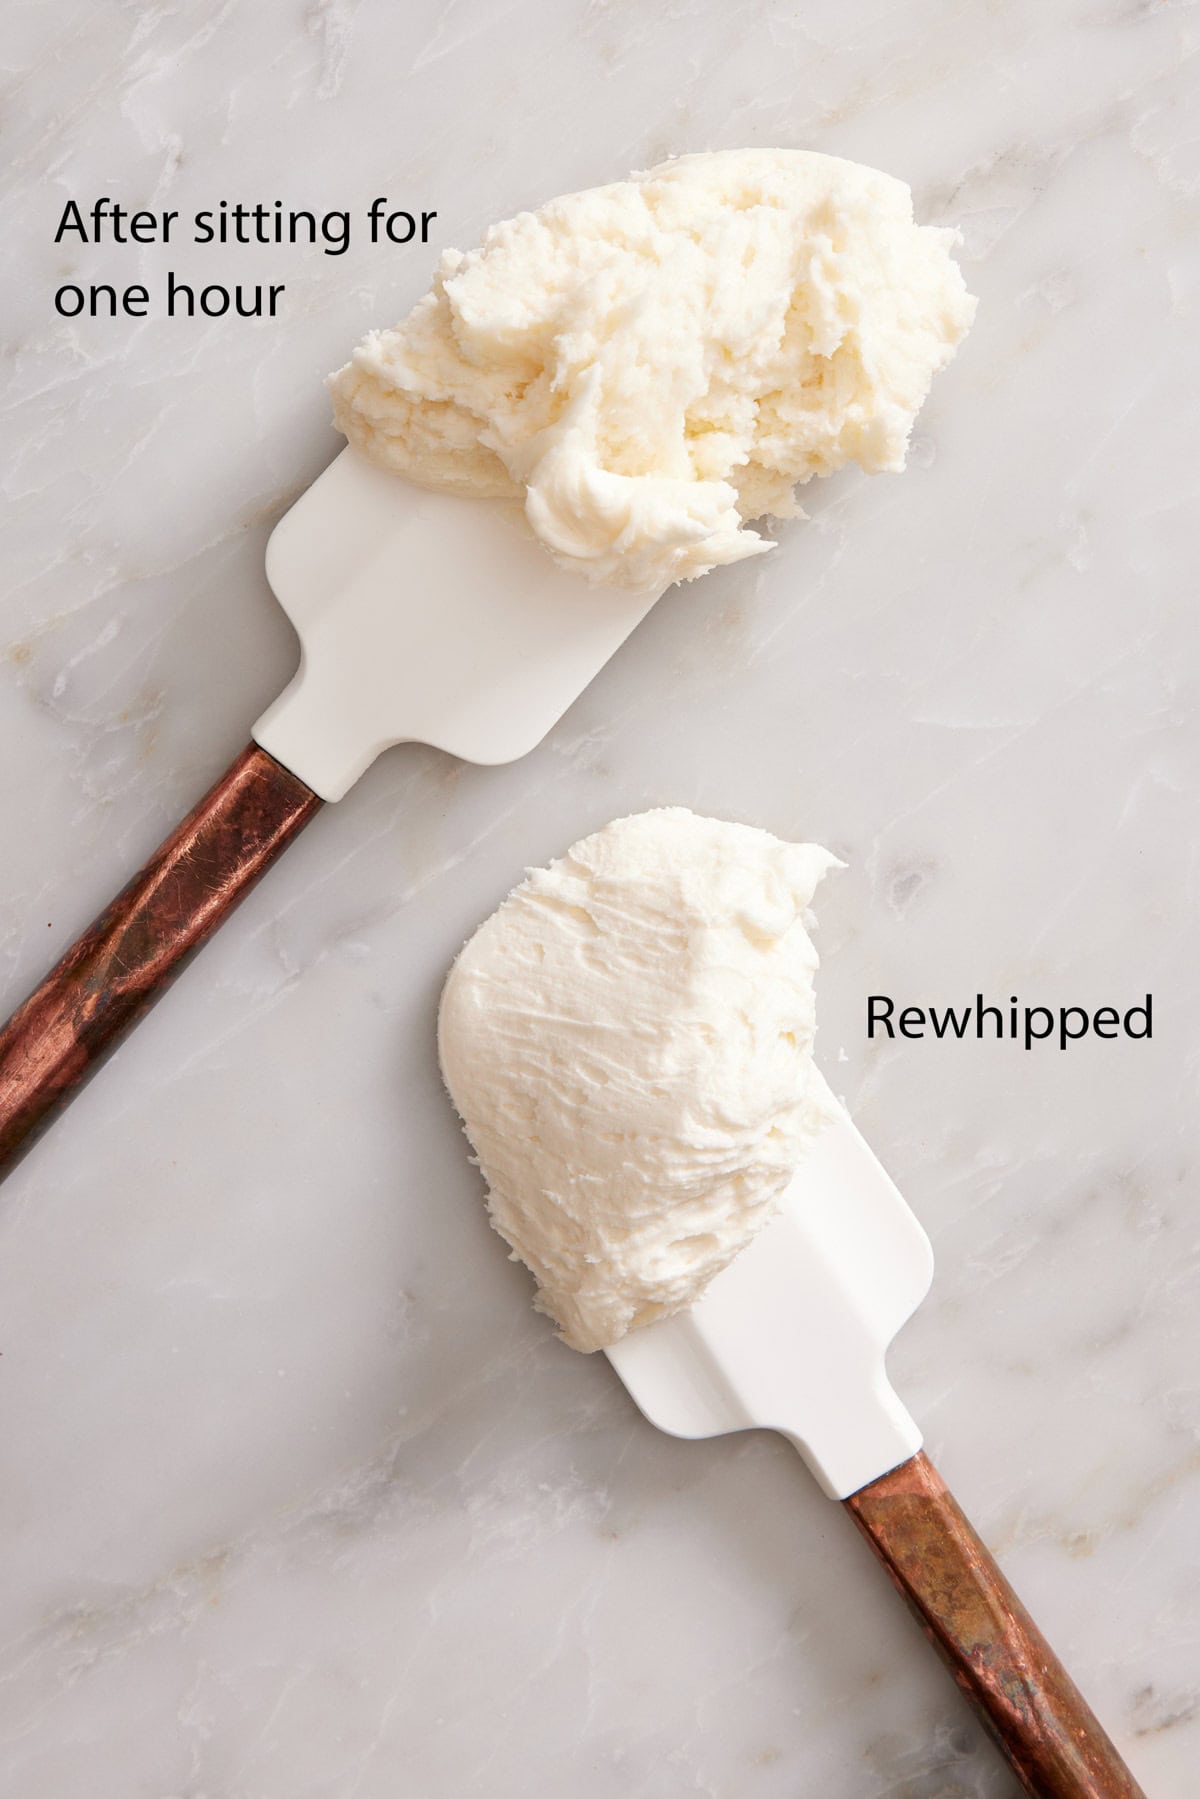
If the frosting has been sitting for 30 minutes or more, re-whip it to restore its ultra-smooth consistency. A smooth, spreadable frosting is key to getting the perfect, even frosting layer on the outside of the cake.
A velvety frosting makes the best decoration, too! It’s easy to swoop using a large offset spatula like in my chocolate cake and strawberry cake.
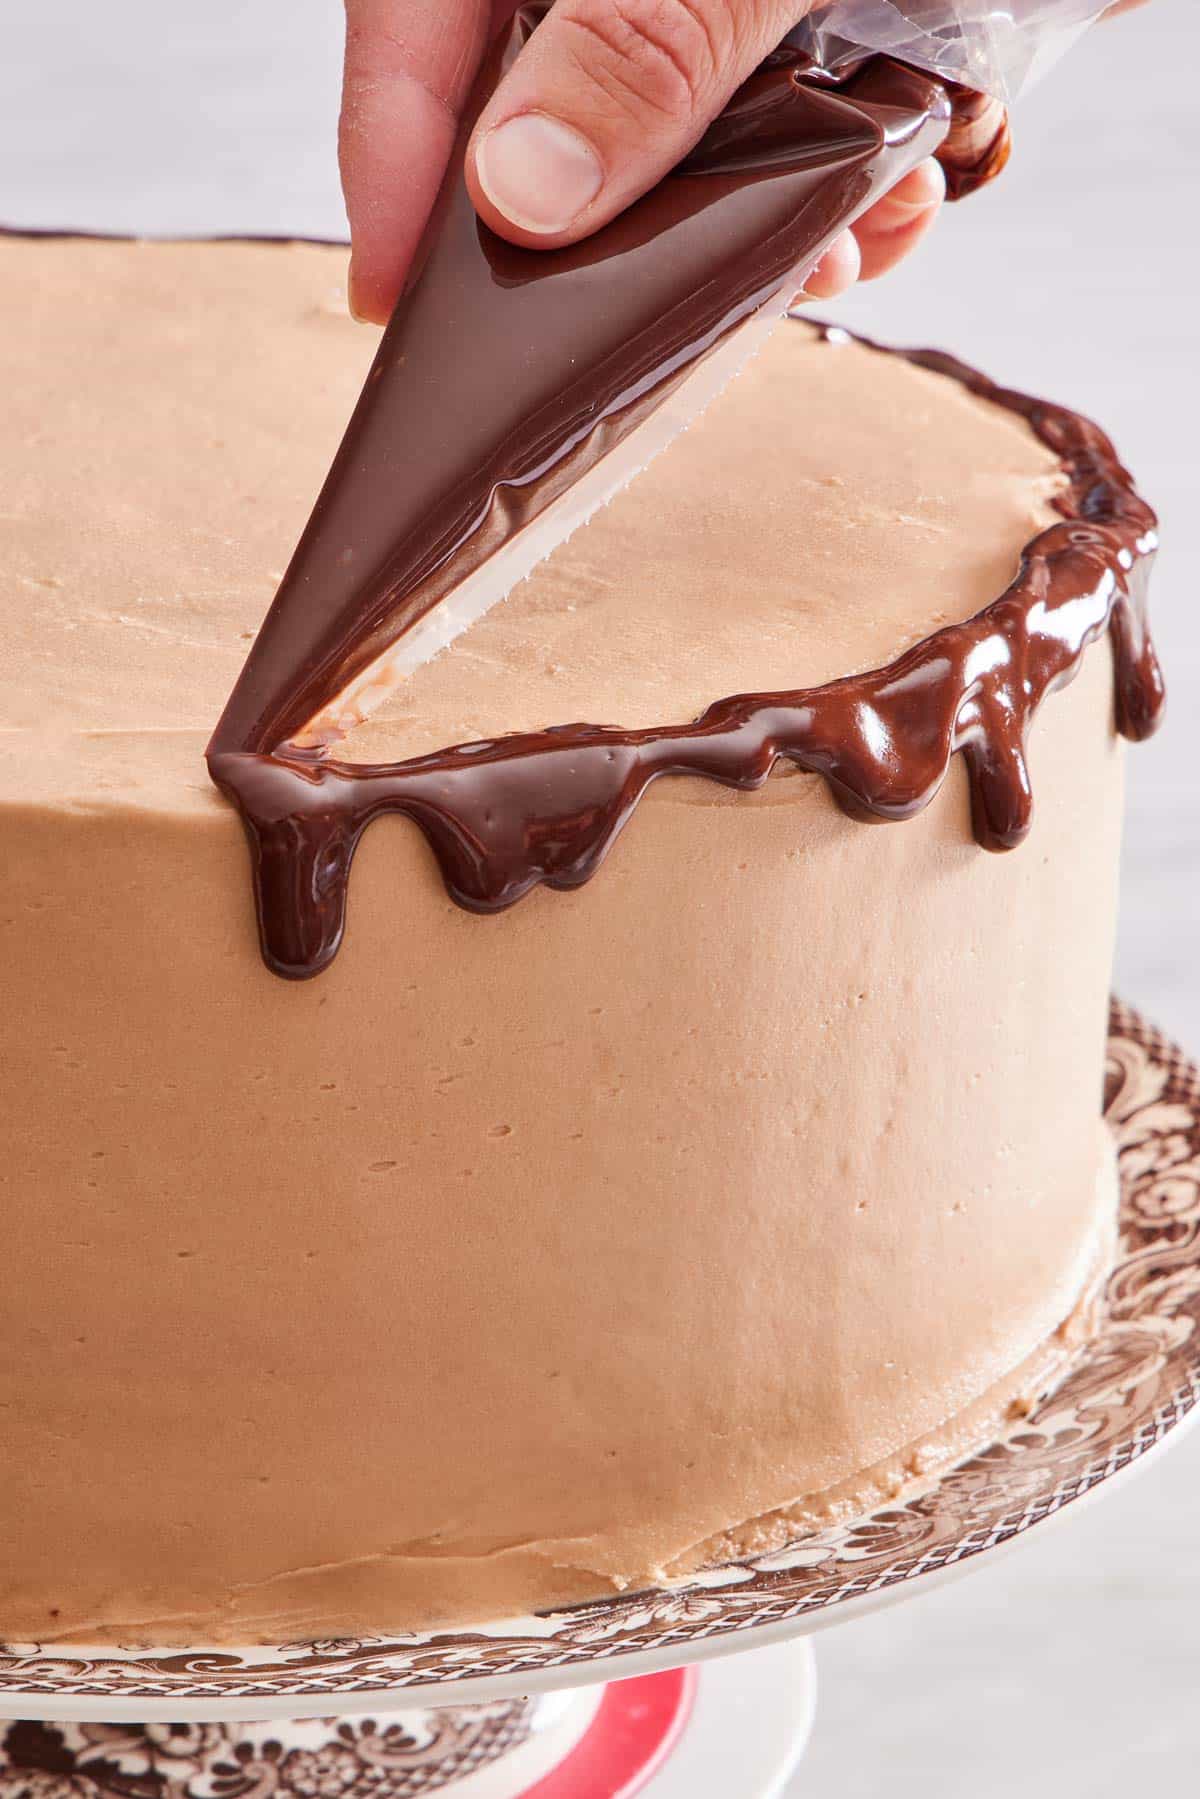
Add A Ganache Drip
A drip is an elegant cake-decorating technique that is much simpler than you may think! This is a fun and easy way to really elevate the look of your cake. The most important thing is to make a chocolate ganache that is thin enough to drip but not so runny that it will run all the way down the sides of the cake and pool at the bottom. You can test your ganache by piping on the lip of a drinking glass and seeing how far and quickly it runs.
Add the ganache to a piping bag (also called a pastry bag) and snip off the corner. Drip the ganache along the top edge of the cake first. Then, add more ganache to the top of your cake and spread it to the edge with an offset spatula. Doing this will hide any possible imperfections on the top of the cake as well! See my mocha cake for more tips.
This drip cake technique also works with candy melts, like on my funfetti cake, or other sauces, like on my butterscotch cake!
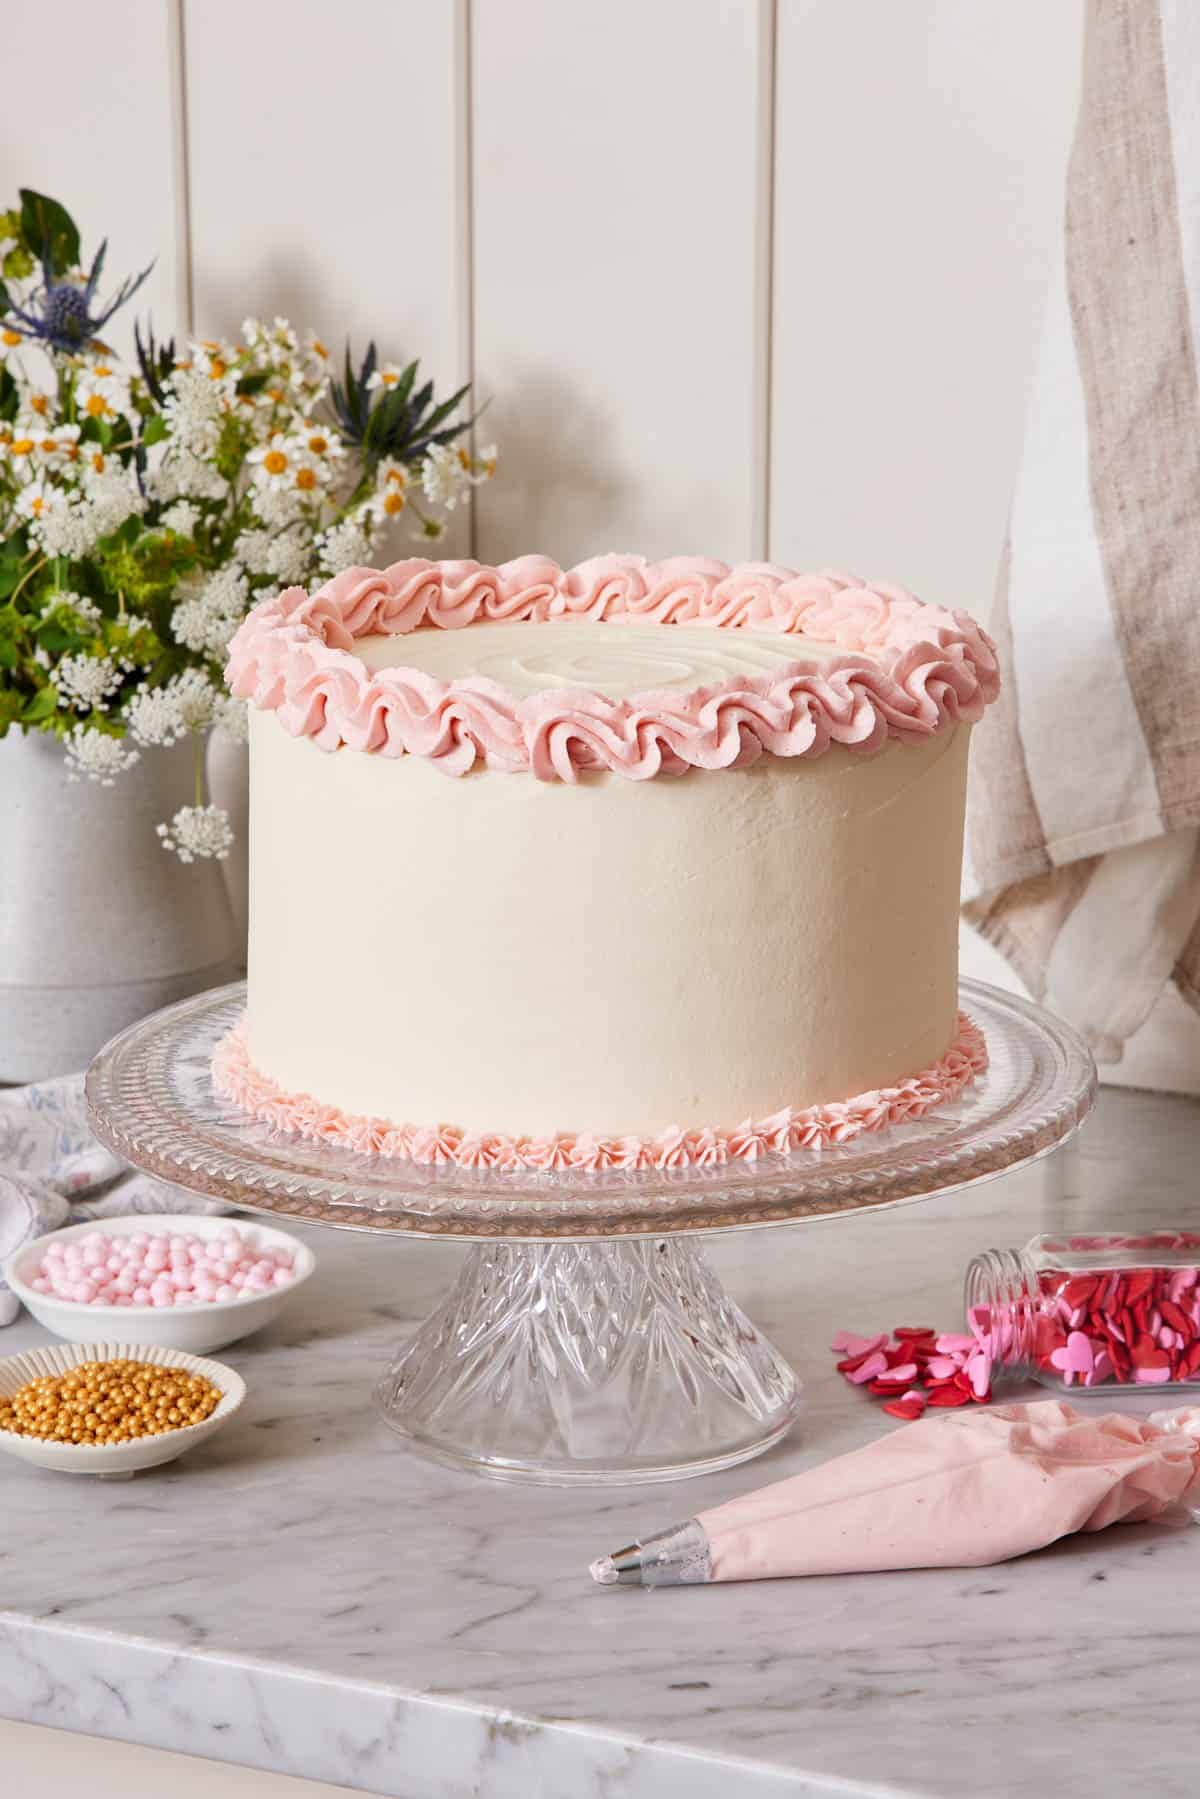
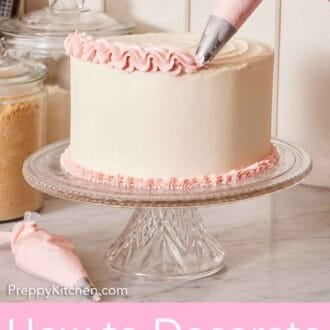
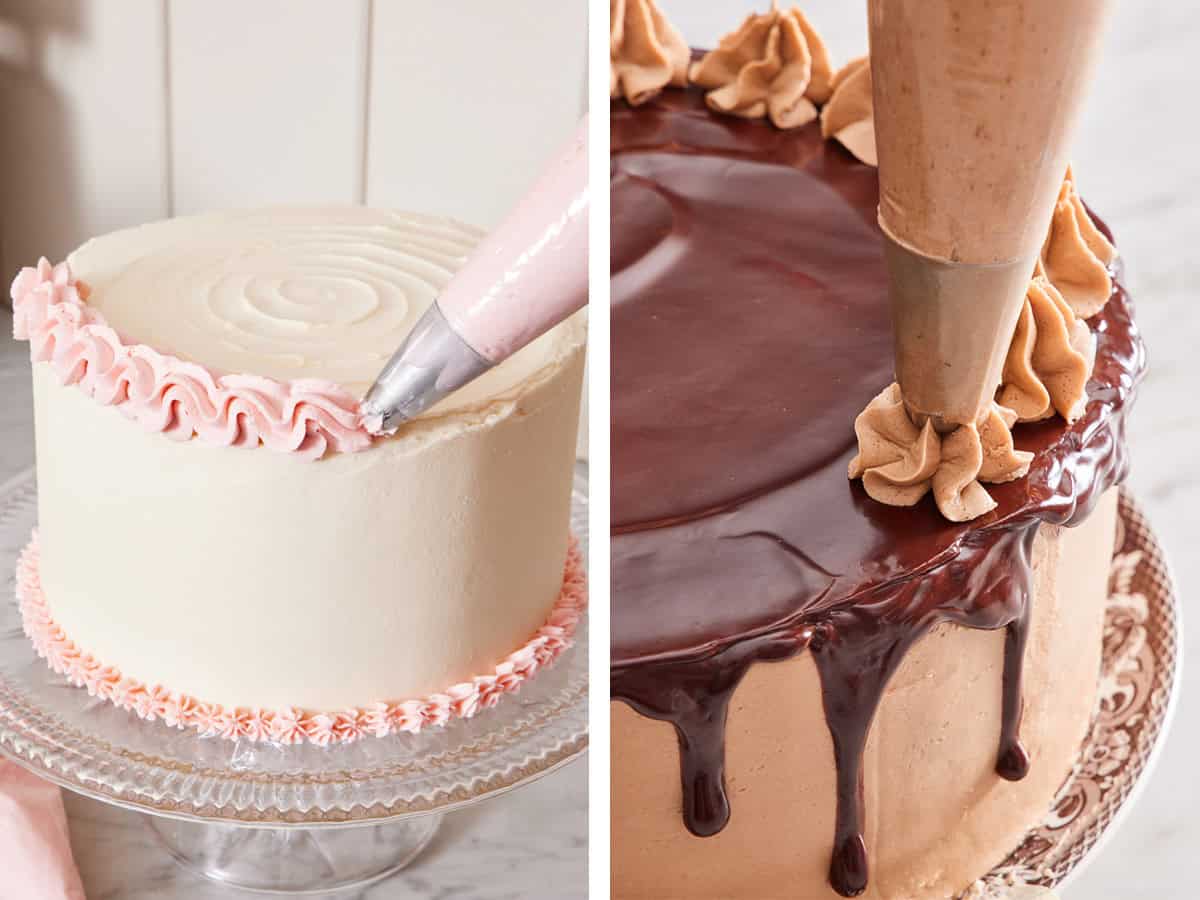
Decorating The Cake With Piped Frosting
If you decide to pipe decorative frosting on the cake, I recommend making 1½ to 2 times the frosting recipe so you have enough to spread over the cake, between layers, and to add decoration. Select your piping tip (round, open star, petal, etc.) and practice the shape on a sheet of parchment paper first if you need to.
You can pipe a border along the top and skirt of the cake like on my strawberry lemonade cake, pipe little dollops on top as I do on my carrot cake, or make a petal design on the outside similar to my Neapolitan cake.
If you want to try your hand at a more advanced technique, make buttercream flowers! These are an absolutely stunning cake decoration that’s almost too pretty to eat!
For an ombre or striped effect, color different shades of frosting and pipe each shade on the outside of the cake, then smooth it with an offset spatula. See my orange creamsicle cake, black and white cake, and Easter bunny cake for inspiration.
When it comes to how to decorate a cake with piped frosting, the limit is your imagination!
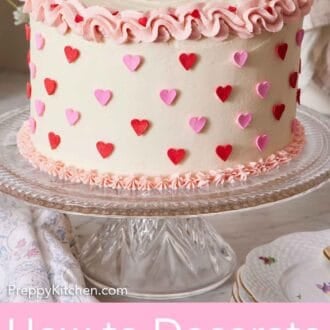
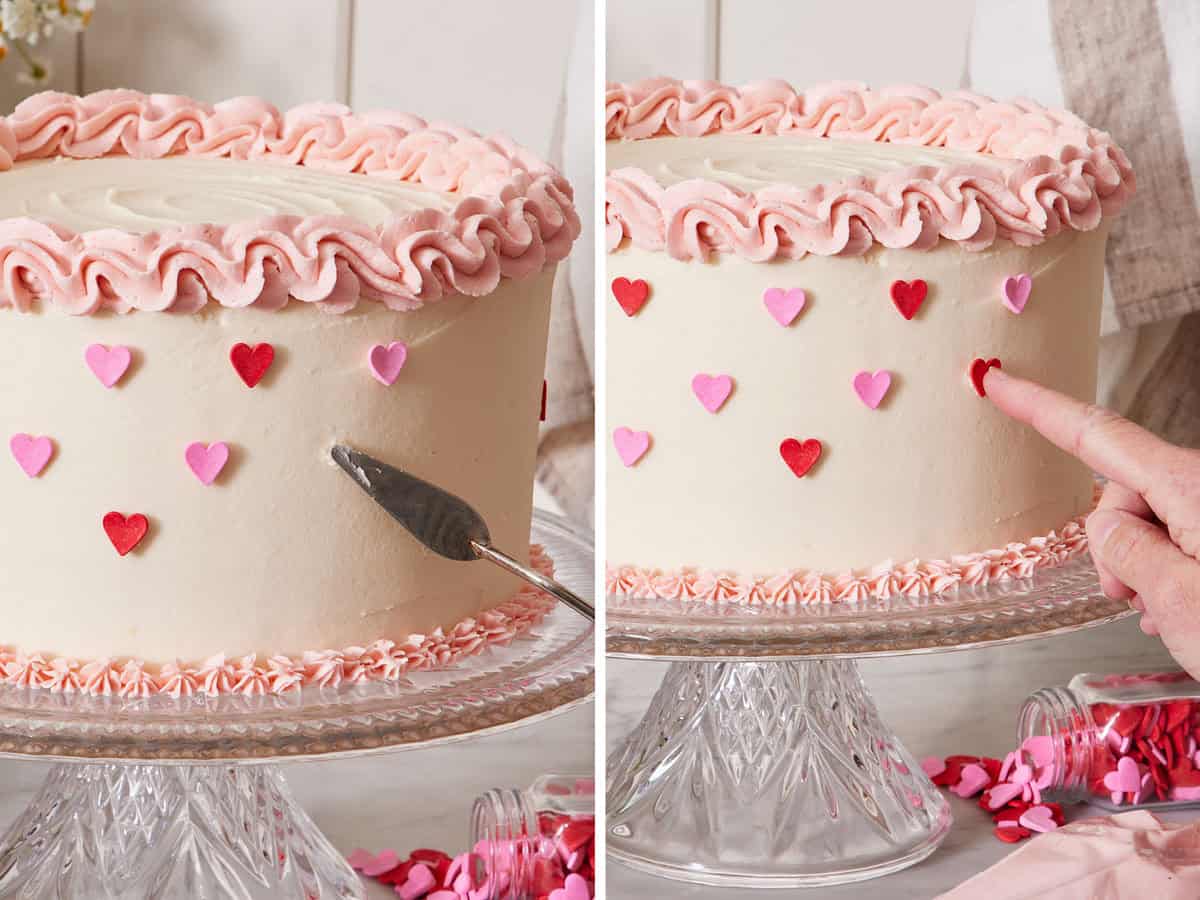
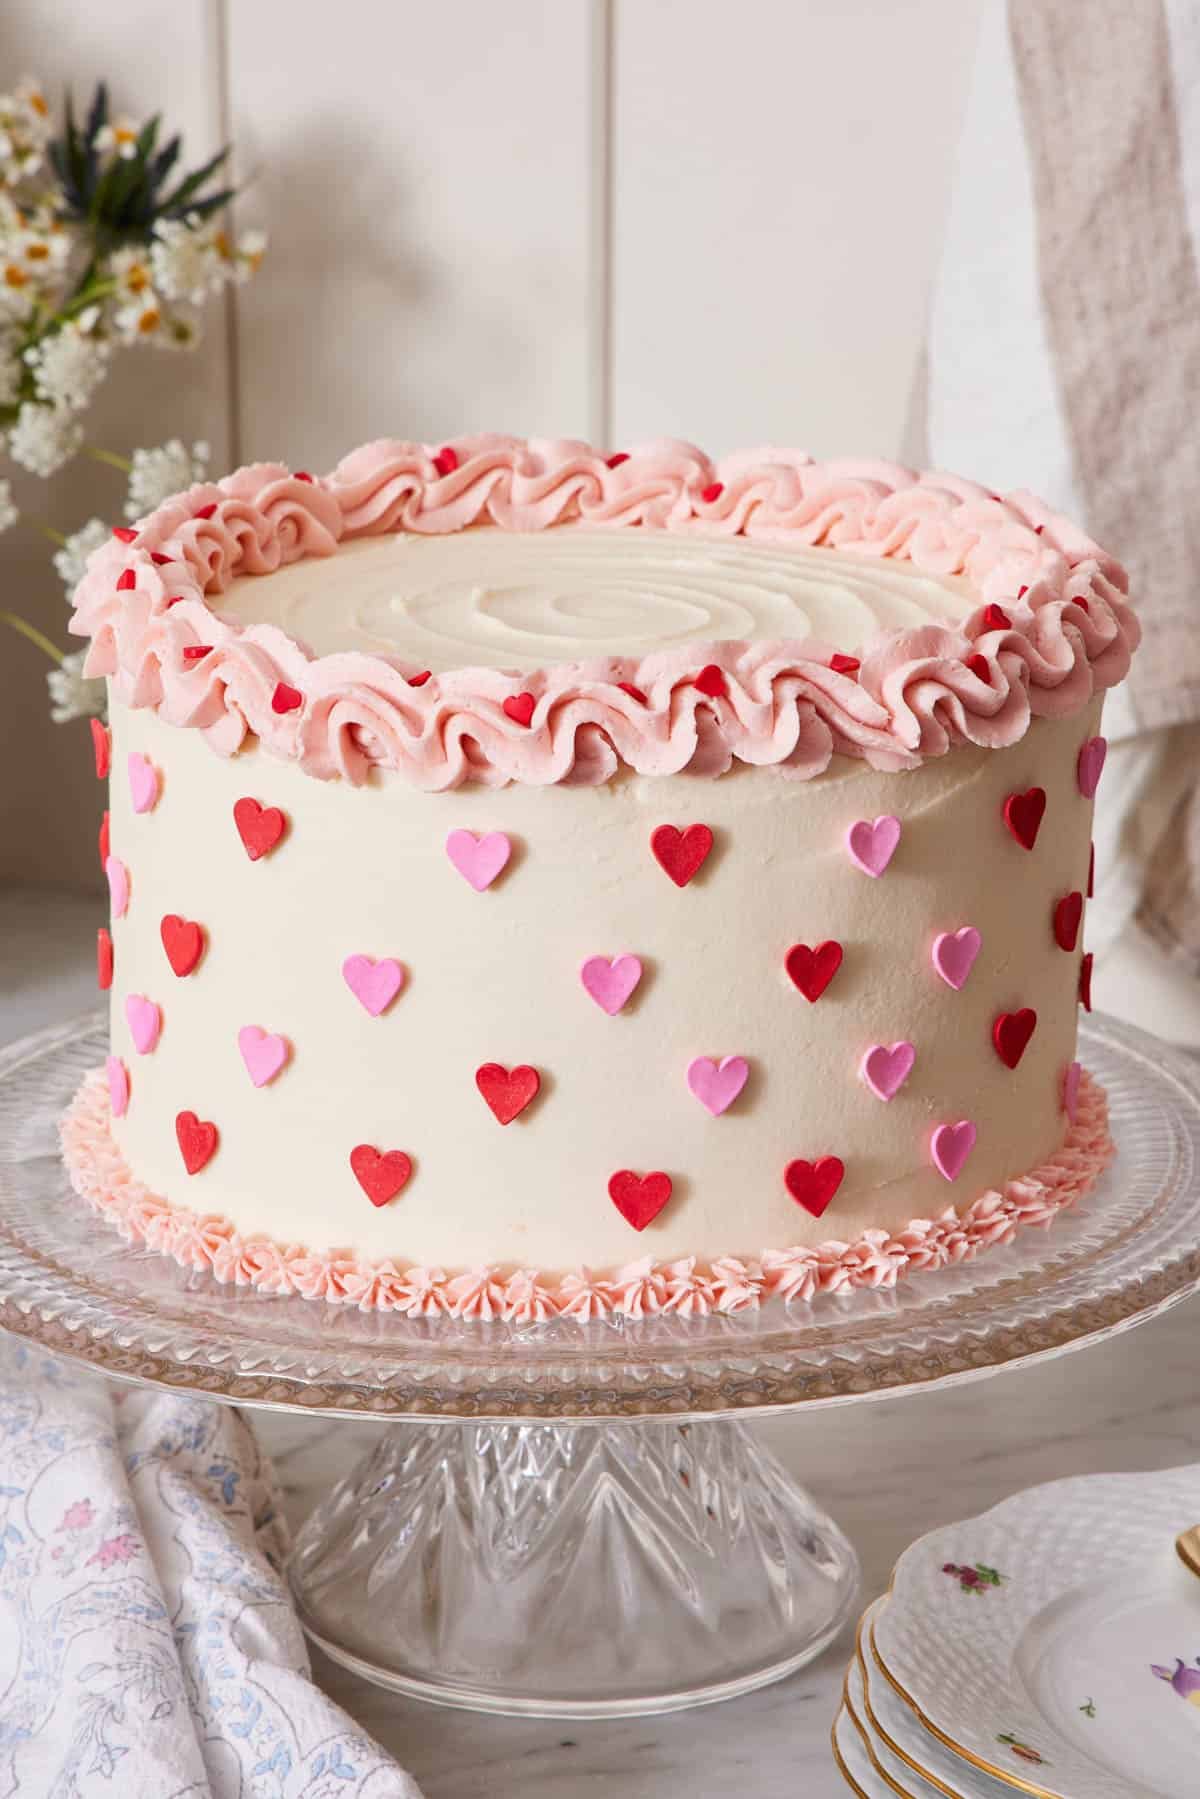
Decorate With Sprinkles
Sprinkles are a pretty decoration for special occasions like birthday cakes or holidays. You can simply sprinkle them over the top of the cake or press the sprinkles along the base of the cake to make a skirt like I do for my white cake. Add an extra special touch with homemade sprinkles!
You can use this same technique with finely chopped nuts for a crunchy element like I use on my Italian cream cake, crushed cookies (see my Oreo Cake), or cake crumbs like I do at the base of my red velvet cake.
If you want to add big sprinkles to the sides of the cake, carefully smear or pipe a small dot of frosting and press a sprinkle onto the dot so it sticks to the cake.
Troubleshooting Tips For Cake Decorating
Unstable layers: If you’re building the cake and things are getting wobbly, it’s time to chill the cake to let things set up; 30 minutes to an hour should do the trick. If the cake is still unstable, which can happen when there are fillings like lemon curd between the layers, making them slide, then add a skewer into the top and down the center of the cake to hold everything in place and chill the cake again.
The cake is bulging at the bottom: This happens when your cake is so tender, moist, and fresh that the bottom layer has trouble supporting the layers above. To save the cake from bulging, get some thick parchment paper or a few sheets of foil and make a collar or “corset” for the cake. Tighten the paper so that the bottom layer is no longer bulging, then tape or pin it together and chill until set. Once the cake has chilled, you can remove the paper and continue decorating.
Difficulty smoothing the cake frosting: As I mentioned a few sections above, a first step to a smooth finish on a cake is to have the smoothest frosting. If it has bubbles, which happens quite quickly as buttercream sits, it will be difficult to coat over the cake. Give the frosting another whip if it has been sitting for an hour or more.
If the buttercream starts looking ragged while you’re frosting, dip your cake decorating tools in a bowl of hot water, pat dry, and continue to smooth the frosting. The warm metal will warm the buttercream and smooth out any ragged bits that may start to form. Lastly, if you start to see small imperfections, take a step back and ask yourself whether anyone aside from you will even notice. The cake probably looks beautiful as is!
Frequently Asked Questions
Absolutely! I love using fresh fruit to add pops of color and hints of tartness to balance the sweet cake and frosting. You can lay out fruit in a design, like I do with berries on my flag cake, pile it on top of the cake for an artfully rustic presentation like my naked cake, or create a fruit crown by placing fruit along the top edge of the cake like my chocolate strawberry cake. You can also use edible flowers to instantly elevate the look of simple cakes like I do with my lemon cake.
No, you don’t have to use frosting for cake decorating. Feel free to use chantilly cream (sweetened whipped cream) as I do for my chantilly cake, make a sturdy caramel icing like I do in my caramel cake, or keep it very simple and fill the layers with your filling of choice and liberally dust the top with powdered sugar like my Victoria sponge cake, skipping the outer coating altogether.
Generally, yes, you can freeze decorated cakes. But storage recommendations differ depending on the recipe, so be sure to look for storage tips for the recipe you’re making. This is because some frostings and fillings actually don’t hold up well when defrosted and should not be frozen.
For simple buttercream-frosted cakes, wrap the whole cake or individual slices with 2 layers of plastic wrap and freeze in an airtight container for up to 2 months. Thaw in the fridge for a few hours before serving.
If you love this recipe try these out!
If you’ve tried this How To Decorate A Cake post, then don’t forget to rate it and let me know how you got on in the comments below. I love hearing from you!
Surbhi says
These ideas to decorate cake are really amazing. I will try this out on the coming weekend for my kids and will share my experiences with you.
jkanell says
Can’t wait!
Sanja says
Can you decorate the cake one day in front with the Italian buttercream, put it in the fridge and serve the next day?
jkanell says
Yes! Just let it come back to room temperature before serving.